Yamaha ns-b310: CONNECTIONS TO YOUR
CONNECTIONS TO YOUR: Yamaha ns-b310
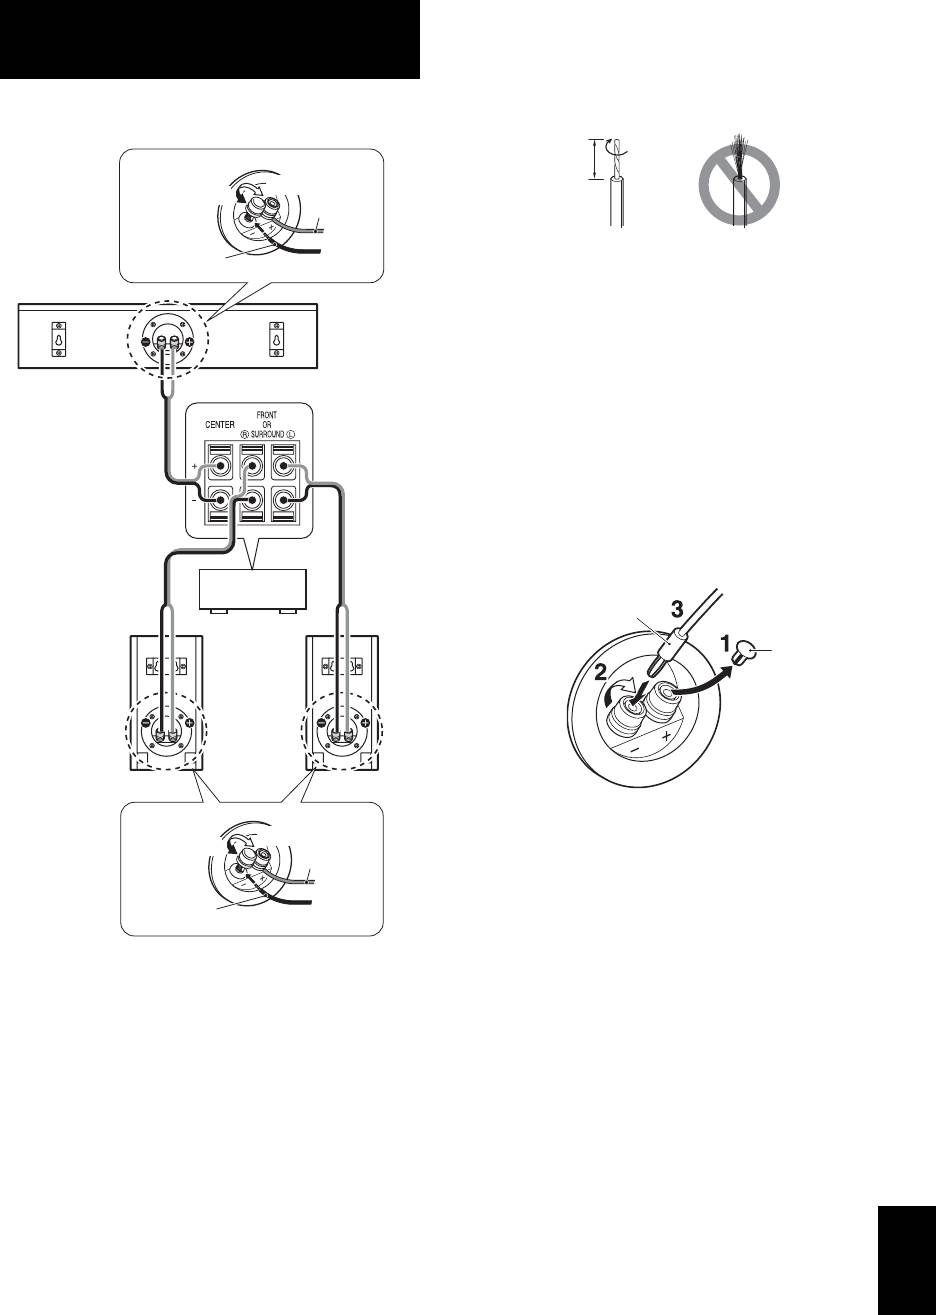
■How to connect
CONNECTIONS TO YOUR
1 Loosen the knob.
AMPLIFIER
2 Remove 10 mm (3/8”) of insulation from each end of the
cables, and twist the exposed conductors together neatly and
Before making connections, make sure that the amplifier is
tightly, as shown below.
switched off.
10 mm
(3/8 ”)
Tighten
Loosen
Red (+)
Good No Good
Black (–)
3 Insert the bare wire.
NS-C310
4 Tighten the knob and secure the cables.
Test the firmness of the connection by pulling lightly on the
cables at the terminal.
Notes
• Do not let the bare speaker wires touch each other as this
could damage the speaker or the amplifier, or both.
• Do not insert the insulation into the hole. Sound may not be
produced.
■When using a banana plug
Note
Do not take off this cover unless using a banana plug.
Amplifier or
receiver
Banana plug
Cover
NS-B310
NS-B310
1 Remove the cover by pulling it toward you.
Tighten
Loosen
2 Tighten the terminal knob.
Red (+)
3 Simply insert the banana plug into the terminal.
Black (–)
• Connect the screw-type input terminals at the rear of the
speakers to the speaker output terminals of the amplifier (or
receiver) with the speaker cable.
• Connect the (+) terminals on the amplifier (or receiver) to the
(+) terminal of each speaker, making sure to confirm the color-
coded wire of the cable at each end. Use the other wire of the
cable to connect the (–) terminals of the components.
• Connect one speaker to the left (marked L) terminals of your
amplifier, and another speaker to the right (marked R)
terminals, making sure not to reverse the polarity (+, –). If one
speaker is connected with reversed polarity the sound will be
unnatural and lack bass.
English
3 En
Оглавление
- PRECAUTIONS
- SUPPLIED ACCESSORIES
- CONNECTIONS TO YOUR
- REMOVING THE FRONT SPECIFICATIONS COVER
- PRÉCAUTIONS
- ACCESSOIRES FOURNIS
- CONNEXIONS À VOTRE
- RETRAIT DU PANNEAU CARACTÉRISTIQUES AVANT TECHNIQUES
- VORSICHTSMASSNAHMEN
- ZUBEHÖR
- ANSCHLUSS AN DEN
- ABNEHMEN DER TECHNISCHE DATEN VORDEREN ABDECKUNG
- PRECAUCIÓN
- ACCESORIOS
- CONEXIONES CON EL
- EXTRACCIÓN DE LA ESPECIFICACIONES CUBIERTA
- МЕРЫ ПРЕДОСТОРОЖНОСТИ
- ПРИЛАГАЕМЫЕ
- ПОДКЛЮЧЕНИЕ К
- СНЯТИЕ ПЕРЕДНЕЙ ТЕХНИЧЕСКИЕ КРЫШКИ ХАРАКТЕРИСТИКИ
- 注意事项
- 提供附件
- 连接到放大器
- 拆卸前盖 规格


