Sharp AR-M351U: ENTERING A METADATA SET ATTHE MACHINE
ENTERING A METADATA SET ATTHE MACHINE: Sharp AR-M351U

5
ENGLISH
ENTERING A METADATA SET AT THE MACHINE
Once the machine has been installed (and machine settings have been configured), users can scan an
image file at the machine, enter metadata associated with the file, and have the metadata automatically
routed to a computer folder or a third-party application. Follow the steps below to enter metadata at the
operation panel.
1
Select the image send function.
The base screen appears.
[For MX models:]
[For AR models:]
2
Touch the [Mode Switch] key. (MX
models only)
3
Touch the [Data Entry] key.
[For MX models:]
[For AR models:]
4
Touch the [Metadata Settings] key.
(MX models only)
If default settings have
been configured in the
Web pages, go to step
7.
5
The metadata sets that have been
defined will appear (metadata set
selection screen). Touch the key of the
metadata set that you wish to use.
6
Touch the [OK] key.
7
The items defined in the metadata
set will appear as keys (metadata
settings screen). Touch the key of
the item that you wish to enter.
If you selected the
wrong metadata set,
touch the [Metadata
Set] key to return to the
metadata set selection
screen.
Scan
Mode Switch
Send Settings
Ready to send.
Image
Settings
DATA ENTRY
E-MAIL/FTP
MODE SWITCH
Scan
Mode Switch
Send Settings
Ready to send.
Image
Settings
Fax
Data Entry
PC Scan
USB Mem. Scan
Internet Fax
Scan
Mode Switch
Send Settings
Image
Settings
DATA ENTRY
E-MAIL/FTP
MODE SWITCH
Send Settings
Mode Switch
Data Entry
Image
Settings
Metadata
Settings
Metadata Set
Metadata Set Name :
Metadata 01
Metadata 03
Metadata 05
Metadata 07
Cancel
OK
1/2
ta 02
ta 04
ta 06
ta 08
Metadata Entry
Metadata Set Name : Metadata 01
Metadat
User ID
User Password
Bill Code1
6
ENGLISH
8
Touch the key of the text string that
you wish to select.
If the selected item has been defined as a
metadata list, the defined text strings will appear
as keys. Select a value from the list.
(To change the number of selections that are
displayed in the screen, touch the [3
6] key.)
Touch the [OK] key to return to the metadata
settings screen.
If the selected item is defined as requiring
character entry, touch the [Direct Entry] key,
enter the appropriate text string manually, and
then touch the [OK] key.
9
When you have completed entries
for all items, touch the [OK] key.
You will return to the
base screen.
10
Follow the usual transmission
procedure to send the image.
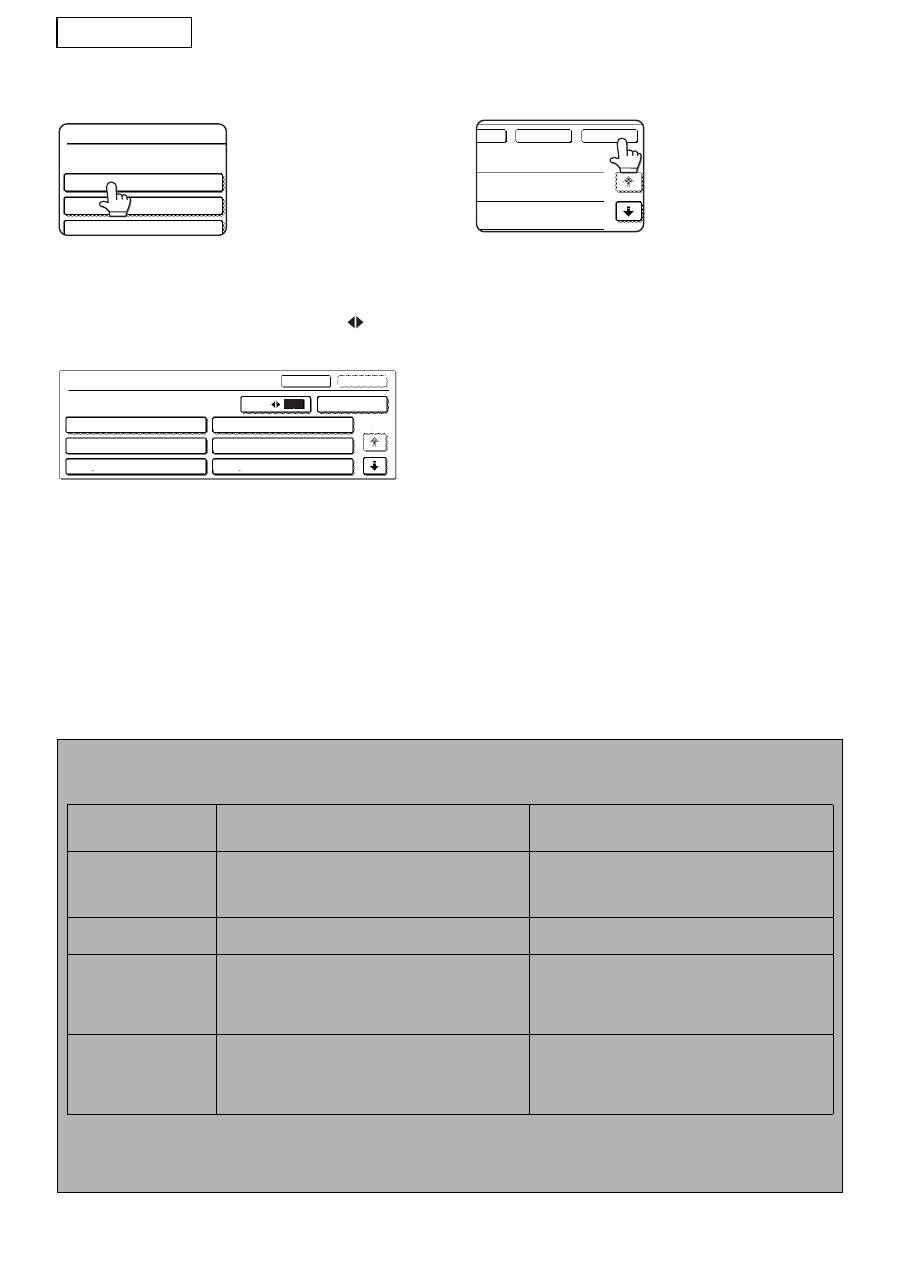
METADATA FIELD DESCRIPTIONS
Three types of metadata are included in the XML file:
• Machine auto-generated data - this data is always included in the XML file and is automatically generated by your machine.
• Pre-defined fields - these fields are automatically recognized by the machine and placed into appropriate XML
tags. These fields are optional and only included in the XML file if configured in the Web pages.
• User-defined fields - additional custom fields can be added to the XML file. These fields are optional and
defined in the Web pages.
<METADATA NAME>
Value1
Value3
Value5
<METADATA NAME>
Value1
Value3
Value5
Value2
Value4
Value6
Cancel
Direct Entry
OK
1/2
3
6
OK
Cancel
et
NOTE
●
With both model, if the defined metadata field is one of the following items, a message will appear and entry
will not be possible. Enter the appropriate information in the corresponding item of the [Send Settings] screen.
Name entered in
metadata field
Description
Location of entry
fromName
This is the name of the user who sends the job. If the
name is not entered as metadata, the sender name
that is determined according to the usual rule is
applied as metadata.
[Reply-To/SENDER NAME]
(sender name of selected sender)
replyTo
This is the E-mail address to be used for Send result
notification.
[Reply-To/SENDER NAME]
(e-mail address of selected sender)
documentSubject
This is the job subject that appears in the "Subject"
field of an e-mail or on a fax cover page.
When the user has entered the [Subject] in the [Send
Settings] screen on the operation panel, the entered
value is applied as metadata.
[Subject]
(Remains blank until a value is configured in the
Send Settings screen.)
fileName
Enter the file name of the image data to be
transmitted.
[File Name]
(Only when the [Allow Custom Filenames] checkbox
is selected in the Web pages.)
(Remains blank until a value is configured in the
Send Settings screen.)
●
When a metadata set is defined, restrictions can be imposed on the types of addresses that can be selected.
When a metadata set with address restrictions is selected, only the permitted address types can be selected.
●
On machines that have the Document Filing function, the [Data Entry] key will appear in the resend screen on
the operation panel and in the resend screen in the Web pages to allow Metadata Delivery to be performed.
Оглавление
- TABLE OF CONTENTS
- INTRODUCTION
- METADATA ACTIVATION
- METADATA SETUP
- ENTERING A METADATA SET ATTHE MACHINE
- ÍNDICE
- INTRODUCCIÓN
- ACTIVACIÓN DE METADATOS
- CONFIGURACIÓN DE METADATOS
- INTRODUCCIÓN DE UN AJUSTEMETADATA EN LA MÁQUINA
- TABLE DES MATIERES
- INTRODUCTION
- ACTIVATION DES METADONNEES
- CONFIGURATION DES METADONNEES
- SAISIE D’UN ENSEMBLE DE METADONNEES SUR LA MACHINE
- INHALTSVERZEICHNIS
- EINLEITUNG
- METADATEN-AKTIVIERUNG
- METADATEN-SETUP
- EINGEBEN EINES META-DATENSATZES AM GERÄT
- INDICE
- INTRODUZIONE
- ATTIVAZIONE DEI METADATI
- IMPOSTAZIONI METADATI
- IMMISSIONE DI UNA SERIE DI METADATI NELLA MACCHINA
- INHOUDSOPGAVE
- INLEIDING
- METADATA ACTIVEREN
- METADATA CONFIGUREREN
- EEN METADATASET INVOEREN OPHET APPARAAT
- INNEHÅLLSFÖRTECKNING
- INLEDNING
- METADATA AKTIVERING
- METADATA INSTÄLLNING
- INMATNING AV METADATA- INSTÄLLNING VID MASKINEN
- INNHOLDSFORTEGNELSE
- INNLEDNING
- METADATAAKTIVERING
- METADATAINNSTILLING
- ANGI METADATAINNSTILLING PÅMASKINEN
- SISÄLLYSLUETTELO
- JOHDANTO
- METADATAN AKTIVOINTI
- METADATAN ASETUS
- METADATAN VALINNAN SYÖTTÄMINEN LAITTEESEEN
- INDHOLDSFORTEGNELSE
- INTRODUKTION
- METADATA-AKTIVERING
- OPSÆTNING AF METADATA
- INDTASTNING AF ET METADATA-SÆT PÅ MASKINEN
- ΠΙΝΑΚΑΣ ΠΕΡΙΕΧΟΜΕΝΩΝ
- ΕΙΣΑΓΩΓΗ
- ΕΝΕΡΓΟΠΟΙΗΣΗ ΜΕΤΑ∆Ε∆ΟΜΕΝΩΝ
- ΡΥΘΜΙΣΗ
- ΚΑΤΑΧΩΡΙΣΗ ΟΡΙΣΜΟΣ METADATA ΣΤΗ ΣΥΣΚΕΥΗ
- SPIS TRE Ś CI
- WPROWADZENIE
- AKTYWACJA METADANYCH
- KONFIGURACJA METADANYCH
- WPROWADZANIE ZBIORU METADANYCH DO URZ Ą DZENIA
- TARTALOMJEGYZÉK
- BEVEZETÉS
- META-ADAT AKTIVÁLÁS
- META-ADAT BEÁLLÍTÁS
- META-ADAT KÉSZLET BEVITELE A GÉPEN
- OBSAH
- ÚVOD
- AKTIVACE METADAT
- NASTAVENÍ METADAT
- ZADÁVÁNÍ SADY METADAT DOZA Ř ÍZENÍ
- ОГЛАВЛЕНИЕ
- ВВЕДЕНИЕ
- АКТИВАЦИЯ МЕТАДАННЫХ
- НАСТРОЙКА МЕТАДАННЫХ
- ВВОД НАБОРА МЕТАДАННЫХ С АППАРАТА
- OBSAH
- ÚVOD
- AKTIVOVANIE METADÁT
- INŠTALÁCIA METADATA
- ZADÁVANIE NASTAV. METAÚDAJOVDO ZARIADENIA
- ÝÇÝNDEKÝLER
- GÝRÝÞ
- METADATA ETKÝNLEÞTÝRME
- METADATA AYARLARI
- MAKÝNEDE META VERÝ SETÝNÝN GÝRÝLMESÝ
- ÍNDICE
- INTRODUÇÃO
- ACTIVAÇÃO DE METADADOS
- DEFINIÇÃO DE METADATA
- INTRODUÇÃO DE UMA DEFINIÇÃOMETADADOS NA MÁQUINA
