Acer W700 – страница 3
Инструкция к Планшету Acer W700
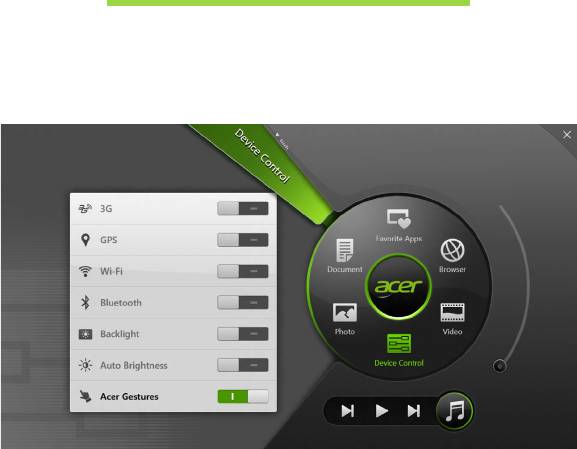
DEVICE CONTROL
Device Control is a convenient way for you to access frequently-used
computer controls: adjust the screen brightness, turn on or off the
backlight, toggle wireless connectivity technologies on or off, and enable
or disable Acer gestures (such as Acer Ring’s five finger tap).
Device Control - 39
ACER CLEAR.FI
Note: Only for certain models.
With Acer clear.fi, you can enjoy videos, photos and music. Stream media
from, or to, other devices with Acer clear.fi installed.
Note: All devices must be connected to the same network.
To watch videos or listen to music open clear.fi Media, to browse photos
open clear.fi Photo.
Important: When you first open a clear.fi application, Windows
Firewall will ask for permission to allow clear.fi to access the network.
Select Allow Access in each window.
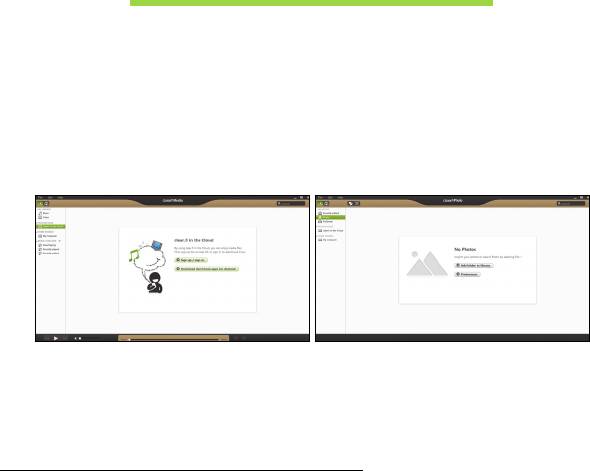
Navigating media and photos
The list in the left panel shows your computer (’My Library’), then other
devices if any are connected to your network (’Home Shared’).
To view files on your computer, select one of the categories under ’My
Library’, then browse the files and folder on the right.
40 - Acer clear.fi
Shared files
Devices connected to your network are shown in the Home Shared
section. Select a device, then the select the category to explore.
After a short delay, shared files and folders are shown on the right.
Browse to the file you want to play, then double-click to start playback.
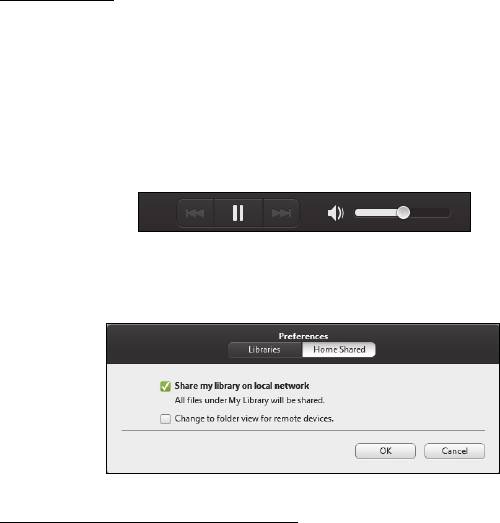
Use the media controls in the bar across the bottom of the screen to
control playback. For example, when music is selected, you can play,
pause or stop playback, and adjust the volume.
Note: You must activate sharing on the device that stores the files.
Open clear.fi on the device that stores the files, select Edit then make
sure Share my library on local network is active.
Which devices are compatible?
Certified Acer devices with clear.fi or DLNA software can be used with the
clear.fi software. These include DLNA-compliant PCs, smartphones, and
NAS (Network Attached Storage) devices.
Acer clear.fi - 41
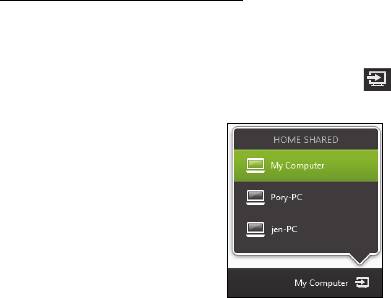
Playing to another device
If you want to play the media on another device, you need to do the
following:
1. In the bottom right corner, select Play to.
2. Select the remote device that will be used to play the file.
Note: Only devices optimised for playback are available in this list,
certain PCs and storage devices will not appear. To add a Windows PC
to this list, open Windows Media Player, select Stream and Allow
remote control of my Player...
3. Select a file in the main window, then use the media controls in the bar
across the bottom of the screen to control the remote device.
For more help, go to http://www.acer.com/clearfi/download/.
42 - Acer clear.fi

SCREEN ORIENTATION
AND G-SENSOR
Your computer has a built-in accelerometer that detects the tablet’s
orientation and automatically rotates the screen to suit the orientation.
You can lock the screen orientation by using the lock switch. The
orientation may also be locked at other times, including:
• When the tablet is attached to the cradle.
• With an HDMI cable is plugged in.
• When programs designed for a specific orientation are running.
Note: You are advised to keep your tablet in landscape orientation
with the webcam above the screen while you are making a video call.
Please rotate your display to the landscape orientation and use the
lock switch to set the orientation before starting a video call.
The screen orientation lock status will be indicated via icons briefly
displayed onscreen when the status changes.
Screen orientation and G-sensor - 43

POWER MANAGEMENT
This computer has a built-in power management unit that monitors system
activity. System activity refers to any activity involving one or more of the
following devices: keyboard, mouse, hard disk, peripherals connected to
the computer, and video memory. If no activity is detected for a period of
time, the computer stops some or all of these devices in order to conserve
energy.
Acer Green Instant On
Note: For selected models only.
The Acer Green Instant On feature allows your computer to wake up from
Sleep mode in less than the time it takes to open the lid. When you close
the lid, or leave your computer for a while, your computer enters Sleep
mode. While the computer is in Sleep mode, the power indicator LED will
flash orange.
Open the lid or press any key to wake the computer from Sleep mode.
After a certain amount of time in Sleep mode, the computer will
automatically enter Deep Sleep to preserve battery life. When the
computer is in Deep Sleep, the power indicator LED will be turned off. In
this state, battery remains ready to use for many weeks.
Press the power button to wake up from Deep Sleep.
44 - Power management

Note: Once in Deep Sleep, your PC will consume significantly less
power compared with Sleep mode, but it will take a little longer to wake
up from Deep Sleep.
Deep Sleep and Sleep mode work together to ensure that your computer
saves as much power as possible while still enabling quick, instant on
access.
To save more power, your computer will typically enter and stay in Deep
Sleep during times when it will not be frequently accessed, for example,
during the middle of the night. To provide quicker access, your computer
will enter and stay in Sleep mode during times when it will be frequently
accessed, for example, during working hours.
Saving power
Disable Fast startup
Your computer uses Fast startup to start quickly, but also uses a small
amount of power to check for signals to start. These checks will slowly
drain your computer’s battery.
If you prefer to reduce your computer’s power requirements and
environmental impact, turn off Fast startup:
Note: If Fast startup is off, your computer will take longer to start from
Sleep. If your computer features Acer Instant On or Acer Always
Connect, these will also be turned off.
Your computer will also not start if it receives an instruction to start
over a network (Wake on LAN).
Power management - 45
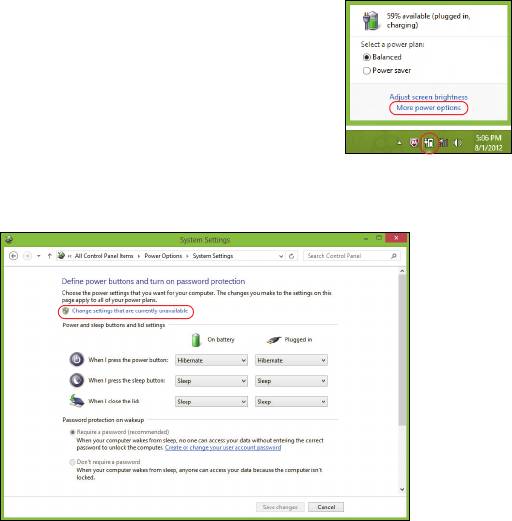
1. Open the Desktop.
2. Click Power Options in the Notification area.
3. Select More Power Options.
4. Select Choose what the power buttons do.
5. To access Shutdown Settings, select Change settings that are
currently unavailable.
46 - Power management
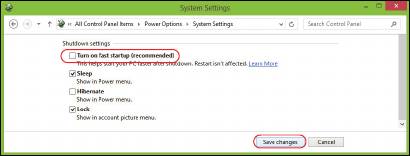
6. Scroll down and disable Turn on fast startup.
7. Select Save changes.
Power management - 47

BATTERY PACK
The computer uses an embedded battery pack that gives you long use
between charges.
Battery pack characteristics
The battery pack has the following characteristics:
• Employs current battery technology standards.
• Delivers a battery-low warning.
The battery is recharged whenever you connect the computer to the AC
adapter. Your computer supports charge-in-use, enabling you to recharge
the battery while you continue to operate the computer. However,
recharging with the computer turned off results in a significantly faster
charge time.
Charging the battery
The preferred method of charging your computer is to use the bundled
cradle. Plug the AC adapter into the cradle and connect to a power outlet.
Insert the tablet into the cradle (see "Connect the tablet to the cradle"
on page 25). You can continue to operate your computer on AC power
while your battery is charging. However, charging the battery with the
computer turned off results in a significantly faster charge time.
48 - Battery pack

Note: You are advised to charge the battery before retiring for the day.
Charging the battery overnight before traveling enables you to start
the next day with a fully charged battery.
Conditioning a new battery pack
Before you use a battery pack for the first time, there is a conditioning
process that you should follow:
1. Connect the AC adapter and fully charge the battery.
2. Disconnect the AC adapter.
3. Turn on the computer and operate using battery power.
4. Fully deplete the battery until the battery-low warning appears.
5. Reconnect the AC adapter and fully charge the battery again.
Follow these steps again until the battery has been charged and
discharged three times.
Use this conditioning process for all new batteries, or if a battery hasn't
been used for a long time.
Warning! Do not expose battery packs to temperatures below 0°
C (32° F) or above 45° C (113° F). Extreme temperatures may
adversely affect the battery pack.
By following the battery conditioning process you condition your battery to
accept the maximum possible charge. Failure to follow this procedure will
prevent you from obtaining the maximum battery charge, and will also
shorten the effective lifespan of the battery.
Battery pack - 49

In addition, the useful lifespan of the battery is adversely affected by the
following usage patterns:
• Using the computer on constant AC power.
• Not discharging and recharging the battery to its extremes, as described
above.
• Frequent use; the more you use the battery, the faster it will reach the
end of its effective life. A standard computer battery has a life span of
more than 1,000 charges.
Optimizing battery life
Optimizing battery life helps you get the most out of battery operation,
prolonging the charge/recharge cycle and improving recharging efficiency.
You are advised to follow the suggestions set out below:
• Use AC power whenever possible, reserving battery for on-the-go use.
• Eject a PC Card if it is not being used, as it will continue to draw power
(for selected models).
• Store your PC in a cool, dry place. The recommended temperature is
10° C (50° F) to 30° C (86° F). Higher temperatures cause the battery to
self-discharge faster.
• Excessive recharging decreases the battery life.
• Look after your AC adapter and battery.
50 - Battery pack

Checking the battery level
The Windows power meter indicates the current battery level. Rest the
cursor over the battery/power icon on the taskbar to see the battery's
present charge level.
Battery-low warning
When using battery power pay attention to the Windows power meter.
Warning! Connect the AC adapter as soon as possible after the
battery-low warning appears. Data will be lost if the battery
becomes fully depleted and the computer shuts down.
When the battery-low warning appears, the recommended course of
action depends on your situation:
Situation Recommended Action
1. Plug the AC adapter into the cradle, and then
connect to the mains power supply.
The AC adapter,
2. Insert the tablet into the cradle.
the cradle, and a
3. Save all necessary files.
power outlet are
4. Resume work.
available.
Turn off the computer if you want to recharge the
battery rapidly.
Battery pack - 51

Situation Recommended Action
1. Plug the AC adapter into the computer, and then
connect to the mains power supply.
The AC adapter
2. Save all necessary files.
and a power outlet
3. Resume work.
are available.
Turn off the computer if you want to recharge the
battery rapidly.
The AC adapter or
1. Save all necessary files.
a power outlet is
2. Close all applications.
unavailable.
3. Turn off the computer.
52 - Battery pack

SECURING YOUR COMPUTER
Your computer is a valuable investment that you need to take care of.
Learn how to protect and take care of your computer.
Using passwords
Passwords protect your computer from unauthorized access. Setting
these passwords creates several different levels of protection for your
computer and data:
• Supervisor Password prevents unauthorized entry into the BIOS utility.
Once set, you must enter this password to gain access to the BIOS
utility. See "BIOS utility" on page 68.
• User Password secures your computer against unauthorized use.
Combine the use of this password with password checkpoints on boot-
up and resume from Hibernation (if available) for maximum security.
• Password on Boot secures your computer against unauthorized use.
Combine the use of this password with password checkpoints on boot-
up and resume from Hibernation (if available) for maximum security.
Important: Do not forget your Supervisor Password! If you forget
your password, please get in touch with your dealer or an
authorized service center.
Securing your computer - 53

Entering passwords
When a password is set, a password prompt appears in the center of the
display screen.
• When the Supervisor Password is set, a prompt appears when you
enter the BIOS utility at boot-up (See "BIOS utility" on page 68).
• Type the Supervisor Password and press <Enter> to access the BIOS
utility. If you enter the password incorrectly, a warning message
appears. Try again and press <Enter>.
• When the User Password is set and the password on boot parameter is
enabled, a prompt appears at boot-up.
• Type the User Password and press <Enter> to use the computer. If you
enter the password incorrectly, a warning message appears. Try again
and press <Enter>.
Important: You have three chances to enter a password. After
each failed attempt, press the Windows key to try again. If you fail
to enter the password correctly after three tries, the system halts.
Press and hold the power button for four seconds to shut down
the computer. Then turn on the computer and enter the BIOS
utility to try again.
54 - Securing your computer

FREQUENTLY ASKED QUESTIONS
The following is a list of possible situations that may arise during the use
of your computer. Easy solutions are provided for each one.
I turned on the power, but the computer does not start or boot up.
Look at the power button’s battery LED:
• If it is not lit, no power is being supplied to the computer. Check the
following:
• If you are using on the battery, it may be low and unable to power the
computer. Connect the AC adapter to recharge the battery pack.
• Make sure that the AC adapter is properly plugged into the cradle and
to the power outlet. Also make sure the tablet fits snug into the cradle.
Nothing appears on the screen.
The computer’s power management system automatically blanks the
screen to save power. Press the power button to turn the display back on.
If pressing a key does not turn the display back on the brightness level
might be too low. Tap the Settings charm > Screen to adjust the
brightness level.
No audio is heard from the computer.
Check the following:
Frequently asked questions - 55

• The volume may be muted. Look at the volume control (speaker) iconby
tapping the Settings charm > Volume. If the speaker has an "x" next to
it, tap on the Volume icon to display the volume bar. At the top of the
bar, tap the speaker icon to un-mute.
• The volume level may be too low. Look at the volume control (speaker)
icon by tapping the Settings charm > Volume. Tap the Volume icon and
adjust the volume accordingly.
• If headphones, earphones or external speakers are connected to the
line-out port on the computer, the internal speakers automatically turn
off.
Requesting service
International Travelers Warranty (ITW)
Your computer is backed by an International Travelers Warranty (ITW)
that gives you security and peace of mind when traveling. Our worldwide
network of service centers are there to give you a helping hand.
An ITW passport comes with your computer. This passport contains all
you need to know about the ITW program. A list of available, authorized
service centers is in this handy booklet. Read this passport thoroughly.
Always have your ITW passport on hand, especially when you travel, to
receive the benefits from our support centers. Place your proof-of-
purchase in the flap located inside the front cover of the ITW passport.
If the country you are traveling in does not have an Acer-authorized ITW
service site, you can still get in contact with our offices worldwide. Please
visit www.acer.com.
56 - Frequently asked questions

Before you call
Please have the following information available when you call Acer for
online service, and please be at your computer when you call. With your
support, we can reduce the amount of time a call takes and help solve
your problems efficiently. If there are error messages or beeps reported by
your computer, write them down as they appear on the screen (or the
number and sequence in the case of beeps).
You are required to provide the following information:
Name:
Address:
Telephone number:
Machine and model type:
Serial number:
Date of purchase:
Frequently asked questions - 57

Tips and hints for using Windows 8
We know this is a new operating system that will take some getting used
to, so we've created a few pointers to help you get started.
Three concepts you might want to keep in mind
1. Start
The Start button is no longer available; you can launch apps from the Start
screen.
2. Tiles
Live tiles are similar to thumbnails of the apps.
3. Charms
Charms allow you to perform useful functions, such as sharing content,
turning off your PC or changing settings.
How do I access the charms?
Swipe the right-hand edge of the screen inwards.
How do I get to Start?
Press the Windows key; or swipe the right-hand edge of the screen
inwards and tap the Start charm.
58 - Frequently asked questions
