Acer Aspire M3-581PT: инструкция
Раздел: Компьютерная техника, комплектующие, аксессуары
Тип: Ноутбук
Инструкция к Ноутбуку Acer Aspire M3-581PT
English
Français
Deutsch
Italiano
Español
Português
Nederlands
Norsk
Dansk
Svenska
Suomi
Contents
Русский
Polski
Magyar
Čeština
Slovenčina
Slovenski
Hrvatski
Română
Български
Eesti
Latviski
Lietuviškai
Ελληνικά
Türkçe
한국어
繁體中文
简体中文
Bahasa Indonesia
ä·Â
Ver.: 01.01.02

Aspire M3
Quick Guide
Product registration
When using your product for the first time, it is recommended that you immediately
register it. This will give you access to some useful benefits, such as:
• Faster service from our trained representatives.
• Membership in the Acer community: receive promotions and participate in customer
surveys.
• The latest news from Acer.
Hurry and register, as other advantages await you!
How to register
To register your Acer product, please visit www.acer.com. Select your country, click
PRODUCT REGISTRATION and follow the simple instructions.
You will also be asked to register your product during the setup process, or you can
double-click the Registration icon on the desktop.
After we receive your product registration, you will be sent a confirmation email with
important data that you should keep in a safe place.
Obtaining Acer accessories
We are happy to inform you that Acer's warranty extension program and Notebook
accessories are available online. Come and visit our online shop and find what you need
at store.acer.com.
The Acer store is being progressively rolled out, and, unfortunately may not be available
in some regions. Please check back regularly to see when it will be available in your
country.
© 08/2012. All Rights Reserved.
Aspire M3 Quick Guide
This revision: 08/2012
Model number: __________________________________
Serial number: ___________________________________
Date of purchase: ________________________________
Place of purchase: ________________________________

3
English
First things first
We would like to thank you for making an Acer notebook your choice for
meeting your mobile computing needs.
Your guides
To help you use your Acer notebook, we have designed a set of guides:
First off, the Setup Poster helps you get started with setting up your
computer.
The Quick Guide introduces you to the basic features and functions of your
new computer.
For more on how your computer can help you to be more productive, please
refer to the Aspire M3 User’s Manual. The Aspire M3 User’s Manual
contains useful information applying to your new computer. It covers basic
topics such as using the keyboard and audio, etc.
This guide contains detailed information on such subjects as system utilities,
data recovery, expansion options and troubleshooting. In addition it contains
warranty information and the general regulations and safety notices for your
notebook.
Follow these steps to access it:
1 Type "User" from Start.
2 Click/tap on Acer User’s Manual.
4
English
Your Acer notebook tour
After setting up your computer as illustrated in the setup poster, let us show
you around your new Acer notebook.
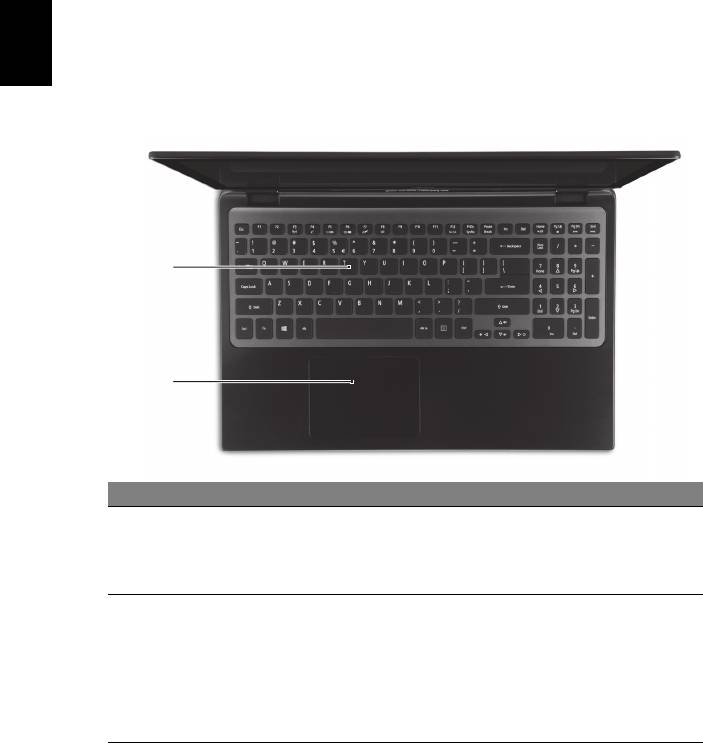
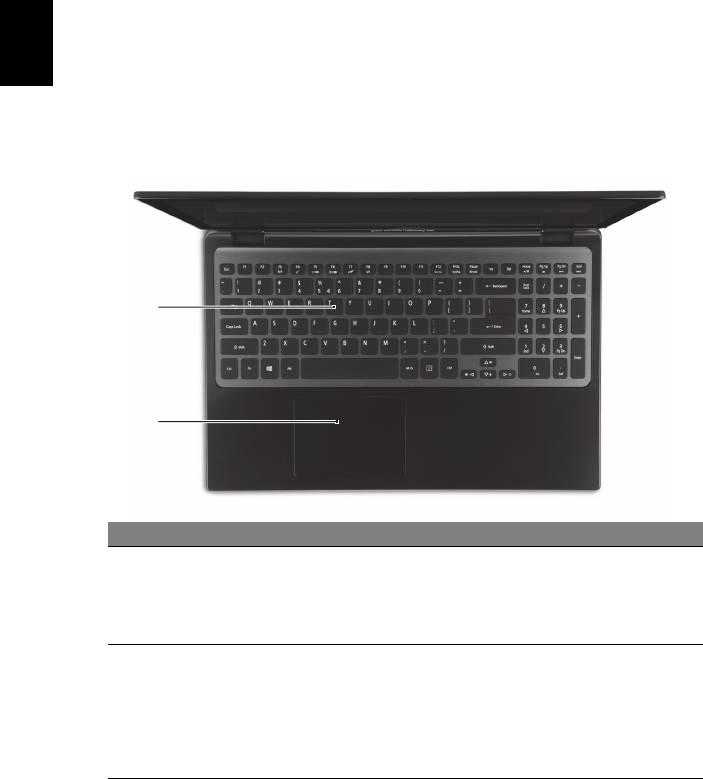
Keyboard view
# Icon Item Description
For entering data into your computer.
Caution: Do n
ot use a keyboard protector
1 Keyboard
or similar cover as the keyboard includes
ventilation intakes for cooling.
Touch-sensitive pointing device.
The touchpad and selection buttons form a
single su
rface.
2 Touchpad
Press down firmly on the touchpad surface
to perform a left click.
Press down firmly on the lower right corner
to perform a right click.
1
2
5
English
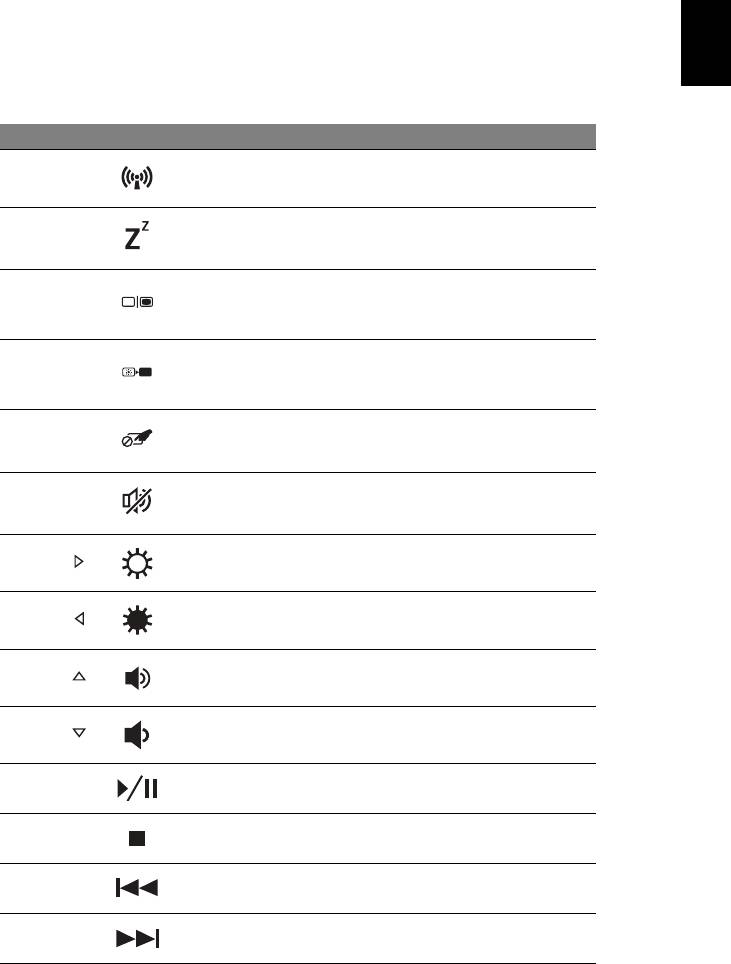
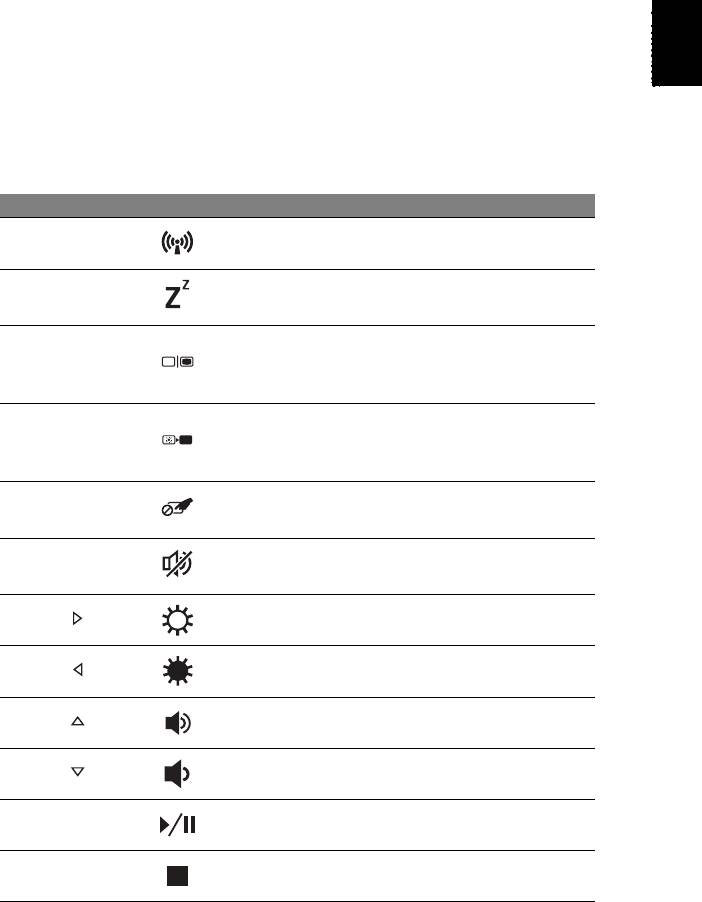
Hotkeys
The computer employs hotkeys or key combinations to access most of the
computer's controls like screen brightness and volume output.
To activate hotkeys, press and hold the <Fn> key before pressing the other
key in the hotkey combination..
Hotkey Icon Function Description
Enables/disables the computer’s
<Fn> + <F3> Communication
communication devices.
<Fn> + <F4> Sleep Puts the computer in Sleep mode.
Switches display output between the
<Fn> + <F5> Display toggle
display screen, external monitor (if
connected) and both.
Turns the display screen backlight off
<Fn> + <F6> Screen blank
to save power. Press any key to
return.
Turns the internal touchpad on and
<Fn> + <F7> Touchpad toggle
off.
<Fn> + <F8> Speaker toggle Turns the speakers on and off.
<Fn> + < >
Brightness up Increases the screen brightness.
<Fn> + < >
Brightness down Decreases the screen brightness.
<Fn> + < >
Volume up Increases the sound volume.
<Fn> + < >
Volume down Decreases the sound volume.
<Fn> +
Play/Pause Play or pause a selected media file.
<Home>
<Fn> +
Stop playing the selected
Stop
<Pg Up>
media file.
<Fn> +
Previous Return to the previous media file.
<Pg Dn>
<Fn> +
Next Jump to the next media file.
<End>

6
English
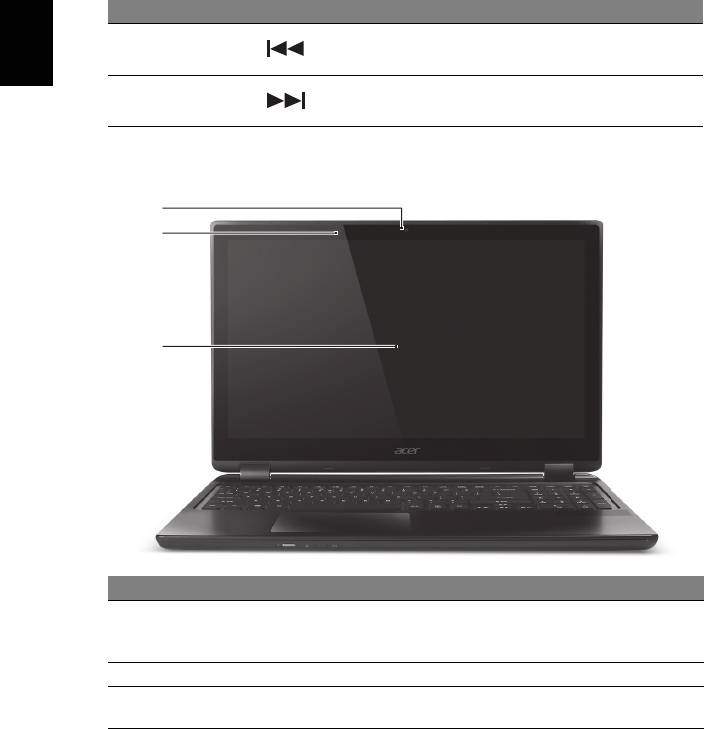
Screen view
# Icon Item Description
Web camera for video communication.
1 Webcam
A light next to the webcam indicates that the
webcam is active.
2 Microphone Internal microphone for sound recording.
Displays computer output, supports multi-
3 Touchscreen
touch inpu
t.
1
2
3
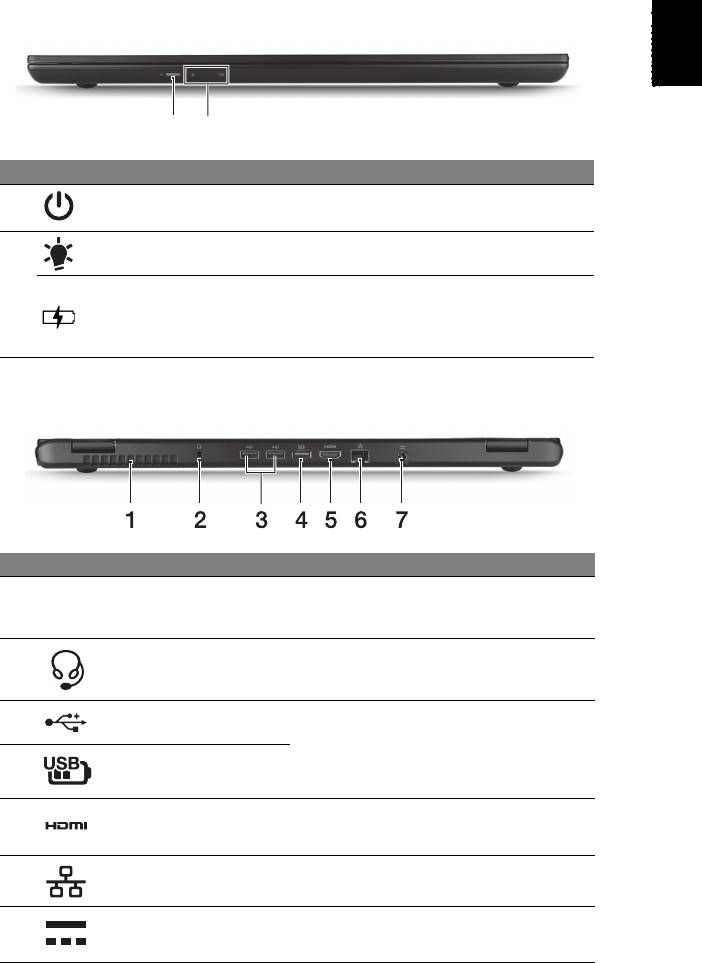
Front view
1 2
# Icon Item Description
1
Power button Turns the computer on and off.
Power indicator Indicates the computer’s power status.
Indicates battery status.
2
Charging: The
light is amber when the
Battery indicator
battery is charging.
Fully charged:
The light is blue.
7
English
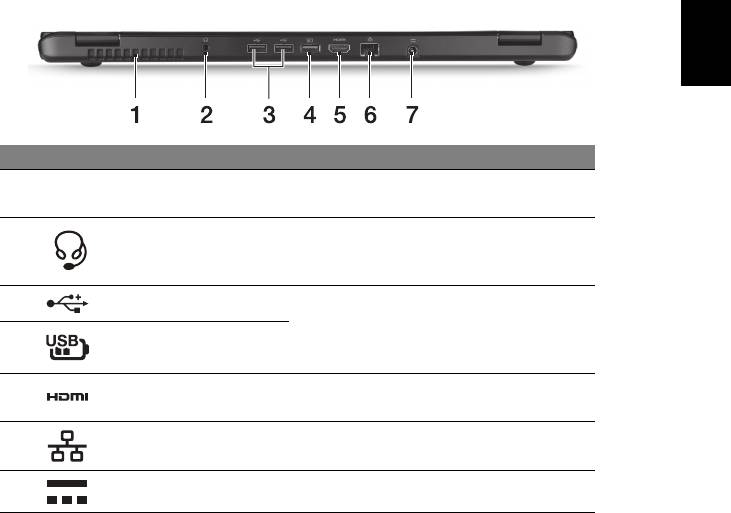
Rear view
# Icon Item Description
Ventilation and cooling
Allows the computer to stay cool.
1
fan
Do not cover or obstruct the openings.
Connects to audio devices (e.g.,
2
Headset/speaker jack
speakers,
headphones) or a headset with
microphone.
Connects to USB devices.
3
USB ports
If a port is black it is USB 2.0 compatible,
USB port with power-
if it
is blue it is also USB 3.0 compatible
4
off charging
(see below).
Supports high-definition digital video
5
HDMI port
connectio
ns.
Connects to an Ethernet 10/100/1000-
6
Ethernet (RJ-45) port
based netw
ork.
7
DC-in jack Connects to an AC adapter.
Information on USB 3.0
• Compatible with USB 3.0 and earlier devices.
• F
or optimal performance, use USB 3.0-certified devices.
• D
efined by the USB 3.0 specification (SuperSpeed USB).
8
English
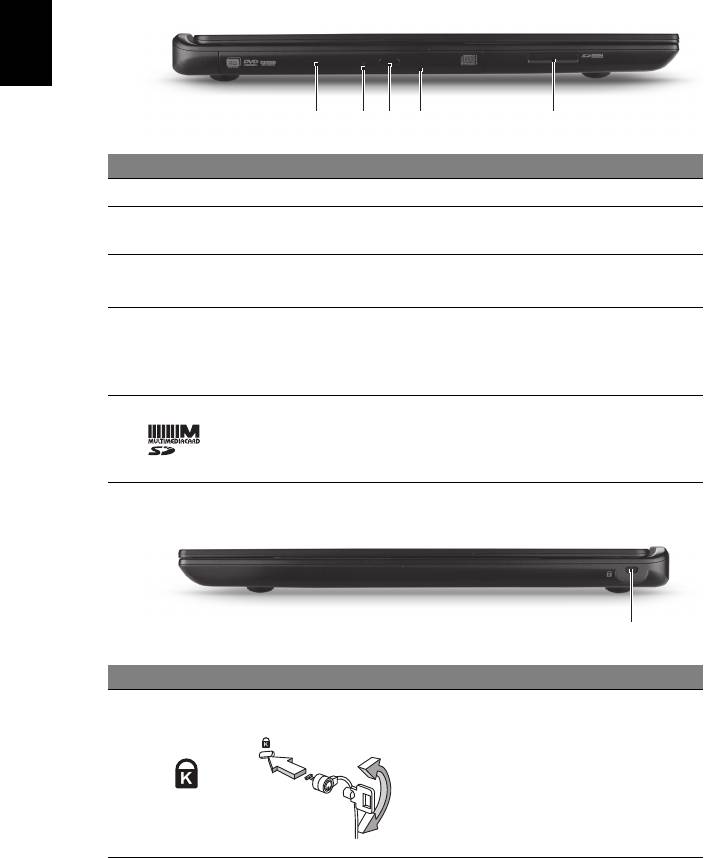
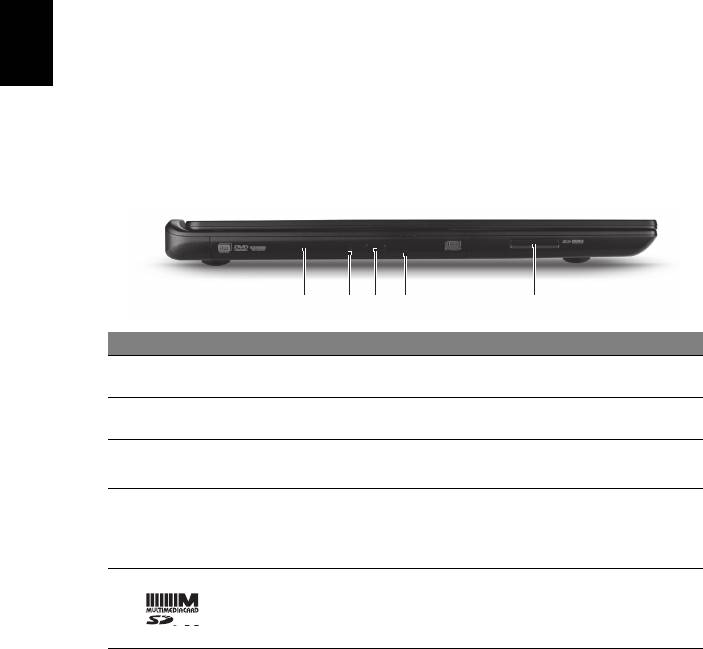
Left view
321 4 5
# Icon Item Description
1 Optical drive Internal optical drive; accepts CDs or DVDs.
Optical disk access
2
Lights up when the optical drive is active.
indicator
Optical drive eject
3
Ejects the optical disk from the drive.
butt
on
Ejects the optical drive tray when the
compute
r is turned off.
4 Emergency eject hole
Carefully insert a straightened paper clip to
e
ject the optical drive tray.
Accepts one Secure Digital (SD or SDHC)
car
d or MultiMediaCard (MMC).
5
2-in-1 card reader
Note: T
o remove the card, simply pull it
from the slot.
Right view
1
# Icon Item Description
Connects to a Kensington-compatible
Kensington lock slot
computer security lock.
Wrap the computer security lock cable
ar
ound an immovable object such as a
1
table or handle of a locked drawer.
Insert the lock into the notch and turn
the key to secure the lock.
Keyless models are also available.
9
English
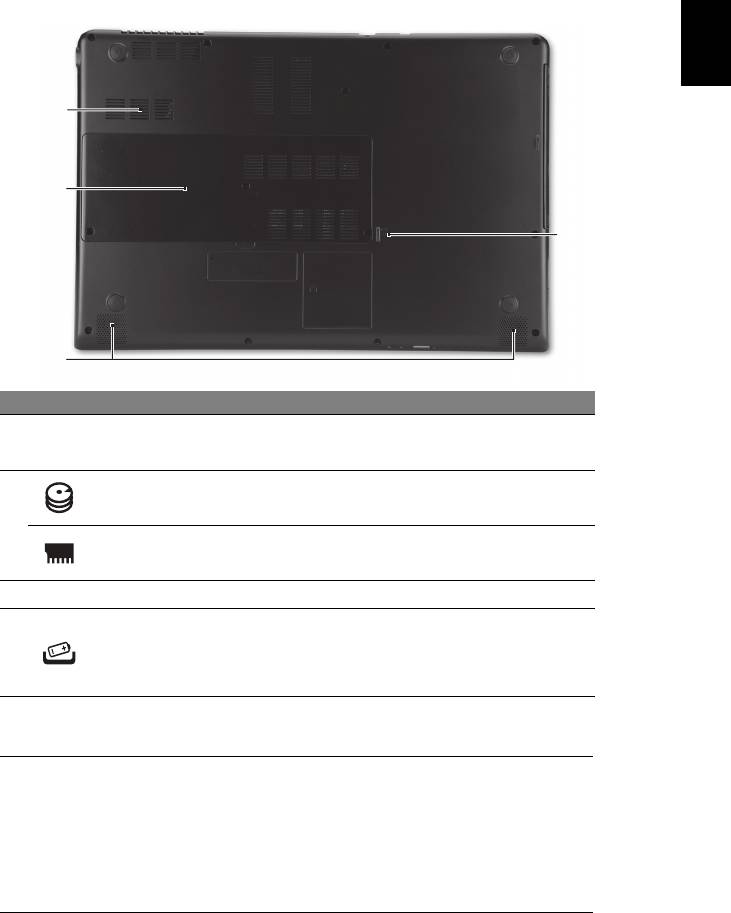
Base view
1
2
4
3
# Icon Item Description
Ventilation and cooling
Allows the computer to stay cool.
1
fan
Do not cover or obstruct the openings.
Hard disk bay Houses the computer's hard disk.
2
Memory compartment Houses the computer's main memory.
3 Speakers Deliver stereo audio output.
Simulates removing and reinstalling the
battery
4
Battery reset pinhole
Insert a paperclip into the hole and press for
four
seconds to reset the computer.
Environment
• Temperature:
• Operating: 5 °C to 35 °C
• Non-operating: -20 °C to 65 °C
• Humidi
ty (non-condensing):
• Operating: 20% to 80%
• Non-operating: 20% to 80%

10
Connecting to the Internet
Your computer's wireless connection is turned on by default.
Windows will detect and display a list of available networks during setup.
English
Select your network and enter the password if required.
Otherwise, open Internet Explorer and follow the instructions. Please also
refer to your ISP or router documentation.
Acer Instant Connect
Instant Connect ensures a faster connection to any of the networks that
your computer connects to most frequently.
Power management
This computer has a built-in power management unit that monitors system
activity, such as activity involving one or more of the following devices:
keyboard, mouse, hard disk, peripherals connected to the computer, and
video memory. If no activity is detected for a period of time, the computer
stops some or all of these devices in order to conserve energy.
Acer Green Instant On
Note: For selected models only.
The Acer Green Instant On feature allows your computer to wake up from
Sleep mode in less than the time it takes to open the lid. When you close
the lid, or leave your computer for a while, your computer enters Sleep
mode. While the computer is in Sleep mode, the power indicator LED will
flash orange.
Open the lid or press any key to wake the computer from Sleep mode.
After a certain amount of time in Sleep mode, the computer will
automatically enter Deep Sleep to preserve battery life. When the computer
is in Deep Sleep, the power indicator LED will be turned off. In this state,
battery remains ready to use for many weeks.
Press the power button to wake up from Deep Sleep.
Note: Once in Deep Sleep, your PC will consume significantly less
power compared with Sleep mode, but it will take a little longer to
wake up from Deep Sleep.
Deep Sleep and Sleep mode work together to ensure that your computer
saves as much power as possible while still enabling quick, instant on
access.
To save more power, your computer will typically enter and stay in Deep
Sleep during times when it will not be frequently accessed, for example,
during the middle of the night. To provide quicker access, your computer
will enter and stay in Sleep mode during times when it will be frequently
accessed, for example, during working hours.
Part no.: NC.M3J11.001
Ver.: 01.01.02

Aspire M3
Guide rapide
Enregistrer votre produit
Lors de la première utilisation de votre produit, il est recommandé de l’enregistrer
immédiatement. Cela vous donne accès à des avantages utiles, comme :
• Service plus rapide de nos représentants entraînés.
• Une adhésion à la communauté Acer : recevez des promotions et participez à nos
enquêtes clients.
• Les dernières nouvelles d’Acer.
Dépêchez-vous et inscrivez-vous, car d’autres avantages vous attendent !
Comment s’enregistrer
Pour enregistrer votre produit Acer, veuillez visiter www.acer.com. Sélectionnez votre
pays, cliquez sur ENREGISTRER VOTRE PRODUIT et suivez simplement les
instructions.
Il vous sera également demandé d’enregistrer votre produit pendant le processus
d’installation, ou vous pouvez double-cliquer sur l’icône Enregistrement sur le bureau.
Une fois votre demande d’inscription reçue, nous vous enverrons un email de
confirmation avec les données importantes que vous devrez conserver précieusement.
Obtenir des accessoires Acer
Nous sommes heureux de vous informer que le programme d’extension de garantie Acer
et les accessoires pour notebook sont disponibles en ligne. Venez et visitez notre
boutique en ligne et trouvez ce dont vous avez besoin sur store.acer.com.
La boutique Acer est progressivement mise en œuvre, et, malheureusement, peut ne pas
être disponible dans certaines régions. Veuillez consulter le site régulièrement pour voir
quand il sera disponible dans votre pays.
© 2012 Tous droits réservés.
Guide rapide de la Aspire M3
Cette révision : 08/2012
Modèle : ______________________________________
No. de série : __________________________________
Date d’achat : _________________________________
Lieu d’achat : __________________________________

3
Français
Français
Pour commencer
Nous désirons vous remercier d’avoir fait d’un notebook Acer votre choix
pour répondre à vos besoins informatiques mobiles.
Vos guides
Pour vous aider à utiliser votre notebook Acer, nous avons conçu plusieurs
guides :
Tout d’abord, le Poster de configuration vous aide à configurer votre
ordinateur.
Le Guide rapide présente les fonctionnalités et fonctions de base de votre
ordinateur.
Pour plus d’information sur l’aide que votre ordinateur peut vous apporter
pour être plus productif, veuillez vous reporter au Manuel d’utilisation
Aspire M3. Le Manuel d’utilisation Aspire M3 contient des informations
utiles qui s’appliquent à votre nouvel ordinateur. Il couvre les notions de
base, telles que l’utilisation du clavier et du son, etc.
Ce guide contient des informations détaillées sur des sujets tels que les
utilitaires systèmes, la récupération des données, les options d’extension
et le dépannage. De plus, il contient des informations de garantie et les
réglementations générales et les avis de sécurité pour votre notebook.
Procédez comme suit pour y accéder :
1 Saisissez « utilisation » depuis Démarrer.
2 Cliquez/appuyez sur Manuel d’utilisation Acer.
4
Visite guidée de votre notebook Acer
Après avoir configuré votre ordinateur comme illustré dans le poster de
Français
configuration, nous allons vous faire explorer votre nouveau notebook
Acer.
Vue du clavier
1
2
# Élément Description
Pour l’entrée des informations dans votre
ordinateur.
1Clavier
Attention : N’utilisez pas un protecteur de clavier
ou housse similaire, car le clavier comprend des
entrées de ventilation pour le refroidissement.
Périphérique de pointage sensible au toucher.
Le touchpad et les boutons de sélection forment
une surface unique.
2 Touchpad
Appuyez fermement sur la surface tactile pour
effectuer un clic gauche.
Appuyez fermement sur le coin inférieur droit pour
effectuer un clic droit.
5
Français
Français
Touches spéciales
L’ordinateur emploie des touches spéciales (combinaisons de touches)
pour accéder à la plupart des contrôles de l’ordinateur comme la luminosité
de l’écran et le volume sonore.
Pour activer les touches spéciales, appuyez et maintenez la touche <Fn>
avant d’appuyer sur l’autre touche dans la combinaison de la touche
spéciale.
Touche spéciale Icône Fonction Description
Active/désactive les périphériques
<Fn> + <F3> Communication
de communication de l’ordinateur.
Place l’ordinateur en mode de
<Fn> + <F4> Sommeil
Sommeil.
Permet de permuter l’affichage
Choix de
entre l’écran d’affichage, le
<Fn> + <F5>
l’affichage
moniteur externe (s’il est connecté)
et les deux.
Désactive le rétro éclairage de
l’écran pour économiser l’énergie.
<Fn> + <F6> Écran noir
Appuyez sur une touche pour le
rallumer.
<Fn> + <F7> Touchpad Active et désactive le touchpad.
Active et désactive les
<Fn> + <F8> Haut-parleur
haut-parleurs.
<Fn> + < >
Luminosité + Augmente la luminosité de l’écran.
<Fn> + < >
Luminosité - Diminue la luminosité de l’écran.
<Fn> + < >
Volume + Augmente le volume sonore.
<Fn> + < >
Volume - Diminue le volume sonore.
Lisez ou effectuez une pause d’un
<Fn> + <Home> Lecture/Pause
fichier multimédia sélectionné.
Arrêtez la lecture du fichier
<Fn> + <Pg Up> Arrêter
multimédia sélectionné.
6
Touche spéciale Icône Fonction Description
Retournez au fichier multimédia
<Fn> + <Pg Dn> Précédent
précédent.
Français
Passez au fichier multimédia
<Fn> + <End> Suivant
suivant.
Vue de l’écran
1
2
3
# Élément Description
Webcam pour communication vidéo.
1 Webcam
Une lumière à côté de la webcam indique que la
webcam est active.
2 Microphone Microphone interne pour l’enregistrement sonore.
Affiche la sortie de l’ordinateur, prend en charge la
3 Écran tactile
saisie multipoint.
7
Français
Français
Vue frontale
1 2
# Icône Élément Description
Met l’ordinateur sous tension et hors
1 Bouton d’alimentation
tension.
Indique l’état d’alimentation de
Indicateur d’alimentation
l’ordinateur.
Indique l’état de la batterie.
2
Charge : La lumière est orange lorsque la
Indicateur de la batterie
batterie se recharge.
Pleine charge : La lumière est bleue.
Vue arrière
# Icône Élément Description
Permet à l’ordinateur de rester froid.
Ventilation et ventilateur
1
Ne couvrez pas et ne bloquez pas les
de refroidissement
ouvertures.
Se connecte à des périphériques audio
Prise haut-parleur/
2
(p.ex. haut-parleurs ou un casque stéréo)
casque
ou à un casque avec microphone.
Se connectent à des périphériques USB.
3Ports USB
Si un port est noir, il est compatible
USB 2.0, si un port est bleu, il est
Port USB avec charge
4
également compatible USB 3.0
hors tension
(voir ci-dessous).
Prend en charge les connexions vidéo
5Port HDMI
numériques à haute définition.
Se connecte à un réseau Ethernet
6 Port Ethernet RJ-45
10/100/1000 Base.
7 Prise d’alimentation Se connecte à l’adaptateur secteur.
8
Informations sur USB 3.0
• Compatible avec USB 3.0 et périphériques USB antérieurs.
• Pour des performances optimales, utilisez des périphériques certifiés
Français
USB 3.0.
• Défini par la spécification USB 3.0 (SuperSpeed USB).
Vue gauche
321 4 5
# Icône Élément Description
Lecteur optique interne, accepte les CD ou
1 Lecteur optique
les DVD.
Indicateur d’accès du
2
S’allume lorsque le lecteur optique est actif.
disque optique
Bouton d’éjection du
3
Éjecte le disque optique du lecteur.
lecteur optique
Éjecte le plateau du lecteur optique lorsque
Trou d’éjection
l’ordinateur est hors tension.
4
d’urgence
Insérez délicatement un trombone pour
éjecter le plateau du lecteur optique.
Accepte une carte mémoire Secure Digital
Lecteur de cartes
(SD ou SDHC) ou MultiMediaCard (MMC).
5
2 en 1
Remarque : Pour retirer la carte, tirez-la
simplement de l’emplacement.
