Acer P7505: инструкция
Раздел: Видео Аудио Фото Оборудование
Тип: Проектор
Инструкция к Проектору Acer P7505

1
English
Acer Projector Gateway
Introduction
The Acer Projector Gateway (APG) is a smart, integrated system that enhances
presentations via your Acer projector. The APG provides versatile source
connectivity, the latest eDisplay Management tools for networking display,
supports for media contents playback via the built-in decoder and more.
Networking APG features
• With high-performance wireless projection via an acer USB WiFi adapter or
an RJ-45 port for wired connections (only for the models with RJ-45 port).
• The projector can act as an access point (AP) or work in Client mode when
doing networking display.
• Users can easily launch the Acer eDisplay Management to do Full screen, L/
R, 4-split screen projection and enable high quality video streaming.
• Powerful wireless display features ready for devices with different OS (MS
Windows, Mac OS, Android, iOS)
• Supports wireless network security (WPA-PSK, WPA2-PSK).
• Acer Projector Gateway Web Management enables a web-based control of
Acer projector for Windows NB/PC (only when the projector is in AP mode).
• Supports firmware upgrade via USB flash drive.
• Crestron compliant (only for the models with RJ-45 port).
Multi-media features
• Fancy and stylish user interface for better experience.
• You can enjoy media & documents playback via internal memory, USB flash
drive and SD card (for selected models).
• Supports high resolution JPEG and BMP picture formats, slideshow and
various slideshow effects for the best viewing experience.
• Supports MP3, PCM and WMA...audio formats, music spectrum and
random play function for your pleasing.
• Supports MPEG4, H.264, WMV, MKV and RMVB...video formats and
smooth video playback with 1080p@30Hz.
• Supports office documents playback (Word, Excel, PowerPoint, PDF).
• Easy control for all media functions by the remote control.
• DLNA compliant. You can enjoy connectivity with other DLNA devices if
under the same local area network environment.
• You can mirror or extend your screen via the source USB B or USB
Connection.
2
English
Getting Started
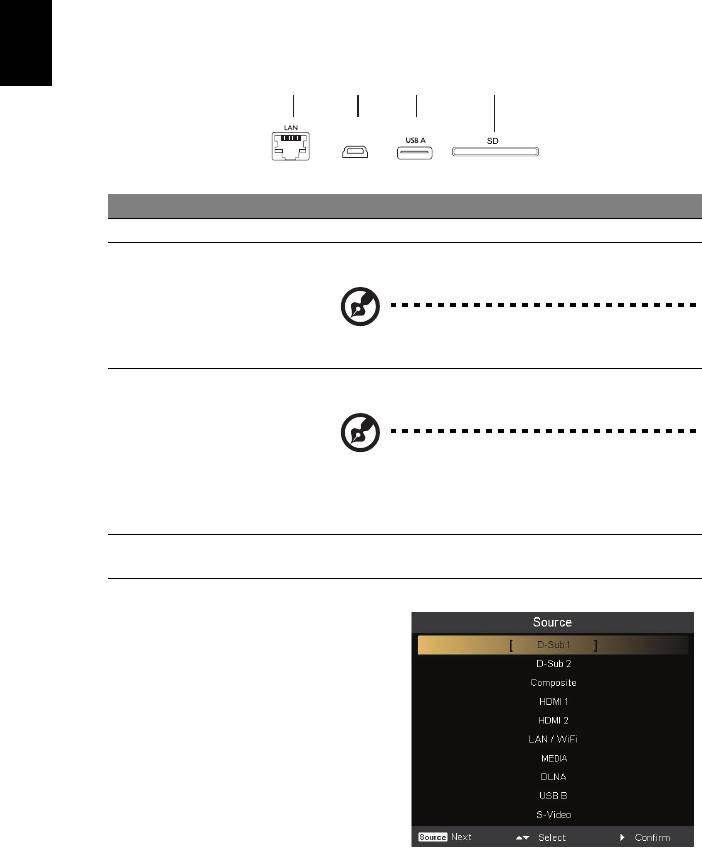
Connecting multi-media device to the projector
# Component Description
1 LAN port Connects to an Ethernet 10/100-based network.
2 Mini USB Projects NB/PC screen via mini USB (USB B or USB
Connection).
NOTE: USB Type A is for USB display (K1
series).
3 USB Type A Connects to USB flash drive for multimedia playback.
Or connects to a USB WiFi adapter (optional).
NOTE: To enable wireless function, the
USB Wireless Adaptor must be plugged
into the USB A1 port if the projector is
equipped with 2 USB Type A ports.
4SD card slot (for
Insert the SD card for multimedia playback.
selected models)
To switch between different inputs,
press SOURCE on the projector or
remote control to open the Source
menu that allows you to select an
input signal source.
123 4
USB B

3
English
Copyright © 2013. Acer Incorporated.
All Rights Reserved.
Changes may be made periodically to the information in this publication
without obligation to notify any person of such revisions or changes.
Such changes will be incorporated in new editions of this manual or
supplementary documents and publications.
This company makes no representations or warranties, either expressed or
implied, with respect to the contents hereof and specifically disclaims the
implied warranties of merchantability or fitness for a particular purpose.
4
English
Control Panel and Remote Control
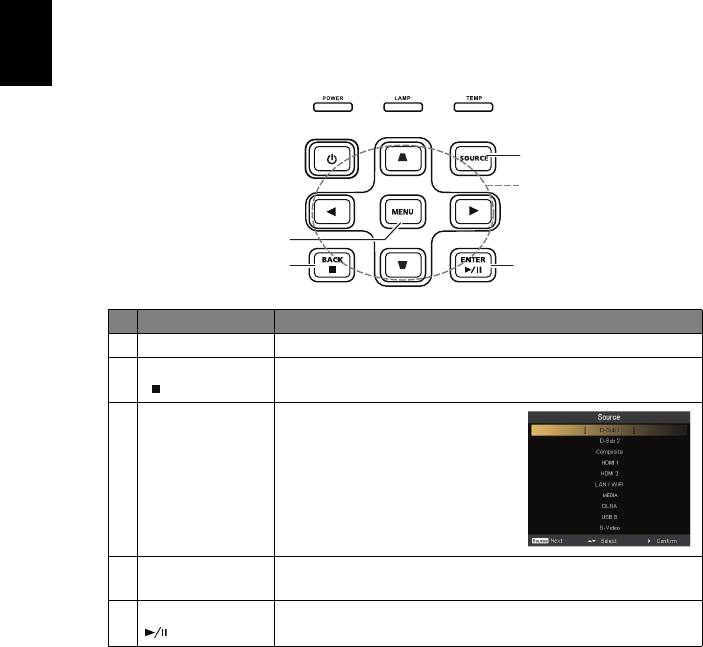
Control Panel
3
4
1
2
5
# Function Description
1 MENU Launches the projector Onscreen Display (OSD) menu.
2BACK
Cancels your selection, or goes back to previous page.
Stop
Stops the playing media files.
3 SOURCE Press to open the Source
menu that allows you to select
an input signal source.
4 Four directional
Selects the media files in four directions.
selection keys
5ENTER
Confirms your selection of items.
Play/Pause
Plays/Pauses the playing media files.
5
English
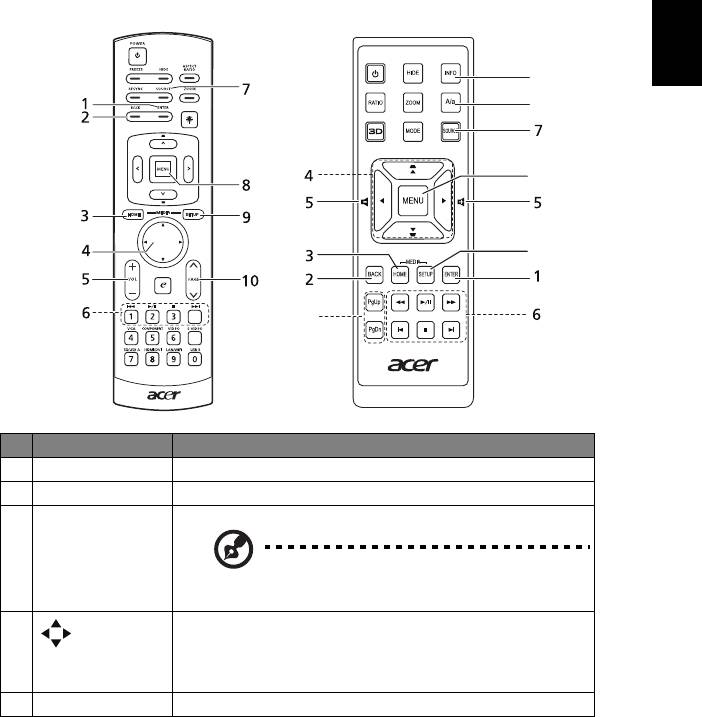
Remote Control
# Function Description
1 ENTER Confirms your selection of items.
2 BACK Cancels your selection, or goes back to previous page.
3 MEDIA HOME Goes to MEDIA HOME page.
NOTE: This button is only available when
the input signal is MEDIA.
4Four
Selects the media files in four directions.
directional
select pad
5 VOL +/- Increases/decreases the volume.
11
12
8
9
10
6
English
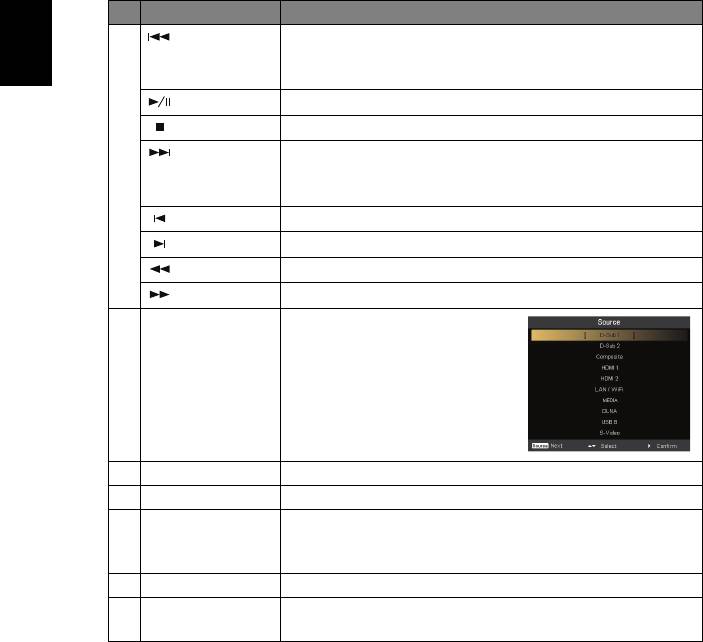
# Function Description
6
Rewind
• Goes to the previous file.
• Rewinds the playing media files with a long press
for 1 second.
Play/Pause
Plays/Pauses the playing media files.
Stop
Stops the playing media files.
Fast-forward
• Goes to the next file.
• Fast-forwards the playing media files with a long
press for 1 second.
Previous
Goes to the previous file.
Next
Goes to the next file.
Rewind
Rewinds the playing media files.
Fast-forward
Fast-forwards the playing media files.
7 SOURCE Press to open the Source
menu that allows you to
select an input signal source.
8 MENU Launches the projector Onscreen Display (OSD) menu.
9 MEDIA SETUP Opens MEDIA SETUP page.
10 PAGE ^/v
For computer mode only. Use the button to select the
PgUp/PgDn
next or previous page. This function is only available
when connected to a computer via a USB cable.
11 INFO Displays information of the selected file.
12 A/a Launches the projector OSD subtitle menu during video
playback.
