Acer P7505: Using the USB Modes
Using the USB Modes: Acer P7505
55
English
Using the USB Modes
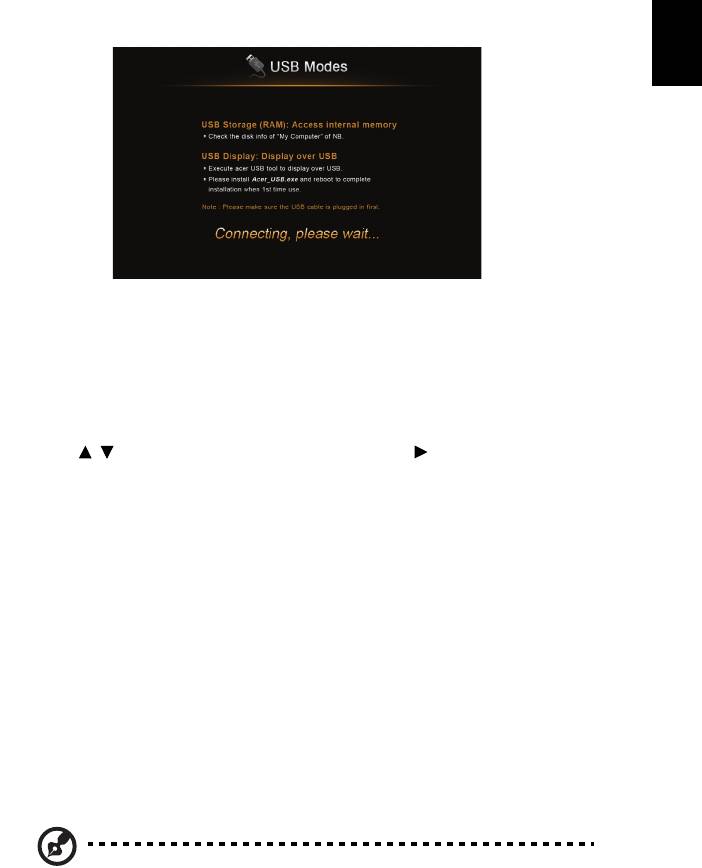
Accessing internal memory (RAM)
1 Adjust projector source to USB B or USB Connection.
2 Connect the USB cable to both projector and NB/PC, plug the type B host to
Projector side and type A host to NB/PC side.
3 Press / to select USB Storage (RAM) and press .
4 The projector can be seen as a portable device with a capacity of up to 1
GB on your NB/PC. You can now transfer media files to the projector.
USB Display
Introduction
You can connect the USB cable to both projector and NB/PC and adjust
projector source to USB B to display the content in your NB/PC.
Compatible with Windows XP/ Vista/ 7/ Mac OS
The USB Display projection function can be performed under Windows XP with
Service Pack 2 and above / Windows Vista 32 bits and 64 bits environments /
Windows 7 32bits and 64 bits, and under Mac OS X 10.7 and above.
Note: only support one NB/PC to one projector (1-to-1 screen
projection) by USB Display connection.

56
English
How to start USB Display
• Under Windows OS
1 Adjust projector source to USB B or USB Connection.
2 Press / to select USB Display and press .
3 Connect the USB cable to both projector and NB/PC, plug the type B host to
Projector side and type A host to NB/PC side.
4 Execute the "Acer_USB.exe" and follow the on-screen instructions to
complete the installation.
Note: If the autorun feature has been disabled on our NB/PC,
please browse to the CD ROM and execute the "Acer_USB.exe"
manually.
5 System will start to install the software on your NB/PC. (For the first time.)
6 Reboot your NB/PC.
7 Double click the icon on your NB/PC.
8 Below screen will be projected along with your NB/PC's screen through USB
cable. And you can decide if you would like to mirror or extend your
screen, check Compatible Mode if you find your projected screen
incomplete, and decide if you would like to start audio streaming.
57
English
NOTE: You cannot extend your screen while using the Microsoft
Media Player.
NOTE: You cannot extend your screen in Windows 8 operating
system.
9 Unplug the USB cable or quit the application to stop displaying over USB.
• Under Mac OS
1 Adjust projector source to USB B or USB Connection.
2 Press / to select USB Display and press .
3 Connect the USB cable to both projector and NB/PC, plug the type B host to
Projector side and type A host to NB/PC side.
4 Execute the "EZUSBInstaller.dmg" and follow the on-screen instructions to
complete the installation. (For the first time.)
5 Reboot your NB/PC.
6 Execute the application "EZUSB" and your NB/PC’s screen will be
projected.
7 The default setting is "Mirror" after eDisplay is successfully executed. Go to
System Preference\Display to select Mirror/Extension mode if you would
like to change the setting.
8 Unplug the USB cable or quit the application to stop displaying over USB.
