Acer P7505: Troubleshooting
Troubleshooting: Acer P7505
58
English
Troubleshooting
• Use the source list well to switch source for different media functions.
Select the MEDIA source to play the multi-media contents; Select the
DLNA source to play the multi-media contents from other DLNA-compliant
devices; Select the LAN/WiFi source for WiFi display; Select the USB B
source for USB display.
• It may take a little more time to play the contents in the USB hard drive
with lots of multi-media contents and make sure enough USB power is fed
to the USB hard drive.
• Before using the eDisplay or DLNA function, make sure networking setup
is complete. AP Mode is recommended because of better bandwidth.
Check if your devices has connected to the correct AP (Access Point) SSID,
IP address and the correct password has been input (if the security
function is enabled). For wired display, check LAN IP address (if no LAN
cable plugged in, LAN IP is 0.0.0.0).
• Before setting up for the WiFi Display or DLNA function, make sure to
plug in acer USB WiFi adapter (optional) first.
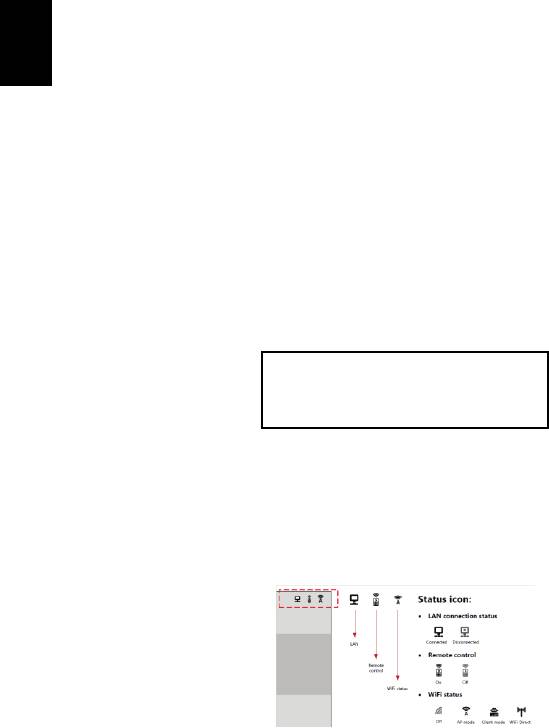
• When you use WiFi display function, check status icon (like AP Mode,
Client Mode or LAN disabled or enabled) on the upper right corner of the
splash screen in the projector and wait a while for the network settings in
the projector to take effect.
• When you enjoy USB projection, make sure to plug in the USB cable to
your NB/PC and projector well. Then execute acer USB tool.
• This projector allows firmware upgrade via the USB flash drive (select the
MEDIA source and go to the Setup > Firmware Upgrade menu).
*** Design and specifications are subject to change without notice.
Projector Name(SSID) : AcerProjector001
WiFi IP : 192.168.100.10
Security : None
LAN IP : 0.0.0.0
