Sharp R-757H – страница 4
Инструкция к Микроволновой Печи Sharp R-757H
A39511 R-757H O/M Russian
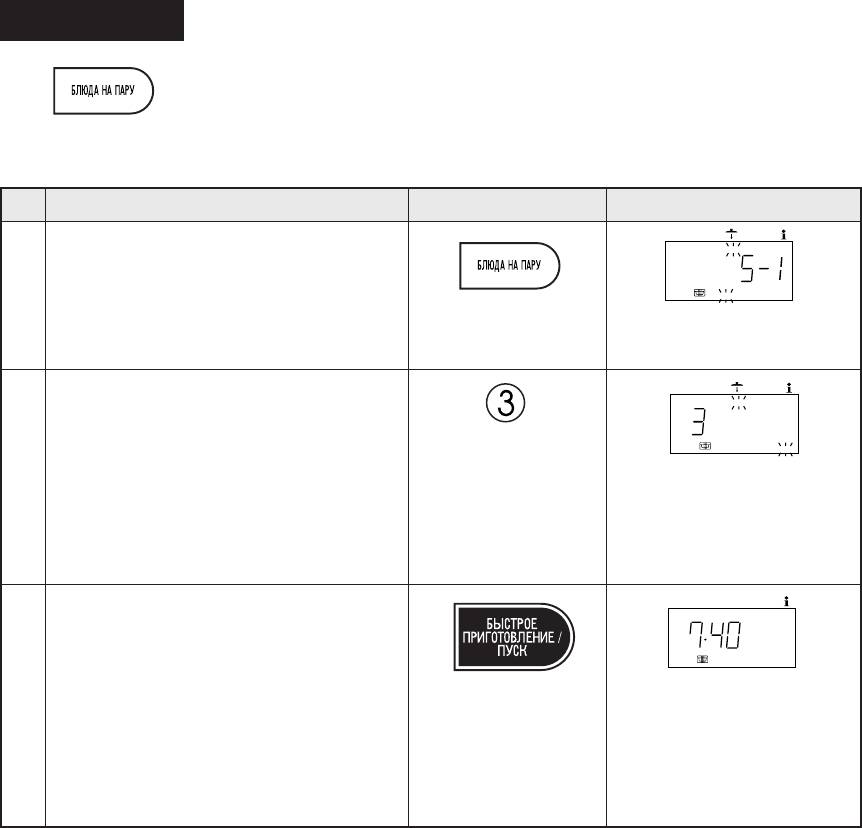
Steam Menu
1. Fish
Press to select 2 popular steam menus.
2. Meat
Follow the detailes provided in Steam Menu Menu
Guide.
* Suppose you want to cook 3 serves of Fish: —
Step
Procedure
Pad Order Display
Press the STEAM MENU pad until the
COVER
HELP
desired menu number is displayed (for
fish press once).
1
PCS
AUTO
x 1
IN FDNJ
PCS and COVER will flash
on and off.
Press the number pad to enter quantity.
COVER HELP
PCS
AUTO
COOK
IN FDNJ
ghbujnjd
2
PCS stops flashing and re-
mains on display.
COOK and COVER will flash
on and off.
Press the INSTANT COOK/START pad.
HELP
AUTO
COOK
FDNJ
ghbujnjd
The cooking time will begin
3
counting down.
When it reaches zero, the
oven will "beep".
STAND COVER will be
displayed.
E – 20
A39511 R757H En P12-* 03.4.25, 4:26 PM20
A39511 R-757H O/M Russian
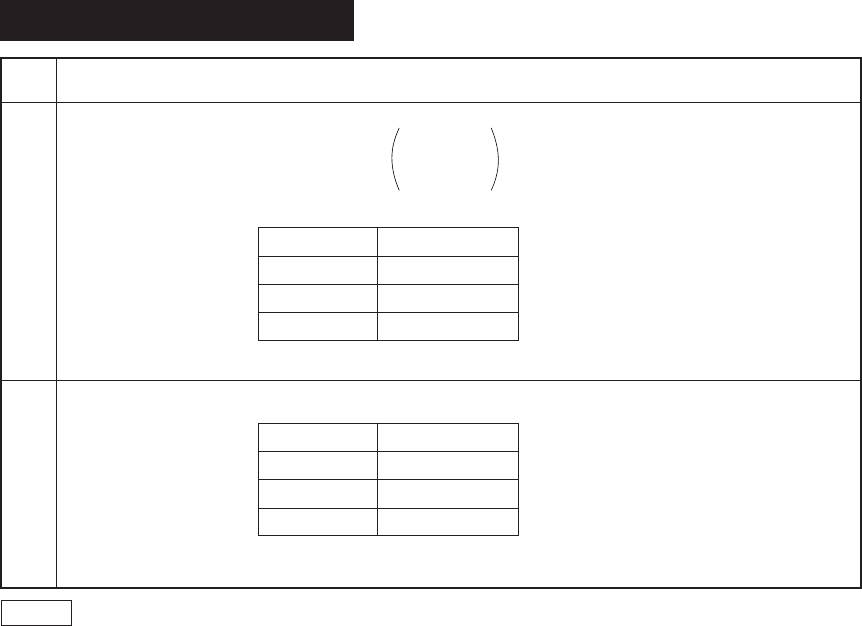
Steam Menu Menu Guide
Menu
Initial
Menu
Quantity
Procedure
No.
Temperature
Fish
8-12°C
1 - 3 serves
• Wash fish thoroughly and remove
Whole fish
scales.
eg: Sea Bream
or
• Make a few cuts on the skin of fish,
Pomfret
Fish fillet
pierce the eyes of fish.
Carp
• Put on a shallow dish, 22-28 cm in
Flatfish
diameter.
S-1
etc.
Serving (s)
Fish
• Sprinkle lightly with water, salt and oil.
• Put green onion and ginger slices on
1 serve
130 - 199g
top.
2 serves
200 - 300g
• Cover with microwave wrap.
• After cooking, stand covered for 3-5
3 serves
301 - 420g
minutes.
Meat
8-12°C
1 - 3 serves
• Marinate the meat.
• For meat patty, try to make it a thin
eg: Beef patty
Serving (s)
Meat
layer.
Chicken pieces
• Put on a shallow dish, 22-28 cm in
1 serve
180 - 249g
with mushrooms
diameter.
S-2
etc.
2 serves
250 - 400g
• Cover with microwave wrap.
• After cooking, stand covered for 3-5
3 serves
401 - 520g
minutes.
* See recipe on page E-22.
NOTE The above serving should be entered in terms of PCS as shown on the display.
E – 21
A39511 R757H En P12-* 03.4.25, 4:26 PM21

A39511 R-757H O/M Russian
STEAM MENU RECIPES (Meat)
Beef Patty
[ Ingredients ]
[ Method ]
330 g Ground beef
1. Marinate the ground beef and preserved vegetables with
50 g Preserved Vegitables
seasonings and mix well. Press into patty shape.
1 Salted Egg Yolk
2. Cut the salted Egg Yolk into dices and place on the patty for
decoration.
3. Cover with microwave wrap and press STEAM MENU pad
[ Seasonings ]
twice to Meat.
1 tsp. Salt
1 tsp. Sugar
2 tsp. Cornstarch
2 tsp. Oil
1
1
/2 tsp. Soya sauce
Chicken Pieces with Mushrooms
[ Ingredients ]
[ Method ]
280 g Chicken pieces
1. Marinate the chicken pieces and soaked mushrooms with
40 g Dried mushrooms
seasonings. Then mix together with ginger and green onion
(soaked)
slices.
Ginger slices
2. Cover with microwave wrap and press STEAM MENU pad
Green onion slices
twice to Meat.
[ Seasonings ]
1
/2 tsp. Salt
1
/2 tsp. Sugar
1
1
/2 tsp Soya sauce
1
/2 tsp Cornstarch
1
1
/2 tsp Sesame oil
E – 22
A39511 R757H En P22-* 03.4.25, 4:26 PM22
A39511 R-757H O/M Russian
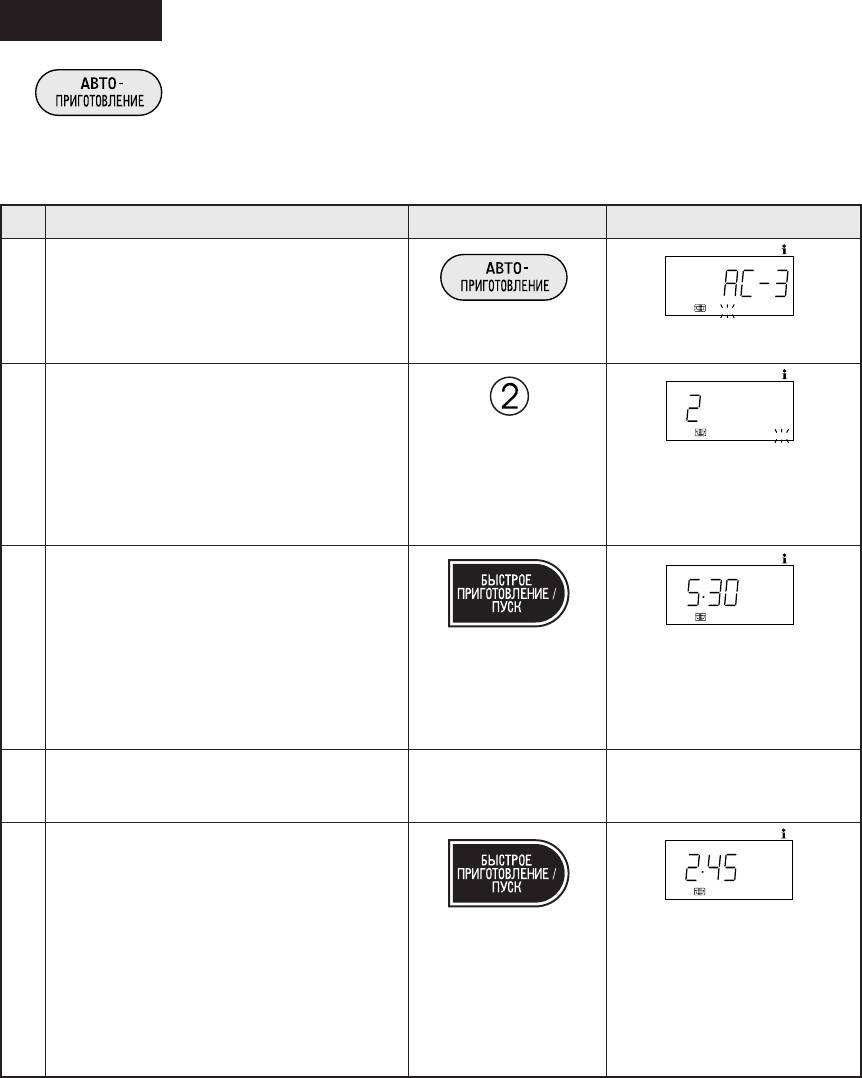
Auto Cook
AUTO COOK will automatically compute
1. Fresh Vegetables
the power level and cooking time. AUTO
2. Frozen Vegetables
COOK has 4 menus. To select a menu, press
3. Jacket Potato
the AUTO COOK pad until the menu of your
4. Noodles
choice is displayed.
* Suppose you want to use Auto Cook to cook 2 pieces Jacket Potato.
Step
Procedure Pad Order Display
Press AUTO COOK pad 3 times to cook
HELP
Jacket Potato.
1
PCS AUTO
x 3
IN FDNJ
PCS flashes on and off.
Press number pad to enter quantity.
HELP
PCS AUTO
COOK
IN FDNJ
ghbujnjd
2
PCS stops flashing and re-
mains on display.
COOK will flash on and off.
Press the INSTANT COOK/START pad.
HELP
AUTO
COOK
FDNJ
ghbujnjd
3
The cooking time will begin
counting down.
The oven will "beep" 4
times and will stop. TURN
OVER will flash on and off.
Open the door. Turn over potatoes.
PRESS START will be
4
Close the door.
displayed repeatedly.
Press the INSTANT COOK/START pad.
HELP
AUTO
COOK
FDNJ
ghbujnjd
The cooking time will be-
5
gin counting to zero, when
it reaches zero, the oven
will "beep".
STAND COVERED WITH
FOIL will be displayed
repeatedly.
E – 23
A39511 R757H En P22-* 03.4.25, 4:26 PM23

A39511 R-757H O/M Russian
Auto Cook Menu Guide
Menu
Initial
Menu
Quantity
Procedure
No.
Temperature
Fresh Vegetables
20-25˚C
0.1 - 1.0 kg
• Wash vegetables, then remove excess
Room
water.
Broccoli (florets)
temperature
• Cut & trim the vegetables info florets,
Lettuce (shreds)
shreds or strips.
Asparagus, large size (in 5cm strips)
• Put on a flat ceramic plate (28-31cm in
White Chinese Cabbage (whole or halves)
diameter), sprinkle sparingly with salt
Chinese Celery Cabbage (Shreds)
& oil.
Spinach (halves)
• Cover loosely with microwave wrap
AC-1
Onions (shreds)
and cook.
Corn-on the-cob (whole or halves)
• After cooking, stir.
Green Pepper (strips)
NOTE 1.For hard type of vegetables, use MORE setting for better result (see page E-30), and let
it stand for a while after cooking for better results.
2.For smaller size or baby asparagus, use LESS settings for better result (see page E-
30).
3.Stir halfway for even cooking results.
4.For other vegetables that are not suggested here, please cook manually.
Frozen Vegetables
-18˚C
0.1 - 1.0 kg
• Before cooking, separate vegetables
Frozen
eg. broccoli as much as possible.
Broccoli (florets)
temperature
• Put on a flat ceramic plate (28-31cm in
Cauliflower (florets)
diameter), add water (2-3 tbsp) it nec-
Asparagus (strips)
AC-2
essary.
Corn-on the-cob (whole or halves)
• Cover loosely with microwave wrap
Green Beans
and cook.
• After cooking, stir
Jacket Potato
20-25˚C
1-6 pieces
• Use washed new potatoes.
Room
1 piece,
• Pierce twice fork on each side.
Potato (whole)
temperature
approx. 220 g
• Place on outside of turntable.
• If one piece only, place on the centre.
• The oven will "beep" and stop, TURN
AC-3
OVER will flash on and off.
Turn over potatoes and press start to
continue cooking.
• After cooking, stand and covered with
aluminium foil for 5-15 minutes.
Noodles
20-25˚C
1-2 serves
• Put the noodles in a bowl.
1.
Fresh, soft type
Room
1 serve,
1 serve: 1-litre bowl
(cooked)
temperature
approx. 200g
2 serves:2-litre bowl
• Add in water (20-25˚C)
eg: Vermicelli, Noodles
1 serve: 500ml
2 serves:800ml
• Cover with microwave wrap or glass lid.
• After cooking, stir and stand covered
for 1 minute.
AC-4
2.Dry, compressed
20-25˚C
1-2 serves
• Put the noodles in a bowl.
type
Room
1 serve,
1 serve: 750ml bowl
temperature
approx. 50g
2 serves:1.5-2 litre bowl
eg: Shrimp Noodles
• Add in cooled boiled water (20-25˚C)
or 100g for
Egg Noodles
1 serve: 500ml
Nissin Noodles
Vermicelli
2 serves:800ml
Nissin Noodle
• Cover with microwave wrap or glass lid.
• After cooking, stir and stand for 5 min-
utes.
NOTE Make sure all noodle is covered by water.
E – 24
A39511 R757H En P22-* 03.4.25, 4:26 PM24
A39511 R-757H O/M Russian
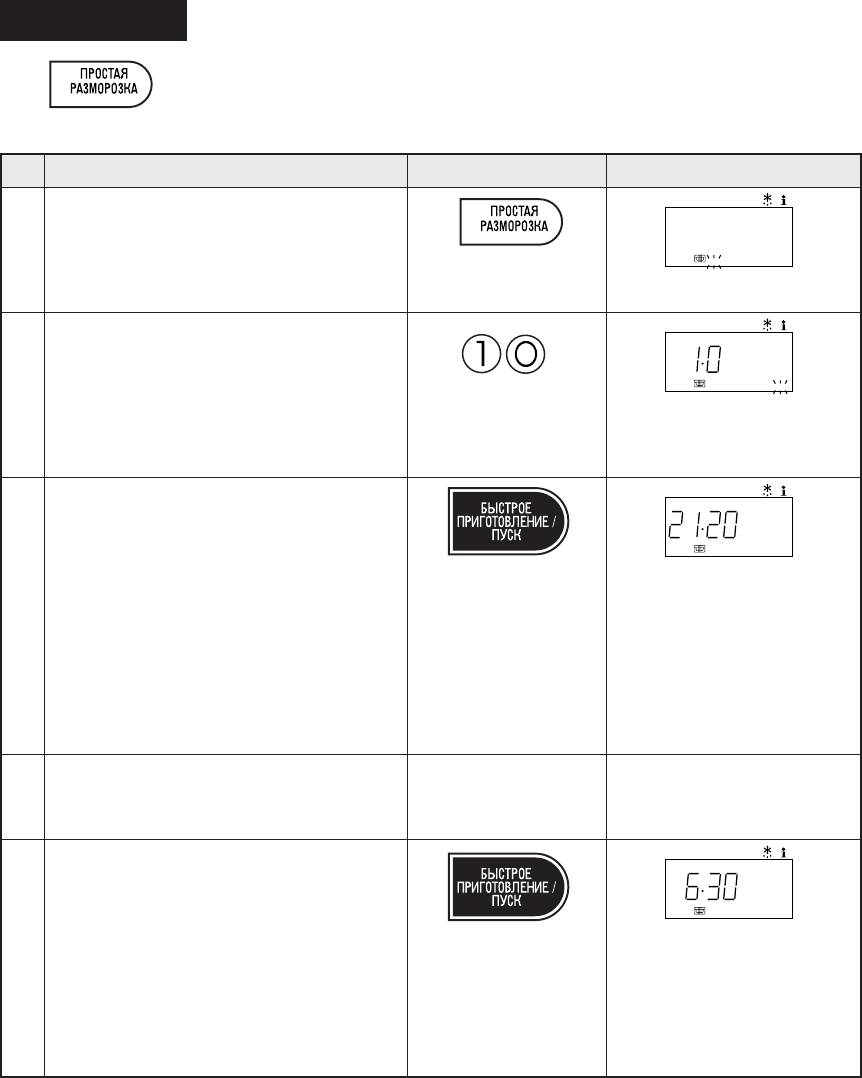
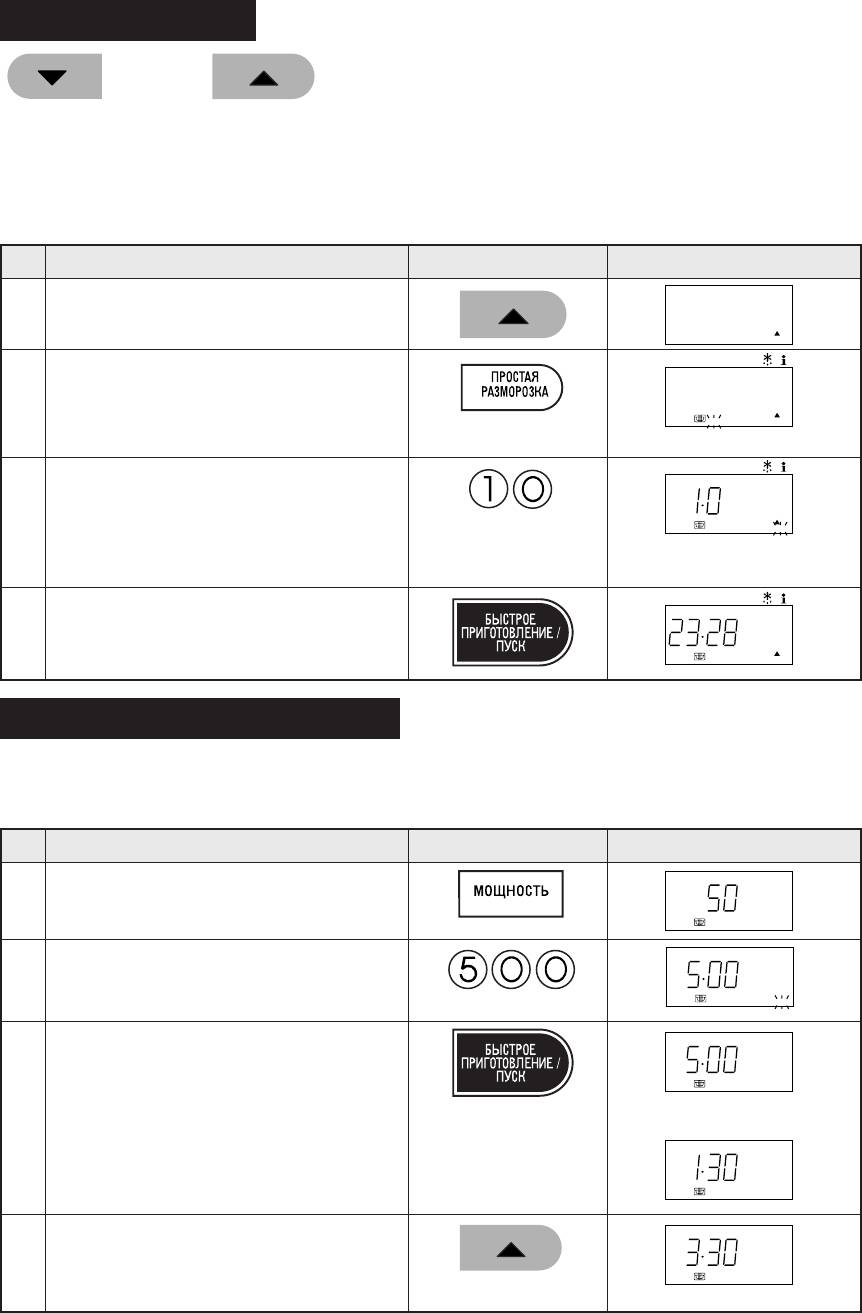
Easy Defrost
The Easy Defrost feature allows you to defrost meats by entering weight.
* Suppose you want to defrost 1.0 kg of Chicken Pieces. (Round off to nearest 0.1 kg)
Step
Procedure Pad Order Display
Press the EASY DEFROST pad .
DEFROST HELP
1
KG AUTO
RU FDNJ
KG flashes on and off.
Press number pads to enter weight.
DEFROST HELP
KG AUTO
COOK
RU FDNJ
ghbujnjd
2
KG stops flashing and re-
mains on display.
COOK will flash on and off.
Press the INSTANT COOK/START pad.
DEFROST HELP
AUTO
COOK
FDNJ
ghnujnjd
The defrosting time will
3
begin counting down.
When a 4 times "beep"
sound is heard, the oven
stops.
TURN OVER will flash on
and off.
Open the door. Turn over the chicken
PRESS STAND will be
pieces.
displayed repeatedly.
4
Close the door.
Press the INSTANT COOK/START pad.
DEFROST HELP
AUTO
COOK
FDNJ
ghbujnjd
When the cooking time
5
reaches zero, audible
signal will sound and
STAND COVERED WITH
FOIL will be displayed
repeatedly.
E – 25
A39511 R757H En P22-* 03.4.25, 4:26 PM25
A39511 R-757H O/M Russian
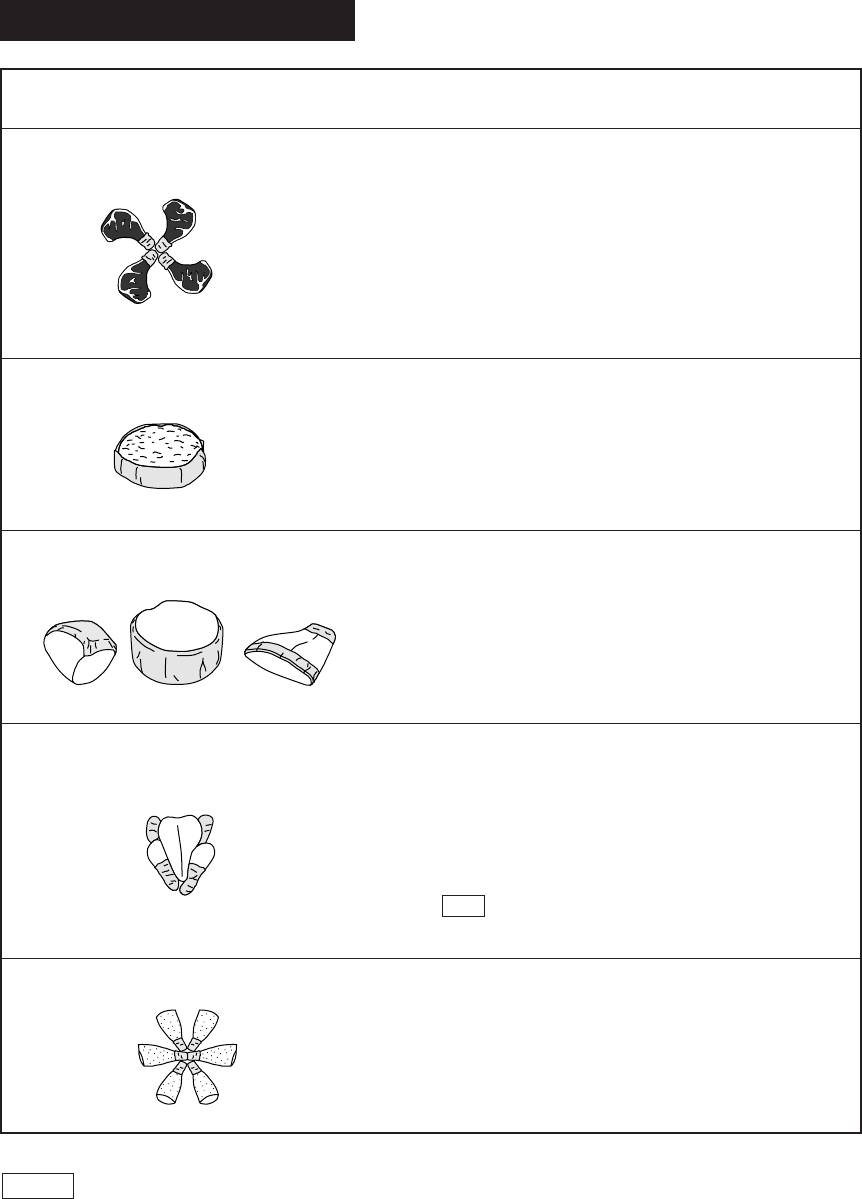
Easy Defrost Menu Guide
QUANTITY
MENU
PROCEDURE
(MIN. – MAX.)
Steaks
0.1 - 2.0 kg
• Shield thin end of chops or steaks with foil.
Chops
• Position the food with thinner parts in the centre in a
single layer on the defrost rack.
If pieces are stuck together, try to separate as soon
as possible.
• When oven has stopped, remove defrosted pieces,
turn over and shield the warm portions.
• Press start to continue defrosting.
• After defrost time, stand covered with aluminium foil
for 5-30 minutes.
Minced Meat
0.1 - 2.0 kg
• Place frozen minced meat on a defrost rack. Shield
Beef/Pork
edges.
• When oven has stopped, remove defrosted portions,
turn over and shield edges with foil strips.
• Press start to continue defrosting.
• After defrost time, stand covered with aluminium foil
for 5-30 minutes.
Roast Meat
0.5 - 2.0 kg
• Shield the edge with foil strips about 2.5cm wide.
Beef/Pork/Lamb
• Place joint with lean side face upwards (if possible)
on the defrost rack.
• When oven has stopped, turn over and shield the
warm portions.
• Press start to continue defrosting.
• After defrost time, stand covered with aluminium foil
for 10-30 minutes.
Poultry
1.0 - 2.0 kg
• Remove from original wrapper. Shield wing and leg
tips with foil.
• Place breast side down on the defrost rack.
• When oven has stopped, turn over and shield the
warm portions.
• Press start to continue defrosting.
• After defrost time, stand covered with aluminium foil
for 15-60 minutes.
N.B. After standing run under cold water to remove
giblets if necessary.
Chicken Pieces
0.1 - 2.0 kg
• Place chicken pieces on the defrost rack.
• When oven has stopped, remove defrosted pieces,
turn over and shield the warm portions.
• Press start to continue defrosting.
• After defrost time, stand covered with aluminium foil
for 5-30 minutes.
Food not listed in the Guide can be defrosted manually using M.LOW power level.
NOTE 1. When freezing minced meat, shape it into flat even sizes.
2. For chicken pieces, steaks and chop, freeze separately in single flat layers and if necessary
interleave with freezer plastic to separate layers. This will ensure even defrosting.
3. It is also a good idea to label the packs with the correct weights.
E – 26
A39511 R757H En P22-* 03.4.25, 4:26 PM26
A39511 R-757H O/M Russian
OTHER CONVENIENT FEATURES
Help Feature
The HELP feature has 4 different programs.
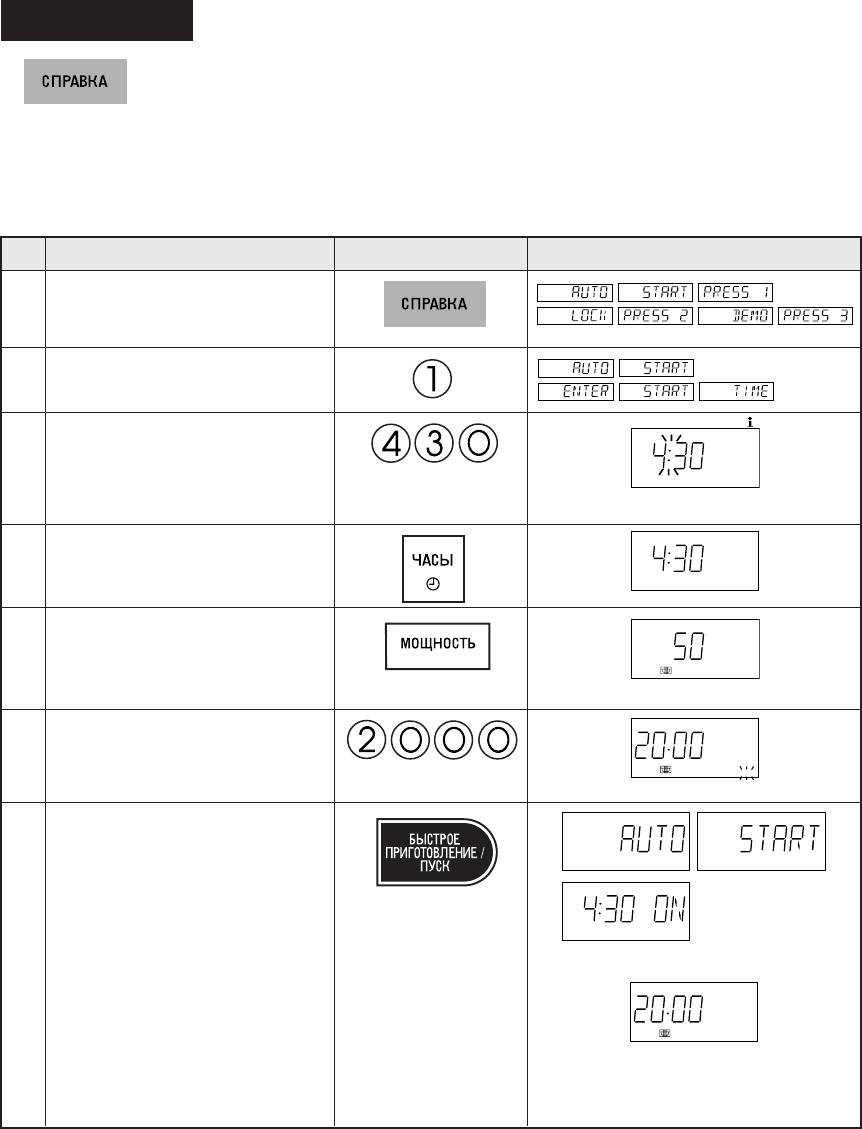
(1) Auto Start
The Auto Start feature allows you to set your oven to start automatically.
Auto Start can be used for manual cooking, Slow Cook or Rice Cook.
* Suppose you want to start cooking a casserole for 20 minutes on MEDIUM at 4:30 in the afternoon.
(Check that the correct time of day is displayed.)
Step
Procedure Pad Order
Display
Press the HELP pad.
1
Press the number 1 pad.
2
Enter the desired start time.
HELP
3
The dots (:) will flash on and off.
Press the CLOCK pad.
4
AUTO
FDNJ
Set the desired cooking mode.
(for microwave cooking on ME-
5
DIUM, press the POWER LEVEL
%
AUTO
pad 3 times)
FDNJ
x 3
Enter the desired cooking time.
6
AUTO
COOK
FDNJ
ghbujnjd
Press the INSTANT COOK/
START pad.
AUTO AUTO
FDNJ FDNJ
AUTO
FDNJ
The oven will start cooking at 4:30
7
P.M.
COOK
ghbujnjd
The timer begins to count down. When
the timer reaches zero, all indicators
will go off and the oven will "beep".
To check the current time, simply press the CLOCK pad, the time will be displayed.
If the door is opened after step 7, close the door and press the START pad to continue with Auto Start.
Press the STOP/CLEAR pad once to cancel Auto Start.
The correct time of day must be set before using Auto Start, see clock setting on page E-7.
E – 27
A39511 R757H En P22-* 03.4.25, 4:26 PM27
A39511 R-757H O/M Russian
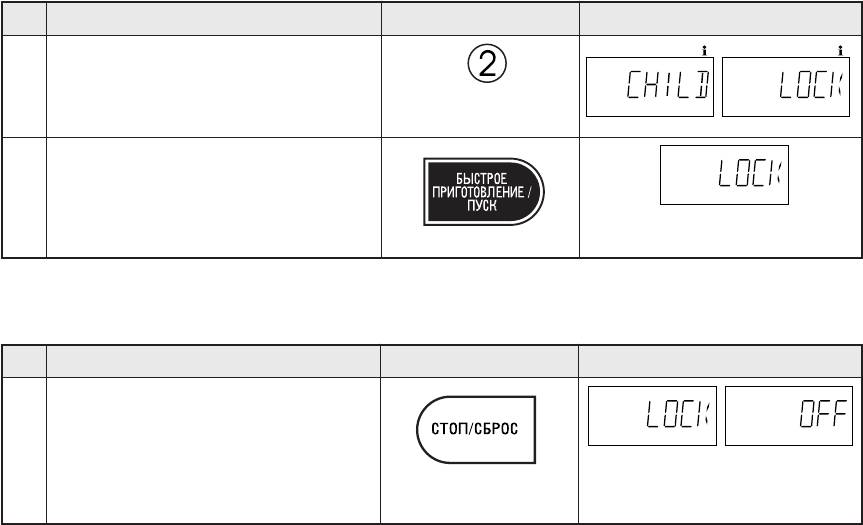
(2) Child Lock
If the oven is accidentally started with no food or liquid in the cavity, the life of the oven can be reduced.
To prevent accidents like this, your oven has a "Child Lock" feature that you can set when the oven is not
in use.
* To set the Child Lock.
After step 1 for Auto Start.
Step
Procedure Pad Order
Display
Press the number 2 pad.
HELP HELP
2
Press the INSTANT COOK/START pad.
3
The time of day will appear in
the display.
The control panel is now locked, each time a pad is pressed, the display will show "LOCK".
* To unlock the control panel.
After step 2 above.
Step
Procedure
Pad Order
Display
Press the STOP/CLEAR pad.
3
The time of day will appear in
the display.
The oven is ready to use.
E – 28
A39511 R757H En P22-* 03.4.25, 4:26 PM28
A39511 R-757H O/M Russian
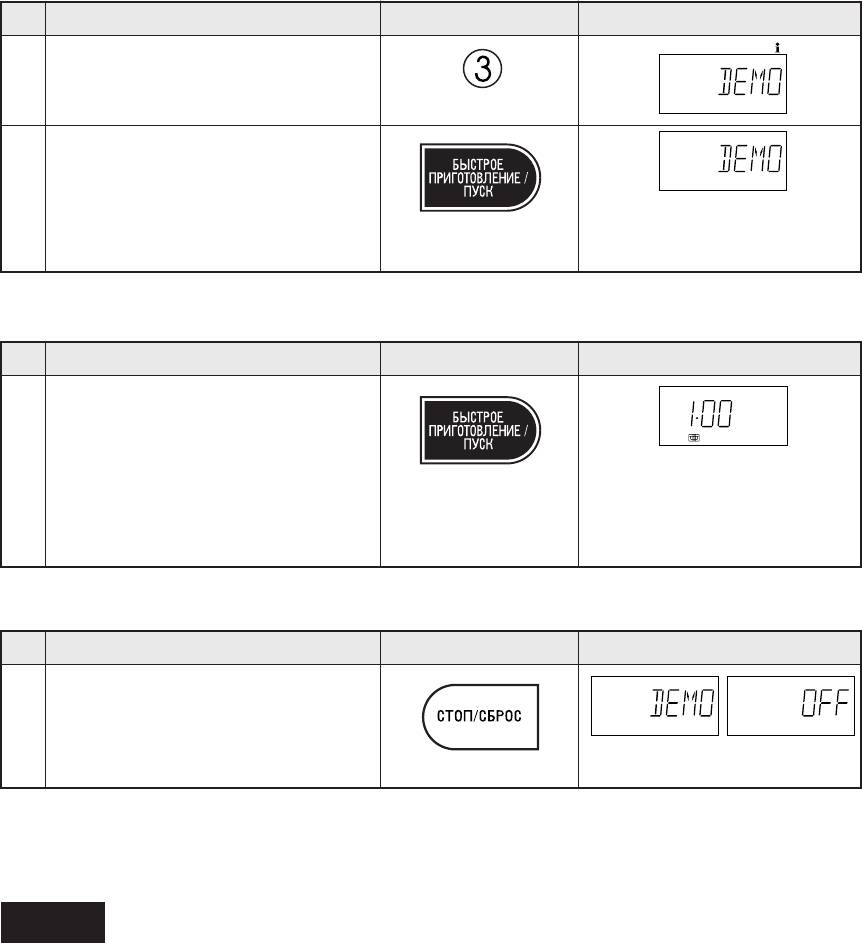
(3) Demonstration Mode
This feature is mainly for use by retail outlets, and also allows you to practice key operations.
* To demonstrate.
After step 1 for Auto Start.
Step
Procedure
Pad Order
Display
Press the number 3 pad.
HELP
2
Press the INSTANT COOK/START pad.
3
Then HELLO DEMO MODE
will appear repeatedly.
Cooking operations can now be demonstrated with no power in the oven.
* Suppose you demonstrate Instant Cook.
Step
Procedure Pad Order
Display
Press the INSTANT COOK/START pad.
COOK
ghbujnjd
1
The cooking time will begin
counting down to zero at ten
times the speed. When the tim-
er reaches zero, an audible sig-
nal will sound.
* To cancel the Demonstration Mode.
After step 2 above.
Step
Procedure Pad Order
Display
Press the STOP/CLEAR pad.
3
The time of day will appear in
the display.
(4) Help
Each setting of Automatic Operations and Slow Cook has a cooking hint.
If you wish to check, press the HELP pad whenever HELP is lighted in the display.
Alarm
Your oven has an alarm function. If you leave food in the oven after cooking, the oven will "beep" 3 times
and REMOVE FOOD will be appeared in the display after 2 minutes.
If you do not remove the food at that time, the oven will "beep" 3 times after 4 minutes and 6 minutes.
E – 29
A39511 R757H En P22-* 03.4.25, 4:26 PM29
A39511 R-757H O/M Russian
Less/More Setting
Multi Cook
To adjust the cooking time to your individual preference -use
the "more" or "less" feature to either add (more) or reduce
(less) cooking time.
The LESS/MORE pads can be used to adjust the cooking time of the following features
– Auto Grill – Reheat – Rice Cook
– Steam Menu – Auto Cook – Easy Defrost
To adjust cooking time, press the LESS or MORE pad at the beginning of the procedure.
* Suppose you want to defrost 1.0 kg Roast Lamb for a longer time.
Step
Procedure DisplayPad Order
Press the MORE pad.
1
Press the EASY DEFROST pad.
DEFROST HELP
2
KG AUTO
RU FDNJ
KG flashes on and off.
Press number pads to enter weight.
DEFROST HELP
3
KG AUTO
COOK
RU FDNJ
ghbujnjd
KG stops flashing and
COOK will flash on and off.
Press the INSTANT COOK/ START pad.
DEFROST HELP
4
AUTO
COOK
FDNJ
ghbujnjd
Multi Cook
Adjust Time During Cooking
Cooking time can be added or decreased during a cooking programme using the "MORE" or "LESS"
pads. (Manual cooking only)
* Suppose you want to increase cooking time by 2 minutes during 5 minutes on MEDIUM cooking.
Step
Procedure DisplayPad Order
Select power leve by pressing the POW-
ER LEVEL pad as required.
1
%
(for MEDIUM press three times)
x 3
Enter desired cooking time.
2
COOK
ghbujnjd
Press the INSTANT COOK/ START pad.
COOK
ghbujnjd
The timer starts to count
3
down.
COOK
ghbujnjd
Press the MORE pad twice to increase
time by two minutes.
4
COOK
x 2
ghbujnjd
E – 30
A39511 R757H En P22-* 03.4.25, 4:26 PM30

A39511 R-757H O/M Russian
CARE AND CLEANING
Disconnect the power supply cord before cleaning or leave the door open to inactivate the oven
during cleaning.
Before cleaning , make sure the oven door, outer cabinet, oven cavity, air vent openings, turnta-
ble, turntable support and racks are not hot.
CLEAN THE OVEN AT REGULAR INTERVALS - Keep the oven clean, or it could lead to deterioration of the
surface. This could adversely affect the life of the appliance and possibly result in a hazardous situation.
Exterior:
The outside may be cleaned with mild soap and warm water, wipe clean with a damp cloth. Avoid the
use of harsh abrasive cleaners.
Door:
Wipe the door and window on both sides, the door seals and adjacent parts frequently with a damp cloth
to remove any spills or spatters. Do not use abrasive cleaner.
Control Panel:
Wipe the panel with a cloth dampened slightly with water only.
Do not scrub or use any sort of chemical cleaners. Avoid the use of excess water.
Interior walls:
Wipe spatters and spills with a little dishwashing liquid on a soft damp cloth for hygienic reasons. For
heavier stains inside the oven cavity only, use a mild stainless steel cleaner applied with a soft damp
cloth. Do not apply to the inside of the door. Wipe clean ensuring all cleaner is removed.
After use wipe
the waveguide cover in the oven with a soft damp cloth to remove any food splashes. Built-up splashes
may overheat and begin to smoke or catch fire. Do not remove the waveguide cover.
DO NOT USE CAUSTIC CLEANERS, ABRASIVE OR HARSH CLEANSERS OR SCOURING PADS ON
YOUR OVEN. NEVER SPRAY OVEN CLEANERS DIRECTLY ONTO ANY PART OF YOUR OVEN.
DO NOT USE A STEAM CLEANER. Avoid using excess water. After cleaning the oven, ensure any
water is removed with a soft cloth.
Note: At regular intervals, heat the oven referring to "Heating without Food" on page E-6.
Because, the splashed dirt or food oil remained around the top heater and oven walls may
cause the smoke and odour.
Accessories:
Wash with mild soapy water and dry thoroughly.
Note: Keep the waveguide cover and accessories clean at all times.If you leave grease or fat in the
cavity or accessories,it may overheat,cause arcing, smoke or even catch fire when next using
the oven.
E – 31
A39511 R757H En P22-* 03.5.16, 5:02 PM31

A39511 R-757H O/M Russian
SERVICE CALL CHECK
Check the following before calling service:
1. Does the display light? Yes
No
2. When the door is opened, does the oven lamp come on? Yes No
3. Place one cup of water (approx. 250 ml) in a glass measuring cup in the oven and close the door
securely. Oven lamp should go off if door is closed properly.
Programme the oven for one minute on HIGH. At this moment:
A. Does the oven lamp light? Yes
No
B. Does the cooling fan work? Yes No
(Put your hand over the rear ventilation openings.)
C. Does the turntable rotate? Yes No
(The turntable can rotate clockwise or counterclockwise. This is quite normal.)
D. Do the microwave symbol and COOK indicator light? Yes
No
E. After one minute, did an audible signal sound? Yes No
F. Is the water inside the oven hot? Yes No
4. Remove water from the oven and programme the oven for 3 minutes on GRILL mode.
A. Does the top heater symbol and COOK indicator light? Yes
No
B. After 3 minutes, does the heater become red? Yes No
If "NO" is the answer to any of the above questions, please check your wall socket and the fuse in your
meter box.
If both the wall socket and the fuse are functioning properly, CONTACT YOUR NEAREST SERVICE
CENTER APPROVED BY SHARP.
NOTE: 1.If time in the display is counting down rapidly, check Demonstration Mode.
(Please see E-29 for detail.)
2.The following thing is not trouble;
Each cooking mode has a maximum cooking time. If you operate the oven longer than the
maximum time, the power will automatically be reduced. The table below shows the
maximum time for each cooking mode.
Cooking mode
Maximum cooking time
Microwave 100% cooking
20 min.
Grill cooking
30 min.
SPECIFICATIONS
AC Line Voltage : Single phase 220V, 50Hz
AC Power Required :
Microwave 1.6 kW
Grill 1.35kW
Output Power :
Microwave 900W* (IEC test procedure)
Grill Heater 1300W (Top heater)
Microwave Frequency : 2450 MHz **(Class B/Group 2)
Outside Dimensions : 520mm(W) x 309mm(H) x 467mm(D)
Cavity Dimensions : 352mm(W) x 207mm(H) x 368mm(D)***
Oven Capacity : 27 liters (1.0 cu.ft)***
Cooking Uniformity : Turntable (325mm tray) system
Weight : Approx. 19kg
* This measurement is based on the International Electrotechnical Commission's standardised
method for measuring output power.
** This is the classification of ISM (Industrial, Scientific and Medical) equipment described in the
International Standard CISPR11.
*** Internal capacity is calculated by measuring maximum width, depth and height.
Actual capacity for holding food is less.
TINSRA003WRRZ-Z31
SHARP CORPORATION OSAKA, JAPAN
E – 32
A39511 R757H En P22-* 03.5.16, 5:02 PM32


