Scarlett SC-401: инструкция
Раздел: Бытовая, кухонная техника, электроника и оборудование
Тип: Хлебопечка

Инструкция к Хлебопечке Scarlett SC-401
Характеристики, спецификации
Оглавление
INSTRUCTION MANUAL
РУКОВОДСТВО
ПО
ЭКСПЛУАТАЦИИ
ІНСТРУКЦІЯ
З
ЕКСПЛУАТАЦІЇ
GB MULTIFUNCTIONAL
BREADMAKER..........................................4
RUS
МУЛЬТИФУНКЦИОНАЛЬНАЯ
ХЛЕБОПЕЧЬ
............................8
UA
БАГАТОФУНКЦІОНАЛЬНА
ХЛІБОПІЧКА
.................................13
KZ
МУЛЬТИФУНКЦИОНАЛДЫҚ
НАН
ПЕШІ
...................................18
EST MITMEOTSTARBELINE
LEIVAKÜPSETI ....................................23
LT DAUGIAFUNKCIN
Ė
DUONKEP
Ė
.................................................27
LV DAUDZFUNKCION
Ā
L
Ā
MAIZES KR
Ā
SNS .................................32
H TÖBBFUNKCIÓS KENYÉRSÜT
Ő
................................................36
GB TABLE OF OPERATION TIME ....................................................... 42
RUS
ТАБЛИЦА
ВРЕМЕНИ
РАБОТЫ
ПРОГРАММ
............................ 44
UA
ТАБЛИЦЯ
ЧАСУ
РОБОТИ
ПРОГРАМ
.......................................... 46
GB RECIPES
......................................................................................48
RUS
РЕЦЕПТЫ
...................................................................................50
UA
РЕЦЕПТИ
.....................................................................................52
KZ
РЕЦЕПТТЕР
..................................................................................55
EST RETSEPTID ...................................................................................57
LT RECEPTAI .....................................................................................59
LV RECEPTES....................................................................................61
H RECEPTEK....................................................................................63
www.scarlett.ru
SC-401

IM009
2
SC-401
GB DESCRIPTION
RUS
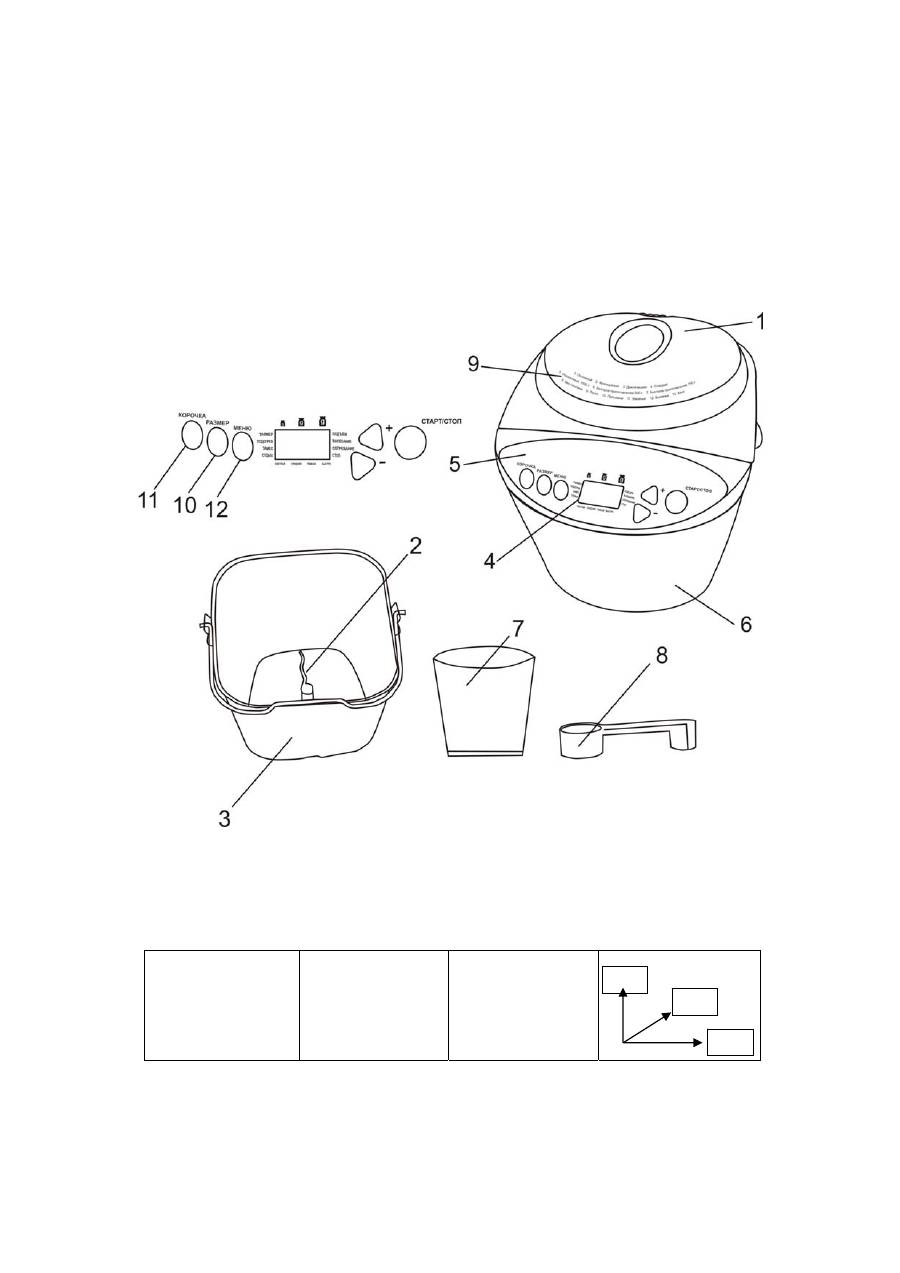
УСТРОЙСТВО
ИЗДЕЛИЯ
1. Lid
2. Kneading blade
3. Baking pan
4. LCD display
5. Control panel
6. Main body
7. Measuring cup
8. Measuring spoon
9. List of programmes
1.
Откидная
крышка
2.
Лопатка
для
замешивания
3.
Съемная
чаша
4.
ЖК
дисплей
5.
Панель
управления
6.
Корпус
7.
Градуированный
стаканчик
8.
Мерная
ложка
9.
Перечень
программ
LCD DISPLAY
ЖК
ДИСПЛЕЙ
10. Loaf weight (500g./750g./1000g.)
11. Crust colour
12. Program selection
10.
Выбор
веса
буханки
(500
г
./750
г
./1000
г
.)
11.
Выбор
цвета
корочки
12.
Выбор
программы
UA
СКЛАД
ВИРОБУ
KZ
СИПАТТАМА
1.
Відкидна
кришка
2.
Лопатка
для
замішування
3.
Знімна
чаша
4.
РК
дисплей
5.
Панель
управління
6.
Корпус
7.
Градуйована
склянка
8.
Мірна
ложка
9.
Перелік
програм
1.
Қайырмалы
қақпақ
2.
Илеуге
арналған
қалақ
3.
Шешілмелі
ыдыс
4.
СК
дисплей
5.
Басқару
тақтасы
6.
Корпус
7.
Градустары
бар
кішкентай
стакан
8.
Өлшеуіш
қасық
9.
Бағдарламалар
тізімі
UA
РК
ДИСПЛЕЙ
KZ
СК
ДИСПЛЕЙ
10.
Вибір
ваги
буханця
(500
г
./750
г
./1000
г
.)
11.
Вибір
кольору
скоринки
12.
Вибір
програми
10.
Бөлке
салмағын
таңдау
(500
г
./750
г
/1000
г
.)
11.
Қабықша
түсін
таңдау
12.
Бағдарламаны
таңдау
EST KIRJELDUS
LT APRAŠYMAS
1. Ülestõstetav kaas
2. Segamislaba
3. Äravõetav kauss
4. LC näidik
5. Juhtpaneel
6. Korpus
7. Mõõteskaalaga klaas
8. Mõõtelusikas
9. Programmide loetelu
1. Atlošiamasis dangtis
2. Maišymo mentel
ė
3. Išimama kepimo forma
4. Skyst
ų
j
ų
kristal
ų
displ
ė
jus
5. Valdymo skydelis
6. Korpusas
7. Matavimo stiklin
ė
8. Matavimo šaukštas
9. Program
ų
s
ą
rašas
EST LC NÄIDIK
LT SKYST
Ų
J
Ų
KRISTAL
Ų
DISPL
Ė
JUS
10. Pätsi kaalu valik (500 g./750 g./1000 g.)
11. Kooriku värvuse valik
12. Programmi valik
10. Pasirinkti duonos kepalo svor
į
(500 g./ 750 g./1000g.)
11. Pasirinkti plutel
ė
s spalv
ą
12.
3. Pasirinkti program
ą
LV APRAKSTS
H LEÍRÁS
1. Pace
ļ
ams v
ā
ks
2. Mais
ā
m
ā
l
ā
psti
ņ
a
3. No
ņ
emams trauks
4. LCD displejs
5. Vad
ī
bas panelis
6. Korpuss
7. M
ē
rgl
ā
ze
8. M
ē
rkarote
9. Programmu uzskait
ī
jums
1. Felhajtható fedél
2. Kever
ő
lapát
3. Kiemelhet
ő
csésze
4. LCD kijelz
ő
5. Vezérl
ő
pad
6. Készüléktest
7. Mér
ő
pohár
8. Mér
ő
kanál
9. Programlista
LV LCD DISPLEJS
H LCD KIJELZ
Ő
10. Klaipa svara izv
ē
le (500g./750g./1000g.)
11. Garozas kr
ā
sas izv
ē
le
12. Programmas izv
ē
le
10. Kenyértömeg kiválasztása (500g./750g./1000g.)
11. Pirítási szint kiválasztása
12. Programválasztás
IM009
3
SC-401
~ 220-240V / 50 Hz
660 W
4.5 / 5.8 kg
mm
633
355
365

IM009
4
SC-401
GB
USER MANUAL
SAFETY MEASURES
Important safety procedures. Read attentively and keep for further references.
•
Incorrect use of this appliance may cause its failure and damage to the user.
•
Before using for the first time check, whether the technical specifications of the product indicated on the label
correspond to the electric supply network parameters.
ATTENTION!
The power supply plug has a phase and an earth connection. Plug the appliance only into properly
earthed outlets.
•
Only for household use in compliance with this Instruction Manual. The appliance is not intended for commercial
use.
•
Do not use outdoors.
•
Always unplug the appliance before cleaning or when not in use.
•
The appliance is not intended for use by persons (including children) with reduced physical, sensual or
intellectual abilities or if they lack the experience or knowledge, unless they are supervised or have been
instructed on operating the appliance by the person responsible for their safety.
•
Children must be supervised to prevent playing with the appliance.
•
Do not leave the operating appliance unattended.
•
Do not use accessories other than the standard equipment.
•
To avoid danger damaged power supply cord must be replaced by the manufacturer or the authorized service
centre, or similar qualified personnel.
•
Do not immerse appliance or cord in water or other liquids. If this happened immediately unplug the appliance
and before operating it further, have qualified specialists check the operating capability and safety of the
appliance.
•
Make sure cord does not touch sharp edges or hot surfaces.
•
Do not pull by the cord, do not twist it or wrap it around the appliance.
•
Use the bread maker only for cooking food. Never dry clothes, paper or other things in it.
•
Do not switch the bread maker on with an empty baking chamber. Do not use the baking chamber for storing
things.
•
The bread maker is not intended for food canning.
•
Do not pour ingredients into the baking chamber directly, use the removable pan.
•
Use cooking recipes for guidance.
•
To avoid short circuit failure or bread maker malfunction prevent water entry into the steam vents.
•
Failure to keep the bread maker clean may lead to surface wear, which might have an adverse effect on the
operation of the appliance and create potential danger for the user.
•
When using an extension cord make sure the maximum power capacity of the cord corresponds to the power
consumption of the bread maker.
•
Attention! During operation the appliance gets hot! If necessary to touch the bread maker during its operation
use oven mitts or pot holders.
•
Avoid touching the kneading paddle during the unit is in operation, this may cause injury!
•
ATTENTION! During operation do not open the bread maker lid or remove the bread pan.
The lid may only be opened for adding necessary ingredients into the dough strictly when the beep is heard.
•
The manufacturer reserves the right to introduce minor changes into the product design without prior notice,
unless such changes influence significantly the product safety, performance, and functions.
ADVANTAGES OF YOUR BREAD MAKER
•
The bread maker has an automatic bread baking mode.
•
You can select out of 13 different baking programmes.
•
You can use pre-packaged bread mixes.
•
The bread maker allows making jam.
•
You can knead the dough for ravioli (pelmeni) or other courses.
INSTALLATION
•
Make sure there are no packaging materials or foreign objects inside the bread maker.
•
Check that the following have not been damaged during shipping:
•
Lid;
•
Main body and viewing window;
•
Chamber walls;
•
Removable bread pan.
•
If you discover any defects do not operate the bread maker; address the seller.
•
Place the unit on a dry, even and heat-resistant surface.
•
Do not place the appliance near combustible materials, explosives or self-igniting gases.
•
Do not place the appliance near a gas or an electric cooker or any other heat sources.
•
Do not put anything on the bread maker. Do not clog steam vents.

IM009
5
SC-401
•
The bread maker should not be placed in a cupboard. To ensure normal operation of the bread maker free
space for ventilation should be left. at least: 20 cm on top, 10 cm at the back panel, and at least 5 cm at both
sides.
•
Before first use wipe bread baking pan, kneading paddle, inner and outer parts of the breadmaker with a clean
wet cloth. Peel the protective film from the control panel.
OPERATION
•
Plug the bread maker to the outlet.
•
Place the ingredients in the bread maker (according to the recipe) and close the lid.
MENU BUTTON
•
Load the desired baking programme. The number of the programme and the respective baking time will appear
on the LCD display.
•
Attention: a sound should be heard when pressing buttons.
CRUST COLOUR
•
The crust colour function allows to programme baking bread with light, medium or dark crust.
•
Press the CRUST button once, twice or three times to have light, medium or dark crust respectively.
•
ATTENTION: If you select programmes 5-13 you cannot adjust the crust colour.
•
ATTENTION: When selecting programmes 1-3 the CRUST button allows to set the QUICK mode, when the
bread is baked in express mode.
•
The possibility of choosing the colour of the crust is not envisaged for the QUICK mode.
LOAF SIZE
•
This function allows to set the weight of the baked loaf. The weight of the loaf is 500 g / 750 g / 1000 g
•
Press the SIZE button once, twice or three times to set 500 g / 750 g / 1000 g respectively.
•
ATTENTION: If you select programme 5-13 you cannot adjust the loaf size.
START/STOP BUTTON
•
To start/stop the operation of the bread maker or reset the selected function press the START/STOP BUTTON.
•
To end an operation or delete the parameters press and hold the button for 2 seconds until a long audio signal
sounds.
•
ATTENTION: Do not press the START/STOP BUTTON if you want to check the state of the dough. To check the
dough use the window in the bread maker lid.
MEMORY FUNCTION
•
In case of a power supply failure during less than 7 minutes the bread maker will resume the selected
programme from the moment there was a power outage.
KEEPING WARM
•
After the baking is complete, the bread maker will automatically proceed to the keeping warm mode – 60
minutes.
•
After the baking is complete the beep will sound 5 times with a 5-minute interval.
TIMER
•
The timer function allows to delay baking time.
•
Maximum delay time is 13 hours.
•
Use buttons
+
and
-
to add or take 10 minutes of delay with each pressing. Then press the START/STOP button
to activate the timer. The countdown will start at the display.
•
For example: it is 20:30 now, you want the bread to be ready by 7:00, i.e. in 10 hours and 30 minutes. Press the
MENU button, select the mode, select the colour of the crust and the loaf size, then press the
+
button to add
time to 10 hours 30 minutes. The time will appear on the LCD display. Then press the START/STOP button to
activate the timer. The countdown will start at the display.
•
ATTENTION: do not use timer when using perishable ingredients such as eggs, milk, cream, and cheese.
BAKING PROGRAMMES
•
To select the necessary programme press the MENU button.
Baking programme 1. Basic
•
This mode is used for baking white and mixed breads. For baking bread rye or wheat flour is used. The loaf is
light and compact. See the list of ingredients for baking in the table at the end of the Instruction Manual.
Baking programme 2. French
•
This mode is used for baking bread with light texture and crispy crust from wheat flour. See the list of ingredients
for baking in the table at the end of the Instruction Manual.
Baking programme 3. Diet
•
This mode is used for baking bread from coarse flours. In this mode dough kneading takes a longer time, and
dough rises much longer. The loaf is heavy and compact. See recipes for baking in the table at the end of the
Instruction Manual.
Baking programme 4. Sweet
•
This mode is used for baking bread with various sweet additives, such as fruit juices, ground nuts, dried fruit,
chocolate or sugar. In this mode the time for bread rising is increased, and so the bread is of light texture. See
recipes for baking in the table at the end of the Instruction Manual.

IM009
6
SC-401
Baking programmes: 5. Quick 1000 g; 6. Rapid baking 500 g; 7. Rapid baking 750 g
•
In these modes the processes of kneading, rising and baking are significantly reduced and do not take much
time. As a result the bread is of the coarsest texture of all 12 offered modes. See recipes for baking in the table
at the end of the Instruction Manual.
Additional ingredients: Programmes 1-5
•
For modes 1-5 adding further ingredients, such as nuts or fruit is possible after an audio signal, which will sound
according to the bread baking programme.
•
In case timer is set fruit and nuts can be added at the beginning but these are to be cut into small pieces.
Baking programme 8. Gluten free
•
Baking gluten free bread is significantly different from baking regular breads. If you bake this bread because of
health reasons consult your doctor and follow the instructions closely. This programme was specially designed
for gluten free bread mixes. The result may be different depending on the mixture type. If this bread is chosen for
diet reasons, it is very important to prevent getting other flour containing gluten into the dough.
Baking programme 9. Dough
•
This mode is used for kneading dough. In this mode only kneading is done without further baking. See recipes in
the table at the end of the Instruction Manual.
Baking programme 10. Ravioli
•
This mode is used for kneading dough for pasta, ravioli or pizza. In this mode only kneading is done without
further baking. See recipes in the table at the end of the Instruction Manual.
Baking programme 11. Jam
•
This mode is used for making jam. See recipes in the table at the end of the Instruction Manual.
Baking programme 12. Baking
•
This mode is used for additional baking in case the bread has not baked completely or the crust is not crisp
roasted enough, as well as for baking ready dough. See baking time in the table at the end of the Instruction
Manual.
•
For an early stop press the STOP/START button and hold it down for 2 seconds until an audio signal sounds.
Baking programme 13. Cake
•
This mode is used for making cakes and pies. See the recipes in the table at the end of the Instruction Manual.
USEFUL TIPS
•
First you need to take out the removable bread pan, add necessary ingredients and only after that put the pan
into the bread maker.
•
Always follow the order of adding ingredients. First add liquids, butter, sugar, salt, then flour and the rest of
ingredients, add yeast at the end.
•
All ingredients must be at room temperature to support optimal leavening of yeast.
•
Measure the amount of ingredients precisely. Even slight deviation from the amount indicated in the recipe can
affect the result of baking.
•
During operation do not open the bread maker lid or remove the bread pan.
•
The lid may only be opened for adding necessary ingredients into the dough (toast, candied fruit, etc.) strictly
when the beep is heard. During the operation the beep will sound 8 times, when ingredients are to be added.
•
Opening the lid at other times leads to the violation of temperature conditions in the bread baker and can affect
the quality of bread baking.
OPERATING PROCEDURE
•
Remove the bread pan.
•
Install the kneading paddle, check whether it works.
•
Put the ingredients into the pan.
•
ATTENTION: make sure the yeast does not come in contact with salt or liquid.
•
Put the removable pan back into the bread maker.
•
Make sure you have placed the pan correctly.
•
Close the appliance lid.
•
Plug the unit to the outlet. An audio signal will sound and the number of the programme and the baking time will
appear on the display.
•
Press the MENU button and select the programme number.
•
Select the crust colour and the loaf size.
•
Now you can adjust the baking time with the timer.
•
Press the START/STOP button to start the programme.
•
When the baking is complete an audio signal will sound, and 0:00 will appear on the display.
•
Let the bread stand for some time.
•
Before opening the lid unplug the appliance.
•
Remove the pan with a pot holder or an oven mitten.
•
Hold the pan upside down and shake gently. If the bread does not go out easily you can use wooden or plastic
paddles to take the bread out of the pan. Never use metal objects, they can scratch the surface of the pan!
•
Let the bread cool down for 30 minutes, then you can cut it.

IM009
7
SC-401
•
ATTENTION: make sure the kneading paddle is not in the loaf. If this happened, remove it carefully from the
bread. Never use metal objects, they can scratch the surface of the pan!
TROUBLESHOOTING GUIDE
Before calling the service centre, please, familiarize with the below table.
The bread does
not rise
The top of the
bread is rugged
The quality of gluten in your flour is inadequate if you use flour other than bread flour.
(The quality of gluten can differ depending on the temperature, humidity, flour
storage conditions and the time of harvesting)
•
Try another type of flour, another manufacturer or another flour batch.
The dough has become too hard, because you added too little liquid.
•
Bread flour with high protein content absorbs more water than other types, so try
to add another 10-20 ml water.
You use inadequate yeast.
•
Use dry yeast from packages with an inscription “quick-acting yeast”. This type
does not need pre-fermentation
You have put too little yeast or your yeast is stale.
•
Use the measuring spoon from the set. Check the expiry date of the yeast. (Store
it in the refrigerator).
Liquid was in contact with the yeast before kneading.
•
Check that you have put the ingredients according to the order as given in the
instruction manual.
You have put too much salt or not enough sugar.
•
Check the recipe and measure the correct amount with the standard measuring
spoon, which comes with the appliance.
•
Check that salt or sugar are not present in other ingredients.
The bread has a
too light texture
You have used too much yeast.
•
Check the recipe and measure the correct amount with the standard measuring
spoon, which comes with the appliance.
You have added too much liquid.
•
Some types of flour absorb more water than others; try to reduce the amount of
water by 10-20 ml.
The bread fell
after rising
The quality of your flour is unsatisfactory.
•
Try flour of another manufacturer.
You have used too much liquid.
•
Try to reduce the amount of water by 10-20 ml.
The bread rose
too high
You have used too much yeast/water.
•
Check the recipe and measure the correct amount with the standard measuring
spoon (yeast) / cup (water), which come with the appliance.
•
Check that no excessive water comes from other ingredients.
You have not enough flour.
•
Weigh flour accurately with the weigh-scale.
The bread is
pale and sticky
You use too little yeast or your yeast is stale.
•
Use the measuring spoon from the set. Check the expiry date of the yeast. (Store
it in the refrigerator).
There was a power outage or the bread maker was stopped during the baking cycle.
•
The bread making machine stops if it was stopped for more than 10 minutes. You
have to remove the bread from the pan and start the cycle again with the new
ingredients.
There is flour left
on the bread.
You have used too much flour, or you have too little liquid.
•
Check the recipe and measure the correct amount of flour with the weigh-scale
or liquid with the measuring cup for liquids, which comes with the set.
The bread is not
well kneaded
You have not inserted a kneading paddle into the bread pan.
•
Before you load the ingredients make sure the kneading paddle is in the pan.
•
There was a power outage or the bread maker was stopped during the baking
cycle.
•
The bread making machine switches off if it was stopped for more than 10
minutes.
•
Presumably you would have to start bread baking again but this could lead to
adverse results if the kneading has already started.
After the start of
the programme
HHH appeared
on the display
This means that the temperature inside the oven is too low. It is necessary to move
the appliance to a warmer room.

IM009
8
SC-401
After the start of
the programme
EEE appeared
on the display
This means that the temperature inside the oven is too high. You need to stop the
programme, unplug the appliance, open the lid and let the unit cool down before
resuming the programme.
After the start of
the bread maker
operation
Е
00/
Е
01 appeared
on the display
-
There was a power outage, failure of the temperature sensor. You need to call the
Service Centre.
CLEANING AND MAINTENANCE
•
The bread maker should be cleaned regularly and any remains of food should be removed from it.
•
Before cleaning unplug the bread maker.
•
Let the bread maker cool down fully.
•
Wipe the control panel, outer and inner surfaces, the removable bread pan with a wet cloth with a detergent.
•
Do not use aggressive substances or abrasive materials.
STORAGE
•
Make sure the bread maker is unplugged and has fully cooled down.
•
Observe all requirements from the “CLEANING AND MAINTENANCE” Section.
•
Store the bread maker with a slightly opened lid in a dry clean place.
RUS
РУКОВОДСТВО
ПО
ЭКСПЛУАТАЦИИ
МЕРЫ
БЕЗОПАСНОСТИ
Важные
инструкции
по
безопасности
.
Прочитайте
внимательно
и
сохраните
для
будущих
справок
.
•
Неправильное
обращение
с
прибором
может
привести
к
его
поломке
и
причинить
вред
пользователю
.
•
Перед
первоначальным
включением
проверьте
,
соответствуют
ли
технические
характеристики
изделия
,
указанные
на
наклейке
,
параметрам
электросети
.
ВНИМАНИЕ
!
Вилка
шнура
питания
имеет
провод
и
контакт
заземления
.
Подключайте
прибор
только
к
соответствующим
заземлённым
розеткам
•
Использовать
только
в
бытовых
целях
в
соответствии
с
данным
Руководством
по
эксплуатации
.
Прибор
не
предназначен
для
промышленного
применения
.
•
Не
использовать
вне
помещений
.
•
Всегда
отключайте
устройство
от
электросети
перед
очисткой
,
или
если
Вы
его
не
используете
.
•
Прибор
не
предназначен
для
использования
лицами
(
включая
детей
)
с
пониженными
физическими
,
чувственными
или
умственными
способностями
или
при
отсутствии
у
них
опыта
или
знаний
,
если
они
не
находятся
под
контролем
или
не
проинструктированы
об
использовании
прибора
лицом
,
ответственным
за
их
безопасность
.
•
Дети
должны
находиться
под
контролем
для
недопущения
игры
с
прибором
.
•
Не
оставляйте
включенный
прибор
без
присмотра
.
•
Не
используйте
принадлежности
,
не
входящие
в
комплект
поставки
.
•
При
повреждении
шнура
питания
его
замену
,
во
избежание
опасности
,
должен
производить
изготовитель
или
уполномоченный
им
сервисный
центр
,
или
аналогичный
квалифицированный
персонал
.
•
Не
погружайте
прибор
и
шнур
питания
в
воду
или
другие
жидкости
.
Если
это
случилось
,
немедленно
отключите
устройство
от
электросети
и
,
прежде
чем
пользоваться
им
дальше
,
проверьте
работоспособность
и
безопасность
прибора
у
квалифицированных
специалистов
.
•
Следите
,
чтобы
шнур
питания
не
касался
острых
кромок
и
горячих
поверхностей
.
•
Не
тяните
за
шнур
питания
,
не
перекручивайте
и
не
обматывайте
его
вокруг
устройства
.
•
Используйте
хлебопечь
только
для
приготовления
продуктов
.
Ни
в
коем
случае
не
сушите
в
ней
одежду
,
бумагу
или
другие
предметы
.
•
Не
включайте
хлебопечь
с
пустой
камерой
.
Не
используйте
камеру
для
хранения
чего
-
либо
.
•
Печь
не
предназначена
для
консервирования
продуктов
.
•
Не
выкладывайте
продукты
непосредственно
на
дно
камеры
,
используйте
съемную
чашу
.
•
Руководствуйтесь
рецептами
приготовления
.
•
Во
избежание
короткого
замыкания
и
поломки
печи
,
не
допускайте
попадания
воды
в
вентиляционные
отверстия
.
•
Ненадлежащее
поддержание
хлебопечи
в
чистом
состоянии
может
привести
к
износу
поверхности
,
что
может
неблагоприятно
повлиять
на
работу
прибора
и
создать
возможную
опасность
для
пользователя
.
•
При
использовании
удлинителя
,
убедитесь
,
что
максимально
допустимая
мощность
кабеля
соответствует
мощности
хлебопечи
.
•
Внимание
!
Во
время
работы
прибор
нагревается
!
В
случае
необходимости
контакта
с
печью
во
время
ее
работы
,
используйте
кухонные
рукавицы
или
прихватки
.

IM009
9
SC-401
•
Избегайте
контакта
с
лопаточкой
для
замешивания
во
время
эксплуатации
прибора
,
это
травмоопасно
!
•
ВНИМАНИЕ
!
Во
время
работы
не
открывайте
крышку
хлебопекарни
и
не
вытаскивайте
форму
для
выпечки
хлеба
.
Крышку
можно
открывать
только
для
добавки
в
тесто
необходимых
ингредиентов
строго
по
сигналу
бипера
.
•
Производитель
оставляет
за
собой
право
без
дополнительного
уведомления
вносить
незначительные
изменения
в
конструкцию
изделия
,
кардинально
не
влияющие
на
его
безопасность
,
работоспособность
и
функциональность
.
ПРЕИМУЩЕСТВА
ВАШЕЙ
ХЛЕБОПЕЧИ
•
Хлебопечь
оснащена
автоматическим
режимом
приготовления
хлеба
.
•
Вы
можете
выбрать
13
различных
программ
приготовления
выпечки
.
•
Вы
можете
использовать
готовые
смеси
для
выпекания
.
•
Хлебопечь
позволяет
варить
варенье
.
•
Вы
можете
замесить
тесто
для
приготовления
пельменей
и
других
блюд
.
УСТАНОВКА
•
Убедитесь
,
что
внутри
хлебопечи
нет
упаковочных
материалов
и
посторонних
предметов
.
•
Проверьте
,
не
повреждены
ли
при
транспортировке
:
•
крышка
;
•
корпус
и
смотровое
окно
;
•
стенки
камеры
;
•
съемная
чаша
.
•
При
обнаружении
любых
дефектов
не
включайте
печь
;
обратитесь
к
продавцу
.
•
Установите
прибор
на
сухую
,
ровную
и
жароустойчивую
поверхность
.
•
Не
устанавливайте
прибор
вблизи
горючих
материалов
,
взрывчатых
веществ
и
самовоспламеняющихся
газов
.
•
Не
ставьте
прибор
рядом
с
газовой
или
электрической
плитами
,
а
также
другими
источниками
тепла
.
•
Ничего
не
кладите
на
печь
.
Не
перекрывайте
вентиляционные
отверстия
.
•
Хлебопечь
не
следует
располагать
в
шкафу
.
Для
нормальной
работы
печи
необходимо
обеспечить
свободное
пространство
для
вентиляции
:
не
менее
: 20
см
сверху
, 10
см
со
стороны
задней
панели
и
не
менее
5
см
с
боковых
сторон
.
•
Перед
первым
использованием
протрите
съемную
чашу
,
лопаточку
для
замешивания
,
внутреннюю
и
внешнюю
части
хлебопечи
чистой
влажной
тканью
.
Снимите
защитную
пленку
с
панели
управления
.
РАБОТА
•
Подключите
хлебопечь
к
электросети
.
•
Поместите
чашу
с
продуктами
в
печь
(
согласно
рецепту
)
и
закройте
крышку
.
КНОПКА
МЕНЮ
•
Загрузите
желаемую
программу
выпечки
.
Номер
программы
и
соответствующее
программе
время
выпечки
появится
на
ЖК
дисплее
.
•
Внимание
:
при
нажатии
на
кнопки
должен
раздаваться
звуковой
сигнал
.
“
КНОПКА
КОРОЧКА
“
•
Функция
“
КОРОЧКА
“
позволяет
запрограммировать
выпекание
светлой
,
средней
или
темной
корочки
.
•
Нажмите
кнопку
“
КОРОЧКА
“
один
,
два
или
три
раза
,
для
светлой
,
средней
или
темной
корочки
соответственно
.
•
ВНИМАНИЕ
:
При
выборе
программы
5-13
регулировать
цвет
корочки
нельзя
.
•
ВНИМАНИЕ
:
При
выборе
программы
1-3
кнопка
КОРОЧКА
позволяет
установить
режим
«
БЫСТРО
»,
при
котором
хлеб
выпекается
в
ускоренном
режиме
.
•
Возможность
выбора
цвета
корочки
в
режиме
«
БЫСТРО
»
не
предусмотрена
.
КНОПКА
РАЗМЕР
•
Данная
функция
позволяет
задать
вес
выпекаемой
буханки
.
Вес
буханки
составляет
500
г
/ 750
г
/1000
г
•
Нажмите
кнопку
РАЗМЕР
один
,
два
или
три
раза
для
500
г
/ 750
г
/1000
г
соответственно
.
•
ВНИМАНИЕ
:
При
выборе
программы
5-13
регулировать
размер
буханки
нельзя
.
КНОПКА
СТАРТ
/
СТОП
•
Для
запуска
/
остановки
работы
хлебопечки
или
сброса
выбранной
функции
нажмите
кнопку
СТАРТ
/
СТОП
.
•
Чтобы
завершить
операцию
или
удалить
параметры
,
держите
кнопку
нажатой
в
течение
2
секунд
,
пока
не
раздастся
длинный
звуковой
сигнал
.
•
ВНИМАНИЕ
:
Не
нажимайте
кнопку
СТАРТ
/
СТОП
,
если
вы
хотите
проверить
состояние
выпечки
.
Для
проверки
выпечки
используйте
окно
на
крышке
хлебопечки
.
ФУНКЦИЯ
ПАМЯТИ
•
В
случае
возникновения
сбоя
питания
не
более
7
минут
,
хлебопечка
продолжит
выполнение
выбранной
программы
с
момента
сбоя
в
электросети
.
ПОДДЕРЖАНИЕ
ТЕМПЕРАТУРЫ
•
После
завершения
приготовления
,
хлебопечь
автоматически
переходит
в
режим
поддержания
температуры
– 60
минут
.

IM009
10
SC-401
•
По
окончанию
работы
сигнал
бипера
будет
звучать
5
раз
с
интервалом
5
минут
.
ТАЙМЕР
•
Функция
таймера
позволяет
откладывать
время
приготовления
выпечки
.
•
Максимальное
время
отсрочки
13
часов
.
•
Используйте
кнопки
+
и
-
чтобы
добавить
или
отнять
10
минут
задержки
при
каждом
нажатии
.
Затем
нажмите
кнопку
СТАРТ
/
СТОП
,
чтобы
активизировать
таймер
.
На
дисплее
начнется
обратный
отсчет
времени
.
•
Например
:
текущее
время
20:30,
вы
хотите
,
чтобы
хлеб
был
готов
к
7:00,
т
.
е
.
через
10
часов
30
минут
.
Нажмите
кнопку
МЕНЮ
,
выберите
режим
,
выберите
цвет
корочки
и
размер
буханки
,
затем
нажмите
кнопку
+
,
чтобы
добавить
время
до
10
часов
30
минут
.
Время
отобразится
на
ЖК
дисплее
.
Затем
нажмите
кнопку
СТАРТ
/
СТОП
,
чтобы
активизировать
таймер
.
На
дисплее
начнется
обратный
отсчет
времени
.
•
ВНИМАНИЕ
:
Не
рекомендуем
использовать
функцию
таймер
при
использовании
быстро
портящихся
ингредиентов
,
таких
как
яйца
,
молоко
,
сливки
и
сыр
.
ПРОГРАММЫ
ВЫПЕЧКИ
•
Для
выбора
нужной
программы
нажмите
кнопку
“
МЕНЮ
”.
Программа
выпечки
1.
Основной
•
Данный
режим
используется
для
приготовления
белого
или
смешанных
сортов
хлеба
.
Для
приготовления
хлеба
используется
ржаная
или
пшеничная
мука
.
Буханка
получается
легкой
и
компактной
.
Состав
ингредиентов
для
приготовления
см
.
в
таблице
в
конце
инструкции
.
Программа
выпечки
2.
Французский
•
Данный
режим
используется
для
приготовления
легкого
,
воздушного
хлеба
с
хрустящей
корочкой
из
пшеничной
муки
.
Состав
ингредиентов
для
приготовления
см
.
в
таблице
в
конце
инструкции
.
Программа
выпечки
3.
Диетический
•
Данный
режим
используется
для
приготовления
хлеба
из
муки
грубого
помола
.
В
данном
режиме
происходит
более
длительный
замес
теста
и
на
процесс
поднятия
хлеба
отводится
значительно
больше
времени
.
Буханка
получается
тяжелой
и
компактной
.
Рецепты
для
приготовления
см
.
в
таблице
в
конце
инструкции
.
Программа
выпечки
4.
Сладкий
•
Данный
режим
используется
для
приготовления
хлеба
с
использованием
различных
сладких
добавок
,
таких
как
фруктовые
соки
,
тертые
орехи
,
сухофрукты
,
шоколад
или
сахар
.
В
данном
режиме
увеличено
время
поднятия
хлеба
,
в
результате
чего
хлеб
получается
легким
и
воздушным
.
Рецепты
для
приготовления
см
.
в
таблице
в
конце
инструкции
.
Программы
выпечки
: 5.
Ускоренный
1000
грамм
; 6.
Быстрое
приготовление
500
грамм
; 7.
Быстрое
приготовление
750
грамм
•
В
данных
режимах
процессы
замеса
,
поднятия
и
выпекания
текста
значительно
сокращены
и
не
занимают
много
времени
.
В
результате
хлеб
получается
самым
грубым
из
12
предложенных
режимов
.
Рецепты
для
приготовления
см
.
в
таблице
в
конце
инструкции
.
Дополнительные
ингридиенты
:
программы
1-5
•
Для
режима
1-5
добавление
дополнительных
ингредиентов
,
таких
как
орехи
или
фрукты
,
возможно
после
звукового
сигнала
,
который
раздастся
согласно
программе
приготовления
хлеба
.
•
В
случае
установки
таймера
,
можно
добавлять
фрукты
и
орехи
в
самом
начале
,
но
для
этого
предварительно
их
нужно
мелко
нарезать
.
Программа
выпечки
8.
Без
глютена
•
Выпекание
хлеба
без
глютена
значительно
отличается
от
выпекания
обычных
сортов
.
Если
Вы
делаете
такой
хлеб
по
причинам
,
связанным
со
здоровьем
,
проконсультируйтесь
с
врачом
и
четко
следуйте
инструкциям
.
Данная
программа
была
специально
разработана
для
хлебо
-
пекарных
смесей
без
глютена
.
Результат
выпечки
может
быть
различным
,
в
зависимости
от
типа
смеси
.
Если
хлеб
выбран
из
диетических
целей
,
то
очень
важно
не
допускать
попадания
в
тесто
другой
муки
,
в
которой
содержится
глютен
.
Программа
выпечки
9.
Тесто
•
Данный
режим
используется
для
приготовления
теста
.
В
данном
режиме
происходит
только
замес
без
последующего
выпекания
.
Рецепты
для
приготовления
см
.
в
таблице
в
конце
инструкции
.
Программа
выпечки
10.
Пельмени
•
Данный
режим
используется
для
приготовления
теста
для
лапши
,
пельменей
или
пиццы
.
В
данном
режиме
происходит
только
замес
теста
без
последующего
выпекания
.
Рецепты
для
приготовления
см
.
в
таблице
в
конце
инструкции
.
Программа
выпечки
11.
Варенье
•
Данный
режим
используется
для
приготовления
варенья
.
Рецепты
для
приготовления
см
.
в
таблице
в
конце
инструкции
.
Программа
выпечки
12.
Выпечка
•
Данный
режим
используется
для
дополнительного
выпекания
,
в
том
случае
если
хлеб
не
пропекся
или
корочка
оказалась
недостаточно
поджаристой
,
а
также
для
выпекания
из
готового
теста
.
Время
приготовления
см
.
в
таблице
в
конце
инструкции
.

IM009
11
SC-401
•
Для
досрочной
остановки
нажмите
кнопку
СТОП
/
СТАРТ
и
держите
ее
нажатой
в
течение
2
секунд
,
пока
не
раздастся
звуковой
сигнал
.
Программа
выпечки
13.
Кекс
•
Данный
режим
используется
для
приготовления
кексов
и
пирогов
.
Рецепты
для
приготовления
см
.
в
таблице
в
конце
инструкции
.
ПОЛЕЗНЫЕ
СОВЕТЫ
•
Необходимо
вначале
извлечь
съемную
чашу
,
добавить
в
нее
необходимые
ингредиенты
,
и
только
затем
поместить
чашу
в
хлебопечь
.
•
Всегда
соблюдайте
порядок
добавления
ингредиентов
.
Сначала
добавляйте
жидкости
,
масло
,
сахар
,
соль
,
затем
муку
и
прочие
добавки
,
в
самом
конце
добавьте
дрожжи
.
•
Все
ингредиенты
должны
иметь
комнатную
температуру
для
поддержания
оптимального
роста
дрожжей
.
•
Точно
измеряйте
количество
ингредиентов
.
•
Во
время
работы
не
открывайте
крышку
хлебопекарни
и
не
вытаскивайте
форму
для
выпечки
хлеба
.
•
Крышку
можно
открывать
только
для
добавки
в
тесто
необходимых
ингредиентов
(
гренки
,
цукаты
и
т
.
д
.)
строго
по
сигналу
бипера
:
во
время
работы
бипер
прозвучит
8
раз
,
когда
нужно
добавить
ингридиенты
.
•
Открывание
крышки
в
другое
время
приводит
к
нарушению
температурного
режима
в
хлебопечке
и
может
повлиять
на
качество
выпекания
хлеба
.
•
Рекомендуем
использовать
муку
высшего
сорта
.
•
Во
время
приготовления
хлеба
нельзя
устраивать
сквозняк
или
хлопать
дверьми
,
хлеб
может
осесть
даже
во
время
выпекания
.
ПОРЯДОК
РАБОТЫ
•
Извлеките
съемную
чашу
.
•
Установите
лопаточку
для
замешивания
,
проверьте
,
что
она
работает
.
•
Положите
ингредиенты
в
чашу
.
•
ВНИМАНИЕ
:
убедитесь
,
что
дрожжи
не
соприкасаются
с
солью
и
жидкостью
.
•
Поместите
съемную
чашу
обратно
в
хлебопечь
.
•
Убедитесь
в
том
,
что
расположили
чашу
правильно
.
•
Закройте
крышку
прибора
.
•
Подключите
прибор
к
сети
.
Раздастся
звуковой
сигнал
и
дисплей
отобразит
номер
и
продолжительность
приготовления
программы
.
•
Нажмите
кнопку
МЕНЮ
и
выберите
номер
программы
.
•
Выберите
цвет
корочки
и
размер
буханки
.
•
Теперь
вы
можете
откорректировать
срок
приготовления
с
помощью
таймера
.
•
Нажмите
кнопку
СТАРТ
/
СТОП
для
запуска
программы
.
•
По
окончанию
работы
раздастся
звуковой
сигнал
и
на
дисплее
отобразится
время
0:00.
•
Дайте
хлебу
немного
настояться
.
•
Перед
тем
как
открыть
крышку
,
отключите
прибор
от
электросети
.
•
Достаньте
чашу
с
помощью
прихватки
или
руковицы
.
•
Переверните
чашу
и
слегка
потрясите
.
Если
хлеб
не
выскальзывает
,
вы
может
использовать
деревянные
или
пластмассовые
лопаточки
для
вынимания
хлеба
из
чаши
.
Ни
в
коем
случае
не
используйте
металлические
предметы
,
они
могут
поцарапать
поверхность
чаши
!
•
Дайте
хлебу
остыть
30
минут
,
затем
можно
его
нарезать
.
•
ВНИМАНИЕ
:
убедитесь
,
что
лопаточка
для
замешивания
не
осталась
в
хлебе
!
Если
это
произошло
,
аккуратно
извлеките
ее
из
хлеба
.
Ни
в
коем
случае
не
используйте
металлические
предметы
,
они
могут
поцарапать
поверхность
лопатки
.
ПРОБЛЕМЫ
И
СПОСОБЫ
ИХ
УСТРАНЕНИЯ
До
обращения
в
сервисный
центр
,
пожалуйста
,
ознакомьтесь
с
представленной
ниже
таблицей
.
Хлеб
не
поднимается
Неровный
верх
хлеба
Качество
клейковины
в
вашей
муке
неподходящее
,
или
вы
не
используете
хлебопекарную
муку
. (
Качество
клейковины
может
меняться
в
зависимости
от
температуры
,
влажности
,
условий
хранения
муки
,
и
времени
сбора
урожая
)
•
Попробуйте
другой
тип
муки
,
другого
производителя
или
другую
партию
муки
.
Тесто
стало
слишком
твердым
,
так
как
вы
добавили
мало
жидкости
.
•
Хлебопекарная
мука
с
большим
содержанием
белка
впитывает
больше
воды
,
чем
другие
,
поэтому
попробуйте
добавить
дополнительно
10-20
мл
воды
.
Вы
используете
неподходящие
дрожжи
.
•
Используйте
сухие
дрожжи
из
пакетиков
,
где
имеется
надпись
“
быстродействующие
дрожжи
”.
Этот
тип
не
требует
предварительного
брожения
.
Вы
положили
мало
дрожжей
,
или
ваши
дрожжи
-
старые
.
•
Используйте
прилагаемую
мерную
ложку
.
Проверьте
срок
годности

IM009
12
SC-401
дрожжей
. (
Храните
их
в
холодильнике
)
На
дрожжи
попала
жидкость
перед
замешиванием
.
•
Проверьте
,
что
вы
положили
ингредиенты
в
правильном
порядке
согласно
инструкции
.
Вы
добавили
слишком
много
соли
,
или
недостаточно
сахара
.
•
Проверьте
рецепт
и
отмеряйте
правильное
количество
с
помощью
прилагаемой
мерной
ложки
.
•
Проверьте
,
чтобы
соль
и
сахар
не
входили
в
другие
ингредиенты
.
Слишком
рыхлый
хлеб
Вы
использовали
чрезмерное
количество
дрожжей
.
•
Проверьте
рецепт
и
отмеряйте
правильное
количество
с
помощью
прилагаемой
мерной
ложки
.
Вы
добавили
слишком
много
жидкости
.
•
Некоторые
виды
муки
впитывают
больше
воды
,
чем
другие
,
попробуйте
уменьшить
количество
воды
на
10-20
мл
.
Хлеб
провалился
после
подъема
Качество
вашей
муки
не
удовлетворительное
.
•
Попробуйте
муку
другого
производителя
.
Вы
использовали
слишком
много
жидкости
.
•
Попробуйте
уменьшить
количество
воды
на
10-20
мл
.
Хлеб
слишком
сильно
поднялся
Вы
используете
чрезмерное
количество
дрожжей
/
воды
.
•
Проверьте
рецепт
и
отмеряйте
правильное
количество
с
помощью
прилагаемой
мерной
ложки
(
дрожжи
)/
чашки
(
вода
).
•
Проверьте
,
чтобы
излишнее
количество
воды
не
поступило
из
других
ингредиентов
.
У
вас
недостаточно
муки
.
•
Аккуратно
взвесьте
муку
с
помощью
весов
.
Хлеб
получился
бледным
и
липким
Вы
используете
недостаточное
количество
дрожжей
,
или
ваши
дрожжи
-
старые
.
•
Используйте
прилагаемую
мерную
ложку
.
Проверьте
срок
годности
дрожжей
. (
Храните
их
в
холодильнике
)
Произошел
сбой
в
подаче
электроэнергии
или
машина
была
остановлена
во
время
выпечки
хлеба
.
•
Машина
выключается
,
если
она
остановлена
более
чем
на
десять
минут
.
Вам
нужно
вынуть
хлеб
из
формы
и
снова
запустить
цикл
с
новыми
ингредиентами
.
На
хлебе
осталась
мука
Вы
использовали
слишком
много
муки
,
или
у
вас
мало
жидкости
.
•
Проверьте
рецепт
и
отмерьте
правильное
количество
муки
с
помощью
весов
или
жидкости
мерной
чашкой
для
жидкостей
,
входящей
в
комплект
.
Хлеб
плохо
смешался
Вы
не
вставили
лопатку
для
замешивания
в
форму
для
выпечки
хлеба
.
•
До
того
,
как
вы
загрузите
ингредиенты
,
убедитесь
в
том
,
что
лопатка
находится
в
форме
.
•
Произошел
сбой
в
подаче
электроэнергии
,
или
машина
была
остановлена
во
время
выпечки
хлеба
.
•
Машина
выключается
,
если
она
остановлена
более
чем
на
десять
минут
.
•
Видимо
,
вам
понадобится
запустить
выпечку
хлеба
снова
,
однако
,
это
может
привести
к
отрицательному
результату
,
если
замешивание
уже
началось
.
На
экране
появилась
надпись
HHH
после
запуска
программы
Это
означает
,
что
температура
внутри
печи
слишком
высока
.
Необходимо
переместить
прибор
в
более
теплое
помещение
.
На
экране
появилась
надпись
EEE
после
запуска
программы
Это
означает
,
что
температура
внутри
печи
слишком
мала
.
Необходимо
остановить
программу
,
отключить
прибор
от
сети
,
открыть
крышку
и
дать
прибору
остынуть
,
прежде
чем
продолжить
работу
программы
.
На
экране
появилась
надпись
Е
00/
Е
01
после
начала
работы
печки
Произошел
сбой
в
подаче
электроэнергии
,
ошибки
в
работе
датчика
температуры
.
Необходимо
обратиться
в
Сервис
Центр
.

IM009
13
SC-401
ОЧИСТКА
И
УХОД
•
Печь
следует
регулярно
чистить
и
удалять
с
ее
поверхности
любые
остатки
пищи
.
•
Перед
очисткой
выключите
печь
и
отключите
ее
от
электросети
.
•
Дайте
печи
полностью
остыть
.
•
Протрите
панель
управления
,
внешние
и
внутренние
поверхности
,
съемную
чашу
влажной
тканью
с
моющим
средством
.
•
Не
применяйте
агрессивные
вещества
или
абразивные
материалы
.
ХРАНЕНИЕ
•
Убедитесь
,
что
печь
отключена
от
электросети
и
полностью
остыла
.
•
Выполните
все
требования
раздела
“
ОЧИСТКА
И
УХОД
”.
•
Храните
печь
с
приоткрытой
крышкой
в
сухом
чистом
месте
.
UA
ПОСІБНИК
З
ЕКСПЛУАТАЦІЇ
ЗАХОДИ
БЕЗПЕКИ
Важливі
інструкції
з
безпеки
.
Прочитайте
уважно
й
збережіть
для
майбутніх
довідок
.
•
Неправильне
поводження
з
приладом
може
призвести
до
його
пошкодження
і
завдати
шкоди
користувачеві
.
•
Перед
першим
увімкненням
приладу
перевірте
,
чи
відповідають
технічні
характеристики
виробу
,
що
вказані
на
наклейці
,
параметрам
електромережі
.
УВАГА
!
Вилка
кабелю
живлення
має
провід
і
контакт
заземлення
.
Підключайте
прилад
тільки
до
відповідних
заземлених
розеток
.
•
Використовувати
тільки
в
побутових
цілях
відповідно
до
цього
Посібника
з
експлуатації
.
Прилад
не
призначений
для
промислового
застосування
.
•
Використовувати
за
лише
в
приміщеннях
.
•
Завжди
відключайте
пристрій
від
електромережі
перед
очищенням
,
або
,
якщо
Ви
його
не
використовуєте
.
•
Прилад
не
призначений
для
використання
особами
(
включаючи
дітей
)
зі
зниженими
фізичними
,
чуттєвими
або
розумовими
здібностями
або
за
відсутності
у
них
досвіду
або
знань
,
якщо
вони
не
знаходяться
під
контролем
особи
,
відповідальної
за
їхню
безпеку
,
або
не
проінструктовані
нею
щодо
використання
приладу
.
•
З
метою
недопущення
гри
з
приладом
,
діти
повинні
знаходитися
під
контролем
.
•
Не
залишайте
увімкнений
прилад
без
нагляду
.
•
Не
використовуйте
деталі
,
що
не
входять
до
комплекту
постачання
.
•
У
разі
ушкодження
кабелю
живлення
,
з
метою
уникнення
небезпеки
,
його
заміну
повинні
проводити
виробник
або
уповноважений
ним
сервісний
центр
,
або
аналогічний
кваліфікований
персонал
.
•
Не
занурюйте
прилад
і
кабель
живлення
у
воду
або
іншу
рідину
.
Якщо
це
сталося
,
негайно
відключіть
пристрій
від
електромережі
,
та
перш
ніж
користуватися
їм
надалі
,
перевірте
працездатність
і
безпеку
приладу
у
кваліфікованих
фахівців
.
•
Стежте
,
щоб
кабель
живлення
не
торкався
гострих
країв
та
гарячих
поверхонь
.
•
Не
тягніть
за
кабель
живлення
,
не
перекручуйте
й
не
обмотуйте
його
навколо
пристрою
.
•
Використовуйте
хлібопічку
тільки
для
приготування
продуктів
.
Ні
в
якому
разі
не
сушіть
в
ній
одяг
,
папір
або
інші
предмети
.
•
Не
вмикайте
хлібопічку
з
порожньою
камерою
.
Не
використовуйте
камеру
для
зберігання
будь
-
чого
.
•
Піч
не
призначена
для
консервації
продуктів
.
•
Не
викладайте
продукти
безпосередньо
на
дно
камери
,
використовуйте
знімну
чашу
.
•
Керуйтеся
рецептами
приготування
.
•
Щоб
уникнути
короткого
замикання
та
поламки
печі
,
не
дозволяйте
попадати
воді
у
вентиляційні
отвори
.
•
Неналежна
підтримка
хлібопічки
в
чистому
стані
може
призвести
до
зносу
поверхні
,
що
може
несприятливо
вплинути
на
роботу
приладу
та
створити
небезпеку
для
користувача
.
•
В
разі
використанні
подовжувача
,
переконайтеся
,
що
максимально
допустима
потужність
кабелю
відповідає
потужності
хлібопічки
.
•
Увага
!
Під
час
роботи
прилад
нагрівається
!
У
разі
потреби
в
контактуванні
з
піччю
під
час
її
роботи
,
використовуйте
кухонні
рукавиці
або
прихватки
.
•
Уникайте
контакту
з
лопаткою
для
замішування
під
час
експлуатації
приладу
,
це
небезпечно
!
•
УВАГА
!
Під
час
роботи
не
відкривайте
кришку
хлібопічки
та
не
витягуйте
форму
для
випікання
хліба
.
•
Кришку
можна
відкривати
тільки
для
додавання
в
тісто
необхідних
інгредієнтів
суворо
за
сигналом
біперу
.
•
Обладнання
відповідає
вимогам
Технічного
регламенту
обмеження
використання
деяких
небезпечних
речовин
в
електричному
та
електронному
обладнанні
.
•
Виробник
залишає
за
собою
право
без
додаткового
повідомлення
вносити
незначні
зміни
до
конструкції
виробу
,
що
кардинально
не
впливають
на
його
безпеку
,
працездатність
та
функціональність
.
ПЕРЕВАГИ
ВАШОЇ
ХЛІБОПІЧКИ
•
Хлібопічка
оснащена
автоматичним
режимом
приготування
хліба
.
•
Ви
можете
обрати
13
різних
програм
приготування
випічки
.

IM009
14
SC-401
•
Ви
можете
використати
готові
суміші
для
випікання
.
•
Хлібопічка
дозволяє
варити
варення
.
•
Ви
можете
замісити
тісто
для
приготування
пельменів
та
інших
страв
.
ВСТАНОВЛЕННЯ
•
Переконайтеся
,
що
всередині
хлібопічка
немає
матеріалів
пакування
та
сторонніх
предметів
.
•
Перевірте
,
чи
не
були
пошкоджені
внаслідок
транспортування
:
•
кришка
;
•
корпус
і
оглядове
вікно
;
•
стінки
камери
;
•
знімна
чаша
.
•
У
разі
виявлення
будь
-
яких
дефектів
не
вмикайте
піч
;
зверніться
до
продавця
.
•
Встановіть
прилад
на
суху
,
рівну
та
жаростійку
поверхню
.
•
Не
встановлюйте
прилад
поблизу
горючих
матеріалів
,
вибухових
речовин
і
самозаймистих
газів
.
•
Не
ставте
прилад
поряд
з
газовою
або
електричною
плитами
,
а
також
іншими
джерелами
тепла
.
•
Нічого
не
кладіть
на
піч
.
Не
перекривайте
вентиляційні
отвори
.
•
Хлібопічку
не
слід
розташовувати
в
шафі
.
Для
нормальної
роботи
печі
необхідно
забезпечити
вільний
простір
для
вентиляції
:
не
менше
: 20
см
зверху
, 10
см
з
боку
задньої
панелі
та
не
менше
5
см
з
обох
боків
.
•
Перед
першим
використанням
протріть
знімну
чашу
,
лопатку
для
замішування
,
внутрішню
і
зовнішню
частині
хлібопічки
чистою
вологою
тканиною
.
Зніміть
захисну
плівку
з
панелі
управління
.
РОБОТА
•
Підключіть
хлібопічку
до
електромережі
.
•
Помістіть
продукти
в
піч
(
згідно
рецепта
)
і
закрийте
кришку
.
КНОПКА
МЕНЮ
•
Завантажте
бажану
програму
випікання
.
Номер
програми
і
час
випікання
,
що
відповідає
програмі
,
з
'
являться
на
РК
дисплеї
.
•
Увага
:
при
натисканні
на
кнопки
повинен
лунати
звуковий
сигнал
.
КОЛІР
СКОРИНКИ
•
Функція
"
Колір
скоринки
"
дозволяє
запрограмувати
випікання
світлої
,
темнішої
або
темної
скоринки
.
•
Натисніть
кнопку
"
СКОРИНКА
"
один
,
два
або
три
рази
,
для
світлої
,
темнішої
або
темної
скоринки
відповідно
.
•
УВАГА
:
При
виборі
програми
5-13
регулювати
колір
скоринки
неможливо
.
•
УВАГА
:
При
виборі
програми
1-3
кнопка
"
СКОРИНКА
"
дозволяє
встановити
режим
"
ШВИДКО
",
при
якому
хліб
випікається
в
прискореному
режимі
.
•
Можливість
вибору
кольору
скоринки
в
режимі
"
ШВИДКО
"
не
передбачена
.
РОЗМІР
БУХАНЦЯ
•
Ця
функція
дозволяє
задати
вагу
буханця
,
що
випікається
.
Вага
буханця
складає
500
г
/ 750
г
/1000
г
•
Натисніть
кнопку
"
РОЗМІР
"
один
,
два
або
три
рази
для
500
г
/ 750
г
/1000
г
відповідно
.
•
УВАГА
:
При
виборі
програми
5-13
регулювати
розмір
буханця
неможливо
.
КНОПКА
СТАРТ
/
СТОП
•
Для
запуску
/
зупинки
роботи
хлібопічки
або
відміни
обраної
функції
натисніть
кнопку
"
СТАРТ
/
СТОП
".
•
Щоб
завершити
операцію
або
відмінити
параметри
,
тримайте
кнопку
натиснутою
впродовж
2
секунд
,
поки
не
пролунає
довгий
звуковий
сигнал
.
•
УВАГА
:
Не
натискайте
кнопку
"
СТАРТ
/
СТОП
",
якщо
ви
хочете
перевірити
стан
випікання
.
Для
перевірки
випікання
використовуйте
вікно
на
кришці
хлібопічки
.
ФУНКЦІЯ
ПАМ
'
ЯТІ
•
У
разі
виникнення
збою
живлення
впродовж
максимум
7
хвилин
,
хлібопічка
продовжить
виконання
обраної
програми
з
моменту
збою
в
електромережі
.
ПІДТРИМКА
ТЕМПЕРАТУРИ
•
Після
завершення
приготування
,
хлібопічка
автоматично
переходить
у
режим
підтримки
температури
- 60
хвилин
.
•
По
закінченню
роботи
сигнал
біпера
звучатиме
5
разів
з
інтервалом
5
хвилин
.
ТАЙМЕР
•
Функція
таймера
дозволяє
відкладати
час
приготування
випічки
.
•
Максимальний
час
відстрочення
13
годин
.
•
Використовуйте
кнопки
"
+"
і
"
-"
щоб
додати
або
відняти
10
хвилин
затримки
при
кожному
натисканні
.
Потім
натисніть
кнопку
"
СТАРТ
/
СТОП
",
щоб
активізувати
таймер
.
На
дисплеї
почнеться
зворотній
відлік
часу
.
•
Наприклад
:
поточний
час
20:30,
ви
хочете
,
щоб
хліб
був
готовий
до
7:00,
тобто
через
10
годин
30
хвилин
.
Натисніть
кнопку
"
МЕНЮ
",
оберіть
режим
,
оберіть
колір
скоринки
та
розмір
буханця
,
потім
натисніть
кнопку
"
+"
,
щоб
додати
час
до
10
годин
30
хвилин
.
Час
відобразиться
на
РК
дисплеї
.
Потім
натисніть
кнопку
"
СТАРТ
/
СТОП
",
щоб
активізувати
таймер
.
На
дисплеї
почнеться
зворотній
відлік
часу
.

IM009
15
SC-401
•
УВАГА
:
не
використовуйте
таймер
при
використанні
інгредієнтів
,
що
швидко
псуються
,
таких
як
яйця
,
молоко
,
вершки
та
сир
.
ПРОГРАМИ
ВИПІКАННЯ
•
Для
вибору
потрібної
програми
натисніть
кнопку
"
МЕНЮ
".
Програма
випікання
1.
Основний
•
Цей
режим
використовується
для
приготування
хліба
білого
або
змішаних
сортів
.
Для
приготування
хліба
використовується
житнє
або
пшеничне
борошно
.
Буханець
виходить
легким
й
компактним
.
Склад
інгредієнтів
для
приготування
див
.
у
таблиці
в
кінці
Посібника
.
Програма
випікання
2.
Французький
•
Цей
режим
використовується
для
приготування
легкого
,
пухкого
хліба
з
хрусткою
скоринкою
з
пшеничного
борошна
.
Склад
інгредієнтів
для
приготування
див
.
у
таблиці
в
кінці
Посібника
.
Програма
випікання
3.
Дієтичний
•
Даний
режим
використовується
для
приготування
хліба
з
борошна
грубого
помелу
.
У
даному
режимі
відбувається
триваліше
замішування
тіста
та
на
процес
підняття
хліба
відводиться
значно
більше
часу
.
Буханець
виходить
важким
та
компактним
.
Рецепти
для
приготування
див
.
у
таблиці
у
кінці
Посібника
.
Програма
випікання
4.
Солодкий
•
Даний
режим
використовується
для
приготування
хліба
з
використанням
різних
солодких
домішок
,
як
фруктові
соки
,
терті
горіхи
,
сухофрукти
,
шоколад
або
цукор
.
У
даному
режимі
збільшений
час
для
підняття
хліба
,
внаслідок
чого
хліб
виходить
легким
та
пухким
.
Рецепти
для
приготування
див
.
у
таблиці
у
кінці
Посібника
.
Програми
випікання
: 5.
Прискорений
1000
грам
; 6.
Швидке
приготування
500
грам
; 7.
Швидке
приготування
750
грам
•
У
цих
режимах
процеси
замішування
,
підняття
та
випікання
тіста
значно
скорочені
і
не
потребують
багато
часу
.
В
результаті
хліб
виходить
найгрубішим
з
12-
ти
запропонованих
режимів
.
Рецепти
для
приготування
див
.
у
таблиці
у
кінці
Посібника
.
Додаткові
інгредієнти
:
програми
1-5
•
Для
режиму
1-5
додавання
додаткових
інгредієнтів
,
таких
як
горіхи
або
фрукти
,
можливо
після
звукового
сигналу
,
який
пролунає
згідно
з
програмою
приготування
хліба
.
•
У
разі
встановлення
таймера
,
можна
додавати
фрукти
й
горіхи
на
самому
початку
,
але
для
цього
їх
заздалегідь
треба
дрібно
порізати
.
Програма
випікання
8.
Без
глютену
•
Випікання
хліба
без
глютену
значно
відрізняється
від
випікання
звичайних
сортів
.
Якщо
Ви
робите
такий
хліб
з
причин
,
пов
'
язаних
із
здоров
'
ям
,
проконсультуйтеся
з
лікарем
і
чітко
виконуйте
інструкції
.
Ця
програма
була
спеціально
розроблена
для
хлібопекарських
сумішей
без
глютену
.
Результат
випікання
може
бути
різним
,
залежно
від
типу
суміші
.
Якщо
хліб
,
обраний
з
дієтичних
цілей
,
то
дуже
важливо
не
допускати
потрапляння
до
тіста
іншого
борошна
,
в
якому
міститься
глютен
.
Програма
випікання
9.
Тісто
•
Цей
режим
використовується
для
приготування
тіста
.
У
цьому
режимі
відбувається
тільки
замішування
без
подальшого
випікання
.
Рецепти
для
приготування
див
.
у
таблиці
у
кінці
Посібника
.
Програма
випікання
10.
Пельмені
•
Цей
режим
використовується
для
приготування
тіста
для
локшини
,
пельменів
або
піцци
.
У
цьому
режимі
відбувається
тільки
замішування
тіста
без
подальшого
випікання
.
Рецепти
для
приготування
див
.
у
таблиці
у
кінці
Посібника
.
Програма
випікання
11.
Варення
•
Цей
режим
використовується
для
приготування
варення
.
Рецепти
для
приготування
див
.
у
таблиці
у
кінці
Посібника
.
Програма
випікання
12.
Випікання
•
Цей
режим
використовується
для
додаткового
випікання
,
у
тому
разі
,
якщо
хліб
не
пропікся
достатньо
,
або
кірочка
скоринка
виявилася
не
досить
підсмаженою
,
а
також
для
випікання
з
готового
тіста
.
Час
приготування
див
.
у
таблиці
в
кінці
Посібника
.
•
Для
дострокової
зупинки
натисніть
кнопку
"
СТОП
/
СТАРТ
"
і
тримайте
її
натиснутою
впродовж
2
секунд
,
поки
не
пролунає
звуковий
сигнал
.
Програма
випікання
13.
Кекс
•
Цей
режим
використовується
для
приготування
кексів
і
пирогів
.
Рецепти
для
приготування
див
.
у
таблиці
в
кінці
Посібника
.
КОРИСНІ
ПОРАДИ
•
Спочатку
необхідно
вийняти
знімну
чашу
,
покласти
до
неї
необхідні
інгредієнти
і
тільки
тоді
помістити
чашу
в
хлібопічку
.
•
Завжди
дотримуйтесь
порядку
додавання
інгредієнтів
.
Спочатку
додавайте
рідину
,
олію
,
цукор
,
сіль
,
потім
-
борошно
та
інші
домішки
,
наприкінці
додавайте
дріжджі
.
•
Для
підтримки
процесу
оптимального
зростання
дріжджів
,
всі
інгредієнти
повинні
бути
кімнатної
температури
.

IM009
16
SC-401
•
Точно
вимірюйте
кількість
інгредієнтів
.
Навіть
незначне
відхилення
від
вказаної
в
рецепті
кількості
може
вплинути
на
результат
випікання
.
•
Під
час
роботи
не
відкривайте
кришку
хлібопічки
та
не
виймайте
форму
для
випікання
хліба
.
•
Кришку
можна
відкривати
тільки
для
додавання
в
тісто
необхідних
інгредієнтів
(
грінки
,
цукати
та
ін
.)
суворо
за
сигналом
біперу
:
під
час
роботи
біпер
пролунає
8
разів
,
коли
треба
додавати
інгредієнти
.
•
Відкривання
кришки
в
інший
час
призведе
до
порушення
температурного
режиму
в
хлібопічці
і
може
вплинути
на
якість
випікання
хліба
.
ПОРЯДОК
РОБОТИ
•
Вийміть
знімну
чашу
.
•
Встановіть
лопатку
для
замішування
,
перевірте
,
що
вона
працює
.
•
Покладіть
інгредієнти
до
чаші
.
•
УВАГА
:
переконайтеся
,
що
дріжджі
не
контактують
з
сіллю
та
рідиною
.
•
Помістіть
знімну
чашу
назад
до
хлібопічки
.
•
Переконайтеся
в
тому
,
що
чаша
встановлена
правильно
.
•
Закрийте
кришку
приладу
.
•
Підключіть
прилад
до
мережі
.
Пролунає
звуковий
сигнал
та
дисплей
відобразить
номер
програми
та
тривалість
приготування
.
•
Натисніть
кнопку
МЕНЮ
та
оберіть
номер
програми
.
•
Оберіть
колір
скоринки
та
розмір
буханця
.
•
Тепер
Ви
можете
відкоригувати
час
приготування
за
допомогою
таймера
.
•
Натисніть
кнопку
СТАРТ
/
СТОП
для
запуску
програми
.
•
По
закінченню
роботи
пролунає
звуковий
сигнал
і
на
дисплеї
відобразиться
час
0:00.
•
Дайте
хлібу
трохи
настоятись
.
•
Перш
ніж
відкрити
кришку
,
відключіть
прилад
від
електромережі
.
•
Дістаньте
чашу
за
допомогою
прихватки
або
рукавиць
.
•
Переверніть
чашу
та
злегка
потрясіть
.
Якщо
хліб
не
вислизає
,
ви
може
використовувати
дерев
'
яні
або
пластмасові
лопатки
для
виймання
хліба
з
чаші
.
У
жодному
випадку
не
використовуєте
металеві
предмети
,
вони
можуть
подряпати
поверхню
чаші
!
•
Дайте
хлібу
охолонути
30
хвилин
,
потім
можна
його
нарізати
.
•
УВАГА
:
переконайтеся
,
що
лопатка
для
замішування
не
потрапила
до
хлібу
!
Якщо
це
сталося
,
акуратно
вийміть
її
з
хліба
.
Ні
в
якому
разі
не
використовуйте
металеві
предмети
,
вони
можуть
подряпати
поверхню
лопатки
.
ПРОБЛЕМИ
І
СПОСОБИ
ЇХ
УСУНЕННЯ
До
звернення
в
сервісний
центр
,
будь
ласка
,
ознайомтеся
з
представленою
нижче
таблицею
.
Хліб
не
піднімається
Нерівний
верх
хліба
Якість
клейковини
у
вашому
борошні
невідповідна
,
або
ви
використовуєте
не
хлібопекарське
борошно
. (
Якість
клейковини
може
змінюватися
залежно
від
температури
,
вологості
,
умов
зберігання
борошна
і
часу
збирання
врожаю
)
•
Спробуйте
інший
тип
борошна
,
іншого
виробника
або
іншу
партію
борошна
.
Тісто
стало
дуже
твердим
,
оскільки
ви
додали
мало
рідини
.
•
Хлібопекарське
борошно
з
великим
змістом
білків
вбирає
більше
води
,
ніж
інші
види
,
тому
спробуйте
додати
додатково
10-20
мл
води
.
Ви
використовуєте
невідповідні
дріжджі
.
•
Використовуйте
сухі
дріжджі
з
пакетиків
,
де
є
напис
“
швидкодіючі
дріжджі
”.
Цей
тип
не
вимагає
попереднього
бродіння
.
Ви
поклали
мало
дріжджів
,
або
ваші
дріжджі
–
прострочені
•
Використайте
мірну
ложку
,
що
додається
.
Перевірте
термін
придатності
дріжджів
. (
Зберігайте
їх
у
холодильнику
)
На
дріжджі
потрапила
рідина
перед
замішуванням
.
•
Перевірте
,
що
Ви
поклали
інгредієнти
в
правильному
порядку
,
згідно
інструкції
.
Ви
додали
дуже
багато
солі
або
недостатньо
цукру
.
•
Перевірте
рецепт
і
відмірюйте
правильну
кількість
за
допомогою
мірної
ложки
,
що
додається
.
•
Перевірте
,
щоб
сіль
і
цукор
не
містилися
в
інших
інгредієнтах
.
Дуже
рихлий
хліб
Ви
використовували
надмірну
кількість
дріжджів
.
•
Перевірте
рецепт
і
відмірюйте
правильну
кількість
за
допомогою
мірної
ложки
,
що
додається
.
Ви
додали
дуже
багато
рідини
.
•
Деякі
види
борошна
вбирають
більше
води
,
ніж
інші
;
спробуйте
зменшити
кількість
води
на
10-20
мл
.
Хліб
провалився
після
того
,
як
Якість
вашого
борошна
незадовільна
.
•
Спробуйте
борошно
іншого
виробника
.
Ви
використовували
дуже
багато
рідини
.

IM009
17
SC-401
піднявся
•
Спробуйте
зменшити
кількість
води
на
10-20
мл
.
Хліб
дуже
сильно
піднявся
Ви
використовуєте
надмірну
кількість
дріжджів
/
води
.
•
Перевірте
рецепт
і
відмірюйте
правильну
кількість
за
допомогою
мірної
ложки
(
дріжджі
)
або
чашки
(
вода
),
які
додаються
.
•
Перевірте
,
щоб
зайва
кількість
води
не
потрапляла
з
інших
інгредієнтів
.
У
Вас
недостатньо
борошна
.
•
Акуратно
зважте
борошно
за
допомогою
вагів
.
Хліб
вийшов
блідим
і
липким
Ви
використовуєте
недостатню
кількість
дріжджів
,
або
ваші
дріжджі
-
прострочені
.
•
Використовуйте
мірну
ложку
,
що
додається
.
Перевірте
термін
придатності
дріжджів
. (
Зберігайте
їх
у
холодильнику
)
Відбувся
збій
в
подачі
електроенергії
,
або
прилад
був
зупинений
під
час
випікання
хліба
.
•
Прилад
вимикається
,
якщо
він
зупинений
більш
ніж
на
десять
хвилин
.
Вам
потрібно
вийняти
хліб
з
форми
і
знову
запустити
цикл
з
новими
інгредієнтами
.
На
хлібі
залишилось
борошно
Ви
використовували
дуже
багато
борошна
,
або
додали
замало
рідини
.
•
Перевірте
рецепт
і
відміряйте
правильну
кількість
борошна
за
допомогою
вагів
,
або
рідини
-
мірною
чашкою
для
рідини
,
що
входить
до
комплекту
.
Хліб
погано
замішався
Ви
не
вставили
лопатку
для
замішування
у
форму
для
випікання
хліба
.
•
До
того
,
як
Ви
завантажите
інгредієнти
,
переконайтеся
в
тому
,
що
лопатка
знаходиться
у
формі
.
Відбувся
збій
в
подачі
електроенергії
,
або
прилад
був
зупинений
під
час
випікання
хліба
.
•
Прилад
вимикається
,
якщо
він
зупинений
більш
ніж
на
десять
хвилин
.
•
Мабуть
,
вам
знадобиться
запустити
процес
випікання
хліба
знову
,
проте
,
це
може
призвести
до
негативного
результату
,
якщо
замішування
вже
почалося
.
Після
запуску
програми
на
екрані
з
'
явився
напис
HHH
Це
означає
,
що
температура
усередині
печі
занадто
висока
.
Необхідно
перемістити
прилад
в
тепліше
приміщення
.
Після
запуску
програми
на
екрані
з
'
явився
напис
EEE
Це
означає
,
що
температура
усередині
печі
занадто
мала
.
Необхідно
зупинити
програму
,
відключити
прилад
від
мережі
,
відкрити
кришку
і
дати
приладу
охолонути
,
перш
ніж
продовжити
роботу
програми
.
Після
початку
роботи
печі
на
екрані
з
'
явився
напис
Е
00/
Е
01
Стався
збій
в
подачі
електроенергії
,
помилки
в
роботі
датчика
температури
.
Необхідно
звернутись
до
сервісного
центру
.
ОЧИЩЕННЯ
ТА
ДОГЛЯД
•
Піч
необхідно
регулярно
чистити
й
видаляти
з
її
поверхні
будь
-
які
залишки
їжі
.
•
Перед
очищенням
вимкніть
піч
та
відключіть
її
від
електромережі
.
•
Дайте
печі
повністю
охолонути
.
•
Панель
управління
,
зовнішні
та
внутрішні
поверхні
,
знімну
чашу
протріть
вологою
тканиною
з
миючим
засобом
.
•
Не
використовуйте
агресивні
речовини
або
абразивні
матеріали
.
ЗБЕРІГАННЯ
•
Переконайтеся
,
що
піч
відключена
від
електромережі
та
повністю
охолонула
.
•
Виконайте
всі
вимоги
розділу
“
ОЧИЩЕННЯ
ТА
ДОГЛЯД
”.
•
Зберігайте
піч
з
відчиненою
кришкою
в
сухому
чистому
місці
.
KZ
ЖАБДЫҚ
НҰСҚАУЫ
ҚАУІПСІЗДІК
ШАРАЛАРЫ
Қауіпсіздік
бойынша
маңызды
нұсқаулар
.
Мұқият
оқып
шығыңыз
жəне
болашақ
анықтамалар
үшін
сақтаңыз
.
•
Құрылғыны
дұрыс
емес
пайдалану
оның
бұзылуына
əкелуі
жəне
пайдаланушыға
зиян
тигізуі
мүмкін
.
•
Бастапқы
қосу
алдында
бұйымның
жапсырмада
көрсетілген
техникалық
сипаттамалары
электр
желісінің
параметрлеріне
сай
келе
ме
,
соны
тексеріңіз
.

IM009
18
SC-401
НАЗАР
АУДАРЫҢЫЗ
!
Қуат
сымының
айырында
сым
жəне
жерге
қосу
контактісі
бар
.
Құрылғыны
тек
тиісті
жерге
қосылған
розеткаларға
қосыңыз
.
•
Осы
Пайдалану
бойынша
нұсқаулыққа
сай
тек
тұрмыстық
мақсаттарда
қолдану
керек
.
Құрылғы
өндірістік
пайдалануға
арналмаған
.
•
Бөлмелерден
тыс
қолдануға
болмайды
.
•
Тазалау
алдында
немесе
қолданып
жатпасаңыз
əрқашан
құрылғыны
электр
желісінен
өшіріңіз
.
•
Құрылғы
бақылаусыз
болса
немесе
олардың
қауіпсіздігіне
жауапты
тұлға
құрылғыны
қолдану
туралы
нұсқаулар
бермеген
болса
,
дене
,
сезу
немесе
ақыл
қабілеттері
төмен
я
болмаса
тəжірибесі
немесе
білімі
жоқ
тұлғалардың
(
соның
ішінде
балалардың
)
қолдануына
арналмаған
.
•
Құрылғымен
ойнауды
болдырмау
үшін
балаларды
бақылау
керек
.
•
Қосылған
құрылғыны
қараусыз
қалдырмаңыз
.
•
Жеткізу
жинағына
кірмейтін
саймандарды
қолданбаңыз
.
•
Сым
зақымдалғанда
қауіпті
болдырмау
үшін
оны
ауыстыруды
өндіруші
немесе
ол
уəкілетті
еткен
сервис
орталығы
я
болмаса
баламалы
білікті
қызметкер
өткізуі
керек
.
•
Құрылғыны
жəне
қуат
сымын
суға
немесе
басқа
сұйықтықтарға
батырмаңыз
.
Егер
бұл
орын
алса
,
құрылғыны
электр
желісінен
дереу
өшіріңіз
жəне
оны
одан
əрі
пайдалану
алдында
құрылғының
жұмысқа
қабілеттілігін
жəне
қауіпсіздігін
білікті
мамандарда
тексеріңіз
.
•
Қуат
сымы
үшкір
жиектерге
жəне
ыстық
беттерге
тимеуін
қадағалаңыз
.
•
Қуат
сымынан
тартпаңыз
,
шатастырмаңыз
жəне
оны
құрылғы
айналасында
орамаңыз
.
•
Наш
пешін
тек
өнімдерді
дайындау
үшін
қолданыңыз
.
Ешбір
жағдайда
онда
киімді
,
қағазды
немесе
басқа
заттарды
құрғатпаңыз
.
•
Камерасы
бос
наш
пешін
қоспаңыз
.
Камераны
бірдеңені
сақтау
үшін
қолданбаңыз
.
•
Пеш
өнімдерді
консервілеуге
арналмаған
.
•
Өнімдерді
тікелей
камера
түбіне
қоймаңыз
,
шешілмелі
ыдысты
қолданыңыз
.
•
Дайындау
рецепттерін
басшылыққа
алыңыз
.
•
Қысқа
тұйықталуды
жəне
пештің
бұзылуын
болдырмау
үшін
желдету
тесіктеріне
судың
тиюін
болдырмаңыз
.
•
Нан
пешін
таза
күйде
тиісті
түрде
ұстамау
беттің
тозуына
əкеліп
,
бұл
құрылғының
жұмысына
нашар
əсер
етуі
жəне
пайдаланушы
үшін
ықтимал
қауіпті
тудыруы
мүмкін
.
•
Ұзартқышты
қолданғанда
,
кабельдің
ең
көп
рұқсат
етілетін
қуаты
наш
пешінің
қуатына
сай
екеніне
көз
жеткізіңіз
.
•
Назар
аударыңыз
!
Жұмыс
кезінде
құрылғы
қызады
!
Жұмыс
істеп
тұрғанында
пешке
тию
керек
болған
жағдайда
ас
үйі
қолғабын
немесе
тұтқыштарды
қолданыңыз
.
•
Құрылғыны
пайдалану
кезінде
илеуге
арналған
қалаққа
тимеңіз
,
бұл
жарақаттауы
мүмкін
!
•
НАЗАР
АУДАРЫҢЫЗ
!
Жұмыс
кезінде
нанхананың
қақпағын
ашпаңыз
жəне
нанды
пісіру
қалыбын
шығармаңыз
.
Қақпақты
тек
қамырға
қажетті
ингредиенттерді
қосу
үшін
қатаң
түрде
бипер
сигналы
бойынша
ашуға
болады
.
•
Өндіруші
бұйымның
қауіпсіздігіне
,
жұмыс
өнімділігі
мен
жұмыс
мүмкіндіктеріне
түбегейлі
əсер
етпейтін
болмашы
өзгерістерді
оның
құрылмасына
қосымша
ескертпестен
енгізу
құқығын
өзінде
қалдырады
.
СІЗДІҢ
НАШ
ПЕШІҢІЗДІҢ
АРТЫҚШЫЛЫҚТАРЫ
•
Нан
пеші
нанды
автоматты
түрде
дайындау
режимімен
жабдықталған
.
•
Сіз
нанды
дайындаудың
13
түрлі
бағдарламасын
таңдай
аласыз
.
•
Сіз
пісіру
үшін
дайын
қоспаларды
қолдана
аласыз
.
•
Нан
пеші
қайнатпаны
қайнатуға
мүмкіндік
береді
.
•
Сіз
түшпара
жəне
басқа
тағамдарды
дайындау
үшін
қамыр
илей
аласыз
.
ОРНАТУ
•
Нан
пешінің
ішінде
орама
материалдар
жəне
бөгде
заттар
жоқ
екеніне
көз
жеткізіңіз
.
•
Тасымалдау
кезінде
мыналар
зақымдалмағанын
тексеріңіз
:
•
қақпақ
;
•
корпус
жəне
көру
терезесі
;
•
камера
қабырғасы
;
•
шешілмелі
ыдыс
.
•
Кез
келген
ақаулықтарды
тапқанда
пешті
қоспаңыз
;
сатушыға
барыңыз
.
•
Құрылғыны
құрғақ
,
тегіс
жəне
ыстыққа
төзімді
бетке
орнатыңыз
.
•
Құрылғыны
жанатын
заттардың
,
жарылғыш
заттардың
жəне
өздігінен
тұтанатын
газдардың
жанында
орнатпаңыз
.
•
Құрылғыны
газ
немесе
электр
плиталарының
жанында
,
сондай
-
ақ
,
басқа
жылу
көздерінің
жанында
қоймаңыз
.
•
Пешке
ештеңе
қоймаңыз
.
Желдету
тесіктерін
жаппаңыз
.

IM009
19
SC-401
•
Нан
пешін
шкафқа
орналастырмаған
жөн
.
Қалыпты
жұмыс
істеуі
үшін
пешке
желдету
үшін
бос
кеңістікті
қамтамасыз
ету
керек
:
мынадан
аз
емес
:
үстінен
20
см
,
артқы
панель
жағынан
10
см
жəне
бүйірлік
жақтардан
5
см
-
ден
кем
емес
.
•
Бірінші
қолдану
алдында
шешілмелі
ыдысты
,
илеуге
арналған
қалақты
,
нан
пешінің
ішкі
жəне
сыртқы
бөліктерін
таза
ылғалды
матамен
сүртіңіз
.
Басқару
тақтасынан
қорғауыш
қабықшаны
алыңыз
.
ЖҰМЫС
•
Нан
пешін
электр
желісіне
қосыңыз
.
•
Өнімдерді
пешке
салыңыз
(
рецептке
сай
)
жəне
қақпақты
жабыңыз
.
МƏЗІР
ТҮЙМЕШІГІ
•
Пісірудің
қалаған
бағдарламасын
жүктеңіз
.
Бағдарлама
нөмірі
жəне
бағдарламаға
сəйкес
пісіру
уақыты
СК
дисплейде
пайда
болады
.
•
Назар
аударыңыз
:
басқанда
түймешікте
дыбыстық
сигнал
шығуы
керек
.
ҚАБЫҚША
ТҮСІ
•
Қабықша
түсі
функциясы
ашық
,
орташа
немесе
күңгірт
қабықшаны
пісіруді
бағдарламалауға
мүмкіндік
береді
.
•
Сəйкес
ашық
,
орташа
немесе
күңгірт
қабықша
үшін
ҚАБЫҚША
түймешігін
бір
,
екі
немесе
үш
рет
басыңыз
.
•
НАЗАР
АУДАРЫҢЫЗ
: 5-13
бағдарламасын
таңдағанда
қабықша
түсін
реттеу
мүмкін
емес
.
•
НАЗАР
АУДАРЫҢЫЗ
: 1-3
бағдарламасын
таңдағанда
,
ҚАБЫҚША
түймешігі
нан
тездетілген
режимде
пісірілетін
«
ТЕЗ
»
режимін
орнатуға
мүмкіндік
береді
.
•
«
ТЕЗ
»
режимінде
қабықша
түсін
таңдау
мүмкіндігі
қарастырылмаған
.
БӨЛКЕ
ӨЛШЕМІ
•
Бұл
функция
пісірілетін
бөлкенің
салмағын
беруге
мүмкіндік
береді
.
Бөлкенің
500
г
/ 750
г
/1000
г
құрайды
•
Сəйкес
500
г
/ 750
г
/1000
г
үшін
ӨЛШЕМ
түймешігін
бір
,
екі
немесе
үш
рет
басыңыз
.
•
НАЗАР
АУДАРЫҢЫЗ
: 5-13
бағдарламасын
таңдағанда
бөлке
өлшемін
реттеу
мүмкін
емес
.
БАСТАУ
/
ТОҚТАТУ
ТҮЙМЕШІГІ
•
Нан
пешінің
жұмысын
бастау
/
тоқтату
үшін
немесе
таңдалған
функцияны
ысыру
үшін
БАСТАУ
/
ТОҚТАТУ
түймешігін
басыңыз
.
•
Əрекетті
аяқтау
немесе
параметрлерді
жою
үшін
түймешікті
2
секунд
бойы
ұзақ
дыбыстық
сигнал
шыққанша
басып
тұрыңыз
.
•
НАЗАР
АУДАРЫҢЫЗ
:
Пісіру
күйін
тексеру
керек
болса
,
БАСТАУ
/
ТОҚТАТУ
түймешігін
баспаңыз
.
Пісіруді
тексеру
үшін
нан
пешінің
қақпағындағы
терезені
қолданыңыз
.
ЖАД
ФУНКЦИЯСЫ
•
7
минуттан
аспайтын
қуат
үзілісі
пайда
болған
жағдайда
,
нан
пеші
таңдалған
бағдарламаны
электр
желісіндегі
үзіліс
сəтінен
бастап
жалғастырады
.
ТЕМПЕРАТУРАНЫ
САҚТАУ
•
Дайындауды
аяқтағаннан
кейін
нан
пеші
температураны
сақтау
режиміне
автоматты
түрде
өтеді
– 60
минут
.
•
Жұмысты
аяқтағанда
бипер
сигналы
5
минут
аралықпен
5
рет
шығады
.
ТАЙМЕР
•
Таймер
функциясы
пісіруді
дайындау
уақытын
кейінге
қалдыруға
мүмкіндік
береді
.
•
Кейінге
қалдырудың
ең
көп
уақыты
– 13
сағат
.
•
Əр
басқанда
10
минут
кейінге
қалдыруды
қосу
немесе
алу
үшін
+
жəне
–
түймешіктерін
қолданыңыз
.
Содан
кейін
таймерді
белсендіру
үшін
БАСТАУ
/
ТОҚТАТУ
түймешігін
басыңыз
.
Дисплейде
уақытты
кері
санау
басталады
.
•
Мысалы
:
ағымдағы
уақыт
20:30,
сізге
нан
7:00
сағатында
дайын
болуы
керек
,
яғни
, 10
сағат
30
минуттан
кейін
.
МƏЗІР
түймешігін
басыңыз
,
режимді
таңдаңыз
,
қабықша
түсін
жəне
бөлке
өлшемін
таңдаңыз
,
содан
кейін
10
сағат
30
минутқа
дейінгі
уақытты
қосу
үшін
+
түймешігін
басыңыз
.
Уақыт
СК
дисплейінде
көрсетіледі
.
Содан
кейін
таймерді
белсендіру
үшін
БАСТАУ
/
ТОҚТАТУ
түймешігін
басыңыз
.
Дисплейде
уақытты
кері
санау
басталады
.
•
НАЗАР
АУДАРЫҢЫЗ
:
жұмыртқа
,
сүт
,
қаймақ
жəне
ірімшік
сияқты
тез
бұзылатын
ингредиенттерді
қолданғанда
таймерді
қолданбаңыз
.
ПІСІРУ
БАҒДАРЛАМАЛАРЫ
•
Қажетіт
бағдарламаны
таңдау
үшін
«
МƏЗІР
»
түймешігін
басыңыз
.
1-
пісіру
бағдарламасы
.
Негізгі
•
Бұл
режим
ақ
жəне
сорттары
аралас
нанды
пісіру
үшін
қолданылады
.
Нанды
пісіру
үшін
қара
бидай
немесе
бидай
ұны
қолданылады
.
Бөлке
жеңіл
жəне
шағын
болады
.
Пісіруге
арналған
ингредиенттердің
құрамын
нұсқаулық
соңындағы
кестеде
қараңыз
.
2-
пісіру
бағдарламасы
.
Француз
•
Бұл
режим
бидай
ұнынан
қытырлақ
қабықшасы
бар
жеңіл
нанды
пісіру
үшін
қолданылады
.
Пісіруге
арналған
ингредиенттердің
құрамын
нұсқаулық
соңындағы
кестеде
қараңыз
.
3-
пісіру
бағдарламасы
.
Диеталық

IM009
20
SC-401
•
Бұл
режим
ірі
тартылған
ұннан
нан
пісіру
үшін
қолданылады
.
Бұл
режимде
қамыр
ұзағырақ
иленеді
жəне
нанның
көтерілу
процесіне
айтарлықтай
көбірек
уақыт
бөлінеді
.
Бөлке
ауыр
жəне
шағын
болады
.
Пісіру
бойынша
рецепттерді
нұсқаулық
соңындағы
кестеде
қараңыз
.
4-
пісіру
бағдарламасы
.
Тəтті
•
Бұл
режим
жеміс
шырындары
,
үгілген
жаңғақ
,
кептірілген
жемістер
,
шоколад
немесе
қант
сияқты
əр
түрлі
тəтті
қоспаларды
қолданып
нан
пісіру
үшін
қолданылады
.
Бұл
режимде
нанның
көтерілу
уақыты
арттырылған
,
нəтижесінде
нан
жеңіл
болады
.
Пісіру
бойынша
рецепттерді
нұсқаулық
соңындағы
кестеде
қараңыз
.
Пісіру
бағдарламалары
: 5.
Тездетілген
1000
грамм
; 6.
Тез
пісіру
500
грамм
; 7.
Тез
пісіру
750
грамм
•
Бұл
режимдерде
илеу
,
көтерілу
жəне
пісіру
процестері
айтарлықтай
қысқартылған
жəне
көп
уақыт
алмайды
.
Нəтижесінде
нан
12
ұсынылған
режимдерден
ең
қатты
болады
.
Пісіру
бойынша
рецепттерді
нұсқаулық
соңындағы
кестеде
қараңыз
.
Қосымша
ингредиенттер
: 1-5
бағдарламалары
•
1-5
режимі
үшін
жаңғақтар
немесе
жемістер
сияқты
қосымша
ингредиенттерді
қосу
нанды
пісіру
бағдарламасына
сай
шығатын
дыбыстық
сигналдан
кейін
мүмкін
болады
.
•
Таймерді
орнатқан
жағдайда
,
ең
басында
жемістерді
жəне
жаңғақтарды
қосуға
болады
,
бірақ
бұл
үшін
оларды
алдын
ала
майда
етіп
кесу
керек
.
8-
пісіру
бағдарламасы
.
Глютенсіз
•
Нанды
глютенсіз
пісіру
əдеттегі
сортарды
пісіруден
айтарлықтай
ерекшеленеді
.
Егер
мұндай
нанды
денсаулықпен
байланысты
себептермен
жасасаңыз
,
дəрігермен
кеңесіңіз
жəне
оның
нұсқауларын
дəл
орындаңыз
.
Бұл
бағдарлама
глютенсіз
наш
пісіру
қоспалары
үшін
арнайы
жасалған
.
Қоспа
түріне
байланысты
пісіру
нəтижесі
əр
түрлі
болуы
мүмкін
.
Нан
диеталық
мақсаттармен
таңдалған
болса
,
онда
қамырға
құрамында
глютен
бар
басқа
қамырдың
түсуін
болдырмау
маңызды
.
9-
пісіру
бағдарламасы
.
Қамыр
•
Бұл
режим
қамырды
дайындау
үшін
қолданылады
.
Бұл
режимде
одан
кейінгі
пісірусіз
тек
илеу
орын
алады
.
Пісіру
бойынша
рецепттерді
нұсқаулық
соңындағы
кестеде
қараңыз
.
10-
пісіру
бағдарламасы
.
Түшпара
•
Бұл
режим
кеспені
,
түшпараны
немесе
пиццаны
дайындау
үшін
қолданылады
.
Бұл
режимде
одан
əрі
пісірусіз
тек
қамырды
илеу
орын
алады
.
Пісіру
бойынша
рецепттерді
нұсқаулық
соңындағы
кестеде
қараңыз
.
11-
пісіру
бағдарламасы
.
Қайнатпа
•
Бұл
режим
қайнатпаны
дайындау
үшін
қолданылады
.
Пісіру
бойынша
рецепттерді
нұсқаулық
соңындағы
кестеде
қараңыз
.
12-
пісіру
бағдарламасы
.
Пісіру
•
Бұл
режим
нан
толық
піспеген
немесе
қабықша
жеткілікті
қызарып
піспеген
жағдайда
қосымша
пісіру
үшін
,
сондай
-
ақ
,
дайын
қамырдан
пісіру
үшін
қолданылады
.
Пісіру
уақытын
нұсқаулық
соңындағы
кестеде
қараңыз
.
•
Мерзімінен
бұрын
тоқтату
үшін
ТОҚТАТУ
/
БАСТАУ
түймешігін
басыңыз
жəне
оны
дыбыстық
сигнал
шыққанша
2
секунд
бойы
басып
тұрыңыз
.
13-
пісіру
бағдарламасы
.
Кекс
•
Бұл
режим
кекстерді
жəне
бəліштерді
пісіру
үшін
қолданылады
.
Пісіру
бойынша
рецепттерді
нұсқаулық
соңындағы
кестеде
қараңыз
.
ПАЙДАЛЫ
КЕҢЕСТЕР
•
Басында
шешілмелі
ыдысты
шығарып
,
оған
қажетті
ингредиенттерді
қосу
керек
жəне
тек
содан
кейін
ыдысты
нан
пешіне
қою
керек
.
•
Əрқашан
ингредиенттерді
қосу
тəртібін
сақтаңыз
.
Алдымен
сұйықтықтарды
,
майды
,
қантты
,
тұзды
,
содан
кейін
ұнды
жəне
басқа
қоспаларды
қосыңыз
,
ең
соңында
ашытқыны
қосыңыз
.
•
Ашытқының
оңтайлы
өсуін
сақтау
үшін
барлық
ингредиенттердің
температурасы
бөлмедегідей
болуы
керек
.
•
Ингредиенттердің
мөлшерін
дəл
өлшеңіз
.
Рецептте
көрсетілген
шамадан
тіпті
азғантай
ауытқу
пісіру
нəтижесіне
əсер
етуі
мүмкін
.
•
Жұмыс
кезінде
нанхананың
қақпағын
ашпаңыз
жəне
нанды
пісіру
қалыбын
шығармаңыз
.
•
Қақпақты
тек
қамырға
қажетті
ингредиенттерді
(
кесіліп
қуырылған
нан
,
цукаттар
жəне
т
.
б
.)
қосу
үшін
ашуға
болады
.
Жұмыс
кезінде
ингредиенттерді
қосу
керек
кезде
бипер
8
рет
дыбыс
шығарады
.
•
Қақпақты
басқа
уақытта
ашу
нан
пешінде
температуралық
режимнің
бұзылуына
əкеледі
жəне
нанды
пісіру
сапасына
əсер
етуі
мүмкін
.
ЖҰМЫС
ТƏРТІБІ
•
Шешілмелі
ыдысты
шығарыңыз
.
•
Илеуге
арналған
қалақты
орнатыңыз
,
оның
жұмыс
істейтінін
тексеріңіз
.
•
Ингредиенттерді
ыдысқа
салыңыз
.
•
НАЗАР
АУДАРЫҢЫЗ
:
Ашытқы
тұзға
жəне
сұйықтыққа
тимейтініне
көз
жеткізіңіз
.
•
Шешілмелі
ыдысты
қайтадан
нан
пешіне
салыңыз
.


