Acer W510P – страница 4
Инструкция к Планшету Acer W510P

How do I check for Windows updates?
Swipe the right-hand edge of the screen inwards and tap Settings >
Change PC settings > Windows Updates. Tap Check for updates
now.
Where can I get more information?
For more information please visit the following pages:
• Windows 8 tutorials: www.acer.com/windows8-tutorial
• Support FAQs: www.acer.com/support
Frequently asked questions - 59

Troubleshooting
This chapter shows you how to deal with common system problems.
Read it before calling a technician if a problem occurs. Solutions to more
serious problems require opening up the computer. Do not attempt to
open the computer yourself; contact your dealer or authorized service
center for assistance.
Troubleshooting tips
This computer incorporates an advanced design that delivers onscreen
error message reports to help you solve problems.
If the system reports an error message or an error symptom occurs, see
"Error messages" below. If the problem cannot be resolved, contact your
dealer. See "Requesting service" on page 51.
Error messages
If you receive an error message, note the message and take the corrective
action. The following table lists the error messages in alphabetical order
together with the recommended course of action.
Error messages Corrective action
Contact your dealer or an authorized service
CMOS battery bad
center.
CMOS checksum
Contact your dealer or an authorized service
error
center.
60 - Frequently asked questions

Error messages Corrective action
Insert a system (bootable) disk, then press
Disk boot failure
<Enter> to reboot.
Press <F2> (during POST) to enter the BIOS
Equipment
utility, then press Exit in the BIOS utility to
configuration error
reboot.
Contact your dealer or an authorized service
Hard disk 0 error
center.
Hard disk 0 extended
Contact your dealer or an authorized service
type error
center.
Contact your dealer or an authorized service
I/O parity error
center.
Keyboard error or no
Contact your dealer or an authorized service
keyboard connected
center.
Keyboard interface
Contact your dealer or an authorized service
error
center.
Press <F2> (during POST) to enter the BIOS
Memory size
utility, then press Exit in the BIOS utility to
mismatch
reboot.
If you still encounter problems after going through the corrective
measures, please contact your dealer or an authorized service center for
assistance.
Frequently asked questions - 61

RECOVERING YOUR SYSTEM
Depending on the storage space available in your computer, your
computer either uses the Acer Recovery Management program, or is
supplied with one or more system recovery DVDs. To use a system
recovery DVD, please see the instructions below, otherwise see
"Recovery" on page 63.
Recovery from a supplied recovery DVD
If your computer comes with system recovery DVDs, obtain an external
optical disc drive (ODD) and complete the following steps to recover your
computer to factory conditions:
1. Shutdown the computer by tapping the Settings charm > Power >
Shutdown.
2. Connect the ODD to your computer.
3. Enter the computer’s BIOS - press and hold the volume down key
before pressing the power button.
4. Select the Boot option in the left pane.
5. Under "Boot priority order", use the arrows to move USB CDROM to the
number one position.
6. Select Exit in the left pane and then select Exit Saving Changes.
7. Insert the recovery DVD, restart your computer, and follow the onscreen
instructions.
62 - Recovering your system

RECOVERY
If you are having trouble with your computer, and the frequently asked
questions (see page 49) do not help, you can 'recover' your computer - i.e.
return it to an earlier state.
This section describes the recovery tools available on your computer. Acer
provides Acer Recovery Management, which allows you to create a
recovery backup, a drivers and applications backup, and to start recovery
options, either using Windows tools, or the recovery backup.
Note: Acer Recovery Management is only available with a pre-
installed Windows operating system.
Important: We recommend that you create a Recovery Backup
and Drivers and Applications Backup and as soon as possible.
In certain situations a full recovery will require a USB recovery
backup.
Creating a recovery backup
To reinstall from a USB storage drive, you must first create a recovery
backup. The recovery backup includes the entire original contents of your
computer’s hard drive, including Windows and all factory-loaded software
and drivers. Using this backup will restore your computer to the same
state as when you purchased it, while giving you an option to retain all
settings and personal data.
Note:
Make sure you have a USB drive with a capacity of at least 16 GB.
Recovery - 63
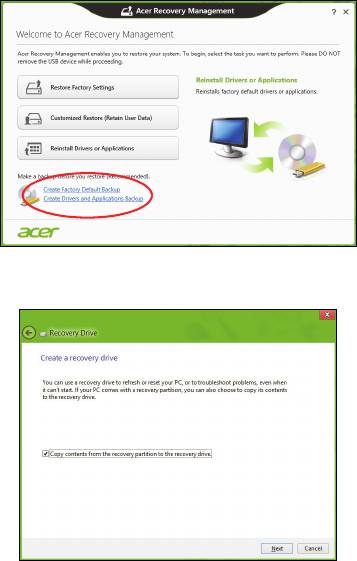
1. From Start, type 'Recovery' and then click Acer Recovery
Management in the list of apps.
2. Click Create Factory Default Backup. The Recovery Drive window
opens.
64 - Recovery
Make sure Copy contents from the recovery partition to the recovery
drive is selected. This provides the most complete and safest recovery
backup.
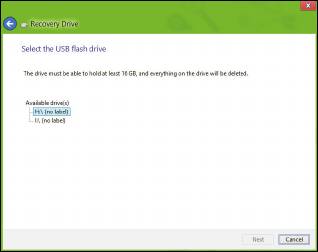
3. Plug in the USB drive then click Next.
• Make sure your USB drive has enough capacity before continuing.
The recovery backup requires at least 16 GB of storage
4. You will be shown the backup progress on the screen.
5. Follow the process until it completes.
6. After creating the recovery backup, you can choose to delete the
recovery information on your computer. If you delete this information,
you can only use the USB recovery backup to restore your computer, if
you lose or erase the USB drive, you cannot restore your computer.
Recovery - 65

7. Unplug the USB drive and label it clearly.
Important: Write a unique, descriptive label on the backup, such
as 'Windows Recovery Backup'. Make sure you keep the backup
in a safe place that you will remember.
Creating a drivers and applications backup
To create a Drivers and Applications Backup, that contains the factory-
loaded software and drivers needed by your computer, you may use either
a USB storage drive or, if your computer features a DVD recorder, one or
more blank recordable DVDs.
66 - Recovery
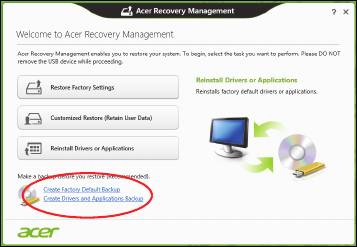
1. From Start, type 'Recovery' and then click Acer Recovery
Management in the list of apps.
2. Click Create Drivers and Applications Backup.
Plug in the USB drive or insert a blank DVD into the optical drive, then
click Next.
Recovery - 67
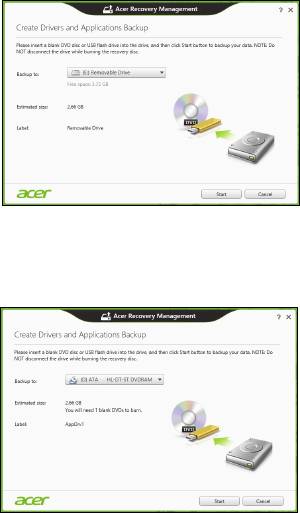
• If you are using a USB drive, make sure your USB drive has enough
capacity before continuing.
• If using DVDs, it will also show the number of blank, recordable discs
you will need to complete the recovery discs. Make sure that you
have the required number of identical, blank discs.
68 - Recovery

3. Click Start to copy files.You will be shown the backup progress on the
screen.
4. Follow the process until it completes:
• If you are using optical discs, the drive ejects each disc as it
completes burning it. Remove the disc from the drive and mark it with
a permanent marker.
If multiple discs are required, insert a new disc when prompted, then
click OK. Continue until the process is complete.
• If you are using a USB drive, unplug the drive and label it clearly.
Important: Write a unique, descriptive label on each backup,
such as 'Drivers and Applications Backup'. Make sure you keep
the backup in a safe place that you will remember.
Recovering your system
To recover your system:
1. Perform minor fixes.
If only one or two items of software or hardware have stopped working
correctly, the problem may be solved by reinstalling the software or the
device drivers.
To reinstall software and drivers that were pre-installed at the factory,
see "Reinstalling drivers and applications" on page 70.
For instructions on reinstalling software and drivers that were not pre-
installed, see that product’s documentation or support Web site.
2. Revert to a previous system condition.
If reinstalling software or drivers does not help, then the problem may be
Recovery - 69

solved by returning your system to a previous state when everything
was working correctly.
For instructions, see "Returning to an earlier system snapshot" on
page 73.
3. Reset your operating system.
If nothing else has solved the problem and you want to reset your
system, but keep your user information, see "Returning your system
to its factory condition" on page 74.
4. Reset your system to its factory condition.
If nothing else has solved the problem and you want to reset your
system to factory condition, see "Returning your system to its factory
condition" on page 74.
Reinstalling drivers and applications
As a troubleshooting step, you may need to reinstall the applications and
device drivers that came pre-installed on your computer from the factory.
You can reinstall using either your hard drive or the backup you have
created.
• Other applications - If you need to reinstall software that did not come
pre-installed on your computer, you need to follow that software’s
installation instructions.
• New device drivers - If you need to reinstall device drivers that did not
come pre-installed on your computer, follow the instructions provided
with the device.
70 - Recovery
If you are reinstalling using Windows and the recovery information stored
on your computer:
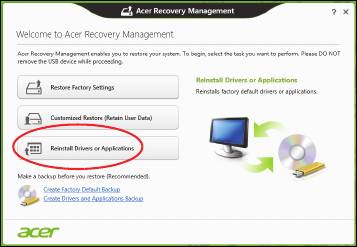
•From Start, type 'Recovery' and then click Acer Recovery
Management in the list of apps.
• Click Reinstall Drivers or Applications.
Recovery - 71
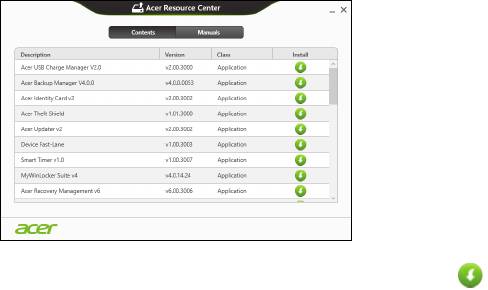
• You should see the Contents section of the Acer Resource Center.
• Click the install icon for the item you want to install, then follow
the onscreen instructions to complete the installation. Repeat
this step for each item you want to reinstall.
If you are reinstalling from a Drivers and Applications Backup on a DVD or
USB drive:
1. Insert the Drivers and Applications Backup into the disc drive or
connect it to a free USB port.
• If you inserted a DVD wait for Acer Resource Center to start.
• If Acer Resource Center does not start automatically, press the
Windows key + <E>, then double-click on the optical drive icon.
• If you are using a USB drive, press the Windows key + <E>, then
double-click on the drive that contains the backup. Double-click on
ResourceCenter.
72 - Recovery
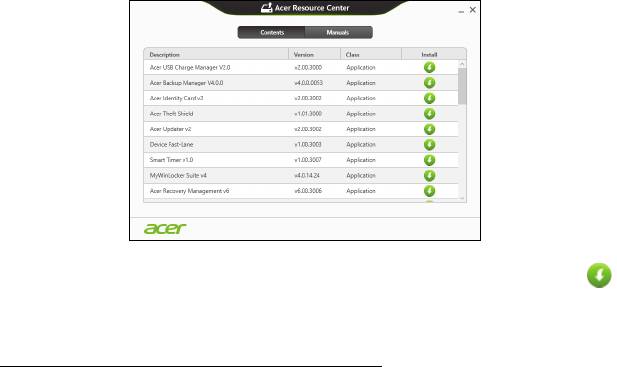
2. You should see the Contents section of the Acer Resource Center.
3. Click the install icon for the item you want to install, then follow the
onscreen prompts to complete the installation. Repeat this step for
each item you want to reinstall.
Returning to an earlier system snapshot
Microsoft System Restore periodically takes a 'snapshot' of your system
settings and saves them as restore points. In most cases of hard-to-
resolve software problems, you can return to one of these restore points to
get your system running again.
Windows automatically creates an additional restore point each day, and
also each time you install software or device drivers.
Note: For more information about using Microsoft System Restore,
from Start, type 'Help' and then click Help and Support in the list of
Recovery - 73

apps. Type 'Windows system restore' in the Search Help box, then
press Enter.
Returning to a restore point
1. From Start, type 'Control Panel' and then click Control Panel in the list
of apps.
2. Click System and Security > Action Center, then click Recovery at
the bottom of the window.
3. Click Open System Restore, then Next.
4. Click the latest restore point (at a time when your system worked
correctly), click Next, then Finish.
5. A confirmation window appears; click Yes. Your system is restored
using the restore point you specified. This process may take several
minutes, and may restart your computer.
Returning your system to its factory condition
If your computer experiences problems that are not recoverable by other
methods, you may need to reinstall everything to return your system to its
factory condition. You can recover from either your hard drive or the
recovery backup you have created.
• If you can still run Windows and have not deleted the recovery partition,
see "Recovering from Windows" on page 75.
• If you cannot run Windows, your original hard drive has been completely
re-formatted or you have installed a replacement hard drive, see
"Recovering from a recovery backup" on page 79.
74 - Recovery
Recovering from Windows
Start Acer Recovery Management:
•From Start, type 'Recovery' and then click Acer Recovery
Management in the list of apps.
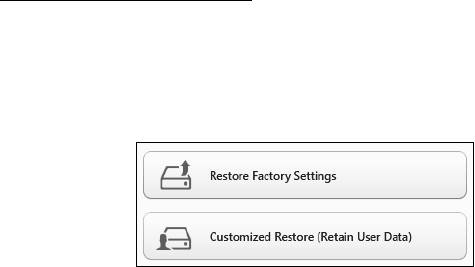
Two options are available, Restore Factory Settings (Reset my PC) or
Customized Restore (Refresh my PC).
Restore Factory Settings deletes everything on your hard drive, then
reinstalls Windows and all software and drivers that were pre-installed on
your system. If you can access important files on your hard drive, back
them up now. See "Restore Factory Settings with Acer Recovery
Management" on page 76.
Customized Restore will attempt to retain your files (user data) but will
reinstall all software and drivers. Software installed since you purchased
your PC will be removed (except software installed from the Windows
Store). See "Customized Restore with Acer Recovery Management"
on page 78.
Recovery - 75
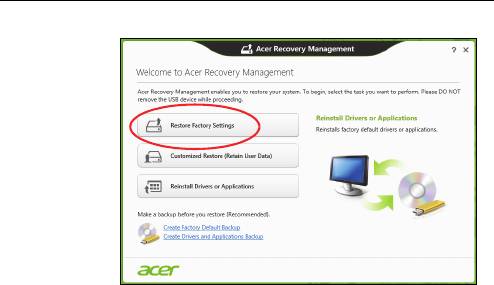
Restore Factory Settings with Acer Recovery Management
1. Click Restore Factory Settings.
Caution: 'Restore Factory Settings' will erase all files on your
hard drive.
2. If your computer is configured with two operating systems (only
available on certain systems), a window opens with the option to restore
either Windows 7 or Windows 8. If you choose Windows 7, your
computer will restart and restore Windows 7. If you choose Windows 8,
Reset your PC opens, as described below.
Note: To fully enjoy Windows 8 features after changing from Windows
7, enter the BIOS (press <F2> when starting your computer) and
change Boot Mode to UEFI. If you reinstall Windows 7, you must
change Boot Mode back to Legacy before restarting your computer.
76 - Recovery
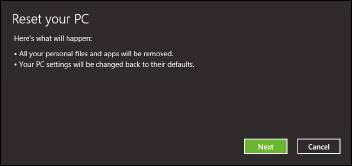
3. The Reset your PC window opens.
Images for reference only.
4. Click Next, then choose how to erase your files:
a. Just remove my files quickly erases all files before restoring your
computer and takes about 30 minutes.
b. Fully clean the drive completely cleans the drive after each file is
erased, so no files can be viewed after the recovery. Cleaning the
drive takes much longer, up to 5 hours, but is much more secure as
old files are completely removed.
5. Click Reset.
6. The recovery process begins by restarting your computer, then
continues by copying files to your hard drive.
7. After the recovery has finished, you can start using your computer by
repeating the first-start process.
Recovery - 77
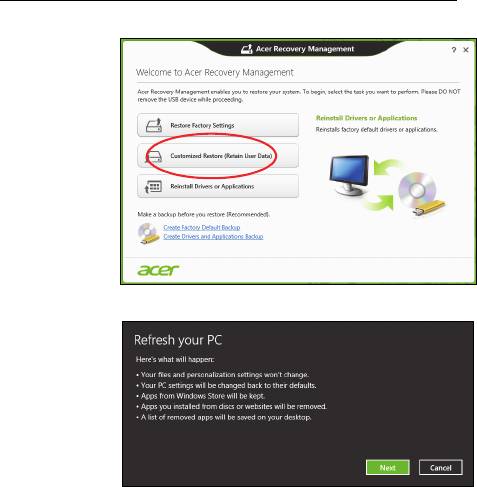
Customized Restore with Acer Recovery Management
1. Click Customized Restore (Retain User Data).
2. The Refresh your PC window opens.
3. Click Next, then Refresh.
4. The recovery process begins by restarting your computer, then continues
by copying files to your hard drive. This process takes about 30 minutes.
78 - Recovery
- 1
- 2
- 3
- 4
- 5
- 6
- 7
- 8
- 9
- 10
- 11
- 12
- 13
- 14
- 15
- 16
- 17
- 18
- 19
- 20
- 21
- 22
- 23
- 24
- 25
- 26
- 27
- 28
- 29
- 30
- 31
- 32
- 33
- 34
- 35
- 36
- 37
- 38
- 39
- 40
- 41
- 42
- 43
- 44
- 45
- 46
- 47
- 48
- 49
- 50
- 51
- 52
- 53
- 54
- 55
- 56
- 57
- 58
- 59
- 60
- 61
- 62
- 63
- 64
- 65
- 66
- 67
- 68
- 69
- 70
- 71
- 72
- 73
- 74
- 75
- 76
- 77
- 78
- 79
- 80
- 81
- 82
- 83
- 84
- 85
- 86
- 87
- 88
- 89
- 90
- 91
- 92
- 93
- 94
- 95
- 96
- 97
- 98
- 99
- 100
- 101
- 102
- 103
- 104
- 105
- 106
- 107
- 108
- 109
- 110
- 111
- 112
- 113
- 114
- 115
- 116
- 117
- 118
- 119
- 120
- 121
- 122
- 123
- 124
- 125
- 126
- 127
- 128
- 129
- 130
- 131
- 132
- 133
- 134
- 135
- 136
- 137
- 138
- 139
- 140
- 141
- 142
- 143
