Acer W510P – страница 2
Инструкция к Планшету Acer W510P
Note: Display orientation may be fixed when apps designed for a
specific orientation are running. These include games and other full-
screen apps.
When making video calls, you should always hold the tablet in
landscape orientation.
LED Indicators
LED color State Description
Blue Steady The computer is fully charged and plugged in.
Amber Steady The computer is charging and plugged in.
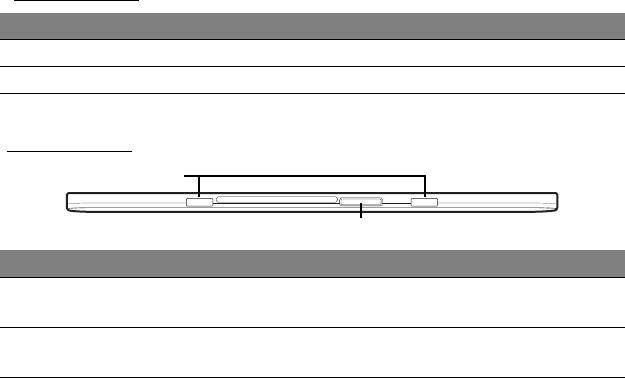
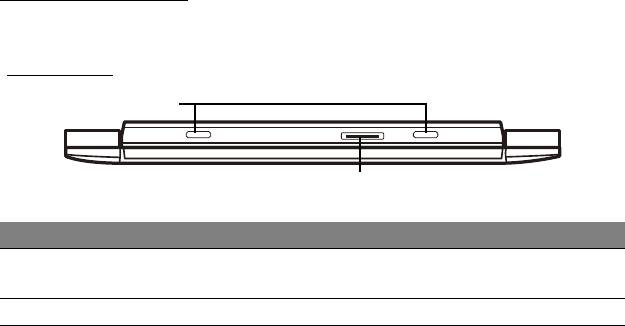
Bottom view
Your Acer tablet PC tour - 19
1
2
No. Item Description
Slot for keyboard
1
Fastens to the keyboard dock.
dock
Dock connector /
2
Connects to an AC adapter or the keyboard dock.
DC-in
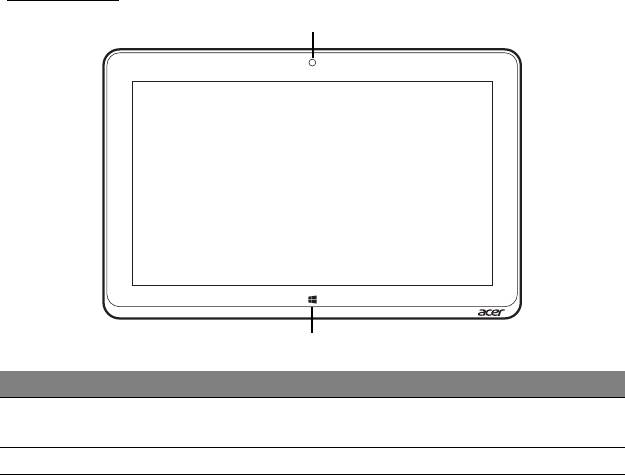
Front view
20 - Your Acer tablet PC tour
1
2
No. Item Description
Integrated
1
Web camera for video communication.
webcam
2 Windows key Press once to open the Start menu.
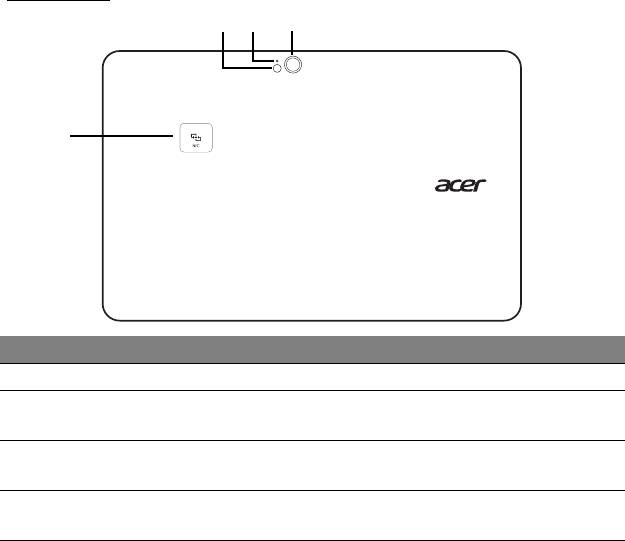
Back view
No. Item Description
1 Flash LED flash for camera.
Camera indicator
2
Lights up when camera is active.
light
8-megapixel camera for taking high-resolution
3 Camera
ima
ges.
NFC contact area.
4 NFC (optional)
Not available on all models.
Your Acer tablet PC tour - 21
1 2 3
4
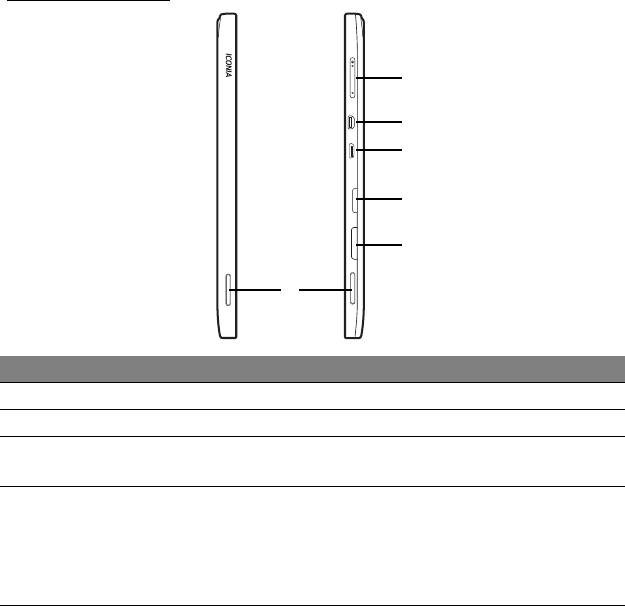
Left/right views
22 - Your Acer tablet PC tour
2
3
4
5
6
1
No. Item Description
1 Speakers Delivers stereo audio output.
2 Volume key Press to increase or decrease volume.
Supports high-definition digital video
3 Micro HDMI port
connections.
Connects to USB devices.
A Micro USB to USB adapter is needed to
Micro USB
4
connect to USB devices.
connector
When using a USB port, it is recommended to
plug in the power adapter
.
No. Item Description
5 MicroSD card slot Insert a microSD card into this slot.
Insert a SIM card into this slot.
6 SIM card slot*
* - only for selected models.
Installing a SIM card (only for selected models)
Certain computers include a SIM slot for Internet access. To take full
advantage of your computer’s Internet capabilities, you should install a
SIM card with data subscription before turning on your computer.
1. Make sure your computer is turned off.
2. Insert the SIM card. When fully inserted, the SIM card will click into place.
3. Turn on your computer.
Note:
Ensure that the SIM card is inserted all the way into the card slot.
Caution: Turn off your computer before installing or removing a SIM
card. You may damage the card or your computer if power it still on.
Using the network connection
Open the desktop and tap the network icon in the
taskbar.
Your Acer tablet PC tour - 23
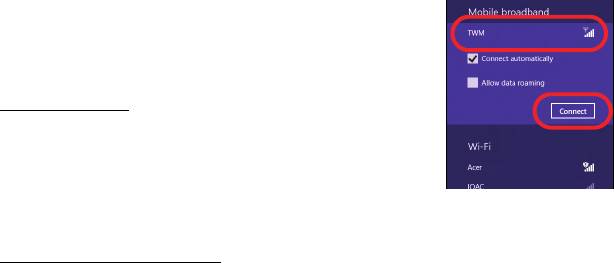
Select your data connection from the list of
networks.
Select Connect, then Next.
SIM card lock
Your computer may come with a SIM card lock, i.e.,
you will only be able to use the SIM card provided
by your network operator.
To cancel the SIM lock, contact your network provider.
Removing the SIM card
1. Make sure your computer is turned off.
2. Press the SIM card into the slot then carefully release. The SIM card will
be pushed out of the slot.
24 - Your Acer tablet PC tour
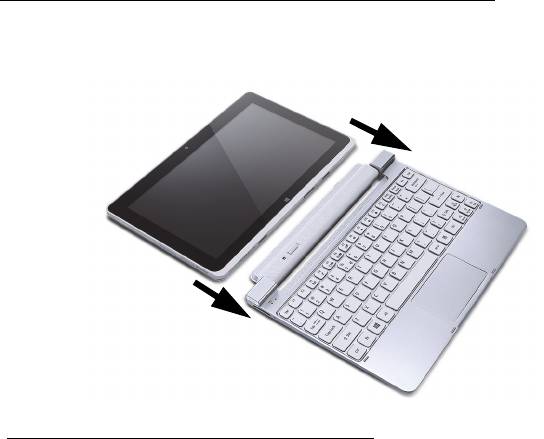
Connect the tablet to the keyboard dock
The keyboard dock is optional.
Align the tablet with the dock connector and two pins on the keyboard
dock. Press the tablet down until the release latch clicks into place.
Secure the tablet to the keyboard dock
Place the tablet on the dock, ensuring it clicks into place.
Note: Push the release latch to the left and lift the tablet to remove it
from the keyboard dock.
Your Acer tablet PC tour - 25
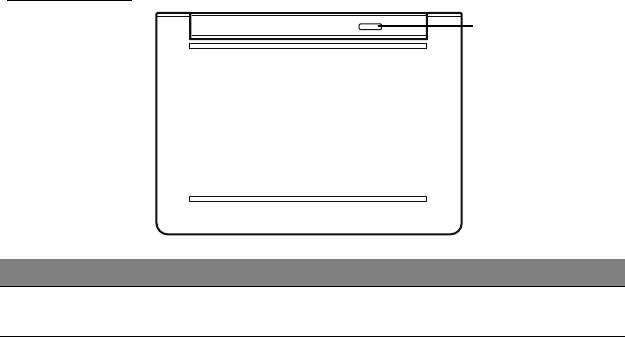
Keyboard dock
The following set of images show you the optional keyboard dock.
Front view
26 - Your Acer tablet PC tour
1
2
No. Item Description
Pin for keyboard
1
Secures the tablet to the dock.
dock
2 Dock connector Connects to the dock connector on the tablet.
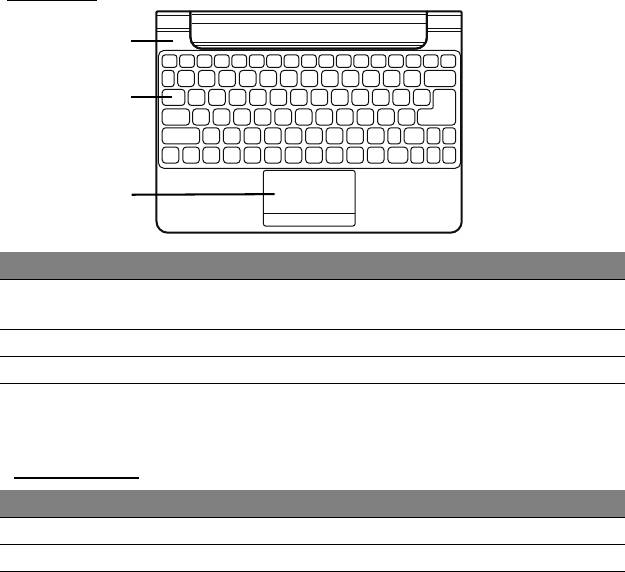
Top view
Your Acer tablet PC tour - 27
1
2
3
No. Item Description
Battery and power
1
Indicates the tablet's power status.
in
dicators
2 Keyboard For entering data into your tablet.
3 Touchpad Touch-sensitive pointing device.
Note: The additional internal battery is not available in all models of
the keyboard dock.
LED Indicators
LED color State Description
Blue Steady The computer is fully charged and plugged in.
Amber Steady The computer is charging and plugged in.
Left view
28 - Your Acer tablet PC tour
1
No. Item Description
1 DC-in Connects to an AC adapter.
Right view
1
No. Item Description
1 USB 2.0 port Connect to USB devices.
Bottom view
Your Acer tablet PC tour - 29
1
No. Item Description
Secures the tablet to the keyboard dock until
1 Release latch
opened
.
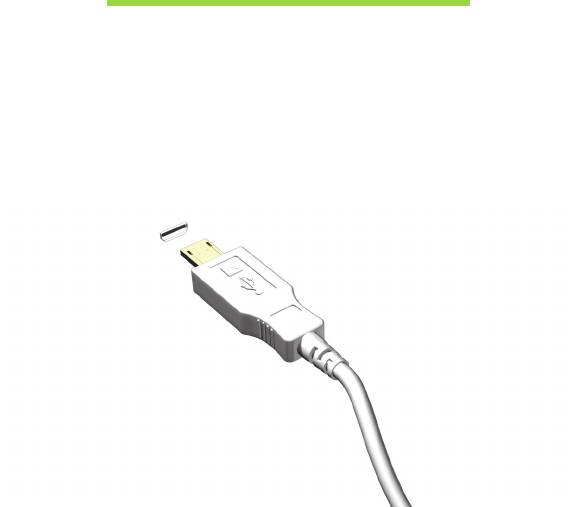
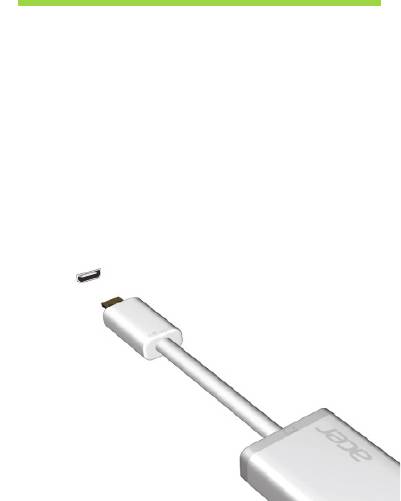
MICRO USB
The USB (Universal Serial Bus) port is a high-speed serial bus which
allows you to connect USB peripherals without taking up system
resources.
The Micro USB port provides a compact port that is fully compatible with
USB 2.0 devices.
Note: A Micro USB to USB adapter is needed to connect to USB
devices that use a full-sized connector.
Note: A Micro USB to USB adapter is only included with certain
models.
30 - Micro USB
HDMI MICRO
HDMI (High-Definition Multimedia Interface) is an industry-supported,
uncompressed, all-digital audio/video interface. HDMI provides an
interface between any compatible digital audio/video source, such as a
set-top box, DVD player, and A/V receiver and a compatible digital audio
and/or video monitor, such as a digital television (DTV), over a single
cable.
Use the HDMI Micro port on your computer to connect with high-end audio
and video equipment. Single cable implementation allows tidy setup and
fast connection.
Note: A HDMI Micro to HDMI adapter is only included with certain
models.
HDMI Micro - 31
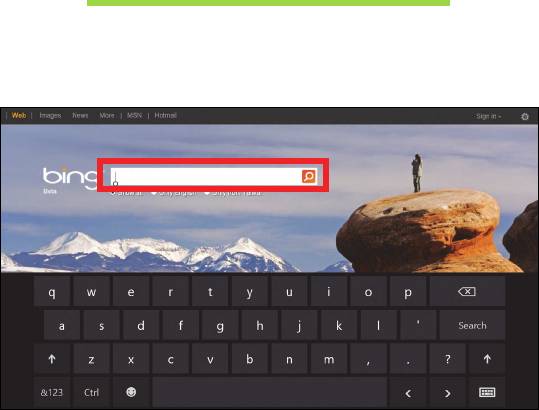
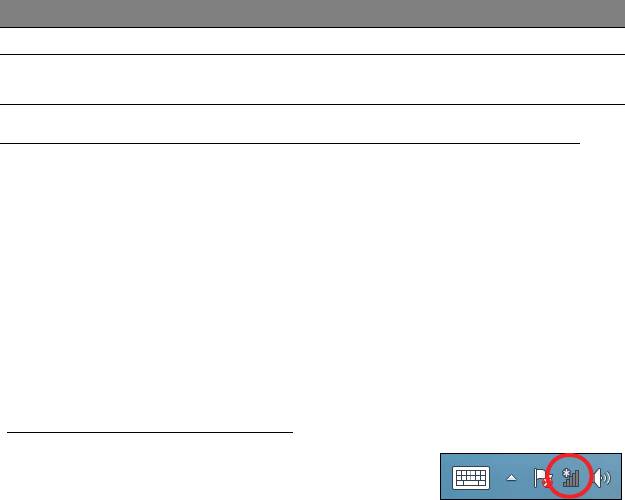
USING THE VIRTUAL KEYBOARD
Microsoft Windows provides a convenient virtual keyboard for entering
data. There are several ways to display the keyboard:
Tap inside any text field to display the Windows virtual keyboard.
32 - Using the virtual keyboard
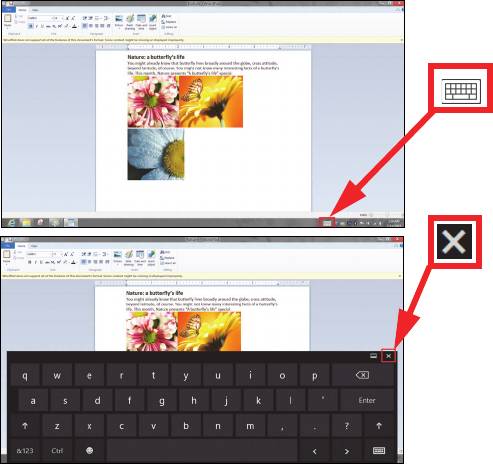
From Desktop, tap the Keyboard icon in the system tray to display the
keyboard. Tap the "x" in the keyboard’s top-right corner to close the
keyboard.
Using the virtual keyboard - 33

WIRELESS NETWORKS
Connecting to the Internet
Your computer's wireless connection is turned on by default.
Windows will detect and display a list of available networks during setup.
Select your network and enter the password if required.
Otherwise, open Internet Explorer and follow the instructions.
Please refer to your ISP or router documentation.
Wireless networks
A wireless LAN or WLAN is a wireless local area network, which may link
two or more computers without using wires. Setting up a wireless network
is easy and allows you to share files, peripheral devices and an Internet
connection.
What are benefits of a wireless network?
Mobility
Wireless LAN systems allow you and other users of your home network to
share access to files and devices connected to the network, for example a
printer or scanner.
Also you can share an internet connection with other computers in your home.
34 - Wireless networks

Installation speed and simplicity
Installing a wireless LAN system can be fast and easy and eliminates the
need to pull cables through walls and ceilings.
Components of a wireless LAN
To set up your Wireless network at home you need to have the following:
Access point (router)
Access points (routers) are two-way transceivers that broadcast data into the
surrounding environment. Access points act as a mediator between wired
and wireless network. Most routers have a built-in DSL modem that will allow
you access to a high speed DSL internet connection. The ISP (Internet
Service Provider) you have chosen normally supplies a modem/router with
the subscription to their services. Read carefully the documentation supplied
with your Access point/router for detailed setup instructions.
Wireless networks - 35
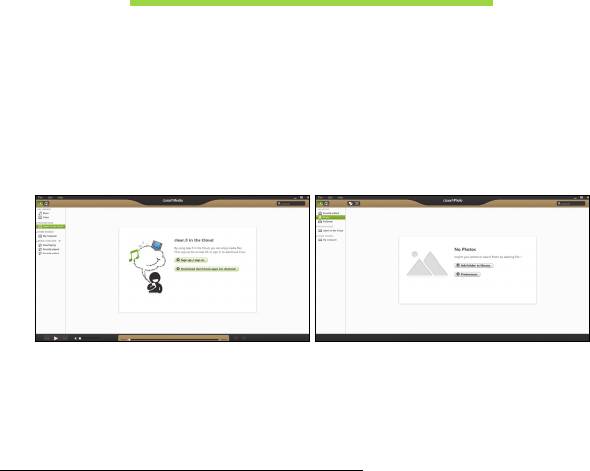
ACER CLEAR.FI
Note: Only for certain models.
With Acer clear.fi, you can enjoy videos, photos and music. Stream media
from, or to, other devices with Acer clear.fi installed.
Note: All devices must be connected to the same network.
To watch videos or listen to music open clear.fi Media, to browse photos
open clear.fi Photo.
Important: When you first open a clear.fi application, Windows
Firewall will ask for permission to allow clear.fi to access the network.
Select Allow Access in each window.
Navigating media and photos
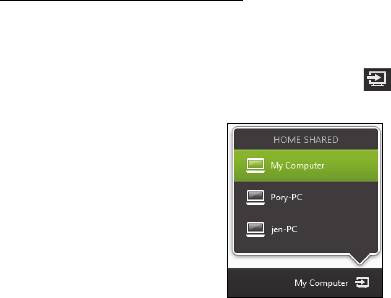
The list in the left panel shows your computer (’My Library’), then other
devices if any are connected to your network (’Home Shared’).
To view files on your computer, select one of the categories under ’My
Library’, then browse the files and folder on the right.
36 - Acer clear.fi
Shared files
Devices connected to your network are shown in the Home Shared
section. Select a device, then select the category to explore.
After a short delay, shared files and folders are shown on the right.
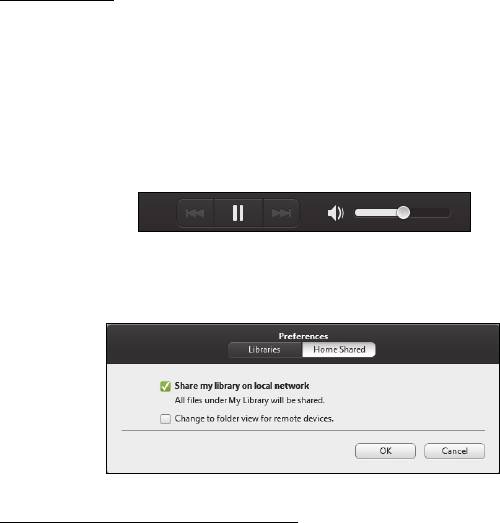
Browse to the file you want to play, then double-click to start playback.
Use the media controls in the bar across the bottom of the screen to
control playback. For example, when music is selected, you can play,
pause or stop playback, and adjust the volume.
Note: You must activate sharing on the device that stores the files.
Open clear.fi on the device that stores the files, select Edit then make
sure Share my library on local network is active.
Which devices are compatible?
Most devices with clear.fi or DLNA software can be used with the clear.fi
software. These include DLNA-compliant PCs, smartphones, and NAS
(Network Attached Storage) devices.
Acer clear.fi - 37
Note: DLNA is an standard that allows devices connected to a home
network to communicate and share files.
Playing to another device
If you want to play the media on another device, you need to do the
following:
1. In the bottom right corner, select Play to.
2. Select the remote device that will be used to play the file.
Note: Only devices optimised for playback are available in this list,
certain PCs and storage devices will not appear. To add a Windows PC
to this list, open Windows Media Player, select Stream and Allow
remote control of my Player...
3. Select a file in the main window, then use the media controls in the bar
across the bottom of the screen to control the remote device.
For more help, go to http://www.acer.com/clearfi/download/.
38 - Acer clear.fi
- 1
- 2
- 3
- 4
- 5
- 6
- 7
- 8
- 9
- 10
- 11
- 12
- 13
- 14
- 15
- 16
- 17
- 18
- 19
- 20
- 21
- 22
- 23
- 24
- 25
- 26
- 27
- 28
- 29
- 30
- 31
- 32
- 33
- 34
- 35
- 36
- 37
- 38
- 39
- 40
- 41
- 42
- 43
- 44
- 45
- 46
- 47
- 48
- 49
- 50
- 51
- 52
- 53
- 54
- 55
- 56
- 57
- 58
- 59
- 60
- 61
- 62
- 63
- 64
- 65
- 66
- 67
- 68
- 69
- 70
- 71
- 72
- 73
- 74
- 75
- 76
- 77
- 78
- 79
- 80
- 81
- 82
- 83
- 84
- 85
- 86
- 87
- 88
- 89
- 90
- 91
- 92
- 93
- 94
- 95
- 96
- 97
- 98
- 99
- 100
- 101
- 102
- 103
- 104
- 105
- 106
- 107
- 108
- 109
- 110
- 111
- 112
- 113
- 114
- 115
- 116
- 117
- 118
- 119
- 120
- 121
- 122
- 123
- 124
- 125
- 126
- 127
- 128
- 129
- 130
- 131
- 132
- 133
- 134
- 135
- 136
- 137
- 138
- 139
- 140
- 141
- 142
- 143
