Sharp R-870B – страница 4
Инструкция к Микроволновой Печи Sharp R-870B
E – 15
Grill Cooking
1
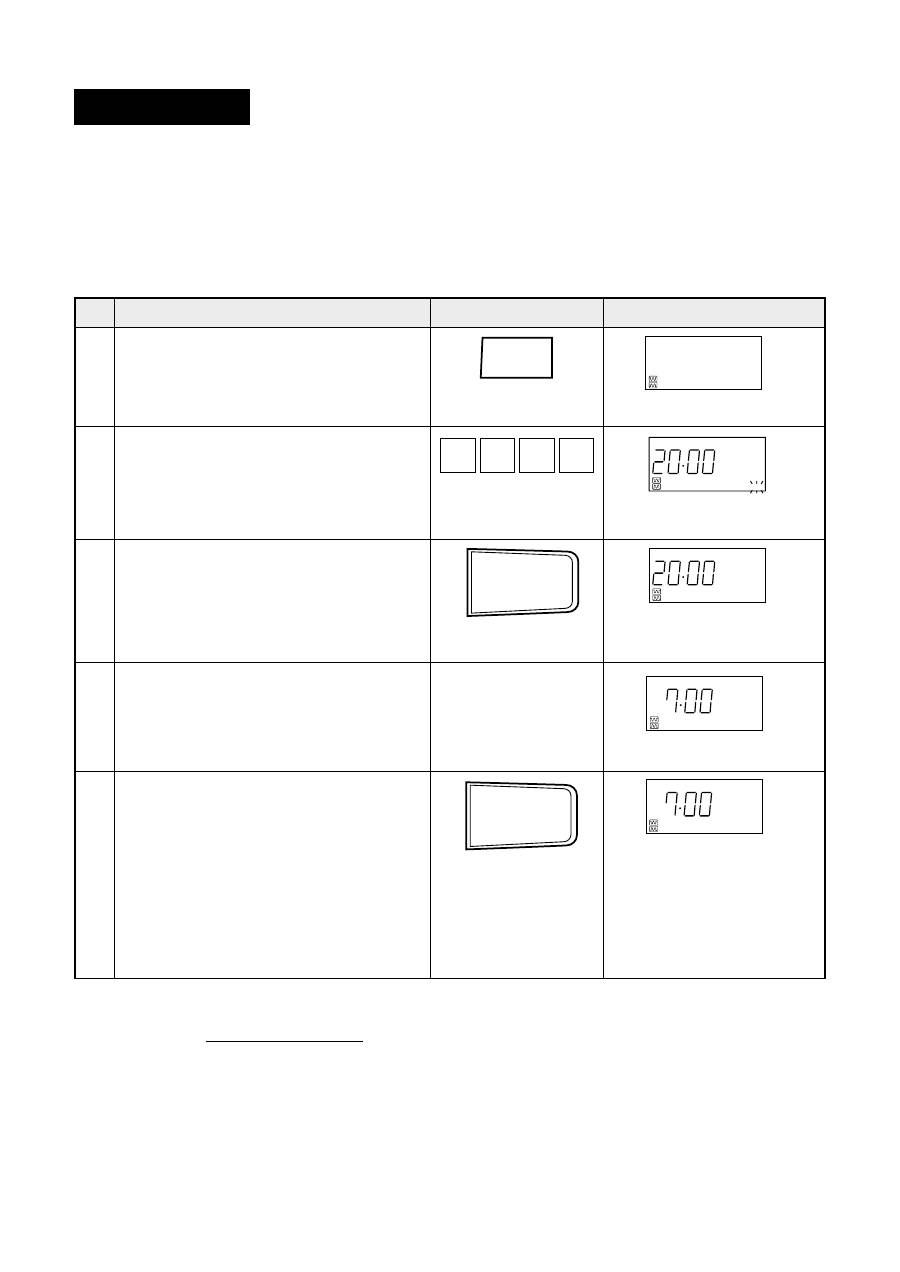
Your oven has three grill cooking modes. Select the desired grill mode by pressing the GRILL pad.
For the top heater mode, press the GRILL pad once.
For the bottom heater mode, press the GRILL pad twice.
For the double grill mode, press the GRILL pad three times.
It is not necessary to preheat for grill cooking.
Step
Procedure
Pad Order
Display
Press the GRILL pad three times.
* Suppose you want to cook 1.0 kg of steak for 20 minutes using the double grill mode.
Enter desired cooking time.
Press the INSTANT COOK/START pad.
When the timer reaches about 2/3 of the
way through the cooking time, open the
door and turn over the steak. And then
close the door.
COOK will flash on and off.
5 3 2
Warning:
The oven cavity, door, turntable, turntable support, racks, dishes and especially bottom heater will
become very hot, use thick oven gloves when putting/removing the food or turntable from the oven to
PREVENT BURNS.
The timer begins to count
down again. When it reaches
zero, all indicators will go off
and the oven will "beep". The
cooling fan will remain on
until the oven cavity has been
cooled.
The timer begins to count
down.
0
0
0
2
4
Press the INSTANT COOK/START pad.
INSTANT COOK/START
>SCNHJT
GHBUJNJDKTZBT/
GECR
COOK
GHBUJN.
COOK
GHBUJN.
INSTANT COOK/START
>SCNHJT
GHBUJNJDKTZBT/
GECR
COOK
GHBUJN.
GRILL
UHBKM
x 3
E – 16
Step
Procedure
Pad Order
Display
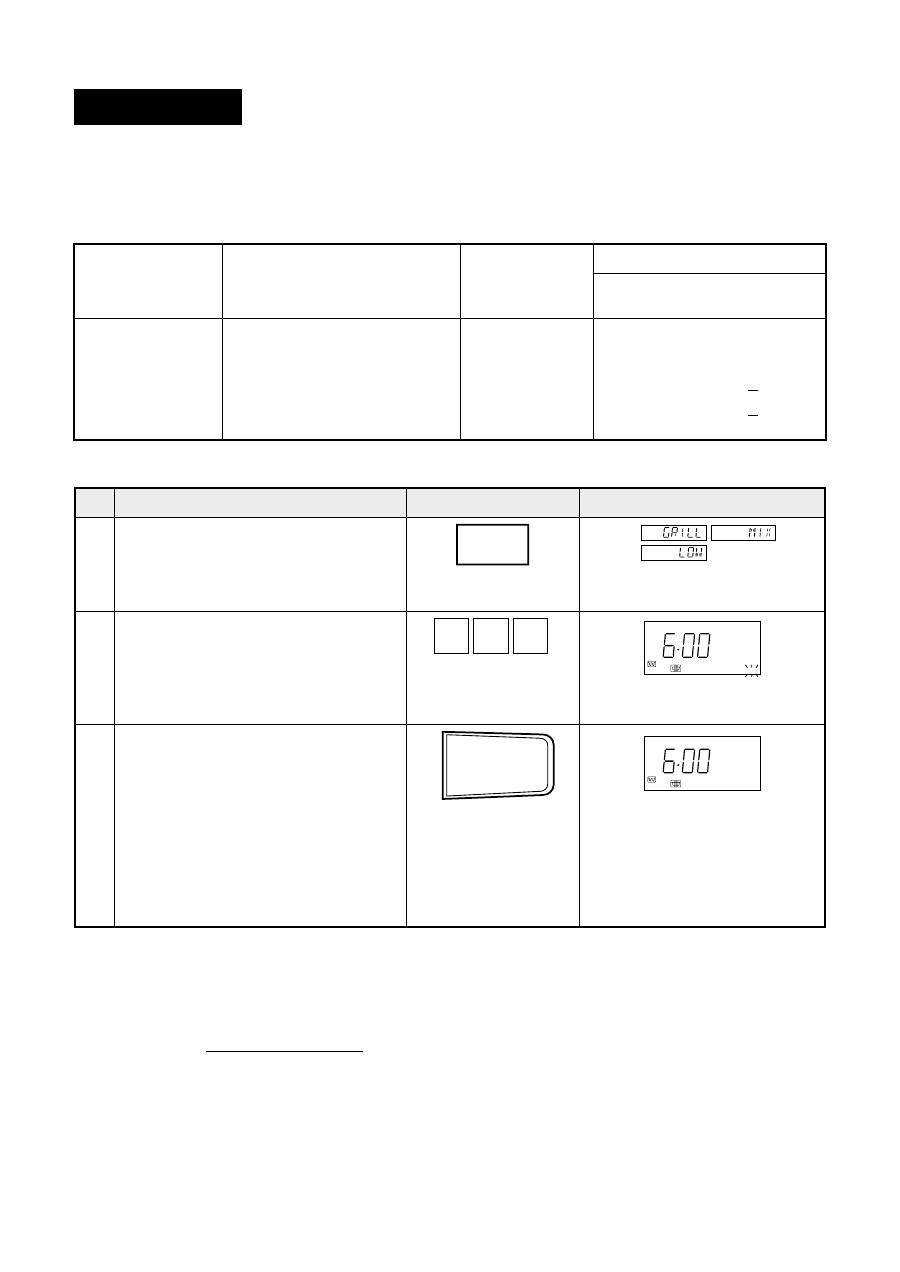
Press the MIX pad 4 times.
Enter desired cooking time.
Press the INSTANT COOK/START pad.
COOK will flash on and off.
2 3
The timer begins to count down.
When it reaches zero, all indica-
tors will go off and the oven will
"beep". The cooling fan will re-
main on until the oven cavity
has been cooled.
6
0
0
INSTANT COOK/START
>SCNHJT
GHBUJNJDKTZBT/
GECR
COOK
GHBUJN.
COOK
GHBUJN.
NOTE:
If you want to change convection temperature, press the CONVEC pad until the desired temperature
appears in the display after step 1. And continue step 2.
Warning:
The oven cavity, door, turntable, turntable support, racks, dishes and especially the bottom heater will
become very hot, use thick oven gloves when putting/removing the food or turntable from the oven to
PREVENT BURNS.
Your oven has four preprogrammed settings that make it easy to cook with convection and microwave
or the top grill heater and microwave.
Select the desired mix setting by pressing the MIX pad. You cannot change the microwave power level.
Preset programme
Convec Mix High
Microwave+Convection (˚C)
Once
30%
250
°
C
Convec Mix Low
Microwave+Convection (˚C)
Twice
10%
250
°
C
Grill Mix High
Microwave+Grill (Top Heater)
Three times
50%
Grill Mix Low
Microwave+Grill (Top Heater)
Four times
10%
Setting
Microwave
power
The times
pressing
MIX pad
Mode
Convection
temperature
(1) To cook by Mix Cooking
Mix Cooking
* Suppose you want to cook for 6 minutes on Grill Mix Low.
1
MIX
CVTIFZZSQ
x 4
E – 17
(2) To Preheat and Cook with Mix (Convection)
COOK will flash on and off.
will be displayed repeatedly.
When preheat is over, the oven
will "beep" 4 times and
will be displayed.
will be
displayed.
5
The timer begins to count down
to zero.
COOK will flash on and off.
COOKING
4 6 3 2 1
NOTE:
The convection temperature of mix cooking after preheat will be set at the preheat temperature
automatically. If you wish to change convection temperature of Mix setting, using the above procedure,
press the CONVEC pad until the desired temperature appears in the display after Step 2. And continue
Step 3.
Warning:
The oven cavity, door, turntable, turntable support, racks, dishes and especially the bottom heater will
become very hot, use thick oven gloves when putting/removing the food or turntable from the oven to
PREVENT BURNS.
Step
Procedure
Display
Pad Order
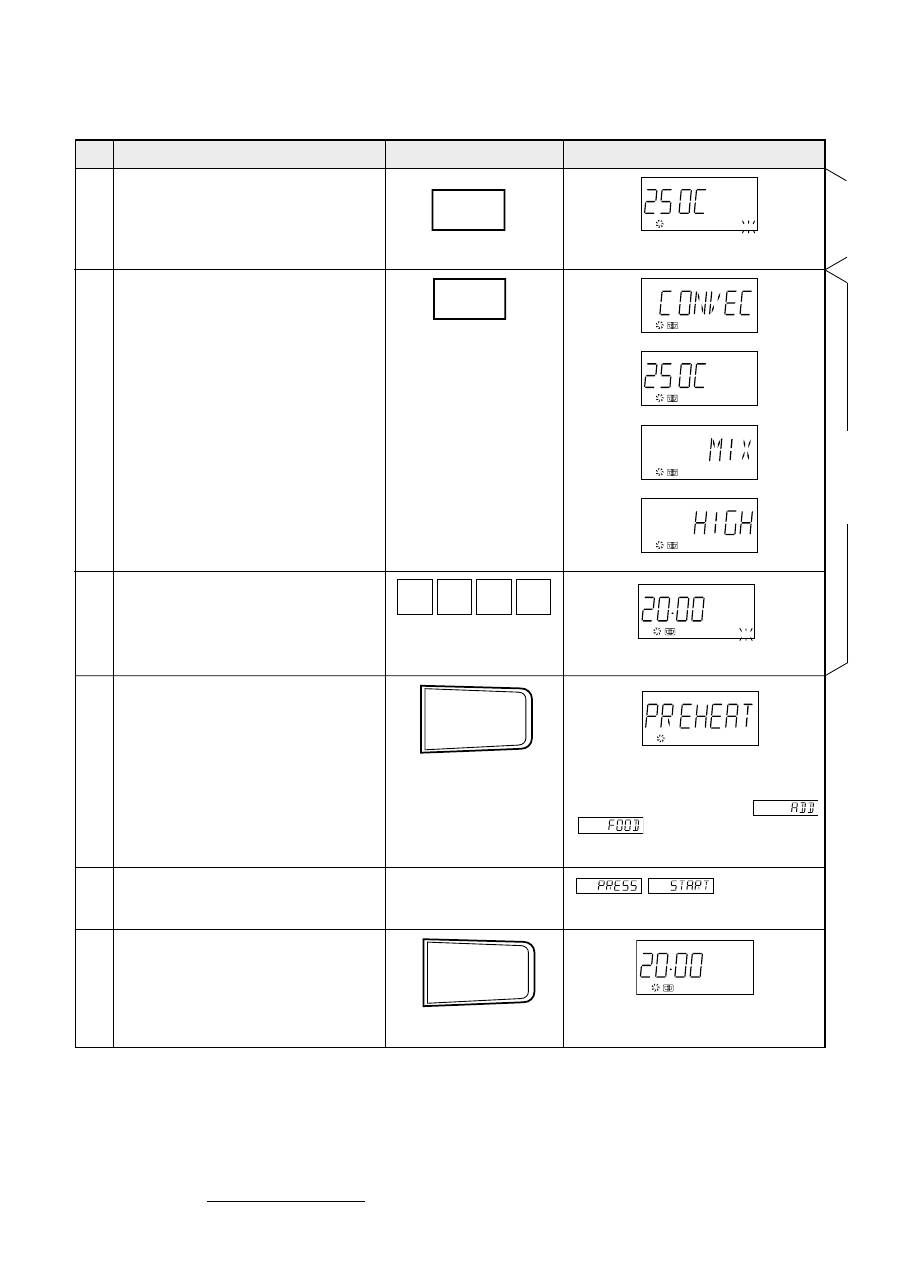
PREHEAT
* Suppose you want to preheat the oven to 250
°
C and cook for 20 minutes on Convec Mix High.
Select preheat temperature by
pressing the PREHEAT pad as
required (for 250
°
C press once).
Select desired Mix setting by
pressing the Mix pad (for Convec
Mix High press once).
Enter desired cooking time.
0
0
0
2
Press the INSTANT COOK/START
pad.
When "ADD FOOD" is displayed,
the oven is preheated. If the oven
door is not opened, the oven will
automatically hold at the preheat
temperature for 30 minutes.
Press the INSTANT COOK/START
pad.
Open the door. Place food in oven.
Close the door.
COOK
GHBUJN.
COOK
GHBUJN.
COOK
GHBUJN.
COOK
GHBUJN.
MIX
CVTIFZZSQ
x 1
INSTANT COOK/START
>SCNHJT
GHBUJNJDKTZBT/
GECR
INSTANT COOK/START
>SCNHJT
GHBUJNJDKTZBT/
GECR
PREHEAT
HFPJUHTD
LEÜJDRB
x 1

E – 18
AUTOMATIC OPERATIONS
1.
will be displayed if:
more or less than the quantity or weight of foods suggested in each MENU GUIDE is programmed
when the INSTANT COOK/START pad is pressed.
To clear, press the STOP/CLEAR pad and reprogramme.
2. When using the automatic features, carefully follow the details provided in each MENU GUIDE to
achieve the best result.
If the details are not followed carefully, the food may be overcooked or undercooked or
may
be displayed.
3. Food weighing more or less than the quantity or weight listed in each MENU GUIDE, cook manually.
Refer to cook book.
4. When entering the weight of the food, round off the weight to the nearest 0.1kg(100g). For example,
1.65kg would become 1.7kg.
5. To change the final cooking or defrosting result from the standard setting, press the MORE(
) or
LESS(
) pad prior to pressing each automatic operation pad. See page E-40.
6. The final cooking result will vary according to the food condition (e.g. initial temperature, shape,
quality). Check the food after cooking and if necessary continue cooking manually.
7. You can get a cooking hint whenever HELP is lit in the display. See page E-39.
SPECIAL NOTE FOR SENSOR COOKING
1. Wipe off any moisture from the outside of cooking containers and the interior of the oven with a
dry cloth or paper towel prior to cooking on SENSOR REHEAT DISH, SENSOR RICE COOK, or
SENSOR STEAM MENU.
2. After the oven is plugged in, wait 2 minutes before using SENSOR REHEAT DISH, SENSOR RICE
COOK, or SENSOR STEAM MENU.
3.
will be displayed if the door is opened or the STOP/CLEAR pad is pressed before the
cooking time is displayed.
To clear, press the STOP/CLEAR pad and cook manually.
Notes for Automatic Operations
E – 19
Crispy Snack
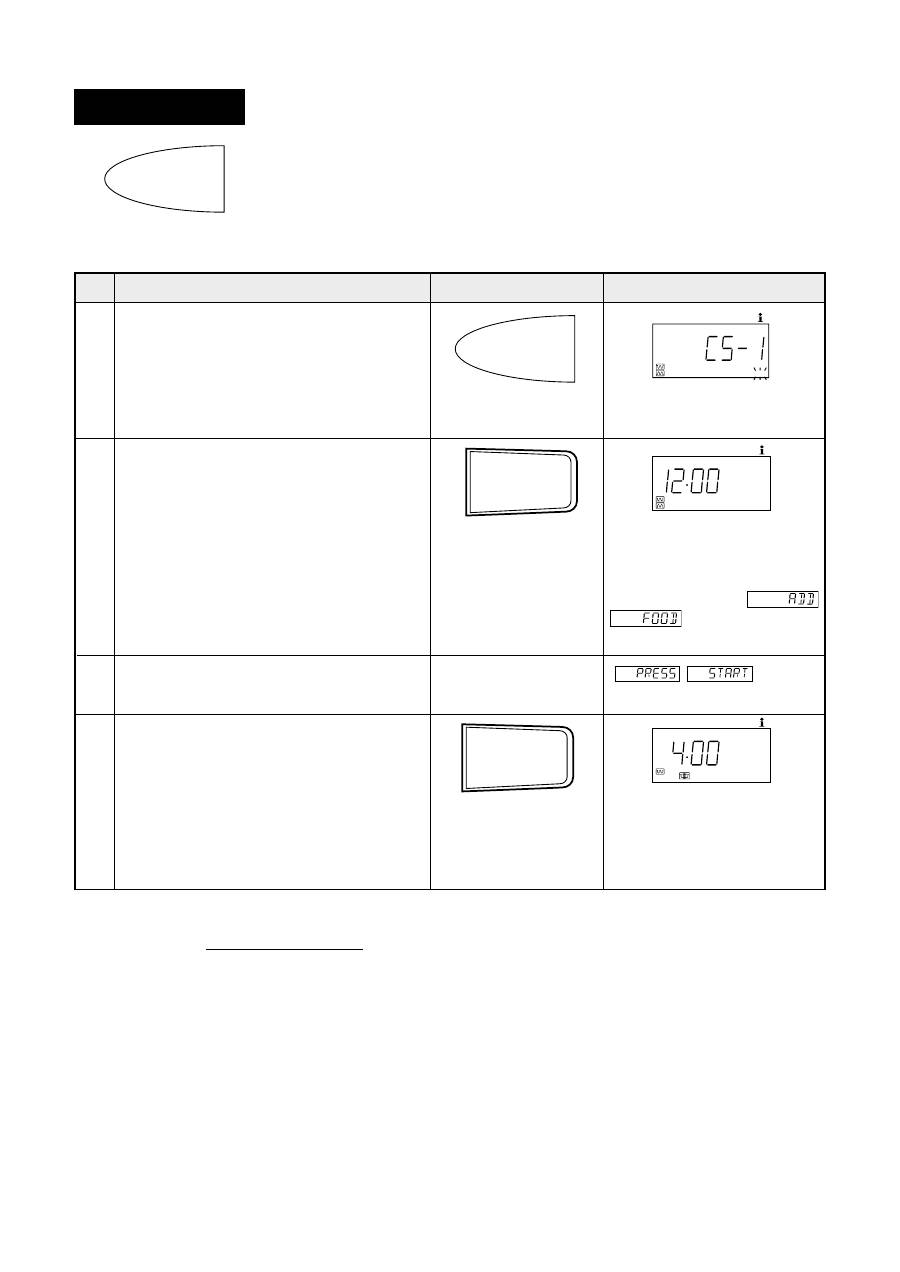
CRISPY SNACK will automatically compute the
cooking mode and cooking time.
* Suppose you want to cook 1 serve of Potato Skins.
Step
Procedure
Pad Order
Display
Press the CRISPY SNACK pad until the
desired menu number is displayed (for
Potato Skin press once).
Open the door. Add the toppings.
Close the door.
Press the INSTANT COOK/START pad.
1. Potato Skin
2. Garlic Bread
3. Chicken Wings
4. Salty Peanuts
5. Convenient Food
Press the INSTANT COOK/START pad.
3
will be
displayed repeatedly.
COOK will flash on and off.
AUTO
COOK
FDNJ
GHBUJN.
HELP
INSTANT COOK/START
>SCNHJT
GHBUJNJDKTZBT/
GECR
4
Warning:
The oven cavity, door, turntable, turntable support, racks, dishes and especially the bottom heater will
become very hot, use thick oven gloves when putting/removing the food or turntable from the oven to
PREVENT BURNS.
CRISPY SNACK
ÜHECNYOFY
PFRECRF
x 1
INSTANT COOK/START
>SCNHJT
GHBUJNJDKTZBT/
GECR
AUTO
COOK
HELP
FDNJ
GHBUJN.
AUTO
COOK
HELP
FDNJ
GHBUJN.
The cooking time will begin
counting down. When the
audible signals sound, the
oven will stop and
will be displayed
repeatedly.
2 1
CRISPY SNACK
ÜHECNYOFY
PFRECRF
The cooking time will begin
counting down to zero, when
it reaches zero, an audible
signal will sound and STAND
will be displayed.

E – 20
10 - 12 pieces
(1 piece, 35 - 40 g)
Potato Skin
350 g
Crispy Snack Menu Guide
Menu
Quantity
(one serve only)
Procedure
Initial
Temperature
Menu
No.
• Cut out the potato skins into slices of
0.5 cm thick, 5 x 7 cm in size (total
weight of potato skins should be around
350 g).
• Put the potato skins on the turntable
brushed with oil (with skin side down).
• Cook uncovered.
• When oven has stopped, splinkle
slightly with salt and pepper.
• Layer cheese slices and bacon dices
and green onion dices on top of the
potato skins.
• Continue to cook.
• After cooking, stand.
• Serve with sour cream.
• Spread the garlic spread evenly on the
French bread.
• Arrange the French bread along the
edge of low rack.
• After cooking, stand.
• Wash the chicken mid-joints, pierce
the skin, pat dry and marinate with the
sauce mixture. (If chicken wings are
used, separate at joints into 3 parts
each, discarding tip.)
• Arrange the mid-joints on low rack.
• After cooking, stand.
• Spread the peanuts on the turntable.
• When oven has stopped, stir. And then
continue to cook.
• When oven has stopped again, stir.
And then continue to cook.
• When oven has stopped again, take
out the peanuts and mix sparingly with
oil and salt, then spread the peanuts
evenly on the turntable again.
• Continue to cook.
• After cooking, stir and stand.
• Remove from package.
• Put onto the turntable lined with oil-
brushed foil paper.
• When oven has stopped, turn over.
And then continue to cook.
• When oven has stopped again, turn
over and brush oil on foil paper lined
turntable where necessary.
• Continue to cook.
• After cooking, stand.
20-25˚C
Room
temperature
CS-2
Garlic Bread
20-25˚C
Room
temperature
Ingredients:
7 slices
French bread (2cm thick)
Few
Garlic Spread
7 pieces
1 piece,
approx. 25 g
Chicken Wings
20-25˚C
Room
temperature
Ingredients:
12 (350-450g)
Chicken mid-joints
(or 10
Chicken wings)
Sauce:
2 tbsp
Soya sauce
3 tbsp
Barbecue Sauce
Drops
Tabasco Sauce
Few
Salt & pepper
CS-4 CS-3
Ingredients:
1-2(350g) Whole Potatoes (cooked)
Few
Sour Cream
Toppings:
70-75g
Cheddar Cheese (0.5cm slices)
Few
Salad bacon (diced)
Few
Green onion (diced)
To taste
Salt & pepper
280 - 330 g
Convenient Food
eg:
-Fish Fingers
-Fried Shrimp
-18˚C
Frozen
temperature
20-25˚C
Room
temperature
Salty Peanuts
300 g
CS-5 CS-1
E – 21
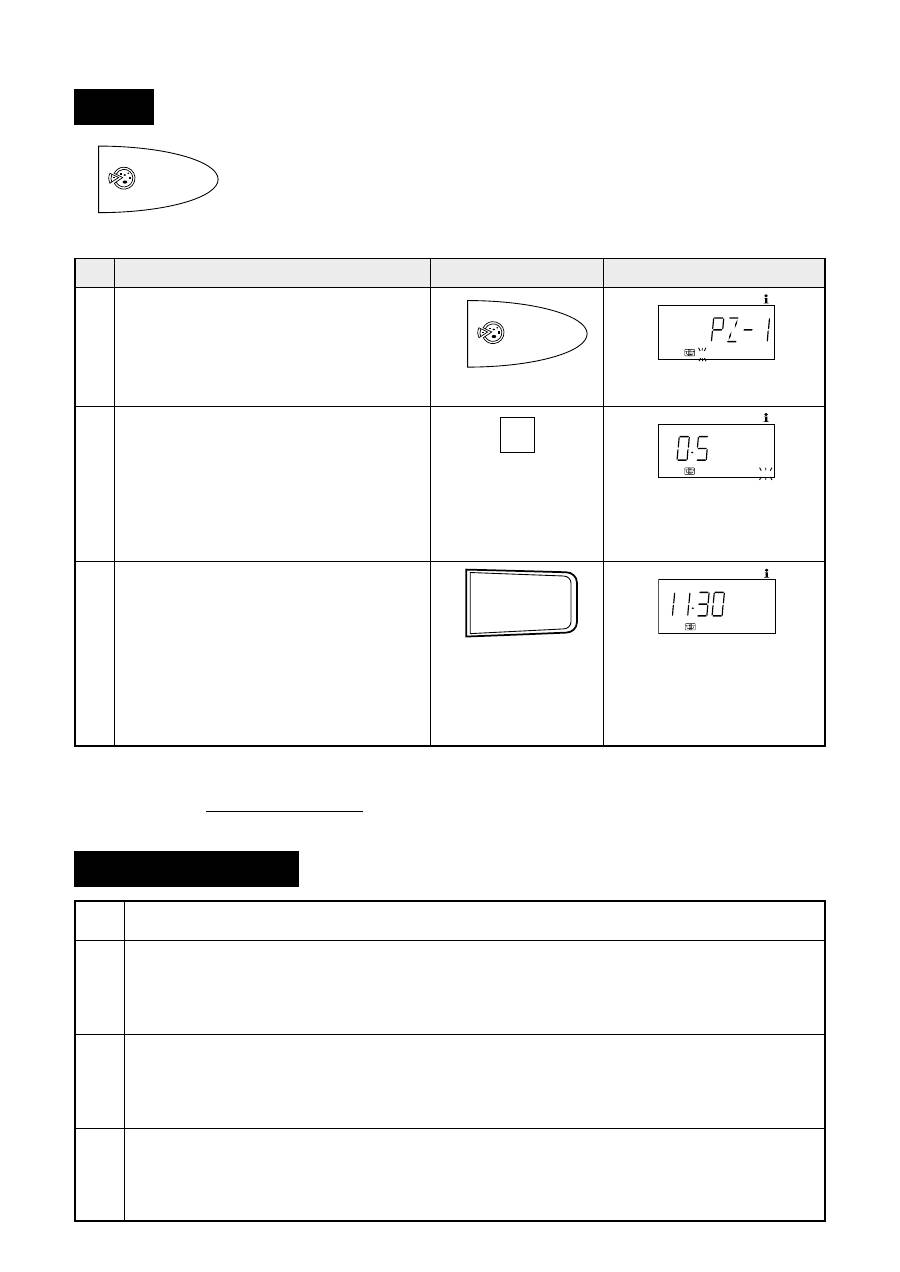
* Suppose you want to cook 0.5 kg of frozen pizza (1 pizza).
Pizza
1. Frozen
2. Fresh (Thin)
3. Fresh (Thick)
Step
Procedure
Pad Order
Display
Press the PIZZA pad until the desired
menu number is displayed (for Frozen
press once).
Press the INSTANT COOK/START pad.
Warning:
The oven cavity, door, turntable, turntable support, racks, dishes and especially bottom heater will
become very hot, use thick oven gloves when putting/removing the food or turntable from the oven to
PREVENT BURNS.
Press number pads to enter weight.
2
Pizza Menu Guide
Menu
Quantity
Procedure
Initial
Temperature
Menu
No.
PZ-3
Frozen Pizza
Fresh Pizza
(thin crust)
Fresh Pizza
(thick crust)
-18˚C
Frozen
temperature
20 - 25˚C
Room
temperature
20 - 25˚C
Room
temperature
0.1 - 0.5 kg
(1 pizza)
0.6 - 1.3 kg
(1 pizza)
0.8 - 1.6 kg
(1 pizza)
• Remove from package.
• Place directly onto turntable.
• After cooking, stand.
KG stops flashing and re-
mains on display.
COOK will flash on and off.
PIZZA
GBWWF
x 1
PIZZA will automatically compute the cooking mode
and cooking time.
The cooking time will begin
counting down to zero, when
it reaches zero, an audible
signal will sound and STAND
will be displayed.
AUTO
COOK
HELP
FDNJ
GHBUJN.
• See recipe on page E-22.
• See recipe on page E-22.
3 1
PIZZA
GBWWF
KG
AUTO
COOK
HELP
RU
FDNJ
GHBUJN.
KG
AUTO
HELP
RU
FDNJ
KG will flash on and off.
5
INSTANT COOK/START
>SCNHJT
GHBUJNJDKTZBT/
GECR
PZ-1 PZ-2

E – 22
HOMEMADE PIZZA RECIPES
[Ingredients](1 portion)
Dough:
Flour ......................................... 150 g
Water (lukewarm) .................... 90 ml
Yeast ............................................. 7 g
Sugar ......................................... 1 tsp
Salt .......................................... 1/2 tsp
Olive Oil ..................................... 2 tsp
Toppings: Canned Tomatoes ..................... 50 g
Tomate Paste ............................. 50 g
* Topping varieties ..................... 180 g
(Corn, Pineapple, Ham, Salami)
Grated Cheese ......................... 150 g
* Spices Varieties .................... to taste
(Basil, Oregano, Thyme, Salt, Pepper)
[Method]
1. Dough Preparation:
Make a deepening in the flour. Mix the lukewarm water with yeast and let stand for around 5
minutes. Pour the mixture into the deepening, then add sugar, salt & olive oil. Mix carefully to
form a dough. Put the dough in a deep bowl and cover with wrap. Then let stand for 30 min-
utes.
2. Roll out the dough to a round sheet, with diameter 8 inches (or 12 inches). Raise the edge with
the thumb to form a rim, then put the sheet of dough onto the turntable brushed with oil.
3. Drain the canned tomatoes and cut into pieces, mix well with tomato paste and the spices
varieties.
Spread the mixture onto the sheet of dough. Then add grated cheese, followed by the topping
varieties. Sprinkle with grated cheese again before baking.
4. Bake the pizza in the following steps :
5. After cooking, stand.
Type
Thin Crisp
Thick Crisp
Size
8 inches
12 inches
8 inches
12 inches
Portion of
1 portion
1
1
/
2
portions
1
1
/
2
portions
2
1
/
2
portions
Dough
(As above)
Portion of
1 portion
2 portion
1 portion
2 portion
Toppings
(As above)
(As above)
E – 23
Warning:
The oven cavity, door, turntable, turntable support, racks, dishes and especially bottom heater will
become very hot, use thick oven gloves when putting/removing the food or turntable from the oven to
PREVENT BURNS.
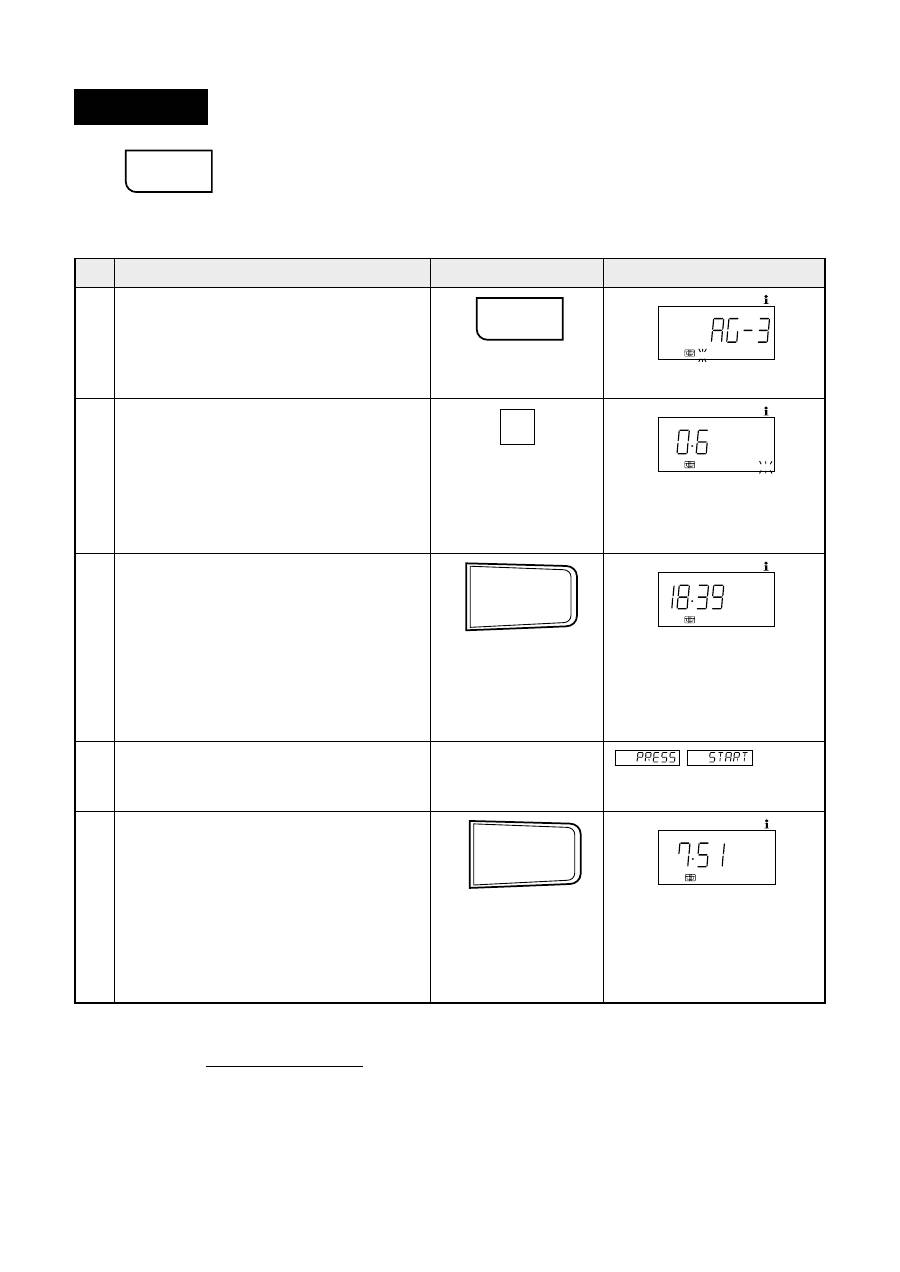
Auto Grill
Step
Procedure
Pad Order
Display
Press the AUTO GRILL pad until the de-
sired menu number is displayed (for Steak
press three times).
Press the INSTANT COOK/START pad.
Press number pads to enter weight.
2
Open the door. Turn over the meat.
Close the door.
Press the INSTANT COOK/START pad.
will be
displayed repeatedly.
4
The cooking time will begin
counting down. When the
audible signals sound, the
oven will stop and TURN
OVER will flash on and off.
KG stops flashing and re-
mains on display.
COOK will flash on and off.
The cooking time will begin
counting down to zero,
when it reaches zero, an
audible signal will sound
and STAND will be dis-
played.
AUTO GRILL will automatically compute the cook-
ing mode and cooking time for the 3 listed menus.
Follow the details provided in Auto Grill Menu
Guide.
INSTANT COOK/START
>SCNHJT
GHBUJNJDKTZBT/
GECR
5 3 1
* Suppose you want to cook 0.6 kg of Steak.
GRILL
UHBKM
KG
AUTO
COOK
HELP
RU
FDNJ
GHBUJN.
AUTO
COOK
HELP
FDNJ
GHBUJN.
1. Grilled Fish
2. Grilled Lobster
3. Steak
6
GRILL
UHBKM
x 3
KG
AUTO
HELP
RU
FDNJ
INSTANT COOK/START
>SCNHJT
GHBUJNJDKTZBT/
GECR
AUTO
COOK
HELP
FDNJ
KG flashes on and off.

E – 24
Auto Grill Menu Guide
Menu
Procedure
Menu
No.
Initial
Temperature
Weight (KG)
8 - 12˚C
0.1 - 0.4kg
• Wash fish thoroughly and remove scales.
• Make a few slits on the skin of fish, pierce
the eyes of fish.
• Pat dry, then brush oil on fish body.
• Place on the high rack (brushed lightly
with oil), uncovered.
• When oven stops, turn it over. Continue
to cook.
• When oven stops, turn it over again.
• Cut the whole lobster into 2 halves.
• Wash the lobster halves and remove all
substances inside its head.
• Sprinkle little cornflour over surface of
lobster's body.
• Slice cheese in about 1 cm thickness and
cover the top of lobster with the cheese.
• Place on a ceramic plate, then on the
high rack.
• Cook uncovered.
• 1/2 (1pc) or 1 (2pcs) lobster can be cooked
each time. But whenever small size of
lobster is cooked, make sure the (
)
LESS pad is entered for best results.
• Steak is recommended to have a thick-
ness of about 1.5 cm to get good result.
• Season as desired.
• Place on the high rack.
• When oven stops, turn steak over.
• After cooking, stand.
• Serve with hot sauce where necessary.
0.1 - 0.6kg
1 lobster,
Regular size:
360g to 600g
Small size (LESS)
240g to 360g
Grilled Fish
eg: Hake
Bass
etc.
NOTE
8 - 12˚C
0.2 - 0.6kg
AG-3 AG-2 AG-1
Grilled Lobster
10 - 14˚C
• The tail of lobsters should be made
“flat” as much as possible to avoid
getting burnt.
• Lobsters should be fresh, otherwise
there will be much “juice” came out
during and after cooking.
• Lobsters should be transferred to
another plate after cooking as the
cheese might melt and spread
around the plate, making it messy
and not presentable when serve.
Steak
(Beef Steak)
E – 25
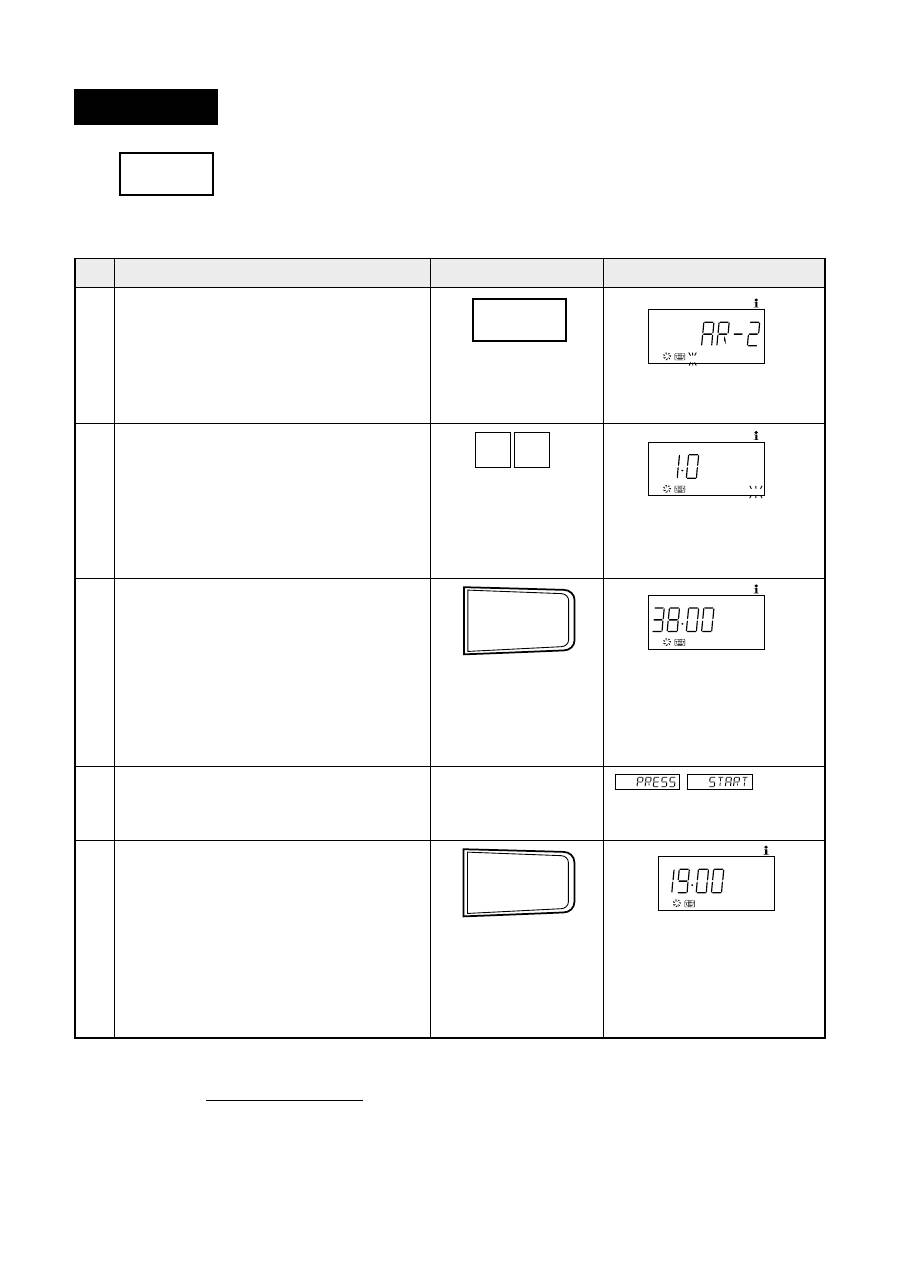
* Suppose you want to cook 1.0 kg of Lamb.
Auto Roast
Press the AUTO ROAST pad until the
desired menu number is displayed (for
Lamb press twice).
Press the INSTANT COOK/START pad.
Press number pads to enter weight.
2
Open the door. Turn over the meat.
Close the door.
Press the INSTANT COOK/START pad.
will be
displayed repeatedly.
Warning:
The oven cavity, door, turntable, turntable support, racks, dishes and especially bottom heater will
become very hot, use thick oven gloves when putting/removing the food or turntable from the oven to
PREVENT BURNS.
The cooking time will begin
counting down. When the
audible signals sound, the
oven will stop and TURN
OVER will flash on and off.
KG stops flashing and
remains on display.
COOK flashes on and off.
AUTO ROAST will automatically compute the cooking
mode and cooking time for the 3 listed menus.
Follow the details provided in Auto Roast Menu
Guide.
KG flashes on and off.
AUTO
COOK
HELP
FDNJ
GHBUJN.
5
The cooking time will begin
counting down to zero,
when it reaches zero, an
audible signal will sound
and STAND will be dis-
played.
3 1 4
KG
AUTO
HELP
RU
FDNJ
AUTO
COOK
HELP
FDNJ
GHBUJN.
1. Beef
2. Lamb
3. Chicken
Step
Procedure
Pad Order
Display
KG
AUTO
COOK
HELP
RU
FDNJ
GHBUJN.
ROAST
ÖFHTZBT
ROAST
ÖFHTZBT
x 2
0
1
INSTANT COOK/START
>SCNHJT
GHBUJNJDKTZBT/
GECR
INSTANT COOK/START
>SCNHJT
GHBUJNJDKTZBT/
GECR

E – 26
Auto Roast Menu Guide
Menu
Procedure
Menu
No.
Initial
Temperature
Weight (KG)
• Place fat side down on low rack,
uncovered.
• When oven has stopped, turn beef
over and shield the well cooked
portions where necessary.
• After cooking, stand for 10-15 minutes.
• Place fat side down on low rack,
uncovered.
• When oven has stopped, turn lamb
over and shield the well cooked
portions where necessary.
• After cooking, stand for 10-15 minutes.
• Wash chicken, trim away fat and pat
dry.
• Season as desired for at least 30 mins.
• Place on the low rack, uncovered.
• When oven stops, cover thinner part or
end of legs with foil. (Discard excess
oil on the turntable where necessary.)
Turn it over and continue to cook.
(Note: Make sure the foil does not
touch each other and the oven wall.)
• After cooking, stand for 5-10 minutes.
8 - 12˚C
8 - 12˚C
1.0 - 1.6kg
1.0 - 1.6kg
Beef
* You can select desired
cooking result.
MORE —Well done
STD —
Medium
LESS — Rare
Lamb
You cannot use the LESS pad
for this menu.
8 - 12˚C
If seasonings are used prior to
cooking, a better-cooked doneness
may be resulted.
NOTE
1.0 - 1.6kg
Chicken
AR-2 AR-1
If seasonings are used prior to
cooking, a better-cooked doneness
may be resulted.
NOTE
AR-3
E – 27
Warning:
The oven cavity, door, turntable, turntable support, racks, dishes and especially bottom heater will
become very hot, use thick oven gloves when putting/removing the food or turntable from the oven to
PREVENT BURNS.
AUTO BAKE will automatically compute the cooking
mode and cooking time for the 3 listed menus.
There is one recommended serving for each menu,
follow the details provided in Auto Bake Menu
Guide.
1. Cake
2. Apple Pie
3. Cookies
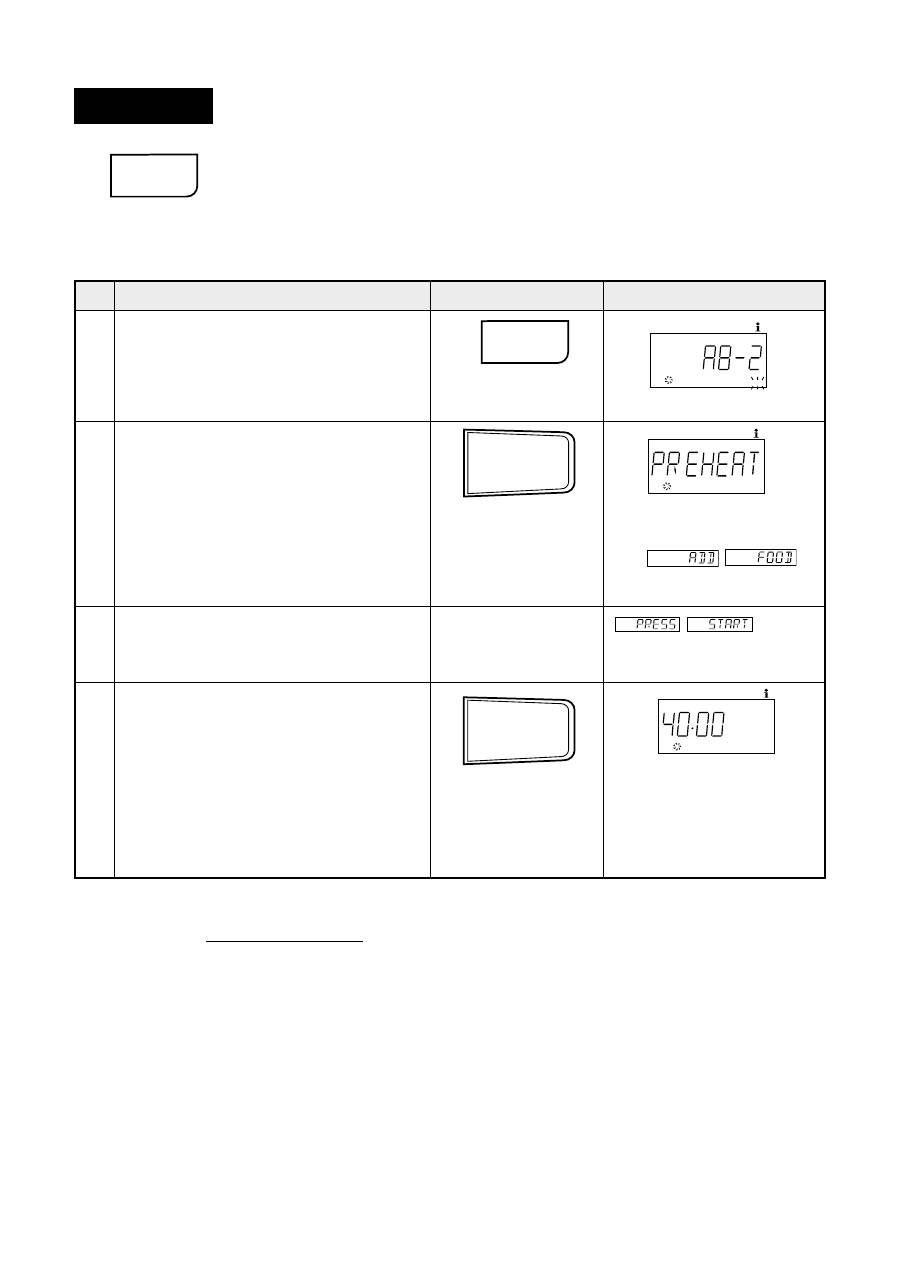
Auto Bake
* Suppose you want to bake 1 layer of Apple Pie.
Step
Procedure
Pad Order
Display
Press the AUTO BAKE pad until the
desired menu number is displayed (for
Apple Pie press twice).
2 3 1 4
Open the door. Place the pie plate on the
turntable.
Close the door.
will be
displayed repeatedly.
The cooking time will begin
counting down to zero,
when it reaches zero, an
audible signal will sound
and STAND will be dis-
played.
INSTANT COOK/START
>SCNHJT
GHBUJNJDKTZBT/
GECR
Press the INSTANT COOK/START pad.
AUTO
COOK
HELP
FDNJ
GHBUJN.
AUTO
COOK
HELP
FDNJ
GHBUJN.
When the audible signals
sound, the oven will stop
and
will be displayed
repeatedly.
AUTO
COOK
HELP
FDNJ
GHBUJN.
BAKE
DSGTXRF
x 2
Press the INSTANT COOK/START pad.
INSTANT COOK/START
>SCNHJT
GHBUJNJDKTZBT/
GECR
COOK will flash on and off.
BAKE
DSGTXRF

E – 28
Auto Bake Menu Guide
Procedure
Menu
No.
AB-1
• Remove turntable before preheating.
• Preheat is automatic for this menu.
• Prepare the cake as in the recipe on
page E-29.
• Place turntable with cake on the low
rack in the oven after preheating.
• After cooking, take out and let stand.
• Remove turntable before preheating.
• Preheat is automatic for this menu.
• Prepare the pie as in the recipe on
page E-29.
• Place turntable with pie in the oven
after preheating.
• After cooking, take out and let stand.
• Remove turntable before preheating.
• Preheat is automatic for this menu.
• Prepare the cookies as in the recipe on
page E-29.
• Place turntable with cookies in the
oven after preheating.
• After cooking, take out and let stand.
Menu
Initial
Temperature
20 - 25˚C
Room
temperature
Apple Pie
1 layer
Make one
22cm
round cake
Make one
22cm
round pie
20 - 25˚C
Room
temperature
20 - 25˚C
Room
temperature
Quantity
Cake
(Plain cake)
Cookies
(Chocochip
cookies)
AB-3 AB-2
Make 13
cookies

E – 29
[ Method ]
1. Mix butter and sugar thoroughly until light and fluffy.
2. Add in beaten eggs and mix well.
3. Fold in self raising flower, baking powder and milk.
4. Pour into a 22cm round metal baking tin lined with wax
paper.
Place on low rack and bake.
Plain Cake
[ Method ]
(Filling)
1. Peel off apple skins and discard apple cores. Cut the
apples into cubes of 3
×
4cm.
2. Mix with other filling ingredients in casserole. Cover and
cook at microwave HIGH for 8 minutes until apple is
tender.
3. After cooking, stir and let stand until it cools off.
Apple Pie
[ Ingredients ]
(Filling)
5 (900g)
apples (medium)
60g
sugar
1 1/2 tbsp
plain flour
2 tsp
lemon juice
few
cinnamon
few
nutmeg
(Pastry)
360g
plain flour
60g
sugar
185g
butter
5 tbsp
cold water
1
egg white (lightly beaten)
[ Ingredients ]
180 g
self raising flour
1/2 tsp
baking powder
80ml
milk
120g
butter (soften)
120g
caster sugar
3
eggs
(Pastry)
1. Sift flour and mix with sugar. Rub in butter until mixture
resembles fine breadcrumbs. Add in cold water sparingly
to form a soft dough.
2. Wrap in greaseproof paper and refrigerate for 1 hour.
3. Roll out 2/3 of pastry on a 22cm bottom, 3cm high metal
pie plate brushed with oil.
4. Spoon prepared filling into pastry case.
5. Roll out remaining pastry and cut into strips. Use pastry
strips as braids and cover the top of pie.
Press edges of pastry together; trim.
6. Brush egg white on pastry (pie top and edges). Place on
turntable and bake.
7. After baking, serve with cream or ice-cream when the pie
cools off.
[ Method ]
1. Cream butter and sugar until light and fluffy. Beat in egg
and vanilla essence.
2. Mix in sifted flour, then mix in chocolate chips and
walnut pieces.
3. Shape tablespoonfuls of mixture into balls. Place direct-
ly on turntable lined with oil-brushed foil paper; press
each down slightly with around 4cm in diameter.
Allow room for spreading, then bake.
4. After cooking, remove cookies from the oven immedi-
ately and let cool.
Chocolate Chip Cookies
[ Ingredients ]
60g
butter (soften)
100g
caster sugar
1/4 tsp
vanilla essence
1
egg (medium)
180g
self-raising flour
40g
chocolate chips
30g
walnut pieces
(Make 13 Cookies)
Auto Bake Recipe
E – 30
Sensor Rice Cook
1. Rice
2. Congee
3. Porridge
* Suppose you want to cook 2 serves of Rice: —
Step
Press the SENSOR RICE COOK pad until
the desired menu number is displayed
(for rice press once).
Procedure
Pad Order
Display
1
Press the INSTANT COOK/START pad.
COOK
COVER
HELP
GHBUJN.
CTZCJH
SENSOR
NOTE
1. For this function, plain congee or porridge without any ingredients is instructed. If you want
to include ingredients, follow the Sensor Rice Cook menu guide in page E-31 for ingredients,
quantity and procedure.
2. If you select CONGEE, you can have comparatively thick and soupish one. If you select
PORRIDGE, you can have more watery and thin one.
3. This function can be used with Auto Start. See page E-37.
COVER and COOK will
flash on and off.
2
The cooking time will begin
counting down.
When it reaches zero, the
oven will "beep".
STIR, STAND, COVER will
be displayed.
COOK
HELP
CTZCJH GHBUJN.
SENSOR
COOK
HELP
CTZCJH GHBUJN.
SENSOR
Press to select 3 popular rice menus.
Follow the detailes provided in Sensor Rice Cook
Menu Guide.
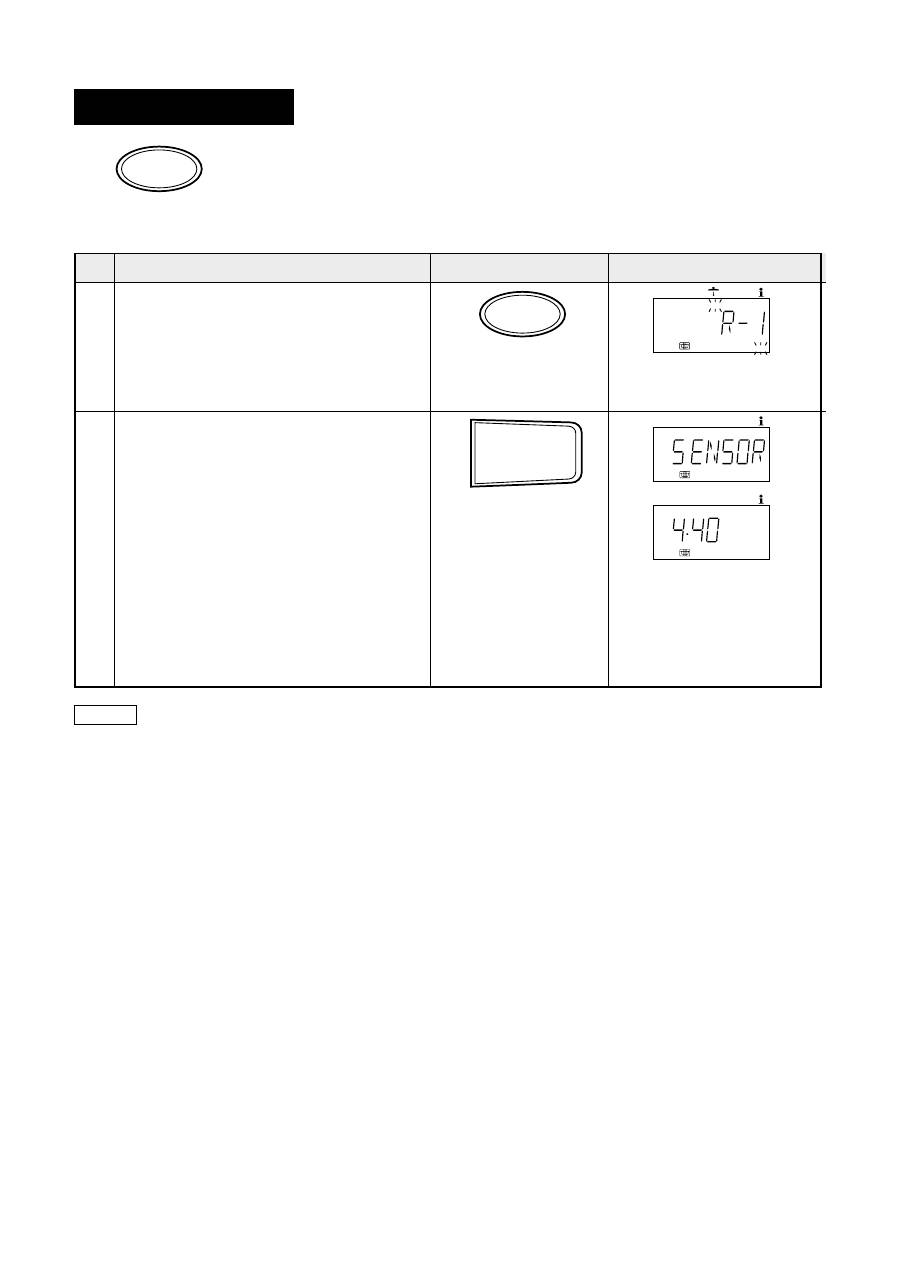
* When the sensor detects the vapour
from the food, the remaining cooking
time will appear.
(eg. remaining cooking time is approx-
imately 4 min. 40 sec.)
RICE COOK
GHBUJNJDKTZBT
HBCF
RICE COOK
GHBUJNJDKTZBT
HBCF
x 1
INSTANT COOK/START
>SCNHJT
GHBUJNJDKTZBT/
GECR
E – 31
Menu Variation
eg
★
Congee with Pallock Fish and Peanuts
Ingredients:
100g Pallock fish (fried; chopped)
(3-5 persons)
50g
Peanuts
1 slice
Salted Turnip (chopped)
3
Spring onions (chopped)
NOTE
The ingredients can be added just after finish, with Salted Turnip and
Spring onions as garnish and sprinkles on top.
★
Congee with salted pork and preserved duck eggs
Ingredients:
approx. 230g (
1
/
2
lb) lean pork (chopped)
(3-5 persons) 2 preserved duck eggs (diced)
NOTE
The ingredients can be added 10 min. before finish.
Serving (s)
Rice
Water
1 serve (1-2 persons)
150g
250ml
2 serves (3-5 persons)
300g
480ml
Serving (s)
Rice
Water
1 serve (1-2 persons)
50g
750ml
2 serves (3-5 persons)
80g
1400ml
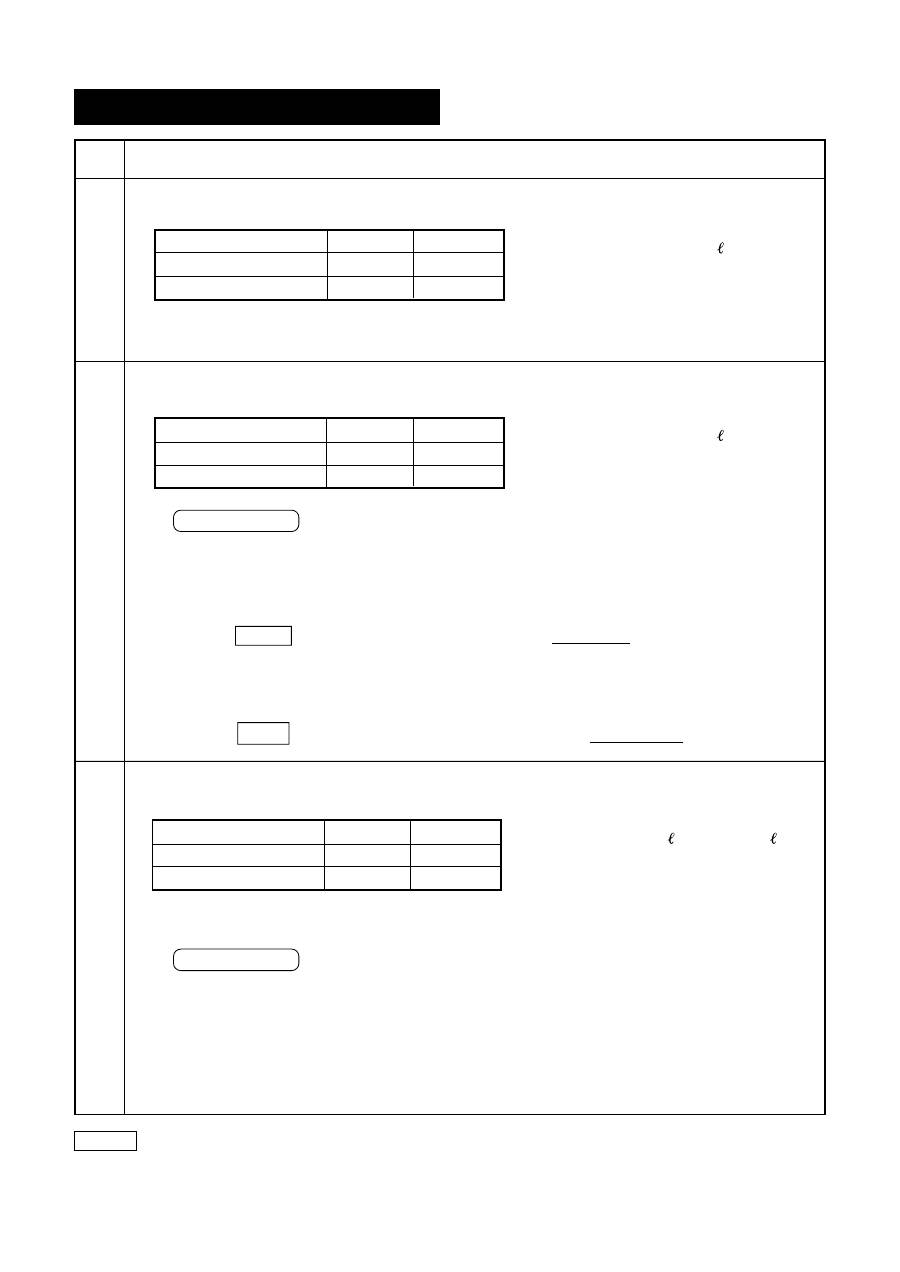
Sensor Rice Cook Menu Guide R-1
Menu
Procedure
Menu
No.
Quantity
Rice
• Wash rice until water runs
clear.
• Place rice and water into a deep
casserole (about 2 ) and soak
for 30 mins. Stir rice a few
times during soaking.
• Stir and cook with cover.
• After cooking, stir lightly and
stand for 5 mins with a cover.
• Wash rice until water runs
clear.
• Place rice and water into a deep
casserole (about 2 ) and soak
for 30 mins. Stir rice a few
times during soaking.
• Stir and cook uncovered.
• After cooking, stir and stand.
• Wash rice until water runs
clear.
• Place rice and water into a deep
casserole (2 for 1 serve, 3 for
2 serves) and soak for 15 mins.
Stir rice a few times during
soaking.
• Stir and cook uncovered.
• After cooking, stir and stand.
Congee
1-2 serves
1-2 serves
R-2
Serving (s)
Rice
Water
1 serve (1-2 persons)
70g
700ml
2 serves (3-5 persons)
140g
1400ml
Porridge
1-2 serves
Menu Variation
You can enjoy the variation by putting some ingredients into Porridge just after finish or 10 mins
before finish.
eg
★
Chicken porridge: 200g Chicken (cut small pieces, precooked)
(3-5 persons)
Spring Onion, cut 3cm long
★
Fish porridge : 250g Fish (precooked)
(3-5 persons)
2 slices Ginger (cut into stripes)
R-3
NOTE
Water temperature should be about 20
°
C at initial cooking.
E – 32
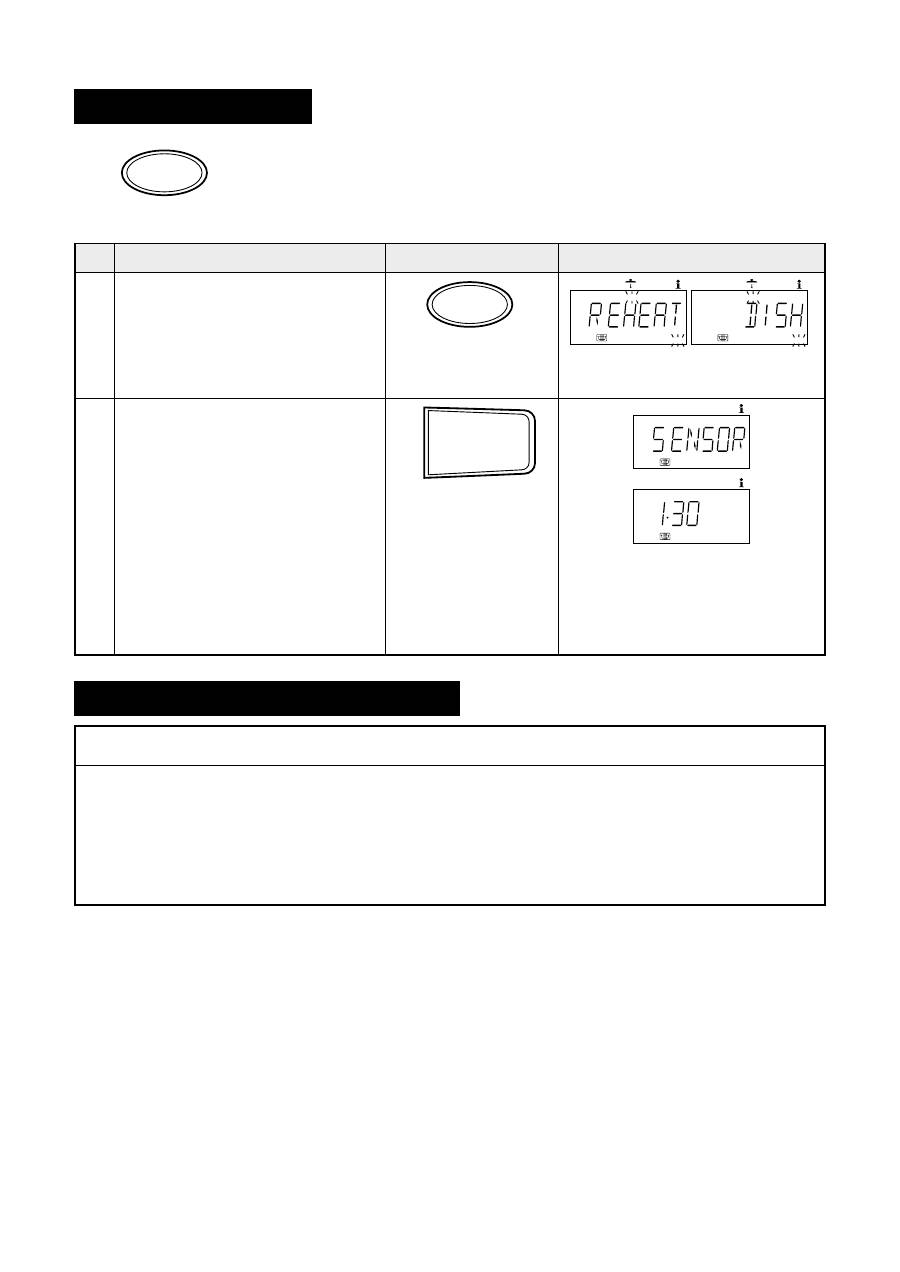
Sensor Reheat Dish
* Suppose you want to reheat dish.
Step
Press the SENSOR REHEAT DISH
pad once.
Display
REHEAT DISH
HFPJUHTD
GBOB
1
SENSOR REHEAT DISH will automatically compute the
power level and cooking time.
Follow the details provided in Sensor Reheat Dish Menu
Guide.
COVER and COOK will flash on
and off.
Pad Order
Procedure
1 dish
0.2 - 0.45kg
Sensor Reheat Dish Menu Guide
• Take out the dish from the
refrigerator.
• Cover with microwave wrap.
Leave around 2.5 cm gap on two
edges to allow steam escape.
• After reheating, stir and stand
covered for 1 minute.
Procedure
Quantity
2
Dish
Lunch/Dinner plate
Meat Dish
Fried Noodles
Plate of Rice
Menu
Initial
Temperature
4-12
°
C
Refrigerated
temperature
COOK
HELP
CTZCJH GHBUJN.
SENSOR
COOK
HELP
CTZCJH GHBUJN.
SENSOR
The cooking time will begin count-
ing down to zero.
After cooking an audible signal
will sound. STIR, STAND, COVER
will be displayed.
Press the INSTANT COOK/START
pad.
* When the sensor detects the
vapour from the food, the
remaining cooking time will
appear.
(eg. remaining cooking time is
approximately 1 min. 30 sec.)
COOK
COVER
HELP
CTZCJH GHBUJN.
SENSOR
COOK
COVER
HELP
CTZCJH GHBUJN.
SENSOR
REHEAT DISH
HFPJUHTD
GBOB
x 1
INSTANT COOK/START
>SCNHJT
GHBUJNJDKTZBT/
GECR
E – 33
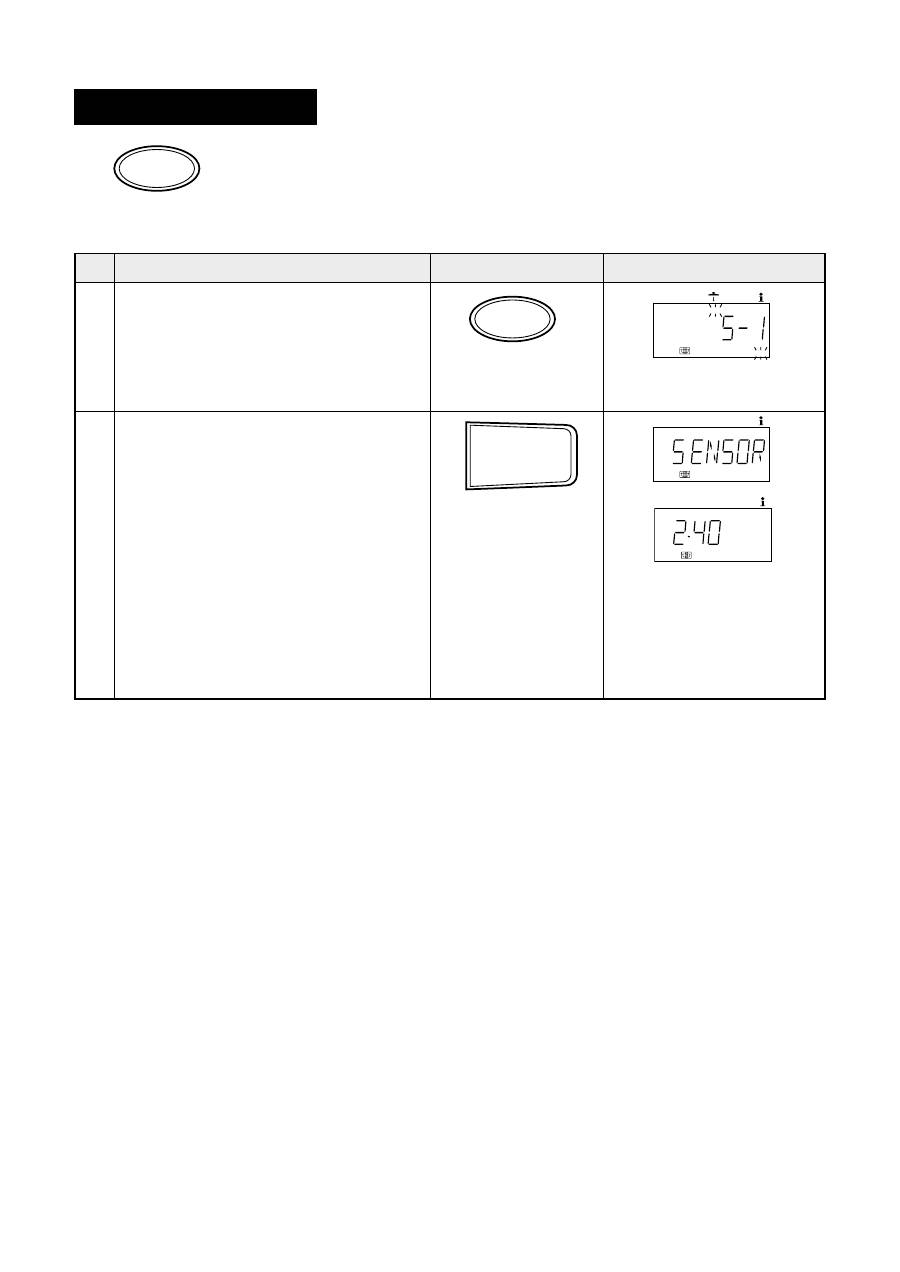
Sensor Steam Menu
1. Fish
2. Meat
3. Dumpling
* Suppose you want to cook 3 serves of Fish: —
Step
Procedure
Pad Order
STEAM MENU
>K*LF ZF
GFHE
Display
COOK
HELP
CTZCJH GHBUJN.
SENSOR
Press to select 3 popular steam menus.
Follow the details provided in Sensor Steam Menu
Guide.
Press the INSTANT COOK/START pad.
Press the SENSOR STEAM MENU pad
until the desired menu number is
displayed (for fish press once).
INSTANT COOK/START
>SCNHJT
GHBUJNJDKTZBT/
GECR
COVER and COOK will
flash on and off.
The cooking time will begin
counting down.
When it reaches zero, the
oven will "beep".
STAND, COVER will be
displayed.
COOK
HELP
CTZCJH GHBUJN.
SENSOR
* When the sensor detects the vapour
from the food, the remaining cooking
time will appear.
(eg. remaining cooking time is approx-
imately 2 min. 40 sec.)
STEAM MENU
>K*LF ZF
GFHE
x 1
2 1
COOK
COVER
HELP
GHBUJN.
CTZCJH
SENSOR

E – 34
Sensor Steam Menu Menu Guide
Menu
Procedure
Menu
No.
• Wash fish thoroughly and remove scales.
• Make a few cuts on the skin of fish, pierce
the eyes of fish.
• Put on a shallow dish, 22-28 cm in diameter.
• Sprinkle lightly with water, salt and oil.
• Put green onion and ginger slices on top.
• Cover with microwave wrap.
Leave around 2.5 cm gap on two edges to
allow steam escape.
• After cooking, stand covered for 3-5
minutes.
• Marinate the meat.
• For meat patty, try to make it a thin layer.
• Put on a shallow dish, 22-28 cm in diameter.
• Cover with microwave wrap.
Leave around 2.5 cm gap on two edges to
allow steam escape.
• After cooking, stand covered for 3-5
minutes.
• Arrange the dumplings from outside to
inside of dish.
• Cover with microwave wrap.
Leave around 2.5 cm gap on two edges to
allow steam escape.
• Place on the low rack.
• After cooking, stand covered for 1 minute.
Initial
Temperature
8-12
°
C
Quantity
1 - 3 serves
(130-420g)
Whole fish
or
Fish fillet
Meat
eg: Beef patty
Chicken pieces
with mushrooms
etc.
* See recipe below.
Dumpling
Ready-made
(cooked)
1 - 3 serves
(180-520g)
8-12
°
C
8-12
°
C
1 - 2 serves
(100-370g)
SENSOR STEAM MENU RECIPES (Meat)
[ Method ]
1. Marinate the ground beef and preserved vegetables
with seasonings and mix well. Press into patty shape.
2. Cut the salted Egg Yolk into dices and place on the patty
for decoration.
3. Cover with microwave wrap and press SENSOR STEAM
MENU pad twice to Meat.
Beef Patty
[ Ingredients ]
330 g
Ground beef
50 g
Preserved Vegitables
1 Salted Egg Yolk
[ Seasonings ]
1 tsp.
Salt
1 tsp.
Sugar
2 tsp.
Cornstarch
2 tsp.
Oil
1
1
/
2
tsp.
Soya sauce
[ Ingredients ]
280 g
Chicken pieces
40 g
Dried mushrooms
(soaked)
Ginger slices
Green onion slices
[ Seasonings ]
1
/
2
tsp.
Salt
1
/
2
tsp.
Sugar
1
1
/
2
tsp.
Soya sauce
1
/
2
tsp.
Cornstarch
1
1
/
2
tsp.
Sesame oil
[ Method ]
1. Marinate the chicken pieces and soaked mushrooms
with seasonings. Then mix together with ginger and
green onion slices.
2. Cover with microwave wrap and press SENSOR STEAM
MENU pad twice to Meat.
Chicken Pieces with Mushrooms
Fish
eg: Sea Bream
Pomfret
Carp
Black Mullet
Flatfish
etc.


