Canon GPS Receiver GP-E1 – страница 2
Инструкция к Ресиверу/Усилителю Canon GPS Receiver GP-E1
付属のソフトウェアについて
ここでは、付属のGPSReceiverSolutionDisk(CD-ROM)に収録さ
れている、各ソフトウェアの概要と、パソコンへのインストール方法を説明
します。
ジーピーエス
レシーバー
ソリューション
ディスク
GPS
Receiver
Solution
Disk
GP-E1用のソフトウェアと、使用説明書が収録されてい
ます。
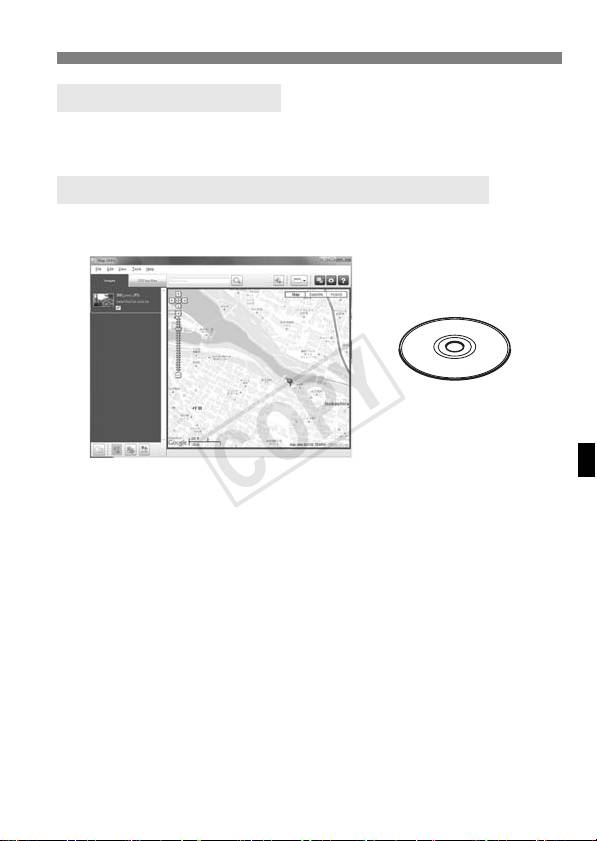
マップ
ユーティリティー
Map
Utility
GP-E1で記録した位置情報を使用して、パソコンの地図に、画像の撮影
場所や撮影方向を表示できます。
イメージブラウザー
イーエックス
ImageBrowser
EX
MapUtilityを最新版に更新することができます。
その他の機能については、ImageBrowserEXの使用説明書PDFをご確
認ください。
MapUtilityを利用するためには、ImageBrowserEXをインストールする必要
があります。
19
COPY

付属のソフトウェアについて
ソフトウェアのインストール
旧バージョンのソフトウェアがインストールされている場合でも、下記の手順に
従ってインストールしてください(必要に応じて、上書きインストールされま
す)。
1 パソコンにGPSReceiverSolutionDisk(CD-ROM)を入
れる
2 CD-ROMのアイコンをダブルクリックする
● Windowsでは、[
(マイ)コンピューター
]内に表示されるアイコン
● Macintoshでは、デスクトップ上に表示されるアイコン
3[
Setup.exe
]をダブルクリックする
4[
おまかせインストール
]をクリックし、画面の指示に従って操作す
る
● インストール途中に、MicrosoftSilverlightのインストール画面
が表示された時は、MicrosoftSilverlightのインストールを行っ
てください。
5[
完了
]をクリックし、CD-ROMを取り出す
● インストール完了です。
20
COPY
付属のソフトウェアについて
使用説明書PDFファイルのコピー方法と見かた
1 パソコンに GPSReceiverSolutionDisk(CD-ROM)を入
れる
2 CD-ROMのアイコンをダブルクリックする
● Windowsでは、[
(マイ)コンピューター
]内に表示されるアイコン
● Macintoshでは、デスクトップ上に表示されるアイコン
3[
Manual
]フォルダをダブルクリックして開く
4[
Japanese
]フォルダをパソコンにコピーする
● 以下の名前の使用説明書PDFファイルがコピーされます。
Windows Macintosh
MapUtility MUx.xWJxx MUx.xMJxx
ImageBrowserEX IBXxxJxx
5 コピーしたPDFファイルをダブルクリックする
● パソコンにAdobe Reader(最新版推奨)がインストールされてい
る必要があります。
● Adobe Readerはインターネット上から無料でダウンロードできま
す。
21
COPY
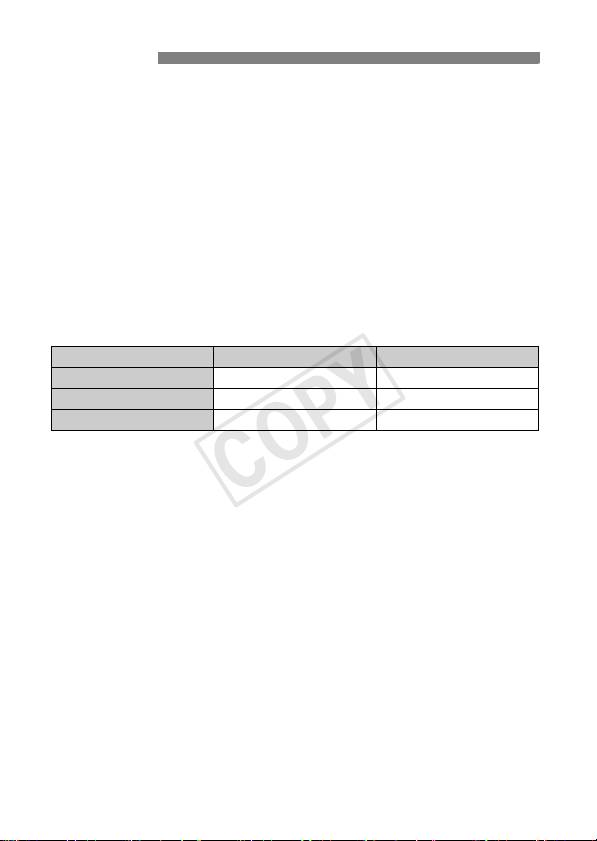
主な仕様
対応カメラ EOS-1DX
画像への位置情報付加 撮影時に付加
緯度、経度、標高、方位、協定世界時、衛星補
捉状態
受信周波数 1575.42MHz(L1帯)
位置情報の更新間隔 1/5/10/15/30秒間隔、1/2/5分間隔
時刻合わせ GPSの時刻データをカメラに設定
電子コンパス 3軸・地磁気センサーと3軸・加速度センサーを
用いて方位を算出
電源 カメラ本体から給電する
撮影可能枚数
位置情報の更新間隔 常温(+23℃) 低温(0℃)
1秒毎 約790枚 約620枚
15秒毎 約970枚 約740枚
5分毎 約990枚 約760枚
*ファインダー撮影時
*CIPA試験基準による
大きさ 約24.7(幅)×57.0(高さ)×35.7(奥行)mm
質量 約44g
*CIPAガイドラインによる
使用可能温度 0℃〜+45℃
使用可能湿度 85%以下
付属ソフトウェア ImageBrowserEX、GP-E1用MapUtility
● 本使用説明書に記載のデータは、すべて当社試験基準によります。
● 製品の仕様、および外観の一部を予告なく変更することがあります。
22
COPY

MEMO
23
COPY

キヤノン株式会社
キヤノンマーケティングジャパン株式会社
〒108-8011東京都港区港南2-16-6
製品取り扱い方法に関するご相談窓口
お客様相談センター(全国共通番号)
050-555-90002
受付時間:平日9:00〜20:00
土・日・祝日10:00〜17:00
(1月1日〜1月3日は休ませていただきます)
※ おかけ間違いのないようにご注意ください。
※ 上記番号をご利用いただけない方は、043-211-9556をご利用ください。
※ IP電話をご利用の場合、プロバイダーのサービスによってつながらない場合
があります。
※ 受付時間は予告なく変更する場合があります。あらかじめご了承ください。
キヤノンカメラサイトのご案内
キヤノンデジタルカメラのホームページを開設しています。インターネットをご
利用の方は、お気軽にお立ち寄りください。
canon.jp/eos-d
この使用説明書に記載しているカメラ、アクセサリーは、2012年2月時点の
ものです。それ以降に発売されたカメラ、アクセサリーとの組み合わせにつき
ましては、上記のお客様相談センターにお問い合わせください。
COPY

GPS RECEIVER
English
COPY
Introduction
The GPS Receiver GP-E1 is an EOS-1D X accessory that can geotag
your shots. Using the provided software Map Utility, you can view
shooting locations. The receiver can also set the camera time via GPS.
Features
Geotagging Images and Adding the Shooting Direction
Shots taken while the receiver is
attached to the camera are
geotagged, adding location
1
information*
(latitude, longitude,
2
elevation, and shooting time (UTC*
))
to images.
Shooting locations and the shooting
direction of geotagged images can be
viewed on a virtual map on a
computer.
Images can also be tagged with the
shooting direction, using the
receiver’s digital compass (magnetic
north standard).
*1: Some traveling conditions or receiver settings may cause inaccurate location
information to be added to images.
*2: Coordinated Universal Time, abbreviated UTC, is essentially the same as
Greenwich Mean Time.
2
COPY
Features
Setting the Camera Time
The camera time can be set using GPS signals. The margin of error
is approx. ±0.02 second.
Viewing Images and Information on a Virtual Map
Shooting locations and the shooting direction can be viewed on a
virtual map, using the Map Utility software on the provided CD-ROM.
3
GPS Receiver
Solution Disk
Map data ©2012 ZENRIN -
COPY

Contents
Introduction....................................................................................... 2
Features ........................................................................................... 2
Conventions Used in this Manual..................................................... 5
Safety Precautions ........................................................................... 6
Nomenclature................................................................................... 7
Attaching and Detaching the Receiver ............................................. 8
Acquiring GPS Signals..................................................................... 9
Setting the Positioning Interval....................................................... 13
Using the Digital Compass............................................................. 14
Setting Time from GPS on the Camera.......................................... 17
GPS Precautions............................................................................ 18
Provided Software.......................................................................... 19
Specifications ................................................................................. 22
4
COPY

Conventions Used in this Manual
Meaning of Symbols
: Warning to prevent shooting problems.
: Supplemental information.
(p.**) : Reference page numbers for more information.
The icons and markings indicating the camera’s controls and settings
used in the manual correspond to the icons and markings on the
camera and on the receiver.
Basic Assumptions
All operations in this manual assume that the camera and receiver
are connected and the camera power switch is set to <
ON
>.
5
Windows is a trademark or registered trademark of Microsoft
Corporation in the United States and other countries.
Macintosh is a registered trademark of Apple Inc. in the United
States and other countries.
Google™ , Google Maps™ , and Google Earth™ are
trademarks of Google Inc.
Map Utility uses Google Maps™ to display images and routes
traveled on a map.
All other corporate and brand names in this manual are
trademarks or registered trademarks of their respective owners.
COPY
Safety Precautions
The following precautions are intended to prevent harm to you and others
as well as damage to equipment. Become familiar with the precautions
before using the receiver to ensure correct and safe operation.
Warning
Preventing Serious Injury or Death
To prevent fire, excessive heat, chemical leakage, or explosion, follow these safety
guidelines.
• Do not insert metallic objects between the receiver’s electrical contacts.
Keep the accessories away from children. In case of accidental ingestion, consult a
physician immediately.
In case of excessive heat, smoke, or fumes, immediately remove the batteries, being
careful to avoid burns. Continued use in this state may cause fire or burns.
Do not operate the receiver while driving. This poses a risk of traffic accidents.
Do not use the receiver where there is flammable gas. There is a risk of explosion or fire.
If the receiver is dropped and internal parts are exposed, do not touch the exposed
parts. There is a risk of electrical shock.
Do not disassemble or modify the receiver. High-voltage internal parts may cause
electrical shock.
Do not store the receiver in dusty or humid places. There is a risk of fire or electrical
shock.
Before using the receiver on board airplanes or in hospitals, make sure use is
permitted. Electromagnetic waves emitted by the receiver may interfere with
instrumentation or medical equipment.
Caution
Preventing Injury or Equipment Damage
Do not leave the receiver inside a vehicle in hot weather or near a heat source. The
receiver may become hot and cause burns if touched.
Do not use the receiver when it is covered by or wrapped in a cloth. This may trap
heat inside, posing a risk of case deformation or fire.
Do not use paint thinner, benzene, or other organic solvents to clean the receiver.
This poses a risk of fire and may be hazardous to your health.
If you drop the receiver in water, or if water or metal objects get inside, immediately
remove the batteries. This poses a risk of fire or electric shock.
If the unit malfunctions, becomes damaged, or requires repair, contact your
dealer or a Canon Service Center.
Handling Precautions
Handle the receiver in accordance with “Handling Precautions: Camera
Care” in the camera instruction manual.
6
COPY
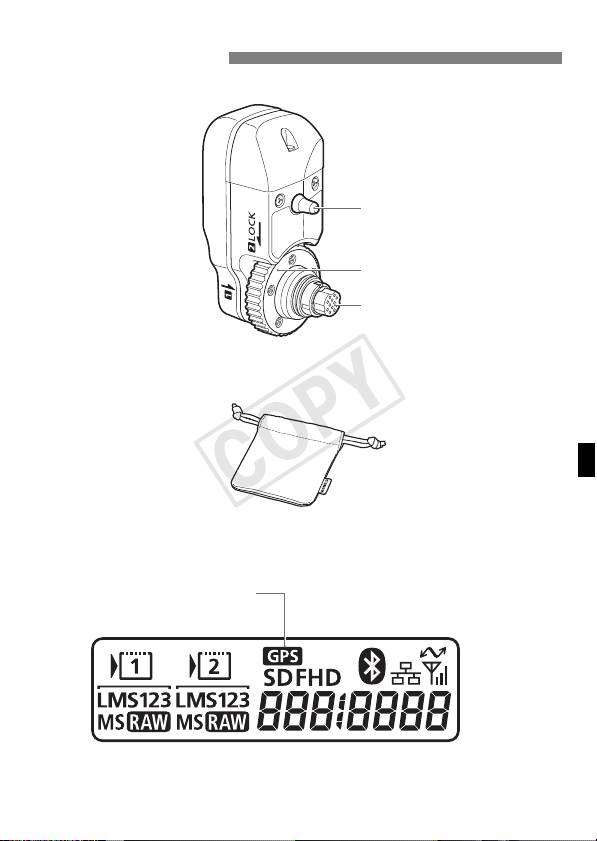
Nomenclature
7
Attachment pin
Tightening screw
Terminal
Storage Case
EOS-1D X Rear LCD Panel
GPS device connection
COPY
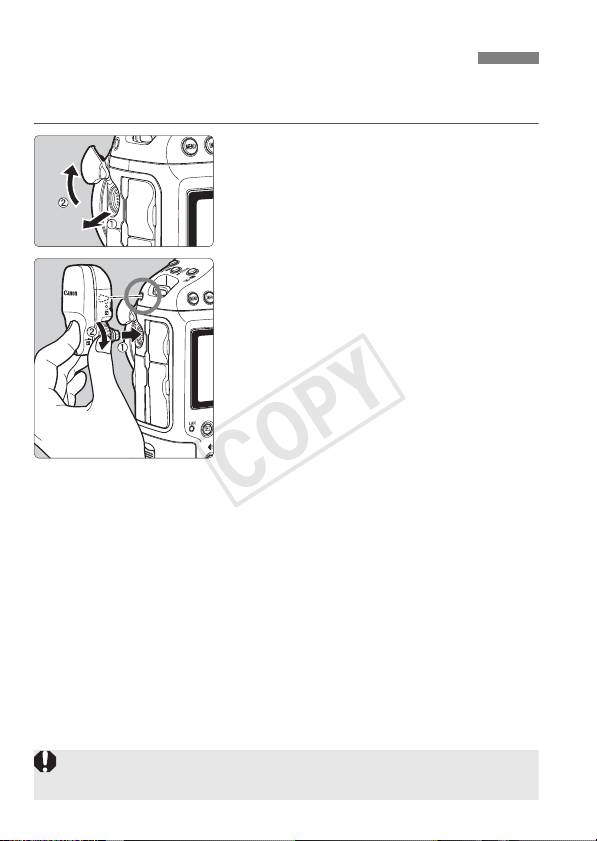
Attaching and Detaching the Receiver
Turn off the camera before attaching the receiver. The receiver is
powered by the camera.
Open the terminal cover on the
1
camera.
Pull out the extension system
terminal cover and rotate it toward the
front.
Attach the receiver.
2
Align the receiver terminal and
attachment pin with the
corresponding camera terminal and
hole.
Push the terminal firmly into the
camera.
As you push the terminal into the
camera with your left index finger,
attach the receiver securely by
turning the tightening screw until it
stops rotating.
Detaching
Turn off the camera.
Loosen the tightening screw until it spins freely.
Pull the terminal out of the camera.
8
Always make sure to turn the camera off before attaching or detaching the
receiver.
COPY
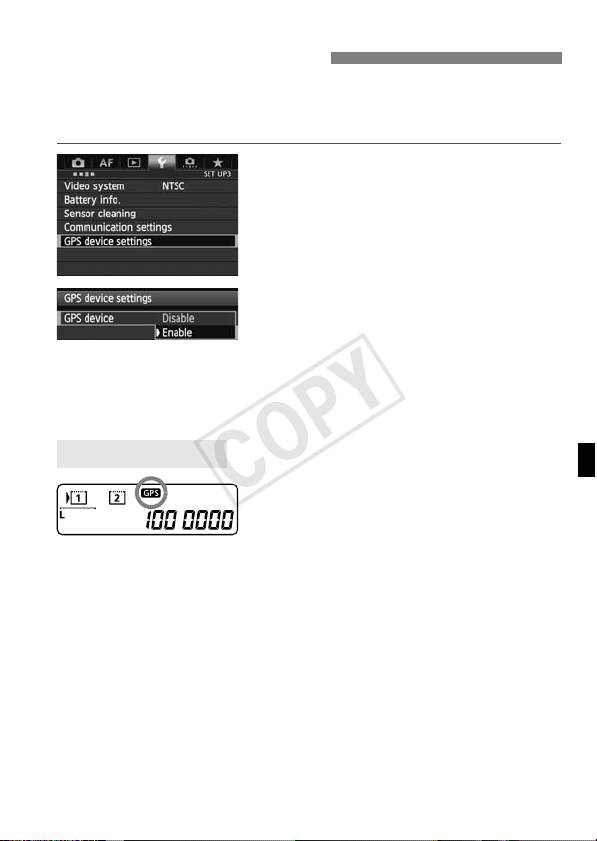
Acquiring GPS Signals
To acquire GPS signals, bring your camera with the receiver attached
outdoors where the sky is unobstructed and aim it up. Keep your hand
or other objects off the top of the receiver.
Select [GPS device settings].
1
Set [GPS device] to [Enable].
2
If the [Calibrate digital compass]
screen is displayed, follow steps 6 – 7
on p.16.
Close the menu.
3
Press the <M> button.
Acquisition Status
GPS signal status is indicated by the
<r> icon on the camera’s rear LCD
panel.
Status details can be checked as
described in “Viewing GPS Information”
on the next page.
Blinking <r>: Signal not
acquired yet
Constant <r>: Signal acquired
Images are geotagged when you shoot.
9
COPY
Acquiring GPS Signals
Signal acquisition takes about 30 – 60 seconds under favorable
conditions after you turn the camera on.
After initial signal acquisition, signals can be reacquired soon after the
camera is turned on again (under favorable conditions, and when the
camera has been off for less than approx. 30 minutes).
Places with Poor GPS Coverage
Location information may not be recorded, or inaccurate information may be
recorded where GPS signal coverage is poor, such as in the following
places.
Indoors, underground, in tunnels or forests, near buildings or in valleys
Near high-voltage power lines or mobile phones operating on the
1.5 GHz band
When traveling through different environments
Even in other places, GPS satellite movement may interfere with
geotagging and cause missing or inaccurate location information. The
information may also indicate that the camera has been used in a
different location, even if you were shooting at the same place.
Appended Information
If shooting is performed immediately after turning on the camera’s power
switch (or resuming use after auto power off) when the receiver is
attached to the camera, images may not be geotagged. Similarly,
directions may not be recorded correctly. To avoid this, wait a moment
before shooting.
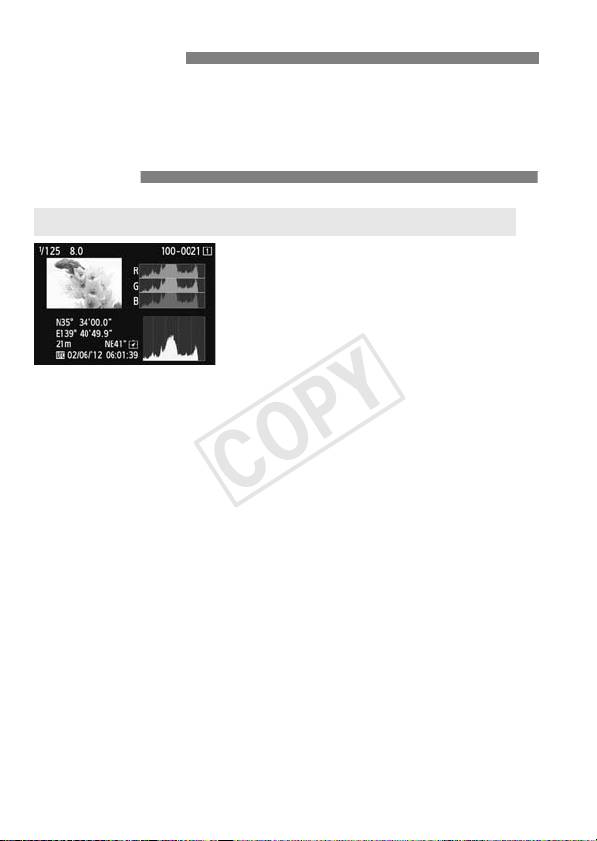
Viewing GPS Information
Select [GPS device settings].
1
Set [GPS device] to [Enable].
2
If the [Calibrate digital compass]
screen is displayed, follow steps 6 – 7
on p.16.
10
COPY
Acquiring GPS Signals
Select [GPS device settings].
3
Select [GPS information display].
4
X Detailed GPS information is
displayed.
In this sample screenshot,
[Direction: NE 45°] indicates that the
camera was facing 45° northeast.
[UTC] (Coordinated Universal Time)
is essentially the same as Greenwich
Mean Time.
The icon <A> indicates signal
conditions. When <C> is displayed,
elevation can also be recorded.
However, elevation cannot be
recorded when <B> is displayed.
Take a picture.
5
X Shots taken after GPS signal
acquisition are geotagged.
11
North
0°
West
East
270°
90°
South
180°
COPY
Acquiring GPS Signals
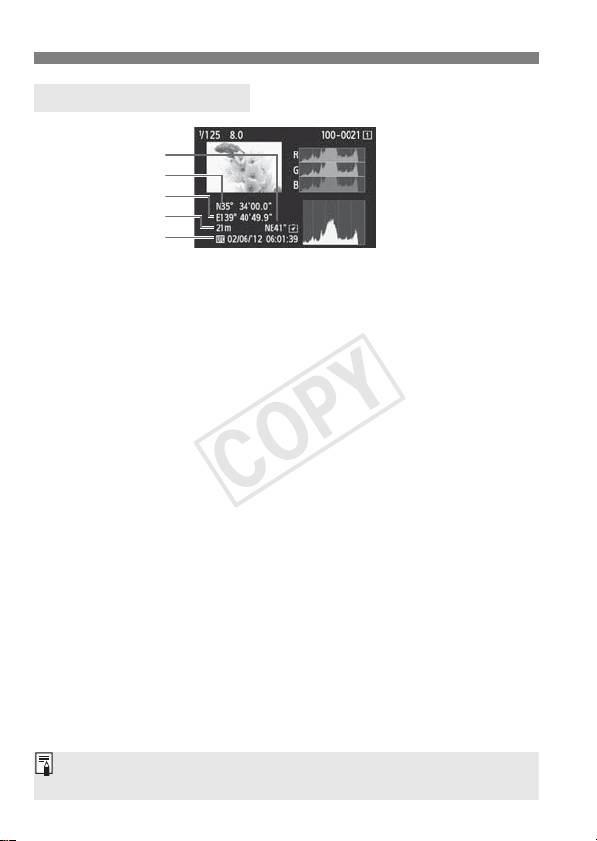
Geotagging Information
12
Direction
Latitude
Longitude
Elevation
UTC
For movies, the GPS information acquired when movie shooting starts is
recorded. Note that signal reception conditions are not recorded.
COPY

Setting the Positioning Interval
On the camera, you can specify the positioning interval. Shorter
positioning intervals yield more accurate location information for your
images. However, fewer shots can be taken per charge.
Select [GPS device settings].
1
Set [GPS device] to [Enable].
2
Select [GPS device settings].
3
Select [Position update timing].
4
Select the time.
5
Estimated No. of Shots per Charge, by Positioning Interval
(Viewfinder Shooting)
Normal Temperature
Low Temperature
Position Update Timing
(23°C/73°F)
(0°C/32°F)
Every second Approx. 790 shots Approx. 620 shots
Every 15 sec. Approx. 970 shots Approx. 740 shots
Every 5 min. Approx. 990 shots Approx. 760 shots
* Fewer shots can be taken per charge in poor signal conditions.
* The nature of GPS may cause some inconsistency between positioning
intervals.
13
COPY
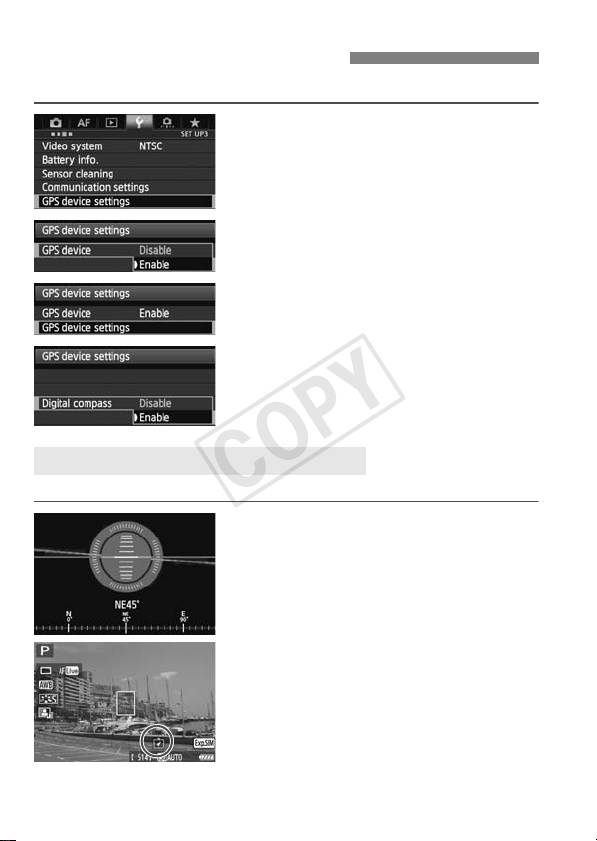
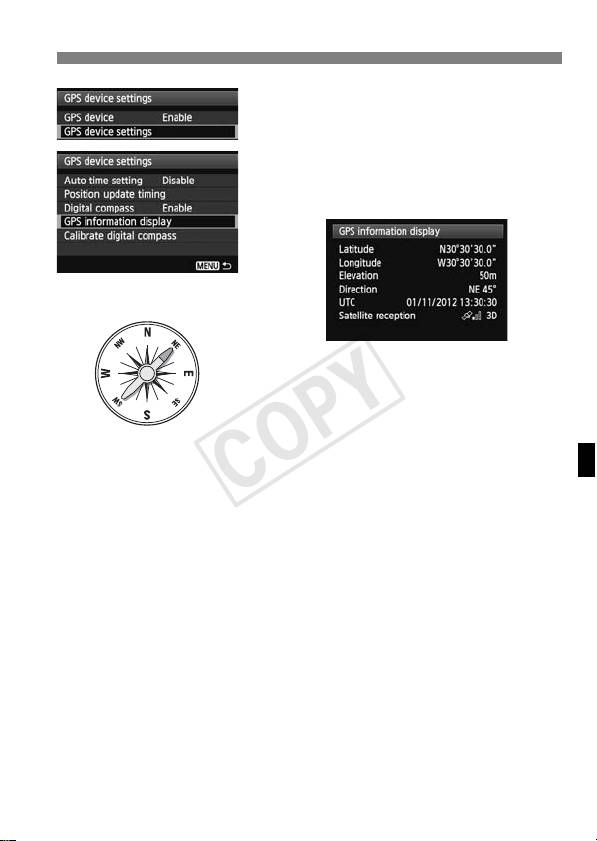
Using the Digital Compass
You can tag images with the shooting direction.
Select [GPS device settings].
1
Set [GPS device] to [Enable].
2
Select [GPS device settings].
3
Set [Digital compass] to [Enable].
4
If the [Calibrate digital compass]
screen is displayed, follow steps 6 – 7
on p.16.
Viewing the Compass when Shooting
You can see which direction the camera is facing as you shoot.
To view the compass, press the
<B> button.
The electronic level is also displayed
at this time.
The compass is also displayed in Live
View or movie shooting.
14
