Sharp AL-840-2 – страница 5
Инструкция к Многофункциональному Устройству (Мфу) Sharp AL-840-2

ODSTRAŇOVÁNÍ PORUCH
Pokud se setkáte s problémy, v každém případě si předtím, než budete kontaktovat středisko služeb firmy
Sharp, pročtěte následující seznam. V uvedených případech se nejedná o závadu kopírovacího stroje.
Problém
Možná příčina
Řešení
Kopírka nepracuje
Je kopírka zapojená?
Zapojte kopírku do sítě pomocí
uzemněné zásuvky. Viz str. 2-3.
Je zapnutý hlavní vypínač?
Zapněte hlavní vypínač. Viz str. 2-3.
Je zavřený přední kryt?
Opatrně uzavřete přední kryt. Viz str. 2-8.
Prázdné kopie
Je originál položen lícem dolů?
Originál pokládejte na sklo originálu
lícem dolů. Viz str. 2-12.
Indikátor úsporného
Nachází se kopírka v režimu
Stisknutím libovolného tlačítka zrušíte
režimu (
) svítí.
předehřívání?
režim předehřívání. Viz str. 2-18.
Nachází se kopírka v režimu
Stisknutím tlačítka tisku (
) zrušíte režim
automatického vypínání?
automatického vypínání. Viz str. 2-18.
Kopie jsou příliš tmavé
Jedná se příliš tmavý nebo světlý
Nastavte úroveň expozice ručně.
nebo příliš světlé.
originál?
Viz str. 2-14.
Pracuje kopírka v režimu
Nastavte úroveň automatické expozice.
automatické expozice?
Viz str. 2-15.
Pracuje kopírka v režimu expozice
Zrušte nastavení fotorežimu.
fotorežim?
Viz str. 2-14.
Na kopiích jsou nečistoty,
Není sklo nebo víko originálu
Pravidelně čistěte. Viz str. 2-24.
prach a skvrny.
špinavé?
Nečistý nebo zmačkaný originál?
Použijte čistý originál.
Část obrazu chybí.
Je válec čistý?
Vyčistěte kazetu válce.
Viz str. 2-24.
PL CZ
Opakovaně dochází k
Nestandardní typ papíru?
Použijte standardní papír. Pokud
zachycení papíru.
používáte speciální materiály, zakládejte
je po jednom listu. Viz str. 2-11.
Není papír zkroucený nebo vlhký?
Papír ukládejte naležato, v obalu a na
suchém místě. Viz str. 2-38.
Nezůstaly v kopírce útržky papíru?
Odstraňte veškeré zbytky papíru z
kopírky. Viz str. 2-26.
Jsou vodítka papíru v zásobníky
Nastavte řádně vodítka papíru podle
správně nastavena?
šířky papíru. Viz str. 2-9.
Není v zásobníku příliš mnoho
Odstraňte přebytečný papír ze
papíru?
zásobníku. Viz str. 2-9.
Kazeta toneru nebo kazeta válce
Zajistěte, aby kazeta toneru a kazeta
není správně instalována.
válce byla řádně instalována.
Viz str. 2-21, 2-22.
Tisk se snadno stírá z
Není papír příliš tlustý?
Používejte rozmnožovací papír povolené
kopie.
tlouš»ky. Viz str. 2-11.
Vlhký papír?
Nahraïte suchým kopírovacím papírem.
Pokud není kopírka delší dobu
používána, vyjměte papír ze zásobníku a
zabalený jej uložte na suchém místě. Viz
str. 2-38.
2–29
Problémy s kvalitou při kopírování a tisku
V následujícím přehledu jsou uvedeny příčiny, které jsou nejvíce pravděpodobné, nemusí však vystihovat všechny případy, k nimž
může v běžných provozních podmínkách dojít. Pokud se setkáte s problémem, který není uveden v tomto přehledu nebo se týká
jiných aspektů kopírování a tisku, obra»te se na technické středisko firmy SHARP.
Problém
Pravděpodobná příčina
Řešení
Nepravidelně vynechané
Problém způsobený nekvalitním papírem.
Používejte výhradně papír, který vyhovuje
plochy nebo tisk
požadavkům kopírky. Str. 2-11
and contains advice on how to get the best performance from the printer.
tells you how to set up, operate and maintain your new printer,
Thank you very much for buying a SHARP laser printer. This manual
The descriptions contained in this manual assume that you are familiar
with the operation of your computer and with how to send files to be printed.
hardware and software.
Your new printer has been specially designed to give you high-quality,
control panel on your computer screen. Printing speed is a maximum
4 pages per minute at resolutions of 300 x 300 dpi for
interface, so you can control all aspects of printing from the Windows Printer
trouble-free printing performance. The printer driver software lets the printer
Please use this manual along with the documentation for your computer
communicate with your computer via an IEEE P1284 bidirectional parallel
the JX-9200 and 600 x 600 dpi for the JX-9210.
Consideration has also been given to ecological and environmental factors.
Toner je nerovnoměrně rozprostřen.
Vyjměte kazetu toneru a jemně ji protřepejte,
during printing, and during standby mode the noise level is no
produced during printing, and the toner self-recycling technology
Your printer features low power consumption, and after printing is
completed it switches to a standby mode which complies with
quiet: the printer generates less than 45 dBA of acoustic noise
the US EPA Energy Star program. Moreover, no harmful ozone is
ensures that no toner is wasted. Printer operation is also very
Its footprint is no larger than a single A4 page, and the total weight is
aby se v ní toner rovnoměrně rozprostřel.
approximately 5 kg, meaning that it is easy to transport and set up. The
100-sheet multipurpose tray is also located at the top of the printer to
Despite being packed with so many features, the printer is very compact.
higher than the background noise level.
save space and to make inserting the paper easy.
Most software applications will let you adjust the margins to have around
the edges of the paper that you will be printing on. The area inside the
margins then becomes the "printable area". The Windows Printer Driver
in PCL emulation mode.
specifies the minimum values that you can set for these page margins.
These minimum margin settings vary depending on whether you are
printing from a Windows application or from a non-Windows application
Potom kazetu vložte zpět. Str. 2-21
The following illustration and tables show the minimum settings that can
be made in your software applications in both Windows and PCL modes.
Z kopírky vycházejí čisté
Kazeta toneru není správně instalována.
Zkontrolujte, zda je kazeta toneru řádně
papíry.
instalována. Str. 2-8
Černé skvrny
Problém způsobený nekvalitním papírem.
Používejte výhradně papír, který vyhovuje
požadavkům kopírky. Str. 2-11
Byla instalována kazeta toneru použitá v
Požívejte jen kazetu toneru použitou v dané
jiné kopírce SHARP.
kopírce. Použití kazety, která již byla použita
v jiné kopírce, nemusí vést k dobrým
výsledkům.
Nedotisknuté znaky
Papír je asi příliš suchý.
Pokuste se ke kopírování nebo tisku použít
jinou dávku papíru.
Skvrny na pozadí
Papír je asi příliš vlhký.
Pokuste se ke kopírování nebo tisku použít
jinou dávku papíru. Neotvírejte balíky papíru
dříve než je nutné, protože by papír mohl
pohltit příliš mnoho vzdušné vlhkosti.
Str. 2-38
Kopíruje se na nerovnou plochu.
Při tisku na obálky změňte rozložení textu
tak, abyste vyloučili tisk v oblastech, kde jsou
na druhé straně chlopně nebo přeložení.
PL CZ
Provozní prostřední (teplota, vlhkost) je
S kopírkou pracujte v příslušném operačním
nevyhovující.
systému. Str. 2-2
Vynechané znaky
Papír je asi příliš vlhký.
Pokuste se ke kopírování nebo tisku použít
Please use this manual along with the documentation for your computer
and contains advice on how to get the best performance from the printer.
tells you how to set up, operate and maintain your new printer,
Thank you very much for buying a SHARP laser printer. This manual
hardware and software.
with the operation of your computer and with how to send files to be printed.
The descriptions contained in this manual assume that you are familiar
jinou dávku papíru. Neotvírejte balíky papíru
4 pages per minute at resolutions of 300 x 300 dpi for
interface, so you can control all aspects of printing from the Windows Printer
communicate with your computer via an IEEE P1284 bidirectional parallel
trouble-free printing performance. The printer driver software lets the printer
Your new printer has been specially designed to give you high-quality,
the JX-9200 and 600 x 600 dpi for the JX-9210.
dříve než je nutné, protože by papír mohl
Consideration has also been given to ecological and environmental factors.
control panel on your computer screen. Printing speed is a maximum
Your printer features low power consumption, and after printing is
completed it switches to a standby mode which complies with
the US EPA Energy Star program. Moreover, no harmful ozone is
produced during printing, and the toner self-recycling technology
higher than the background noise level.
ensures that no toner is wasted. Printer operation is also very
quiet: the printer generates less than 45 dBA of acoustic noise
Despite being packed with so many features, the printer is very compact.
during printing, and during standby mode the noise level is no
pohltit příliš mnoho vzdušné vlhkosti.
approximately 5 kg, meaning that it is easy to transport and set up. The
100-sheet multipurpose tray is also located at the top of the printer to
save space and to make inserting the paper easy.
Its footprint is no larger than a single A4 page, and the total weight is
Most software applications will let you adjust the margins to have around
the edges of the paper that you will be printing on. The area inside the
margins then becomes the "printable area". The Windows Printer Driver
specifies the minimum values that you can set for these page margins.
These minimum margin settings vary depending on whether you are
printing from a Windows application or from a non-Windows application
in PCL emulation mode.
Str. 2-38
The following illustration and tables show the minimum settings that can
be made in your software applications in both Windows and PCL modes.
Válec může být znečištěný.
Vyčistěte válec. Str. 2-24
Dvojitý tisk (předchozí obraz
Používá se příliš tlustý papír.
Tlusté papíry zakládejte po jednom. Str. 2-11
překrývá současný)
Papír je asi příliš suchý.
Pokuste se ke kopírování nebo tisku použít
jinou dávku papíru.
Zadní strana výtisku je
Podávací válečky jsou asi znečištěné.
Zkopírujte nebo vytiskněte několik prázdných
nečistá
stránek, aby se podávací válečky vyčistily.
2–30
Problém Pravděpodobná příčina
Řešení
Chybějící obraz podél hran
TD kazeta nebo kazeta válce nejsou
Zajistěte, aby TD kazeta a kazeta válce byly
papíru
and contains advice on how to get the best performance from the printer.
The descriptions contained in this manual assume that you are familiar
Thank you very much for buying a SHARP laser printer. This manual
with the operation of your computer and with how to send files to be printed.
tells you how to set up, operate and maintain your new printer,
Please use this manual along with the documentation for your computer
hardware and software.
řádně instalovány.
řádně instalovány. Str.2-21, 2-22
Your new printer has been specially designed to give you high-quality,
trouble-free printing performance. The printer driver software lets the printer
communicate with your computer via an IEEE P1284 bidirectional parallel
interface, so you can control all aspects of printing from the Windows Printer
control panel on your computer screen. Printing speed is a maximum
4 pages per minute at resolutions of 300 x 300 dpi for
the JX-9200 and 600 x 600 dpi for the JX-9210.
Consideration has also been given to ecological and environmental factors.
Your printer features low power consumption, and after printing is
quiet: the printer generates less than 45 dBA of acoustic noise
Its footprint is no larger than a single A4 page, and the total weight is
higher than the background noise level.
ensures that no toner is wasted. Printer operation is also very
completed it switches to a standby mode which complies with
the US EPA Energy Star program. Moreover, no harmful ozone is
produced during printing, and the toner self-recycling technology
during printing, and during standby mode the noise level is no
100-sheet multipurpose tray is also located at the top of the printer to
Despite being packed with so many features, the printer is very compact.
approximately 5 kg, meaning that it is easy to transport and set up. The
save space and to make inserting the paper easy.
Most software applications will let you adjust the margins to have around
the edges of the paper that you will be printing on. The area inside the
margins then becomes the "printable area". The Windows Printer Driver
These minimum margin settings vary depending on whether you are
specifies the minimum values that you can set for these page margins.
be made in your software applications in both Windows and PCL modes.
printing from a Windows application or from a non-Windows application
in PCL emulation mode.
The following illustration and tables show the minimum settings that can
Aktivovala se funkce tisku s
Na počítači je zřejmě otevřeno příliš
Před tiskem ukončete všechny nepoužívané
nízkým rozlišením. *
1
mnoho aplikací.
aplikace.
Rozlišení je nastaveno na 600 dpi.
Rozlišení nastavte na 300 dpi.
Závady při tisku grafiky
Toner je asi v kazetě nerovnoměrně
Vyjměte kazetu toneru a jemně ji protřepejte
rozprostřen.
ve vodorovném směru, aby se v ní toner
rovnoměrně rozprostřel. Str. 2-8
Málo toneru.
Kazetu toneru je třeba co nejdříve vyměnit.
Připravte novou kazetu toneru. Str. 2-21
Polovina stránky je
Obsah stránky je příliš složitý.
Zjednodušte obsah a uspořádání stránky,
prázdná.*
2
aby se snížily nároky na potřebnou pamě».
tells you how to set up, operate and maintain your new printer,
Thank you very much for buying a SHARP laser printer. This manual
hardware and software.
Please use this manual along with the documentation for your computer
and contains advice on how to get the best performance from the printer.
The descriptions contained in this manual assume that you are familiar
with the operation of your computer and with how to send files to be printed.
Rozlišení je nastaveno na 600 dpi.
Rozlišení nastavte na 300 dpi.
control panel on your computer screen. Printing speed is a maximum
interface, so you can control all aspects of printing from the Windows Printer
communicate with your computer via an IEEE P1284 bidirectional parallel
trouble-free printing performance. The printer driver software lets the printer
Your new printer has been specially designed to give you high-quality,
Orientace stránky je asi neprávně nas-
Změňte orientaci stránky pomocí ovladače
tavená.
tisku.
Na počítači je zřejmě otevřeno příliš
Před tiskem ukončete všechny nepoužívané
mnoho aplikací.
aplikace.
Papír v zásobníku je asi větší než papír
Do zásobníku založte správný typ papíru.
specifikovaný v použité aplikaci nebo v
ovladači tisku.
Kabel rozhraní je zřejmě nesprávný.
Použijte kabel rozhraní dodaný spolu s ko-
pírkou AL-840.
PL CZ
Specifikace CPU je asi nesprávná.
Zkontrolujte, zda je použitý počítač typu
486DX 66 MHz nebo lepší.
Počítač má zřejmě nedostatek volné
Do počítače nainstalujte více paměti RAM.
paměti RAM.
*
1
Tisk s nízkým rozlišením (jen u AL-840)
Jestliže se tiskne stránka, která obsahuje složitou grafiku nebo několik různých druhů písma, nemusí být zdroje počítače k
tomu účelu dostatečné. V tom případě ovladač tiskárny aktivuje funkci tisku s nízkým rozlišením, která u složité stránky au-
tomaticky sníží rozlišení.
*
2
K problému dochází pouze v případě, že je kopírka použita jako tiskárna. (Jen u modelu AL-840.) Podrobnosti obsahuje
příručka k tiskárně.
2–31
NIEPRAWIDŁOWOŚCI W PRACY KOPIARKI
W przypadku wystąpienia nieprawidłowości w trakcie użytkowania kopiarki należy poddać kopiarkę kontroli na podstawie
poniższego zestawienia przed porozumieniem się z ośrodkiem serwisowym firmy Sharp. W przypadkach opisanych poniżej
kopiarka pozostaje sprawna.
Problem
Możliwa przyczyna
Środek zaradczy
Kopiarka nie pracuje
Kopiarka nie jest podłączona do sieci.
Podłącz kopiarkę do gniazda sieciowego z
uziemieniem, str. 2-3
Nie włączony wyłącznik kopiarki.
Włącz włącznik sieciowy kopiarki, str. 2-3
Nie domknięta pokrywa przednia
Ostrożnie zamknij pokrywę czołową,
str. 2-8
Brak kopii na
Oryginał zwrócony stroną przeznaczoną
Umieść oryginał na płycie oryginału stroną
wyprowadzanych arkuszach
do kopiowania w górę.
przeznaczoną do kopiowania zwróconą w
dół, str. 2-12
Włączony wskaźnik
Kopiarka znajduje się w trybie wstępnego
Naciśnij dowolny klawisz w celu skasowania
oszczędzania energii ( )
nagrzewania
trybu wstępnego nagrzewania, str. 2-18
Kopiarka znajduje się w trybie
Naciśnij przycisk kopiownia ( ) w celu
automatycznego wyłączenia zasilania
skasowania trybu automatycznego
wyłączenia zasilania, str. 2-18
Kopie są zbyt ciemne lub
Oryginał zbyt ciemny lub zbyt jasny
Wyreguluj poziom naświetlania ręcznie,
zbyt jasne
str. 2-14
Kopiarka znajduje się w trybie
Wyreguluj poziom naświetlania
naświetlania automatycznego
automatycznego, str. 2-15
Kopiarka znajduje się w trybie
Skasuj tryb naświetlania foto, str. 2-14
naświetlania foto
Na kopiach jest widoczny
Zabrudzenie płyty lub pokrywy oryginału
Konieczne jest regularne czyszczenie,
pył, zabrudzenia, smugi
str. 2-24
Oryginał zaplamiony lub ze smugami.
Wykorzystaj wyraźny oryginał.
Brak fragmentów obrazu
Kaseta z bębnem zabrudzona?
Sprawdź czy kaseta z bębnem jest czysta,
str. 2-24
PL CZ
Częste zakleszczanie
Zastosowany został nieprawidłowy
Wykorzystaj standardowy papier. W
papieru
papier.
przypadku używania papierów specjalnych
wprowadzaj arkusze pojedynczo, str 2-11
Papier pofałdowany lub wilgotny.
Przechowuj papier kserograficzny na
równym podłożu w oryginalnym
opakowaniu, w suchym miejscu, str. 2-38
Kawałki papieru wewnątrz kopiarki.
Usunąć wszystkie kawałki zakleszczonego
papieru, str. 2-26
Nieprawidłowe ustawienie prowadnic
Wyreguluj prawidłowo ustawienie
papieru w szufladce na papier
prowadnic w zależności od wielkości
papieru, str. 2-9
Nadmierna ilość papieru w podajniku
Usuń nadliczbowe arkusze papieru z
papieru?
podajnika papieru, str. 2-9
Kaseta TD lub kaseta z bębnem
Zapewnij prawidłowe zainstalowanie kasety
zainstalowane nieprawidłowo.
TD i kasety z bębnem, str. 2-21, 2- 22
Obraz na kopii zostaje
Zbyt gruby papier.
Wykorzystaj papier o grubości mieszczącej
częściowo starty.
się we wskazanym zakresie, str. 2-11
Wilgotny papier.
Wykorzystaj suchy papier. Jeli kopiarka nie
jest użytkowana przez dłuższy czas należy
usunąć papier z szufladki na papier i
przechować go w opakowaniu w suchym
miejscu, str. 2-38
2–32
Problemy związane z jakością kopii lub wdruku
Przyczyny zestawione w poniższej tabeli są przyczynami prawdopodobnymi i mogą nie obejmować wszystkich możliwych
przypadków występujących w rzeczywistach warunkach użytkowania kopiarki. W przypadku wystąpienia problemu, którego nie
można przyporządkować żadnej z przyczyn zestawionych w tabeli lub w przypadku jakichkolwiek wątpliwości dotyczących
kopiowania i drukowania należy porozumieć się z najbliższym ośrodkiem serwisowym SHARP.
Problem
Możliwa przyczyna
środek zaradczy
Nieregularne rozjaśnienia
Niewłaściwa jakość papieru.
Stosuj wyłącznie papier spełniający
obrazu lub druku
wymagania wskazane dla kopiarki, str. 2-11
tells you how to set up, operate and maintain your new printer,
and contains advice on how to get the best performance from the printer.
Thank you very much for buying a SHARP laser printer. This manual
The descriptions contained in this manual assume that you are familiar
Your new printer has been specially designed to give you high-quality,
with the operation of your computer and with how to send files to be printed.
trouble-free printing performance. The printer driver software lets the printer
Please use this manual along with the documentation for your computer
communicate with your computer via an IEEE P1284 bidirectional parallel
hardware and software.
interface, so you can control all aspects of printing from the Windows Printer
control panel on your computer screen. Printing speed is a maximum
Nierównomierny rozkład tonera.
Wyjmij kasetę TD i potrząśnij nią ostrożnie
4 pages per minute at resolutions of 300 x 300 dpi for
ensures that no toner is wasted. Printer operation is also very
quiet: the printer generates less than 45 dBA of acoustic noise
the US EPA Energy Star program. Moreover, no harmful ozone is
completed it switches to a standby mode which complies with
the JX-9200 and 600 x 600 dpi for the JX-9210.
Your printer features low power consumption, and after printing is
Consideration has also been given to ecological and environmental factors.
Its footprint is no larger than a single A4 page, and the total weight is
during printing, and during standby mode the noise level is no
produced during printing, and the toner self-recycling technology
w celu równomiernego rozłożenia tonera.
Despite being packed with so many features, the printer is very compact.
approximately 5 kg, meaning that it is easy to transport and set up. The
higher than the background noise level.
100-sheet multipurpose tray is also located at the top of the printer to
save space and to make inserting the paper easy.
margins then becomes the "printable area". The Windows Printer Driver
specifies the minimum values that you can set for these page margins.
Most software applications will let you adjust the margins to have around
These minimum margin settings vary depending on whether you are
the edges of the paper that you will be printing on. The area inside the
Następnie na powrót osadź kasetę TD, str.
be made in your software applications in both Windows and PCL modes.
printing from a Windows application or from a non-Windows application
in PCL emulation mode.
The following illustration and tables show the minimum settings that can
2-21
W czasie kopiowania
Kaseta TD zainstalowana
Sprawdź, czy kaseta TD została
wyprowadzane są czyste
nieprawidłowo.
zainstalowana prawidłowo, str. 2-8
arkusze papieru.
Obecność czarnych plam
Niewłaściwa jakość papieru.
Stosuj wyłącznie papier spełniający
wymagania wskazane dla kopiarki, str. 2-11
Zainstalowana została kaseta TD
Należy stosować zawsze tę samą kasetę
wykorzystana już w innej kopiarce
TD w tej samej kopiarce. Wykorzystanie
SHARP.
kasety, która była już użytkowana z inną
kopiarką może być przyczyną
niezadowalających wyników kopiowania.
Niecałkowite zaczernienie
Papier zbyt suchy.
Przeprowadź kopiowanie lub drukowanie
druku
na papierze pochodzącym z innej partii.
Rozmycia w tle
Papier zbyt wilgotny.
Przeprowadź kopiowanie lub drukowanie
na papierze pochodzącym z innej partii. Nie
otwieraj paczki papieru do chwili gdy
będzie to konieczne, tak aby papier nie
wchłonął zbyt dużej ilości wilgoci z
otoczenia, str. 2-38
PL CZ
Kopiowanie lub drukowanie na
W przypadku drukowania na kopertach
nierównej powierzchni.
należy zmienić położenie wydruku w celu
uniknięcia drukowania w obszarach
przypadających ponad sklejeniami na
odwrocie koperty.
Niewłaściwe otoczenie pracy
Użytkuj kopiarkę przy właciwych warunkach
(temperatura, wilgotność).
otoczenia, str. 2-2.
Brakujące znaki na
Papier zbyt wilgotny.
Przeprowadź kopiowanie lub drukowanie
wydruku.
na papierze pochodzącym z innej partii. Nie
The descriptions contained in this manual assume that you are familiar
with the operation of your computer and with how to send files to be printed.
Please use this manual along with the documentation for your computer
and contains advice on how to get the best performance from the printer.
tells you how to set up, operate and maintain your new printer,
Thank you very much for buying a SHARP laser printer. This manual
otwieraj paczki papieru do chwili gdy
hardware and software.
interface, so you can control all aspects of printing from the Windows Printer
Your new printer has been specially designed to give you high-quality,
trouble-free printing performance. The printer driver software lets the printer
communicate with your computer via an IEEE P1284 bidirectional parallel
control panel on your computer screen. Printing speed is a maximum
4 pages per minute at resolutions of 300 x 300 dpi for
the JX-9200 and 600 x 600 dpi for the JX-9210.
Consideration has also been given to ecological and environmental factors.
Your printer features low power consumption, and after printing is
będzie to konieczne, tak aby papier nie
completed it switches to a standby mode which complies with
the US EPA Energy Star program. Moreover, no harmful ozone is
quiet: the printer generates less than 45 dBA of acoustic noise
produced during printing, and the toner self-recycling technology
ensures that no toner is wasted. Printer operation is also very
approximately 5 kg, meaning that it is easy to transport and set up. The
higher than the background noise level.
during printing, and during standby mode the noise level is no
Despite being packed with so many features, the printer is very compact.
wchłonął zbyt dużej ilości wilgoci z
specifies the minimum values that you can set for these page margins.
margins then becomes the "printable area". The Windows Printer Driver
the edges of the paper that you will be printing on. The area inside the
Most software applications will let you adjust the margins to have around
save space and to make inserting the paper easy.
Its footprint is no larger than a single A4 page, and the total weight is
100-sheet multipurpose tray is also located at the top of the printer to
The following illustration and tables show the minimum settings that can
printing from a Windows application or from a non-Windows application
in PCL emulation mode.
These minimum margin settings vary depending on whether you are
otoczenia, str. 2-38
be made in your software applications in both Windows and PCL modes.
Zabrudzony bęben.
Oczyść bęben, str. 2-24
Drukowanie podwójne
Stosowany jest gruby papier.
Arkusze grubego papieru wprowadzaj
(druga kopia zachodzi na
pojedynczo, str. 2-11
pierwszą)
Papier zbyt suchy.
Przeprowadź kopiowanie lub drukowanie
na papierze pochodzącym z innej partii.
Zabrudzona odwrotna
Zabrudzony wałek przenoszący.
Skopiuj lub wydrukuj parę pustych stron w
strona arkusza.
celu oczyszczenia wałka przenoszącego.
2–33
Problem Możliwa przyczyna
środek zaradczy
Brak elementów obrazu
Kaseta TD lub kaseta z bębnem
Zapewnij prawidłowe zainstalowanie
wzdłuż krawędzi arkusza.
nieprawidłowo zainstalowane
kasety TD i kasety z bębnem,
with the operation of your computer and with how to send files to be printed.
The descriptions contained in this manual assume that you are familiar
and contains advice on how to get the best performance from the printer.
tells you how to set up, operate and maintain your new printer,
Thank you very much for buying a SHARP laser printer. This manual
str. 2-21, 2-22
communicate with your computer via an IEEE P1284 bidirectional parallel
trouble-free printing performance. The printer driver software lets the printer
Your new printer has been specially designed to give you high-quality,
hardware and software.
Please use this manual along with the documentation for your computer
control panel on your computer screen. Printing speed is a maximum
interface, so you can control all aspects of printing from the Windows Printer
produced during printing, and the toner self-recycling technology
Your printer features low power consumption, and after printing is
Consideration has also been given to ecological and environmental factors.
4 pages per minute at resolutions of 300 x 300 dpi for
the JX-9200 and 600 x 600 dpi for the JX-9210.
the US EPA Energy Star program. Moreover, no harmful ozone is
ensures that no toner is wasted. Printer operation is also very
completed it switches to a standby mode which complies with
quiet: the printer generates less than 45 dBA of acoustic noise
during printing, and during standby mode the noise level is no
higher than the background noise level.
the edges of the paper that you will be printing on. The area inside the
save space and to make inserting the paper easy.
Most software applications will let you adjust the margins to have around
100-sheet multipurpose tray is also located at the top of the printer to
approximately 5 kg, meaning that it is easy to transport and set up. The
Its footprint is no larger than a single A4 page, and the total weight is
Despite being packed with so many features, the printer is very compact.
margins then becomes the "printable area". The Windows Printer Driver
specifies the minimum values that you can set for these page margins.
These minimum margin settings vary depending on whether you are
be made in your software applications in both Windows and PCL modes.
in PCL emulation mode.
printing from a Windows application or from a non-Windows application
The following illustration and tables show the minimum settings that can
Włączona funkcja wydruku
Otwarta nadmierna ilość programów
Przed przystąpieniem do drukowania
niskiej rozdzielczości*
1
.
użytkowych.
zamknij wszystkie niepotrzebne
programy użytkowe.
Rozdzielczość nastawiona na 600 dpi.
Nastaw rozdzielczość na 300 dpi.
Rozjaśnione pola w
Nierównomierny rozkład tonera.
Wyjmij kasetę TD i potrząśnij nią
obrębie grafiki.
ostrożnie w celu równomiernego
rozłożenia tonera. Następnie na powrót
osadź kasetę TD, str. 2-8
Niski poziom tonera
Należy możliwie wkrótce wymienić
kasetę TD. Przygotuj nową kasetę TD,
str. 2-21
Połowa strony pozostaje
Układ strony zbyt złożony.
Uproć układ strony dla zmniejszenia
pusta*
2
.
wymaganej pamięci.
tells you how to set up, operate and maintain your new printer,
with the operation of your computer and with how to send files to be printed.
hardware and software.
The descriptions contained in this manual assume that you are familiar
and contains advice on how to get the best performance from the printer.
Thank you very much for buying a SHARP laser printer. This manual
Your new printer has been specially designed to give you high-quality,
trouble-free printing performance. The printer driver software lets the printer
Please use this manual along with the documentation for your computer
communicate with your computer via an IEEE P1284 bidirectional parallel
interface, so you can control all aspects of printing from the Windows Printer
Rozdzielczość nastawiona na 600 dpi.
Nastaw rozdzielczość na 300 dpi.
control panel on your computer screen. Printing speed is a maximum
Nieprawidłowe nastawienie położenia
Zmień ustawienie strony przy pomocy
strony.
funkcji sterownika drukarki.
Otwarta nadmierna ilość programów
Przed przystąpieniem do drukowania
użytkowych.
zamknij wszystkie niepotrzebne
programy użytkowe.
Papier w podajniku papier większy niż
Włóż właściwy papier do podajnika
wielkość papieru dobrana w
papieru.
PL CZ
programie użytkowym lub z pomocą
sterownika drukarki.
Nieprawidłowe parametry kabla
Wykorzystaj kabel złącza drukarkowego
drukarkowego.
dołączony do kopiarki AL-840.
Mikroprocesor o niedostatecznych
Sprawdź, czy Twój komputer posiada
parametrach.
mikroprocesor 486DX 66 MHz lub
lepszy.
Komputer wyposażony w
Zainstaluj w swoim komputerze więcej
niedostateczną ilość pamięci roboczej
pamięci roboczej (RAM).
(RAM)
*
1
Wydruk o niskiej rozdzielczoci (tylko AL-840)
W przypadku drukowania strony zawierającej złożoną grafikę lub różne rodzaje czcionki może ulec wyczerpaniu pamięć
komputera. W tykim przypadku sterownik drukarki aktywuje tryb drukowania z niższą rozdzielczocią, który automatycznie
obniża rozdzielczoć złożonej grafiki na stronie.
*
2
Ten problem występuje tylko wówczas, gdy kopiarka jest użytkowana w charakterze drukarki (tylko AL-840). Patrz także
podręcznik obsługi drukarki.
2–34
INDIKÁTORY STAVU
Jestliže následující kontrolky na ovládacím panelu svítí, blikají nebo je na displeji zobrazen některý z uvedených symbolů, pokuste
se bezodkladně příslušný problém vyřešit s pomocí níže uvedené tabulky a textu na uvedené stránce.
Indikátor
Příčina a způsob nápravy
Kontrolka výzvy k
Trvale
Brzy bude třeba vyměnit válec. Připravte novou kazetu válce.
výměně kazety válce
svítí
Viz str. 2-22.
w
Bliká
Válec musí být vyměněn. Nahraïte jej novým válcem.
Viz str. 2-22.
Kontrolka výzvy k
Trvale svítí
Brzy bude třeba vyměnit kazetu toneru. Viz str. 2-21.
výměně kazety toneru
s
Bliká
Kazeta toneru musí být vyměněna. Nahraïte ji novou kazetou
toneru.Viz str. 2-21.
Indikátor zachycení
Bliká
Došlo k poruše podávání papíru. Zachycený papír odstraňte postupem
t
papíru
uvedeným v části "Odstranění zachyceného papíru". Viz str. 2-26.
Na displeji bliká "CH"
Kazeta toneru není instalována. Přesvědčte se, že je kazeta řádně
instalována. Viz str. 2-8.
n
Na displeji trvale svítí
Přední kryt je otevřen. Zavřete řádně přední kryt. Viz str. 2-8.
"CH"
Na displeji bliká "P"
Zásobník papíru je prázdný. Doplňte rozmnožovací papír. Viz str. 2-9.
Došlo k zachycení papíru v zásobníku.
Q
Odstraňte zachycený papír. Viz str. 2-26.
Střídavě se zobrazuje
Vypněte a znovu zapněte vypínač a jestliže znovu dojde k chybě,
písmeno a číslice
vytáhněte přívodní šňůru ze zásuvky a požádejte o pomoc středisko
služeb autorizovaného zástupce.
WSKAŹNIKI STANU
Jeśli niżej podane wskaźniki palą się światłem ciągłym lub migoczą w polu obsługi kopiarki, lub na wyświetlaczu pojawiają się
poniżej podane wskazania, możliwe jest natychmiastowe rozpoznanie nieprawidłowości przez odwołanie się do poniższej tabeli
oraz tekstu na odpowiedniej stronie.
PL CZ
Wskazanie
Przyczyna i sposób postępowania
Wskaźnik potrzeby
świecenie
W najbliższym czasie konieczna będzie wymiana kasety z bębnem. Przygotuj
wymiany bębna
w sposób
nową kasetę, str. 2-22
w
ciągły
migotanie
Konieczna wymiana kasety z bębnem. Osadź nową kasetę, str. 2-22
Wskaźnik potrzeby
świecenie
W najbliższym czasie konieczna będzie wymiana kasety TD. Przygotuj nową
w sposób
wymiany kasety TD
ciągły
kasetę, str. 2-21
s
migotanie
Konieczna wymiana kasety TD. Osadź nową kasetę, str. 2-21
Wskaźnik zakleszczenia
migotanie
Nastąpiło zakleszczenie papieru. Usuń zakleszczony papier korzystając ze
papieru
wskazówek dotyczących "Usuwanie zakleszczonych arkuszy papieru", str.
t
2-26
Na wyświetlaczu migocze wskazanie
Kaseta TD nie została osadzona w kopiarce. Sprawdź czy kaseta została
"CH"
osadzona, str. 2-8
n
Na wyświetlaczu wskazanie "CH" pali
Pokrywa czołowa otwarta. Domknij pokrywę czołową, str. 2-8
się wiatłem ciągłym
Na wyświetlaczu migocze wskazanie
Szufladka na papier bez papieru. Włóż papier kserograficzny, str. 2-9
Q
"P".
Zakleszczenie papieru w podajniku papieru. Usuń zakleszczony papier,
str. 2-26
Na wyświetlaczu pojawiają się na
Wyłącz zasilanie sieciowe przyciskiem wyłącznika, po czym ponownie włącz
przemian litera i numer.
zasilanie. Jeli ponownie pojawi się błąd, wyjmij przewód zasilania z gniazda
sieciowego i powiadom przedstawiciela autoryzowanego serwisu
technicznego.
2–35
TECHNICKÉ ÚDAJE VÝROBKU
Typ Digitální kopírovací stroj, stolní provedení
Systém kopírování Suchý proces, elektrostatický přenos
Originály Volné listy, vázané dokumenty
Velikost originálu Max. A4
Velikost kopie A6 až A4,
(Podávání papíru pouze ve směru delší strany.)
Hranice tisku: Max. 5 mm (na začátku a konci stránky).
Max. 3 mm (na bočních stranách).
Rychlost kopírování 8 kopií/min
Kontinuální kopírování Předvolba max. 50 kopií, počítadlo zbývajícího počtu kopií
Čas první kopie 12,5 sek. (normální režim kopírování)
Měřítka reprodukce Proměnná: 50 až 200 % s odstupňováním po 1 % (celkem 151 kroků)
Pevná: 50, 70, 86, 100, 141, 200 %
Systém expozice Pohyblivý zdroj světla, pevné sklo s funkcemi automatické expozice
Zdroj papíru Jeden zásobník s automatickým podáváním (250 listů)
Systém fixace Vytápěné válečky
Systém developeru Jednosložkové elektrostatické válečky
Zdroj světla Fluorescentní lampy
Rozlišení Snímkování: 400 dpi, Výstup: 600 dpi
Gradace Snímkování: 256 úrovní, Výstup: 2 úrovně
Napájení Běžné sí»ové napětí ± 10%
Příkon 600 W
Půdorysné rozměry (Š x Hl) 460 x 750 mm
PL CZ
Hmotnost Ca 11 kg včetně kazety válce a kazety toneru
Celkové rozměry (Š x Hl x V) 460 x 425 x 229 mm
Pracovní prostředí Teplota: 10 až 35˚C, Vlhkost vzduchu: 20% až 80% (max. 60% při 35˚C)
Hlučnost Úroveň akustického výkonu: L
WA
tlaku (1 B = 10 dB)
Kopírování: 6,7 [B (A)], Stav pohotovosti: nepřesahuje úroveň pozadí
Úroveň akustického tlaku: LPA (v místě obsluhy)
Kopírování: 49 [dB (A)], Stav pohotovosti: nepřesahuje úroveň pozadí
Metodika měření hluku v souladu s ISO 7779.
Čas první kopie se může lišit v závislosti na pracovních podmínkách, což jsou sí»ové napětí a teplota místnosti. Hodnoty rychlosti
kopírování jsou zaokrouhleny na nejbliþãí vyããí celé íslo.
Jako souèást snahy o neustálé zlepování si firma SHARP vyhrazuje právo na zmìny konstrukce a technických údajù
vzniklé pøi zdokonalování výrobkù bez pøedchozího upozornìní. Uvedené hodnoty výkonu pøedstavují jmenovité
hodnoty u øady vyrábìných jednotek. U jednotlivých výrobkù se mohou vyskytnout drobné odchylky od tìchto hodnot.
2–36
SPECYFIKACJE
Typ cyfrowa kopiarka stołowa
System kopiowania kopiowanie suche z przeniesieniem elektrostatycznym
Oryginały arkusze, dokumenty w oprawie
Wymiary oryginału maks. A4
Wymiary kopii A6 do A4
(podawanie papieru wyłącznie w kierunku podłużnym)
Obcinanie obrazu: maks. 5 mm (krawędzie przednia i tylna)
maks. 3 mm (każda z krawędzi bocznych)
Szybkoć kopiowania 8 kopii/min
Kopiowanie ciągłe maks. 50 kopii, licznik malejący
Czas do pierwszej kopii 12,5 sek. (tryb kopiowania normalnego)
Stosunek wielkoci kopii Regulowany: 50% do 200% w przyrostach co 1% (łącznie 151 stopni)
Stały: 50%, 70%, 86%, 100%, 141%, 200%
System nawietlania Ruchome źródło
światła, naświetlanie szczelinowe (stolik stacjonarny) z
automatycznym nawietlaniem
Podawanie papieru Jedna szufladka na papier z podawaniem automatycznym (250 arkuszy)
kserograficznego
System utrwalający gorący wałek dociskowy
System wywołujący Jednoczęciowy wałek elektrostatyczny
Ródło wiatła lampy fluorescencyjne
Rozdzielczość Wczytywanie: 400 dpi, wyprowadzanie: 600 dpi
Stopnie szaroci Wczytywanie: 256 stopni, wyprowadzanie: 2 stopnie
Zasilanie Napięcie lokalne ±10% (wymagania dotyczące zasilania dla tej kopiarki patrz
tabliczka znamionowa umieszczona z tyłu urządzenia)
Pobór mocy 600 W
Wymiary całkowite 460 mm (szer.) x 750 mm (gł.)
PL CZ
Masa ok. 11 kg wraz z kasetą TD i kasetą z bębnem
Wymiary kopiarki 460 mm (szer.) x 425 mm (gł.) x 229 mm (wys.)
Warunki pracy temperatura: 10˚ do 35˚C
Wilgotnoć: 20% do 80% (maks 60% w temp. 35˚C)
Poziom hałasu poziom mocy akustycznej L
wa
(1B= 10dB)
kopiowanie: 6,7 [B (A)], w stanie gotowo
ści: poziom hałasu tła akustycznego
poziom ci
śnienia akustycznego L
pa
(w sąsiedztwie kopiarki)
kopiowanie: 49 [dB (A)]; w stanie gotowo
ści: poziom hałasu tła akustycznego
Pomiar emisji hałasu zgodnie z normą ISO 7779
Czas pierwszej kopii może zmieniać się w zależności od warunków pracy, takich jak napięcie zasilania i temperatura otoczenia.
Szybkość kopiowania zaokrąglono do wartości najbliższej liczby całkowitej.
W ramach naszej polityki stałego wprowadzania ulepszeń, firma SHARP zastrzega sobie prawo wprowadzania zmian
konstrukcyjnych i zmian specyfikacji na potrzeby ulepszania wyrobu bez uprzedniego powiadomienia. Dane zawarte w
specyfikacji osiągów są wartościami normalnymi dla wyrobu pochodzącego z produkcji. Poszczególne egzemplarze
wyrobu mogą wykazywać niewielkie odstępstwa od tych wartości.
2–37
OZNAČENÍ SPOTŘEBNÍHO MATERIÁLU A JEHO SKLADOVÁNÍ
WYPOSAŻENIE DODATKOWE I MATERIAŁY EKSPLOATACYJNE -
NUMERY KATALOGOWE I PRZECHOWYWANIE
Při objednávání náhradních dílů uvádějte příslušná označení
Przy zamawianiu materiałów eksploatacyjnych i wyposażenia
uvedená v následujícím seznamu.
dodatkowego należy wskazać prawidłowy numer części zgodnie
z zestawieniem poniżej.
Dbejte na to, abyste používali výhradně díly a
Należy stosować wyłącznie oryginalne części i
spotřební materiál firmy SHARP.
materiały eksploatacyjne SHARP.
Nejlepších výsledků při kopírování dosáhnete,
Aby uzyskać najlepsze wyniki kopiowania należy
budete-li používat originální spotřební materiál s
stosować wyłącznie oryginalne materiały
označením SHARP Genuine Supplies, který je
eksploatacyjne SHARP rozwinięte, wykonane i
navržen, vyroben a odzkoušen s cílem zajistit
przetestowane z myślą o przedłużeniu trwałości
maximální životnost kopírek SHARP. Používejte
użytkowej i maksymalizacji osiągów kopiarek
kazety toneru s označením Genuine Supplies na
SHARP. Na opakowaniu tonera znajduje się etykieta
obalu.
wskazująca oryginalne materiały eksploatacyjne
dla kopiarki.
Seznam dílů
Wykaz materiałów eksploatacyjnych
Název Označení Životnost
Materiał Numer części Trwałość użytkowa
Kaseta TD AL-80TD ok. 3.000 arkuszy
*
Kazeta toneru
(TD cartridge) AL-80TD Přibližně 3 000 listů*
Kaseta z AL-80DR ok. 20.000 arkuszy
Kazeta válce
bębnem
(Drum cartridge) AL-80DR Přibližně 20 000 listů
*
dla kopiowania na papierze typu letter przy 5% pokryciu
* Kopírování na rozmnožovací papír s pokrytím 5 % plochy
Správné ukládání
Prawidłowe przechowywanie
1. Spotřební materiál ukládejte na místa s těmito vlastnostmi:
1. Materiały eksploatacyjne należy przechowywać w miejscu
· čisté a suché,
· czystym i suchym,
· se stálou teplotou,
· o stałej temperaturze,
· nevystavené přímému slunečnímu svitu.
· nie wystawionym na bezpośrednie działanie promieni
2. Rozmnožovací papír ukládejte v obalech naležato.
słonecznych.
2. Papier kserograficzny należy przechowywać w opakowaniu
PL CZ
· Papír uložený bez obalů nebo postavený na hraně může
zvlhnout nebo se zkroutit a výsledkem budou potíže spojené
na równym podłożu.
se zachycováním papíru.
· Papier przechowywany bez opakowania oryginalnego lub w
opakowaniach ułożonych na boku może ulegać pofałdowaniu
lub chłonąć wilgoć, co prowadzi do zakleszczania arkuszy
papieru w kopiarce.
ZOBRAZENÍ CELKOVÉHO POČTU KOPIÍ
WYŚWIETLENIE ŁĄCZNEJ ILOŚCI WYKONANYCH KOPII
Ke zjištění celkového počtu zhotovených kopií použijte následující
W celu wyświetlenia łącznej ilości wykonanych kopii należy
postup.
postępować zgodnie z poniższą procedurą:
1. Stiskněte tlačítko (
>
), aby se zobrazení
1. Naciśnij klawisz kasowania (
>
) w celu
vynulovalo.
wyzerowania wyświetlacza.
2. Stiskněte a držte tlačítko (
>
) po dobu asi 5
2. Naciśnij i przytrzymaj klawisz kasowania
vteřin. Celkový počet bude zobrazen ve dvou
(
>
) na przeciąg ok. 5 sekund. Całkowaita
krocích, přičemž každý z nich bude
ilość wykonanych kopii zostaje wyświetlona
obsahovat tři číslice.
w postaci wskazania dwuczęściowego po
trzy cyfry na każde wskazanie częściowe.
Příklad:
Przykład:
Celkový počet kopií je 1234
całkowita ilość kopii wynosi 1234.
2–38
POKYNY PRO MANIPULACI
INSTRUKCJE DOTYCZĄCE PRZENOSZENIA KOPIARKI
Jestliže kopírku přemis»ujete na jiné místo, postupujte podle
Przy przenoszeniu kopiarki należy postępować zgodnie z
následujících pokynů.
poniższą procedurą.
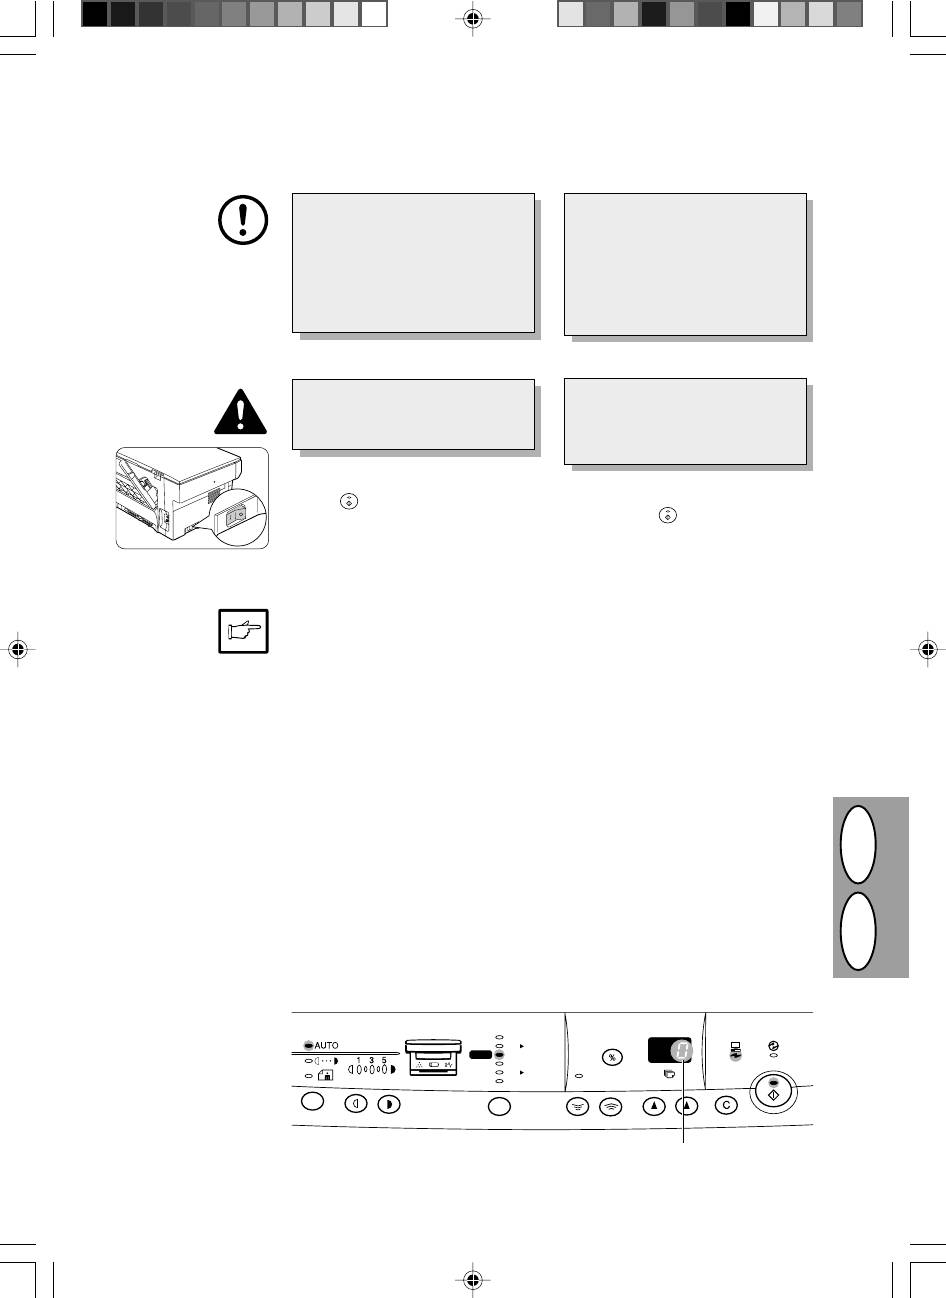
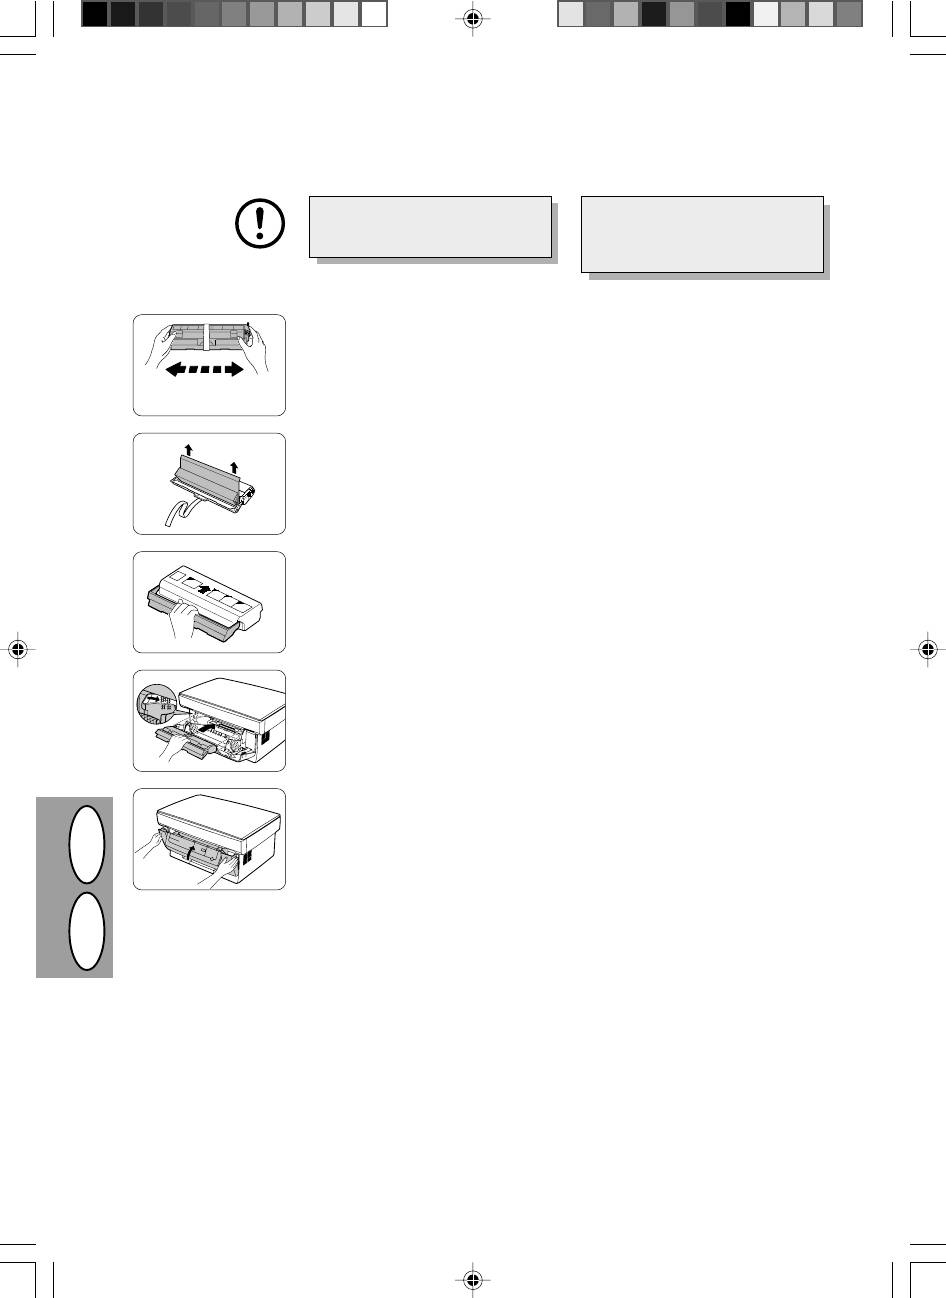
Při dopravě kopírky vyjměte kazetu
W przypadku potrzeby przeniesienia
toneru ze zařízení. Zabráníte tak
kopiarki zadbaj o usunięcie kasety
zaprášení vnitřku kopírky tonerem
TD z kopiarki. Zapobiegnie to
během dopravy.
rozsypaniu tonera we wnętrzu
kopiarki w czasie przenoszenia
urządzenia.
1. Vypněte hlavní vypínač a vytáhněte sí»ovou
1. Wyłącz wyłącznik sieciowy i wyjmij przewód
šňůru ze zásuvky.
zasilający z gniazda sieciowego.
2. Kabel rozhraní vytáhněte ze zásuvky. (Jen u
2. Usuń kabel złącza drukarkowego (tylko
AL-840.)
AL-840).
3. Opatrně zatáhněte za obě strany předního
3. Wywrzyj ostrożnie nacisk z obu boków
krytu a otevřete jej.
pokrywy czołowej w celu otwarcia pokrywy.
4. Opatrně vytáhněte kazetu toneru. Viz str.
4. Ostrożnie wysuń kasetę TD z kopiarki. Patrz
2-21 VÝMĚNA KAZETY TONERU.
strona 2-21 WYMIANA KASETY TD.
5. Vyjměte kopírovací papír ze zásobníku.
5. Usuń papier z podajnika papieru.
Postupujte přitom podle pokynů na str.
Wyjmowanie papieru patrz strona 2-26
2-26, Odstranění zachyceného papíru.
Zakleszczenie papieru w podajniku papieru.
6. Odstraňte kopírovací papír z kopírky.
6. Usuń podajnik papieru.
7. Opatrně vytáhněte zásobník papíru z
7. Ostrożnie wsuń podstawkę wyjściową
kopírky.
papieru do wnętrza kopiarki do oporu.
8. Na levé straně kopírky znovu zašroubujte
8. Wkręć zachowany wkręt z lewej strony
šroub, který jste si uložili. Viz str. 2-7
kopiarki. Patrz strona 2-7 NASTAWIANIE.
UVEDENÍ DO CHODUO.
Před dopravou kopírky je třeba šroub
Wkręt ten zapewnia unieruchomienie
znovu zašroubovat, aby se zabránilo
głowicy skanującej. Jeśli zasilanie
poškození při přepravě. Šroub slouží k
sieciowe zostało wyłączone w toku
zajištění snímací hlavy. Jestliže během
wczytywania oryginału, głowica
snímání originálu došlo k vypnutí proudu,
skanująca nie znajduje się w lewym
nevrátí se hlava do své výchozí polohy na
skrajnym położeniu. W takim przypadku
levé straně. V tom případě kopírku
należy włączyć kopiarkę i wyłączyć ją
zapněte a vypněte a přesvědčte se, že se
ponownie po upewnieniu się, że głowica
PL CZ
hlava vrátila do polohy vlevo.
znajduje się w lewym skrajnym położeniu.
9. Zavřete přední kryt.
9. Zamknij pokrywę czołową.
10. Vložte výplňový materiál a upevněte lepicí
10.
Umocuj materiał ochronny do pakowania i
pásky, které byly odstraněny při instalaci
taśmę usunięte w czasie instalowania kopiarki.
kopírky. Viz str. 2-7 UVEDENÍ DO CHODUO.
Patrz strony 2-7 NASTAWIANIE.
11. Zabalte kopírku zpět do kartonu.
11. Umieść kopiarkę w pudle kartonowym.
2–39
INTRODUCTION
EINLEITUNG
This copier has been designed to provide intuitive
Dieser Kopierer wurde so konstruiert, daß er bei einem
operating ease while requiring a minimum amount of
Minimum an Platzbedarf die intuitive, einfache Bedie-
space. To get full use of all copier features, be sure to
nung ermöglicht. Um alle Kopiermöglichkeiten optimal
familiarize yourself with this manual and the copier.
anwenden zu können, machen Sie sich bitte mit dieser
For quick reference during copier use, keep this man-
Anleitung und dem Kopierer vertraut.
ual in a handy location.
Der AL-840 kann als Kopierer und als Laserdrucker
The AL-840 can be used as a copier and as a
verwendet werden, während der AL-800 nur als
laser printer while the AL-800 can be used only
Kopierer einsetzbar ist. In dieser Bedienungsanlei-
as a copier. This manual describes only the cop-
tung wird nur die Kopierfunktion beschrieben. Die
Erläuterungen der Druckerfunktionen entnehmen
ier features. For description of the printer fea-
Sie bitte einer separaten Bedienungsanleitung.
tures, see a separate manual.
Hinweise in dieser Bedienungsanleitung
Conventions used in this manual
In dieser Bedienungsanleitungen werden folgende
In this manual, the following icons are used to provide
Symbole verwendet, die sachdienliche Informationen
the user with information pertinent to the use of the
zum Gebrauch des Kopierers hervorheben:
copier.
Warns the user that injury to the user or
Werden die Angaben des Warnhinweises
damage to the copier may result if the con-
nicht richtig befolgt, kann dies zu Verletzun-
tents of the warning are not properly fol-
gen des Anwenders oder zur Beschädigung
lowed.
des Kopierers führen.
Warning
Warnung
Cautions the user that damage to the copier
Werden die Angaben des Vorsichtshinwei-
or one of its components may result if the
ses nicht richtig befolgt, kann dies zu Be-
contents of the caution are not properly
schädigungen des Kopierers oder einzel-
followed.
Caution
ner Komponenten führen.
Vorsicht
Notes provide information relevant to the
copier regarding specifications, functions,
Die Hinweise liefern wichtige Informationen
performance, operation and such, that may
zu dem Kopierer bezüglich der technischen
be useful to the user.
Daten, der Funktionen, der Leistung und
Note
des Betriebs sowie nützliche Informationen
Hinweis
für den Anwender.
Indicates a letter displayed in the display.
Gibt einen Buchstaben an, der in der Anzei-
ge erscheint.
CONTENTS
INHALT
Unpacking.................................................................. I
Auspacken................................................................. I
Part names ..............................................................III
Bezeichnung der Teile ............................................ III
Operation panel..................................................... VII
Bedienfeld.............................................................. VII
Introduction........................................................... 3-1
Einleitung.............................................................. 3-1
A word on copier installation................................ 3-2
Richtige Installation des Kopierers ...................... 3-2
Cautions ............................................................... 3-4
Warnhinweise ....................................................... 3-4
Setup .................................................................... 3-7
Aufstellen.............................................................. 3-7
Installieren der Entwicklereinheit ......................... 3-8
Installing the TD cartridge .................................... 3-8
Kopierpapier einlegen .......................................... 3-9
Loading copy paper.............................................. 3-9
Anschliessen des Schnittstellenkabels
Connecting the interface cable (AL-840 only) ... 3-10
(nur AL-840) ..................................................... 3-10
Normal copying .................................................. 3-12
Normalkopien ..................................................... 3-12
DGB
Exposure adjustment/Photo copying ................. 3-14
Belichtungseinstellung/Photo-Modus ................ 3-14
Automatic exposure adjustment ........................ 3-15
Automatische Belichtungskorrektur ................... 3-15
Reduction/Enlargement/Zoom ........................... 3-16
Verkleinerung/Vergrösserung/Zoom.................. 3-16
Two sided copying .............................................. 3-17
Zweiseitiges kopieren......................................... 3-17
Descriptions of special functions ....................... 3-18
Beschreibung spezieller Funktionen.................. 3-18
Toner save mode ................................................ 3-19
Tonersparmodus ................................................ 3-19
User programs.................................................... 3-20
Bedienerprogramme .......................................... 3-20
TD cartridge replacement .................................. 3-21
Auswechseln der Entwicklereinheit ................... 3-21
Drum cartridge replacement .............................. 3-22
Auswechseln der Trommeleinheit ...................... 3-22
User maintenance .............................................. 3-24
Wartung .............................................................. 3-24
Misfeed removal ................................................. 3-26
Papierstaubeseitigung........................................ 3-26
Copier trouble ..................................................... 3-29
Fehlersuche........................................................ 3-32
Status indicators................................................. 3-35
Statusanzeigen................................................... 3-35
Specifications ..................................................... 3-36
Technische Daten ............................................... 3-37
Supply part numbers and storage ..................... 3-38
Aufbewahrung und artikelnummern von
Moving instructions ............................................ 3-39
verbrauchsmaterialien........................................ 3-38
Transportanweisungen ....................................... 3-39
3–1

A WORD ON COPIER INSTALLATION
RICHTIGE INSTALLATION DES KOPIERERS
Improper installation may damage the
Eine falsche Installation kann dem Ko-
copier. Please note the following during
pierer schaden. Beachten Sie bitte die
initial installation and whenever the cop-
folgenden Punkte, wenn Sie den Kopie-
ier is moved.
rer in Betrieb nehmen und wenn der
Kopierer transportiert wurde.
If the copier is moved from a cool
place to a warm place, condensa-
Nach Verlagerung des Kopierers
tion may form inside the copier.
von einem kühlen an einen warmen
Operation in this condition will
Ort kann es im Inneren des Kopie-
cause poor copy quality and mal-
res zu Kondensationen kommen.
functions. Leave the copier at room
Wird der Kopierer in diesem Zu-
temperature for at least 2 hours
stand in Betrieb genommen, so ent-
before use.
stehen Kopien in schlechter Quali-
tät, und es können Fehlfunktionen
1. Do not install your copier in areas that
auftreten. Der Kopierer sollte vor
are:
Inbetriebnahme mindestens zwei
· damp, humid, or very dusty
Stunden lang der Raumtemperatur
· exposed to direct sunlight
ausgesetzt werden.
· poorly ventilated
1. Den Kopierer nicht an Plätzen auf-
· subject to extreme temperature or
stellen, wo
humidity changes, e.g., near an air
· es feucht, klamm oder extrem stau-
conditioner or heater.
big ist;
2. Be sure to allow the required space
· er direkter Sonneneinstrahlung
around the machine for servicing and
ausgesetzt ist;
proper ventilation.
· schlechte Belüftung herrscht;
3. Do not expose the drum cartridge to
· der Kopierer extremen Tempera-
direct sunlight.
tur- oder Feuchtigkeitsschwankun-
Doing so will damage the surface
gen ausgesetzt ist, wie beispiels-
(green portion) of the drum cartridge,
weise in der Nähe einer Klimaanla-
causing smudges on copies.
ge oder eines Heizkörpers.
4. Store spare supplies such as drum
2. Für eine gute Belüftung und die einfa-
cartridges and TD cartridges in a dark
che Durchführbarkeit von Wartungs-
place without removing from the pack-
arbeiten muß ein ausreichender Ab-
age before use.
stand rund um den Kopierer eingehal-
If they are exposed to direct sunlight,
ten werden.
smudges on copies may result.
3. Die Trommeleinheit darf keinem di-
(20 cm)
5. Do not touch directly the surface
rekten Sonnenlicht ausgesetzt wer-
(green portion) of the drum catridge
den. Andernfalls wird die Oberfläche
with a hand.
(grüner Teil) der Trommeleinheit be-
Doing so will damage the surface of
schädigt, und die Kopien werden un-
the cartridge, causing smudges on
sauber.
(10 cm)
(10 cm)
copies.
4. Verbrauchsmaterial, wie Trommelein-
heiten oder Entwicklereinheiten, muß
in der Verpackung an einem dunklen
DGB
Ort aufbewahrt werden.
(20 cm)
Durch Einwirkung von direktem Son-
nenlicht kommt es zu unsauberen Ko-
pien.
5. Die Oberfläche der Trommeleinheit
(grüner Teil) darf nicht direkt mit der
Hand berührt werden.
Andernfalls wird die Oberfläche der
Trommeleinheit beschädigt, und die
Kopien werden unsauber.
3–2
6. Ensure that the power switch of the
6. Darauf achten, daß der Netzschalter des
copier is in the OFF position. Insert
Kopierers ausgeschaltet ist (AUS/OFF).
the attached power cord into the pow-
Das beiliegende Netzkabel in die Netzka-
er cord socket at the rear of the cop-
belbuchse an der Rückseite des Kopie-
ier.
rers einstecken.
If you use the copier in a country
Wird der Kopierer nicht in dem Land
other than the country where the cop-
verwendet, in dem er gekauft wurde, so
ier was purchased, you will need to
muß sichergestellt werden, daß die ört-
make sure that your local power sup-
liche Netzspannung für das Modell ge-
ply is compatible with your model. If
eignet ist. Wird der Kopierer an ein Netz
you plug the copier into an incompat-
mit ungeeigneter Spannung ange-
ible power supply, irreparable dam-
schlossen, kommt es zu irreparablen
age to the copier will result.
Schäden an dem Gerät.
7. Plug the other end of the power cord
7. Das andere Ende des Netzkabels in die
into the nearest outlet.
nächste Wandsteckdose einstecken.
Only insert the power cord into a
Das Netzkabel darf nur in eine ord-
properly grounded wall socket.
nungsgemäß geerdete Wandsteckdo-
Do not use extension cord or multi-
se eingesteckt werden. Keine Verlän-
way power distribution boards.
gerungskabel oder Mehrfachsteckdo-
sen verwenden.
Turn the power switch on the left side of
the copier to the "ON" position. The
Den Netzschalter an der linken Seite des
ready (
) indicator will light up and
Kopierers einschalten (EIN/ON). Die Bereit-
other indicators which show the initial
schaftsanzeige (
) und weitere Anzeigen
settings of the operation panel will also
zu den anfänglichen Einstellungen des Be-
light up to indicate the ready condition.
dienfelds leuchten auf und zeigen die Be-
For the initial settings, see the "Initial
triebsbereitschaft an. Die anfänglichen Ein-
settings of operation panel" described
stellungen sind nachfolgend unter „Anfäng-
below.
liche Einstellungen des Bedienfelds“ be-
schrieben.
The copier will enter a power save mode
Der Kopierer schaltet auf Energiesparbe-
once the set time has elapsed without
trieb, wenn eine bestimmte Zeit nach Erstel-
any copier operation after the last copy
len der letzten Kopie oder nach dem Ein-
of a run is made or power is turned on.
schalten abgelaufen ist, während der keine
The settings of the power save modes
weiteren Kopien angefertigt wurden. Die Ein-
can be modified. See page 3-20, USER
stellungen der Energiespar-Betriebsarten
PROGRAMS.
können verändert werden (siehe S. 3-20,
The copier will return to the initial set-
BEDIENERPROGRAMME).
tings a preset amount of time after the
Nach Ablauf einer voreingestellten Zeit nach
last copy is made. The preset amount of
dem Erstellen der letzten Kopie kehrt der Ko-
time (auto clear time) can be changed.
pierer zu den anfänglichen Einstellungen zu-
See page 3-20, USER PROGRAMS.
rück. Die voreingestellte Zeitdauer (automati-
sche Rückstellzeit) kann verändert werden
(siehe S. 3-20, BEDIENERPROGRAMME).
INITIAL SETTINGS OF OPERATION PANEL
ANFÄNGLICHE EINSTELLUNGEN DES BEDIENFELDS
The copier assumes the initial settings
Nach dem Einschalten oder dem Ablauf
DGB
when the copier is turned on or a preset
einer voreingestellten Zeit nach dem
time (auto clear time) elapses after the
Erstellen der letzten Kopie (automati-
last copy is made.
sche Rückstellzeit) übernimmt der Ko-
pierer die anfänglichen Einstellungen.
200%
141%
A5 A4
100%
86%
70%
A4 A5
ZOOM
50%
„0“ is displayed in the display.
Auf der Anzeige erscheint „0“.
3–3
CAUTIONS
WARNHINWEISE
Follow the cautions below when using this copier.
Bei der Bedienung des Kopieres sind folgende Warn-
· Place the copier on a firm, level surface.
hinweise zu befolgen:
· Den Kopierer auf einer festen, ebenen Unterlage
· Do not install the copier in a humid or dusty location.
aufstellen.
· When the copier is not used for a long time, for
· Den Kopierer nicht an einem feuchten oder staubi-
example for consecutive holidays, turn the power
gen Ort aufstellen.
switch off and remove the power cord from the
· Wird der Kopierer über längere Zeit nicht verwen-
outlet.
det, beispielsweise während des Urlaubs, muß der
· The fusing area is hot. Exercise care in this area
Netzschalter ausgeschaltet und das Netzkabel aus
when removing misfed paper.
der Steckdose gezogen werden.
· When moving the copier, be sure to turn the power
· Der Fixierbereich ist heiß. Bei der Beseitigung eines
switch off and remove the power cord from the
Papierstaus in diesem Bereich besonders vorsichtig
outlet.
vorgehen.
· Do not look directly at the light source. Doing so may
· Wird der Kopierer transportiert, muß der Netzschal-
damage your eyes.
ter ausgeschaltet und das Netzkabel aus der Steck-
dose gezogen werden.
· Do not cover the copier with a dust cover, cloth or
plastic film while the power is on. Doing so may
· Nicht direkt in die Lichtquelle blicken. Dies schadet
prevent heat radiation, damaging the copier.
den Augen.
· Den eingeschalteten Kopierer nicht mit einer Staub-
schutzhaube, einem Tuch oder Plastikfolie abdek-
ken. Dies würde die Wärmeabstrahlung verhindern
und zur Beschädigung des Kopierers führen.
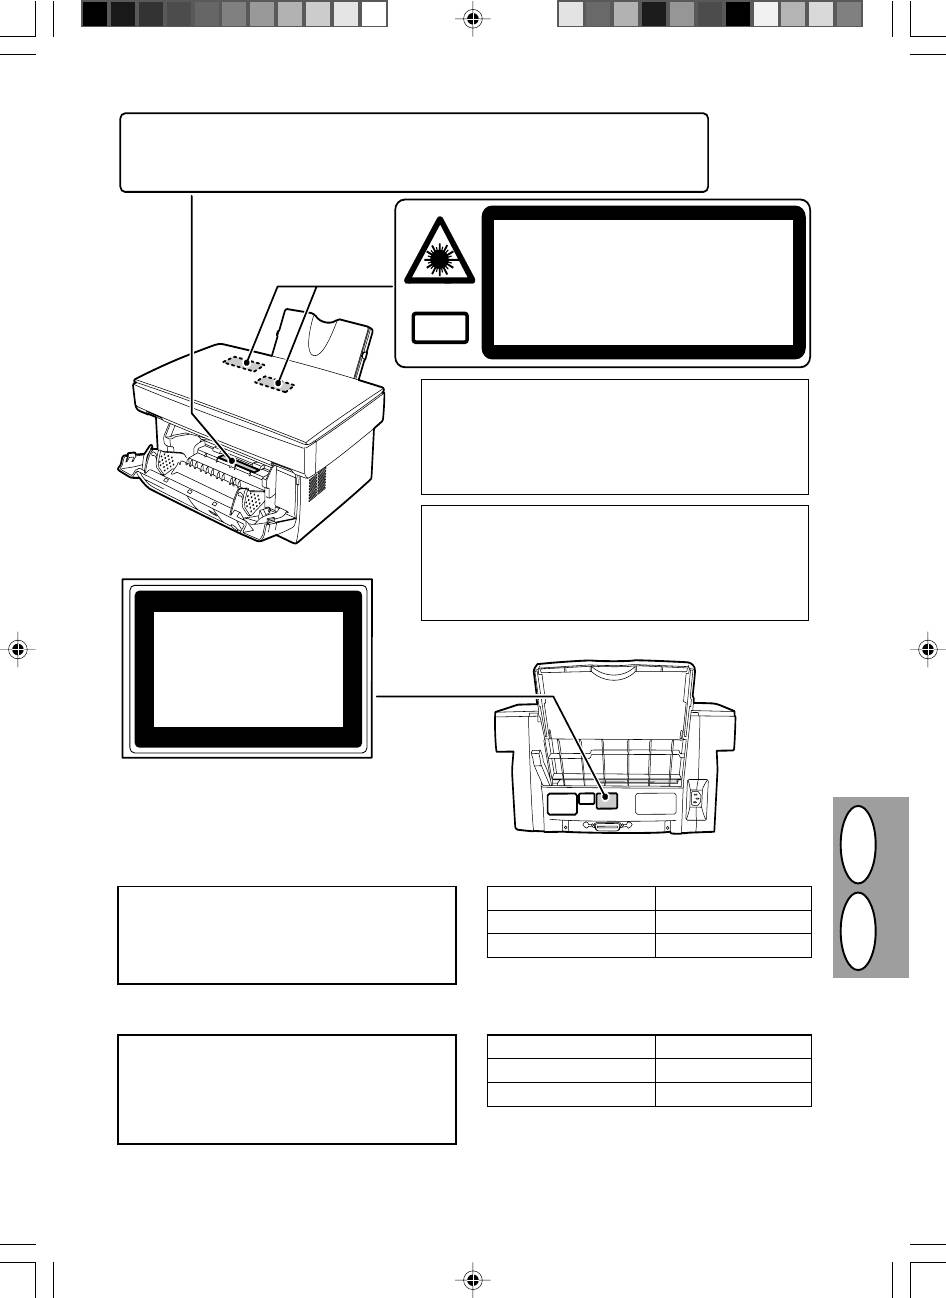
Class 1 Laser product
Lasergerät Klasse 1
Invisible laser radiation when open and inter-
Unsichtbare Laserstrahlung wenn geöffnet
locks defeated. Avoid exposure to beam. At
oder Veriegelungen gelöst. Kontakt mit der
the production line, the output power of the
Strahlung vermeiden.
scanner unit is adjusted to 0.6 MILLIWATT
Werkseitig wird die Ausgangsleistung der
Scannereinheit auf 0,6 MILLIWATT PLUS
PLUS 13.4 PCTS and is maintained constant
13,4 PCTS eingestellt und durch die Automa-
by the operation of the Automatic Power
tic Power Control (APC, automatische Lei-
Control (APC).
stungssteuerung) auf konstantem Niveau ge-
This product contains a low power laser de-
halten.
vice. To ensure continued safety do not re-
Dieses Produkt enthält ein Niedrigenergie-
move any cover or attempt to gain access to
Lasergerät. Zur Gewährleistung der Sicher-
the inside of the product. Refer all servicing to
heit dürfen keine Abdeckungen entfernt und
qualified personnel.
keine Versuche unternommen werden, an
das Innere des Produktes zu gelangen. Die
gesamte Wartung muß von qualifiziertem
Personal durchgeführt werden.
CAUTION
VORSICHT
·Do not switch the copier rapidly on and off.
·Vermeiden Sie rasches Ein- und Ausschal-
After turning the copier off, wait 10 to 15
ten des Kopierers. Warten Sie nach dem
seconds before turning it back on.
Ausschalten 10 bis 15 Sekunden, bevor
DGB
·Copier power must be turned off before
Sie ihn wieder einschalten.
installing any supplies.
·Vor dem installieren von Verbrauchsmate-
rialien muß die Spannungsversorgung des
Kopierers ausgeschaltet werden.
3–4
●
CAUTION: HIGH TEMPERATURE
●
ZUR BEACHTUNG: HOHE TEMPERATUR
●
ATTENTION: TEMPERATURE ELEVEE
●
CUIDADO: TEMPERATURA ELEVADA
INVISIBLE LASER RADIATION WHEN OPEN AND INTERLOCKS DEFEATED.
CAUTION
AVOID EXPOSURE TO BEAM.
UNSICHTBARE LASERSTRAHLUNG WENN ABDECKUNG GEÖFFNET UND
VORSICHT
SICHERHEITSVERRIEGELUNG ÜBERERÜCKT. NICHT DEM STRAHL AUSSETZEN.
USYNLIG LASERSTRÅLING VED ÅBNING, NÅR SIKKERHEDSAFBRYDERE ER
ADVARSEL
UDE AF FUNKTION. UNDGA UDSAETTELSE FOR STRÅLING.
USYNLIG LASERSTRÅLING NÅR DEKSEL ÅPNES OG SIKKERHEDSLÅS BRYTES.
ADVERSEL
UNNGÅ EKSPONERING FOR STRÅLEN.
OSYNLIG LASERSTRÅLNING NÄR DENNA DEL ÄR ÖPPNAD OCH SPÄRRAR ÄR
VARNING
URKOPPLADE. STRÅLEN ÄR FARLIG. BETRAKTA EJ STRÅLEN.
Laserstrahl
AVATTAESSA JA SUOJALUKITUS OHITETTAESSA OLET ALTTIINA NÄKYMÄTÖNTÄ
VARO!
LASERSÄTEILYLLE. ÄLÄ KATSO SÄTEESEEN.
VAROITUS! LAITTEEN KÄYTTÄMINEN MUULLA
KUIN TÄSSÄ KÄYTTÖOHJEESSA MAINITULLA
TAVALLA SAATTAA ALTISTAA KÄYTTÄJÄN
TURVALLISUUSLUOKAN 1 YLITTÄVÄLLE
NÄKYMÄTTÖMÄLLE LASERSÄTEILYLLE.
VARNING - OM APPARATEN ANVÄNDS PÅ ANNAT
SÄTT ÄN I DENNA BRUKSANVISNING
SPECIFICERATS, KAN ANVÄNDAREN UTSÄTTAS
FÖR OSYNLIG LASERSTRÅLNING, SOM
ÖVERSKRIDER GRÄNSEN FÖR LASERKLASS 1.
CLASS 1
LASER PRODUCT
LASER KLASSE 1
Caution
Wave length 785 nm ± 15 nm
This product contains a low power laser device. To
Pulse times (13.98 ± 2 µs)/7 mm
ensure continued safety do not remove any cover or
DGB
attempt to gain access to the inside of the product.
Output power 0.40 mW ± 0.05 mW
Refer all servicing to qualified personnel.
Vorsicht
Wellenlänge 785 nm ± 15 nm
Dieses Produkt ist mit einem Niederleistungs-
Impulsdauern (13,98 ± 2 µs)/7 mm
Laserabtaster ausgestattet. Aus Sicherheitsgründen
keine Abdeckung entfernen und nicht innenteile zu
Abgabeleistung 0,40 mW ± 0,05 mW
berühren versuchen. Wartungsarbeiten dürfen nur von
geschultem Fachpersonal durchgeführt werden.
3–5
Use of controls or adjustments or performance of
Die Verwendung von Bedienelementen oder Ein-
procedures other than those specified herein may
stellungen und die Durchführung von Verfahren,
result in hazardous radiation exposure.
die nicht in dieser Bedienungsanleitung beschrie-
ben sind, kann zum Auftreten gefährlicher Strah-
lung führen.
MAIN FEATURES
HAUPTFUNKTIONEN
1 High-speed laser copying
1 Hochgeschwindigkeits-Laser-Kopieren
· Since warm-up time is zero, copying can be start-
· Da keine Aufwärmzeit benötigt wird, kann mit dem
ed immediately after the power switch is turned on.
Kopieren sofort nach Einschalten des Netzschal-
ters begonnen werden.
· First-copy time is only 12.5 seconds (normal
· Die Zeit bis zur ersten Kopie beträgt nur
12,5
mode).
Sekunden (Normalmodus).
· Copying speed is 8 copies/min., which improves
· Die Kopiergeschwindigkeit beträgt 8 Kopien/min,
working efficiency.
trägt also zur Steigerung der Arbeitseffizienz bei.
2 Digital high-quality image
2 Digitale Bilder in hoher Qualität
· High-quality image copying with 600 dpi can be
· Es können qualitativ hochwertige Bildkopien mit
performed.
600 dpi erstellt werden.
· In addition to the automatic exposure mode, the
· Zusätzlich zum automatischen Belichtungsmodus
manual exposure can be adjusted in five steps.
kann auch der manuelle Belichtungsmodus in fünf
Stufen eingestellt werden.
· The photo mode copying function which allows
· Zum scharfen Kopieren von fein gerasterten Ori-
clear copying of delicate halftone original images
ginalen, wie Monochrom-Fotografien und Farbfo-
such as monochrome photos and color photos can
tografien, steht der Photomodus zur Verfügung.
be used.
3 Wesentliche Kopierfunktionen
3 Substantial copying functions
· Zoomen von 50% bis 200% in Schritten von 1%.
· Zoom copying from 50% to 200% in 1% incre-
· Fortlaufendes Kopieren von maximal 50 Seiten.
ments can be performed.
· Tonersparmodus zur Verringerung des Tonerver-
· Continuous copying of maximum 50 sheets can
brauchs um ca. 10%.
also be performed.
· Bedienerprogramme erlauben die Einstellung/Än-
· Toner save mode for reducing toner consumption
derung der Funktionen entsprechend den Bedürf-
by approximately 10% can be set.
nissen des Anwenders.
· User programs which allow setting/modification of
4 Einmaliges Scannen/Mehrfachausdruck
functions for customer’s needs are provided.
· Der Kopierer ist mit einem Speicherpuffer für eine
Seite ausgestattet. Dieser Speicher ermöglicht
4 Scan once/Print many
das einmalige Scannen eines Originals und die
· The copier is equipped with a 1-page memory
nachfolgende Erstellung von bis zu 50 Kopien.
buffer. This memory allows the copier to scan an
Diese Funktion führt zur Verbesserung des Ar-
original 1 time only and make up to 50 copies. This
beitsablaufs; die Betriebsgeräusche des Kopie-
feature allows for improved workflow, reduced
rers und der Verschleiß des Scanning-Mechanis-
operating noise from the copier and reduced wear
mus werden verringert. Auf diese Weise entsteht
and tear on the scanning mechanism. This feature
höhere Betriebssicherheit.
provides for a higher reliability.
5 Druckerfunktion (nur AL-840)
5 Printer feature (AL-840 only)
· Der AL-840 kann als Laserdrucker verwendet
DGB
· The AL-840 can be used as a laser printer.
werden.
6 250-sheet paper tray
6 Papierfach mit 250 Blatt
· Das Papierfach faßt bis zu 250 Blatt Kopierpapier.
· The paper tray holds up to 250 sheets of copy
Die Kapazität ist dem Bürobetrieb angepaßt und
paper. The capacity adapts to office use allowing
ermöglicht das Kopieren umfangreicher Originale
high-volume printing and saving labor for loading
ohne häufiges Nachlegen von Kopierpapier.
paper.
7 Umweltfreundliche Konstruktion
7 Environmentally friendly design
· Das Ausgabefach befindet sich aus Gründen der
· Paper output tray can be pushed into the copier for
Platzeinsparung im Kopierer.
space saving when copying is not performed.
· Zur Verringerung des Stromverbrauchs im Stand-
· Preheat mode and auto power shut-off mode are
by-Betrieb stehen Vorwärmphase und automati-
provided to reduce power consumption in standby
scher Energiesparbetrieb zur Verfügung.
mode.
3–6
DGB
3–7
a
b
SET UP
AUFSTELLEN
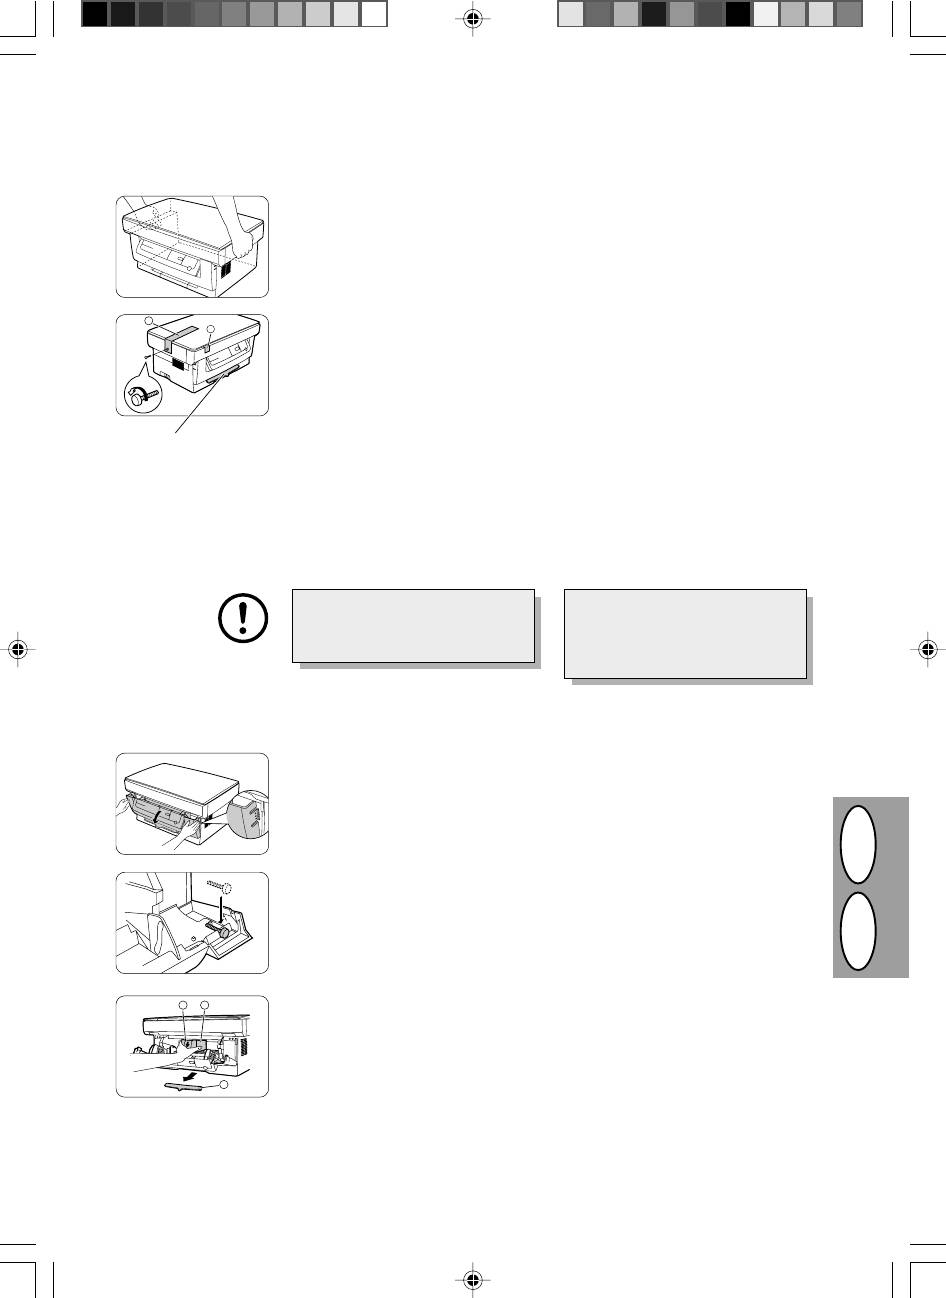
1. Unpack the copier and hold it on both
1. Kopierer auspacken, dabei an beiden
sides as shown to carry it to the instal-
Seiten, wie abgebildet, halten und
lation location.
zum Aufstellungsort tragen.
2. Remove the screw from the left side of
3. Die Schraube an der linken Seite des
the copier by rotating it in the direction
Kopierers durch Drehen in Pfeilrich-
indicated by the arrow. Remove pro-
tung entfernen. Die Originalabdek-
tective material a.
kung a entfernen.
Do not remove this part
with the front cover closed
Dieses Teil nicht bei ge-
3. Remove the tape b.
3. Das Klebeband b entfernen.
schlossener Frontabdek-
kung entfernen.
Save the screw because it will be
Die Schraube aufbewahren. Sie
used if the copier has to be moved
wird für einen Transport des Kopie-
(p. 3-39). Store the screw inside
rers wieder benötigt (S. 3-39).
the front cover.
Schraube an der Innenseite der
Frontabdeckung aufbewahren.
4. Push gently on both sides of the front
4. Vorsichtig an beiden Seiten der Front-
cover to open the cover.
abdeckung drücken, um sie zu öff-
nen.
5. Store the screw which has been re-
5. Schraube, die in Schritt 2 entfernt
moved in step 2 at the right side inside
wurde, rechts innen an der Frontab-
the front cover.
deckung aufbewahren.
d
e
6. After removing protecting material c,
6. Nach Entfernen des Schutzmaterials
gently pull black protective paper d
c das schwarze Schutzpapier d und
and protective material e together to
das Schutzmaterial e gleichzeitig
your side and remove them. Be care-
heranziehen und entfernen. Das
ful not to tear the protective paper
Schutzpapier dabei nicht zerreißen.
c
during removal.
INSTALLING THE TD CARTRIDGE
INSTALLIEREN DER ENTWICKLEREINHEIT
Be sure to remove the protective
Darauf achten, daß vor der Installa-
paper from the drum cartridge be-
tion der Entwicklereinheit das
fore installing the TD cartridge.
Schutzpapier von der Trommelein-
heit entfernt wird.
1. Remove the TD cartridge from the
1. Die Entwicklereinheit aus der Hülle
bag. Hold the cartridge on both sides
nehmen. Die Einheit an beiden Seiten
and shake it horizontally four or five
festhalten und vier- bis fünfmal in ho-
times.
rizontaler Richtung schütteln.
4 or 5 times
4 oder 5 mal
2. Remove the protective tape and then
2. Das Sicherheitsklebeband und an-
the protective cover.
schließend die Schutzabdeckung ent-
fernen.
3. Hold the handle of the TD cartridge so
3. Den Griff der Entwicklereinheit so fas-
that the stamped markings on top of
sen, daß die Markierungen an der
the cartridge are facing upward.
Oberseite der Entwicklereinheit nach
oben weisen.
4. Gently insert the TD cartridge into the
4. Die Entwicklereinheit vorsichtig ent-
copier along the guides in the direc-
lang der Führungen in Pfeilrichtung in
tion indicated by the arrow.
den Kopierer einschieben.
Align the projections on both sides
Die Sicherungsknöpfe an beiden Sei-
with the guides.
ten mit den Führungen ausrichten.
5. Close the front cover.
5. Die Frontabdeckung schließen.
DGB
3–8
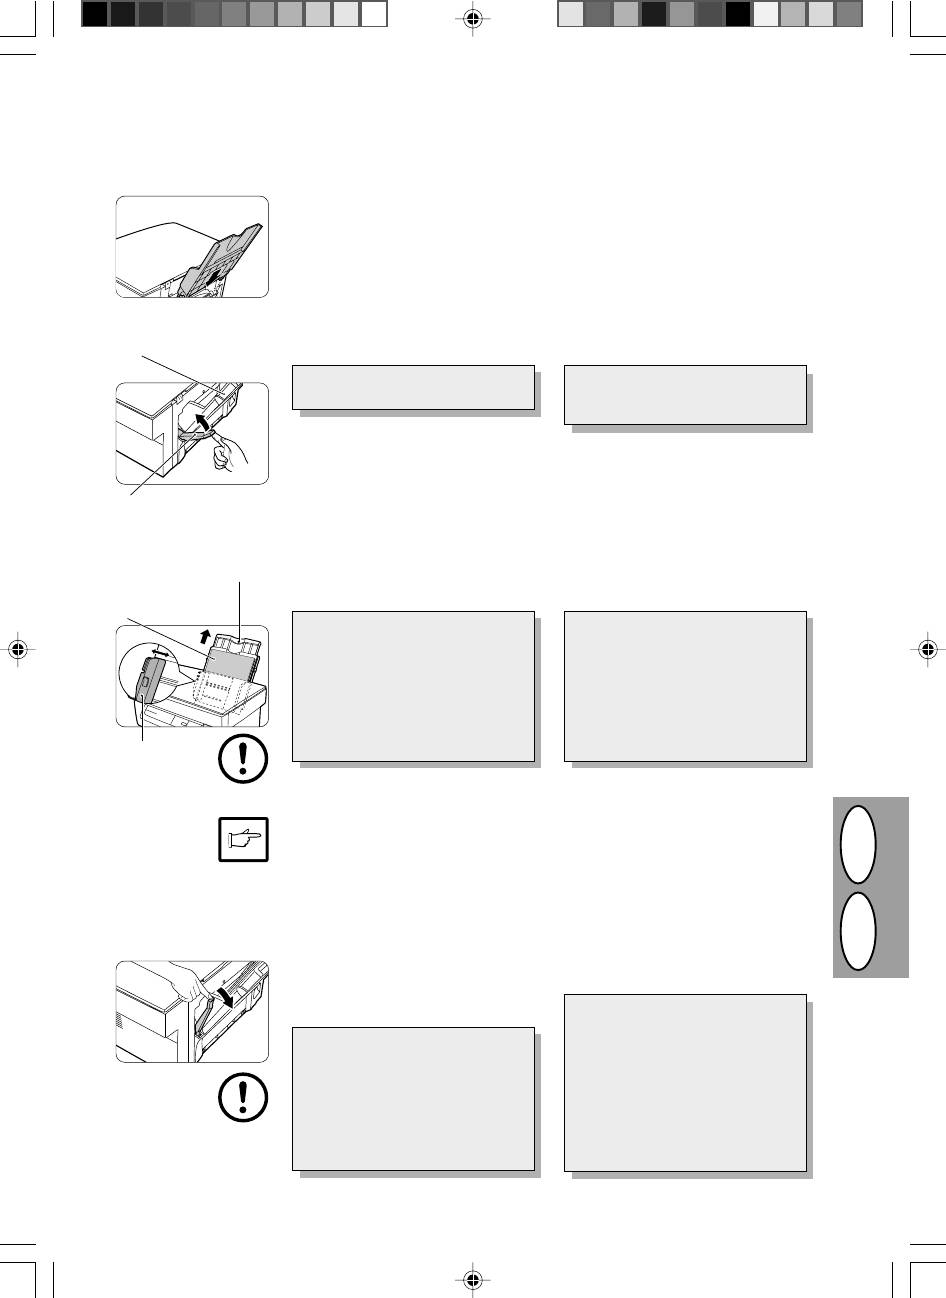
LOADING COPY PAPER
KOPIERPAPIER EINLEGEN
1. Hold the paper tray so that the paper
1. Das Papierfach so halten, daß die
guide of the paper tray is facing front
Papierführung des Fachs nach vorne
and then insert the paper tray into the
weist. Das Papierfach in die dafür
copier’s paper tray slots.
vorgesehenen Schlitze am Kopierer
einsetzen.
2. Pull the paper release lever located at
2. Den Papier-Entriegelungshebel an
Paper tray
the back of the copier.
der Rückseite des Kopierers ziehen.
Papierfach
If the paper is inserted without do-
Wird das Papier ohne Ziehen des
ing this, paper misfeeds will occur.
Hebels eingelegt, tritt ein Papiers-
tau auf.
3. If extra long paper is used, raise the
3. Bei Verwendung von besonders lan-
paper support to support the paper.
gem Papier zur Unterstützung die
Fan the copy paper and place it into
Papierstütze ausziehen. Das Kopier-
the paper tray with the side to be
papier auffächern und so in das Pa-
Paper release lever
Papier-Entriegelungshebel
printed facing toward you. Position
pierfach einlegen, daß die zu bedruk-
the paper along the right end of the
kende Seite zum Anwender weist.
paper tray. Then adjust the paper
Das Papier an der rechten Seite des
Paper support
guide to the paper width.
Papierfachs anlegen, anschließend
Papierstütze
die Papierführung auf die Papierbrei-
Side to be printed
te einstellen.
Zu bedruckende Seite
· The paper tray holds up to 250
· Das Papierfach faßt bis zu 250
sheets of standard paper (56 to
Blatt Standardpapier (56 bis 80 g/
80 g/m²). Do not set too many
m²). Nicht zu viel Papier einlegen.
sheets.
· Das Kopierpapier nur der Länge
· Feed copy paper lengthwise only.
nach einlegen.
· When copying onto special pa-
· Beim Kopieren auf Spezialpapier
per such as labels and transparen-
wie Etiketten oder transparente Fo-
Paper guide
cy film, feed one sheet at a time.
lie die Seiten einzeln zuführen.
Papierführung
When copying onto an envelope, insert it
Für das Kopieren auf einen Umschlag
so that the side to be printed on is facing
diesen so einlegen, daß die zu bedruk-
upwards and so that the flap on the
kende Seite von der Vorderseite des
reverse side is at the right when looking
Kopierers aus betrachtet nach oben und
from the front of the copier. Leave a gap
die Klappe auf der Rückseite nach rechts
of approximately 1 mm between the pa-
weist. Einen Abstand von ca. 1 mm zwi-
per guide and the left edge of the enve-
schen der Papierführung und der linken
lope.
Kante des Umschlags einhalten.
4. Make sure the paper release lever is
4. Darauf achten, daß der Papier-Ent-
pushed back. The paper will be
riegelungshebel zurückgeschoben
DGB
clamped by the paper feed roller in-
wurde. Das Papier wird im Inneren
side the copier.
des Kopierers durch die Papierein-
zugsrolle festgehalten.
Beim Auflegen von Spezialpapier
oder mehreren Blatt Papier oder
When placing special paper or sev-
beim Anfertigen von beidseitigen
eral sheets of paper or when mak-
Kopien darf das Papier auch beim
ing two-sided copies, the paper may
Zurückschieben des Papier-Entrie-
not be clamped inside the copier
gelungshebels nicht im Kopierer
even if the paper release lever is
festgeklemmt werden. Wenn dies
pushed back. In this case, repeat
passiert, Papier-Entriegelungs-
the paper release lever operation
hebel mehrere Male hin- und her-
several times to make sure that the
bewegen, so daß das Papier nicht
paper is clamped.
eingeklemmt wird.
3–9


