Beurer BM 75: 4. Preparing the measurement Setting the hour format, date and time Inserting the batteries
4. Preparing the measurement Setting the hour format, date and time Inserting the batteries: Beurer BM 75
Table of contents
- 2. Important information 1. Getting to know your instrument Signs and symbols
- Advice on use
- Advice on batteries Storage and Care Repair and disposal
- 3. Device description
- Information on the display: USB interface System requirements for the Beurer „HealthManager“ PC software
- 4. Preparing the measurement Setting the hour format, date and time Inserting the batteries
- 5. Measuring blood pressure Positioning cuff Operation with the mains part
- Performing the blood pressure measurement Correct posture
- WHO classification: 6. Evaluating results Cardiac arrhythmia:
- Range of blood pressure values Systolic Resting indicator measurement (using HSD diagnostics) RED: Lack of haemodynamic stability GREEN: Haemodynamic stability
- 7. Displaying and deleting measurements
- 8. Transferring measurements USB interface NFC
- 9. Cleaning and storing the instrument 11. Specifications 10. Rectifying faults
- 12. Mains part
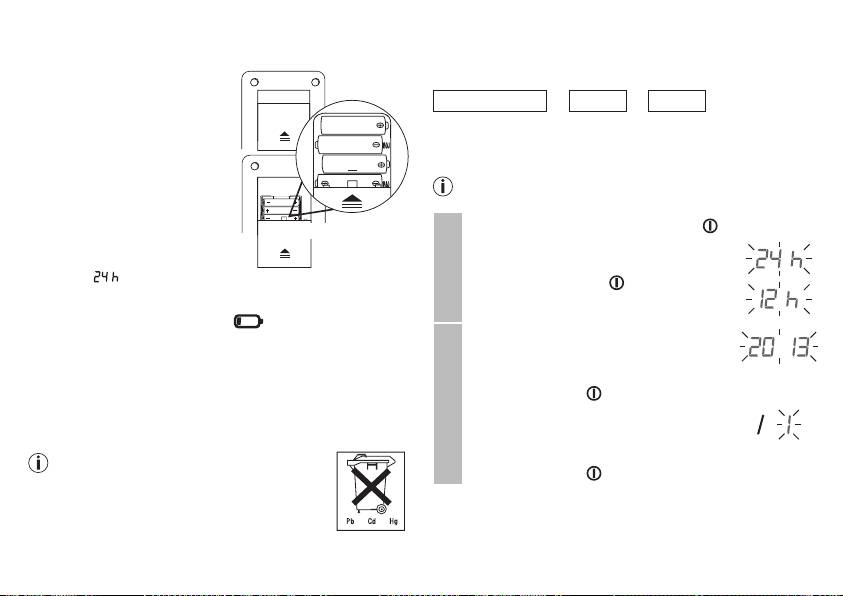
4. Preparing the measurement
Setting the hour format, date and time
Inserting the batteries
This menu allows you to set the following functions, one after
another.
•
Remove the battery compart-
ment lid on the rear of the
Hour format
➔
Date
➔
Time
device.
•
Insert four 1.5 V AAA (alkaline
It is essential to set the date and time. Otherwise, you will not
type LR03) batteries. Make sure
be able to save your measured values correctly with a date and
that the batteries are inserted
time and access them again later.
the correct way round. Do not
If you press and hold the M1 or M2 memory button, you
use rechargeable batteries.
can set the values more quickly.
•
Close the battery compartment
•
Press and hold the Start/stop button for 5 seconds.
lid again carefully.
4 x 1,5V AAA (LR03)
•
Choose the desired hour format with the
All display elements are briefly
M1/M2 memory buttons and confirm with
displayed,
flashes in the dis-
the Start/stop button .
play. Set the date and time as described below.
Hour format
If the battery replacement symbol
is permanently dis-
played, you can no longer perform any measurements and
The year flashes on the display.
must replace all batteries. Once the batteries have been
•
Choose the desired year with the M1/
removed from the device, the date and time must be set again.
M2 memory buttons and confirm with the
Any saved measurements are retained.
Start/stop button .
Used batteries should not be disposed of in normal household
Date
The month flashes on the display.
waste. Dispose of them via your electronics retailer or your
local recycling point. You are legally obligated to do so.
•
Choose the desired month with the M1/
The codes below are printed on batteries
M2 memory buttons and confirm with the
containing harmful substances: Pb: Battery
Start/stop button .
contains lead, Cd: Battery contains cadmium,
Hg: Battery contains mercury.
22
