Beurer WL 70: instruction
Class: Household, kitchen appliances, electronics and equipment
Type: Clock
Manual for Beurer WL 70
Table of contents
- Included in delivery
- 4. Warning notices/safety notes 1. Getting to know your device 2. Signs and symbols 3. Intended use
- 5. Device description 7. Basic settings 7.1 Setting the time 6. Initial use
- 7.2 Setting the alarm properties 7.3 Setting the display brightness 7.4 Setting the snooze duration 7.5 Switching the button tone on/o 8. Device functions 8.1 Setting the alarm
- 8.3 AUX mode 8.4 USB mode 8.2 Switching o the alarm 8.5 Radio mode
- 8.6 Good night function (radio sleep timer) 8.7 Light functions 8.8 Resetting the device to factory settings 9. Cleaning and storage
- 10. Disposal 11. Technical data
WL 80
D
Lichtwecker
I
Luce sveglia
Gebrauchsanweisung .................. 2
Istruzioni per l'uso ..................... 30
G
Wake-up light
T
Ișıklı Çalar Saat
Instructions for use ...................... 9
Kullanma Talimatı ....................... 37
F
Lumière de réveil
r
Световой будильник
Mode d'emploi ............................ 16
Инструкция по применению .. 44
E
Luz para despertar
Q
Budzik świetlny
Instrucciones de uso .................. 23
Instrukcja obsługi ...................... 52
BEURER GmbH
•
Söflinger Str. 218
•
89077 Ulm (Germany)
Tel.: +49 (0) 731 / 39 89-144
•
Fax: +49 (0) 731 / 39 89-255
www.beurer.com
•
Mail: kd@beurer.de

D DEUTSCH
Lesen Sie diese Gebrauchsanweisung sorgfältig durch, bewahren Sie sie
für den späteren Gebrauch auf, machen Sie sie anderen Benutzern zugäng-
lich und beachten Sie die Hinweise.
Inhaltsverzeichnis
1. Zum Kennenlernen .......................................................................................................................... 3
2. Zeichenerklärung ............................................................................................................................. 3
3. Bestimmungsgemäßer Gebrauch .................................................................................................. 3
4. Warn-/ Sicherheitshinweise ............................................................................................................ 3
5. Gerätebeschreibung ........................................................................................................................ 4
6. Inbetriebnahme ................................................................................................................................ 4
7. Grundeinstellungen ......................................................................................................................... 4
7.1 Uhrzeit einstellen .......................................................................................................................... 4
7.2 Alarmeigenschaften einstellen ..................................................................................................... 5
7.3 Displayhelligkeit einstellen ........................................................................................................... 5
7.4 Snooze-Dauer einstellen .............................................................................................................. 5
7.5 Tastenton einschalten /ausschalten ............................................................................................. 5
8. Gerätefunktionen ............................................................................................................................. 5
8.1 Alarm einstellen ............................................................................................................................ 5
8.1.1 Alarm einschalten (ON)........................................................................................................ 5
8.1.2 Alarm pro Tag einschalten (DAY) ......................................................................................... 6
8.1.3 Alarm dauerhaft deaktivieren (OFF)..................................................................................... 6
8.2 Alarm ausschalten........................................................................................................................ 6
8.2.1 Alarm ausschalten während Sonnenaufgang:..................................................................... 6
8.2.2 Schlummermodus (Snooze) bei Alarm ................................................................................ 6
8.2.3 Alarm ausschalten bei Weckton .......................................................................................... 6
8.3 AUX-Modus ................................................................................................................................. 6
8.4 USB-Modus ................................................................................................................................. 6
8.5 Radio-Modus ............................................................................................................................... 6
8.6 Gute-Nacht-Funktion (Radio Sleep-Timer) ................................................................................... 7
8.7 Lichtfunktionen ............................................................................................................................ 7
8.7.1 Leselampe ........................................................................................................................... 7
8.7.2 Sonnenuntergangsfunktion ................................................................................................. 7
8.7.3 Stimmungslicht mit Farbwechsel ........................................................................................ 7
8.8 Auf Werkseinstellung zurücksetzen ............................................................................................. 7
9. Reinigung/Aufbewahrung ............................................................................................................... 8
10. Entsorgung ....................................................................................................................................... 8
11. Technische Daten ............................................................................................................................ 8
12. Garantie ............................................................................................................................................ 8
•
AUX-Kabel
Lieferumfang
•
Gebrauchsanweisung
•
Lichtwecker mit Wurfantenne
•
Halterung für Smartphone / MP3-Player
•
Netzadapter
2
Sehr geehrte Kundin, sehr geehrter Kunde,
haftet nicht für Schäden, die durch unsachgemäßen oder
wir freuen uns, dass Sie sich für ein Produkt unseres Sor-
falschen Gebrauch verursacht wurden.
timentes entschieden haben. Unser Name steht für hoch-
wertige und eingehend geprüfte Qualitätsprodukte aus
4. Warn-/ Sicherheitshinweise
den Bereichen Wärme, Gewicht, Blutdruck, Körpertem-
peratur, Puls, Sanfte Therapie, Massage, Luft und Beauty.
WARNUNG
Mit freundlicher Empfehlung
•
Betreiben Sie das Gerät nur mit dem mitgelieferten
Ihr beurer-Team
Netzadapter und nur mit der auf dem Netzadapter no-
tierten Netzspannung.
1. Zum Kennenlernen
•
Überprüfen Sie vor dem Gebrauch das Gerät und Zu-
behör auf sichtbare Schäden. Benutzen Sie es im Zwei-
Der beurer Lichtwecker WL 80 ermöglicht Ihnen ein sanf-
felsfall nicht und wenden Sie sich an Ihren Händler oder
tes und natürliches Erwachen aus Ihrem Schlaf. Duch das
an die angegebene Kundendienstadresse.
langsam heller werdende LED-Licht wird ein Sonnenauf-
gang simuliert. Auf diese Weise können Sie sich lang-
•
Das Gerät ist nur für den Einsatz im häuslichen/priva-
sam an die Lichtverhältnisse gewöhnen und Ihr Körper
ten Umfeld bestimmt, nicht im gewerblichen Bereich.
bereitet sich behutsam auf das Aufwachen vor. Sie kön-
•
Dieses Gerät kann von Kindern ab 8 Jahren und darü-
nen zusätzlich einen Weckton einstellen, der nach dem
ber sowie von Personen mit verringerten physischen,
simulierten Sonnenaufgang ertönt und Sie beim Aufwa-
sensorischen oder mentalen Fähigkeiten oder Mangel
chen akustisch unterstützt. Als Weckton stehen Ihnen Ra-
an Erfahrung und Wissen benutzt werden, wenn sie
dio und verschiedene Klänge zur Verfügung. Der beurer
beaufsichtigt oder bezüglich des sicheren Gebrauchs
Lichtwecker WL 80 verhilft Ihnen zu einem ausgeruhten
des Gerätes unterwiesen wurden und die daraus resul-
und zufriedenen Start in den Tag.
tierenden Gefahren verstehen.
•
Kinder dürfen nicht mit dem Gerät spielen.
2. Zeichenerklärung
•
Reinigung und Benutzer-Wartung dürfen nicht von Kin-
Warnhinweis auf Verletzungs-
dern ohne Beaufsichtigung durchgeführt werden.
gefahren oder Gefahren für Ihre
•
Wenn die Netzanschlussleitung dieses Gerätes beschä-
WARNUNG
Gesundheit.
digt ist, muss sie durch den Hersteller oder seinen Kun-
Sicherheitshinweis auf mögliche
dendienst oder einer ähnlich qualifizierten Person ersetzt
ACHTUNG
Schäden am Gerät/Zubehör.
werden, um Gefährdungen zu vermeiden.
•
Schalten Sie das Gerät im Falle von Defekten oder Be-
Hinweis auf wichtige Informati-
Hinweis
triebsstörungen sofort aus und trennen Sie das Gerät
onen.
vom Stromanschluss.
Entsorgung gemäß Elektro- und
•
Stecken Sie den Netzadapter niemals ein oder aus,
Elektronik-Altgeräte EG-Richtli-
wenn Sie feuchte Hände haben.
nie –WEEE (Waste Electrical and
Electronic Equipment
•
Halten Sie Kinder vom Verpackungsmaterial fern (Er-
stickungsgefahr).
Hersteller
•
Verlegen Sie das Stromkabel so, dass niemand darü-
ber stolpern kann.
Dieses Produkt erfüllt die Anfor-
•
Halten Sie das Gerät, den Netzadapter und das Strom-
derungen der geltenden euro-
kabel von Wasser fern!
päischen und nationalen Richt-
linien.
ACHTUNG
•
Schützen Sie das Gerät vor Stößen, Feuchtigkeit,
3. Bestimmungsgemäßer Gebrauch
Schmutz, starken Temperaturschwankungen und di-
rekter Sonneneinstrahlung.
WARNUNG
•
Lassen Sie das Gerät nicht fallen.
Das Gerät darf nur für den Zweck verwendet werden, für
den es entwickelt wurde, und auf die in der Gebrauchs-
anweisung angegebene Art und Weise. Jeder unsach-
gemäße Gebrauch kann gefährlich sein. Der Hersteller
3
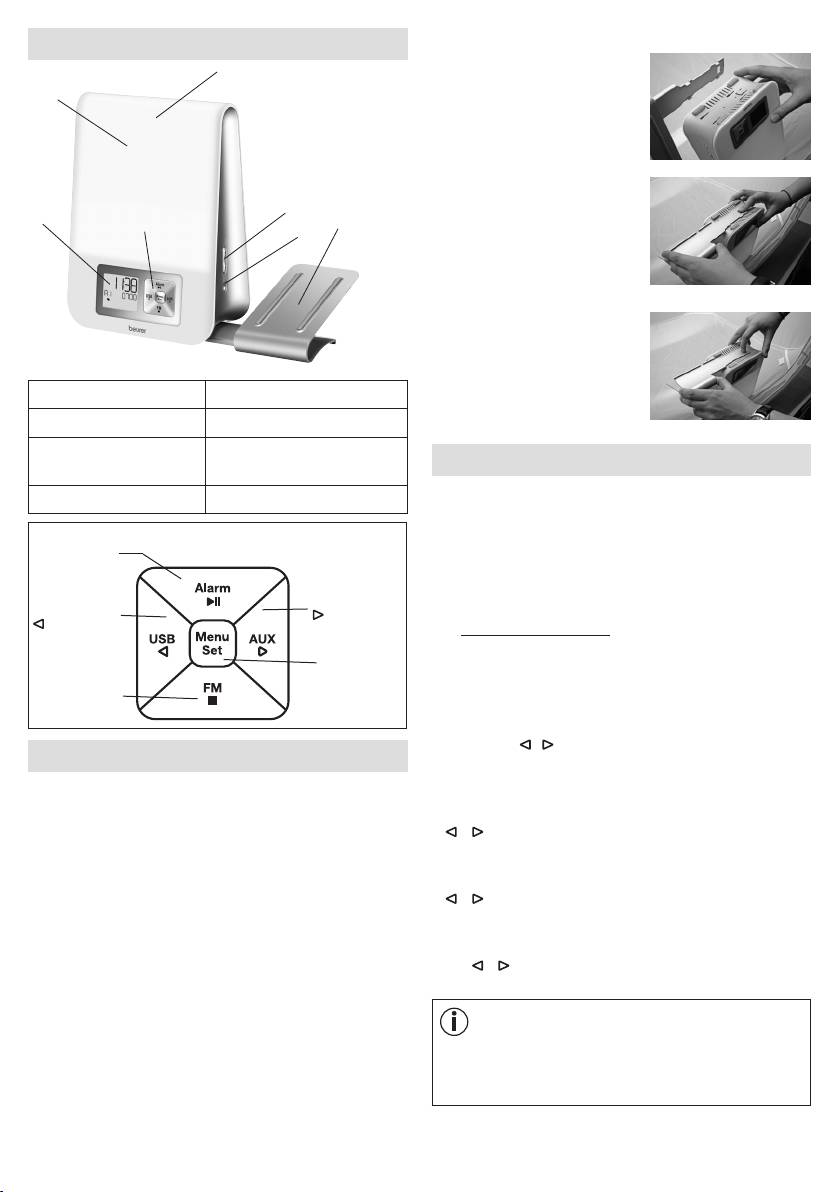
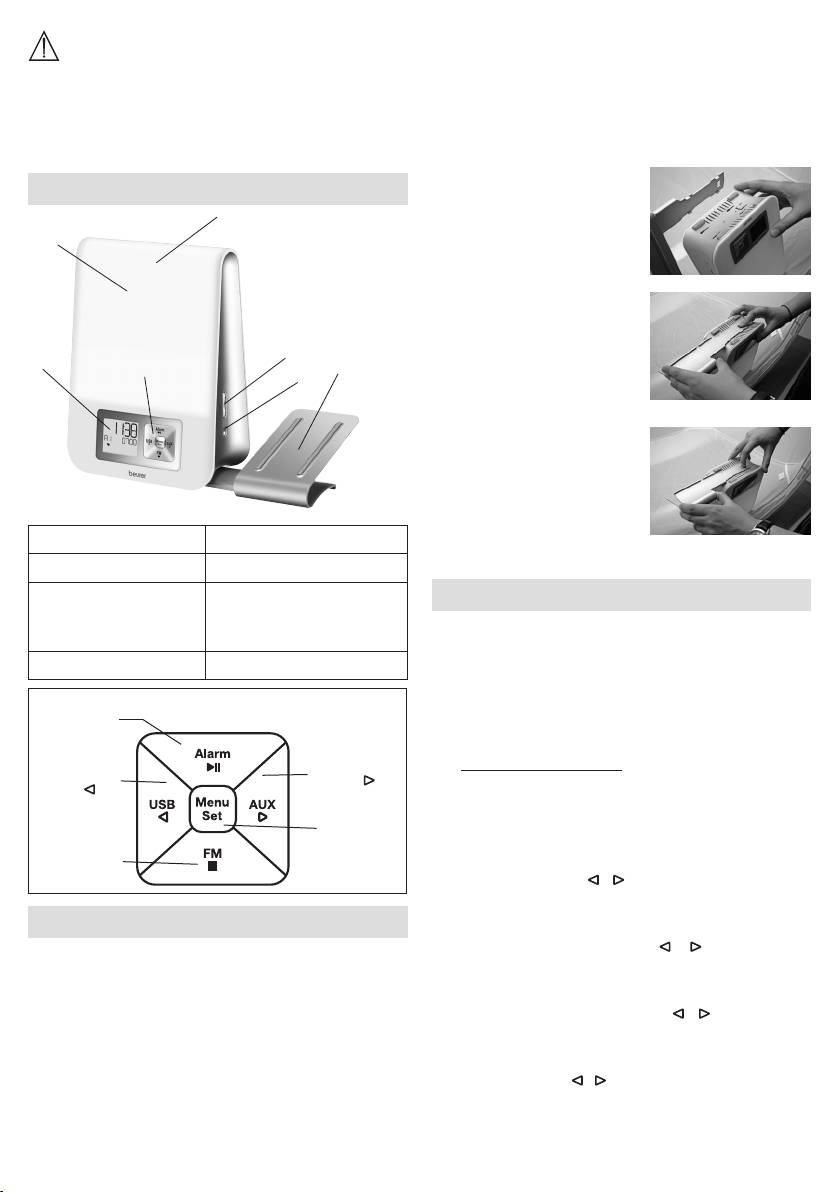
Halterung für Smartphone befestigen
5. Gerätebeschreibung
3
1.
Die vier Einrasthaken der Hal-
2
terung auf die vier rechtecki-
gen Önungen des Lichtwe-
ckers auflegen.
2.
Mit dem rechten Zeigenfin-
5
ger die Halterung nach un-
1
4
7
6
ten drücken und sie mit der
anderen Hand in Pfeilrichtung
vorsichtig schieben, bis sie
hör- und spürbar einrastet.
3. Zum Entfernen, die Entriege-
lung am Lichtwecker drücken
und die Halterung vorsichtig
1 Display 5 +/- Tasten
in Pfeilrichtung schieben.
2 Lichtfläche 6 Light-Taste
3 Snooze-Funktion (An-
7 Halterung für Smartphone
7. Grundeinstellungen
tippen auf Lichtfläche).
/ MP3-Player
In den Grundeinstellungen können Sie nacheinander
4 Tastenfeld
die Uhrzeit (
TIME
), die Alarmeigenschaften für die ein-
gestellten Alarmzeiten (
ALARM 1, ALARM 2, ALARM
Alarm-Taste /
3
), die Displayhelligkeit (
DISPLAY
), die Snooze-Dauer
►ǁ-Taste
(
SNOOZE
) und den Tastenton (
BEEP
) einstellen.
AUX-Taste /
USB-Taste /
-Taste
-Taste
7.1 Uhrzeit einstellen
Menu/Set-
•
Am eingeschalteten Gerät Menu/Set-Taste drücken.
Taste
"
TIME
" blinkt im Display. Erneut Menu/Set-Taste drü-
Radio-Taste /
cken.
■ -Taste
•
Stunden-Modus "
24 Hr
" blinkt im Display. Stunden-
Modus mit / -Tasten einstellen (24-Stunden-Modus
6. Inbetriebnahme
oder 12-Stunden-Modus). Mit Menu/Set-Taste bestä-
tigen.
•
Entfernen Sie das Verpackungsmaterial.
•
Stundenanzeige blinkt im Display. Die Stunden mit
•
Überprüfen Sie, ob alle Teile im Lieferumfang enthal-
/ -Tasten einstellen. Mit Menu/Set-Taste bestä-
ten sind
.
tigen.
•
Überprüfen Sie Gerät, Netzadapter und Stromkabel auf
•
Minutenanzeige blinkt im Display. Die Minuten mit
Beschädigungen.
/ -Tasten einstellen. Mit Menu/Set-Taste bestä-
•
Stellen Sie das Gerät auf eine ebene und feste Fläche.
tigen.
•
Stecken Sie den Netzadapteranschluss in die Netzad-
•
Wochentaganzeige blinkt im Display. Den Wochentag
apterbuchse auf der Rückseite des Geräts.
mit / -Tasten einstellen. Mit Menu/Set-Taste be-
•
Stecken Sie den Netzadapter in eine geeignete Steck-
stätigen.
dose.
•
Auf dem Display des Geräts erscheint die Uhrzeit.
Hinweis
MON
= Montag,
TUE
= Dienstag,
WED
= Mittwoch,
•
Legen Sie die Wurfantenne des Geräts nach hinten.
THU
= Donnerstag,
FRI
= Freitag,
SAT
= Samstag,
SUN
= Sonntag.
4
7.2 Alarmeigenschaften einstellen
Wenn Sie relativ schnell vom Licht wach werden, ist
eine Reduzierung der Helligkeit sinnvoll.
Sie können sich entweder mit einer der 8 Aufwachmelo-
dien, einem Weckton, per Radio, oder eigener Musik via
7.3 Displayhelligkeit einstellen
USB-Stick wecken lassen.
Zu den eingestellten Alarmzeiten (siehe Kapitel 8.1) kön-
•
Am eingeschalteten Gerät Menu/Set-Taste drücken.
nen Sie folgende Alarmeigenschaften einstellen: Weck-
"
TIME
" blinkt im Display.
ton, Lautstärke, Sonnenaufgang, Dauer des Sonnenauf-
•
Mit / -Tasten
DISPLAY
wählen. Mit Menu/Set-
gangs, Helligkeit des Sonnenaufgangs.
Taste bestätigen.
Um die Alarmeigenschaften einzustellen, befolgen Sie die
•
Die aktuelle Displayhelligkeit blinkt (
3 DISPLAY
).
folgenden Handlungsschritte:
Mit / -Tasten gewünschte Displayhelligkeit wäh-
len (OFF, 1,2, oder 3). Mit Menu/Set-Taste bestätigen.
•
Am eingeschalteten Gerät Menu/Set-Taste drücken.
"
TIME
" blinkt im Display.
Hinweis
•
Mit / -Tasten gewünschten Alarmspeicherplatz
Nach dem Einstellen dauert es ca. 10 Sekunden, bis
wählen (
ALARM 1, ALARM 2
oder
ALARM 3
), des-
die aktuelle eingestellte Displayhelligkeit erscheint, da
sen Funktionen Sie einstellen wollen
.
Mit Menu/Set-
nach jedem Tastendruck (auch Snooze-Funktion) das
Taste bestätigen.
Display für 10 Sekunden automatisch auf der höchs-
•
Aktuell eingestellter Weckton (z.B.
BUZZ
) blinkt.
ten Stufe leuchtet.
Mit / -Tasten gewünschten Weckton wählen. Mit
Menu/Set-Taste bestätigen.
7.4 Snooze-Dauer einstellen
Hinweis
•
Am eingeschalteten Gerät Menu/Set-Taste drücken.
BUZZ
= Piepton
"
TIME
" blinkt im Display.
SOUND 1-8
= 8 verschiedene Aufwachmelodien
•
Mit / -Tasten
SNOOZE
wählen. Mit Menu/Set-
RADIO
= Radio
Taste bestätigen.
USB
= Über angeschlossenen USB-Stick
•
Snooze-Dauer blinkt (
5 MIN SNOOZE
). Mit / -Tas-
ten gewünschte Snooze-Dauer wählen (1, 2, 5, 10, 20
•
Lautstärke des Alarms (
VOL
) blinkt. Mit / -Tasten
oder 30 Minuten). Mit Menu/Set-Taste bestätigen.
gewünschte Lautstärke (
1
bis
10
) einstellen. Mit Menu/
7.5 Tastenton einschalten /ausschalten
Set-Taste bestätigen.
•
Sonnenaufgangsfunktion blinkt (
SUNRISE
).
•
Am eingeschalteten Gerät Menu/Set-Taste drücken.
Mit / -Tasten die Sonnenaufgangsfunktion einschal-
"
TIME
" blinkt im Display.
ten (
ON
) oder ausschalten (
OFF
). Mit Menu/Set-Taste
•
Mit / -Tasten
FEEDBACK
wählen. Mit Menu/Set-
bestätigen.
Taste bestätigen.
•
Mit / -Tasten den Tastenton einschalten (
ON
) oder
Hinweis
ausschalten (
OFF
). Mit Menu/Set-Taste bestätigen.
Sie können sich zusätzlich zum Weckton mit einer Son-
nenaufgangsfunktion wecken lassen. Die Sonnenauf-
8. Gerätefunktionen
gangsfunktion ist ein simulierter Sonnenaufgang. Hier-
bei wird das LED-Licht vor der eigentlich eingestellten
8.1 Alarm einstellen
Weckzeit langsam heller.
Das Gerät besitzt drei Alarm-Speicherplätze, die Sie un-
terschiedlich einstellen können.
•
Wenn die Sonnenaufgangsfunktion eingeschaltet
ist, blinkt die Dauer des Sonnenaufgangs (
10
MIN
).
8.1.1 Alarm einschalten (
ON
)
Mit / -Tasten gewünschte Dauer des Sonnenauf-
1.
Am eingeschalteten Gerät so oft ALARM-Taste drü-
gangs, vor dem Zeitpunkt der Weckzeit, wählen (1, 2,
cken, bis gewünschter Alarm-Speicherplatz im Display
5, 10, 20 oder 30 Minuten). Mit Menu/Set-Taste be-
erscheint (
A1, A2 oder A3).
stätigen.
2. Mit / -Tasten drücken, bis im Display
ON
steht.
•
Helligkeit des Sonnenaufgangs blinkt (
20 LI
) im Dis-
play. Mit / -Tasten gewünschte Helligkeit des
3.
Menu/Set-Taste drücken. Im Display blinkt die Stun-
Sonnenaufgangs zum Zeitpunkt der Weckzeit wählen
denanzeige des Alarms. Mit / -Tasten Stunde ein-
(5, 10, 15 oder 20). Mit Menu/Set-Taste bestätigen.
stellen und mit Menu/Set-Taste bestätigen.
5
4.
Im Display blinkt die Minutenanzeige des Alarms.
8.2.3 Alarm ausschalten bei Weckton
Mit / -Tasten Minute einstellen und mit Menu/Set-
Wenn der Alarm ertönt, beliebige Taste außer Snooze
Taste bestätigen.
drücken. Der Alarm ist nun ausgeschaltet und wird erst
wieder zur eingestellten Alarmzeit ertönen.
5. Im Display erscheint kurz
END.
Der eingestellte Alarm
ist nun aktiviert und erscheint im Display.
8.3 AUX-Modus
Sie können eine externe Audioquelle (z.B. MP3-Player,
8.1.2 Alarm pro Tag einschalten (
DAY
)
Smartphone oder CD-Player) über den AUX-Eingang mit
Sie können mit der
DAY
-Funktionzu zu jedem eingestell-
dem Lichtwecker verbinden.
ten Alarm zusätzlich festlegen, an welchen Wochentagen
1. Mitgelieferte AUX-Kabel an Audioquelle anschließen.
der Alarm ertönen soll.
2.
Andere Ende des AUX-Kabels in den AUX-Eingang auf
1.
Am eingeschalteten Gerät so oft ALARM-Taste drü-
der Geräterückseite stecken.
cken, bis gewünschter Alarm-Speicherplatz im Display
erscheint (
A1, A2 oder A3
)
.
3. AUX-Taste am Gerät drücken. Externe Audioquelle ist
nun mit Lichtwecker verbunden.
2. Mit / -Tasten drücken, bis im Display
DAY
steht.
4. Mit den seitlichen +/- Tasten Lautstärke regeln.
3.
Menu/Set-Taste drücken. Im Display erscheint
MON
(Montag) und
off.
5.
Um den AUX-Modus wieder zu verlassen, ■-Taste drü-
cken.
4. Mit / -Tasten den Alarm für Montag aktivieren (
on
)
oder deaktivieren (
off
). Mit Menu/Set-Taste bestäti-
6. Nach Gebrauch das AUX-Kabel wieder ausstecken.
gen.
8.4 USB-Modus
5.
Im Display erscheint
TUE
(Dienstag). Die restlichen Wo-
Sie haben die Möglichkeit einen USB-Stick (bis zu 32
chentage wie im vorherigen Punkt bei Montags ein-
GB) über den USB-Anschluss an den Lichtwecker anzu-
stellen. Anschließend die Alarmzeit wie in Kapitel 8.1.1
schließen und Musik zu hören. Das Gerät kann folgende
beschrieben, einstellen.
Dateiformate abspielen: MP3, WMA und WAV.
8.1.3 Alarm dauerhaft deaktivieren (
OFF
)
Um einen eingestellten Alarm dauerhaft zu deaktivieren,
Hinweis
gehen Sie wie folgt vor:
Das Gerät kann nur Musikdateien abspielen, die im
Stammverzeichnis abgelegt sind. Musikdateien, die
1.
Am eingeschalteten Gerät so oft ALARM-Taste drü-
sich in Unterverzeichnissen befinden, kann das Gerät
cken, bis gewünschter Alarm-Speicherplatz im Display
nicht abspielen.
erscheint (
A1, A2 oder A3
)
.
2. Mit / -Tasten drücken, bis im Display OFF steht.
Wenn Sie den USB-Modus nutzen möchten, befolgen Sie
3. Mit Menu/Set-Taste bestätigen.
die folgenden Handlungsschritte.
4. Im Display erscheint END. Der Alarm ist nun dauerhaft
1.
USB-Stick in den USB-Anschluss des Lichtweckers
deaktiviert.
stecken (befindet sich auf Geräterückseite).
2. Wenn USB-Stick bereits steckt: Am eingeschalteten
8.2 Alarm ausschalten
Gerät USB-Taste drücken.
"USB", die aktuelle Liednummer- und Lieddauer er-
8.2.1 Alarm ausschalten während Sonnenaufgang:
scheinen im Display.
Bei eingeschalteter Sonnenaufgangsfunktion fängt das
3.
Um zum nächsten Lied zu wechseln, -Taste drücken.
Gerät vor der eingestellten Alarmzeit langsam an zu
Um zum vorherigen Lied zu wechseln, -Taste drücken.
leuchten und das Display zeigt "SUNRISE" an. Sie können
Um Wiedergabe zu pausieren, ►ǁ-Taste drücken.
diesen Sonnenaufgang durch Drücken einer beliebigen
Um zwischen "normaler Wiedergabe",
Taste ausschalten. Der Weckton wird zur eingestellten
"Wiedergabewiederholung"(P) und "Wiedergabewie-
Alarmzeit dennoch ertönen.
derholung aller Lieder"( P
ALL
) zu wechseln, Menu/
8.2.2 Schlummermodus (Snooze) bei Alarm
Set-Taste drücken.
Das Gerät besitzt einen Schlummermodus (Snooze).
4. Mit den seitlichen +/- Tasten Lautstärke regeln.
Wenn der Alarm angeht und Sie die Snooze-Funktion
5. Um USB-Modus zu beenden, ■ -Taste drücken.
drücken (antippen der Lichtfläche), wird der Alarm nach
der eingestellten Snooze-Dauer (siehe Kapitel 7.4) er-
8.5 Radio-Modus
neut ertönen.
Mit dem Gerät können Sie auch Radio hören.
6
Wenn Sie den Radio-Modus nutzen möchten, befolgen
2. Das Licht geht an,
20 light
erscheint im Display und
Sie die folgenden Handlungsschritte.
gleich danach mit seitlichen +/- Tasten gewünschte
Lichthelligkeit einstellen (wählbar 1-20). Mit Light-Taste
1.
Am eingeschalteten Gerät FM-Taste drücken.
bestätigen.
10 sunset
erscheint im Display.
Die aktuelle Senderfrequenz und Programmnummer
(z.B.
P1
) erscheinen im Display.
3. Mit seitlichen +/- Tasten gewünschte Dauer des Son-
nenuntergangs wählen (2, 5, 10, 15, 20, 30, 45 oder 60
2.
Mit / -Tasten gewünschte Programmnummer wäh-
Minuten). Anschließend 5 Sekunden warten. Die Son-
len (z.B.
P1
oder
P2
), auf dem ein Sender gespeichert
nenuntergangsfunktion ist danach automatisch aktiviert
werden soll.
und im Display erscheint ein kleines -Symbol. Das
3.
-Taste gedrückt halten, um automatischen Sender-
Licht wird nun automatisch nach Ablauf der eingestell-
suchlauf zu starten. Um einen Sender auf der ausge-
ten Dauer des Sonnenuntergangs ausgehen.
wählten Programmnummer zu speichern (z.B.
P1),
Menu/Set-Taste drücken.
Hinweis
4.
Um zwischen den gespeicherten Sendern zu wechseln,
Sonnenuntergang mit Musik
/ -Tasten drücken.
Sie können mit dem Gerät auch einen Sonnenunter-
gang simulieren und nebenbei Musik hören. Hierbei
8.6
Gute-Nacht-Funktion (Radio Sleep-Timer)
wird das Licht nach einer eingestellten Dauer langsam
Wenn der Radio-Modus eingeschaltet ist, können Sie zu-
dunkler. Die Musik wird nach der eingestellten Dauer
sätzlich eine Gute-Nacht-Funktion hinzuschalten.
automatisch ausgeschaltet.
Mit der Gute-Nacht-Funktion können Sie einstellen, nach
wie vielen Minuten sich das Radio automatisch ausschal-
Um mit dem Gerät einen Sonnenuntergang mit Mu-
ten soll.
sik zu starten, befolgen Sie die folgenden Handlungs-
schritte:
Wenn Sie die Gute-Nacht-Funktion nutzen möchten, be-
folgen Sie die folgenden Handlungsschritte:
1. Am eingeschalteten Gerät gewünschte Musikquelle
wählen (USB, Radio(FM) oder AUX).
1.
Am eingeschalteten Gerät FM-Taste drücken, um in den
Radio-Modus zu gelangen.
2. Die weiteren Schritte wie unter "8.7.2 Sonnenunter-
gangsfunktion" durchführen.
2. Menu/Set-Taste drücken,
2 MIN sleep
erscheint im
Display.
8.7.3 Stimmungslicht mit Farbwechsel
3. Mit Menu/Set-Taste gewünschte Zeit einstellen, nach
Sie können den Lichtwecker auch als Stimmungslicht mit
der sich das Radio automatisch ausschalten soll ( 2, 5,
Farbwechsel verwenden.
10, 15, 20, 30, 45 oder 60 Minuten). Um die Auswahl
1. Am eingeschalteten Gerät 3x die Light-Taste drücken.
zu bestätigen, 5 Sekunden warten. Danach erscheint
2.
LIGHT change
erscheint im Display.
automatisch im Display ein kleines -Symbol
3.
Wenn Ihnen während des Farbwechsels ein Farblicht
8.7 Lichtfunktionen
dauerhaft anzeigen lassen möchten, können Sie dieses
durch Drücken der Light-Taste fixieren.
LIGHT fixed
8.7.1 Leselampe
erscheint im Display.
1. Am eingeschalteten Gerät Light-Taste drücken.
4. Um das Licht ganz auszuschalten, erneut Light-Taste
2. Das Licht geht an und
20 light
erscheint im Display.
drücken.
Mit +/- Tasten gewünschte Lichthelligkeit einstellen
(wählbar 1-20).
8.8 Auf Werkseinstellung zurücksetzen
Wenn Sie am Lichtwecker alle Einstellungen auf die
3.
Um das Licht wieder auszuschalten, drücken Sie die
Werkseinstellung zurücksetzen möchten, befolgen Sie
Light-Taste so oft bis "
LIGHT off"
im Display er-
die folgenden Handlungsschritte:
scheint.
1.
Netzadapter des Lichtweckers von der Steckdose tren-
8.7.2 Sonnenuntergangsfunktion
nen.
Sie können mit dem Gerät auch einen Sonnenuntergang
2. Menu/Set-Taste und Light-Taste am ausgeschalteten
simulieren. Hierbei wird das Licht nach einer eingestellten
Gerät beide gedrückt halten und Netzadapter des Licht-
Dauer langsam dunkler.
weckers wieder in Steckdose einstecken. Die Tasten
Um mit dem Gerät einen Sonnenuntergang zu simulieren,
ca. 10 Sekunden gedrückt halten, bis "
DEFAULT"
im
befolgen Sie die folgenden Handlungsschritte:
Display angezeigt wird.
1.
Am eingeschalteten Gerät seitliche Light-Taste drücken.
3. Das Gerät ist nun auf die Werkseinstellung zurückge-
setzt.
7
Tastenton Aus, An
9. Reinigung/Aufbewahrung
AUX Line-In, 3,5 mm Klinkenstecker
•
Reinigen Sie das Gerät mit einem trockenen Tuch.
Wiedergabe über USB-Stick,
•
Verwenden Sie keine scheuernden Reinigungsmittel.
maximal 32GB.
•
Achten Sie darauf, dass kein Wasser in das Gerät ein-
Dateiformate: MP3, WMA, WAV,
dringt. Falls dies doch einmal der Fall sein sollte, dann
USB
maximal 9999 Dateien, nur im
verwenden Sie bitte das Gerät erst dann wieder, wenn
Stammverzeichnis lesbar, Unter-
es völlig trocken ist.
verzeichnisse werden nicht un-
•
Gerät und Steckernetzteil keinesfalls in Wasser oder
terstützt. 5 V Ausgangsspannung
andere Flüssigkeiten tauchen.
Frequenzbereich UKW 87,5 -
Radio
•
Schützen Sie das Gerät vor Stößen, Feuchtigkeit, Staub,
108 MHz, 10 Speicherplätze
Chemikalien, starken Temperaturschwankungen und zu
Lautsprecher 2 Watt
nahen Wärmequellen (Öfen, Heizungskörper).
Eingang: 110-240 V, AC, 50/60
Netzteil Span-
Hz, 0,5 A
10. Entsorgung
nungsversorgung
Ausgang: 9 V, DC, 1500mA
Im Interesse des Umweltschutzes darf das Gerät am En-
Netzteil Schutz-
de seiner Lebensdauer nicht mit dem Hausmüll entfernt
Schutzklasse II
klasse
werden. Die Entsorgung kann über entsprechen-
de Sammelstellen in Ihrem Land erfolgen. Befol-
Technische Änderungen vorbehalten.
gen Sie die örtlichen Vorschriften bei der Entsor-
gung der Materialien. Entsorgen Sie das Gerät
12. Garantie
gemäß der Elektro- und Elektronik Altgeräte EG-Richtlinie
– WEEE (Waste Electrical and Electronic Equipment). Bei
Sie erhalten 3 Jahre Garantie ab Kaufdatum auf Material
Rückfragen wenden Sie sich an die für die Entsorgung
und Fabrikationsfehler des Produktes.
zuständige kommunale Behörde.
Die Garantie gilt nicht:
•
im Falle von Schäden, die auf unsachgemäßer Bedie-
11. Technische Daten
nung beruhen,
•
für Verschleißteile,
Beleuchtungs-
Maximal ca. 2500 Lux (bei 15 cm
stärke
Abstand)
•
für Mängel, die dem Kunden bereits bei Kauf bekannt
waren,
Licht LED Technologie
20 Lichtstufen mit Simulation von
•
bei Eigenverschulden des Kunden.
Lichtstufen
Morgenrot
Die gesetzlichen Gewährleistungen des Kunden bleiben
Automatischer RGB Farbwechsel
durch die Garantie unberührt. Für Geltendmachung ei-
Stimmungslicht
mit individueller Farbfixierung
nes Garantiefalles innerhalb der Garantiezeit ist durch
Lichtweckerfunk-
Aus 2, 5, 10, 15, 20, 30, 45, 60
den Kunden der Nachweis des Kaufes zu führen. Die
tion
Minuten vor Alarm
Garantie ist innerhalb eines Zeitraumes von 3 Jahren ab-
Sonnenaufgangs-
Maximale Lichtstärke bis zum
Kaufdatum gegenüber der Beurer GmbH, Söflinger Stra-
Funktion
Alarm: Lichtstufe 5, 10, 15, 20
ße 218, 89077 Ulm, Germany geltend zu machen. Der
Kunde hat im Garantiefall das Recht zur Reparatur der
Snooze-Dauer 1, 2, 5, 10, 20, 30 Minuten
Ware bei unserem eigenen oder bei von uns autorisierten
Sonnenuntergang-
2, 5, 10, 15, 20, 30, 45, 60 Minuten
Werkstätten. Weitergehende Rechte werden dem Kunden
Funktion
(aufgrund der Garantie) nicht eingeräumt.
Gute-Nacht-Funk-
2, 5, 10, 15, 20, 30, 45, 60 Minuten
tion (Sleep Radio)
LCD-Hintergrund-
Aus, 1, 2, 3
beleuchtung
12h / 24h Umstellbar, 15 Minu-
Uhrzeit
ten Puer bei Stromausfall
3 Alarmzeiten (Aus, An, Tag)
Alarm
Weckton, 8 Klänge, Radio, MP3
über USB-Stick
8

G ENGLISH
Read these instructions for use carefully and keep them for later use, be
sure to make them accessible to other users and observe the information
they contain.
Table of contents
1. Getting to know your device ......................................................................................................... 10
2. Signs and symbols ......................................................................................................................... 10
3. Intended use ................................................................................................................................... 10
4. Warning notices/safety notes ....................................................................................................... 10
5. Device description ......................................................................................................................... 11
6. Initial use ........................................................................................................................................ 11
7. Basic settings ................................................................................................................................. 11
7.1 Setting the time .......................................................................................................................... 11
7.2 Setting the alarm properties ...................................................................................................... 12
7.3 Setting the display brightness ................................................................................................... 12
7.4 Setting the snooze duration ....................................................................................................... 12
7.5 Switching the button tone on/o ............................................................................................... 12
8. Device functions ............................................................................................................................ 12
8.1 Setting the alarm ........................................................................................................................ 12
8.1.1 Switching the alarm on (ON) ............................................................................................. 12
8.1.2 Setting an alarm for each day (DAY) ................................................................................. 13
8.1.3 Permanently deactivating the alarm (OFF) ........................................................................ 13
8.2 Switching o the alarm .............................................................................................................. 13
8.2.1 Switching off the alarm during sunrise: ............................................................................. 13
8.2.2 Snooze mode (Snooze) for the alarm ................................................................................ 13
8.2.3 Switching off the alarm when the alarm tone sounds ....................................................... 13
8.3 AUX mode .................................................................................................................................. 13
8.4 USB mode ................................................................................................................................. 13
8.5 Radio mode ............................................................................................................................... 13
8.6 Good night function (radio sleep timer) ...................................................................................... 14
8.7 Light functions ........................................................................................................................... 14
8.7.1 Reading lamp .................................................................................................................... 14
8.7.2 Sunset function ................................................................................................................. 14
8.7.3 Mood light with change of colour ..................................................................................... 14
8.8 Resetting the device to factory settings .................................................................................... 14
9. Cleaning and storage .................................................................................................................... 14
10. Disposal .......................................................................................................................................... 15
11. Technical data ................................................................................................................................ 15
•
AUX cable
Included in delivery
•
Instructions for use
•
Wake-up light with cable antenna
•
Holder for smartphone/MP3 player
•
Mains adapter
9
Dear customer,
4. Warning notices/safety notes
Thank you for choosing one of our products. Our name
stands for high-quality, thoroughly tested products for
WARNING
applications related to heating, weight, blood pressure,
body temperature, pulse, gentle therapy, massage, air
•
Only operate the device with the mains adapter
and beauty.
provided and at the mains voltage specified on the
mains adapter.
With kind regards,
•
Before use, inspect the device and accessories for
Your Beurer team
visible damage. If you have any doubts, do not use
the device and contact your retailer or the specified
1. Getting to know your device
Customer Services address.
The Beurer WL 80 wake-up light wakes you from sleep
•
The device is only intended for domestic/private use,
in a gentle and natural manner. The LED light gradually
not for commercial use.
becomes brighter like a rising sun, allowing you to slowly
•
This device may be used by children over the age of
become accustomed to the light conditions and your
eight and by people with reduced physical, sensory
body to gently prepare itself for waking up. You can also
or mental skills or a lack of experience or knowledge,
set an alarm tone that is sounded following the simulated
provided that they are supervised or have been
sunrise and provides an acoustic aid to help you wake
instructed on how to use the device safely and are fully
up. You can choose between the radio or various sounds.
aware of the consequent risks of use.
The Beurer WL 80 wake-up light provides a rested and
pleasant start to your day.
•
Children must not play with the device.
•
Cleaning and user maintenance must not be performed
2. Signs and symbols
by children unless supervised.
•
If the mains connection cable of this device is damaged,
Warning notice indicating a risk
it must be replaced by the manufacturer, its customer
WARNING
of injury or damage to health.
service department or a similarly qualified person to
Safety note indicating possible
avoid any risk.
IMPORTANT
damage to the device/accessory.
•
In the case of defects or operational faults, switch the
device o immediately and disconnect the device from
Note on important information.
Note
the mains socket.
Disposal in accordance with the
•
Never plug in or unplug the mains adapter when you
Waste Electrical and Electronic
have wet hands.
Equipment EC Directive – WEEE
•
Keep packaging material away from children (risk of
suocation).
Manufacturer
•
Arrange the mains cable so that it is not a trip hazard.
•
Keep the device, mains adapter and mains cable away
This product satisfies the
from water.
requirements of the applicable
European and national
IMPORTANT
directives.
•
Protect the device from impacts, humidity, dirt, marked
3. Intended use
temperature fluctuations and direct sunlight.
•
Do not drop the device.
WARNING
The device must only be used for the purpose for
which it is designed and in the manner specified in the
instructions for use. Any improper use can be dangerous.
The manufacturer is not liable for damage resulting from
improper or careless use.
10

Securing the smartphone holder
5. Device description
3
1.
Position the four latching
2
hooks of the holder onto the
four rectangular openings on
the wake-up light.
2.
Press down the holder
5
with your right index finger
1
4
7
6
and use your left hand to
carefully slide the holder in
the direction of the arrow until
you hear and see it engage.
3. To remove, press the release
on the wake-up light and
carefully slide the holder in
1 Display 5 +/- buttons
the direction of the arrow.
2 Light area 6 Light button
3 Snooze function
7 Holder for smartphone /
7. Basic settings
(taplight area)
MP3 player
In the basic settings, you can set the time (
TIME
), the alarm
4 Keypad
properties for the set alarm times (
ALARM 1, ALARM 2,
ALARM 3
), the display brightness (
DISPLAY
), the
Alarm button /
snooze duration (
SNOOZE
) and the button tone (
BEEP
)
►ǁ button
in the order stated here.
AUX button /
USB button /
7.1 Setting the time
button
button
•
When the device is switched on, press the
Menu/Set
Menu/Set button. "
TIME
" flashes in the display. Press
button
the Menu/Set button again.
Radio button /
■ button
•
The hour mode "
24 Hr
" flashes in the display. Set hour
mode using the / buttons (24-hour mode or 12-hour
mode). Confirm using the Menu/Set button.
6. Initial use
•
The hour display flashes in the display. Set the hours
•
Remove the packaging material.
using the / buttons. Confirm using the Menu/Set
button.
•
Check that all parts listed are present
.
•
The minute display flashes in the display. Set the
•
Check the device, mains adapter and mains cable for
minutes using the / buttons. Confirm using the
damage.
Menu/Set button.
•
Place the device on a firm, even surface.
•
The weekday display flashes in the display. Set the day
•
Insert the mains adapter connector into the mains
of the week using the / buttons. Confirm using the
adapter socket on the rear of the device.
Menu/Set button.
•
Insert the mains adapter into a suitable socket.
•
The time is shown on the device display.
Note
MON
= Monday,
TUE
= Tuesday,
WED
= Wednesday,
•
Route the cable antenna of the device to the rear.
THU
= Thursday,
FRI
= Friday,
SAT
= Saturday,
SUN
= Sunday.
11
7.2 Setting the alarm properties
7.3 Setting the display brightness
You can choose to wake up with one of the 8 wake-up
•
When the device is switched on, press the Menu/Set
melodies, an alarm tone, the radio or your own music
button. "
TIME
" flashes in the display.
via a USB stick.
•
Use the / buttons to select
DISPLAY
. Confirm
For the alarm times that have been set (see section 8.1),
using the Menu/Set button.
you can configure the following alarm properties: alarm
tone, volume, sunrise, duration of sunrise, brightness of
•
The current display brightness flashes (
3 DISPLAY
).
sunrise.
Use the / buttons to select the desired brightness
(OFF, 1, 2, or 3). Confirm using the Menu/Set button.
To configure the alarm properties, proceed as follows:
•
When the device is switched on, press the Menu/Set
Note
button. "
TIME
" flashes in the display.
Once the setting is made, it takes approx. 10 seconds
for the currently configured display brightness to
•
Use the / buttons to select the desired alarm
appear. This is because the display is automatically
storage location (
ALARM 1, ALARM 2
or
ALARM 3
)
illuminated at the highest setting for 10 seconds
for which you wish to configure the functions
.
Confirm
each time a button is pressed (including the snooze
using the Menu/Set button.
function).
•
The currently set alarm tone (e.g.
BUZZ
) flashes. Use
the / buttons to select the desired alarm tone.
7.4 Setting the snooze duration
Confirm using the Menu/Set button.
•
When the device is switched on, press the Menu/Set
button. "
TIME
" flashes in the display.
Note
•
Use the / buttons to select
SNOOZE
. Confirm using
BUZZ
= acoustic signal
the Menu/Set button.
SOUND 1-8
= 8 dierent wake-up melodies
•
The snooze duration flashes (
5 MIN SNOOZE
). Use the
RADIO
= radio
/ buttons to select the desired snooze duration (1,2,
USB
= via connected USB stick
5, 10, 20 or 30 minutes). Confirm using the Menu/Set
button.
•
The alarm volume (
VOL
) flashes. Use the / buttons
to set the desired volume (
1
to
10
). Confirm using the
7.5 Switching the button tone on/o
Menu/Set button.
•
When the device is switched on, press the Menu/Set
•
The sunrise function flashes (
SUNRISE
). Use the /
button. "
TIME
" flashes in the display.
buttons to switch the sunrise function on (
ON
) or o
•
Use the / buttons to select
FEEDBACK
. Confirm
(
OFF
). Confirm using the Menu/Set button.
using the Menu/Set button.
•
Use the / buttons to switch the button tone on
Note
(
ON
) or o (
OFF
). Confirm using the Menu/Set button.
You can also choose to be woken up by a sunrise
function in addition to the alarm tone. The sunrise
function is a simulated sunrise. In the process, the LED
8. Device functions
light slowly turns brighter prior to the actual alarm time
that is set.
8.1 Setting the alarm
The device features three alarm memory spaces that can
be configured individually.
•
If the sunrise function is switched on, the duration of
the sunrise flashes (
10
MIN
). Use the / buttons
8.1.1 Switching the alarm on (
ON
)
to select the duration of the sunrise prior to the alarm
1.
When the device is switched on, keep pressing the
time (1, 2, 5, 10, 20 or 30 minutes). Confirm using the
ALARM button until the desired alarm memory space
Menu/Set button.
appears in the display (
A1, A2
or
A3
).
•
The brightness of the sunrise flashes (
20 LI
) in the
display. Use the / buttons to select the desired
2.
Press the / buttons until
ON
appears in the display.
brightness of the sunrise at the alarm time (5, 10, 15
3.
Press the Menu/Set button. The hour display of the
or 20). Confirm using the Menu/Set button. If you are
alarm flashes in the display. Use the / buttons to
woken up by light relatively quickly, then we recommend
set the hour and confirm using the Menu/Set button.
reducing the brightness.
12
4. The minute display of the alarm flashes in the display.
8.2.3
Switching o the alarm when the alarm tone sounds
Use the / buttons to set the minute and confirm
When the alarm sounds, press any button apart from
using the Menu/Set button.
Snooze. The alarm is now switched o and will only
sound again at the set alarm time.
5.
END
is briefly shown in the display.
The set alarm is
now activated and appears in the display.
8.3 AUX mode
You can connect an external audio source (e.g. MP3
8.1.2 Setting an alarm for each day (
DAY
)
player, smartphone or CD player) to the wake-up light
For each alarm that has been set, you can use the
DAY
via the AUX input.
function to specify the days of the week on which the
1. Connect the supplied AUX cable to an audio source.
alarm should sound.
2.
Insert the other end of the AUX cable into the AUX input
1.
When the device is switched on, keep pressing the
on the rear of the device.
ALARM button until the desired alarm memory space
appears in the display (
A1, A2 or A3).
3.
Press the AUX button on the device. The external audio
source is now connected to the wake-up light.
2.
Press the / buttons until
DAY
is shown in the
display.
4. Use the +/- buttons on the side to adjust the volume.
3.
Press the Menu/Set button.
MON
(Monday) and
off
5. Press the ■ button to exit AUX mode again.
appear in the display.
6. Disconnect the AUX cable after use.
4.
Use the / buttons to activate (
on
) or deactivate
8.4 USB mode
(
off
) the alarm for Monday. Confirm using the
You have the option of connecting a USB stick (up to
Menu/Set button.
32 GB) to the wake-up light via the USB connection,
5.
TUE
(Tuesday) appears in the display. Make the settings
enabling you to listen to music. The device can play the
for the other days of the week in the same way as for
following file formats: MP3, WMA and WAV.
Monday, as described in the previous point. Then set
the alarm time as described in section 8.1.1.
Note
8.1.3 Permanently deactivating the alarm (
OFF
)
The device can only play music files that are stored
To permanently deactivate a set alarm, proceed as
inthe root directory. Music files that are stored in sub-
follows:
directories cannot be played.
1.
When the device is switched on, keep pressing the
If you wish to use USB mode, proceed as follows:
ALARM button until the desired alarm memory space
appears in the display (
A1, A2 or A3).
1.
Insert the USB stick into the USB connection on the
wake-up light (located on the rear of the device).
2.
Press the / buttons until OFF appears in the display.
2. If the USB stick is already inserted: when the device
3. Confirm using the Menu/Set button.
is switched on, press the USB button.
4.
END appears in the display. The alarm is now
"USB", the current song number and the song length
permanently deactivated.
appear in the display.
3.
To switch to the next song, press the button. To switch
8.2 Switching o the alarm
to the previous song, press the button. To pause
playback, press the ►ǁ button. To switch between
8.2.1 Switching o the alarm during sunrise:
"Standard playback", "Repeat" (P) and "Repeat all
When the sunrise function is switched on, the device
songs" ( P
ALL
), press the Menu/Set button.
slowly begins to light up prior to the set alarm time and
"SUNRISE" is shown in the display. You can switch o
4. Use the +/- buttons on the side to adjust the volume.
this sunrise by pressing any button. However, the alarm
5. To end USB mode, press the ■ button.
tone will still sound at the set alarm time.
8.5 Radio mode
8.2.2 Snooze mode (Snooze) for the alarm
You can also use the device to listen to the radio.
The device features a snooze mode (Snooze).
If you wish to use radio mode, proceed as follows:
If the alarm sounds and you press the Snooze function
1. When the device is switched on, press the FM button.
(by tapping the light area), the alarm will sound again once
The current station frequency and programme number
the set snooze duration has elapsed (see section 7.4).
(e.g.
P1
) appear in the display.
13
2.
Use the / buttons to select the desired programme
function is then activated automatically and a small
number (e.g.
P1
or
P2
) under which a station is to be
icon appears in the display. The light will now go
saved.
out automatically once the configured duration of the
sunset has elapsed.
3.
Press and hold the button to start the automatic
station search. To save a station under the selected
programme number (e.g.
P1), press the
Menu/Set
Note
button.
Sunset with music
The device can also be used to simulate a sunset while
4. To switch between the saved stations, press the
/
you listen to music. In the process, the light slowly
buttons.
turns darker after a set duration. The music is switched
8.6 Good night function (radio sleep timer)
o automatically after the set duration has elapsed.
If radio mode is switched on, you can also enable a good
To start a sunset with music on the device, proceed
night function.
as follows:
You can use the good night function to set the number
1. When the device is switched on, select the desired
of minutes after which the radio should automatically
music source (USB, radio (FM) or AUX).
switch o.
2.
Perform the subsequent steps as in "8.7.2 Sunset
If you wish to use the good night function, proceed as
function".
follows:
1. When the device is switched on, press the FM button
8.7.3 Mood light with change of colour
to access radio mode.
The wake-up light can also be used as a mood light with
change of colour.
2.
Press the Menu/Set button;
2 MIN sleep
appears
in the display.
1.
When the device is switched on, press the Light button
3x.
3. Use the Menu/Set button to set the desired time after
which the radio should automatically switch o (2, 5,
2.
LIGHT change
appears in the display.
10, 15, 20, 30, 45 or 60 minutes). Wait 5 seconds to
3.
If you wish to have a coloured light permanently
confirm the selection. A small icon will subsequently
displayed, this can be set by pressing the Light button
appear in the display.
while the colour-change operation is in progress.
LIGHT
fixed
appears in the display.
8.7 Light functions
4.
To fully switch o the light, press the Light button again.
8.7.1 Reading lamp
8.8 Resetting the device to factory settings
1.
When the device is switched on, press the Light button.
If you wish to reset all settings on the wake-up light to
2.
The light turns on and
20 light
appears in the display.
the factory settings, proceed as follows:
Use the +/- buttons to set the desired brightness for the
1.
Remove the mains adapter of the wake-up light from
light (can be selected between 1-20).
the socket.
3.
To switch the light o again, keep pressing the Light
2.
Press and hold both the Menu/Set button and the Light
button until "
LIGHT off
" appears in the display.
button on the device, which is now switched o, and
8.7.2 Sunset function
reinsert the mains adapter of the wake-up light into
The device can also be used to simulate a sunset. In the
the socket. Keep pressing the buttons about 10 sec..
process, the light slowly turns darker after a set duration.
3. The device has now been reset to the factory settings.
To simulate a sunset with the device, proceed as follows:
9. Cleaning and storage
1.
When the device is switched on, press the Light button
on the side.
•
Clean the device with a dry cloth.
2.
The light turns on and
20 light
appears in the
•
Do not use any abrasive cleaning products.
display; immediately afterwards, use the +/- buttons
•
Ensure that no water enters the device. If this should
on the side to set the desired brightness of the light
happen, reuse the device only when it has fully dried
(can be selected between 1-20). Use the Light button
out.
to confirm.
10 sunset
appears in the display.
•
Never immerse the device or mains part plug in water
3.
Use the +/- buttons on the side to select the desired
or other liquids.
duration of the sunset (2, 5, 10, 15, 20, 30, 45 or
60 minutes), then wait for 5 seconds. The sunset
14
•
Protect the device from impacts, humidity, dust,
Speaker 2 Watt
chemicals, marked temperature fluctuations and nearby
Input: 110-240 V, AC, 50/60 Hz,
sources of heat (ovens, heaters).
Mains part
0.5 A
voltage supply
Output: 9 V, DC, 1500 mA
10. Disposal
Mains part
For environmental reasons, do not dispose of the device
Protection class II
protection class
in the household waste at the end of its useful life.
Dispose of the device at a suitable local collection
Subject to technical changes.
or recycling point. Observe the local regulations
for material disposal. Dispose of the device in
accordance with EC Directive – WEEE (Waste
Electrical and Electronic Equipment). If you have any
questions, please contact the local authorities responsible
for waste disposal.
11. Technical data
Max. approx. 2500 lux
Illuminance
(atdistance of 15 cm)
Light LED technology
20 light levels with simulation
Light levels
ofdawn
Automatic RGB colour change,
Mood light
option of setting individual colour
Wake-up light
O, 2, 5, 10, 15, 20, 30, 45,
function
60minutes prior to alarm
Maximum light intensity up to
Sunrise function
alarm: Light level 5, 10, 15, 20
Snooze duration 1, 2, 5, 10, 20, 30 minutes
Sunset function
2, 5, 10, 15, 20, 30, 45, 60 minutes
Good night
function
2, 5, 10, 15, 20, 30, 45, 60 minutes
(sleepradio)
LCD backlighting O, 1, 2, 3
Toggle 12h/24h mode, 15 minute
Time
buer in event of power failure
3 alarm times (O, On, Day)
Alarm
Alarm tone, 8 sounds, radio,
MP3 via USB stick
Button tone O, On
AUX Line-in, 3.5 mm jack plug
Playback via USB stick, max.
32 GB.
File formats: MP3, WMA, WAV,
USB
max. 9999 files, can only be read
in root directory, subdirectories
are not supported. 5 V output
voltage
Frequency range VHF 87.5-108
Radio
MHz, 10 memory spaces
15

F FRANÇAIS
Lisez attentivement cette notice, conservez-la pour un usage ultérieur,
mettez-la à disposition des autres utilisateurs et suivez les consignes qui y
figurent.
Table des matières
1. Familiarisation avec l'appareil ...................................................................................................... 17
2. Symboles utilisés ........................................................................................................................... 17
3. Utilisation conforme aux recommandations ............................................................................... 17
4. Consignes de sécurité ................................................................................................................... 17
5. Description de l'appareil ............................................................................................................... 18
6. Mise en service .............................................................................................................................. 18
7. Réglages de base .......................................................................................................................... 18
7.1 Réglage de l’heure ..................................................................................................................... 18
7.2 Réglage des propriétés de l'alarme ........................................................................................... 19
7.3 Réglage de la luminosité de l'écran ........................................................................................... 19
7.4 Réglage de la durée de la fonction snooze ................................................................................ 19
7.5 Activation/désactivation du bip des touches ............................................................................. 19
8. Fonctions de l'appareil .................................................................................................................. 20
8.1 Réglage de l’alarme ................................................................................................................... 20
8.1.1 Activation (ON) de l'alarme ............................................................................................... 20
8.1.2 Réglage des jours de l'alarme (DAY) ................................................................................. 20
8.1.3 Désactivation permanente de l'alarme (OFF) .................................................................... 20
8.2 Désactivation de l'alarme ........................................................................................................... 20
8.2.1 Désactivation de l'alarme pendant un lever de soleil: ...................................................... 20
8.2.2 Fonction de rappel d'alarme (Snooze) .............................................................................. 20
8.2.3 Désactivation de l'alarme .................................................................................................. 20
8.3 Mode AUX .................................................................................................................................. 20
8.4 Mode USB ................................................................................................................................. 20
8.5 Mode radio ................................................................................................................................. 21
8.6 Fonction bonne nuit (Radio/Sleep/Timer) .................................................................................. 21
8.7 Fonctions lumineuses ................................................................................................................ 21
8.7.1 Lampe de lecture .............................................................................................................. 21
8.7.2 Fonction coucher de soleil ................................................................................................ 21
8.7.3 Lumière d'ambiance avec changement de couleur .......................................................... 21
8.8 Repasser aux réglages d'usine .................................................................................................. 22
9. Nettoyage/stockage ...................................................................................................................... 22
10. Élimination des déchets ................................................................................................................ 22
11. Données techniques ..................................................................................................................... 22
•
Câble AUX
Contenu
•
Mode d'emploi
•
Lumière de réveil avec antenne volante
•
Support pour smartphone/lecteur MP3
•
Adaptateur secteur
16

Chère cliente, cher client,
3. Utilisation conforme
Nous vous remercions d'avoir choisi l'un de nos
produits. Notre société est réputée pour l'excellence
aux recommandations
de ses produits et les contrôles de qualité auxquels ils
sont soumis. Nos produits couvrent les domaines de la
AVERTISSEMENT
chaleur, du poids, de la pression sanguine, de la tempé-
L'appareil ne doit être utilisé qu'aux fins pour lesquelles
rature corporelle, de la thérapie douce, des massages,
il a été conçu et conformément aux indications données
de l’amélioration de l’air et de la beauté.
par ce mode d'emploi. Toute utilisation inappropriée peut
être dangereuse. Le fabricant ne peut être tenu pour
Sincères salutations,
responsable des dommages causés par une utilisation
Votre équipe Beurer
inappropriée ou non conforme.
1. Familiarisation avec l'appareil
4. Consignes de sécurité
La lumière de réveil Beurer WL 80 vous ore un réveil en
douceur et naturel. La lumière LED, s'intensifiant progres-
AVERTISSEMENT
sivement, permet de simuler un lever de soleil. Vous
pouvez alors tranquillement vous habituer aux condi-
•
Utilisez l'appareil uniquement avec l’adaptateur secteur
tions lumineuses et votre corps se préparer doucement
fourni et à la tension indiquée sur l'adaptateur secteur.
au réveil. En plus de la simulation de lever de soleil, vous
•
Avant l'utilisation, vérifiez si l'appareil et les accessoires
pouvez paramétrer une sonnerie qui vous accompagne
présentent des dégâts visibles. En cas de doute, ne
lors de votre réveil. Pour la sonnerie, vous pouvez choisir
l’utilisez pas et adressez-vous à votre revendeur ou au
entre la radio et plusieurs sonorités. La lumière de réveil
service client indiqué.
WL 80 de Beurer vous permet de débuter la journée
•
L’appareil ne doit être utilisé que dans un environnement
reposé et du bon pied.
domestique/privé et pas dans un cadre professionnel.
•
Cet appareil peut être utilisé par les enfants à partir de
2. Symboles utilisés
8ans ainsi que les déficients physiques, sensoriels ou
Ce symbole vous avertit des
mentaux et les personnes ayant peu de connaissances
risques de blessures ou des
ou d'expérience à la condition qu'ils soient surveillés
AVERTISSEMENT
dangers pour votre santé.
ou sachent comment l'utiliser en toute sécurité et en
comprennent les risques.
Ce symbole vous avertit des
•
Les enfants ne doivent pas jouer avec cet appareil.
éventuels dommages au niveau
ATTENTION
de l’appareil ou d’un accessoire.
•
Le nettoyage et l'entretien ne doivent pas être eectués
par des enfants sans surveillance.
Ce symbole indique des infor-
Remarque
mations importantes.
•
Si le câble d'alimentation électrique de l'appareil est
endommagé, il doit être remplacé par le fabricant, son
Élimination conformément à
service client ou toute autre personne qualifiée afin
la directive européenne WEEE
d'éviter tout danger.
(Waste Electrical and Electronic
Equipment) relative aux déchets
•
En cas de défaut ou de panne, éteignez immédiatement
d'équipements électriques et
l’appareil et débranchez l’alimentation.
électroniques
•
Ne branchez ou débranchez jamais l'adaptateur secteur
si vous avez les mains humides.
Fabricant
•
Conservez l'emballage hors de portée des enfants
(risque d’étouement).
Ce produit répond aux exigences
•
Placez le câble d'alimentation de manière à ce que
des directives européennes et
personne ne puisse trébucher dessus.
nationales en vigueur.
•
Tenez l'appareil, l'adaptateur secteur et le câble à l'écart
de l'eau!
17
•
Branchez l'adaptateur secteur sur une prise secteur
ATTENTION
adaptée.
•
Protégez l'appareil contre les chocs, l'humidité, les
•
L'heure s'ache sur l'écran de l'appareil.
saletés, les fortes variations de température et l'enso-
•
Placez l'antenne volante de l'appareil vers l'arrière.
leillement direct.
•
Ne laissez pas tomber l'appareil.
Fixation du support pour smartphone
5. Description de l'appareil
1.
Accrochez les quatre
3
crochets du support dans les
2
quatre ouvertures rectangu-
laires de la lumière de réveil.
2.
Avec l'index droit, poussez le
support vers le bas et, avec
l'autre main, faites-le glisser
5
1
4
7
doucement dans le sens de
6
la flèche jusqu'à sentir et
entendre un clic.
3.
Pour le retirer, appuyez sur
le bouton de déblocage sur
la lumière de réveil et faites
glisser doucement le support
dans le sens de la flèche.
1 Écran 5 Touche +/-
2 Surface lumineuse 6 Touche Light
3 Fonction Snooze
7 Support pour smart-
7. Réglages de base
(appuyer sur la surface
phone/lecteur MP3
Dans les réglages de base, vous pouvez régler l'un
lumineuse).
après l'autre l'heure (
TIME
), les propriétés de l'alarme
4 Clavier
pour l'heure réglée (
ALARM 1, ALARM 2, ALARM 3
), la
luminosité de l'écran (
DISPLAY
), la durée de la fonction
Touche Alarm/
snooze (
SNOOZE
) et le bip des touches (
BEEP
).
touche ►ǁ
Touche AUX/
7.1 Réglage de l’heure
Touche USB/
touche
touche
•
Lorsque l'appareil est allumé, appuyez sur la touche
Menu/Set. «
TIME
» clignote à l'écran. Appuyez à
Touche
nouveau sur la touche Menu/Set.
Menu/Set
Touche Radio/
•
Le mode «
24 Hr
» clignote à l'écran. Réglez le mode
touche ■
à l'aide des touches / (mode 24h ou mode 12h)
Confirmez en appuyant sur la touche Menu/Set.
6. Mise en service
•
L'achage de l'heure clignote à l'écran. Réglez les
heures à l'aide des touches / . Confirmez en
•
Retirez le matériel d'emballage.
appuyant sur la touche Menu/Set.
•
Vérifiez que toutes les pièces sont présentes lors de
•
L'achage des minutes clignote à l'écran. Réglez
la livraison
.
les minutes à l'aide des touches / . Confirmez en
•
Vérifiez que l'appareil, l'adaptateur secteur et le câble
appuyant sur la touche Menu/Set.
ne sont pas endommagés.
•
L'achage du jour clignote à l'écran. Réglez le jour à
•
Posez l'appareil sur une surface stable et plane.
l'aide des touches
/ . Confirmez en appuyant sur la
•
Branchez la fiche de l'adaptateur secteur dans la prise
touche Menu/Set.
de l'adaptateur secteur à l'arrière de l'appareil.
18
avant la sonnerie (1, 2, 5, 10, 20 ou 30 minutes).
Confirmez en appuyant sur la touche Menu/Set.
Remarque
MON
= lundi,
TUE
= mardi,
WED
= mercredi,
•
La luminosité du lever de soleil (
20 LI
) clignote à
THU
= jeudi,
FRI
= vendredi,
SAT
= samedi,
l'écran. À l'aide des touches / , choisissez la lumi-
SUN
= dimanche.
nosité du lever de soleil souhaitée au moment de la
sonnerie (5, 10, 15 ou 20). Confirmez en appuyant sur la
touche Menu/Set. Si la lumière vous réveille assez rapi-
7.2 Réglage des propriétés de l'alarme
dement, nous vous conseillons de réduire la luminosité.
Vous pouvez choisir d'être réveillé par l'une des 8 mélo-
dies de réveil, une sonnerie, la radio ou par votre propre
7.3 Réglage de la luminosité de l'écran
musique en connectant une clé USB.
•
Lorsque l'appareil est allumé, appuyez sur la touche
Pour l'heure de réveil programmée (voir chapitre 8.1),
Menu/Set. «
TIME
» clignote à l'écran.
vous pouvez définir les propriétés de l'alarme suivantes:
•
À l'aide des touches / , sélectionnez
DISPLAY
.
sonnerie, volume, lever de soleil, durée du lever de soleil,
Confirmez en appuyant sur la touche Menu/Set.
luminosité du lever de soleil.
•
La luminosité de l'écran actuelle clignote (
3 DISPLAY
).
Pour régler les propriétés de l'alarme, eectuez les étapes
À l'aide des touches / , sélectionnez la luminosité
suivantes:
de l'écran souhaitée (OFF, 1, 2, ou 3). Confirmez en
appuyant sur la touche Menu/Set.
•
Lorsque l'appareil est allumé, appuyez sur la touche
Menu/Set. «
TIME
» clignote à l'écran.
Remarque
•
À l'aide des touches / , sélectionnez l'emplace-
Après le réglage, il faut environ 10secondes pour
ment d'alarme (
ALARM 1, ALARM 2
ou
ALARM 3
)
que la luminosité réglée apparaisse, car dès que
que vous voulez régler
.
Confirmez en appuyant sur la
vous appuyez sur une touche (et sur Snooze), l'écran
touche Menu/Set.
s'éclaire automatiquement au plus haut niveau de
•
Le signal sonore actuel (par ex.
BUZZ
) clignote. À l'aide
luminosité pendant 10secondes.
des touches / , sélectionnez le signal sonore souhaité.
Confirmez en appuyant sur la touche Menu/Set.
7.4
Réglage de la durée de la fonction snooze
•
Lorsque l'appareil est allumé, appuyez sur la touche
Remarque
Menu/Set. «
TIME
» clignote à l'écran.
BUZZ
= bip
•
À l'aide des touches / , sélectionnez
SNOOZE
.
SOUND 1-8
= 8 mélodies de réveil diérentes
Confirmez en appuyant sur la touche Menu/Set.
RADIO
= radio
•
La durée de la fonction snooze clignote (
5 MIN
USB
= via clé USB connectée
SNOOZE
). À l'aide des touches / , sélectionnez la
durée de la fonction snooze souhaitée (1, 2, 5, 10, 20
•
Volume de l'alarme (
VOL
) clignote. À l'aide des touches
ou 30minutes). Confirmez en appuyant sur la touche
/ , réglez le volume souhaité (
1
à
10
). Confirmez en
Menu/Set.
appuyant sur la touche Menu/Set.
•
La fonction lever de soleil clignote (
SUNRISE
). À l'aide
des touches / , activez (
ON
) ou désactivez (
OFF
) la
7.5
Activation/désactivation du bip des
fonction lever de soleil. Confirmez en appuyant sur la
touches
touche Menu/Set.
•
Lorsque l'appareil est allumé, appuyez sur la touche
Menu/Set. «
TIME
» clignote à l'écran.
Remarque
•
À l'aide des touches / , sélectionnez
FEEDBACK
.
En plus de la sonnerie, vous pouvez également vous
Confirmez en appuyant sur la touche Menu/Set.
faire réveiller par la fonction lever de soleil. La fonction
•
À l'aide des touches / , activez (
ON
) ou désactivez
lever de soleil simule un lever de soleil. La LED devient
(
OFF
) le bip des touches. Confirmez en appuyant sur
de plus en plus lumineuse avant que le signal sonore
la touche Menu/Set.
ne retentisse.
•
Lorsque la fonction lever de soleil est activée, la durée
du lever de soleil clignote (
10
MIN
). À l'aide des touches
/ , choisissez la durée du lever de soleil souhaitée
19
2.
Appuyez sur les touches / jusqu'à ce que OFF
8. Fonctions de l'appareil
s'ache.
3. Confirmez en appuyant sur la touche Menu/Set.
8.1 Réglage de l’alarme
4.
END clignote à l'écran. L'alarme est alors désactivée
L'appareil propose trois alarmes diérentes qui peuvent
de façon permanente.
être réglées indépendamment l'une de l'autre.
8.1.1 Activation (
ON
) de l'alarme
8.2 Désactivation de l'alarme
1.
Lorsque l'appareil est allumé, appuyez sur la touche
ALARM autant de fois que nécessaire jusqu'à ce que
8.2.1
Désactivation de l'alarme pendant un lever de
l'emplacement de l'alarme souhaité s'ache à l'écran
soleil:
(
A1, A2 ou A3).
Lorsque la fonction de lever de soleil est activée, l'appa-
2.
Appuyez sur les touches / jusqu'à ce que
O N
reil s'éclaire lentement avant l'heure de réveil programmée
s' ache.
et l'écran ache «SUNRISE ». Vous pouvez désactiver le
lever de soleil en appuyant sur n'importe quelle touche.
3.
Appuyez sur la touche Menu/Set. L'achage de l'heure
Cela ne désactivera pas l'alarme.
de l'alarme clignote à l'écran. À l'aide des touches
/ , réglez l'heure et confirmez en appuyant sur la
8.2.2 Fonction de rappel d'alarme (Snooze)
touche Menu/Set.
L'appareil propose la fonction de rappel d'alarme
(Snooze). Si, lorsque l'alarme se déclenche, vous
4. L'achage des minutes de l'alarme clignote à l'écran.
appuyez sur Snooze (sur la surface lumineuse), l'alarme
À l'aide des touches / , réglez les minutes et
sonne à nouveau après la durée de la fonction snooze
confirmez en appuyant sur la touche Menu/Set.
définie (voir chapitre 7.4).
5.
END
clignote brièvement à l'écran.
L'alarme est alors
8.2.3 Désactivation de l'alarme
réglée et achée à l'écran.
Lorsque l'alarme sonne, appuyez sur n'importe quelle
touche sauf Snooze. L'alarme est alors désactivée et ne
8.1.2 Réglage des jours de l'alarme (
DAY
)
sonnera à nouveau qu'à l'heure réglée.
À l'aide de la fonction
DAY
, vous pouvez définir, pour
chaque alarme enregistrée, quels jours vous voulez que
8.3 Mode AUX
l'alarme sonne.
Vous pouvez connecter une source externe (par exemple,
1.
Lorsque l'appareil est allumé, appuyez sur la touche
lecteur MP3, smartphone ou lecteur CD) via l'entrée AUX
ALARM autant de fois que nécessaire jusqu'à ce que
de la lumière de réveil.
l'emplacement de l'alarme souhaité s'ache à l'écran
1. Branchez le câble AUX fourni à la source audio.
(
A1, A2
ou
A3
)
.
2.
Branchez l'autre extrémité du câble dans la sortie AUX,
2.
Appuyez sur les touches / jusqu'à ce que
DAY
à l'arrière de l'appareil.
s'ache.
3.
Appuyez sur la touche AUX. La lumière de réveil est
3. Appuyez sur la touche Menu/Set.
MON
(lundi) et
off
alors connectée à la source externe.
s'achent à l'écran.
4. Réglez le volume à l'aide des touches latérales +/-.
4. À l'aide des touches
/ , activez (
on
) ou désactivez
(
off
) l'alarme pour lundi. Confirmez en appuyant sur
5. Pour quitter le mode AUX, appuyez sur la touche ■.
la touche Menu/Set.
6. Après utilisation, débranchez le câble AUX.
5.
TUE
(mardi) s'ache à l'écran. Réglez le reste de
8.4 Mode USB
la semaine comme indiqué précédemment pour
Vous avez la possibilité de brancher une clé USB (jusqu'à
lundi. Réglez ensuite l'alarme comme indiqué au
32Go) à la lumière de réveil via le câble USB pour écouter
chapitre 8.1.1.
de la musique. L'appareil prend en charge les formats
8.1.3 Désactivation permanente de l'alarme (
OFF
)
suivants: MP3, WMA et WAV.
Procédez comme suit pour désactiver une alarme de
façon permanente:
Remarque
1.
Lorsque l'appareil est allumé, appuyez sur la touche
L'appareil ne peut lire que les fichiers musicaux placés
ALARM autant de fois que nécessaire jusqu'à ce que
dans le répertoire racine. Les fichiers musicaux placés
l'emplacement de l'alarme souhaité s'ache à l'écran
dans les sous-répertoires ne pourront pas être lus.
(
A1, A2 ou A3
)
.
20
