Beurer WL 70: 5. Device description 7. Basic settings 7.1 Setting the time 6. Initial use
5. Device description 7. Basic settings 7.1 Setting the time 6. Initial use: Beurer WL 70
Table of contents
- Included in delivery
- 4. Warning notices/safety notes 1. Getting to know your device 2. Signs and symbols 3. Intended use
- 5. Device description 7. Basic settings 7.1 Setting the time 6. Initial use
- 7.2 Setting the alarm properties 7.3 Setting the display brightness 7.4 Setting the snooze duration 7.5 Switching the button tone on/o 8. Device functions 8.1 Setting the alarm
- 8.3 AUX mode 8.4 USB mode 8.2 Switching o the alarm 8.5 Radio mode
- 8.6 Good night function (radio sleep timer) 8.7 Light functions 8.8 Resetting the device to factory settings 9. Cleaning and storage
- 10. Disposal 11. Technical data
Securing the smartphone holder
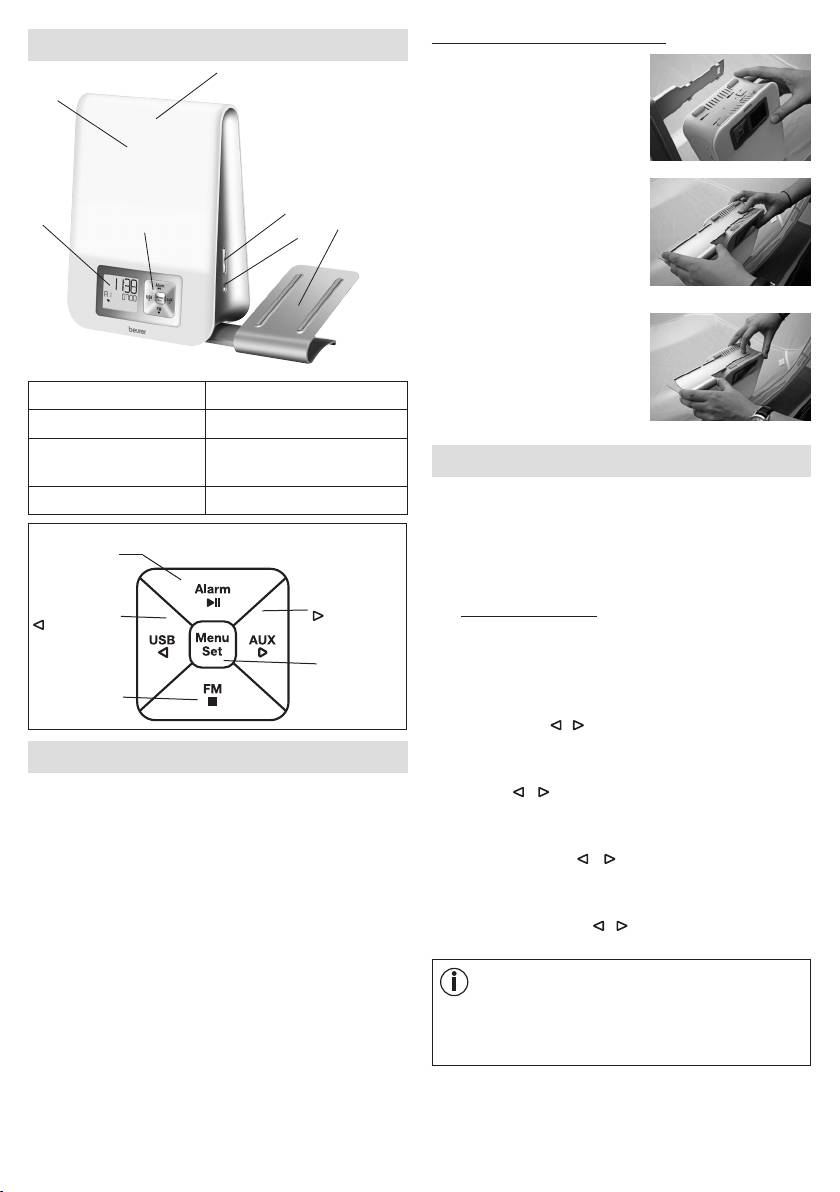
5. Device description
3
1.
Position the four latching
2
hooks of the holder onto the
four rectangular openings on
the wake-up light.
2.
Press down the holder
5
with your right index finger
1
4
7
6
and use your left hand to
carefully slide the holder in
the direction of the arrow until
you hear and see it engage.
3. To remove, press the release
on the wake-up light and
carefully slide the holder in
1 Display 5 +/- buttons
the direction of the arrow.
2 Light area 6 Light button
3 Snooze function
7 Holder for smartphone /
7. Basic settings
(taplight area)
MP3 player
In the basic settings, you can set the time (
TIME
), the alarm
4 Keypad
properties for the set alarm times (
ALARM 1, ALARM 2,
ALARM 3
), the display brightness (
DISPLAY
), the
Alarm button /
snooze duration (
SNOOZE
) and the button tone (
BEEP
)
►ǁ button
in the order stated here.
AUX button /
USB button /
7.1 Setting the time
button
button
•
When the device is switched on, press the
Menu/Set
Menu/Set button. "
TIME
" flashes in the display. Press
button
the Menu/Set button again.
Radio button /
■ button
•
The hour mode "
24 Hr
" flashes in the display. Set hour
mode using the / buttons (24-hour mode or 12-hour
mode). Confirm using the Menu/Set button.
6. Initial use
•
The hour display flashes in the display. Set the hours
•
Remove the packaging material.
using the / buttons. Confirm using the Menu/Set
button.
•
Check that all parts listed are present
.
•
The minute display flashes in the display. Set the
•
Check the device, mains adapter and mains cable for
minutes using the / buttons. Confirm using the
damage.
Menu/Set button.
•
Place the device on a firm, even surface.
•
The weekday display flashes in the display. Set the day
•
Insert the mains adapter connector into the mains
of the week using the / buttons. Confirm using the
adapter socket on the rear of the device.
Menu/Set button.
•
Insert the mains adapter into a suitable socket.
•
The time is shown on the device display.
Note
MON
= Monday,
TUE
= Tuesday,
WED
= Wednesday,
•
Route the cable antenna of the device to the rear.
THU
= Thursday,
FRI
= Friday,
SAT
= Saturday,
SUN
= Sunday.
11
