Dell Latitude D530 – page 2
Manual for Dell Latitude D530
Table of contents
- Notes, Notices, and Cautions
- Contents
- Finding Information What Are You Looking For? Find It Here
- What Are You Looking For? Find It Here
- What Are You Looking For? Find It Here
- What Are You Looking For? Find It Here
- What Are You Looking For? Find It Here
- What Are You Looking For? Find It Here
- What Are You Looking For? Find It Here Setting Up Your Computer Transferring Information to a New Computer
- Microsoft Windows XP Running the Files and Settings Transfer Wizard With the Operating System Disc
- To copy data from the old computer: To transfer data to the new computer:
- Running the Files and Settings Transfer Wizard Without the Operating System Disc To create a wizard disk, use your new computer with Windows XP and perform the following steps: To copy data from the old computer:
- To transfer data to the new computer: Microsoft Windows Vista
- Turning Off Your Computer
- About Your Computer Front View
- Left Side View Right Side View
- Back View
- Bottom View
- Using a Battery Battery Performance
- Checking the Battery Charge Dell QuickSet Battery Meter Microsoft Windows Power Meter Charge Gauge
- Check the Battery Charge Check the Battery Health Low-Battery Warning
- Conserving Battery Power Power Management Modes Standby and Sleep Mode
- Hibernate Mode
- Configuring Power Management Settings Accessing Power Options Properties Windows XP Windows Vista Charging the Battery
- Replacing the Battery
- Storing a Battery Troubleshooting
- Lockups and Software Problems The computer does not start up The computer stops responding A program stops responding A program crashes repeatedly A program is designed for an earlier Windows operating system
- A solid blue screen appears Other software problems Dell Diagnostics
- When to Use the Dell Diagnostics Starting the Dell Diagnostics From Your Hard Drive
- Starting the Dell Diagnostics From the Optional Drivers and Utilities Disc
- Dell Diagnostics Main Menu Option Function Tab Function
- Tab Function
- Index
- 36 Index
- Index 37

Using a Battery
Battery Performance
NOTE: For information about the Dell warranty for your computer, see the Product
Information Guide or separate paper warranty document that shipped with your
computer.
For optimal computer performance and to help preserve BIOS settings,
operate your Dell portable computer with the main battery installed at all
times. One battery is supplied as standard equipment in the battery bay.
NOTE: Because the battery may not be fully charged, use the AC adapter to
connect your new computer to an electrical outlet the first time you use the
computer. For best results, operate the computer with the AC adapter until the
battery is fully charged. To view battery charge status, check the Power Meter in
Power Options (see "Accessing Power Options Properties" on page 26).
NOTE: Battery operating time (the time the battery can hold a charge) decreases
over time. Depending on how often the battery is used and the conditions under
which it is used, you may need to purchase a new battery during the life of your
computer.
NOTE: It is recommended that you connect your computer to an electrical outlet
when writing to a CD or DVD.
Operating time is significantly reduced when you perform operations
including, but not limited to, the following:
• Using optical drives.
• Using wireless communications devices, PC Cards, Express Cards, media
memory cards, or USB devices.
• Using high-brightness display settings, 3D screen savers, or other power-
intensive programs such as complex 3D graphics applications.
• Running the computer in maximum performance mode. See "Configuring
Power Management Settings" on page 26 for information about accessing
Windows Power Options Properties or Dell QuickSet, which you can use
to configure power management settings.
You can check the battery charge before you insert the battery into the
computer. You can also set power management options to alert you when the
battery charge is low.
Quick Reference Guide 21

CAUTION: Using an incompatible battery may increase the risk of fire or
explosion. Replace the battery only with a compatible battery purchased from
Dell. The battery is designed to work with your Dell computer. Do not use a battery
from other computers with your computer.
CAUTION: Do not dispose of batteries with household waste. When your battery
no longer holds a charge, call your local waste disposal or environmental agency
for advice on disposing of a lithium-ion battery. See "Battery Disposal" in the
Product Information Guide.
CAUTION: Misuse of the battery may increase the risk of fire or chemical burn.
Do not puncture, incinerate, disassemble, or expose the battery to temperatures
above 65°C (149°F). Keep the battery away from children. Handle damaged or
leaking batteries with extreme care. Damaged batteries may leak and cause
personal injury or equipment damage.
Checking the Battery Charge
The Dell QuickSet Battery Meter, the Microsoft Windows Power Meter
window and icon, the battery charge gauge and health gauge, and the
low-battery warning provide information on the battery charge.
Dell QuickSet Battery Meter
If Dell QuickSet is installed, press <Fn><F3> to display the QuickSet
Battery Meter. The Battery Meter displays status, battery health, charge level,
and charge completion time for the battery in your computer.
For more information about QuickSet, right-click the QuickSet icon in the
taskbar, and click Help.
Microsoft Windows Power Meter
The Windows Power Meter indicates the remaining battery charge. To check
the Power Meter, double-click the icon on the taskbar.
If the computer is connected to an electrical outlet, a icon appears.
Charge Gauge
By either pressing once or pressing and holding the status button on the
charge gauge on the battery, you can check:
• Battery charge (check by pressing and
releasing
the status button)
• Battery health (check by pressing and
holding
the status button)
22 Quick Reference Guide

The battery operating time is largely determined by the number of times it is
charged. After hundreds of charge and discharge cycles, batteries lose some
charge capacity—or battery health. That is, a battery can show a status of
"charged" but maintain a reduced charge capacity (health).
Check the Battery Charge
To check the battery charge, press and release the status button on the battery
charge gauge to illuminate the charge-level lights. Each light represents
approximately 20 percent of the total battery charge. For example, if the
battery has 80 percent of its charge remaining, four of the lights are on. If no
lights appear, the battery has no charge.
Check the Battery Health
NOTE: You can check battery health in one of two ways: by using the charge gauge
on the battery as described below and by using the Battery Meter in Dell QuickSet.
For information about QuickSet, right-click the icon in the taskbar, and click Help.
To check the battery health using the charge gauge, press and hold the status
button on the battery charge gauge for at least 3 seconds. If no lights appear,
the battery is in good condition, and more than 80 percent of its original
charge capacity remains. Each light represents incremental degradation. If
five lights appear, less than 60 percent of the charge capacity remains, and you
should consider replacing the battery. See "Using a Battery" on page 21 for
more information about the battery operating time.
Low-Battery Warning
NOTICE: To avoid losing or corrupting data, save your work immediately after a
low-battery warning. Then connect the computer to an electrical outlet, or install a
second battery in the media bay. If the battery runs completely out of power,
hibernate mode begins automatically.
A pop-up window warns you when the battery charge is approximately
90 percent depleted. If two batteries are installed, the low-battery warning
means that the combined charge of both batteries is approximately
90 percent depleted. The computer enters hibernate mode when the battery
charge is at a critically low level.
Quick Reference Guide 23

You can change the settings for the battery alarms in QuickSet or the Power
Options Properties window. See "Configuring Power Management Settings"
on page 26 for information about accessing QuickSet or the Power Options
Properties window.
Conserving Battery Power
Perform the following actions to conserve battery power:
• Connect the computer to an electrical outlet when possible because
battery life is largely determined by the number of times the battery is
used and recharged.
• Place the computer in standby mode or hibernate mode when you leave
the computer unattended for long periods of time. See "Power
Management Modes" on page 24.
• Use the Power Management Wizard or the
Power Options Properties
window to select options to optimize your computer’s power usage. These
options can also be set to change when you press the power button, close
the display, or press <Fn><Esc>.
NOTE: See "Configuring Power Management Settings" on page 26 for information
on conserving battery power.
Power Management Modes
Standby and Sleep Mode
Standby mode (sleep mode in Microsoft Windows Vista) conserves power by
turning off the display and the hard drive after a predetermined period of
inactivity (a time-out). When the computer exits standby or sleep mode, it
returns to the same operating state it was in before entering standby or sleep
mode.
NOTICE: If your computer loses AC and battery power while in standby or sleep
mode, it may lose data.
To enter standby mode in Windows XP, click the Start button, click Turn off
computer, and then click Stand by.
To enter sleep mode in Windows Vista, click the Windows Vista Start button
, and then click Sleep.
24 Quick Reference Guide

Depending on how you set the power management options in the Power
Options Properties window or the QuickSet Power Management Wizard, you
may also use one of the following methods:
• Press the power button.
• Close the display.
• Press <Fn><Esc>.
To exit standby or sleep mode, press the power button or open the display,
depending on how you set the power management options. You cannot make
the computer exit standby or sleep mode by pressing a key or touching the
touch pad.
Hibernate Mode
Hibernate mode conserves power by copying system data to a reserved area on
the hard drive and then completely turning off the computer. When the
computer exits hibernate mode, it returns to the same operating state it was
in before entering hibernate mode.
NOTICE: You cannot remove devices or undock your computer while your
computer is in hibernate mode.
Your computer enters hibernate mode if the battery charge level becomes
critically low.
To manually enter hibernate mode in Windows XP, click the Start button,
click Turn off computer, press and hold <Shift>, and then click Hibernate.
To manually enter hibernate mode in Windows Vista, click the Windows
Vista Start button , and then click Hibernate.
Depending on how you set the power management options in the Power
Options Properties window or the QuickSet Power Management Wizard, you
may also use one of the following methods to enter hibernate mode:
• Press the power button.
• Close the display.
• Press <Fn><Esc>.
NOTE: Some PC Cards or Express Cards may not operate correctly after the
computer exits hibernate mode. Remove and reinsert the card, or simply restart
(reboot) your computer.
Quick Reference Guide 25

To exit hibernate mode, press the power button. The computer may take a
short time to exit hibernate mode. You cannot make the computer exit
hibernate mode by pressing a key or touching the touch pad. For more
information on hibernate mode, see the documentation that came with your
operating system.
Configuring Power Management Settings
You can use the QuickSet Power Management Wizard or Windows Power
Options Properties to configure the power management settings on your
computer. For more information about QuickSet, right-click the QuickSet
icon in the taskbar and click Help.
Accessing Power Options Properties
Windows XP
Click the Start button, point to Control Panel→ Performance and
Maintenance, and then click Power Options
Windows Vista
Click the Windows Vista Start button , click Control Panel, click System
and Maintenance, and then click Power Options.
Charging the Battery
When you connect the computer to an electrical outlet or install a battery
while the computer is connected to an electrical outlet, the computer checks
the battery charge and temperature. If necessary, the AC adapter then charges
the battery and maintains the battery charge.
NOTE: With Dell ExpressCharge™, when the computer is turned off, the AC
adapter charges a completely discharged battery to 80 percent in about 1 hour and
to 100 percent in approximately 2 hours. Charge time is longer with the computer
turned on. You can leave the battery in the computer for as long as you like. The
battery’s internal circuitry prevents the battery from overcharging.
If the battery is hot from being used in your computer or being in a hot
environment, the battery may not charge when you connect the computer to
an electrical outlet.
26 Quick Reference Guide
The battery is too hot to start charging if the light flashes alternately
green and orange. Disconnect the computer from the electrical outlet and
allow the computer and the battery to cool to room temperature. Then
connect the computer to an electrical outlet to continue charging the battery.
For information about resolving problems with a battery, see "Power Problems
in your User’s Guide.
Replacing the Battery
CAUTION: Using an incompatible battery may increase the risk of fire or
explosion. Replace the battery only with a compatible battery purchased from
Dell. The battery is designed to work with your Dell™ computer. Do not use a
battery from other computers with your computer.
CAUTION: Before performing these procedures, turn off the computer, disconnect
the AC adapter from the electrical outlet and the computer, disconnect the modem
from the wall connector and computer, and remove any other external cables from
the computer.
NOTICE: You must remove all external cables from the computer to avoid possible
connector damage.
For information about replacing the second battery, which is located in the
media bay, see the User’s Guide for your system on support.dell.com.
To remove the battery:
1
If the computer is connected to a docking device (docked), undock it. See
the documentation that came with your docking device for instructions.
2
Ensure that the computer is turned off.
3
Slide the battery-bay latch release on the bottom of the computer, and
then remove the battery from the bay.
Quick Reference Guide 27
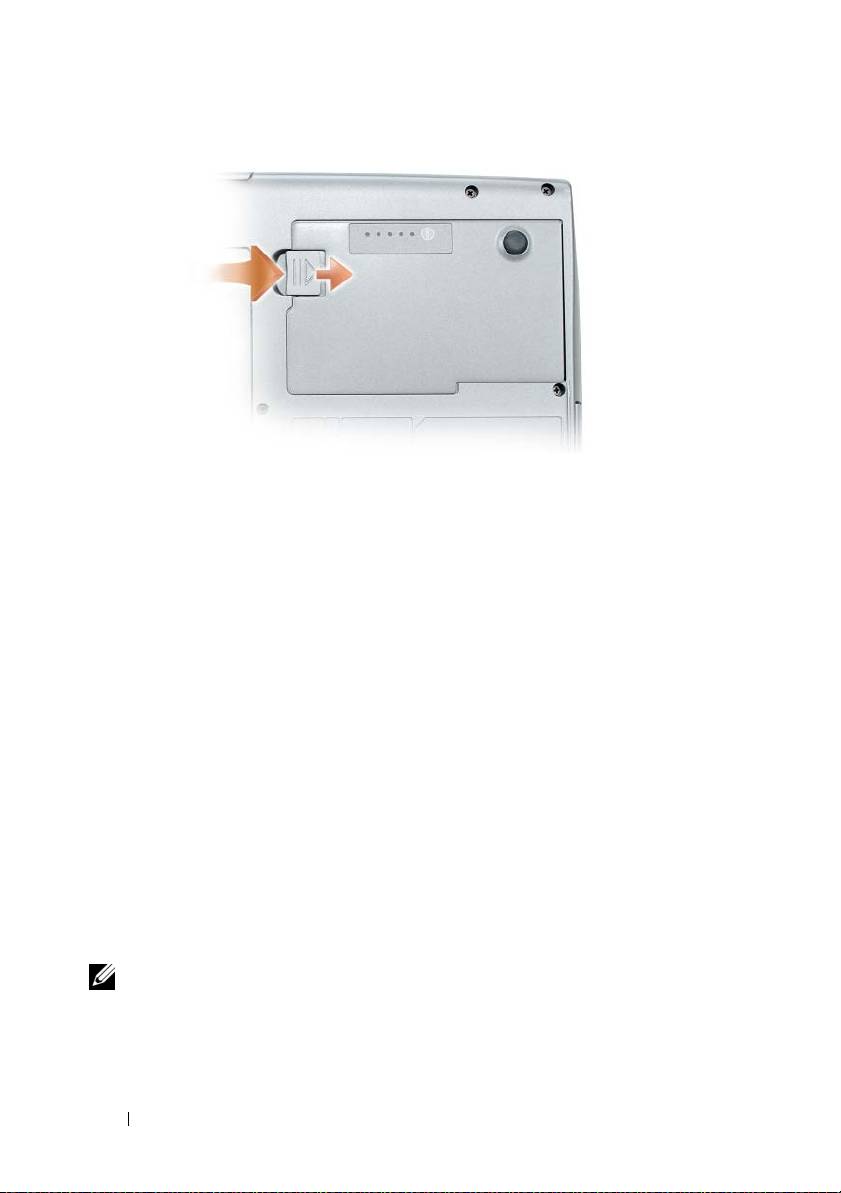
To replace the battery, follow the removal procedure in reverse order and press
down until the battery-bay latch release fully engages.
Storing a Battery
Remove the battery when you store your computer for an extended period of
time. A battery discharges during prolonged storage. After a long storage
period, recharge the battery fully (see "Charging the Battery" on page 26)
before you use it.
Troubleshooting
Follow these tips when you troubleshoot your computer:
• If you added or removed a part before the problem started, review the
installation procedures and ensure that the part is correctly installed.
• If a peripheral device does not work, ensure that the device is properly
connected.
• If an error message appears on the screen, write down the exact message.
This message may help support personnel diagnose and fix the problem(s).
• If an error message occurs in a program, see the program’s documentation.
NOTE: The procedures in this document were written for the Windows default
view, so they may not apply if you set your Dell computer to the Windows Classic
view.
28 Quick Reference Guide

Lockups and Software Problems
CAUTION: Before you begin any of the procedures in this section, follow the
safety instructions in the Product Information Guide.
The computer does not start up
ENSURE THAT THE POWER CABLE IS FIRMLY CONNECTED TO THE COMPUTER AND TO
THE ELECTRICAL OUTLET
The computer stops responding
NOTICE: You may lose data if you are unable to perform an operating system
shutdown.
T
URN THE COMPUTER OFF — If you are unable to get a response by pressing a key on
your keyboard or moving your mouse, press and hold the power button for at least 8 to
10 seconds (until the computer turns off), and then restart your computer.
A program stops responding
END THE PROGRAM —
1
Press <Ctrl><Shift><Esc> simultaneously to access the Task Manager.
2
Click the
Applications
tab.
3
Click to select the program that is no longer responding.
4
Click
End Task
.
A program crashes repeatedly
NOTE: Most software includes installation instructions in its documentation or on a
floppy disk, CD, or DVD.
C
HECK THE SOFTWARE DOCUMENTATION — If necessary, uninstall and then reinstall
the program.
A program is designed for an earlier Windows operating system
RUN THE PROGRAM COMPATIBILITY WIZARD —
Windows XP:
The Program Compatibility Wizard configures a program so that it runs in an
environment similar to non-XP operating system environments.
1
Click
Start
→
All Programs
→
Accessories
→
Program Compatibility Wizard
→
Next
.
2
Follow the instructions on the screen.
Quick Reference Guide 29

Windows Vista:
The Program Compatibility Wizard configures a program so that it runs in an
environment similar to non-Windows Vista operating system environments.
1
Click
Start
→
Control Panel
→
Programs
→
Use an older program with this
version of Windows.
2
In the welcome screen, click
Next
.
3
Follow the instructions on the screen.
A solid blue screen appears
TURN THE COMPUTER OFF — If you are unable to get a response by pressing a
key on your keyboard or moving your mouse, press and hold the power button
for at least 8 to 10 seconds (until the computer turns off), and then restart
your computer.
Other software problems
CHECK THE SOFTWARE DOCUMENTATION OR CONTACT THE SOFTWARE
MANUFACTURER FOR TROUBLESHOOTING INFORMATION —
• Ensure that the program is compatible with the operating system installed on your
computer.
• Ensure that your computer meets the minimum hardware requirements needed to
run the software. See the software documentation for information.
• Ensure that the program is installed and configured properly.
• Verify that the device drivers do not conflict with the program.
• If necessary, uninstall and then reinstall the program.
BACK UP YOUR FILES IMMEDIATELY
USE A VIRUS-SCANNING PROGRAM TO CHECK THE HARD DRIVE, FLOPPY DISKS,
CD
S , OR DVDS
SAVE AND CLOSE ANY OPEN FILES OR PROGRAMS AND SHUT DOWN YOUR
COMPUTER THROUGH THE START MENU
Dell Diagnostics
CAUTION: Before you begin any of the procedures in this section, follow the
safety instructions in the Product Information Guide.
30 Quick Reference Guide

When to Use the Dell Diagnostics
If you experience a problem with your computer, perform the checks in
"Lockups and Software Problems" on page 29 and run the Dell Diagnostics
before you contact Dell for technical assistance.
It is recommended that you print these procedures before you begin.
NOTICE: The Dell Diagnostics works only on Dell computers.
NOTE: The Drivers and Utilities disc is optional and may not ship with your
computer.
Start the Dell Diagnostics from either your hard drive or from the optional
Drivers and Utilities disc.
Starting the Dell Diagnostics From Your Hard Drive
The Dell Diagnostics is located on a hidden diagnostic utility partition on
your hard drive.
NOTE: If your computer cannot display a screen image, contact Dell (see
"Contacting Dell" in your User’s Guide).
1
Shut down the computer.
2
If the computer is connected to a docking device (docked), undock it. See
the documentation that came with your docking device for instructions.
3
Connect the computer to an electrical outlet.
4
The Dell Diagnostics can be invoked in one of two ways:
• Turn on the computer. When the DELL™ logo appears, press <F12>
immediately. Select
Diagnostics
from the boot menu and press
<Enter>.
NOTE: If you wait too long and the operating system logo appears, continue to
wait until you see the Microsoft Windows desktop. Then shut down your
computer and try again.
• Press and hold the <Fn> key while powering the computer on.
NOTE: If you see a message stating that no diagnostics utility partition has
been found, run the Dell Diagnostics from the optional Drivers and Utilities
disc.
The computer runs the Pre-boot System Assessment, a series of initial
tests of your system board, keyboard, hard drive, and display.
Quick Reference Guide 31

• During the assessment, answer any questions that appear.
• If a failure is detected, the computer stops and beeps. To stop the
assessment and restart the computer, press <Esc>; to continue to the
next test, press <y>; to retest the component that failed, press <r>.
• If failures are detected during the Pre-boot System Assessment, write
down the error code(s) and contact Dell (see "Contacting Dell" in
your
User’s Guide
)
.
If the Pre-boot System Assessment completes successfully, you receive the
message
Booting Dell Diagnostic Utility Partition.
Press any key to continue
.
5
Press any key to start the Dell Diagnostics from the diagnostics utility
partition on your hard drive.
Starting the Dell Diagnostics From the Optional Drivers and Utilities Disc
1
Insert the
Drivers and Utilities
disc.
2
Shut down and restart the computer.
When the DELL logo appears, press <F12> immediately.
If you wait too long and the Windows logo appears, continue to wait until
you see the Windows desktop. Then shut down your computer and try
again.
NOTE: The next steps change the boot sequence for one time only. On the
next start-up, the computer boots according to the devices specified in the
system setup program.
3
When the boot device list appears, highlight
CD/DVD/CD-RW Drive
and press <Enter>.
4
Select the
Boot from CD-ROM
option from the menu that appears and
press <Enter>.
5
Ty p e
1
to start the menu and press <Enter> to proceed.
6
Select
Run the 32 Bit Dell Diagnostics
from the numbered list. If
multiple versions are listed, select the version appropriate for your
computer.
7
When the Dell Diagnostics
Main Menu
appears, select the test that you
want to run.
32 Quick Reference Guide

Dell Diagnostics Main Menu
1
After the Dell Diagnostics loads and the
Main
Menu
screen appears, click
the button for the option you want.
Option Function
Express Test Performs a quick test of devices. The test typically takes
10 to 20 minutes and requires no interaction on your
part. Run Express Test first to increase the possibility of
tracing the problem quickly.
Extended Test Performs a thorough check of devices. The test typically
takes 1 hour or more and requires you to answer
questions periodically
Custom Test Tests a specific device. You can customize the tests you
want to run.
Symptom Tree Lists the most common symptoms encountered and
allows you to select a test based on the symptom of the
problem you are having.
2
If a problem is encountered during a test, a message appears with an error
code and a description of the problem. Write down the error code and
problem description and follow the instructions on the screen.
If you cannot resolve the error condition, contact Dell (see "Contacting
Dell" in your
User’s Guide
).
NOTE: The Service Tag for your computer is located at the top of each test
screen. If you contact Dell, technical support will ask for your Service Tag.
3
If you run a test from the
Custom Test
or
Symptom Tree
option, click the
applicable tab described in the following table for more information.
Tab Function
Results Displays the results of the test and any error conditions
encountered.
Errors Displays error conditions encountered, error codes, and
the problem description.
Help Describes the test and may indicate requirements for
running the test.
Quick Reference Guide 33

Tab Function
Configuration Displays your hardware configuration for the selected
device.
The Dell Diagnostics obtains configuration information
for all devices from system setup, memory, and various
internal tests, and it displays the information in the
device list in the left pane of the screen. The device list
may not display the names of all the components
installed on your computer or all devices attached to your
computer.
Parameters Allows you to customize the test by changing the test
settings.
4
When the tests are completed, if you are running the Dell Diagnostics
from the
Drivers and Utilities
disc
,
remove the disc.
5
When the tests are complete, close the test screen to return to the
Main
Menu
screen. To exit the Dell Diagnostics and restart the computer, close
the
Main
Menu
screen.
34 Quick Reference Guide

Index
B
documentation (continued)
User’s Guide, 6
battery
warranty, 6
charge gauge, 22
Drivers and Utilities disc
charging, 26
Dell Diagnostics, 30
checking the charge, 22
performance, 21
power meter, 22
removing, 27
E
storing, 28
End User License Agreement, 6
ergonomics information, 6
C
computer
H
crashes, 29-30
hardware
stops responding, 29
Dell Diagnostics, 30
hibernate mode, 25
D
Dell Diagnostics, 30
I
Dell support site, 8
installing parts
diagnostics
turning off your computer, 16
Dell, 30
documentation
End User License Agreement, 6
L
ergonomics, 6
labels
online, 8
Microsoft Windows, 7
Product Information Guide, 6
Service Tag, 7
regulatory, 6
safety, 6
Index 35

O
S
operating system
safety instructions, 6
reinstalling, 10
Service Tag, 7
Operating System disc, 10
software
problems, 29-30
standby mode
P
about, 24
power
Starting the Dell Diagnostics
hibernate mode, 25
From the Drivers and
standby mode, 24
Utilities Disc, 32
problems
Starting the Dell Diagnostics
blue screen, 30
From Your Hard Drive, 31
computer crashes, 29-30
support website, 8
computer stops responding, 29
Dell Diagnostics, 30
general, 29
T
program crashes, 29
program stops responding, 29
troubleshooting
software, 29-30
Dell Diagnostics, 30
Product Information Guide, 6
U
Q
User’s Guide, 6
QuickSet Help, 10
W
R
warranty information, 6
regulatory information, 6
Windows 2000
hibernate mode, 25
standby mode, 24
36 Index

Windows Vista
reinstalling, 10
Windows XP
hibernate mode, 25
reinstalling, 10
standby mode, 24
Index 37

38 Index

Dell™ Latitude™ D530
Brzi referentni priručnik
Model PP17L
www.dell.com | support.dell.com

Napomene, obavijesti i upozorenja
NAPOMENA:
OBAVIJESTI označava važne informacije koje vam pomažu pri
boljem korištenju računala.
OBAVIJEST:
OBAVIJEST označava moguće oštećenje hardvera ili gubitak
podataka i informira vas kako taj problem možete izbjeći.
OPREZ:
OPREZ označava moguću opasnost od kvarova, fizičkih ozljeda ili
smrtnih slučajeva.
____________________
Informacije u ovom dokumentu podložne su promjeni bez prethodne najave.
© 2007 Dell Inc. Sva prava pridržana.
Bilo koji oblik reprodukcije bez pisanog odobrenja tvrtke Dell Inc. strogo je zabranjen.
Trgovački znakovi koji se koriste u ovom tekstu: Dell, DELL logotip, Latitude, ExpressCharge,
i Undock & Go su zaštitni znakovi tvrtke Dell Inc.; Microsoft, Windows, Outlook, i Windows Vista
su zaštitni znakovi ili registrirani zaštitni znakovi tvrtke Microsoft Corporation u SAD-u i/ili drugim
zemljama; Bluetooth je registrirani zaštitni znak u vlasništvu tvrtke Bluetooth SIG, Inc., a tvrtka Dell
ga koristi uz licencu.
U dokumentu se možda koriste i drugi trgovački znakovi i zaštićeni nazivi koji označavaju ili entitete
koji su vlasnici tih znakova ili njihove proizvode. Dell Inc. odriče se bilo kakvih vlasničkih interesa
za navedene trgovačke znakove i zaštićene nazive, osim vlastitih.
Model PP17L
Rujan 2007. P/N NM074 Izmijenjeno izdanje A00
