Toshiba JournE Air800-801: инструкция
Раздел: Аксессуары для фото- и видеотехники
Тип:
Инструкция к Toshiba JournE Air800-801
Оглавление
- Содержание
- Программное обеспечение 3D Album ................................................37
- Введение Проверьте наличие компонентов Что в коробке Что еще вам понадобится:
- Важная информация Меры предосторожности и обслуживание
- Уход за цифровой рамкой Утилизация Заявление об авторских правах
- Отказ от ответственности Товарные знаки
- Обзор фоторамки Journe Air Вид спереди Вид снизу
- Вид сзади Вид слева Требования к системе
- Приступаем к работе Размещение устройства Подключение к источнику переменного тока Включение цифровой рамки
- Встроенная батарея (только в модели Journe Air 801)
- Соединения Карта памяти: Подключение через шину USB
- Значение значков Wi-Fi
- Основные операции Фоторежим Последовательность демонстрации слайдов
- 3. Выберите Последовательность демонстрации слайдов (Slideshow Sequence) и нажмите кнопку OK.
- Эффект перехода
- Частота
- Цвет фона
- Эффект
- Поворот
- Навигация по фотографиям Flickr/Picasa
- Активация учетной записи Порядок включения и выключения учетных записей:
- Добавление учетной записи
- Удаление учетной записи
- Режим времени и даты Установка времени и даты
- Установка времени Установка даты
- Установка будильника и выбор его звукового сигнала Установка будильника Включение и выключение
- Выбор звукового сигнала будильника Чтобы внести аудиофайл в список звуковых сигналов будильника:
- Вставка фотографий в фотокалендарь
- Режим «Фото + Аудио»
- Видеорежим Чтобы перейти в видеорежим:
- Значения значков режима воспроизведения видеозаписей
- Аудиорежим
- Вы также можете выполнять следующие действия: Воспроизведение одним нажатием
- Копирование и удаление файлов Чтобы скопировать или удалить файлы:
- Чтобы скопировать файлы на другое устройство хранения данных: Чтобы скопировать все файлы, находящиеся на устройстве хранения данных, на другое устройство:
- Чтобы удалить файлы: Чтобы удалить все файлы, находящиеся на устройстве хранения данных:
- Программное обеспечение 3D Album Установка 3D Album 1. Вставьте компакт-диск с программным обеспечением в компьютер
- 2. Щелкните Да, соглашаюсь (Yes, I agree), чтобы принять условия 3. В поле Путь установки (Install path) выберите место установки
- 4. После того, как установка будет выполнена, откроется окно
- Функции 3D Album Преобразование фотографий
- 1. Выберите место расположения фотографий в поле Исходная папка (From Folder).
- Создание трехмерного альбома
- Настройки системы Яркость
- Язык Сеть
- WPS
- Мастер Wi-Fi
- Дополнительная настройка Чтобы использовать DHCP:
- 3. Выберите Да (Yes) и нажмите кнопку OK. Чтобы настроить параметры вручную: 1. Выберите Дополнительная настройка (Advance Configuration) и нажмите кнопку OK.
- 4. Выберите Да (Yes) и нажмите кнопку OK. См. раздел Мастер Wi-Fi.
- Список профилей
- Веб-альбом
- Функция таймера (автоматическое включение и выключение) 1. Выберите Авто вкл/выкл (Auto On/Off) и нажмите кнопку OK.
- 3. Чтобы задать время выключения, выберите «Авто выкл» (Auto Off) и нажмите кнопку OK.
- Автонаклон
- Автосвет Чтобы активировать функцию «Автосвет»:
- Восстановление настроек, используемых по умолчанию Режим USB
- Дополнительное представление
- Чтобы перевести цифровую рамку в режим «Расширенный»:
- n Снимите флажок Расширить рабочий стол на этот монитор (Extend my Windows desktop onto this monitor). Во вкладке «Параметры» (Settings) можно разместить значки мониторов в соответствии с их расположением.
- Печать с PictBridge
- Информация о состоянии Информация о состоянии Wi-Fi
- Обновление встроенного программного обеспечения Поддерживаемые видеоформаты
- Ответы на часто задаваемые вопросы Поддержка корпорации TOSHIBA
- Регламентирующие положения Страны Ограничения по использованию
- Условия эксплуатации
- Изложенная далее информация актуальна только в странах-членах ЕС:
- Утилизация батарей и/или аккумуляторов

User’s Manual
CZ
HU
SK
FR
PL
SL
GR
RS
TR
HR
RU
AR

User’s Manual
Table of Contents
Introduction................................................................................................4
Check the components .............................................................................4
Important Information ...............................................................................5
Safety Precautions and Maintenance.....................................................5
Care of the Digital Frame .......................................................................5
Recycling ................................................................................................6
Copyright Statement...............................................................................6
Disclaimer...............................................................................................6
Trademarks ............................................................................................6
Journe Air Overview..................................................................................7
Front View ..............................................................................................7
Bottom View ...........................................................................................7
Rear View ...............................................................................................8
Left View.................................................................................................8
System Requirements ............................................................................8
Getting Started...........................................................................................9
Placing the Unit ......................................................................................9
Connecting to the A/C Power .................................................................9
Turning on the Digital Frame ..................................................................9
Built-in battery (available on Journe Air 801 only) ................................10
Connections..........................................................................................11
Memory Card:..................................................................................11
USB Connection..............................................................................11
Understanding the Wi-Fi Icons .............................................................12
Basic Operations .....................................................................................13
Photo Mode ..........................................................................................13
Slideshow Sequence.......................................................................13
Transition Effect...............................................................................15
Frequency........................................................................................16
Background Color............................................................................17
Effect ...............................................................................................18
Rotate..............................................................................................19
Browsing Photos..............................................................................20
Flickr / Picasa ..................................................................................20
Time and Date Mode ............................................................................23
Set Time and Date...........................................................................23
Set Alarm Clock and Alarm Tone ....................................................25
Put Photos in the Photo Calendar ...................................................27
Photo + Audio Mode.............................................................................28
Video Mode ..........................................................................................29
Video Playback Mode Icons Definition ............................................30
EN-2 User’s Manual

Audio Mode ..........................................................................................31
One click playing ..................................................................................32
Copy and Delete Files ..........................................................................33
3D Album..................................................................................................36
Installing 3D Album ..............................................................................36
3D Album Functions .............................................................................38
Converting Photos...........................................................................38
Create a 3D-Album..........................................................................39
System Settings.......................................................................................40
Brightness ............................................................................................40
Language .............................................................................................41
Network ................................................................................................42
WPS ................................................................................................42
Wi-Fi Wizard....................................................................................43
Advance Configuration....................................................................44
Profile List........................................................................................46
Web Album...........................................................................................47
Store to............................................................................................47
Timer Function (Auto On/Off) ...............................................................48
Auto Tilt ................................................................................................50
Auto Light .............................................................................................51
Restore to Default Settings ..................................................................52
USB Mode............................................................................................52
Mass Storage ..................................................................................52
Sub View .........................................................................................52
PictBridge Print................................................................................56
Status Information ................................................................................56
Wi-Fi Status Information.......................................................................57
Firmware Upgrade...................................................................................57
Supported Video Format.........................................................................58
Frequently Asked Questions..................................................................58
TOSHIBA Support....................................................................................58
Regulatory statements............................................................................59
CE Compliance ....................................................................................59
Indication of the countries ....................................................................59
Indication of restrictions of use.............................................................59
Working Environment ...........................................................................60
Following information is only for EU-member states: ...........................61
Disposal of products.............................................................................61
Disposal of batteries and/or accumulators ...........................................61
User’s Manual EN-3
Introduction
Welcome and thank you for choosing a TOSHIBA product.
For your convenience, your TOSHIBA product is furnished with two guides:
n Quick Start Guide
n this comprehensive PDF User’s Manual
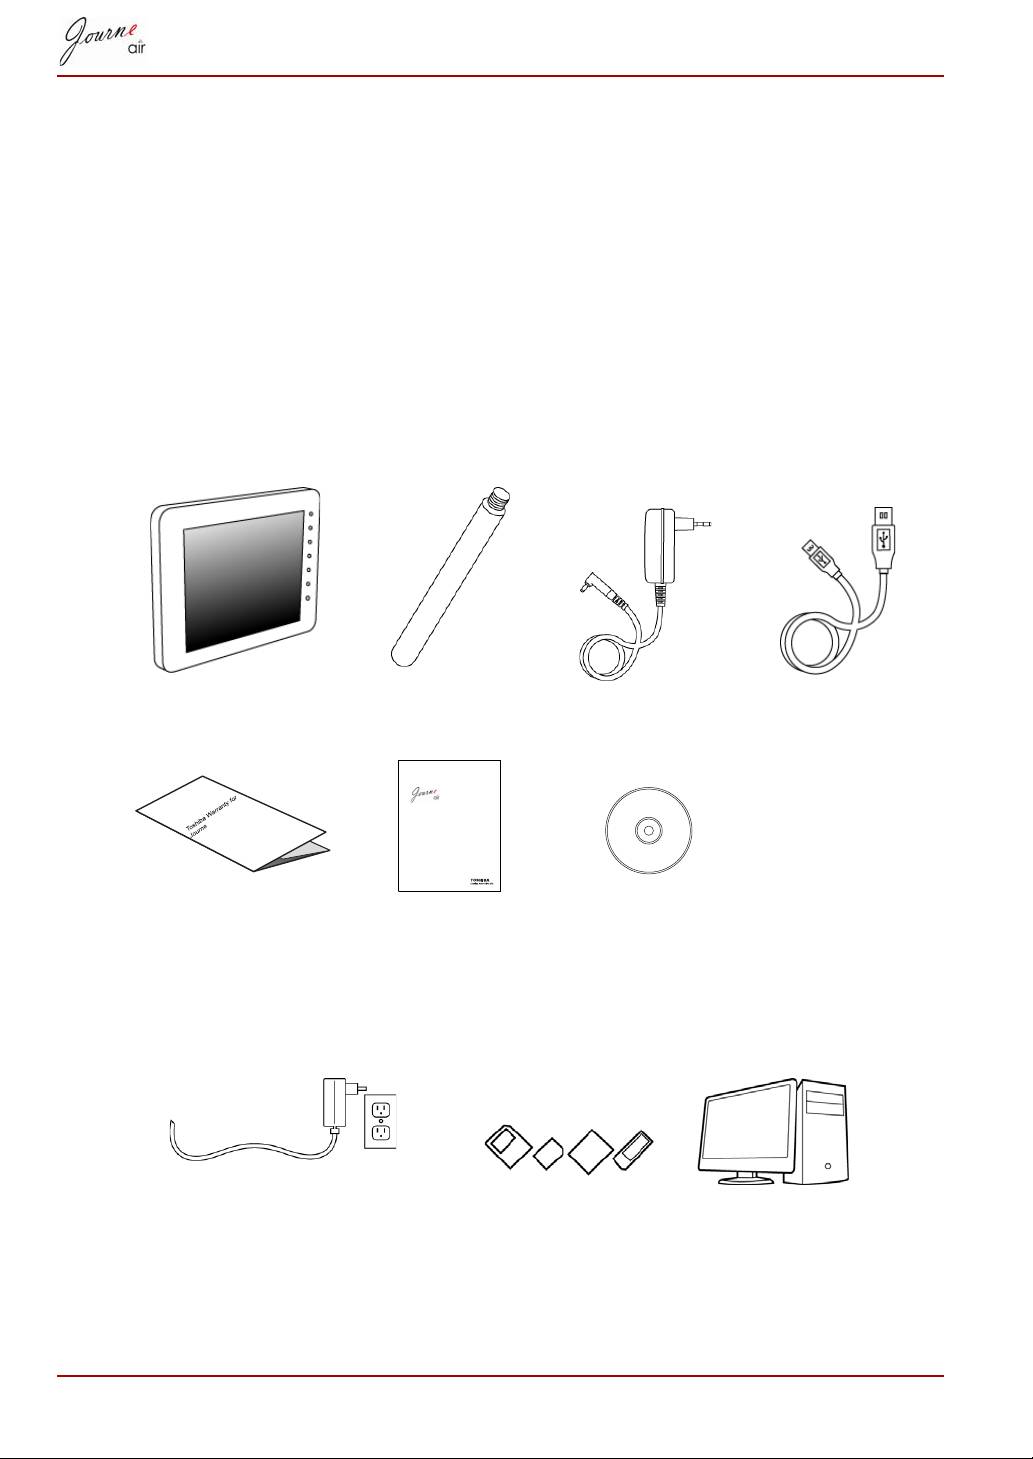
Check the components
What’s in the Box
Digital Frame Frame Stand Adapter USB Cable
Warranty Leaflet Quick Start
Software CD with
Guide
User’s Manual
What else you’ll need:
EN-4 User’s Manual
Quick Start Guide
CZ
HU
SK
FR
PL
SL
GR
RS
TR
HR
RU
AR
Power outlet Digital photos on memory card or PC

Important Information
Safety Precautions and Maintenance
Read and follow these instructions when connecting and using the digital
frame:
n To protect the display from possible damage, do not put excessive
pressure on the LCD panel. When moving the digital frame, lift it by the
frame; do not lift it by placing your hands or fingers on the LCD panel.
n Unplug the digital frame if you are not going to use it for an extended
period of time.
n Unplug the digital frame if you need to clean it with a slightly damp cloth.
The screen may be wiped with a dry cloth when the power is off.
However, never use alcohol, solvents or ammonia-based liquids.
n Consult a service technician if the digital frame does not operate
normally after you have followed the instructions in this manual.
n The casing cover should be opened only by qualified service personnel.
n Keep the digital frame out of direct sunlight and away from stoves or any
other heat source.
n Keep the digital frame dry. To avoid electric shock, do not expose it to
rain or excessive moisture.
n When positioning the digital frame, make sure the power plug and outlet
are easily accessible.
n To avoid the risk of shock or permanent damage to the unit, do not
expose the digital frame to rain or excessive moisture.
Care of the Digital Frame
n Do not drop
The digital frame is a complicated electronic device and may suffer
damage if dropped.
n Do not expose to moisture
The digital frame is neither moisture-proof nor moisture-resistant.
Exposing it to moisture or liquid of any kind will very likely damage the
digital frame.
n Do not hit or scratch it
The LCD panel of the digital frame is made of glass and is therefore
sensitive to abnormal force and sharp edges.
n Screen cleaning
Use only a dry soft cloth to clean the screen.
User’s Manual EN-5

n Temperature and humidity limitations
Operating temperature:
n 0° ~ 40°(Celsius) / 32° ~ 113°(Fahrenheit)
Recycling
n The digital frame uses materials that can be recycled. To minimize
environmental waste, check your area for companies that will recover
used televisions for dismantling and collection of reusable materials, or
contact your dealer for recycling tips.
n Please dispose of the carton and packing materials through the proper
waste disposal management in your area.
Copyright Statement
No part of this publication may be reproduced in any form by any means
without prior written permission. Other trademarks or brand names
mentioned herein are trademarks or registered trademarks of their
respective companies.
Disclaimer
Information in this document is subject to change without notice. The
manufacturer does not make any representations or warranties (implied or
otherwise) regarding the accuracy and completeness of this document and
shall in no event be liable for any loss of profit or any commercial damage,
including but not limited to special, incidental, consequential, or other
damage.
October 2008, Rev1.0
Trademarks
Microsoft, Microsoft Office, Windows and Windows Vista are either
registered trademarks or trademarks of Microsoft Corporation in the United
States and/or other countries.
Adobe and Reader are either registered trademarks or trademarks of
Adobe Systems Incorporated in the United States and/or other countries.
Other brands and product names are trademarks or registered trademarks
of their respective companies.
EN-6 User’s Manual
Journe Air Overview
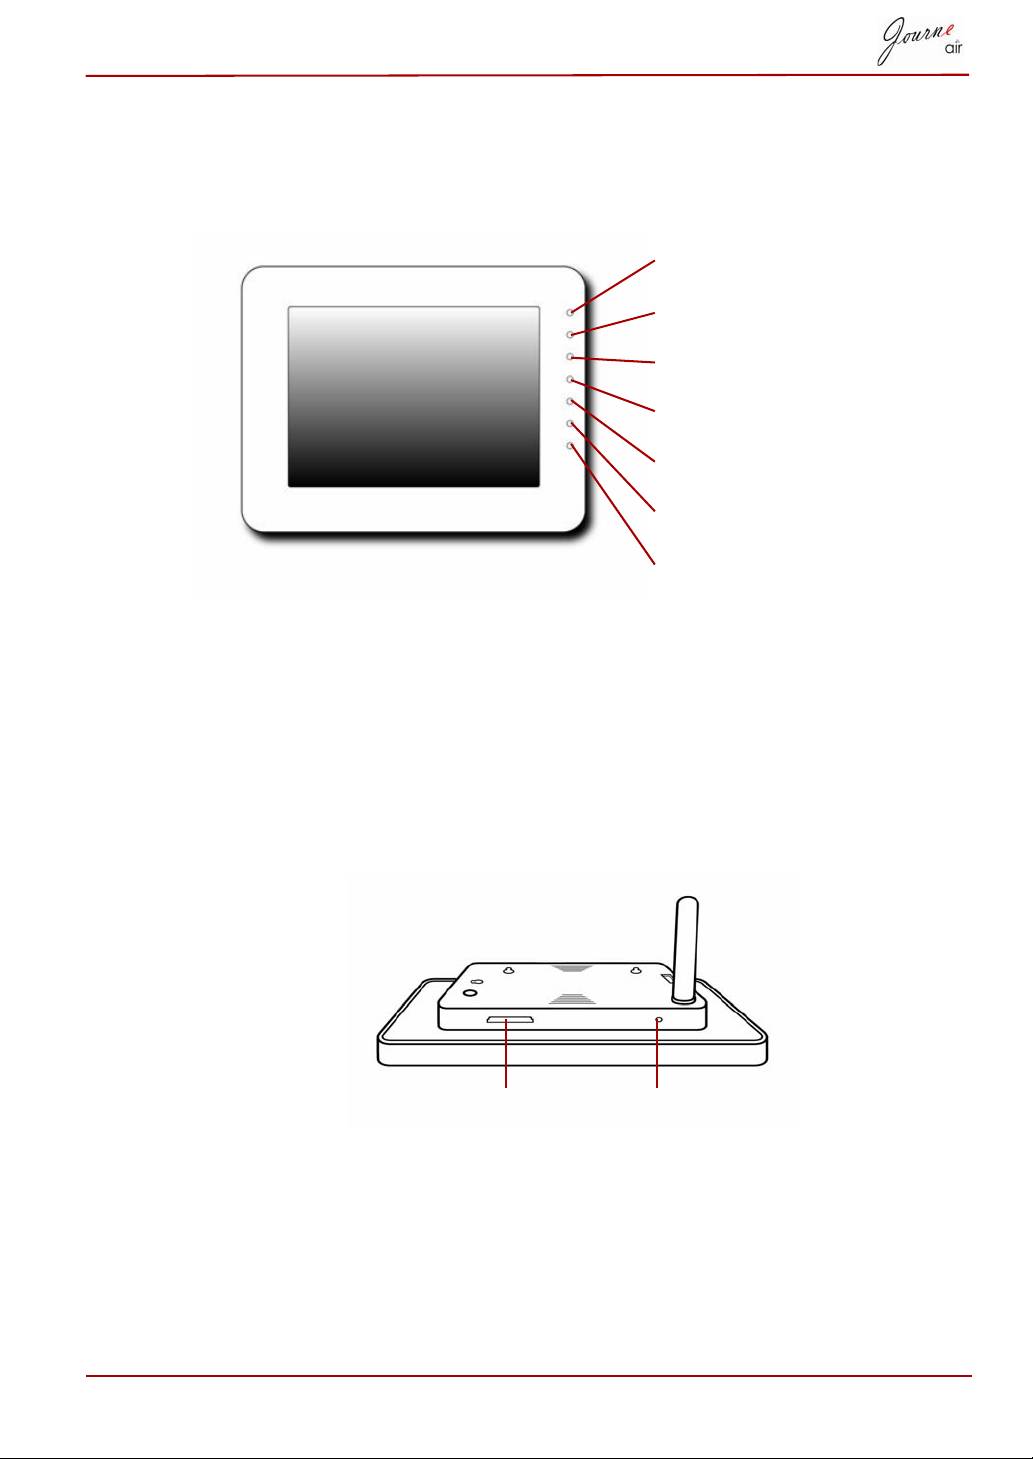
Front View
Control Buttons Operate the photo frame by pressing the control
buttons in the front panel.
LCD also shows the function icons for each
button in the corresponding position.
Bottom View
User’s Manual EN-7
Back Button
Home Button
Up Button
Down Button
Left Button
Right Button
Enter Button
Reset Button To reset the digital frame, press the Reset button
below the frame stand.
Memory Card Slot Reset Button
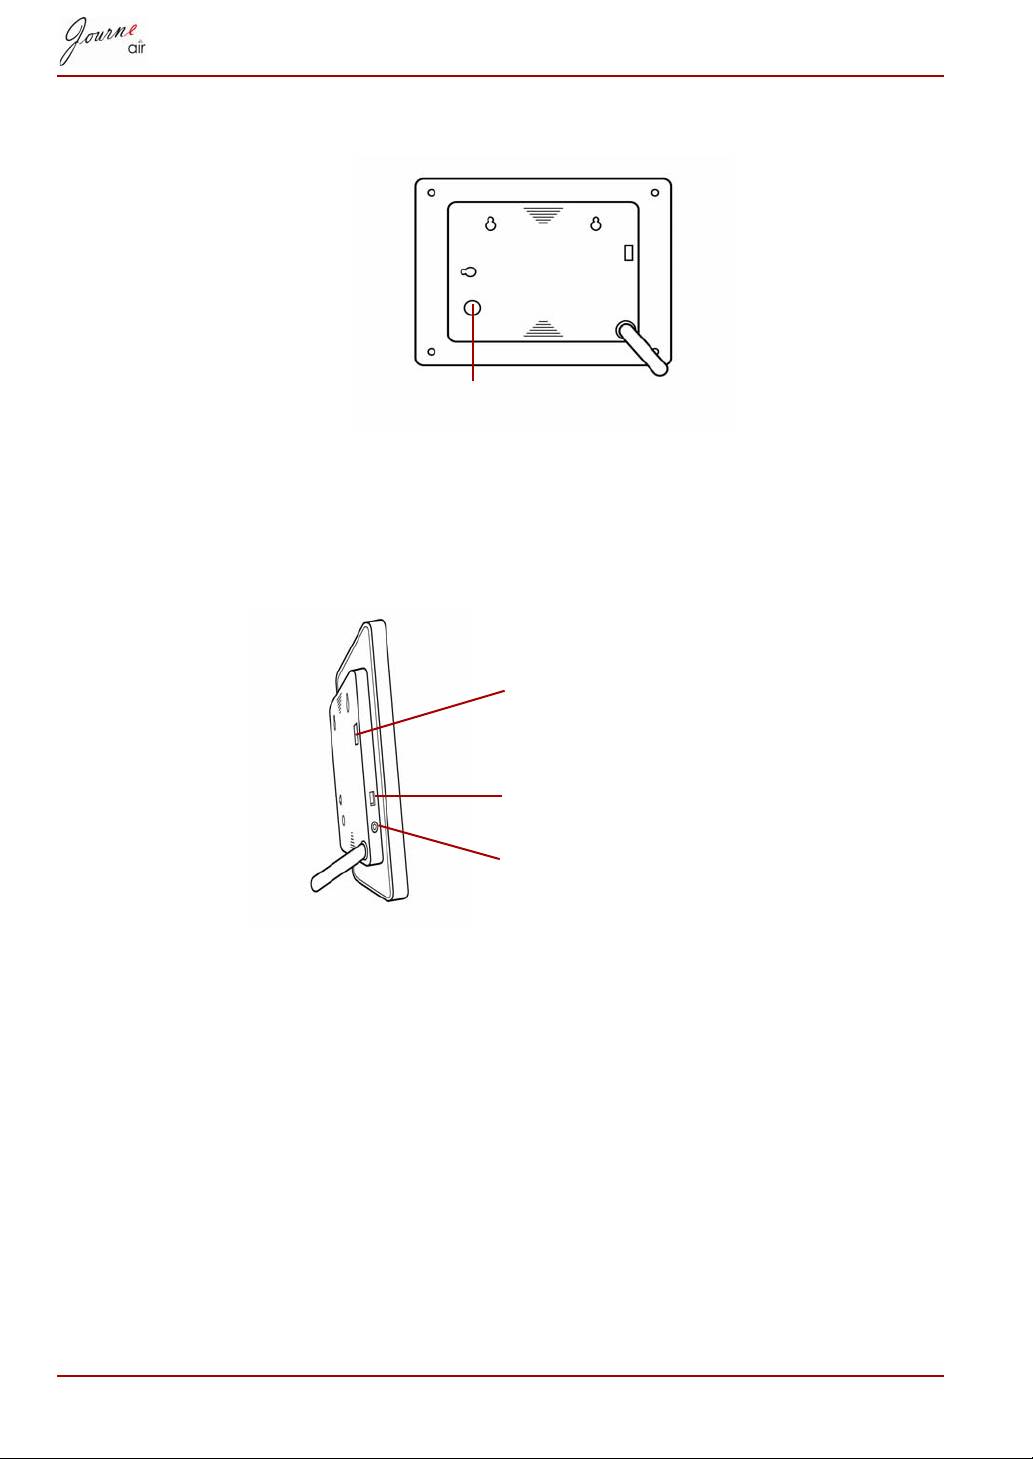
Rear View
Power Button To turn on the digital frame, press the Power
button on the back of the display.
Left View
System Requirements
n Windows 2000/XP/Vista
n USB 2.0 Interface
EN-8 User’s Manual
Power Button
Power Port The Power Port is where you will connect
the power adapter.
USB port for PC This USB port connects the digital frame
to your PC.
USB port for flash drive This USB port connects the digital frame
to other flash drives.
USB Port for Flash Drives
USB Port for PC
Power Port
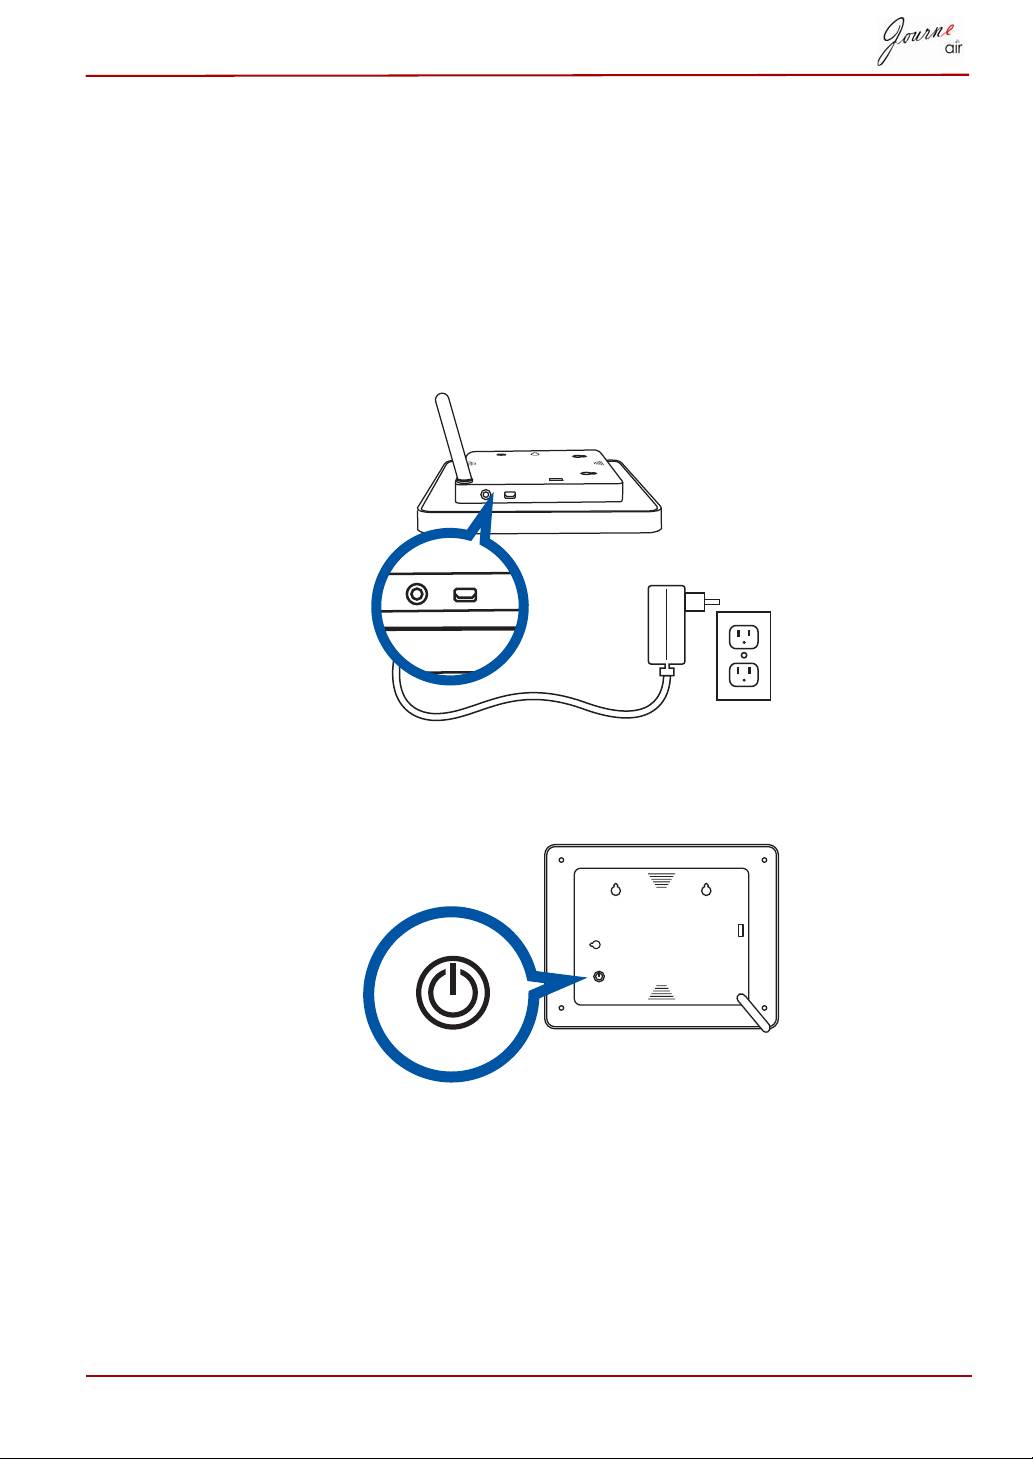
Getting Started
Placing the Unit
The digital frame should be placed on a flat surface or hung on sturdy
hooks, close to a power socket. Keep it away from high temperatures and
high levels of moisture.
Connecting to the A/C Power
Connect the supplied power cable to a power outlet.
Turning on the Digital Frame
Press the power button on the back of the display.
User’s Manual EN-9

Built-in battery (available on Journe Air 801 only)
The digital frame is equipped with a built-in lithium polymer battery. To
check the battery status, enter SETTINGS mode and then select Status.
To charge the battery, follow the steps below:
1. Connect one end of the AC power adapter to the power jack on the left
side of the frame.
2. Connect the other end to a power outlet.
3. Place the photo frame horizontally or vertically on a stable surface,and
then keep the power connected until the battery is fully charged.
When the battery time is 5 minutes left, a warning
message will show on the screen again and the frame
will shut down automatically. Charge the battery as
described above.
The fully charged battery usually lasts about 50
minutes,depending on your use and settings.
Power system and plug types may vary depending on
your country/region.
Do not disassemble or modify the battery.
EN-10 User’s Manual
NOTE
CAUTION

Connections
Memory Card:
Inserting a memory card:
n Insert a memory card into the slot on the bottom edge of the display.
n The digital frame supports SD, MMC, MS, MS Pro, xD and SDHC
memory cards.
n A few seconds after inserting the card, the digital frame will begin
searching for RSS feeds to download from. The digital frame will
connect to the network and update photos to the internal memory.
n If no RSS feeds are detected, the digital frame will search for photos in
the memory card and will display them in slideshow mode automatically.
Removing a memory card:
n To remove the memory card, unplug it directly from the slot.
USB Connection
For Windows PC (XP & Vista)
n Connect the digital frame to a PC with the supplied USB cable. The PC
will recognize the digital frame as a mass storage device.
n After installing the Sub View software on your PC, you can connect and
use your digital frame as an external monitor.
n You can connect to a PC and save RSS feeds in the .RSS format to the
digital frame. They will be detected and added to the digital frame’s
internal memory as new accounts.
n Once the digital frame connects to a PC, it is not operable until it is
disconnected from the PC.
For PictBridge printers
n You can connect to a PictBridge printer and print photos directly from
your digital frame.
User’s Manual EN-11
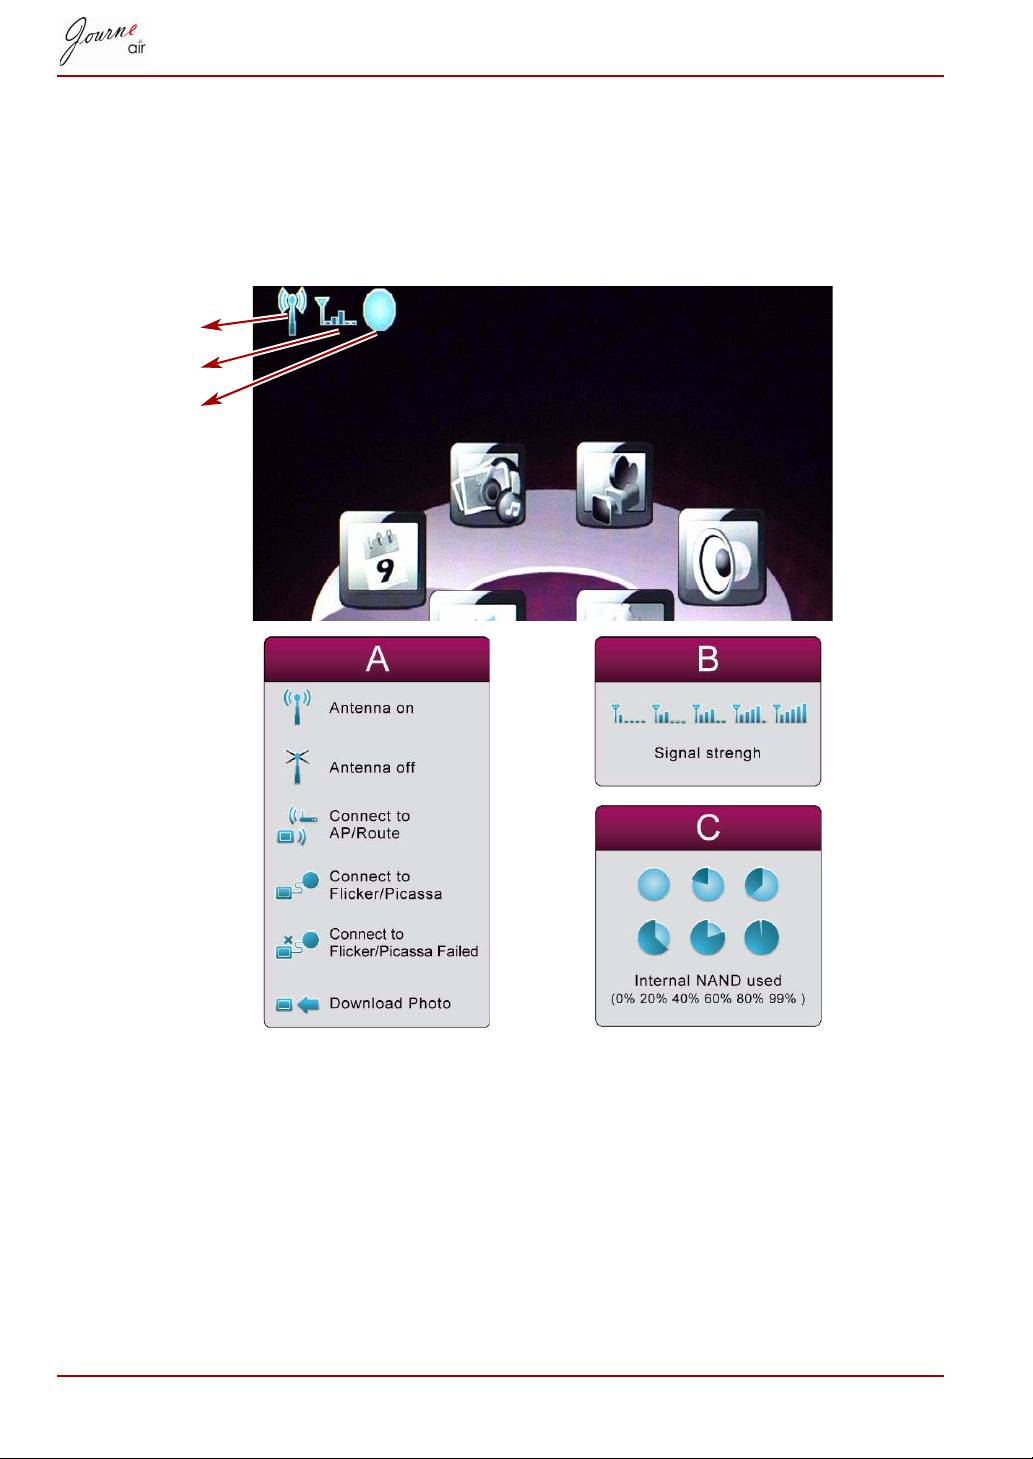
Understanding the Wi-Fi Icons
Your digital frame features Wi-Fi technology for connecting to the network.
The top left corner of the LCD screen displays Wi-Fi icons that allow you to
view the operation status of your wireless connection, and the amount of
internal memory in use. The Wi-Fi icons are defined as follows:
EN-12 User’s Manual
A
B
C
Basic Operations
Photo Mode
In Photo Mode you can set up slideshow sequences, transition effects,
background color, special photo effects, and rotation function. You can also
browse photos in the digital frame, and set up Flickr and Picasa.
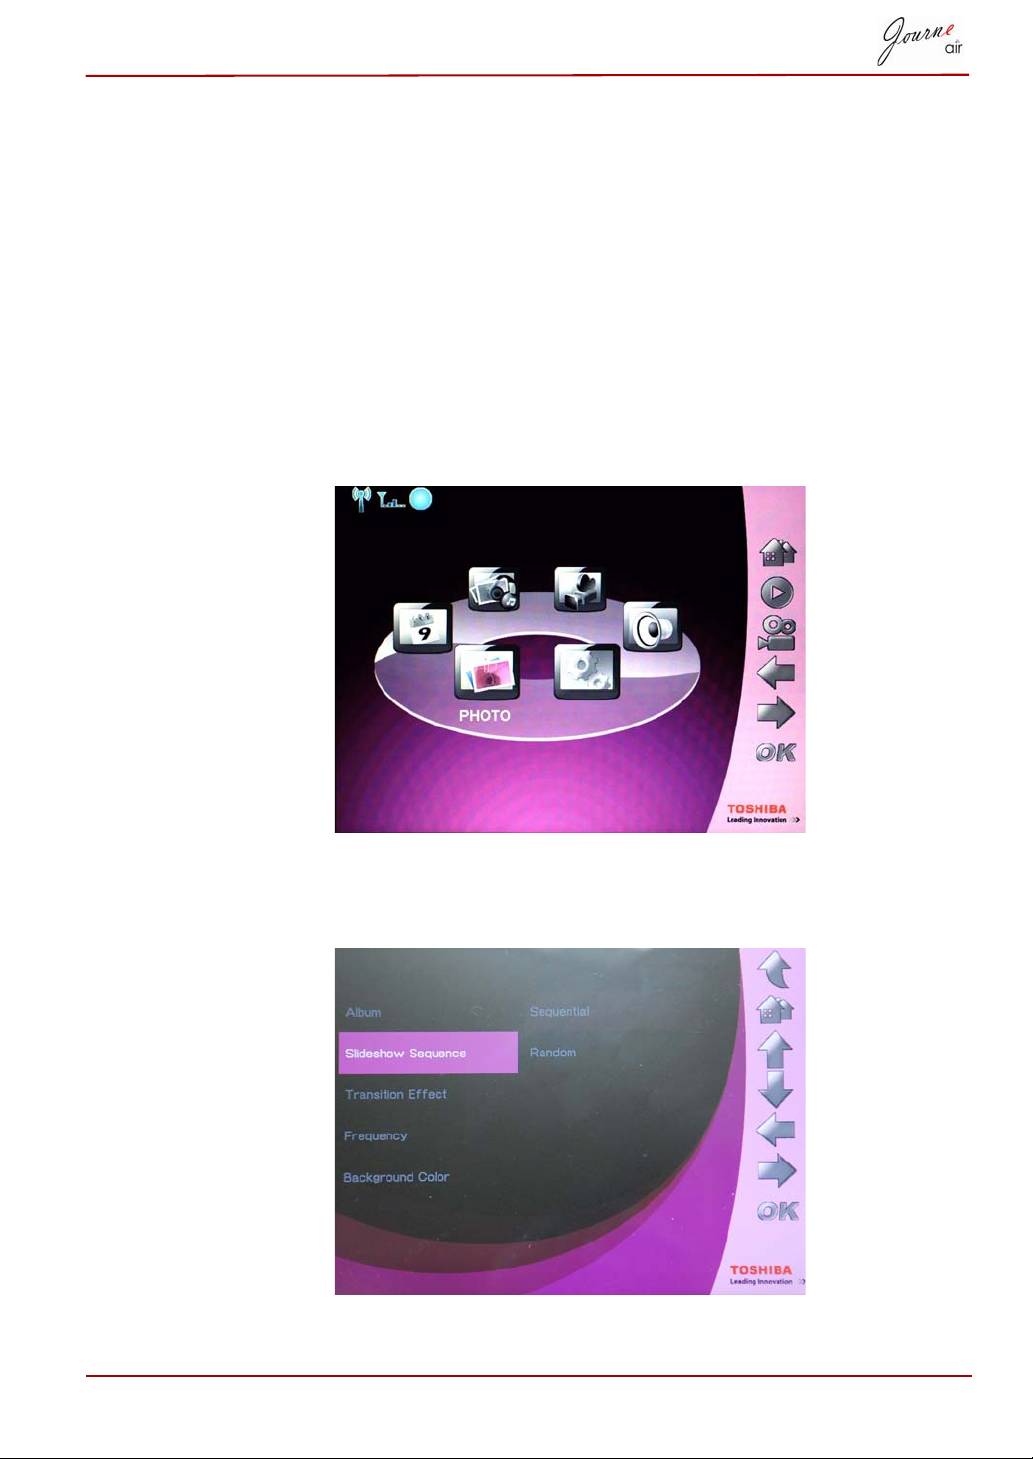
Slideshow Sequence
Slideshow can be played in one of two ways; Sequentially or Randomly. To
select a slideshow sequence:
1. In the main menu, select Photo and press OK to enter Photo Mode.
2. Select the storage device you want to access, then press OK.
3. Select Slideshow Sequence and press OK.
User’s Manual EN-13

4. Select a sequence: Sequential or Random, then press OK.
EN-14 User’s Manual
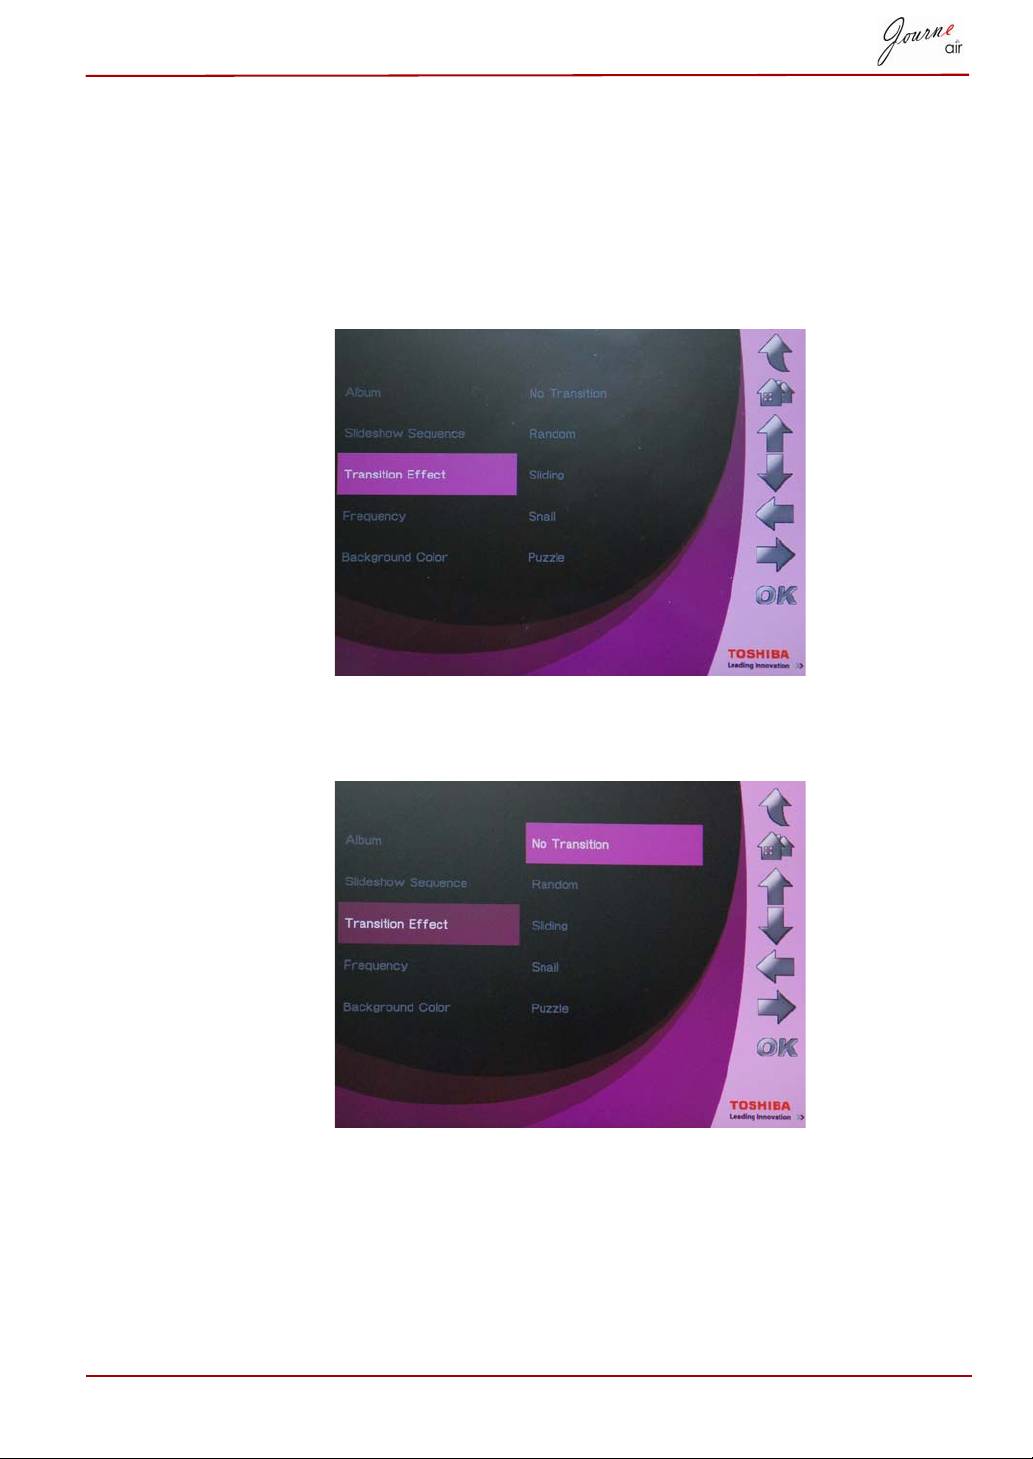
Transition Effect
The photos can appear on the screen using special transitions. To select a
transition effect:
1. In the main menu, select Photo and press OK to enter Photo Mode.
2. Select a storage device you want to access, then press OK.
3. Select Transition Effect and press OK.
4. Select an effect from the list as follows: No Transition, Random,
Sliding, Snail, or Puzzle, then press OK.
User’s Manual EN-15
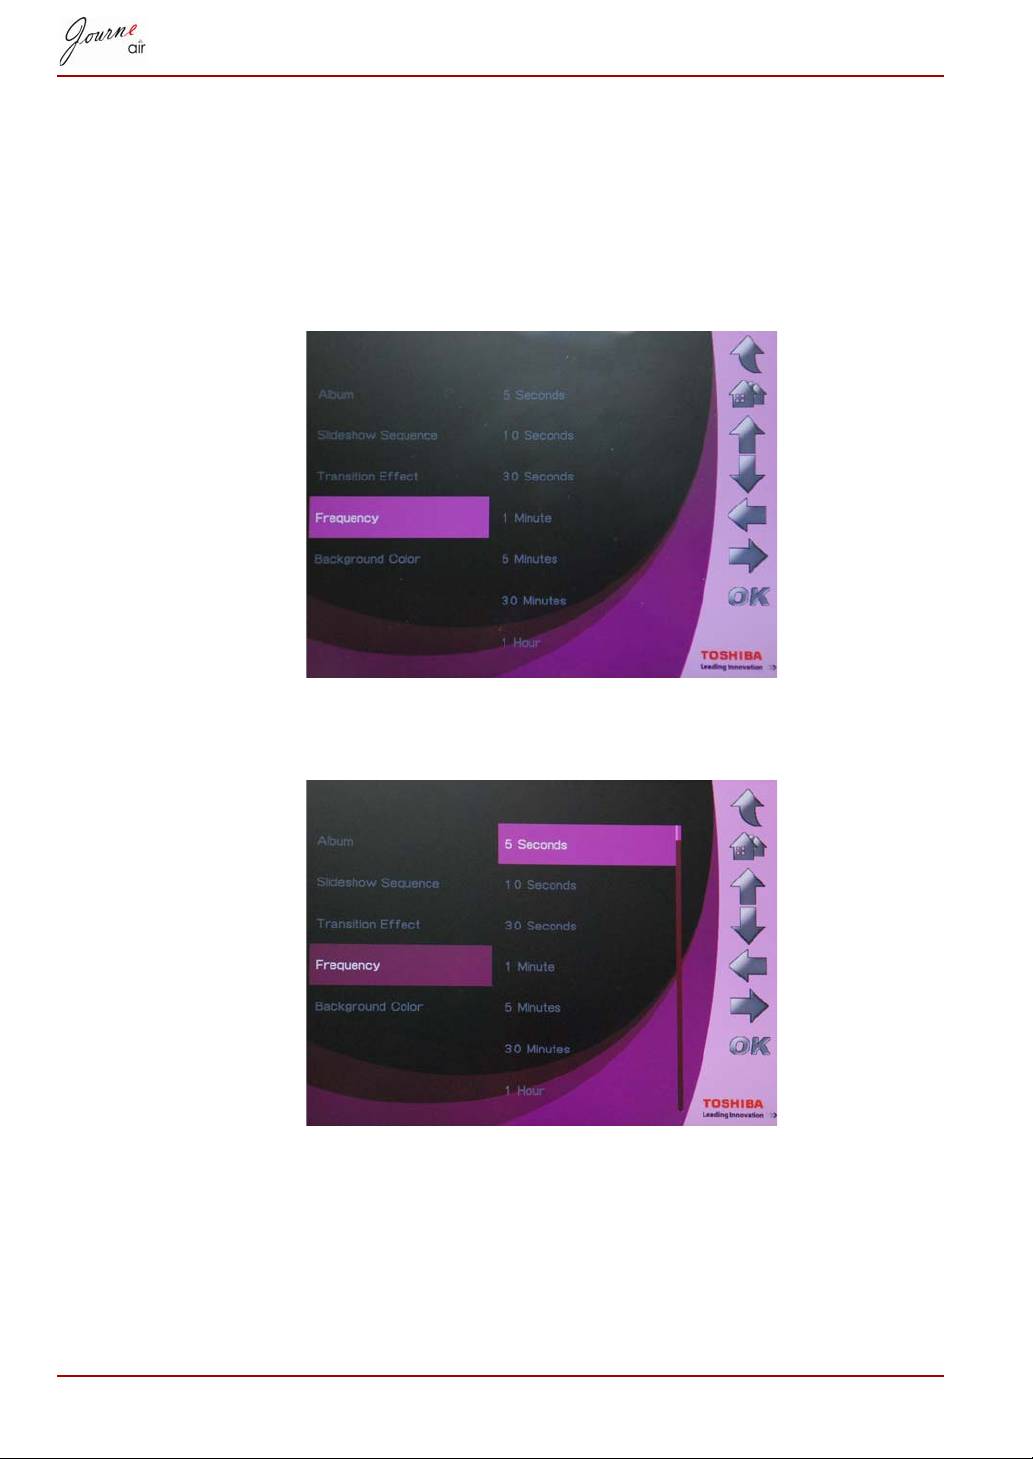
Frequency
Use this option to decide how long each photo is displayed for during the
slideshow. To select a frequency:
1. In the main menu, select Photo and press OK to enter Photo Mode.
2. Select the storage device you want to access, then press OK.
3. Select Frequency and press OK.
4. Select a display time from the list, then press OK. The shortest possible
display time is 5 seconds, and the longest is 1 day.
EN-16 User’s Manual
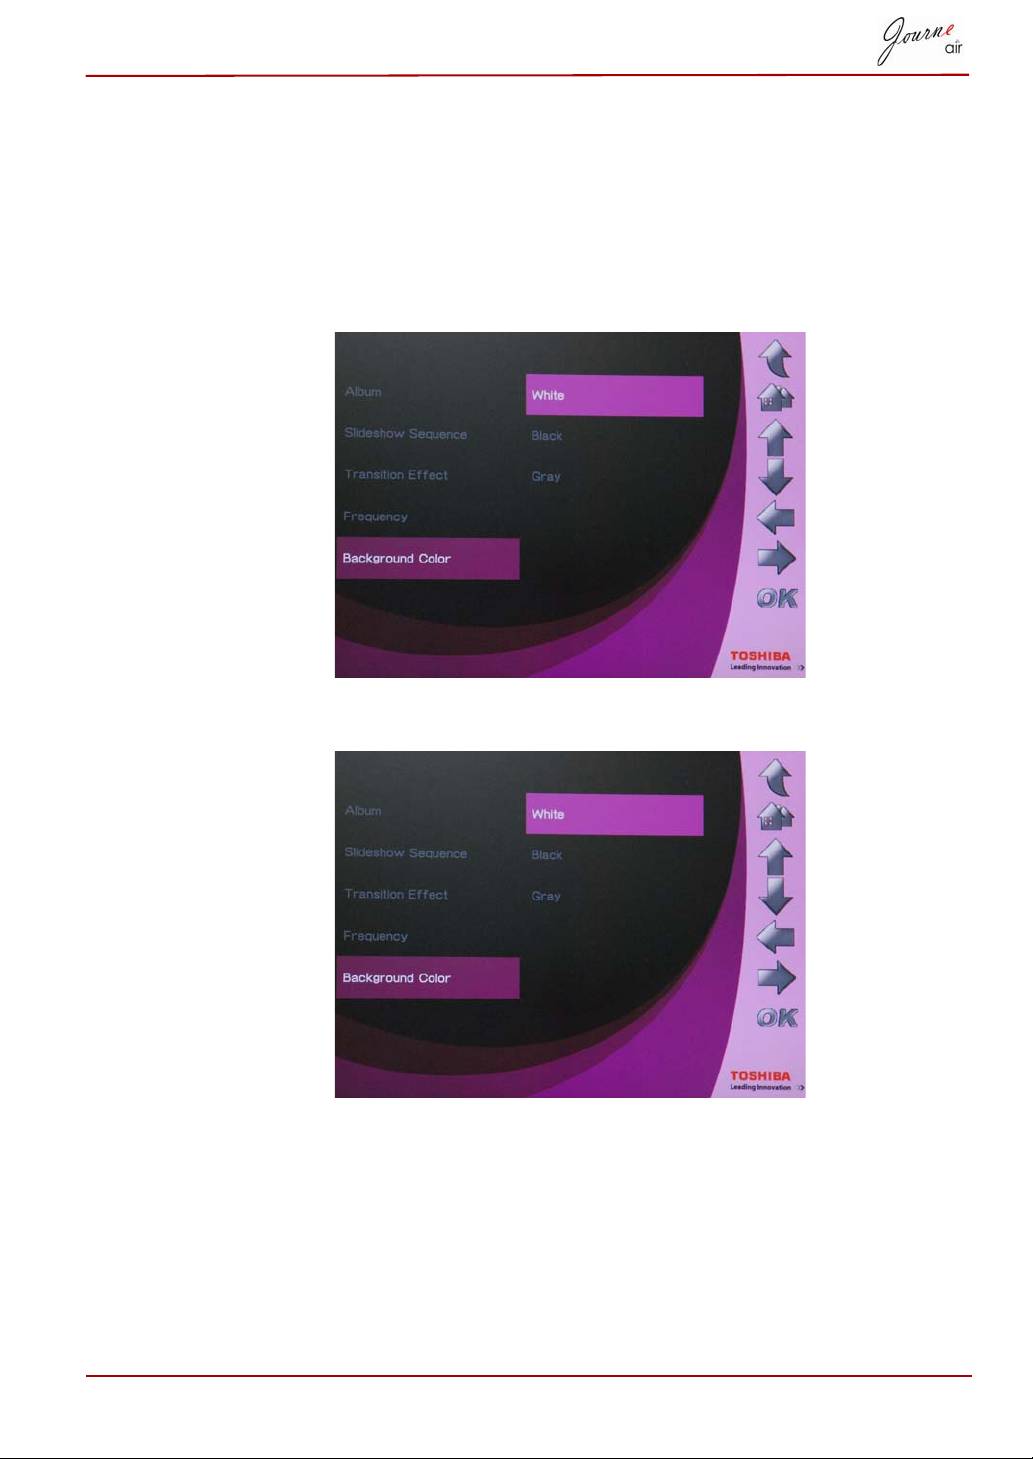
Background Color
Use this option to select the background color for photos that are smaller
than the display. To select a background:
1. In the main menu, select Photo and press OK to enter Photo Mode.
2. Select the storage device you want to access, then press OK.
3. Select Background Color and press OK.
4. Select a background color, White, Black, or Gray, then press OK.
User’s Manual EN-17
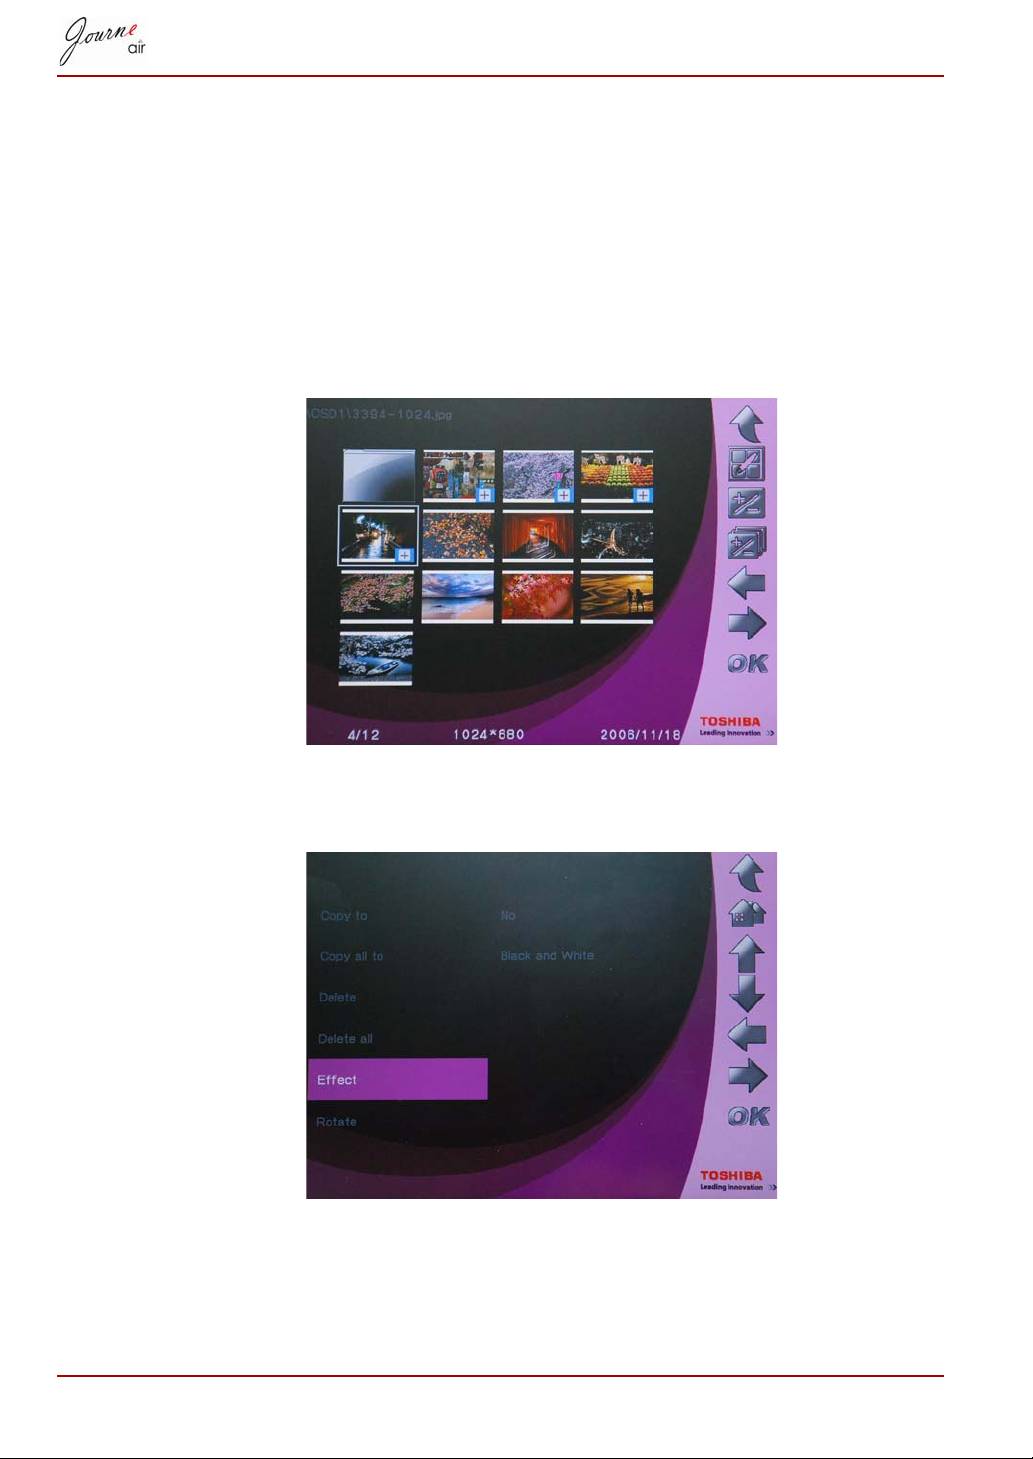
Effect
Use this function to add special effects to photos.
1. In the main menu, select Photo and press OK to enter Photo Mode.
2. Select the storage device you want to access, and then press OK.
3. Select Album and press OK.
4. Select ALL and press OK to display the photo files in the storage
device.
5. Select a photo you want to add an effect to and press Home.
6. Select Effect and press OK.
7. Select an effect you want to add and press OK to confirm.
EN-18 User’s Manual
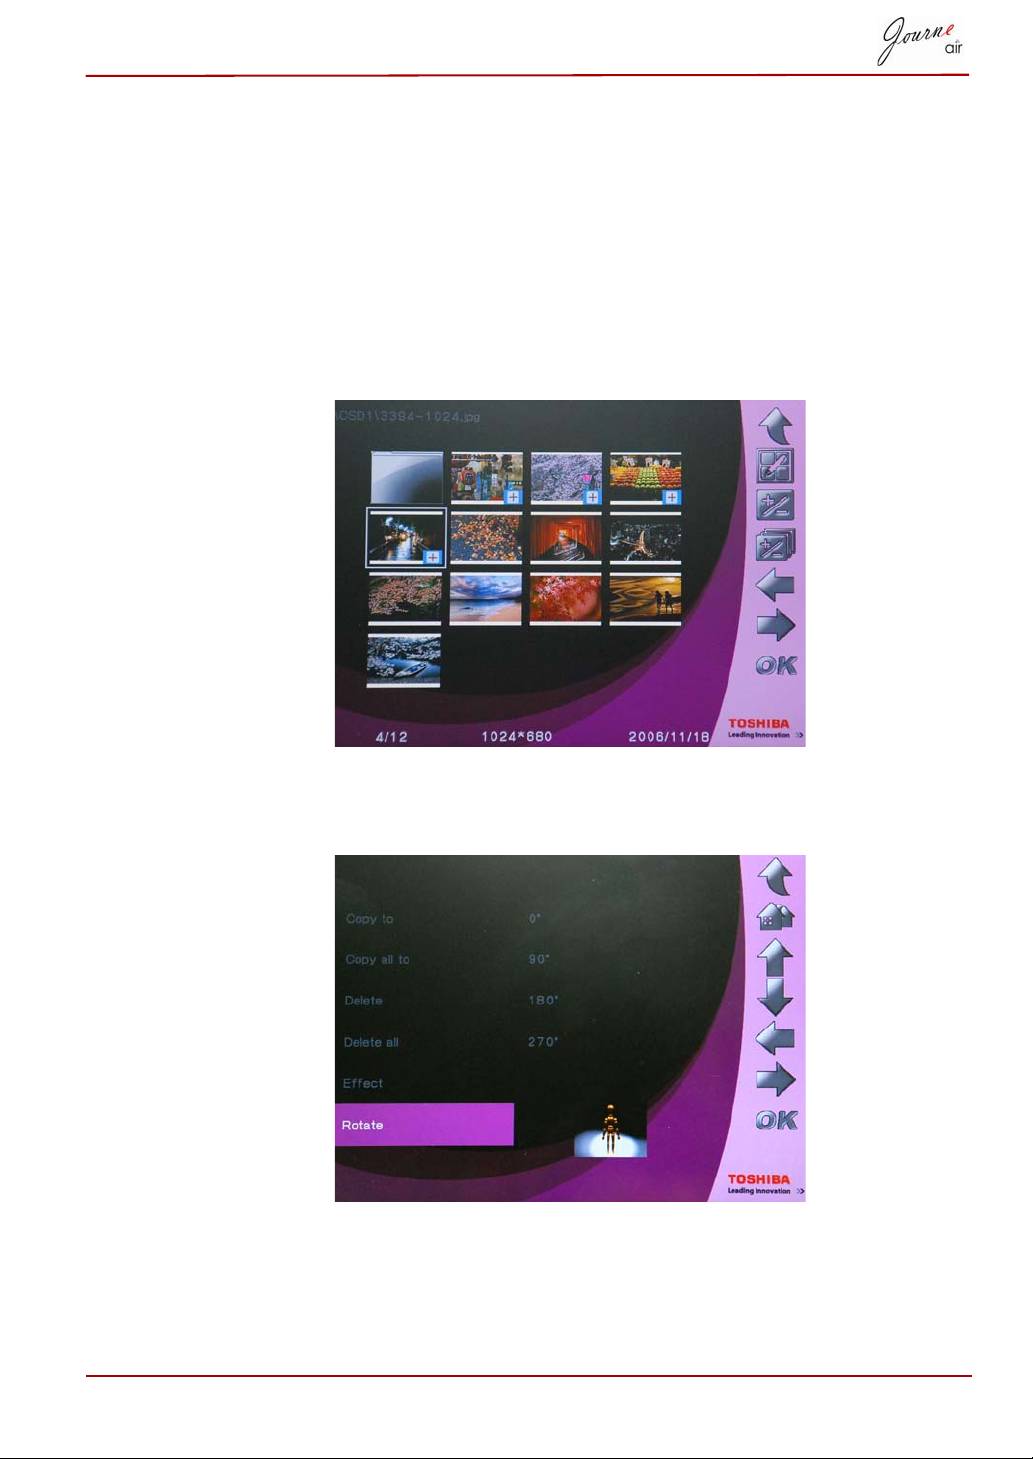
Rotate
Use this function to rotate photos to their correct position.
1. In the main menu, select Photo and press OK to enter Photo Mode.
2. Select the storage device you want to access, then press OK.
3. Select Album and press OK.
4. Select ALL and press OK to display the photo files in the storage
device.
5. Select the photo you want to rotate and press Home.
6. Select Rotate and press OK.
7. Select degree of rotation and press OK to confirm.
User’s Manual EN-19

Browsing Photos
1. In the main menu, select Photo and press OK to enter Photo Mode.
2. Select the storage device you want to access, then press OK.
3. Select Album and press OK.
4. Select All and press OK to browse all photos as thumbnails.
5. Select a photo and press OK, then the digital frame will enter slideshow
mode.
6. Press Up to change to browse mode. In browse mode, press Right to
view the next photo and press Left to view the previous photo. Press Up
again to change back to slideshow mode.
7. Press Down to view detailed information of the photo.
8. Press OK again to return to photo thumbnails.
Flickr / Picasa
The digital frame supports Wi-Fi technology. You can download photos
from Flickr and Picasa web albums and view them on the digital frame.
Before downloading, you must configure network
settings.
Each time the digital frame is turned on, it searches
external memory cards and the internal memory for
Flickr or Picasa RSS feeds. RSS feeds that are detected
on external memory cards will be saved to the internal
memory as new accounts.
For external memory cards, save the RSS feed of web
albums you wish to add to the digital frame in the .RSS
format.
Activate an Account
The digital frame downloads photos from all accounts that are turned on.
If you have downloaded photos from an account before,
future downloads will only update new photos to your
storage memory.
To turn accounts on and off:
1. In the main menu, select Photo and press OK to enter Photo Mode.
2. Select Flickr or Picasa, and then press OK.
EN-20 User’s Manual
NOTE
NOTE
