Toshiba JournE Air1000: инструкция
Раздел: Аксессуары для фото- и видеотехники
Тип:
Инструкция к Toshiba JournE Air1000
Оглавление
- Содержание
- Информация о соответствии нормативным требованиям . . . . . . . . . . . . . . . . . . . . . . . . . . . . . . . . . . . . . 23
- Введение
- Правила техники безопасности
- n Для очистки поверхность экрана используйте мягкую,
- Этап 1. Проверка содержимого упаковки
- Этап 2. Идентификация частей Вид сзади Вид слева
- Пульт дистанционного управления
- Этап 3. Применение подставки
- Этап 4. Подключение адаптера переменного тока
- Этап 5. Установка и удаление карты памяти
- Этап 6. Эксплуатация устройства Выбор режима Регулировка громкости
- Этап 7. Использование экранных меню Пункты меню «Фото» Базовые операции просмотра фотографий
- Масштабирование фотографий Пункты меню «Календарь»
- Пункты меню «Музыка» Пункты меню «Видео»
- Пункты меню «WiFi» Использование WiFi-устройств
- Чтобы воспользоваться экранной клавиатурой:
- RSS
- Flickr/Picasa
- Радио
- Мои любимые, прикоснитесь к значку . Она появится в списке Мои любимые в следующий раз. Чтобы вернуться
- Часто задаваемые вопросы Техническая поддержка TOSHIBA
- Информация о соответствии нормативным требованиям
- Ограничения по использованию Условия эксплуатации
- Другие условия, не связанные с электромагнитной совместимостью
- Изложенная далее информация актуальна только в странах-членах ЕС: Утилизация изделий Утилизация батарей и/или аккумуляторов
Air1000-QSG-EEMEA-V1-1208.book Page 1 Tuesday, November 18, 2008 11:54 PM
Quick Start Guide
CZ
HU
SK
FR
PL
SL
GR
RS
TR
HR
RU
AR

Air1000-QSG-EEMEA-V1-1208.book Page 2 Tuesday, November 18, 2008 11:54 PM
Table of Contents
Introduction . . . . . . . . . . . . . . . . . . . . . . . . . . . . . . . . . . . . . . . . 4
Safety instructions . . . . . . . . . . . . . . . . . . . . . . . . . . . . . . . . . . 4
Follow the instructions below to set up and operate
this unit (digital photo frame). . . . . . . . . . . . . . . . . . . . . . . . . . 6
Step 1: Check the package contents . . . . . . . . . . . . . . . . . . . 6
Step 2: Identify the parts . . . . . . . . . . . . . . . . . . . . . . . . . . . . . 7
Rear view . . . . . . . . . . . . . . . . . . . . . . . . . . . . . . . . . . . . . . . . 7
Left view . . . . . . . . . . . . . . . . . . . . . . . . . . . . . . . . . . . . . . . . . 7
Remote control . . . . . . . . . . . . . . . . . . . . . . . . . . . . . . . . . . . . 8
Step 3: Use the foot stand . . . . . . . . . . . . . . . . . . . . . . . . . . . 9
Step 4: Connect the AC power . . . . . . . . . . . . . . . . . . . . . . . 10
Step 5: Insert or remove a memory card . . . . . . . . . . . . . . . 10
Step 6: Operate the unit . . . . . . . . . . . . . . . . . . . . . . . . . . . . 11
Selecting a mode . . . . . . . . . . . . . . . . . . . . . . . . . . . . . . . 12
Adjusting the volume . . . . . . . . . . . . . . . . . . . . . . . . . . . . 12
Step 7: Use the OSD menus. . . . . . . . . . . . . . . . . . . . . . . . . 12
Controls on the Photo menu . . . . . . . . . . . . . . . . . . . . . . 12
Basic photo playback . . . . . . . . . . . . . . . . . . . . . . . . . . 12
Zooming the photo . . . . . . . . . . . . . . . . . . . . . . . . . . . . 13
Controls on the Calendar menu . . . . . . . . . . . . . . . . . . . . 13
Controls on the Music menu . . . . . . . . . . . . . . . . . . . . . . 14
Controls on the Video menu . . . . . . . . . . . . . . . . . . . . . . 14
Controls on the WiFi menu . . . . . . . . . . . . . . . . . . . . . . . 15
Using WiFi-enabled services . . . . . . . . . . . . . . . . . . . . 15
RSS . . . . . . . . . . . . . . . . . . . . . . . . . . . . . . . . . . . . . . . 16
Flickr / Picasa. . . . . . . . . . . . . . . . . . . . . . . . . . . . . . . . 17
Radio . . . . . . . . . . . . . . . . . . . . . . . . . . . . . . . . . . . . . . 18
Frequently asked questions. . . . . . . . . . . . . . . . . . . . . . . . . . 19
TOSHIBA support . . . . . . . . . . . . . . . . . . . . . . . . . . . . . . . . . . 20
EN-2
Quick Start Guide
Air1000-QSG-EEMEA-V1-1208.book Page 3 Tuesday, November 18, 2008 11:54 PM
Regulatory information . . . . . . . . . . . . . . . . . . . . . . . . . . . . . 20
EU conformity statement . . . . . . . . . . . . . . . . . . . . . . . . . 20
Indication of the countries . . . . . . . . . . . . . . . . . . . . . . . . 20
Indication of restrictions of use . . . . . . . . . . . . . . . . . . . . 21
Working environment. . . . . . . . . . . . . . . . . . . . . . . . . . . . 21
Additional environments not related to EMC . . . . . . . . . . 22
Following information is only valid for
EU-member states: . . . . . . . . . . . . . . . . . . . . . . . . . . . . . 23
Disposal of products . . . . . . . . . . . . . . . . . . . . . . . . . . 23
Disposal of batteries and/or accumulators . . . . . . . . . 23
Quick Start Guide
EN-3
Air1000-QSG-EEMEA-V1-1208.book Page 4 Tuesday, November 18, 2008 11:54 PM
Introduction
Welcome and thank you for choosing a TOSHIBA product.
For your convenience, your TOSHIBA product is furnished with
this Quick Start Guide.
Journ
e
air1000 features a 10.1" touch-sensitive Liquid Crystal
Display (LCD) panel. This unit enables you to display photos or
play music and video files stored on a memory card. More than
just a photo frame, this unit comes with WiFi-enabled functions.
This unit is equipped with the following features:
n Clear and bright pictures
n Capable of viewing web albums, receiving radio signals and
subscribing to RSS feeds via wireless access points
n Supports playback of multimedia files
n Sets up mp3 as alarm ringtones
n Multi-language On-Screen Display (OSD) menus
n Built-in speakers
Safety instructions
Before operating this unit, please carefully read and follow the
instructions below.
n Retain this Quick Start Guide for future reference.
n Read the safety and operating instructions carefully before
using the product. All warnings on the product and in the
operating instructions should be observed.
n Do not place this product under direct sunlight or near heat
sources, such as in a closed car under sunlight or near a
stove. The outer casing of this product may become deformed
and the sophisticated sensors inside may become damaged
due to excessive heat.
n Do not use this product near water, in the rain or allow any
liquid to get inside this product. Water and moisture may
cause short-circuit to the electronic components and lead to
malfunctions.
EN-4
Quick Start Guide
Air1000-QSG-EEMEA-V1-1208.book Page 5 Tuesday, November 18, 2008 11:54 PM
n Do not use this product near strong electromagnetic sources,
such as a microwave oven. The electromagnetic interference
may cause this product to malfunction.
n Do not drop or apply shock/vibration to this product. Strong
impacts may damage the components inside.
n Do not insert objects other than compatible memory cards into
the memory card slots of this product. The metal contacts
inside the slots can easily become damaged by foreign
objects.
n Do not use an unknown power adapter other than the one
supplied with this unit. Connecting this product to an unknown
power adapter is very dangerous and may lead to fire or
explosion.
n Do not cut, bend, modify, place heavy objects, or step on the
cable of the power adapter. Otherwise the external insulation
may be damaged and result in short-circuit or fire.
n If there are strange odors or heat emitting from this product or
any signs of malfunction, disconnect this unit from the power
immediately and contact your dealer for inspection or service.
n Use a smooth, soft cloth to clean the surface of the screen.
Do not use liquid cleaners or glass cleaners.
n If a foreign substance or water gets in this product, please turn
the power off immediately and disconnect the power adapter.
Next, remove the foreign substance or water, and then send
the product to your nearest service center.
n Do not attempt to disassemble or modify this product. There
are no user serviceable parts inside this product, and
unauthorized modifications will cause the warranty to void.
n Although the LCD panel is made with high-precision
technology and has effective pixels of 99.99% or more, black
dots or bright points of light (red, blue, or green) may appear
constantly on the LCD panel. This is a structural property of
the LCD panel and is not a malfunction.
Quick Start Guide
EN-5
Air1000-QSG-EEMEA-V1-1208.book Page 6 Tuesday, November 18, 2008 11:54 PM
Follow the instructions below to set up and operate
this unit (digital photo frame).
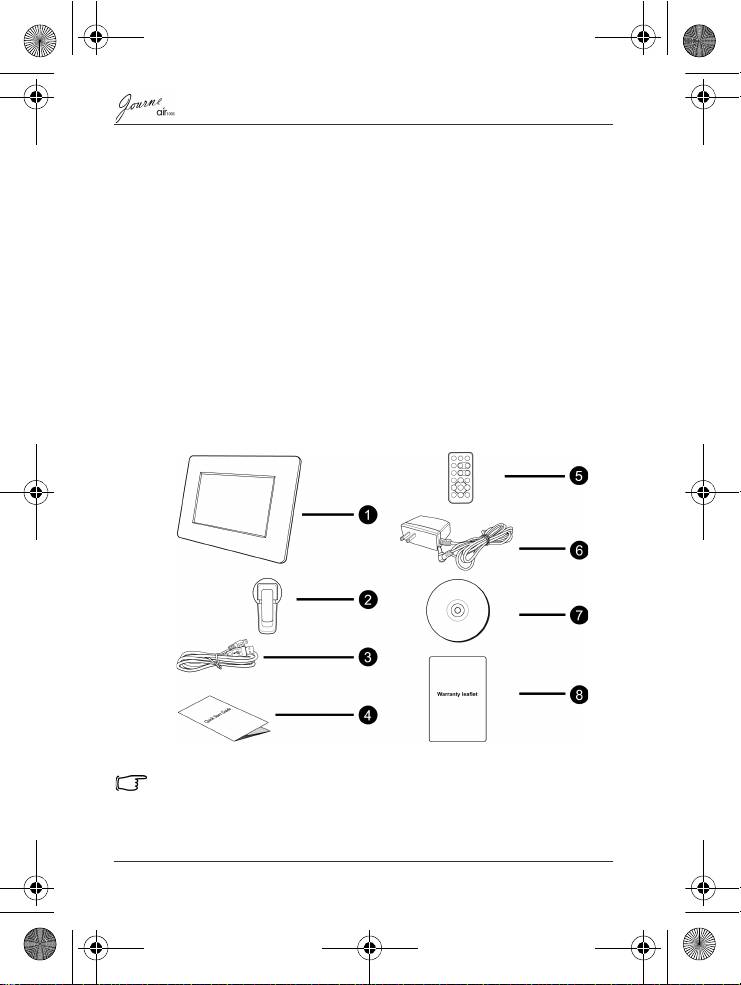
Step 1: Check the package contents
Carefully open the packing box and ensure that you have the
following items.
1. Journ
e
air1000 x 1
2. Foot stand x 1
3. USB cable x 1
4. Quick Start Guide x 1
5. Remote control (with the included battery) x 1
6. AC power adapter x 1
7. CD x 1 (including a video converter software)
8. Warranty leaflet x 1
Available accessories may vary depending on the area where you
purchased this unit.
EN-6
Quick Start Guide
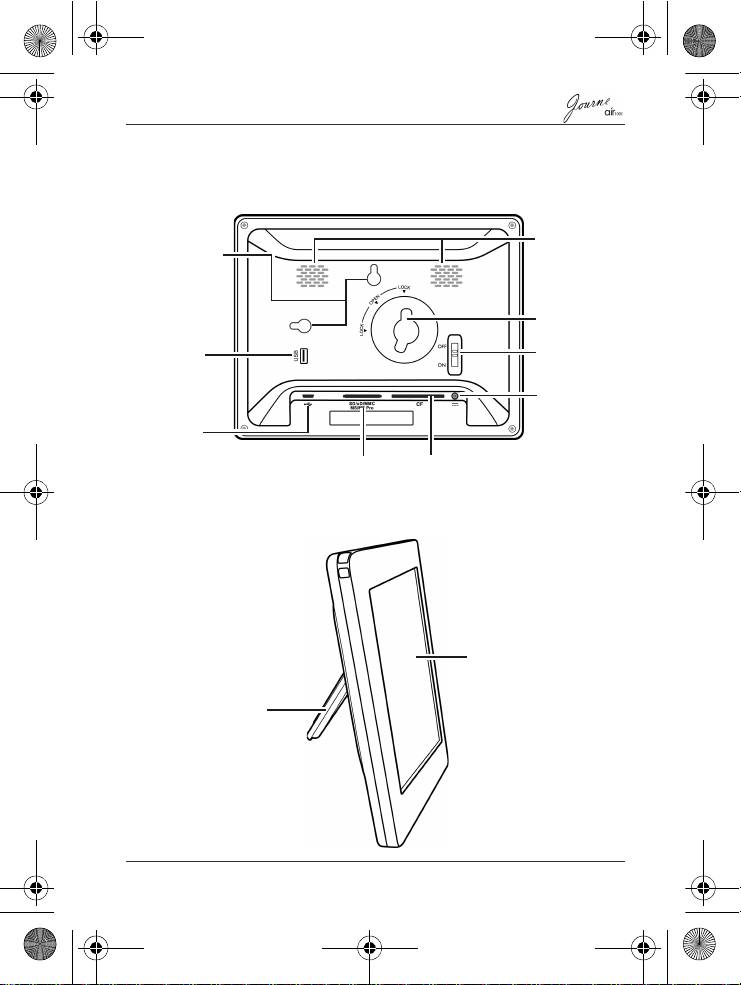
Step 2: Identify the parts
Rear view
Left view
Quick Start Guide
EN-7
Speakers
Hanging slot
USB jack
Lock slot
(optional)
Uses to
download
Power switch
files from a
USB device
Power jack
USB jack
Uses to connect the unit to a
computer so the computer can
5-in-1
CF card
edit files stored in the unit
card slot
slot
Touch panel
Foot stand
Air1000-QSG-EEMEA-V1-1208.book Page 7 Tuesday, November 18, 2008 11:54 PM
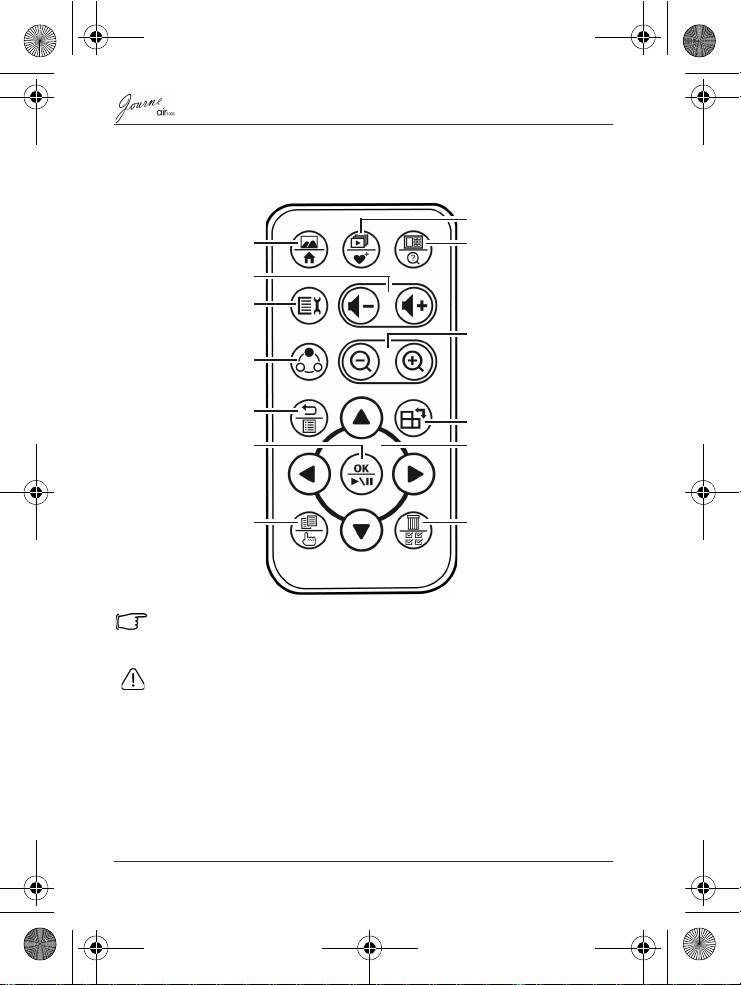
Remote control
Please remove the plastic film under the battery before using the
remote control for the first time.
• Protect the battery from overheating or excessive moisture.
• Failure to replace the battery in the correct manner may result in
damage to the battery.
• Use only the approved specified batteries.
• Properly recycle or dispose used batteries according to local
guidelines and regulations.
• Do not throw batteries into fire. This may result in an explosion.
EN-8
Quick Start Guide
Slideshow view/
My favorite
Single View/Home
Thumbnail view/
New search
Volume up/
Volume down
Setup
Zoom in/Zoom out
Mode change
Return/Playlist
Rotate
OK/Play back/Pause
Navigation buttons
Copy/Select
Delete/Select all
Air1000-QSG-EEMEA-V1-1208.book Page 8 Tuesday, November 18, 2008 11:54 PM
Air1000-QSG-EEMEA-V1-1208.book Page 9 Tuesday, November 18, 2008 11:54 PM
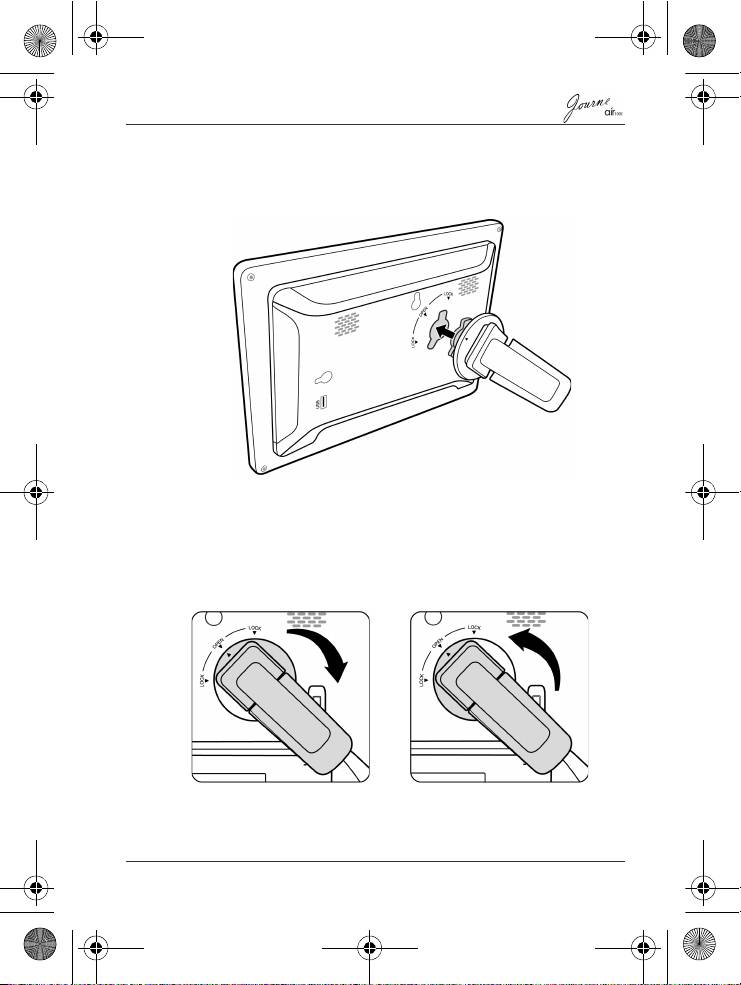
Step 3: Use the foot stand
1. On the back of the unit, attach the foot stand to the lock slot as
illustrated below.
2. To place the photo frame horizontally (recommended
direction), rotate the foot stand clockwise until it is secured to
the photo frame.
To place the photo frame vertically, rotate the foot stand
counter-clockwise until it is secured to the photo frame.
Quick Start Guide
EN-9
Air1000-QSG-EEMEA-V1-1208.book Page 10 Tuesday, November 18, 2008 11:54 PM
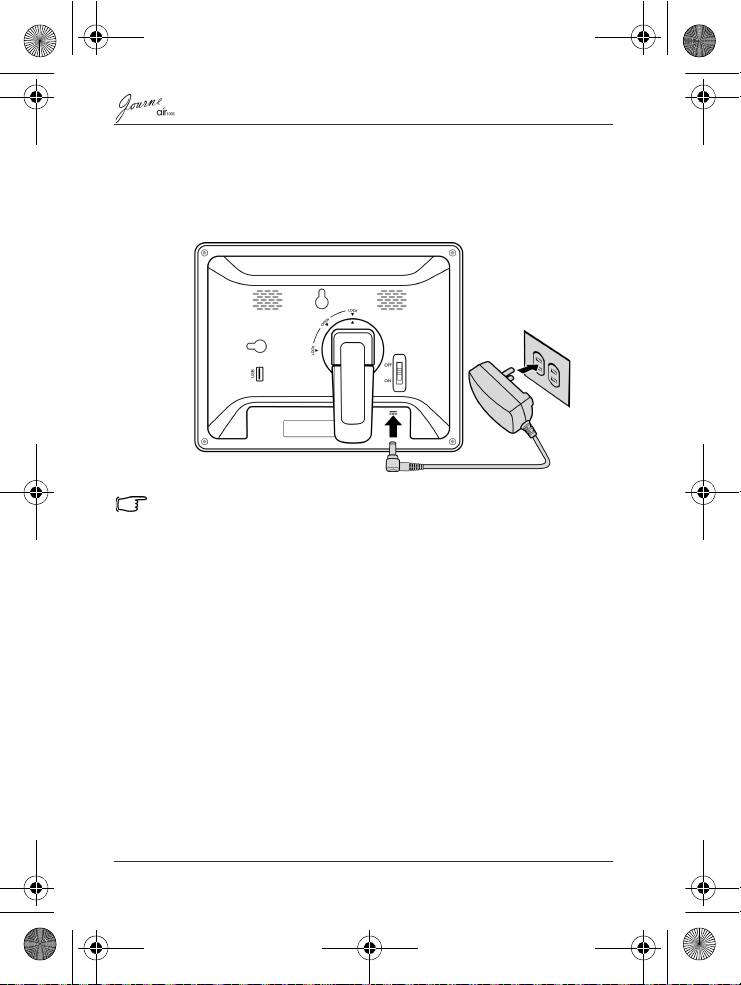
Step 4: Connect the AC power
Connect one end of the AC power adapter into the power jack on
the back of this unit, and then plug the other end into a power
outlet.
Power systems and plug types may vary depending on your country/
region.
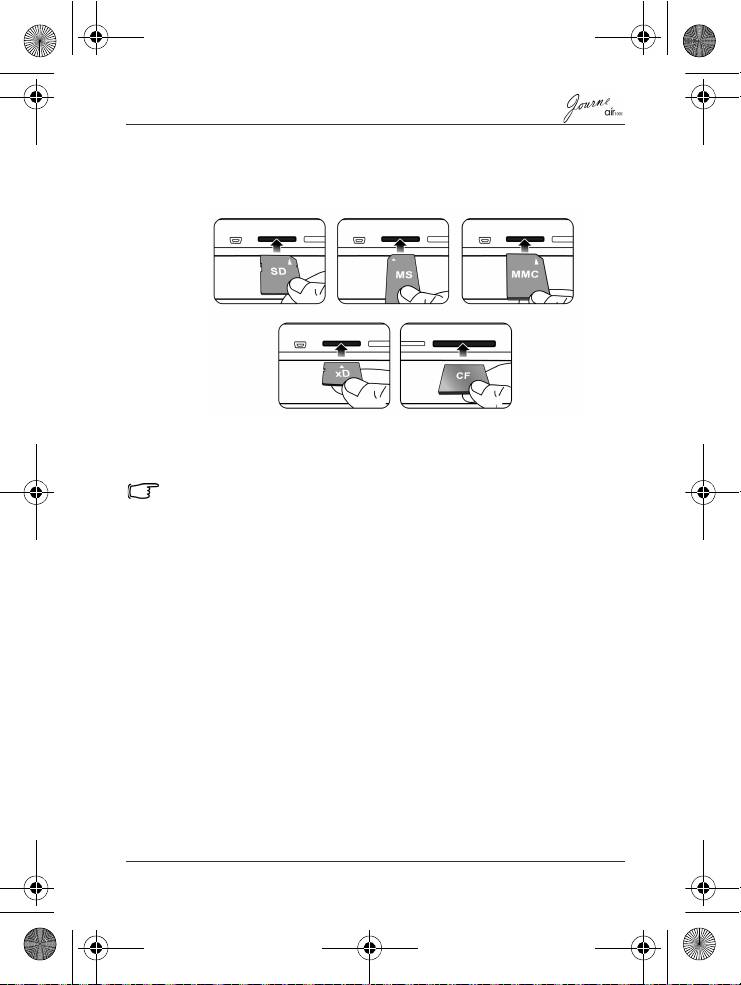
Step 5: Insert or remove a memory card
The unit is preloaded with some demo images and music in the
internal memory. On the back of the unit, you can also insert a
memory card containing the other types of media files you want
to show on the unit, such as video files.
EN-10
Quick Start Guide
Air1000-QSG-EEMEA-V1-1208.book Page 11 Tuesday, November 18, 2008 11:54 PM
To insert the memory card:
Insert the memory card into the card slot following the direction
indicated on the card.
To remove the memory card:
Press on the memory card to release the card.
This unit can support a microSD or microSDHC card with capacity up
to 8GB.
Step 6: Operate the unit
To turn on the power, slide the power switch to the ON position.
After the unit is turned on, available functions (represented by
icons) show on the screen.
n Simply tap the corresponding icon below (if the unit is placed
horizontally) or beside (If the unit is placed vertically)
indicating the function you want to use.
Or
n Press the corresponding button on the remote control. If the
control panel is unused for a certain period of time, the LED
turns off automatically. To turn on the backlight again, tap
anywhere on the control panel.
To turn off the unit:
When the power is on, slide the power switch to the OFF position
to turn it off.
Quick Start Guide
EN-11
Selecting a mode
Tap or press on the remote control repeatedly to
toggle through the following modes: Photo, Calendar, Music, WiFi
and Video.
Adjusting the volume
In the Music, Video or Photo mode during slideshow, tap /
or press / on the remote control to increase or
decrease volume.
Step 7: Use the OSD menus
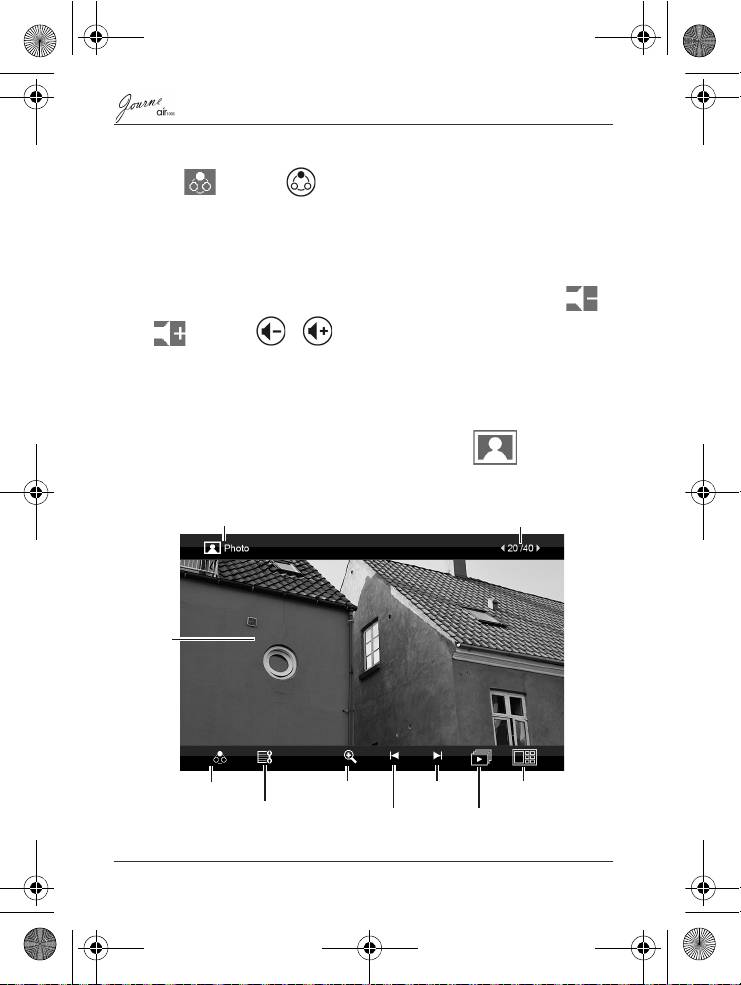
Controls on the Photo menu
Basic photo playback
EN-12
Quick Start Guide
Current mode
Current file number/Total number of files
LCD
screen
Mode selection
Zoom-in view
Next file
Thumbnail view
Edit slideshow, copy, delete or
Previous file
Slideshow view
rotate files, and set up display
layout and display clock
Air1000-QSG-EEMEA-V1-1208.book Page 12 Tuesday, November 18, 2008 11:54 PM
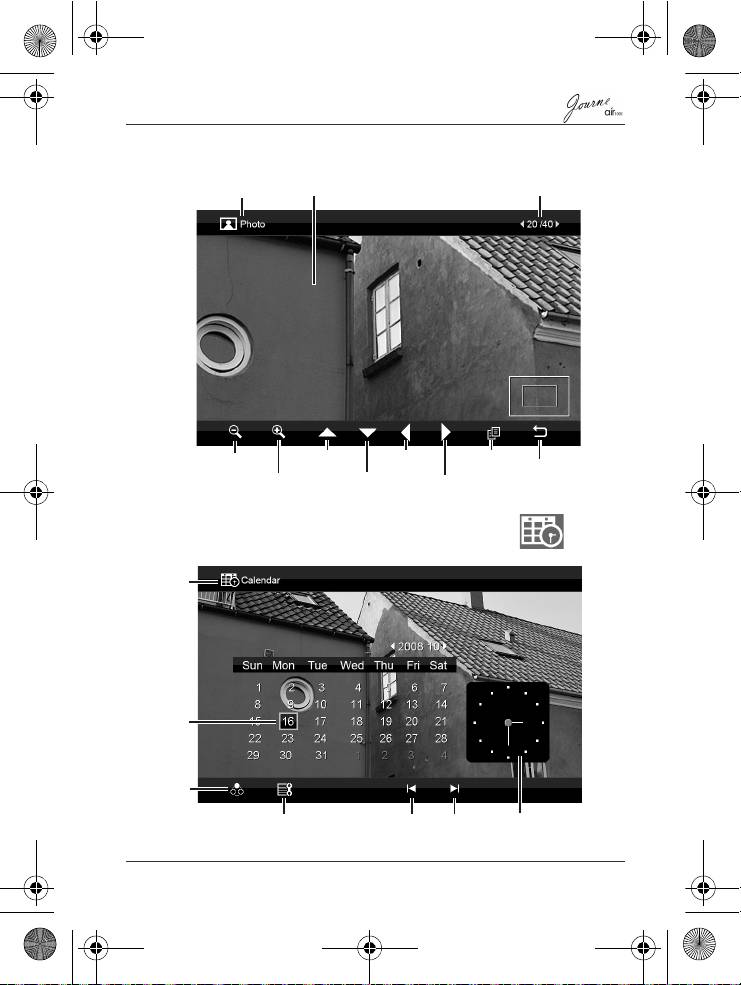
Zooming the photo
Controls on the Calendar menu
Quick Start Guide
EN-13
Current file number/
Current mode
LCD screen
Total number of files
Move up
Move left
Copy
Zoom out
Return
Zoom in
Move down
Move right
Current
mode
Current
date
Mode
selection
Set up date/time, alarm time
Previous
Next
Current time
and backlight saving function
month
month
Air1000-QSG-EEMEA-V1-1208.book Page 13 Tuesday, November 18, 2008 11:54 PM
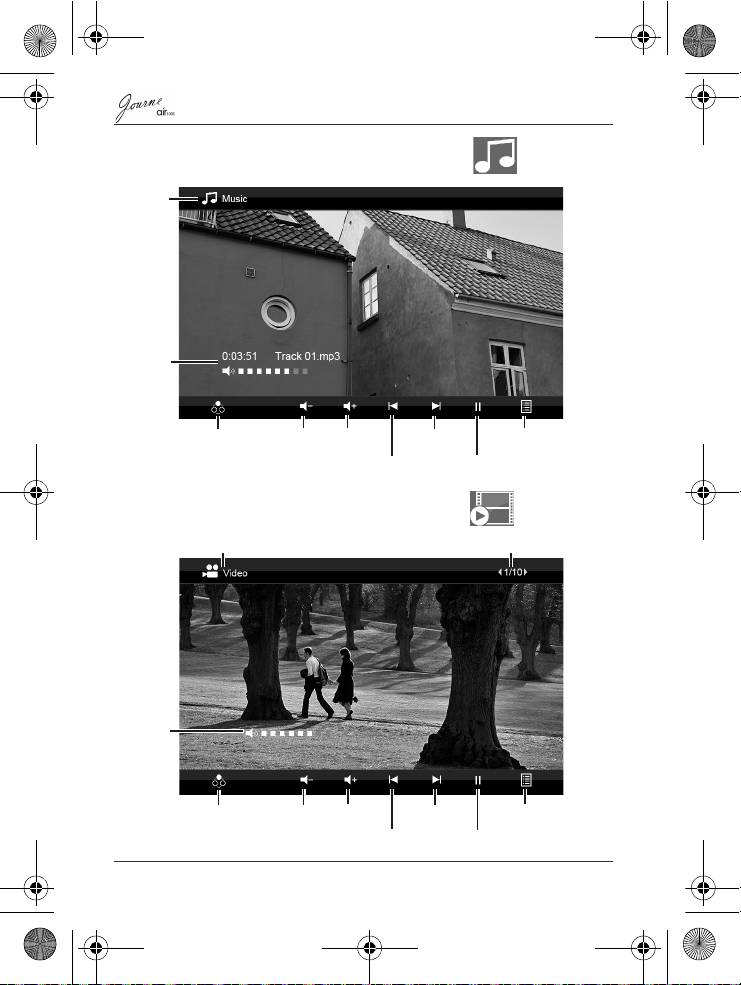
Controls on the Music menu
Controls on the Video menu
EN-14
Quick Start Guide
Current
mode
Track
name, its
elapsed
time and
volume
level
Mode
Volume
Volume
Next file
Music list
selection
down
up
Previous file
Play/Pause
Current mode
Current file number/Total number of files
Volume
level
Mode selection Next file
Volume
Volume
Video thumbnail list
down
up
Previous file
Play/Pause
Air1000-QSG-EEMEA-V1-1208.book Page 14 Tuesday, November 18, 2008 11:54 PM
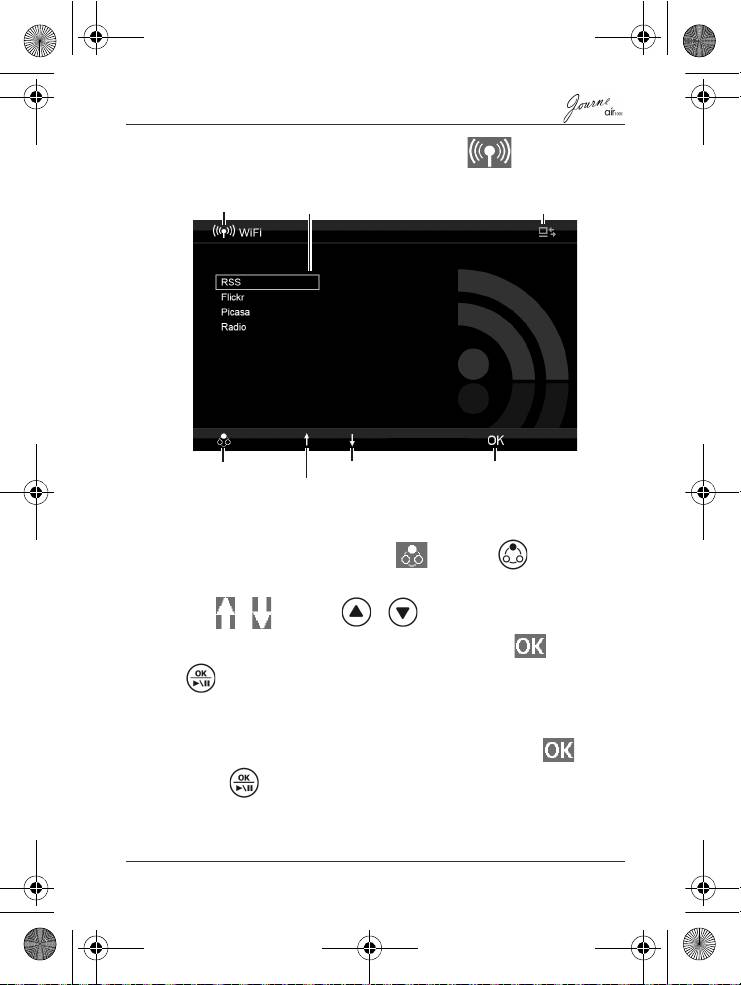
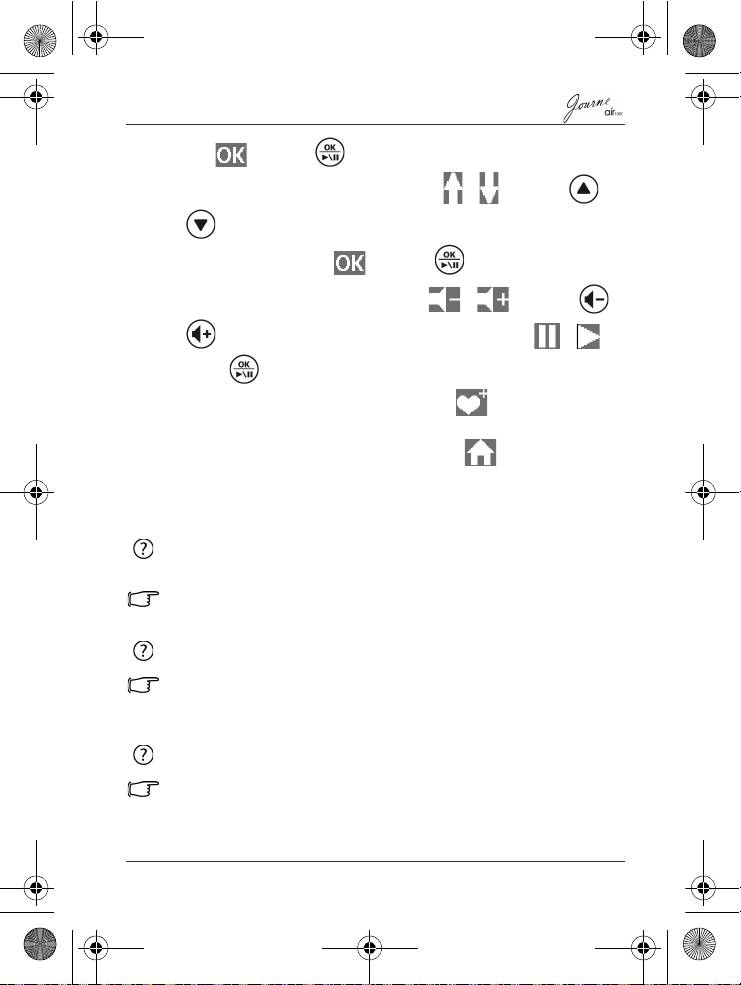
Controls on the WiFi menu
Using WiFi-enabled services
1. After you turn on the unit, tap or press on the
remote control to enter the WiFi mode.
2. Tap / or press / on the remote control to
select a service you want to use, and then tap or press
on the remote control.
3. A message asking you to connect to an access point shows.
Confirm the task and then a list of available WiFi stations
appears on the screen. Select one station and tap or
press on the remote control to start the connection.
Quick Start Guide
EN-15
Supported WiFi-enabled
WiFi icon
services
WiFi connection status
Mode selection
Move down
Confirm selection
Move up
Air1000-QSG-EEMEA-V1-1208.book Page 15 Tuesday, November 18, 2008 11:54 PM
Air1000-QSG-EEMEA-V1-1208.book Page 16 Tuesday, November 18, 2008 11:54 PM
• indicates that this station is password-protected. You will have
to enter its password and/or set up its security level/settings
accordingly.
• indicates the current signal strength of the selected station.
4. After successful connection, continue to use the selected WiFi
service.
This unit supports IEEE 802.11 b/g connectivity with WPA/WPA2-PSK.
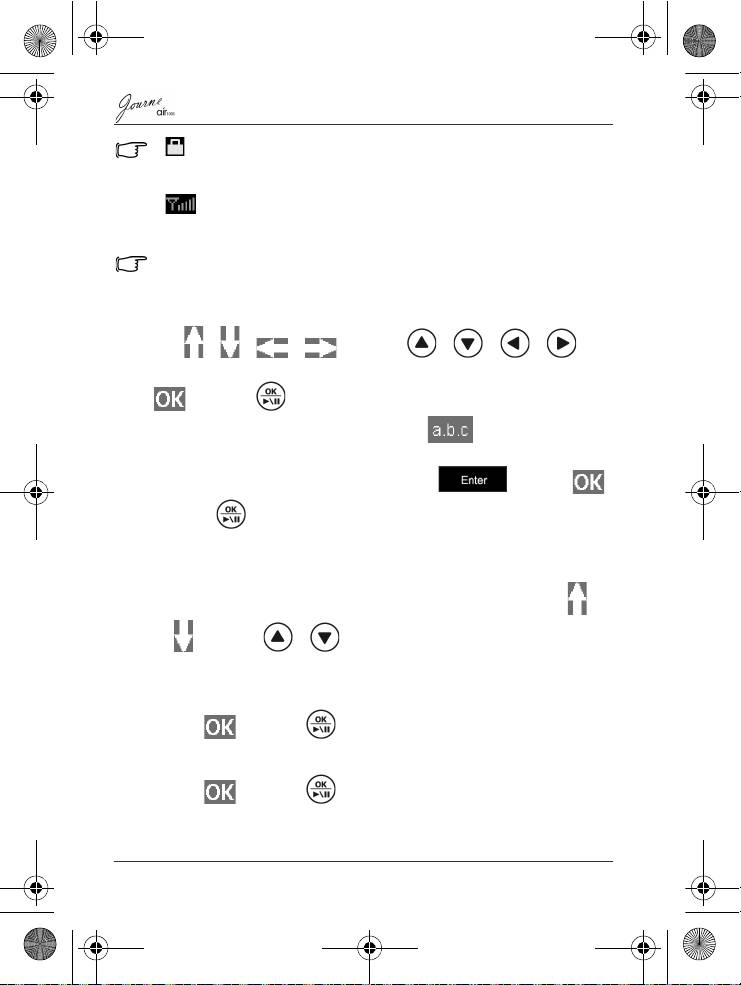
To use the on-screen keypad:
Tap / / / or press / / / on
the remote control to move to the letter/symbol you want, and tap
or press on the remote control to enter the letter/
symbol. To change input methods, tap repeatedly to
switch among uppercase texts, lowercase texts and numbers.
Upon completion, move the selection to and tap
or press on the remote control to confirm inputs.
RSS
1. A list of preset RSS entries appears on the screen. Tap /
or press / on the remote control to select a
preferred entry.
Or
Tap or press on the remote control in the Add box.
Enter a desired RSS feed directory using the keypad below.
2. Tap or press on the remote control.
EN-16
Quick Start Guide

Air1000-QSG-EEMEA-V1-1208.book Page 17 Tuesday, November 18, 2008 11:54 PM
3. A list of RSS titles appears to the left. Tap / or press
/ on the remote control to preview the contents of
each title to the right. To view details of the selected title, tap
or press on the remote control.
To return to the WiFi service menu, tap .
Flickr / Picasa
1. Tap or press on the remote control in the Add
Flickr / Picasa Account box. Enter an account name or
keywords containing part of the account name using the
keypad below.
2. Tap or press on the remote control. A list of possible
accounts appears on the screen. Tap / or press /
on the remote control to select the account you want to
visit, and then tap or press on the remote control.
• indicates that this account is password-protected. You will have
to enter its password and/or set up its security level/settings
accordingly.
• To start a new search, tap .
3. If the selected account contains more than one folder, tap /
or press / on the remote control to select a
desired folder, and then tap or press on the remote
control to open the folder.
Quick Start Guide
EN-17
Air1000-QSG-EEMEA-V1-1208.book Page 18 Tuesday, November 18, 2008 11:54 PM
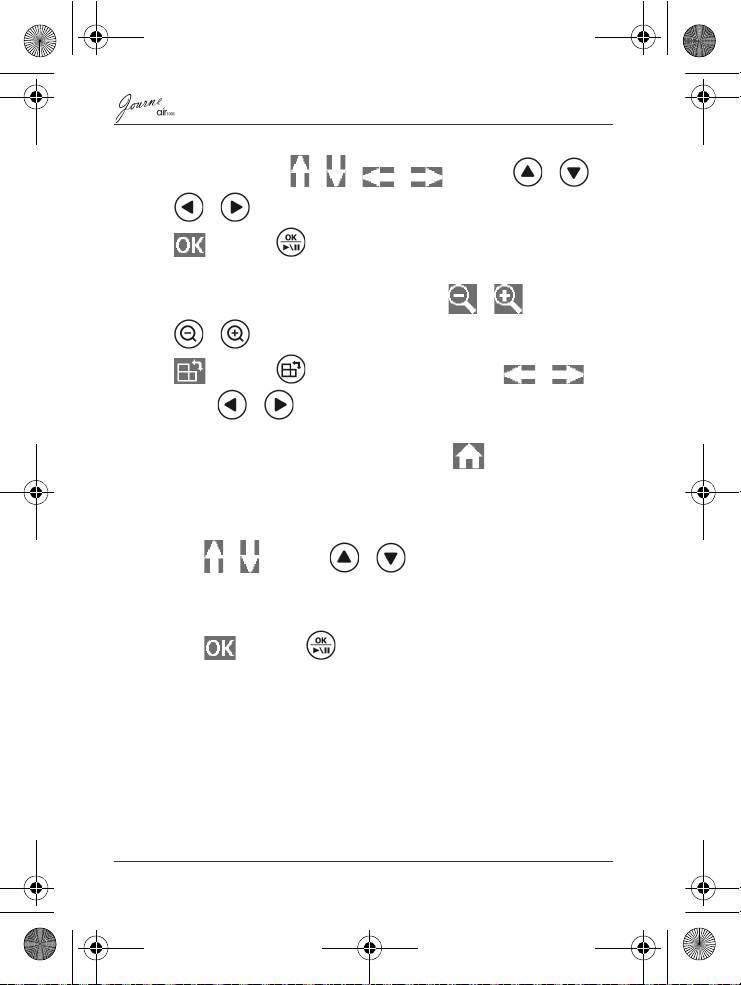
4. Photos existed in the folder appear on the screen as
thumbnails. Tap / / / or press / /
/ on the remote control to select a photo and tap
or press on the remote control to view the photo in
full screen.
5. To zoom in/out the selected photo, tap / or press
/ on the remote control. To rotate this photo, tap
or press on the remote control. Tap / or
press / on the remote control to view the previous/
next photo.
To return to the WiFi service menu, tap .
Radio
1. A list of preset music genres appears on the screen.
Tap / or press / on the remote control to
select a preferred genre.
Or
Tap or press on the remote control in the Search
box. Enter a radio station name or keywords containing part of
the station name using the keypad below.
EN-18
Quick Start Guide
Air1000-QSG-EEMEA-V1-1208.book Page 19 Tuesday, November 18, 2008 11:54 PM
2. Tap or press on the remote control. A list of possible
stations appears on the screen. Tap / or press /
on the remote control to select the station you want to
tune in, and then tap or press on the remote control.
3. Playback of the station starts. Tap / or press /
on the remote control to adjust volume. Tap / or
press on the remote control to pause/resume playback.
To add this station to My Favorite, tap . It will then appear
in the My Favorite list next time.
To return to the WiFi service menu, tap .
Frequently asked questions
After copying photos, how can I check if files are already stored in
this unit?
Once photos are copied, a confirmation message will appear on
the screen.
What memory card types are compatible with the unit?
Secure Digital™ Card (SD), xD-Picture Card™ (xD), Multi Media
Card™ (MMC), Memory Stick™ (MS), and Memory Stick Pro™
(MS Pro) memory card types are compatible with the unit.
Why do some pictures load faster than others?
Higher resolution pictures load slower. Using a lower resolution
when taking pictures will speed up loading time.
Quick Start Guide
EN-19
Air1000-QSG-EEMEA-V1-1208.book Page 20 Tuesday, November 18, 2008 11:54 PM
TOSHIBA support
Need help?
For the latest driver updates, user's manuals & FAQs please
have a look at the TOSHIBA options & services support page:
computers.toshiba.eu/options-support
Please see computers.toshiba.eu/options-warranty
for the TOSHIBA hotline numbers.
Regulatory information
EU conformity statement
This product is CE marked in
accordance with the requirements of
the applicable EU Directive (1999/
05/EC, R&TTE). Responsible for
CE-marking is Toshiba Europe
GmbH, Hammfelddamm 8, 41460
Neuss, Germany. A copy of the
official Declaration of Conformity can
be obtained from the following
website:
http://epps.toshiba-teg.com
Indication of the countries
This device is for use in:
AT, BE, CZ, CY, DK, EE, FI, FR, DE, EL, HU, IE, IT, LV, LT, LU,
MT, NL, PL, PT, SK, SI, ES, SE, UK, IS, NO, CH, LI
Some restrictions may apply. For further information see user
documentation.
EN-20
Quick Start Guide
