Toshiba Gigaframe Q-Series: инструкция
Раздел: Аксессуары для фото- и видеотехники
Тип:
Инструкция к Toshiba Gigaframe Q-Series
Оглавление
- Введение Содержание
- Правила техники безопасности
- Далее изложен порядок установки и эксплуатации устройства. Действие 1: проверка компонентов Требования к системе:
- Передние органы управления Задние органы управления
- Действие 2: установка регулируемой подставки
- Действие 3: подключение адаптера переменного тока.
- Действие 4 (факультативно): установка карты памяти.
- Действие 5: включение устройства.
- Действие 6: работа с устройством.
- Установка съёмной рамки
- Работа в фоторежиме Работа в режиме календаря
- Работа в режиме музыки Работа в видеорежиме
- Дополнительные средства (присутствуют только в модели PA3650*-1ET2) Встроенная батарея
- Встроенный датчик наклона Встроенный датчик освещения
- Ответы на типичные вопросы
- Техническая поддержка TOSHIBA Информация о соответствии законодательным требованиям
- Условия применения
- Другие условия, не связанные с электромагнитной совместимостью Изложенная далее информация актуальна только в странах-членах ЕС
- Утилизация батарей и/или аккумуляторов
GMH300038010_EEU.book Page 1 Friday, June 20, 2008 12:18 AM
User’s Manual
Gigaframe
(PA3650*)
computers.toshiba-europe.com

GMH300038010_EEU.book Page 2 Friday, June 20, 2008 12:18 AM
Gigaframe (PA3650*)
Introduction
Welcome and thank you for choosing a TOSHIBA product.
Table of Contents
Safety Instructions . . . . . . . . . . . . . . . . . . . . . . . . . . . . . . . . . . . . . . . . 3
Before operating this unit (Gigaframe), please carefully read
and follow the instructions below.. . . . . . . . . . . . . . . . . . . . . . . . . . . . 3
Follow the instructions below to install and operate the unit. . . . . . . . 4
Step 1: Check the components . . . . . . . . . . . . . . . . . . . . . . . . . . . 4
System Requirements: . . . . . . . . . . . . . . . . . . . . . . . . . . . . . . . 4
Controls on the front . . . . . . . . . . . . . . . . . . . . . . . . . . . . . . . . . 5
Controls on the back. . . . . . . . . . . . . . . . . . . . . . . . . . . . . . . . . 5
Step 2: Install the adjustable foot stand. . . . . . . . . . . . . . . . . . . . . 6
Step 3: Connect the AC power.. . . . . . . . . . . . . . . . . . . . . . . . . . . 7
Step 4: (Optional) Insert a memory card. . . . . . . . . . . . . . . . . . . . 8
Step 5: Turn on the unit. . . . . . . . . . . . . . . . . . . . . . . . . . . . . . . . . 9
Step 6: Operate the unit. . . . . . . . . . . . . . . . . . . . . . . . . . . . . . . . 10
Installing the changeable frame. . . . . . . . . . . . . . . . . . . . . . . . . . 11
Using the Photo mode . . . . . . . . . . . . . . . . . . . . . . . . . . . . . . 12
Using the Calendar mode . . . . . . . . . . . . . . . . . . . . . . . . . . . . 12
Using the Music mode . . . . . . . . . . . . . . . . . . . . . . . . . . . . . . 13
Using the Video mode . . . . . . . . . . . . . . . . . . . . . . . . . . . . . . 13
Additional features (available on PA3650*-1ET2 only) . . . . . . . . 14
Built-in battery. . . . . . . . . . . . . . . . . . . . . . . . . . . . . . . . . . . . . 14
Built-in tilt sensor . . . . . . . . . . . . . . . . . . . . . . . . . . . . . . . . . . 15
Built-in light sensor . . . . . . . . . . . . . . . . . . . . . . . . . . . . . . . . . 15
Frequently asked questions. . . . . . . . . . . . . . . . . . . . . . . . . . . . . 16
TOSHIBA support . . . . . . . . . . . . . . . . . . . . . . . . . . . . . . . . . . . . . . . . 17
Regulatory Information. . . . . . . . . . . . . . . . . . . . . . . . . . . . . . . . . . . . 17
EU Conformity Statement . . . . . . . . . . . . . . . . . . . . . . . . . . . . . . 17
Working Environment . . . . . . . . . . . . . . . . . . . . . . . . . . . . . . . . . 18
Additional environments not related to EMC . . . . . . . . . . . . . . . . 18
Following information is only valid for EU-member states. . . . . . 19
Disposal of products . . . . . . . . . . . . . . . . . . . . . . . . . . . . . . . . 19
Disposal of batteries and/or accumulators . . . . . . . . . . . . . . . 20
EN-2 User’s Manual
GMH300038010_EEU.book Page 3 Friday, June 20, 2008 12:18 AM
Gigaframe (PA3650*)
Safety Instructions
Before operating this unit (Gigaframe), please
carefully read and follow the instructions
below.
n The operating temperature is between 0 and 40 degrees Celsius.
n Do not use or store this unit in the environments listed below:
n Direct sunlight
n A high-humidity area such as bathroom
n Dusty places
n Next to an air conditioner, electric heater or other heat sources
n In a closed car that is in direct sunlight
n Unstable locations
n If this unit becomes wet, wipe it with a dry cloth as soon as
possible.
n Salt or seawater may cause severe damage to this unit.
n Do not use solvents (such as alcohol) to clean this unit.
n If the screen is dirty, use a lens brush or soft cloth to clean the
screen.
n To prevent electric shock, do not attempt to disassemble or repair
this unit by yourself.
n Water may cause a fire or electric shock. Therefore, store this unit
in a dry place.
n Do not use this unit outdoors when it is raining or snowing.
n Do not use this unit in or near water.
n If a foreign substance or water gets in this unit, please turn the
power off immediately and disconnect the power adapter. Next,
remove the foreign substance or water, and then send it to your
nearest service center.
User’s Manual EN-3
GMH300038010_EEU.book Page 4 Friday, June 20, 2008 12:18 AM
Gigaframe (PA3650*)
Follow the instructions below to install and
operate the unit.
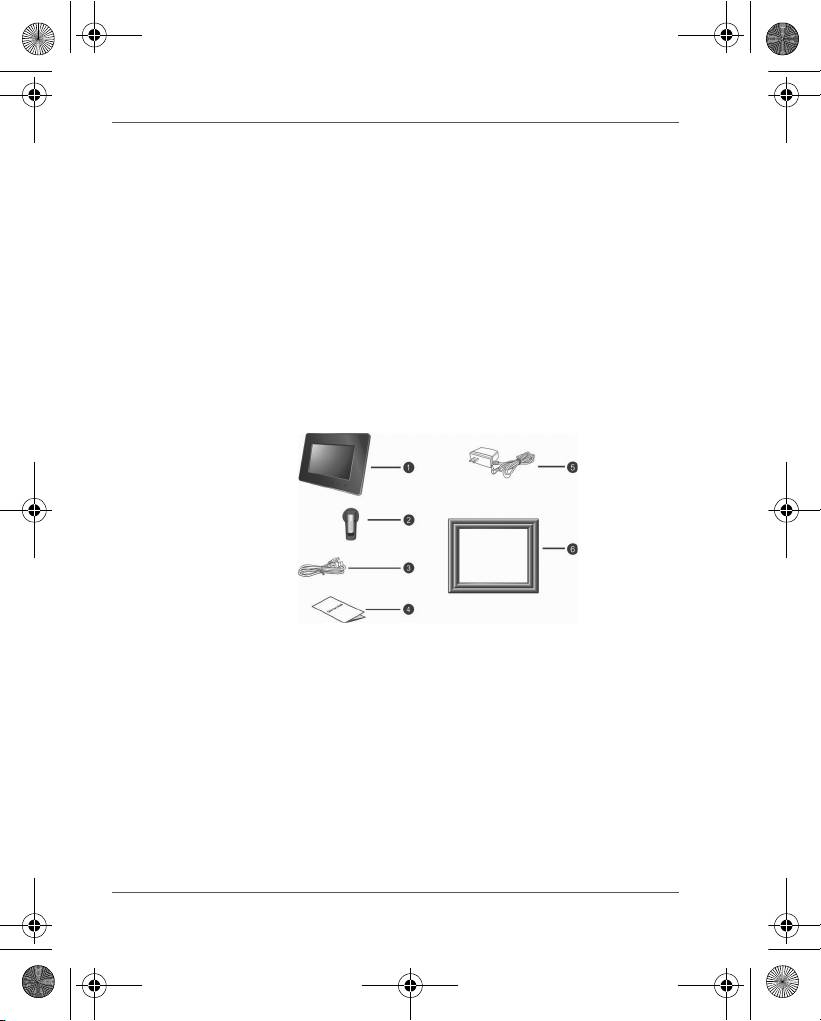
Step 1: Check the components
Carefully open the packing box and ensure that you have the
following items.
1. Gigaframe
2. Adjustable foot stand
3. USB cable
4. User’s Manual
5. AC power adapter
6. Changeable frame
System Requirements:
n USB 2.0 interface
n Windows 2000/XP/Vista
EN-4 User’s Manual
Gigaframe (PA3650*)
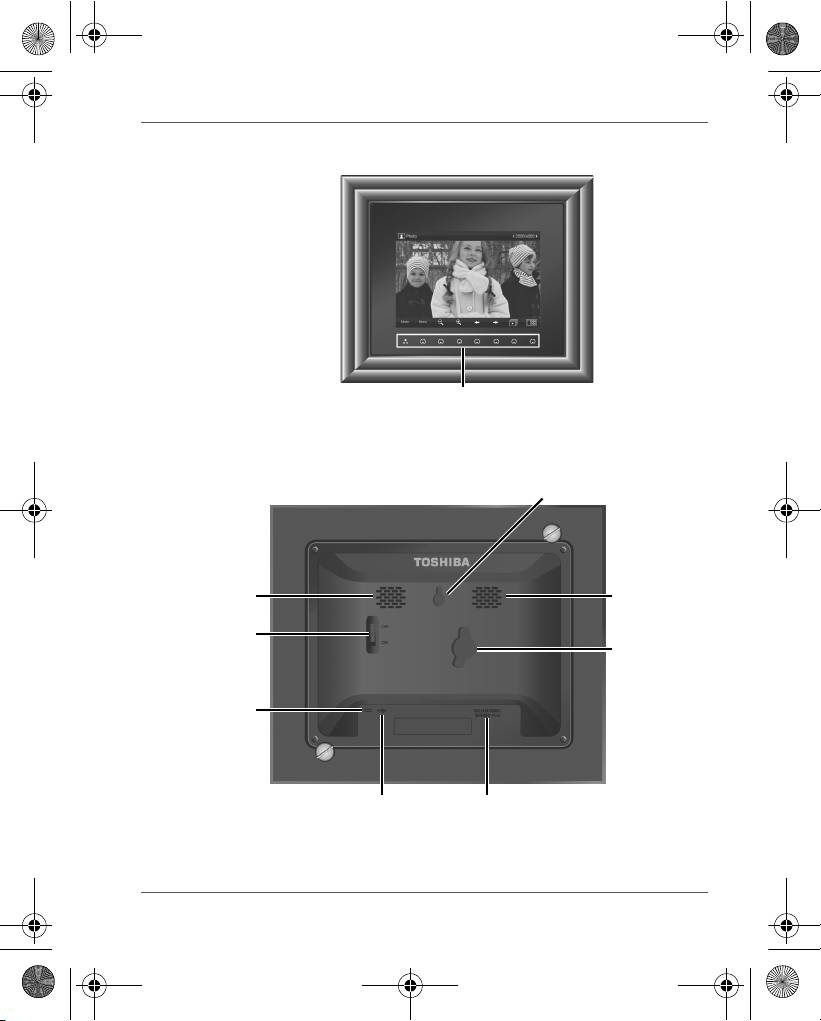
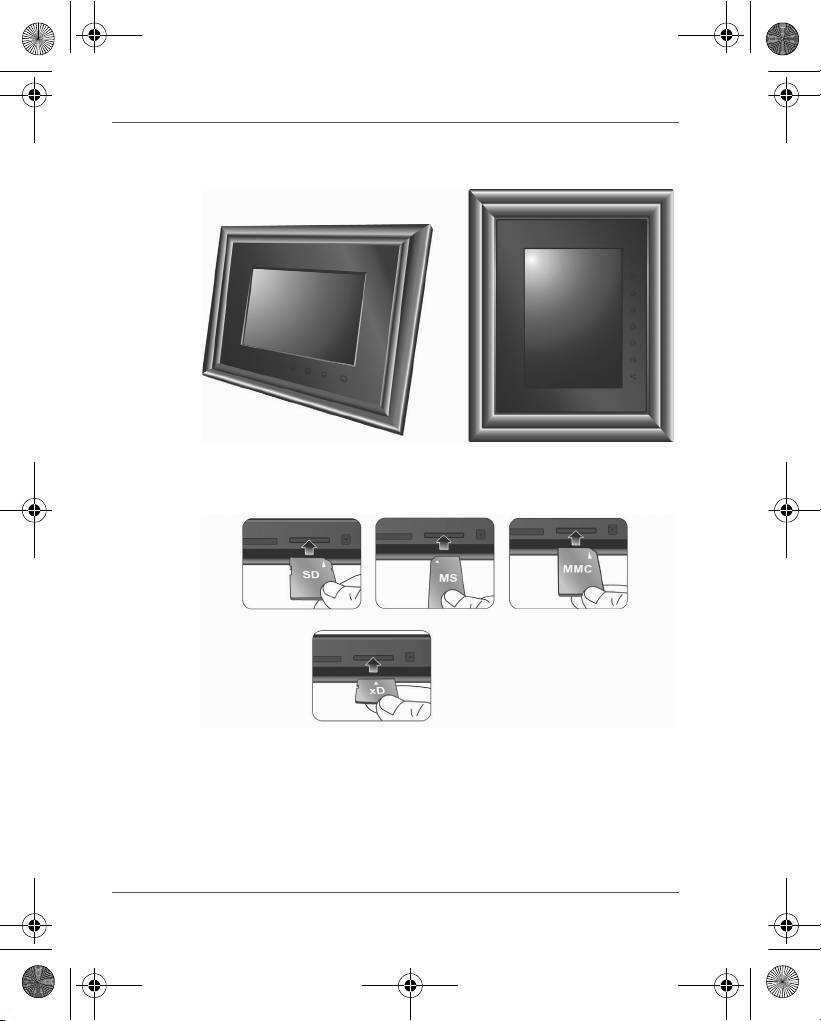
Controls on the front
Controls on the back
User’s Manual EN-5
Control panel
Hanging slot
Speaker
Speaker
Power switch
Lock slot
Power jack
USB jack (for connecting to a
5-in-1 card slot:
computer so the computer can edit
SD/xD/MMC/MS/MS Pro
files in the unit)
GMH300038010_EEU.book Page 5 Friday, June 20, 2008 12:18 AM
Gigaframe (PA3650*)
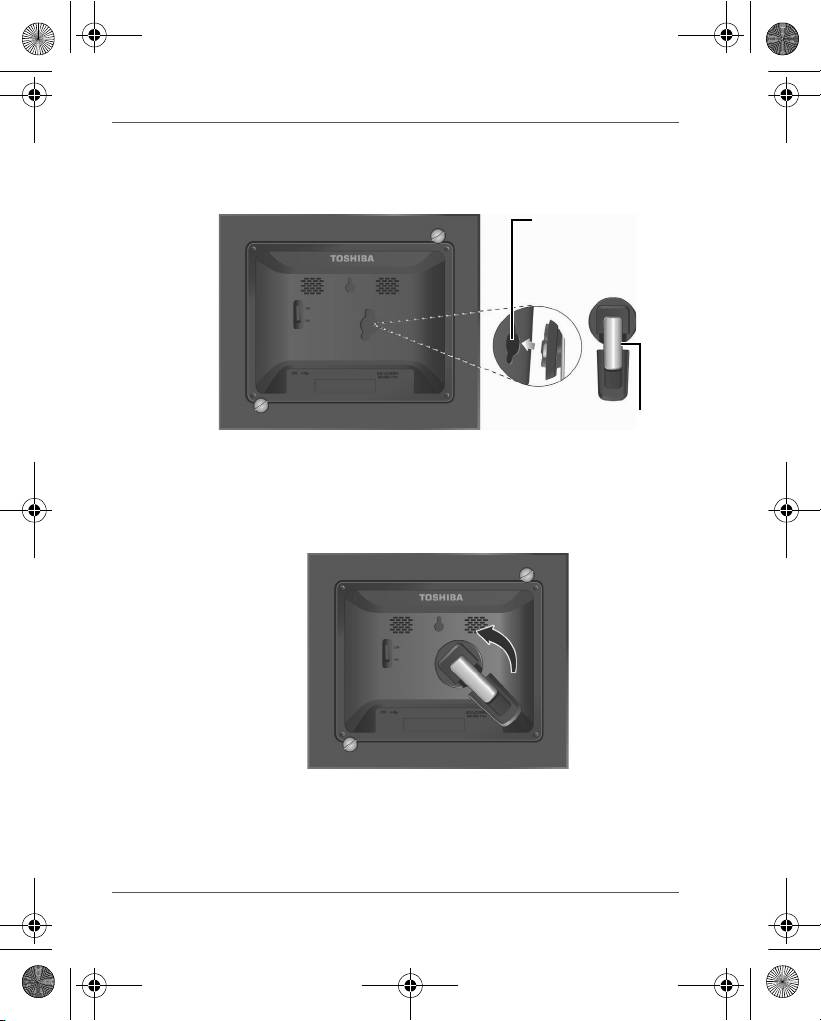
Step 2: Install the adjustable foot stand.
1. On the back of the unit, attach the foot stand to the lock slot.
2. To place the photo frame vertically, rotate the foot stand counter-
clockwise until it is secured to the photo frame.
EN-6 User’s Manual
Lock slot
Adjustable foot stand
GMH300038010_EEU.book Page 6 Friday, June 20, 2008 12:18 AM
GMH300038010_EEU.book Page 7 Friday, June 20, 2008 12:18 AM
Gigaframe (PA3650*)
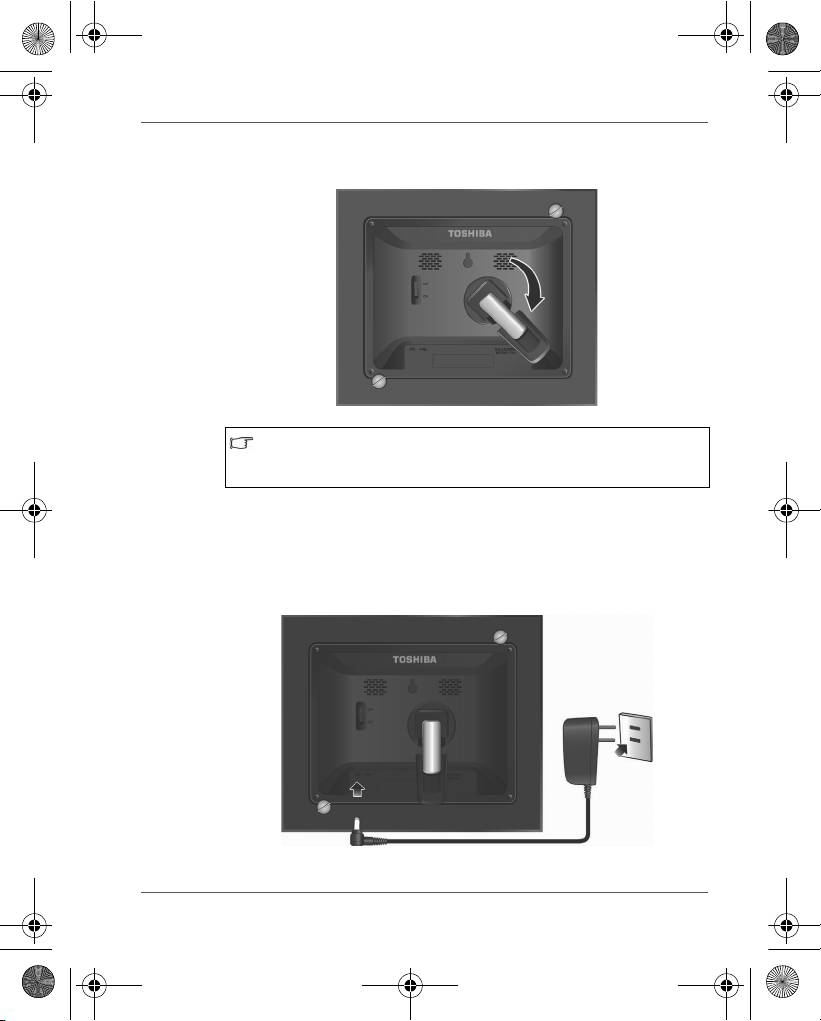
3. To place the photo frame horizontally, rotate the foot stand
clockwise until it is secured to the photo frame.
When the changeable frame is installed or removed, the
required length of the foot stand will vary. Please adjust the
foot stand accordingly.
Step 3: Connect the AC power.
1. Plug one end of the AC power adapter into the power jack on the
back of this unit.
2. Plug the other end into a power outlet.
User’s Manual EN-7
GMH300038010_EEU.book Page 8 Friday, June 20, 2008 12:18 AM
Gigaframe (PA3650*)
3. Place this unit horizontally (recommended direction) or vertically
on a stable surface.
Step 4: (Optional) Insert a memory card.
The unit is preloaded with some demo images and music in the
internal memory. On the back of the unit, you can also insert a
memory card containing the content you want to show on the unit.
EN-8 User’s Manual
Gigaframe (PA3650*)
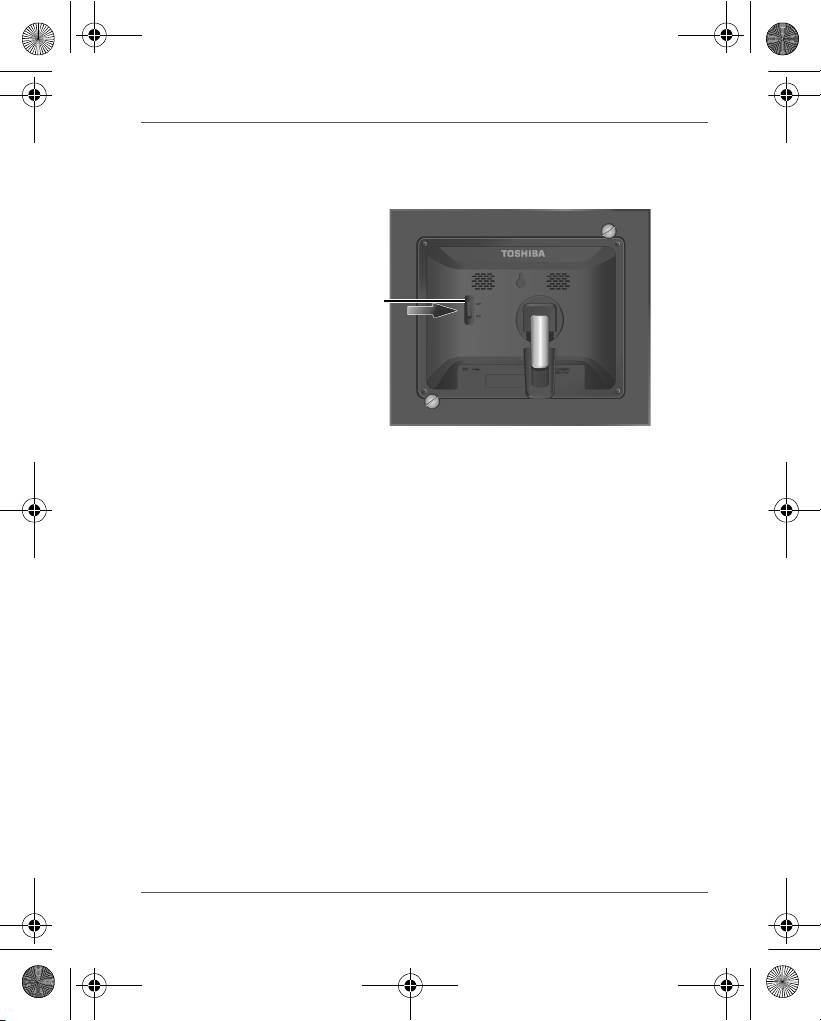
Step 5: Turn on the unit.
Sliding the power switch to ON turns on the unit.
User’s Manual EN-9
Power switch
GMH300038010_EEU.book Page 9 Friday, June 20, 2008 12:18 AM
Gigaframe (PA3650*)
Step 6: Operate the unit.
After the unit is turned on, available functions (represented by name
or icon) show on the screen. Their corresponding buttons also light
up on the control panel for a period of time.
Simply press the corresponding button below (if the unit is placed
horizontally) or beside (if the unit is placed vertically) the name or
icon indicating the function you want to use.
n To toggle among Photo, Calendar, Music, and Video modes,
press under Mode.
n If the control panel is unused for a certain period of time, the LED
turns off automatically. To turn on the backlight again, press
anywhere on the control panel.
EN-10 User’s Manual
Control panel
GMH300038010_EEU.book Page 10 Friday, June 20, 2008 12:18 AM
GMH300038010_EEU.book Page 11 Friday, June 20, 2008 12:18 AM
Gigaframe (PA3650*)
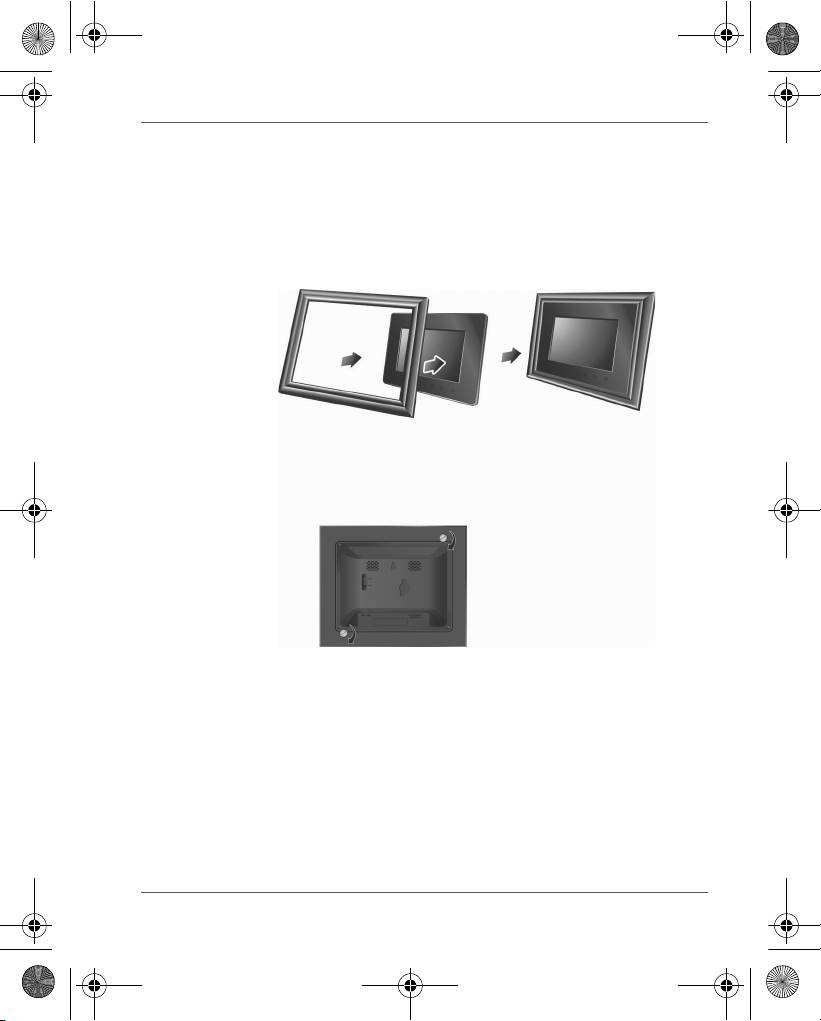
Installing the changeable frame
You can install the changeable frame by following the steps below
easily.
1. Install the changeable frame to the unit.
2. Install the two supplied screws to back of the unit and rotate the
screws clockwise.
User’s Manual EN-11
Gigaframe (PA3650*)
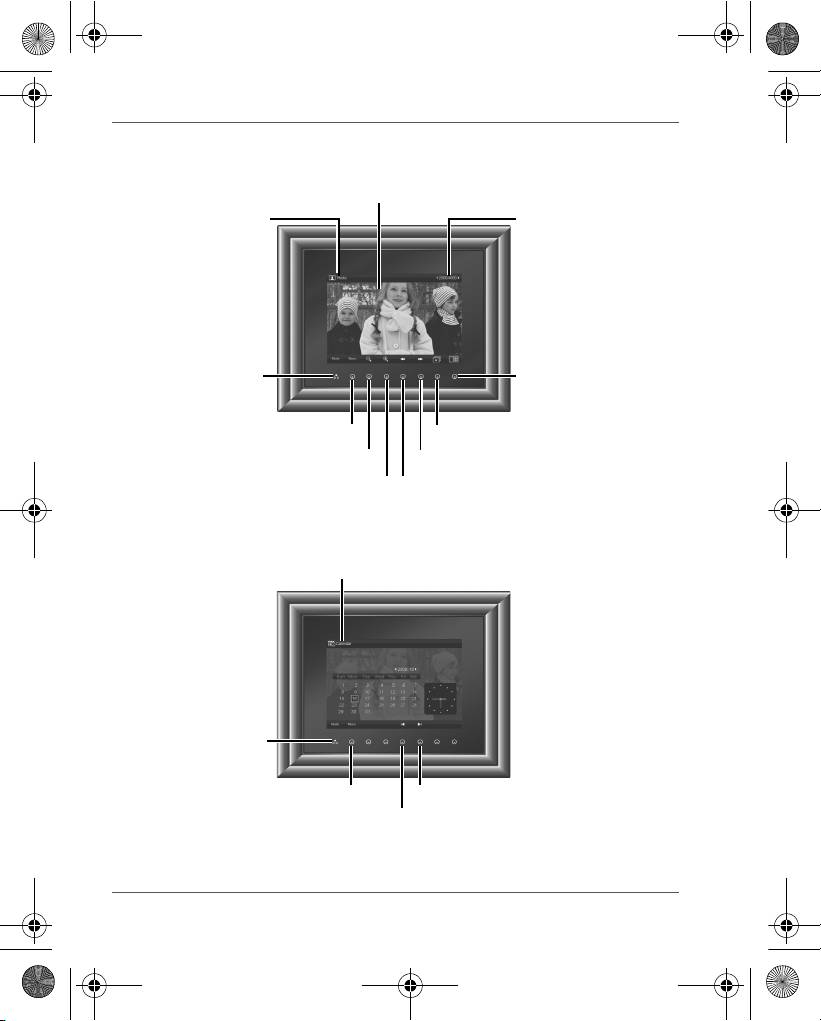
Using the Photo mode
Using the Calendar mode
EN-12 User’s Manual
LCD screen
Current mode
Current file number/Total
number of files
Mode selection Thumbnail view
Menu
Slideshow
Zoom-out
Next file
Zoom-in
Previous file
Current mode
Mode selection
Menu
Next month
Previous month
GMH300038010_EEU.book Page 12 Friday, June 20, 2008 12:18 AM
Gigaframe (PA3650*)
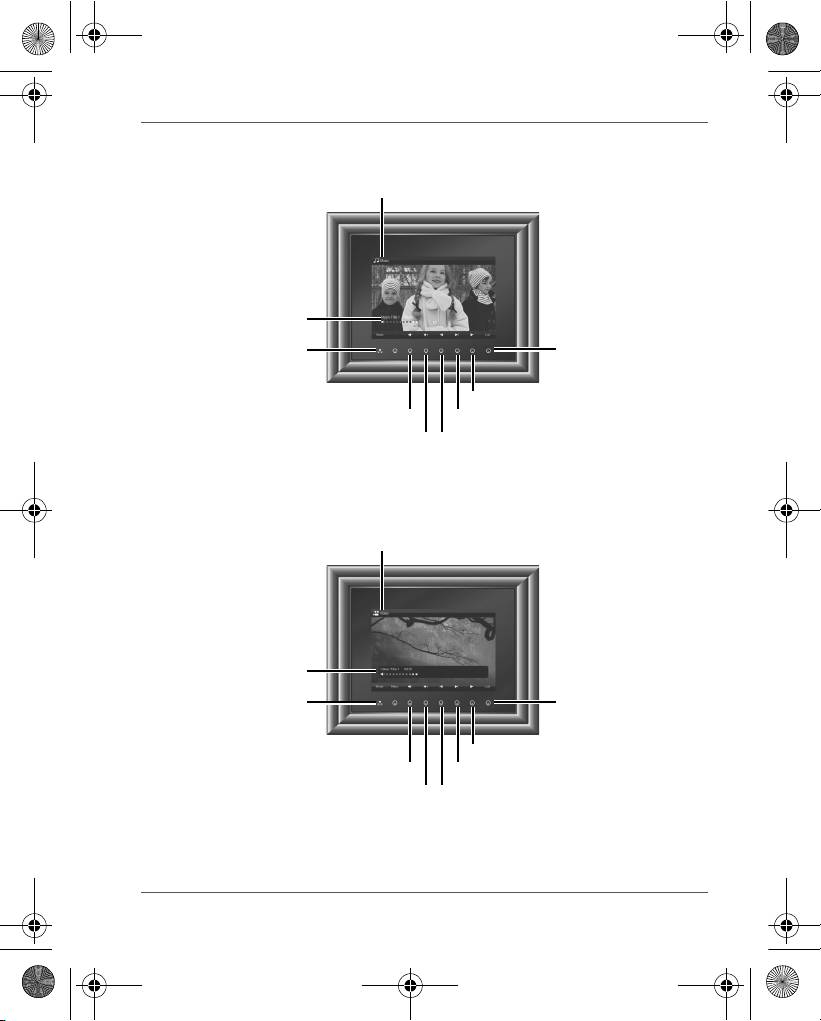
Using the Music mode
Using the Video mode
User’s Manual EN-13
Current mode
Track name, elapsed
time, and volume level
List of all music
tracks and access
Mode selection
to menu
Play or Pause
Volume down
Next track
Volume up
Previous track
Current mode
Video file name,
elapsed time, and
volume level
List of all video files
and access to menu
Mode selection
Play or Pause
Volume down
Next video file
Volume up
Previous video file
GMH300038010_EEU.book Page 13 Friday, June 20, 2008 12:18 AM
GMH300038010_EEU.book Page 14 Friday, June 20, 2008 12:18 AM
Gigaframe (PA3650*)
Additional features (available on PA3650*-1ET2
only)
Built-in battery
On the PA3650*-1ET2 model, the photo frame is equipped with a
built-in lithium polymer battery.
To charge the battery, follow the steps below:
1. Connect one end of the AC power adapter to the power jack on
the back of the photo frame.
2. Connect the other end to a power outlet.
3. Place the photo frame horizontally or vertically on a stable
surface, and then keep the power connected until the battery is
fully charged.
n When the battery charge is running out of power, a warning
message will appear on the screen. Charge the battery as
described above.
n The fully charged battery usually lasts about 30 minutes,
depending on your use and settings.
n Power system and plug types may vary depending on your
country/region.
Do not disassemble or modify the battery.
EN-14 User’s Manual
Gigaframe (PA3650*)
Built-in tilt sensor
On the PA3650*-1ET2 model, the photo frame has a built-in tilt
sensor that allows the photo frame to determine its own orientation
relative to gravity and thereby automatically switch from displaying
pictures vertically to displaying pictures horizontally.
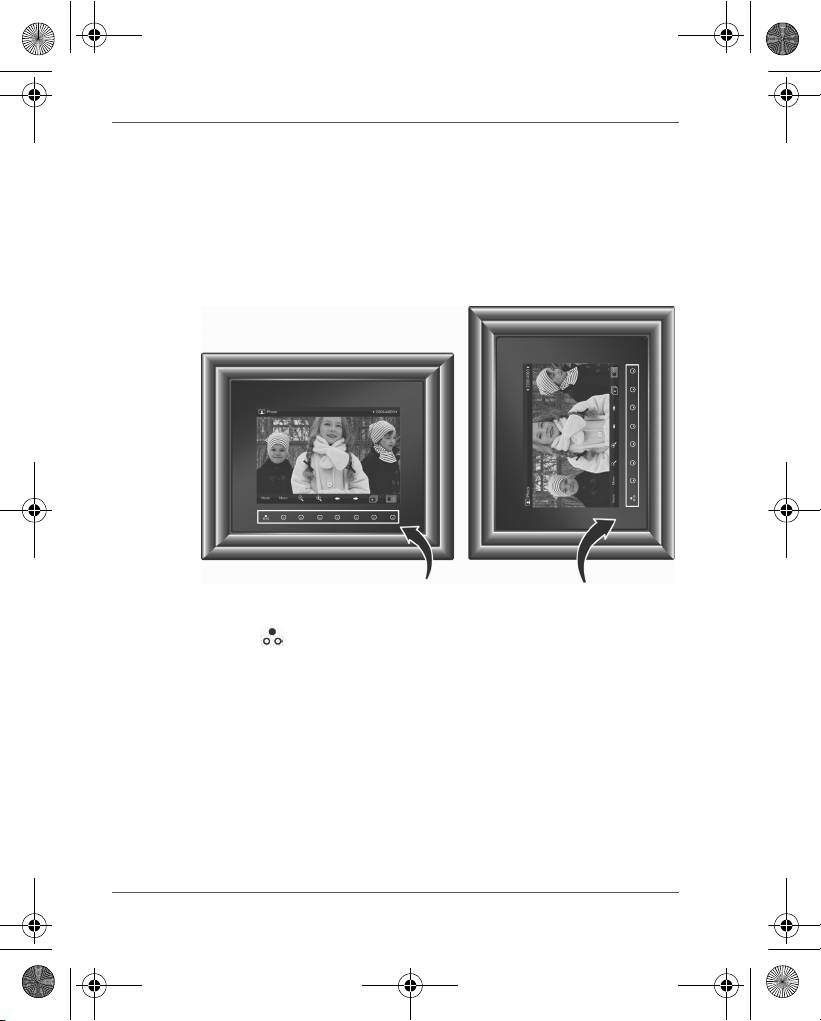
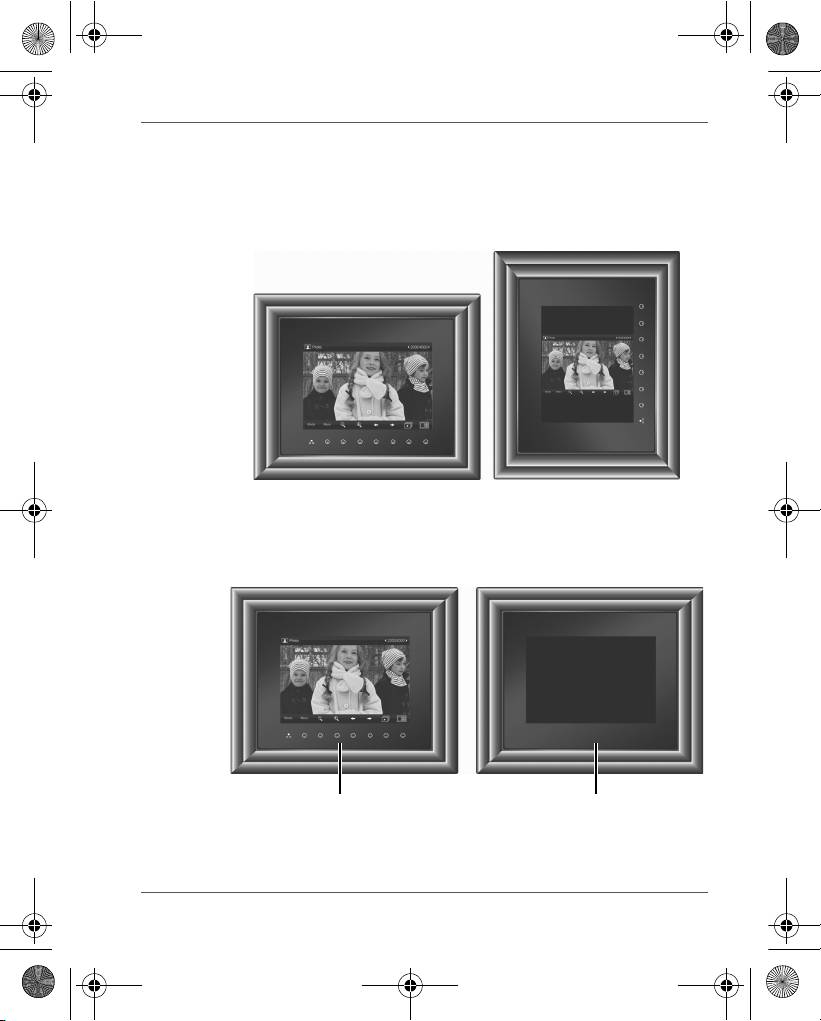
Built-in light sensor
On the PA3650*-1ET2 model, the photo frame has a built-in light
sensor that can automatically turn on/off the panel display, when the
ambient lights in a room are turned on/off.
User’s Manual EN-15
When lights in a room are turn on When lights in a room are turn off
GMH300038010_EEU.book Page 15 Friday, June 20, 2008 12:18 AM

GMH300038010_EEU.book Page 16 Friday, June 20, 2008 12:18 AM
Gigaframe (PA3650*)
Frequently asked questions
After copying photos, how can I check if files are
already stored in this unit?
Once photos are copied, a confirmation message will
appear on the screen.
What memory card types are compatible with the
unit?
Secure Digital™ Card (SD), xD-Picture Card™ (xD),
Multi Media Card™ (MMC), Memory Stick™ (MS), and
Memory Stick Pro™ (MS Pro) memory card types are
compatible with the unit.
Why do some pictures load faster than others?
Higher resolution pictures load slower. Using a lower
resolution when taking pictures will speed up loading
time.
EN-16 User’s Manual
GMH300038010_EEU.book Page 17 Friday, June 20, 2008 12:18 AM
Gigaframe (PA3650*)
TOSHIBA support
Need help?
For the latest driver updates, user manuals & FAQs please have a
look at the TOSHIBA options & services support page:
computers.toshiba.eu/options-support
Please see computers.toshiba.eu/options-warranty
for the TOSHIBA hotline numbers.
Regulatory Information
EU Conformity Statement
“This product and - if applicable - the supplied
accessories too are marked with “CE” and complies
therefore with the applicable harmonized European
standards listed under the EMC Directive 2004/108/
EC and/or the Low Voltage Directive 2006/95/EC.”
Responsible for CE-marking:
TOSHIBA EUROPE GMBH, Hammfelddamm 8,
41460 Neuss, Germany.
Manufacturer:
Toshiba Corporation, 1-1 Shibaura 1-chome,
Minato-ku, Tokyo, 105-8001, Japan
The complete official EU CE Declaration can be
obtained on following internet page:
http://epps.toshiba-teg.com/
User’s Manual EN-17
GMH300038010_EEU.book Page 18 Friday, June 20, 2008 12:18 AM
Gigaframe (PA3650*)
Working Environment
The Electromagnetic Compliance (EMC) of this product has been
verified typically for this product category for a so called Residential,
Commercial & Light Industry Environment. Any other working
environment has not been verified by Toshiba and the use of this
product in these working environments is maybe restricted or cannot
be recommended. Possible consequences of the use of this product
in non verified working environments can be: Disturbances of other
products or of this product in the nearby surrounding area with
temporarily malfunction or data loss/corruption as result. Example of
non verified working environments and related advices:
n Industrial environment (e.g. environments where a mains voltage
of 380V three-phase is being used mainly): Danger of
disturbances of this product due to possible strong
electromagnetic fields especially near to big machinery or power
units.
n Medical environment: The compliance to the Medical Product
Directive has not been verified by Toshiba, therefore this product
cannot be used as a medical product without further verification.
The use in usual office environments e.g. in hospitals should be
no problem if there is no restriction by the responsible
administration.
This product is not certified as a medical product according to the
Medical Product Directive 93/42 EEC.
n Automotive environment: Please search the owner instructions of
the related vehicle for advices regarding the use of this product
(category).
n Aviation environment: Please follow the instructions of the flight
personnel regarding restrictions of use.
Additional environments not related to EMC
Outdoor use: As a typical home/office equipment this product has no
special resistance against ingress of moisture and is not strong
shock proofed.
Explosive atmosphere: The use of this product in such special
working environment (Ex) is not allowed.
EN-18 User’s Manual
GMH300038010_EEU.book Page 19 Friday, June 20, 2008 12:18 AM
Gigaframe (PA3650*)
Following information is only valid for
EU-member states
Disposal of products
The crossed out wheeled dust bin symbol indicates that
products must be collected and disposed of separately
from household waste. Integrated batteries and
accumulators can be disposed of with the product. They
will be separated at the recycling centres.
The black bar indicates that the product was placed on
the market after August 13, 2005.
By participating in separate collection of products and
batteries, you will help to assure the proper disposal of
products and batteries and thus help to prevent potential
negative consequences for the environment and human
health.
For more detailed information about the collection and
recycling programmes available in your country, please
visit our website (http://eu.computers.toshiba-
europe.com) or contact your local city office or the shop
where you purchased the product.
User’s Manual EN-19
GMH300038010_EEU.book Page 20 Friday, June 20, 2008 12:18 AM
Gigaframe (PA3650*)
Disposal of batteries and/or accumulators
The crossed out wheeled dust bin symbol indicates that
batteries and/or accumulators must be collected and
disposed of separately from household waste.
If the battery or accumulator contains more than the
specified values of lead (Pb), mercury (Hg), and/or
cadmium (Cd) defined in the Battery Directive (2006/66/
EC), then the chemical symbols for lead (Pb), mercury
(Hg) and/or cadmium (Cd) will appear below the crossed
out wheeled dust bin symbol.
By participating in separate collection of batteries, you will
help to assure the proper disposal of products and
batteries and thus help to prevent potential negative
consequences for the environment and human health.
For more detailed information about the collection and
recycling programmes available in your country, please
visit our website (http://eu.computers.toshiba-europe.com)
or contact your local city office or the shop where you
purchased the product.
© 2008 TOSHIBA Europe GmbH. All rights reserved.
TOSHIBA reserves the right to make technical changes. TOSHIBA
assumes no liability for damages incurred directly or indirectly from
errors, omissions or discrepancies between this product and the
documentation.
EN-20 User’s Manual
