Toshiba JournE Scan: инструкция
Раздел: Аксессуары для фото- и видеотехники
Тип:
Инструкция к Toshiba JournE Scan
Оглавление
- Важные правила техники безопасности
- n При обращении со шнуром/кабелем питания переменного тока соблюдайте следующие меры предосторожности.
- n Подсоединение шнура/кабеля питания переменного тока
- Введение Проверка компонентов
- Части сканера и их функции Вид спереди Номер Название Функция/описание
- Использование сканера Подготовка Вид сзади Номер Название Функция/описание
- Выполнение сканирования
- ПРИМЕЧАНИЕ.
- Сканирование в цифровую фоторамку Подключение сканера к компьютеру Требования к системе (компьютера) Выполнение подключения
- Более подробная информация Пригодные и непригодные типы оригиналов Ориентация оригинала и сканированного изображения Обрезка сканированных изображений
- Уход и обслуживание Чистка сканера Чистка ролика
- Чистка датчика изображения Калибровка сканера
- Возможные проблемы и способы их решения
- Технические характеристики
- Поддержка TOSHIBA Заявление об авторских правах Отказ от ответственности Товарные знаки
- Заявления о соответствии нормативным требованиям Соответствие требованиям ЕС Условия эксплуатации
- Другие условия, не связанные с электромагнитной совместимостью Изложенная далее информация актуальна только в странах-членах ЕС Утилизация изделий
UM_EEMEA_Scan_1108.book Page 1 Monday, December 15, 2008 2:26 PM
User’s Manual
CZ
RS
FR
RU
GR
SK
HR
SL
HU
TR
PL
AR
2 User’s Manual
EN
UM_EEMEA_Scan_1108.book Page 2 Monday, December 15, 2008 2:26 PM
Table of Contents
Important Safety Instructions . . . . . . . . . . . . . . . . . . . . . . . . . . . . . . . . . . . . . .3
Introduction . . . . . . . . . . . . . . . . . . . . . . . . . . . . . . . . . . . . . . . . . . . . . . . . . . . . .6
Checking the Components . . . . . . . . . . . . . . . . . . . . . . . . . . . . . . . . . . . . . . .6
Parts of the Scanner and Their Functions . . . . . . . . . . . . . . . . . . . . . . . . . . .6
Using the Scanner . . . . . . . . . . . . . . . . . . . . . . . . . . . . . . . . . . . . . . . . . . . . . . .8
Preparation . . . . . . . . . . . . . . . . . . . . . . . . . . . . . . . . . . . . . . . . . . . . . . . . . . .8
Making a Scan . . . . . . . . . . . . . . . . . . . . . . . . . . . . . . . . . . . . . . . . . . . . . . . .9
Scanning to a Digital Photo Frame . . . . . . . . . . . . . . . . . . . . . . . . . . . . . . . .10
Connecting the Scanner to a Computer . . . . . . . . . . . . . . . . . . . . . . . . . . . .10
More Information . . . . . . . . . . . . . . . . . . . . . . . . . . . . . . . . . . . . . . . . . . . . . .11
Care and Maintenance . . . . . . . . . . . . . . . . . . . . . . . . . . . . . . . . . . . . . . . . . . .13
Cleaning the Scanner . . . . . . . . . . . . . . . . . . . . . . . . . . . . . . . . . . . . . . . . . .13
Calibrating the Scanner . . . . . . . . . . . . . . . . . . . . . . . . . . . . . . . . . . . . . . . .14
Troubleshooting . . . . . . . . . . . . . . . . . . . . . . . . . . . . . . . . . . . . . . . . . . . . . . . .15
Specifications . . . . . . . . . . . . . . . . . . . . . . . . . . . . . . . . . . . . . . . . . . . . . . . . . .16
TOSHIBA Support . . . . . . . . . . . . . . . . . . . . . . . . . . . . . . . . . . . . . . . . . . . . . . .17
Copyright Statement . . . . . . . . . . . . . . . . . . . . . . . . . . . . . . . . . . . . . . . . . . . .17
Disclaimer . . . . . . . . . . . . . . . . . . . . . . . . . . . . . . . . . . . . . . . . . . . . . . . . . . . . .17
Trademarks . . . . . . . . . . . . . . . . . . . . . . . . . . . . . . . . . . . . . . . . . . . . . . . . . . . .17
Regulatory Statements . . . . . . . . . . . . . . . . . . . . . . . . . . . . . . . . . . . . . . . . . . .18
CE Compliance . . . . . . . . . . . . . . . . . . . . . . . . . . . . . . . . . . . . . . . . . . . . . . .18
Working Environment . . . . . . . . . . . . . . . . . . . . . . . . . . . . . . . . . . . . . . . . . .18
Additional Environments not Related to EMC . . . . . . . . . . . . . . . . . . . . . . . .19
Following Information is Only for EU-member States . . . . . . . . . . . . . . . . . .19
User’s Manual 3
EN
UM_EEMEA_Scan_1108.book Page 3 Monday, December 15, 2008 2:26 PM
Important Safety Instructions
Please read the following important safety instructions carefully before using this
scanner. Failure to observe these instructions may result in personal injuries or
damages to this scanner.
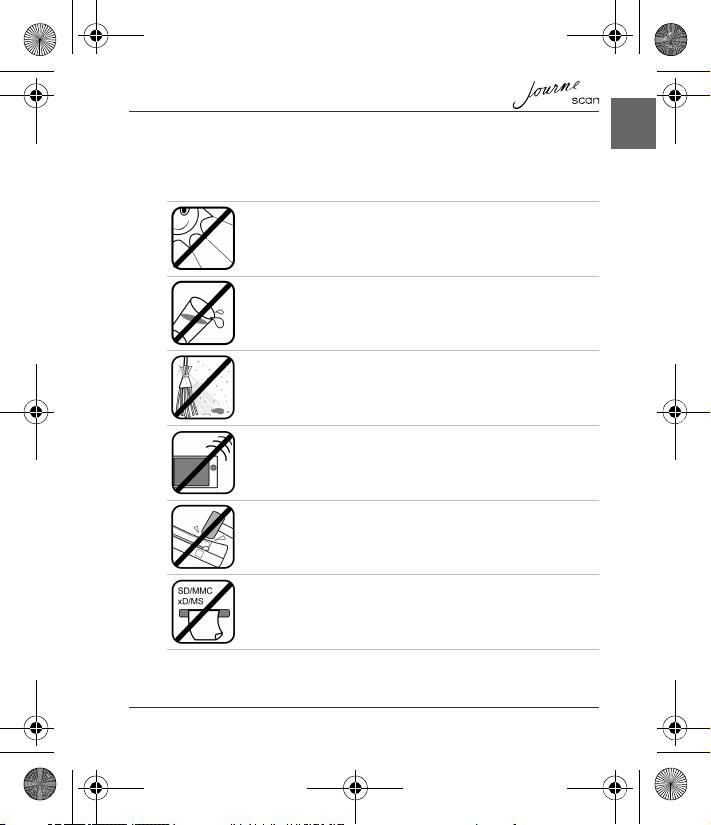
Do not place this scanner under direct sunlight or near heat
sources, such as in a closed car under sunlight or near a stove.
The outer casing of this scanner may become deformed and the
sophisticated sensors inside may become damaged due to
excessive heat.
Do not use this scanner near water, in the rain or allow any liquid
to get inside this product. Water and moisture may cause short-
circuit to the electronic components and lead to malfunctions.
Do not use this scanner in dusty environments. Dust grains may
cover this scanner and scratch the original to be scanned. Do not
scan originals that are contaminated by dusts or other particles.
Do not use this scanner near strong electromagnetic sources,
such as a microwave oven or television. The electromagnetic
interference may cause this scanner to malfunction.
Do not drop or apply shock/vibration to this scanner. Strong
impacts may damage the components inside.
Do not insert objects other than compatible memory cards into the
memory card slots of this scanner. The metal contacts inside the
slots can easily become damaged by foreign objects.
4 User’s Manual
EN
UM_EEMEA_Scan_1108.book Page 4 Monday, December 15, 2008 2:26 PM
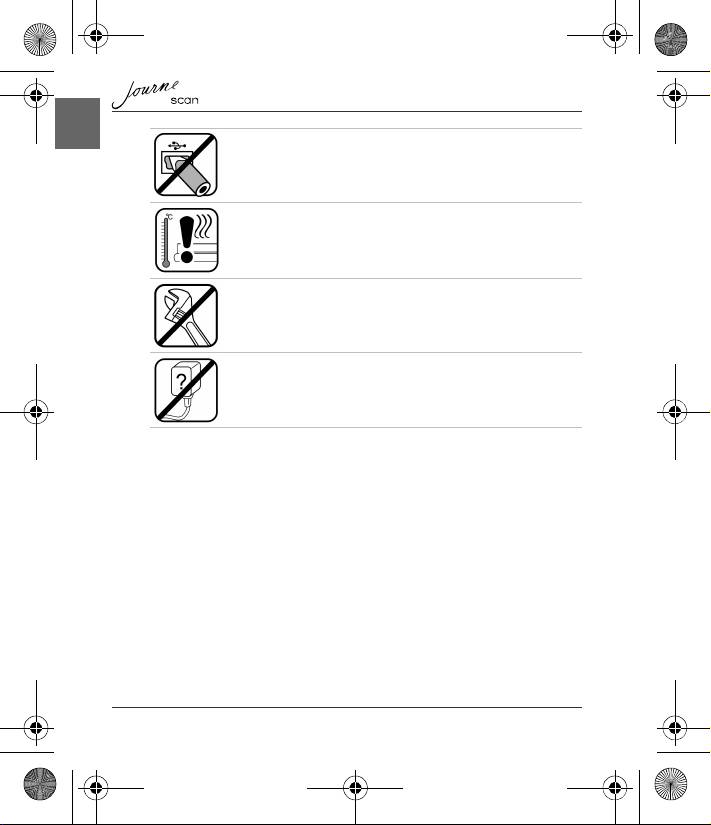
The power socket and USB port on this scanner are designed
solely for connecting to the supplied power adapter and optional
USB cable. Do not insert any other objects into these sockets.
If there are strange odors or heat emitting from this scanner or any
signs of malfunction, disconnect this scanner from the power
immediately and contact your dealer for inspection or service.
Do not attempt to disassemble, modify, tamper with or repair
product (including AC adaptor). Disassembly, modification,
tampering or repairing the product could cause fire or electric
shock, possibly resulting in serious injury. Please contact an
authorized Toshiba service provider for any repair service.
Please pay specail attention to the following when using AC
adaptor and handling the power cable/cord:
n When handling the power cable/cord, follow these precautions:
n Never tamper with the power cable/cord or plug.
n Never splice or alter a power cable/cord.
n Never bend or twist a power cable/cord.
n Never pull on a power cable/cord to remove a plug from a socket.
Always grasp the plug directly.
n Never place heavy objects on a power cable/cord.
n Never run a power cable/cord through a pinch point such as a door or
window.
n Never place a power cable/cord near a heat source.
n Never use nails, staples or similar objects to fasten or attach cord in place.
n Never attempt to disassemble or repair an AC adaptor.
n Doing any of the above may damage the cables, and/or result in a fire or
electric shock, possibly resulting in serious injury.

User’s Manual 5
EN
UM_EEMEA_Scan_1108.book Page 5 Monday, December 15, 2008 2:26 PM
n Attaching the power cable/cord
n Always confirm that the power plug (and extension cable plug if used) has
been fully inserted into the socket, to ensure a secure electrical connection.
Failure to do so may result in a fire or electric shock, possibly resulting in
serious injury.
n Be careful if you use a multiple connector. An overload on one socket could
cause a fire or electric shock, possibly resulting in serious injury.
n If dust gets on the power plug connectors or connector base, turn the power off
and disconnect the power plug. Then clean the connector and/or connector
base with a dry cloth. Continuing to use the product without cleaning the power
plug may result in a fire or an electric shock, possibly resulting in serious injury.
n Always use the TOSHIBA AC adaptor that was provided with your product (that
may have been provided with your product), or use AC adaptors specified by
TOSHIBA to avoid any risk of fire or other damage to the product. Use of an
incompatible AC adaptor could cause fire or damage to the product possibly
resulting in serious injury. TOSHIBA assumes no liability for any damage
caused by use of an incompatible adaptor or charger.
n Never plug the AC adaptor into a power source that does not correspond to
both the voltage and the frequency specified on the regulatory label of the unit.
Failure to do so could result in a fire or electric shock, possibly resulting in
serious injury.
n Always use or purchase power cables/cords that comply with the legal voltage
and frequency specifications and requirements in thecountry of use. Failure to
do so could result in a fire or electric shock, possibly resulting in serious injury.
n Never attempt to connect or disconnect a power plug with wet hands. Failure to
follow this instruction could result in an electric shock, possibly resulting in
serious injury.
n Never allow any liquids to spill into any part of your product, and never expose
the product to rain, water, seawater or moisture. Exposure to liquid or moisture
can cause electric shock or fire, resulting in damage or serious injury. If any of
these eventualities should accidentally occur, immediately:
n Turn off the product.
n Disconnect the AC adaptor from the power plug socket and product.
Do not turn on the power again, until you have taken the product to an
authorized service center. Failure to follow these instructions could result in
serious injury or permanent damage to the product.
6 User’s Manual
EN
Introduction
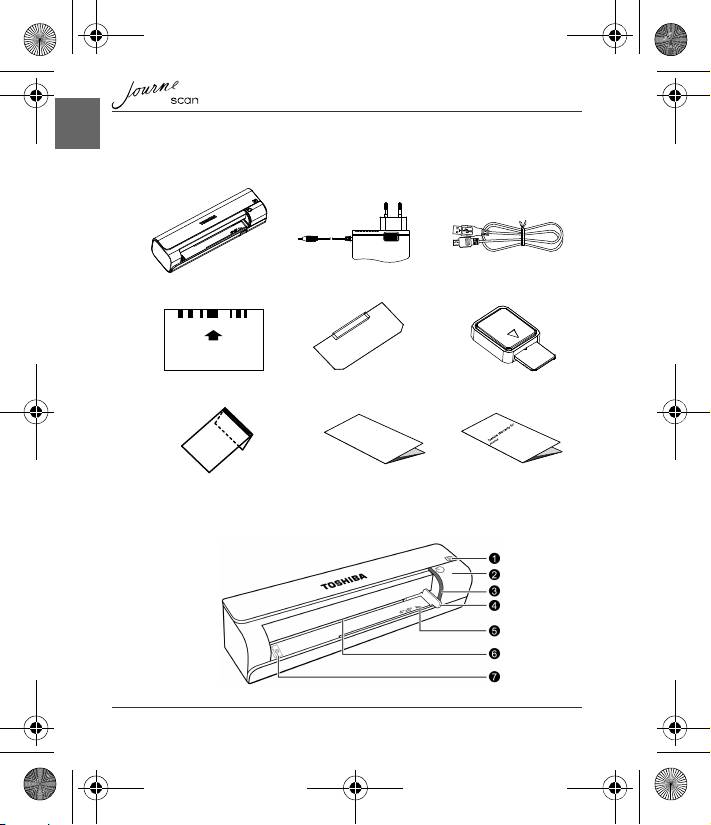
Checking the Components
Parts of the Scanner and Their Functions
Calibrate
調整
/
校准
/
校正
/ Calibrer / Kalibrieren / Calibra / Calibrar
Journe Scan AC Adapter USB Cable
Calibration Card Roller cleaning sheet Sensor cleaning swab
User’s Manual Warranty leafletProtective Sheath
Front view
UM_EEMEA_Scan_1108.book Page 6 Monday, December 15, 2008 2:26 PM

User’s Manual 7
EN
No. Name Function/description
Status/card
Indicates the operating status of the scanner and
indicator
memory card.
Press this button to turn the power on or off.
Press and hold this button for 5 seconds to enter
Power button
cleaning mode. See “Cleaning the Scanner” on
page 13.
Power indicator Indicates the power status of the scanner.
Used to guide the material to be scanned to ensure
Paper guide
the alignment.
Slide the paper guide to this position when scanning
4" x 6" mark
4" x 6" photos.
Feeding slot Insert an original into this slot to begin scanning.
Orientation mark Indicates the correct original orientation.
No. Name Function/description
SD/xD/MMC/MS
Accepts the following types of memory cards: SD, xD,
card slot
MMC and MS.
Output slot The scanned original comes out from this slot.
CF card slot Accepts a Type I CF card.
For connecting to a computer (or digital photo frame)
Mini USB socket
via a USB cable.
Power socket For connecting to the supplied power adapter.
1
2
3
4
5
6
7
Rear view
1
2
3
4
5
UM_EEMEA_Scan_1108.book Page 7 Monday, December 15, 2008 2:26 PM
8 User’s Manual
EN
UM_EEMEA_Scan_1108.book Page 8 Monday, December 15, 2008 2:26 PM
Using the Scanner
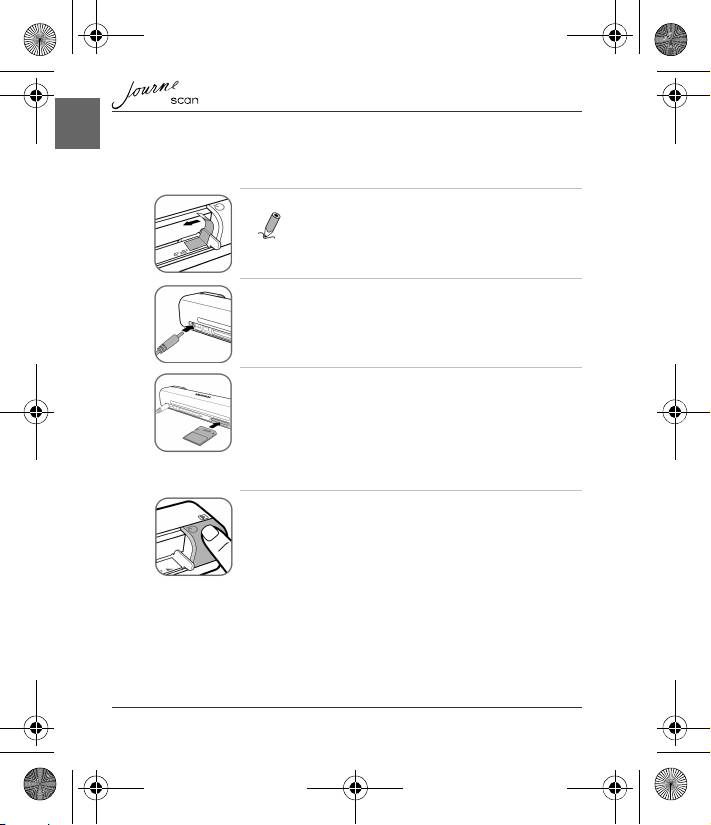
Preparation
1. Peel off the tape that secures the guide lever.
NOTE: This step is only required when you use the
scanner for the first time.
2. Connect the plug on the power adapter cable to the power
socket on the scanner. Plug the power adapter into a power
outlet.
3. Insert an unlocked (writable) memory card into a suitable
memory card slot.
• If both slots are occupied, the scanner will take the following priority when
storing the scanned images: SD (MMC) > CF > xD > MS
4. Press the Power button. The Power indicator blinks. Wait
until the Power indicator stops blinking and then goes off.
The Status/card indicator will light up instead, indicating that
the scanner is ready.
User’s Manual 9
EN
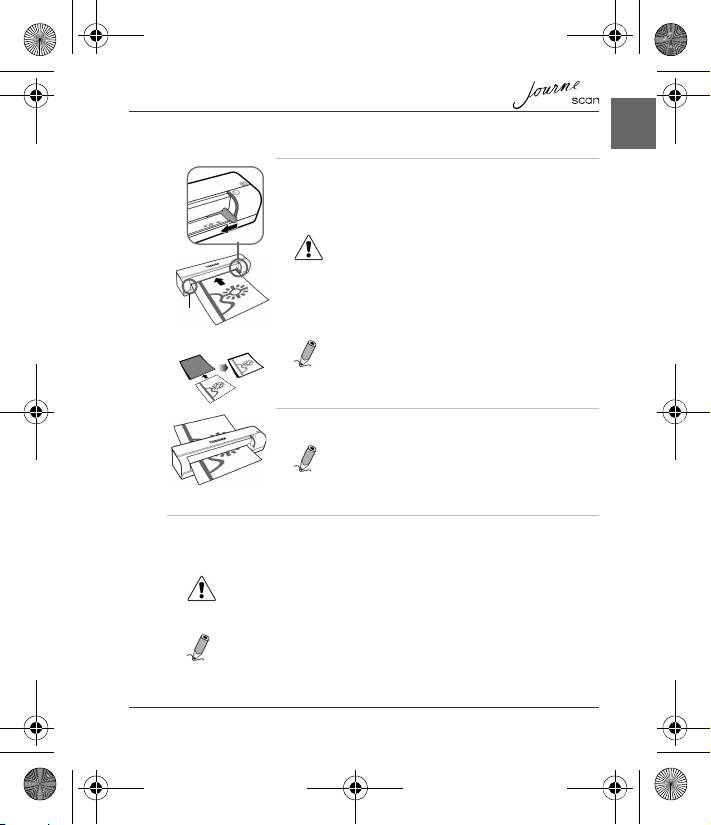
Making a Scan
1. With the side to be scanned facing upward and in correct
orientation as indicated by the orientation mark, place one
edge of the original on the scanner and adjust the guide
lever so that the original aligns against the left side of the
feeding slot. Insert the original into the feeding slot.
CAUTION: Do not scan glossy photos in humid
environments (humidity higher than 70% RH). Otherwise
the surface of the photo will become sticky and cause the
scanner to jam.
NOTE: For your older, fragile photographs, we
suggest to use the supplied protective sheath before
scanning.
2. The original will be fed into the slot and scanned
automatically.
NOTE: If the protective sheath is used, insert it with
the folded side first into the feeding slot of the scanner.
See “More Information” on page 11 for how to insert
photos and other types of originals.
3. When scanning is completed, the Power and Status/card indicators will keep
blinking for a while, indicating that the scanner is processing the image and
storing the file. Wait until the indicators stop blinking before inserting and
scanning the next original.
CAUTION:
Insert only one sheet at a time. Insert the next original only when the previous
one is done. Otherwise the scanner will fail to function normally.
NOTE:
n Do not remove the memory card or disconnect the power supply while the
indicators are blinking.
Align left
UM_EEMEA_Scan_1108.book Page 9 Monday, December 15, 2008 2:26 PM
10 User’s Manual
EN
UM_EEMEA_Scan_1108.book Page 10 Monday, December 15, 2008 2:26 PM
n This scanner only supports output images in JPEG (.jpg) format, and the
date/time mark will not be added.
n For more information on how this scanner stores the scanned image files on
the memory card, see “Orientation of the original and scanned image” on
page 12.
n If the memory card is near full (lower than 1MB), the Status/card indicator
blinks. Use another card or delete some files on it if necessary.
4. To turn off the scanner after all originals are scanned, press
and hold the Power button for 1 second. The power indicator
will blink and then go off.
Scanning to a Digital Photo Frame
By connecting this photo scanner to a compatible digital photo frame, the
scanned images will be transferred to and displayed on the digital photo frame
automatically.
NOTE: This function requires a compatible digital photo frame (visit
www.computers.toshiba-europe.com for information about purchasing the digital
frame and using this function).
Connecting the Scanner to a Computer
By connecting the scanner to a computer, you can access the scanned images on
the memory card directly, or use the scanner as a memory card reader.
System requirements (for computer)
n Operating system: Windows: Windows 2000, XP or Vista.
n An available USB 1.1 or 2.0 port
User’s Manual 11
EN
UM_EEMEA_Scan_1108.book Page 11 Monday, December 15, 2008 2:26 PM
Making connection
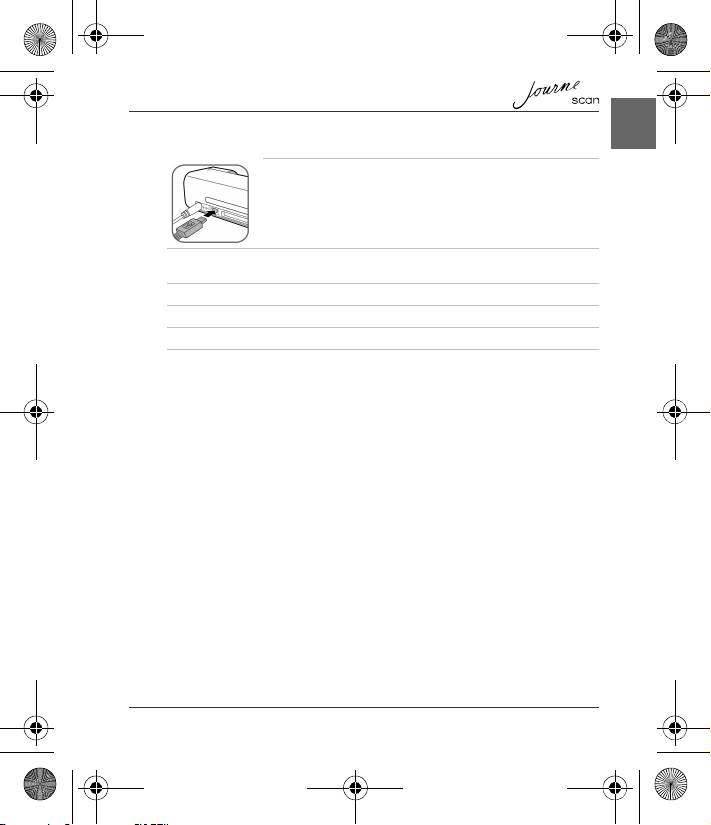
1. Connect one end of the USB cable (with a Mini USB
connector) to the Mini USB socket on the scanner.
2. Turn on the computer, and connect the other end of the USB cable to the USB
port of the computer.
3. Insert an unlocked (writable) memory card into a suitable memory card slot.
4. Connect the power supply to the scanner.
5. Press the Power button. The Power indicator blinks.
6. The scanner will be recognized by the computer as a removable disk
(Windows system). Now you are ready to manipulate the files on the memory
card.
More Information
Suitable and unsuitable types of originals
This scanner is designed to obtain the best scanning results for the following
types of originals:
n 3.5"x5" and 4"x6" photos
n Name cards
12 User’s Manual
EN
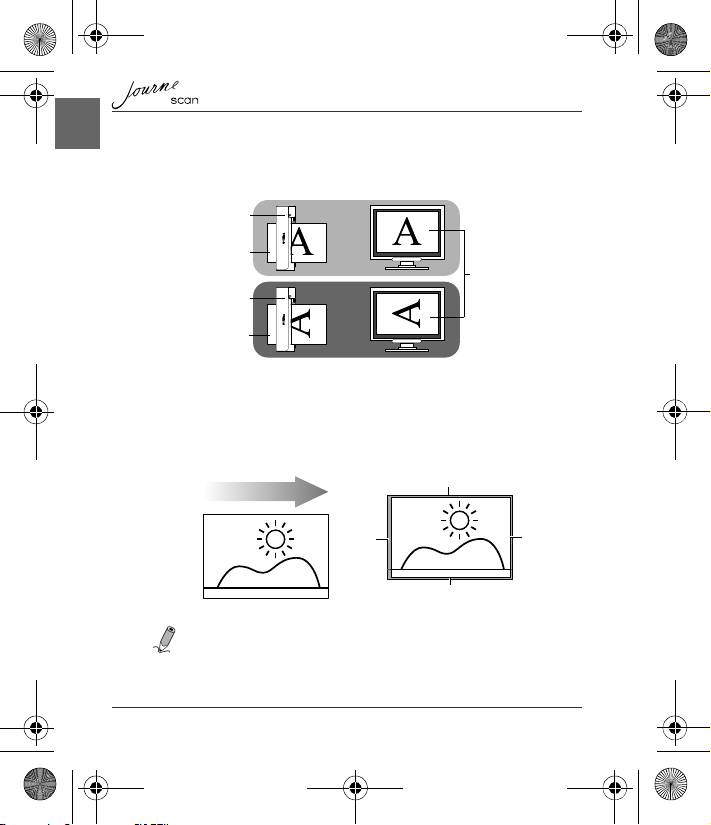
Orientation of the original and scanned image
Please refer to the illustrations below for the relationship between the orientation
of the original when scanning and that of the scanned image when displayed on
the computer screen.
Cropping on scanned images
In order for the scanner to determine the correctness of the scanned image data,
some cropping on the scanned image may occur. Please refer to the illustration
below.
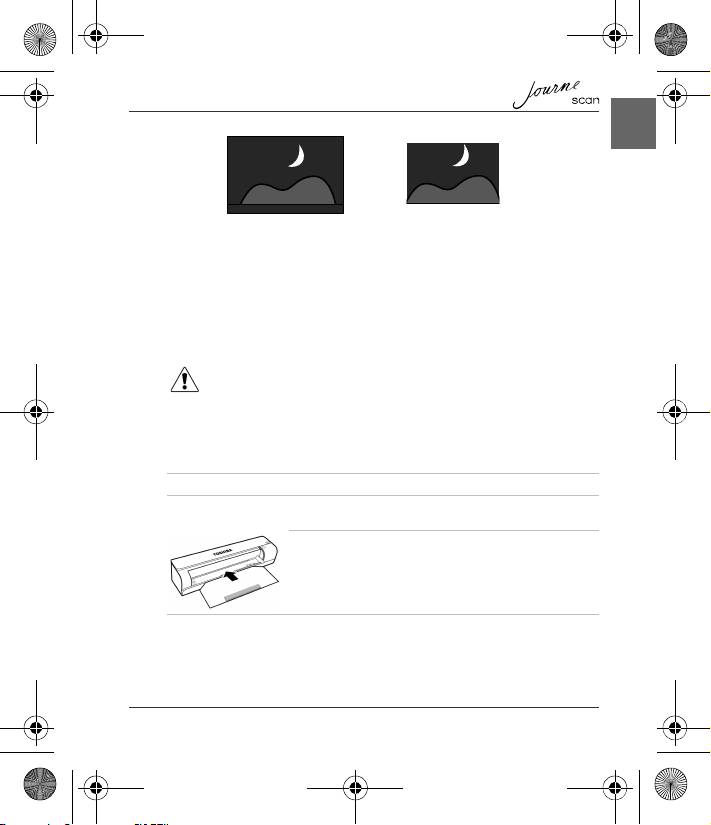
NOTE: When scanning darker originals (for example, a photo of the night
sky), over-cropping may occur. Please insert the original in a different
direction (orientation) and try again.
Scanner
Original
Scanned image
when displayed
on-screen
Scanner
Original
Cropping size (as measured on the original)
Max. 1.5mm
Scanning direction
Max.
2.5mm
Max.
1.5mm
Max. 1.5mm
Original
Scanned image
UM_EEMEA_Scan_1108.book Page 12 Monday, December 15, 2008 2:26 PM
User’s Manual 13
EN
Care and Maintenance
Cleaning the Scanner
In order to maintain the scanned image quality and prevent dust accumulation, it
is recommended that you clean the scanner (outer casing, image sensor and
roller inside the scanner) regularly (about every 150-200 scans) using only the
recommended and supplied tools.
CAUTION: Do not use any tools other than the supplied ones to clean the
image sensor and roller inside the scanner. Otherwise they will be permanently
damaged. Make sure that there is no visible dust on the cleaning tool before
using.
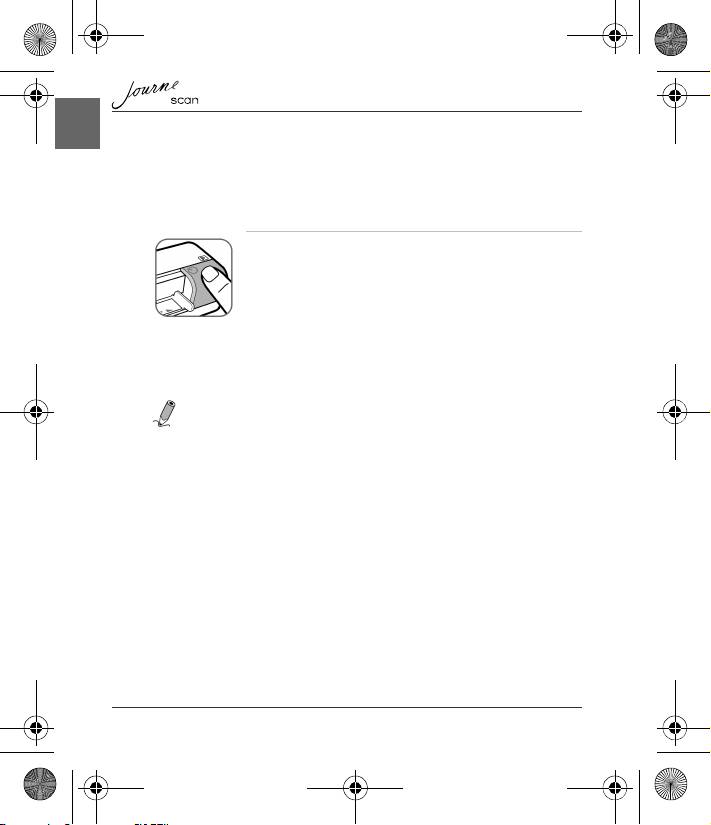
Cleaning the roller
Scanned image (over-
Original
cropped)
UM_EEMEA_Scan_1108.book Page 13 Monday, December 15, 2008 2:26 PM
1. Connect the power supply to the scanner.
2. With scanner power off, press and hold the Power button for 5 seconds. The
scanner will enter cleaning mode.
3. Insert the supplied roller cleaning sheet as shown.
Note the direction of the black sponge on the sheet
when inserting.
4. The cleaning sheet will be brought into the feeding slot automatically, and the
cleaning process will begin.
14 User’s Manual
EN
UM_EEMEA_Scan_1108.book Page 14 Monday, December 15, 2008 2:26 PM
5. When the cleaning process is completed, the cleaning sheet will be ejected
from the feeding slot, and the Power indicator will go off. Remove the cleaning
sheet, and keep it away from dust.
Cleaning the image sensor
1. With the scanner power off and disconnected from
the power supply, insert the sensor cleaning swab
into one end of the output slot.
2. Gently slide the sensor cleaning swab to the other
end of the output slot. Repeat two or three times
consecutively.
3. Remove the sensor cleaning swab, store it in a safe place and keep it away
from dust.
Calibrating the Scanner
If the scanned image looks fuzzy or there are strange stripes on it, then the
scanner needs to be calibrated in order for the sensor to resume its original
precision. To calibrate the scanner:
1. Follow the instructions on how to clean the roller and image sensor, and then
follow the instructions in “Preparation” on page 8 to prepare the scanner for
scanning.
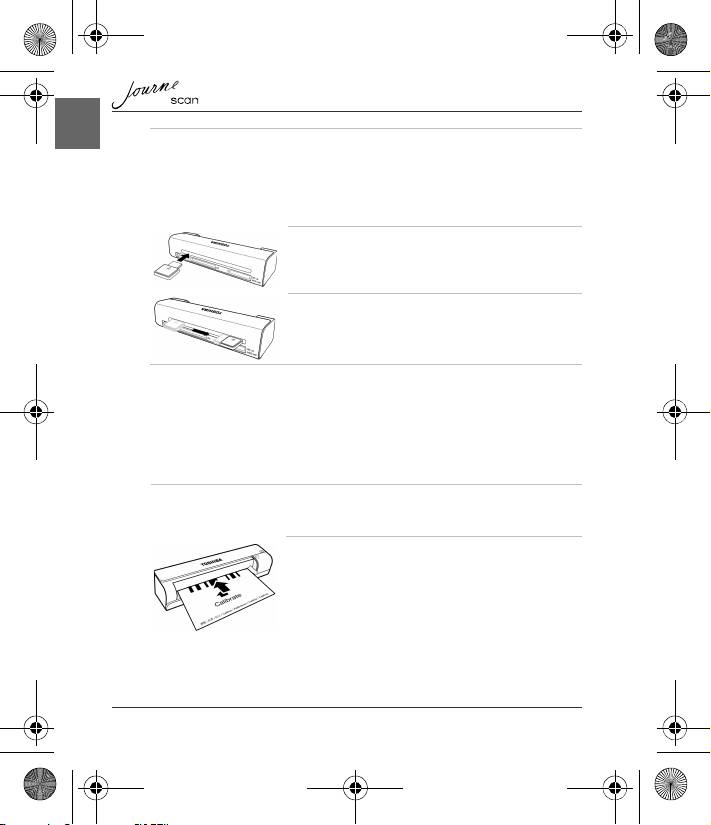
2. Insert the calibration card as shown. The scanner
will scan the pattern on the calibration card and
perform calibration to the sensor inside
automatically. Make sure that the calibration card is
inserted in the correct direction.

User’s Manual 15
EN
UM_EEMEA_Scan_1108.book Page 15 Monday, December 15, 2008 2:26 PM
Troubleshooting
Problem: There are strange lines on the scanned image, or the image is
not clear.
Solution: Please ensure the following:
n Are there scratches on the original, or is the original clean?
Remove any stains or dust from the original before scanning.
n Has the scanner been used for a long period of time without
cleaning and calibration? Refer to “Cleaning the Scanner” on
page 13 and “Calibrating the Scanner” on page 14 to clean and
calibrate the scanner and then try again.
Problem: The original gets stuck halfway in the feeding slot.
Solution: Press the Power button. The scanner will advance the original so
you can remove the jammed original from the output slot.
Problem: The status indicator blinks rapidly and no scan is possible.
Solution: Check the following:
n Is the memory card inserted properly into the memory card slot?
Re-insert the card and try again.
n Is the SD card locked? Unlock the card.
n Is the memory card full? The indicator blinks when the free space
on the memory card is below 3MB. Use another card if
necessary.
n Did you insert the next original before the scanning process of
the previous one is completed? Power off and then on the
scanner and try again. Make sure that you scan the next original
only after the scanning process of the previous one is completed
n Does the length of the original exceed the maximum acceptable
size?
16 User’s Manual
EN
UM_EEMEA_Scan_1108.book Page 16 Monday, December 15, 2008 2:26 PM
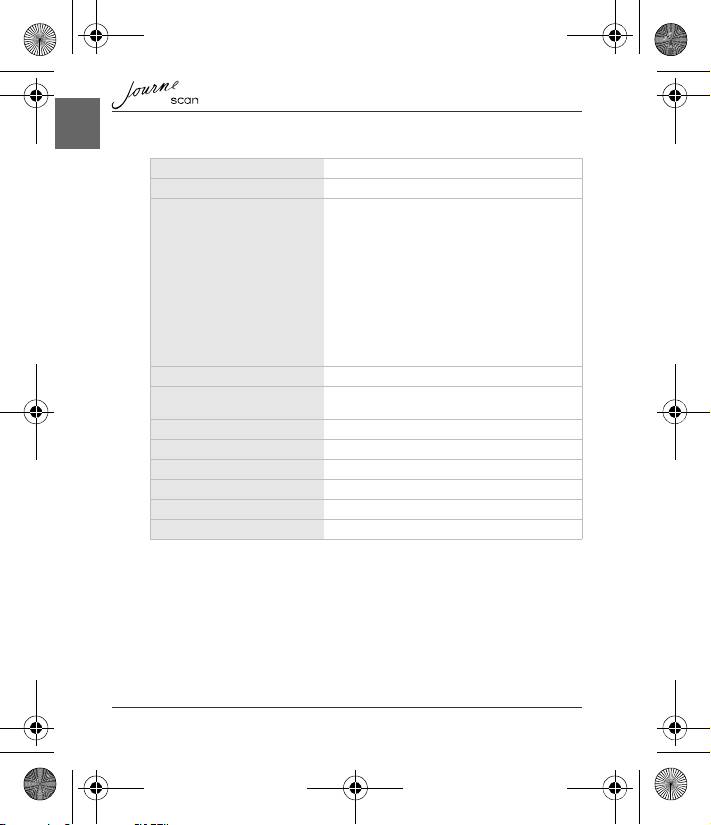
Specifications
Dimensions (scanner only) 156 x 46 x 38mm
Weight (scanner only) 170g
Supported memory card types
• CF (CompactFlash) Type I
• MS (MemoryStick)
•MS Pro
• MS Pro Duo (adapter needed)
• MS Duo (adapter needed)
• MMC (MultiMediaCard)
• RS-MMC (adapter needed)
• xD (H-type and M-type)
• SD (SecureDigital)
• Mini SD (adapter needed)
• micro SD/T-Flash (adapter needed)
Supported output image format JPEG (.jpg)
USB port USB or compatible with the USB 2.0
specification
Power input 100 - 240V AC, 50/60 Hz
Power output 6V DC, 1.5A
Operating temperature 15°C ~ 35°C
Operating humidity 20% ~70% RH
Storage temperature -20°C ~ 60°C
Storage humidity 10% ~ 90% RH
User’s Manual 17
EN
UM_EEMEA_Scan_1108.book Page 17 Monday, December 15, 2008 2:26 PM
TOSHIBA Support
Need help?
For the latest driver updates, user manuals & FAQs please have a look at the
TOSHIBA options & services support page:
computers.toshiba.eu/options-support
Please see computers.toshiba.eu/options-warranty
for the TOSHIBA hotline numbers.
Copyright Statement
No part of this publication may be reproduced in any form by any means without
prior written permission. Other trademarks or brand names mentioned herein are
trademarks or registered trademarks of their respective companies.
Disclaimer
Information in this document is subject to change without notice. The
manufacturer does not make any representations or warranties (impliedor
otherwise) regarding the accuracy and completeness of this document and shall
in no event be liable for any loss of profit or any commercial damage, including
but not limited to special, incidental, consequential, or other damage.
December 2008, Rev1.0
Trademarks
Microsoft, Windows and Windows Vista are either registered trademarks or
trademarks of Microsoft Corporation in the United States and/or other countries.
Other brands and product names are trademarks or registered trademarks of their
respective companies.
18 User’s Manual
EN
UM_EEMEA_Scan_1108.book Page 18 Monday, December 15, 2008 2:26 PM
Regulatory Statements
CE Compliance
This product is CE marked in accordance with the requirements of the applicable
EU Directives. Responsible for CE-marking is Toshiba Europe GmbH,
Hammfelddamm 8, 41460 Neuss, Germany. A copy of the official Declaration of
Conformity can be obtained from following website:
http://epps.toshiba-teg.com/
Working Environment
The Electromagnetic Compliance (EMC) of this product has been verified typically
for this product category for a so called Residential, Commercial & Light Industry
Environment. Any other working environment has not been verified by Toshiba
and the use of this product in these working environments is maybe restricted or
cannot be recommended. Possible consequences of the use of this product in
non verified working environments can be: Disturbances of other products or of
this product in the nearby surrounding area with temporarily malfunction or data
loss/corruption as result. Example of non verified working environments and
related advices:
n Industrial environment (e.g. where 3-phase 380V mains is being used mainly):
Danger of disturbances of this product due to possible strong electromagnetic
fields especially near to big machinery or power units.
n Medical environment: The compliance to the Medical Product Directive
has not been verified by Toshiba, therefore this product cannot be used as a
medical product without further verification. The use in usual office
environments e.g. in hospitals should be no problem if there is no restriction by
the responsible administration.
n Automotive environment: Please search the owner instructions of the related
vehicle for advices regarding the use of this product (category).
n Aviation environment: Please follow the instructions of the flight personnel
regarding restrictions of use.

User’s Manual 19
EN
UM_EEMEA_Scan_1108.book Page 19 Monday, December 15, 2008 2:26 PM
Additional Environments not Related to EMC
n Outdoor use: As a typical home/office equipment this product has no special
resistance against ingress of moisture and is not strong shock proofed.
n Explosive atmosphere: The use of this product in such special working
environment (Ex) is not allowed.
Following Information is Only for EU-member States
Disposal of products
The crossed out wheeled dust bin symbol indicates that
products must be collected and disposed of separately from
household waste.
The black bar indicates that the product was placed on the
market after August 13, 2005.
By participating in separate collection of products, you will help
to assure the proper disposal of products and thus help to
prevent potential negative consequences for the environment
and human health.
For more detailed information about the collection and
recycling programmes available in your country, please visit
our website (http://eu.computers.toshiba-europe.com) or
contact your local city office or the shop where you purchased
the product.
© 2008 TOSHIBA Europe GmbH. All rights reserved.
TOSHIBA reserves the right to make technical changes. TOSHIBA assumes no
liability for damages incurred directly or indirectly from errors, omissions or
discrepancies between this product and the documentation.
1 Uživatelská příručka
CZ
UM_EEMEA_Scan_1108.book Page 1 Monday, December 15, 2008 2:26 PM
Obsah
Důležité bezpečnostní pokyny . . . . . . . . . . . . . . . . . . . . . . . . . . . . . . . . . . . . .2
Úvod . . . . . . . . . . . . . . . . . . . . . . . . . . . . . . . . . . . . . . . . . . . . . . . . . . . . . . . . . . .5
Kontrola součástí . . . . . . . . . . . . . . . . . . . . . . . . . . . . . . . . . . . . . . . . . . . . . .5
Součásti skeneru a jejich funkce . . . . . . . . . . . . . . . . . . . . . . . . . . . . . . . . . .5
Používání skeneru . . . . . . . . . . . . . . . . . . . . . . . . . . . . . . . . . . . . . . . . . . . . . . .7
Příprava . . . . . . . . . . . . . . . . . . . . . . . . . . . . . . . . . . . . . . . . . . . . . . . . . . . . .7
Skenování . . . . . . . . . . . . . . . . . . . . . . . . . . . . . . . . . . . . . . . . . . . . . . . . . . . .8
Skenování do digitálního fotorámečku . . . . . . . . . . . . . . . . . . . . . . . . . . . . . .9
Připojení skeneru k počítači . . . . . . . . . . . . . . . . . . . . . . . . . . . . . . . . . . . . . .9
Další informace . . . . . . . . . . . . . . . . . . . . . . . . . . . . . . . . . . . . . . . . . . . . . . .10
Péče a údržba . . . . . . . . . . . . . . . . . . . . . . . . . . . . . . . . . . . . . . . . . . . . . . . . . .12
Čištění skeneru . . . . . . . . . . . . . . . . . . . . . . . . . . . . . . . . . . . . . . . . . . . . . . .12
Kalibrace skeneru . . . . . . . . . . . . . . . . . . . . . . . . . . . . . . . . . . . . . . . . . . . . .13
Odstraňování závad . . . . . . . . . . . . . . . . . . . . . . . . . . . . . . . . . . . . . . . . . . . . .14
Specifikace . . . . . . . . . . . . . . . . . . . . . . . . . . . . . . . . . . . . . . . . . . . . . . . . . . . .15
Podpora TOSHIBA . . . . . . . . . . . . . . . . . . . . . . . . . . . . . . . . . . . . . . . . . . . . . .16
Prohlášení o autorských právech . . . . . . . . . . . . . . . . . . . . . . . . . . . . . . . . . .16
Poznámka . . . . . . . . . . . . . . . . . . . . . . . . . . . . . . . . . . . . . . . . . . . . . . . . . . . . .16
Obchodní známky . . . . . . . . . . . . . . . . . . . . . . . . . . . . . . . . . . . . . . . . . . . . . . .16
Regulační opatření . . . . . . . . . . . . . . . . . . . . . . . . . . . . . . . . . . . . . . . . . . . . . .17
Splnění CE . . . . . . . . . . . . . . . . . . . . . . . . . . . . . . . . . . . . . . . . . . . . . . . . . .17
Pracovní prostředí . . . . . . . . . . . . . . . . . . . . . . . . . . . . . . . . . . . . . . . . . . . .17
Další prostředí bez souvislosti s EMC . . . . . . . . . . . . . . . . . . . . . . . . . . . . .18
Následující informace platí pouze pro členské státy EU . . . . . . . . . . . . . . . .18
