Dell Precision T7400 (Late 2007) – page 2
Manual for Dell Precision T7400 (Late 2007)
Table of contents
- Notes, Notices, and Cautions
- Contents
- Finding Information What Are You Looking For? Find It Here
- What Are You Looking For? Find It Here
- What Are You Looking For? Find It Here
- What Are You Looking For? Find It Here
- What Are You Looking For? Find It Here Setting Up Your Computer Changing Between Tower and Desktop Orientations Switching From Tower to Desktop Orientation
- Switching From Desktop to Tower Orientation Installing Your Computer in an Enclosure
- • Leave 10.2 cm (4 in) minimum clearance on all vented sides of the computer to permit the airflow required for proper ventilation.
- • Do not install your computer in an enclosure that does not allow airflow.
- Transferring Information to a New Computer Microsoft Windows XP
- Files and Settings Transfer Wizard (With the Operating System Disc) PREPARE THE DESTINATION COMPUTER FOR THE FILE TRANSFER — COPY DATA FROM THE SOURCE COMPUTER —
- TRANSFER DATA TO THE DESTINATION COMPUTER — Files and Settings Transfer Wizard (Without the Operating System Disc) CREATE A WIZARD DISK — COPY DATA FROM THE SOURCE COMPUTER —
- TRANSFER DATA TO THE DESTINATION COMPUTER — Microsoft Windows Vista Power Protection Devices
- Surge Protectors Line Conditioners Uninterruptible Power Supplies
- About Your Computer Front View (Tower Orientation) 1–3 5.25-inch drive bays
- 13 network link light The network link light is on when a good connection exists
- Back View (Tower Orientation)
- Back Panel Connectors 6 link integrity light Green — A good connection exists between a 10-Mbps
- 11 serial connectors (2)
- Cleaning Your Computer Computer, Keyboard, and Monitor Mouse (Non-Optical)
- Floppy Drive CDs and DVDs Troubleshooting Tools Power Lights
- • Eliminate interference. Some possible causes of interference are:
- Diagnostic Lights Diagnostic Light Codes During POST Light Pattern Problem Description Suggested Resolution
- Light Pattern Problem Description Suggested Resolution
- Light Pattern Problem Description Suggested Resolution
- Light Pattern Problem Description Suggested Resolution
- Beep Codes Code Cause Code Description Suggested Remedy
- Code Description Suggested Remedy System Messages
- Hardware Troubleshooter
- Dell Diagnostics When to Use the Dell Diagnostics Starting the Dell Diagnostics From Your Hard Drive
- Starting the Dell Diagnostics From the Drivers and Utilities Disc
- Dell Diagnostics Main Menu Option Function
- Tab Function Troubleshooting
- Battery Problems Drive Problems
- Optical Drive Problems Hard Drive Problems
- E-Mail, Modem, and Internet Problems HECK THE MICROSOFT OUTLOOK EXPRESS SECURITY SETTINGS — If you cannot RUN THE MODEM DIAGNOSTIC TOOL —
- VERIFY THAT THE MODEM IS COMMUNICATING WITH WINDOWS — Error Messages
- IEEE 1394 Device Problems
- Keyboard Problems Lockups and Software Problems The computer does not start up The computer stops responding A program stops responding
- A program crashes repeatedly A program is designed for an earlier Windows operating system A solid blue screen appears Other software problems
- Memory Problems F YOU RECEIVE AN INSUFFICIENT MEMORY MESSAGE — IF YOU EXPERIENCE OTHER MEMORY PROBLEMS — Mouse Problems C HECK THE MOUSE CABLE —
- RESTART THE COMPUTER — HECK THE MOUSE SETTINGS — Network Problems
- Power Problems
- Printer Problems Scanner Problems
- Sound and Speaker Problems
- No sound from headphones Video and Monitor Problems The screen is blank
- The screen is difficult to read
- 3D image quality is poor Only part of the screen is readable
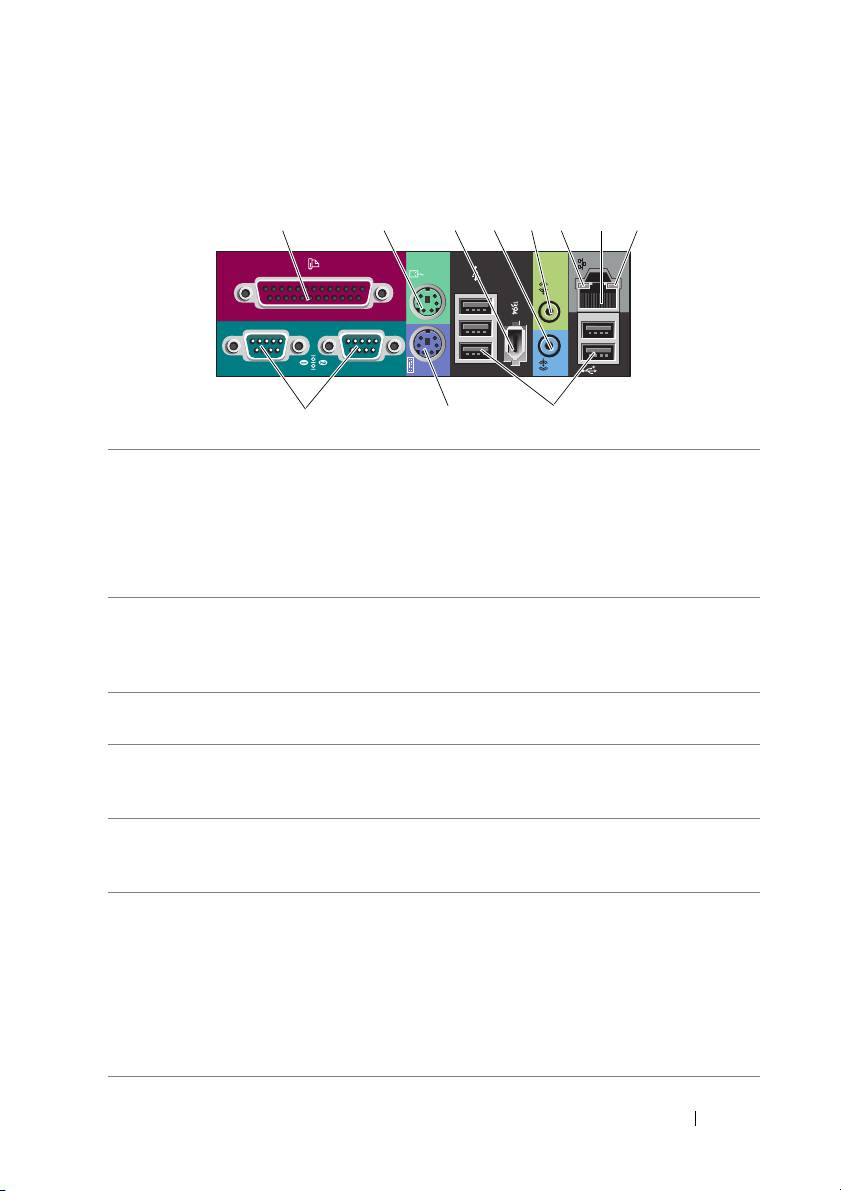
Back Panel Connectors
12345678
11 10 9
1 parallel connector Connect a parallel device, such as a printer, to the parallel
connector. If you have a USB printer, plug it into a USB connector.
NOTE: The integrated parallel connector is automatically
disabled if the computer detects an installed card containing
a parallel connector configured to the same address. For more
information, see "System Setup Options" in your User’s Guide.
2 mouse connector Plug a standard PS/2 mouse into the green mouse connector.
Turn off the computer and any attached devices before you
connect a mouse to the computer. If you have a USB mouse,
plug it into a USB connector.
3 IEEE 1394
Use the IEEE 1394 connector for high-speed data devices such
connector
as digital video cameras and external storage devices.
4 line-in connector Use the blue line-in connector to attach a playback device
such as an MP3 player, CD drive, or VCR. On computers with
a sound card, use the connector on the card.
5 line-out connector Use the green line-out connector to attach headphones and
most speakers with integrated amplifiers. On computers with
a sound card, use the connector on the card.
6 link integrity light Green — A good connection exists between a 10-Mbps
network and the computer.
Orange — A good connection exists between a 100-Mbps
network and the computer.
Yellow — A good connection exists between a 1000-Mbps
(or 1-Gbps) network and the computer.
Off — The computer is not detecting a physical connection to
the network.
Quick Reference Guide 21

7 network adapter
To attach your computer to a network or broadband device,
connector
connect one end of a network cable to either a network jack or
your network or broadband device. Connect the other end of
the network cable to the network adapter connector on your
computer. A click indicates that the network cable has been
securely attached.
Do not plug a telephone cable into the network connector.
On computers with an additional network connector card, use
the connectors on the card and on the back of the computer
when setting up multiple network connections (such as
a separate intra- and extranet).
It is recommended that you use Category 5 wiring and connectors
for your network. If you must use Category 3 wiring, force the
network speed to 10 Mbps to ensure reliable operation.
8network
Flashes a yellow light when the computer is transmitting or
activity light
receiving network data. A high volume of network traffic may
make this light appear to be in a steady "on" state.
9 USB 2.0
It is recommended that you use the front USB connectors for
connectors (5)
devices that you connect occasionally, such as flash memory
keys, cameras, or bootable USB devices.
Use the back USB connectors for devices that typically remain
connected, such as printers and keyboards.
10 keyboard
If you have a standard PS/2 keyboard, plug it into the purple
connector
keyboard connector. If you have a USB keyboard, plug it into
a USB connector.
11 serial
Connect a serial device, such as a handheld device, to the
connectors (2)
serial port. If necessary, the address for this port can be
modified through the system setup program (see "System
Setup" in you User’s Guide).
22 Quick Reference Guide

Cleaning Your Computer
CAUTION: Before you begin any of the procedures in this section, follow the
safety instructions in the
Product Information Guide
.
Computer, Keyboard, and Monitor
CAUTION: Before you clean your computer, disconnect the computer from the
electrical outlet. Clean your computer with a soft cloth dampened with water. Do
not use liquid or aerosol cleaners, which may contain flammable substances.
• Use a vacuum cleaner with a brush attachment to gently remove dust from
the slots and holes on your computer and from between the keys on the
keyboard.
NOTICE: Do not wipe the display screen with a soap or alcohol solution. Doing so
may damage the antiglare coating.
• To clean your monitor screen, lightly dampen a soft, clean cloth with water.
If possible, use a special screen-cleaning tissue or solution suitable for the
monitor’s antistatic coating.
• Wipe the keyboard, computer, and plastic part of the monitor with a soft
cleaning cloth moistened with water.
Do not soak the cloth or let water drip inside your computer or keyboard.
Mouse (Non-Optical)
1
Turn the retainer ring on the underside of your mouse counterclockwise,
and then remove the ball.
2
Wipe the ball with a clean, lint-free cloth.
3
Blow carefully into the ball cage to dislodge dust and lint.
4
Clean the rollers inside the ball cage with a cotton swab moistened lightly
with isopropyl alcohol.
5
Recenter the rollers in their channels, as needed. Ensure that fluff from
the swab is not left on the rollers.
6
Replace the ball and retainer ring, and then turn the retainer ring clockwise
until it clicks into place.
Quick Reference Guide 23

Floppy Drive
NOTICE: Do not attempt to clean drive heads with a swab. The heads may become
misaligned and prevent the drive from operating.
Clean your floppy drive using a commercially available cleaning kit. These
kits contain pretreated floppy disks to remove contaminants that accumulate
during normal operation.
CDs and DVDs
NOTICE: Always use compressed air to clean the lens in the CD/DVD drive, and
follow the instructions that come with the compressed air. Never touch the lens
in the drive.
1
Hold the disc by its outer edge. You can also touch the inside edge of the
center hole.
NOTICE: To prevent damaging the surface, do not wipe in a circular motion around
the disc.
2
With a soft, lint-free cloth, gently wipe the bottom of the disc (the unlabeled
side) in a straight line from the center to the outer edge of the disc.
For stubborn dirt, try using water or a diluted solution of water and mild
soap. You can also purchase commercial products that clean discs and
provide some protection from dust, fingerprints, and scratches. Cleaning
products for CDs are safe to use on DVDs.
Troubleshooting Tools
Power Lights
CAUTION: Before you begin any of the procedures in this section, follow the
safety instructions in the
Product Information Guide
.
The power button light located on the front of the computer illuminates and
blinks or remains solid to indicate different states:
• If the power light is green and the computer is not responding, "Diagnostic
Lights" on page 26.
• If the power light is blinking green, the computer is in standby mode. Press
a key on the keyboard, move the mouse, or press the power button to resume
normal operation.
24 Quick Reference Guide

• If the power light is off, the computer is either turned off or is not receiving
power.
– Reseat the power cable into both the power connector on the back of
the computer and the electrical outlet.
– If the computer is plugged into a power strip, ensure that the power
strip is plugged into an electrical outlet and that the power strip is
turned on.
– Bypass power protection devices, power strips, and power extension
cables to verify that the computer turns on properly.
– Ensure that the electrical outlet is working by testing it with another
device, such as a lamp.
– Ensure that the main power cable and front panel cable are securely
connected to the system board (see "System Board Components" in
your
User’s Guide
).
• If the power light is blinking amber, the computer is receiving electrical
power, but an internal power problem might exist.
– Ensure that the voltage selection switch is set to match the AC power
at your location, if applicable.
– Ensure that the processor power cable is securely connected to the
system board (see "System Board Components" in your
User’s Guide
).
• If the power light is steady amber, a device may be malfunctioning or
incorrectly installed.
– Remove and then reinstall the memory modules (see "Removing the
Front Panel" in your
User’s Guide
).
– Remove and then reinstall any cards (see "Cards" in your
User’s Guide
).
• Eliminate interference. Some possible causes of interference are:
– Power, keyboard, and mouse extension cables
– Too many devices on a power strip
– Multiple power strips connected to the same electrical outlet
Quick Reference Guide 25
Diagnostic Lights
CAUTION: Before you begin any of the procedures in this section, follow the
safety instructions in the
Product Information Guide
.
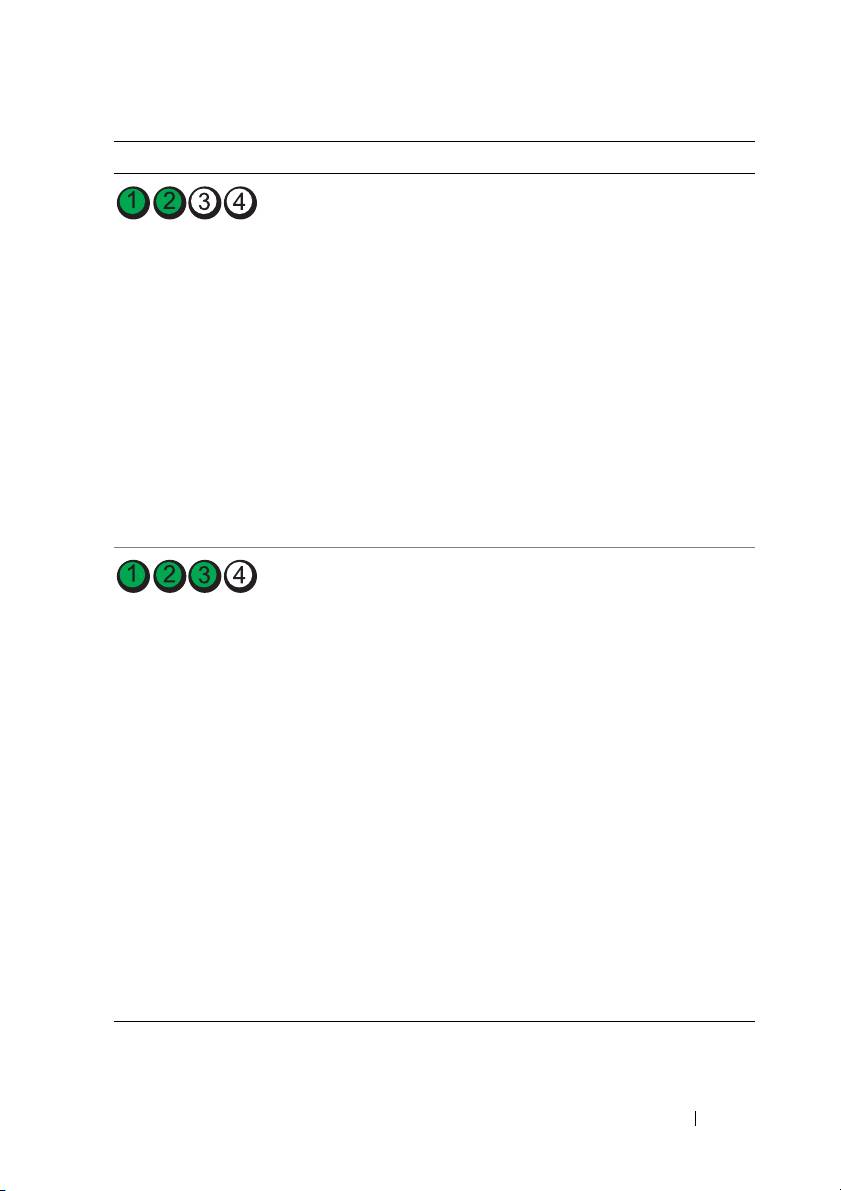
To help troubleshoot a problem, your computer has four lights labeled 1, 2, 3, and
4 on the front panel (see "Front View (Tower Orientation)" on page 18). When
the computer starts normally, the lights flash, and then turn off. If the computer
malfunctions, use the sequence of the lights to help identify the problem.
NOTE: After the computer completes POST, all four lights turn off before booting to
the operating system.
Diagnostic Light Codes During POST
Light Pattern Problem Description Suggested Resolution
The computer is in
Plug the computer into a working
a normal off
electrical outlet and press the
condition or
power button.
a possible pre-BIOS
failure has occurred.
A possible BIOS
• Run the BIOS Recovery utility, wait
failure has occurred;
for recovery completion, and then
the computer is in the
restart the computer.
recovery mode.
• If the problem persists, contact Dell
(see
"Contacting Dell" in your
User’s Guide
).
A possible processor
• Reseat the processor (see "Processor"
failure has occurred.
in your User’s Guide
).
• If the problem persists, contact Dell
(see
"Contacting Dell" in your
User’s Guide
).
26 Quick Reference Guide
Light Pattern Problem Description Suggested Resolution
Memory modules are
• If two or more memory modules are
detected, but
installed, remove the modules
amemory failure
(see "Memory"
in your User’s Guide
),
has occurred.
reinstall one module, and then restart
the computer. If the computer starts
normally, continue to install additional
memory modules (one at a time) until
you have identified a faulty module or
reinstalled all modules without error.
• If available, install working memory of
the same type into your computer
(see "Memory"
in your User’s Guide
).
• If the problem persists, contact Dell
(see
"Contacting Dell" in your
User’s Guide
).
A possible graphics
• Reseat any installed graphics cards
card failure has
(see "Cards"
in your User’s Guide
).
occurred.
• If available, install a working graphics
card into your computer.
• If the problem persists, contact Dell
(see
"Contacting Dell" in your
User’s Guide
).
A possible floppy or
• Reseat all power and data cables and
hard drive failure has
restart the computer.
occurred.
• If the problem persists, contact Dell
(see
"Contacting Dell" in your
User’s Guide
).
A possible USB failure
• Reinstall all USB devices, check cable
has occurred.
connections, and then restart the
computer.
• If the problem persists, contact Dell
(see
"Contacting Dell" in your
User’s Guide
).
Quick Reference Guide 27
Light Pattern Problem Description Suggested Resolution
No memory
• If two or more memory modules are
modules are detected.
installed, remove the modules
(see "Memory"
in your User’s Guide
),
reinstall one module, and then restart
the computer. If the computer starts
normally, continue to install additional
memory modules (one at a time) until
you have identified a faulty module or
reinstalled all modules without error.
• If available, install working memory of
the same type into your computer
(see "Memory"
in your User’s Guide
).
• If the problem persists, contact Dell
(see
"Contacting Dell" in your
User’s Guide
).
System board failure
Contact Dell (see "Contacting Dell" in
has occurred.
your User’s Guide).
Memory modules are
• Ensure that no special requirements
detected, but
for memory module/connector
amemory
placement exist (see "Memory"
in
configuration or
your User’s Guide
).
compatibility
• Ensure that the memory you are using
error exists.
is supported by your computer
(see "Memory"
in your User’s Guide
).
• If the problem persists, contact Dell
(see
"Contacting Dell" in your
User’s Guide).
A possible system
• Perform the procedures in "Restoring
board resource and/or
Your Operating System"
in your
hardware failure has
User’s Guide
.
occurred.
• If the problem persists, contact Dell
(see "Contacting Dell"
in your
User’s Guide
).
28 Quick Reference Guide
Light Pattern Problem Description Suggested Resolution
A possible
1
Determine if a conflict exists by removing
expansion card
an expansion card (not a graphics
failure has occurred.
card) and restarting the computer
(see "Cards"
in your User’s Guide
).
2
If the problem persists, reinstall the card
you removed, and then remove
a different card and restart the computer.
3
Repeat this process for each expansion
card installed. If the computer starts
normally, troubleshoot the last card
removed from the computer for resource
conflicts (see "Restoring Your Operating
System"
in your User’s Guide
).
4
If the problem persists, contact Dell
(see
"Contacting Dell" in your
User’s Guide
).
Another failure
• Ensure that all hard drive and
has occurred.
CD/DVD drive cables are properly
connected to the system board
(see "System Board Components"
in
your User’s Guide
).
• If there is an error message on the
screen identifying a problem with
a device (such as the floppy drive or
hard drive), check the device to make
sure it is functioning properly.
• If the operating system is attempting to
boot from a device (such as the floppy
drive or CD/DVD drive), check the
system setup program (see "System
Setup"
in your User’s Guide
) to ensure
the boot sequence is correct for the
devices installed on your computer.
• If the problem persists, contact Dell
(see
"Contacting Dell" in your
User’s Guide
).
Quick Reference Guide 29

Beep Codes
Your computer may emit a series of beeps during start up. The series of beeps is
called a beep code and can be used to help identify a problem with your computer.
If your computer emits a series of beeps during start-up:
1
Write down the beep code.
2
Run the Dell Diagnostics to identify the cause (see "Dell Diagnostics" on
page 33).
Code Cause
2 short, 1 long BIOS checksum error
1 long, 3 short, 2 short Memory error
1 short F12 key pressed
Code
Description Suggested Remedy
(repetitive
short beeps)
1BIOS checksum
Contact Dell (see "Contacting Dell" in
failure. Possible
your User’s Guide).
motherboard failure.
2 No memory modules
• If two or more memory modules are
are detected.
installed, remove the modules
(see "Memory"
in your User’s Guide
),
reinstall one module, and then restart
the computer. If the computer starts
normally, continue to install additional
memory modules (one at a time) until
you have identified a faulty module or
reinstalled all modules without error.
• If available, install working memory of
the same type into your computer
(see "Memory"
in your User’s Guide
).
• If the problem persists, contact Dell
(see
"Contacting Dell" in your
User’s Guide
).
3Possible
Contact Dell (see "Contacting Dell" in
motherboard failure.
your User’s Guide).
30 Quick Reference Guide

Code
Description Suggested Remedy
(repetitive
short beeps)
4 RAM Read/Write
• Ensure that no special requirements for
failure.
memory module/connector placement
exist (see "Memory"
in your User’s Guide
).
• Ensure that the memory you are using is
supported by your computer (see "Memory"
in your User’s Guide
).
• If the problem persists, contact Dell (see
"Contacting Dell" in your User’s Guide).
5 Real time clock failure.
• Replace the battery (see "Replacing the
Possible battery failure
Battery"
in your User’s Guide
).
or motherboard failure.
• If the problem persists, contact Dell (see
"Contacting Dell" in your User’s Guide).
6Video BIOS
Dell (see "Contacting Dell" in your
Test Fai lure.
User’s Guide).
System Messages
NOTE: If the message you received is not listed in the following table, see the
documentation for either the operating system or the program that was running
when the message appeared.
A
LERT! PREVIOUS ATTEMPTS AT BOOTING THIS SYSTEM HAVE FAILED AT CHECKPOINT
[
NNNN]. FOR HELP IN RESOLVING THIS PROBLEM, PLEASE NOTE THIS CHECKPOINT
AND CONTACT DELL TECHNICAL SUPPORT — The computer failed to complete the
boot routine three consecutive times for the same error (see "Contacting Dell" in your
User’s Guide for assistance).
CMOS
CHECKSUM ERROR — Possible motherboard failure or the real-time clock
battery charge is low. Replace the battery (see "Replacing the Battery" or "Contacting
Dell" in your User’s Guide for assistance).
CPU
FAN FAILURE — CPU fan failure. Replace the CPU fan (see "Removing the
Processor" in your User’s Guide).
F
LOPPY DISKETTE SEEK FAILURE — A cable may be loose, or the computer
configuration information may not match the hardware configuration. Check cable
connections (see "Contacting Dell" in your User’s Guide for assistance).
D
ISKETTE READ FAILURE — The floppy disk may be defective or a cable may be
loose. Replace the floppy disk and/or check for a loose cable connection.
Quick Reference Guide 31

HARD-DISK READ FAILURE — Possible hard drive failure during hard-drive boot test
(see "Contacting Dell" in your User’s Guide for assistance).
K
EYBOARD FAILURE — Keyboard failure or the keyboard cable is loose (see "Keyboard
Problems" in your User’s Guide).
N
O BOOT DEVICE AVAILABLE — The system cannot detect a bootable device or partition.
• If the floppy drive is your boot device, ensure that the cables are connected and that
a bootable floppy disk is in the drive.
• If the hard drive is your boot device, ensure that the cables are connected and that
the drive is installed properly and partitioned as a boot device.
• Enter the system setup program and ensure that the boot sequence information is
correct (see "Entering System Setup"
in your User’s Guide
).
NO TIMER TICK INTERRUPT — System board failure or a chip on the system board
might be malfunctioning (see "Contacting Dell" in your User’s Guide for assistance).
N
ON-SYSTEM DISK OR DISK ERROR — Replace the floppy disk with one that has
a bootable operating system or remove the floppy disk from drive A and restart
the computer.
N
OT A BOOT DISKETTE — Insert a bootable floppy disk and restart your computer.
NOTICE - H
ARD DRIVE SELF MONITORING SYSTEM HAS REPORTED THAT
A PARAMETER HAS EXCEEDED ITS NORMAL OPERATING RANGE. DELL RECOMMENDS
THAT YOU BACK UP YOUR DATA REGULARLY. A PARAMETER OUT OF RANGE MAY OR
MAY NOT INDICATE A POTENTIAL HARD DRIVE PROBLEM.—S.M.A.R.T error,
possible HDD failure. This feature can be enabled or disabled in BIOS setup.
Hardware Troubleshooter
If a device is either not detected during the operating system setup or is
detected, but incorrectly configured, you can use the Hardware Troubleshooter
to resolve the incompatibility.
Windows XP:
1
Click
Start
→
Help and Support
.
2
Ty p e
hardware troubleshooter
in the search field and press
<Enter> to start the search.
3
In the
Fix a Problem
section, click
Hardware Troubleshooter
.
4
In the
Hardware Troubleshooter
list, select the option that best describes
the problem and click
Next
to follow the remaining troubleshooting steps.
32 Quick Reference Guide
Windows Vista:
1
Click the Windows Vista start button
,
and click
Help and Support.
2
Ty p e
hardware troubleshooter
in the search field and press
<Enter> to start the search.
3
In the search results, select the option that best describes the problem and
follow the remaining troubleshooting steps.
Dell Diagnostics
CAUTION: Before you begin any of the procedures in this section, follow the
safety instructions in the
Product Information Guide
.
When to Use the Dell Diagnostics
If you experience a problem with your computer, perform the checks in "Lockups
and Software Problems" (see "Troubleshooting" in your User’s Guide) and run
the Dell Diagnostics before you contact Dell for assistance.
You can run the Dell Diagnostics from your hard drive or from the Drivers and
Utilities disc.
See "System Setup" in your User’s Guide to review your computer’s configuration
information, and ensure that the device that you want to test displays in the
system setup program and is active.
NOTE: The Dell Diagnostics works only on Dell computers.
NOTE: Print the following procedures before you run the Dell diagnostics.
Starting the Dell Diagnostics From Your Hard Drive
The Dell Diagnostics is located on a separate diagnostic utility partition on
your hard drive.
NOTE: If your computer cannot display a screen image, see "Contacting Dell" in
your User’s Guide.
1
Turn on (or restart) your computer.
2
When the DELL logo appears, press <F12> immediately.
NOTE: Keyboard failure may result when a key is held down for extended
periods of time. To avoid possible keyboard failure, press and release <F12> in
even intervals to open the Boot Device Menu.
Quick Reference Guide 33

NOTE: If at any time a message appears stating that no diagnostics utility
partition has been found, run the Dell Diagnostics from your Drivers and
Utilities disc (see "Starting the Dell Diagnostics From the Drivers and Utilities
Disc" on page 34)
.
If you wait too long and the operating system logo appears, continue to
wait until you see the Microsoft Windows desktop, and then shut down
your computer and try again.
3
At the
Boot Device Menu
, use the up- and down-arrow keys or press the
appropriate number on the keyboard to highlight
Boot to Utility Partition
,
and then press <Enter>.
NOTE: The Quickboot feature changes the boot sequence for the current
boot only. Upon restart, the computer boots according to the boot sequence
specified in the system setup program.
4
At the Dell Diagnostics
Main Menu
, left-click with the mouse, or press
<Tab> and then <Enter>, to select the test you want to run (see "Dell
Diagnostics Main Menu" on page 35).
NOTE: Write down any error codes and problem descriptions exactly as they
appear and follow the instructions on the screen.
5 After all tests have completed, close the test window to return to the
Dell Diagnostics Main Menu.
6 Close the Main Menu window to exit the Dell Diagnostics and restart
the computer.
Starting the Dell Diagnostics From the Drivers and Utilities Disc
1
Turn on your computer.
2
Press the eject button on the front of the optical drive to open the drive tray.
3
Place the
Drivers and Utilities
disc in the center of the drive tray, and then
press the eject button or gently push on the tray to close it.
4
Restart the computer.
5
When the DELL logo appears, press <F12> immediately.
NOTE: Keyboard failure may result when a key on the keyboard is held down
for extended periods of time. To avoid possible keyboard failure, press and
release <F12> in even intervals until the Boot Device Menu appears.
If you wait too long and the operating system logo appears, continue to
wait until you see the Microsoft Windows desktop, and then shut down
your computer and try again.
34 Quick Reference Guide

6
At the
Boot Device Menu
, use the up- and down-arrow keys or press the
appropriate number on the keyboard to highlight
Onboard or USB
CD-ROM
, and then press <Enter>.
NOTE: The Quickboot feature changes the boot sequence for the current
boot only. Upon restart, the computer boots according to the boot sequence
specified in the system setup program.
7
Press <1> to select the Dell Diagnostics.
8
At the
Dell Diagnostics Menu
, press <1> to select the Dell Diagnostics.
9
At the Dell Diagnostics
Main Menu
, left-click with the mouse, or press
<Tab> and then <Enter>, to select the test you want to run (see "Dell
Diagnostics Main Menu" on page 35).
NOTE: Write down any error codes and problem descriptions exactly as they
appear and follow the instructions on the screen.
10 After all tests have completed, close the test window to return to the
Dell Diagnostics Main Menu.
11 Remove the Drivers and Utilities disc, close the Main Menu window to
exit the Dell Diagnostics, and then restart the computer.
Dell Diagnostics Main Menu
The following tests can be run from the Dell Diagnostics Main Menu:
Option Function
Express Test Performs a quick test of system devices. The test typically
takes 10 to 20 minutes and requires no interaction on your
part. Run Express Test first to increase the possibility of
tracing the problem quickly.
Extended Test Performs a thorough check of system devices. The test
typically takes an hour or more and periodically requires
your input to answer specific questions.
Custom Test Tests a specific device in the system and can be used to
customize the tests you want to run.
Symptom Tree Lists a number of common symptoms and allows you to
select a test based on the symptom of the problem you
are having.
Quick Reference Guide 35

For any problem encountered during a test, a message appears with an error
code and a description of the problem. Write down the error code and problem
description exactly as it appears and follow the instructions on the screen. If
you cannot resolve the problem, contact Dell (see "Contacting Dell" in your
User’s Guide).
NOTE: The Service Tag for your computer is located at the top of each test screen.
When contacting Dell support, have your Service Tag ready.
The following tabs provide additional information for tests run from the
Custom Test or Symptom Tree option:
Tab Function
Results Displays the results of the test and any error conditions
encountered.
Errors Displays error conditions encountered, error codes, and the
problem description.
Help Describes the test and any requirements for running
the test.
Configuration
Displays the hardware configuration for the selected device.
(Custom Test only)
The Dell Diagnostics obtains configuration information for
all devices from the system setup program, memory, and
various internal tests, and it displays the information in the
device list in the left pane of the screen.
NOTE: The device list may not display the names of all the
components installed on your computer or all devices
attached to your computer.
Parameters
Allows you to customize the test, if applicable, by changing
the test settings.
(Custom Test only)
Troubleshooting
Follow these tips when you troubleshoot your computer:
• If you added or removed a part before the problem started, review the
installation procedures and ensure that the part is correctly installed.
• If a peripheral device does not work, ensure that the device is properly
connected.
• If an error message appears on the screen, write down the exact message.
This message may help support personnel diagnose and fix the problem(s).
36 Quick Reference Guide
• If an error message occurs in a program, see the program’s documentation.
NOTE: The procedures in this document were written for the Windows default
view, so they may not apply if you set your Dell™ computer to the Windows
Classic view.
Battery Problems
CAUTION: There is a danger of a new battery exploding if it is incorrectly installed.
Replace the battery only with the same or equivalent type recommended by the
manufacturer. Discard used batteries according to the manufacturer's instructions.
CAUTION: Before you begin any of the procedures in this section, follow the
safety instructions in the
Product Information Guide
.
R
EPLACE THE BATTERY — If you have to repeatedly reset time and date information
after turning on the computer, or if an incorrect time or date displays during start-up,
replace the battery (see "Replacing the Battery" in your User’s Guide). If the battery
still does not work properly, contact Dell (see "Contacting Dell" in your User’s Guide).
Drive Problems
CAUTION: Before you begin any of the procedures in this section, follow the
safety instructions in the
Product Information Guide
.
E
NSURE THAT MICROSOFT WINDOWS RECOGNIZES THE DRIVE —
Windows XP:
•Click
Start
and click
My Computer
.
Windows Vista:
•Click
Start
and click
Computer
.
If the drive is not listed, perform a full scan with your antivirus software to check
for and remove viruses. Viruses can sometimes prevent Windows from recognizing
the drive.
T
EST THE DRIVE —
• Insert another disc to eliminate the possibility that the original drive is defective.
• Insert a bootable floppy disk and restart the computer.
CLEAN THE DRIVE OR DISK —
See "Cleaning Your Computer
" on page 23.
C
HECK THE CABLE CONNECTIONS
RUN THE HARDWARE TROUBLESHOOTER — See "Restoring Your Operating System"
in your User’s Guide.
R
UN THE DELL DIAGNOSTICS — See "Dell Diagnostics" on page 33.
Quick Reference Guide 37

Optical Drive Problems
NOTE: High-speed optical drive vibration is normal and may cause noise, which
does not indicate a defect in the drive or the disc.
NOTE: Because of different regions worldwide and different disc formats, not all
DVD titles work in all DVD drives.
A
DJUST THE WINDOWS VOLUME CONTROL —
• Click the speaker icon in the lower-right corner of your screen.
• Ensure that the volume is turned up by clicking the slidebar and dragging it up.
• Ensure that the sound is not muted by clicking any boxes that are checked.
CHECK THE SPEAKERS AND SUBWOOFER — See "Sound and Speaker Problems" on
page 48.
Problems Writing to an Optical Drive
CLOSE OTHER PROGRAMS — The optical drive must receive a steady stream of data
during the writing process. If the stream is interrupted, an error occurs. Try closing all
programs before you write to the optical.
T
URN OFF STANDBY MODE IN WINDOWS BEFORE WRITING TO A DISC — Search for
the keyword standby in Windows Help and Support for information on power management
modes.
Hard Drive Problems
RUN CHECK DISK —
Windows XP:
1
Click
Start
and click
My Computer
.
2
Right-click
Local Disk C:
.
3
Click
Properties
→
Tools
→
Check Now
.
4
Click
Scan for and attempt recovery of bad sectors
and click
Start
.
Windows Vista:
1
Click
Start
and click
Computer
.
2
Right-click
Local Disk C:
.
3
Click
Properties
→
Tools
→
Check Now
.
The
User Account Control
window may appear. If you are an administrator on the
computer, click
Continue
; otherwise, contact your administrator to continue the
desired action.
4
Follow the instructions on the screen.
38 Quick Reference Guide

E-Mail, Modem, and Internet Problems
CAUTION: Before you begin any of the procedures in this section, follow the
safety instructions in the
Product Information Guide
.
NOTE: Connect the modem to an analog telephone jack only. The modem does not
operate while it is connected to a digital telephone network.
NOTE: Do not plug a telephone cable into the network adapter connector (see "Back
Panel Connectors" in your User’s Guide).
C
HECK THE MICROSOFT OUTLOOK EXPRESS SECURITY SETTINGS — If you cannot
open your e-mail attachments:
1
In Outlook Express, click
Tools
→
Options
→
Security
.
2
Click
Do not allow attachments
to remove the check mark, as needed.
CHECK THE TELEPHONE LINE CONNECTION
CHECK THE TELEPHONE JACK
CONNECT THE MODEM DIRECTLY TO THE TELEPHONE WALL JACK
USE A DIFFERENT TELEPHONE LINE —
• Verify that the telephone line is connected to the jack on the modem (the jack has
either a green label or a connector-shaped icon next to it).
• Ensure that you hear a click when you insert the telephone line connector into
the modem.
• Disconnect the telephone line from the modem and connect it to a telephone; then
listen for a dial tone.
• If you have other telephone devices sharing the line, such as an answering machine,
fax machine, surge protector, or line splitter, bypass them and use the telephone to
connect the modem directly to the telephone wall jack. If you are using a line that is
3 meters (10 feet) or more in length, try a shorter line.
RUN THE MODEM DIAGNOSTIC TOOL —
Windows XP:
1
Click
Start
→
All
Programs
→
Modem Helper
.
2
Follow the instructions on the screen to identify and resolve modem problems.
Modem Helper is not available on certain computers.
Windows Vista:
1
Click
Start
→
All Programs
→
Modem Diagnostic Tool
.
2
Follow the instructions on the screen to identify and resolve modem problems.
Modem diagnostics are not available on all computers.
Quick Reference Guide 39

VERIFY THAT THE MODEM IS COMMUNICATING WITH WINDOWS —
Windows XP:
1
Click
Start
→
Control Panel
→
Printers and Other Hardware
→
Phone and Modem
Options
→
Modems
.
2
Click the COM port for your modem, and then click
Properties
→
Diagnostics
→
Query Modem
to verify that the modem is communicating with Windows.
If all commands receive responses, the modem is operating properly.
Windows Vista:
1
Click
Start
→
Control Panel
→
Hardware and Sound
→
Phone and Modem
Options
→
Modems
.
2
Click the COM port for your modem, and then click
Properties
→
Diagnostics
→
Query Modem
to verify that the modem is communicating with Windows.
If all commands receive responses, the modem is operating properly.
ENSURE THAT YOU ARE CONNECTED TO THE INTERNET — Ensure that you have
subscribed to an Internet provider. With the Outlook Express e-mail program open,
click File. If Work Offline has a check mark next to it, click the check mark to remove
it and connect to the Internet. For help, contact your Internet service provider.
Error Messages
CAUTION: Before you begin any of the procedures in this section, follow the
safety instructions in the
Product Information Guide
.
If the error message is not listed, see the documentation for the operating system or
the program that was running when the message appeared.
A
FILENAME CANNOT CONTAIN ANY OF THE FOLLOWING CHARACTERS: \ / : * ? “ < > | —
Do not use these characters in filenames.
A
REQUIRED .DLL FILE WAS NOT FOUND — The program that you are trying to open
is missing an essential file. To remove and then reinstall the program:
Windows XP:
1
Click
Start
→
Control Panel
→
Add or Remove Programs
→
Programs and Features
.
2
Select the program you want to remove.
3
Click
Uninstall
.
4
See the program documentation for installation instructions.
Windows Vista:
1
Click
Start
→
Control Panel
→
Programs
→
Programs and Features
.
2
Select the program you want to remove.
3
Click
Uninstall
.
4
See the program documentation for installation instructions.
40 Quick Reference Guide
