Hama USB 3.0 Controller PCIe: инструкция
Раздел: Компьютерные аксессуары
Тип:
Инструкция к Hama USB 3.0 Controller PCIe
THE SMART SOLUTION
USB 3.0 Controller PCIe
00053121-V2
00053121man_V2_cs_de_el_en_es_fi_fr_hu_it_nl_pl_pt_ro_ru_sk_sv_tr.indd 1 30.03.12 09:34
d Bedienungsanleitung
Packungsinhalt:
Hinweis:
Möchten Sie die Bedienungsanleitung in elektronischer
• USB 3.0 PCIe Karte mit 2x Anschlüssen
Form lesen, klicken Sie auf Anleitung anzeigen. Beachten
• Low-Prole Slotblende zum Einbau in Mini-PC´s
Sie, dass zum Anzeigen der Anleitung ein installierter
• Treiber CD-ROM
Adobe Acrobat Reader benötigt wird. Falls dieses Pro-
• Diese gedruckte Installationsanleitung
gramm nicht installiert ist, klicken Sie auf Acrobat Reader,
um die Software von CD zu installieren. Klicken Sie auf
Treiber-Download um zu überprüfen, ob neue Treiber
Softwareinstallation:
für das Produkt vorhanden sind. Um zur Sprachauswahl
Installation unter Windows Vista und Windows 7
zurückkehren, wählen Sie Zurück.
Bevor Sie die PCIe Karte in Ihren Computer einbauen
(siehe Abschnitt Hardwareinstallation) müssen Sie den
benötigten Treiber von der CD-ROM zuerst installieren.
Legen Sie die beiliegende Treiber CD in das Laufwerk
Ihres Computers ein. Kurz danach startet das Hama
Installationsprogramm automatisch. Sollte das Programm
nicht starten, so klicken Sie doppelt mit der rechten
Maustaste auf die Datei autorun.exe im Hauptverzeichnis
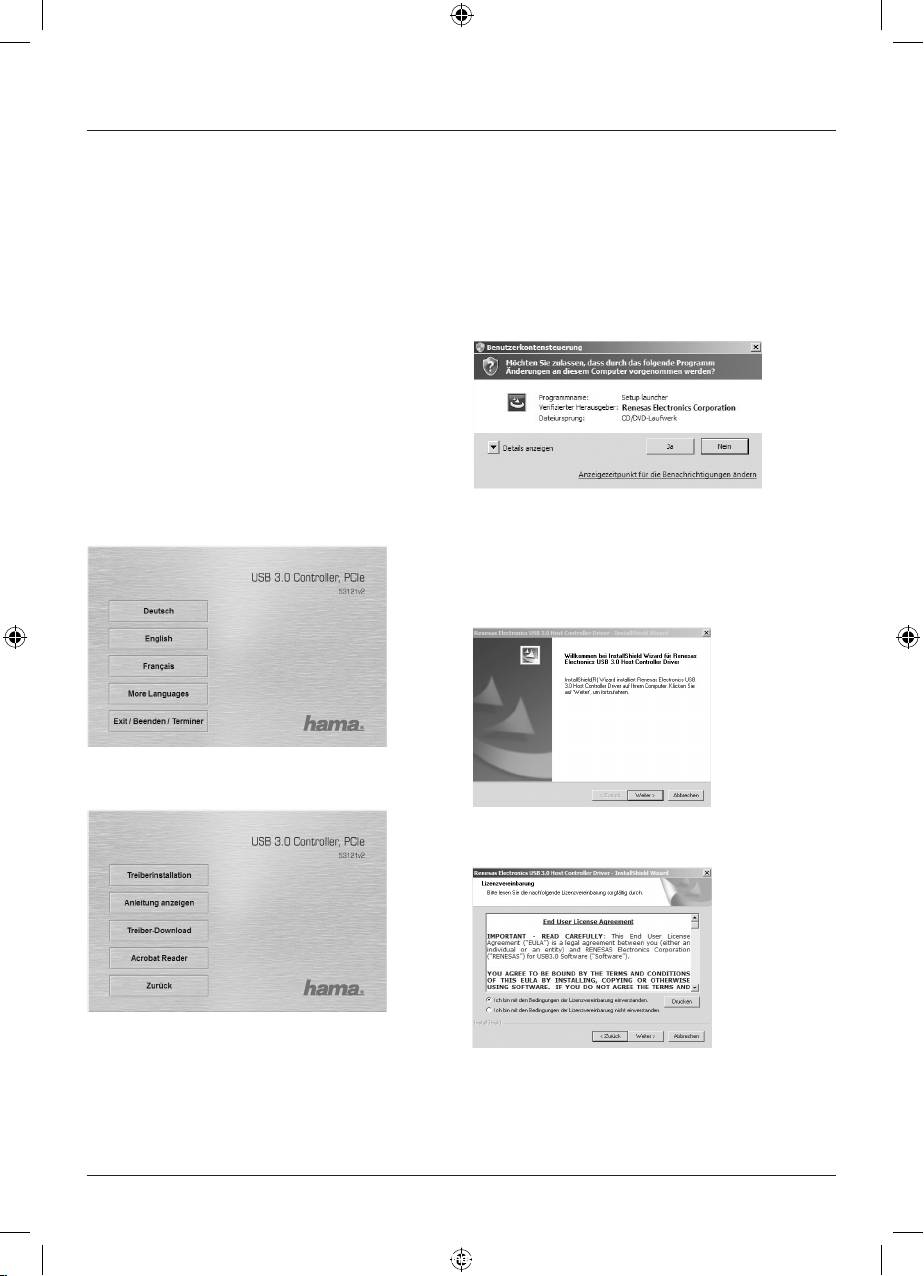
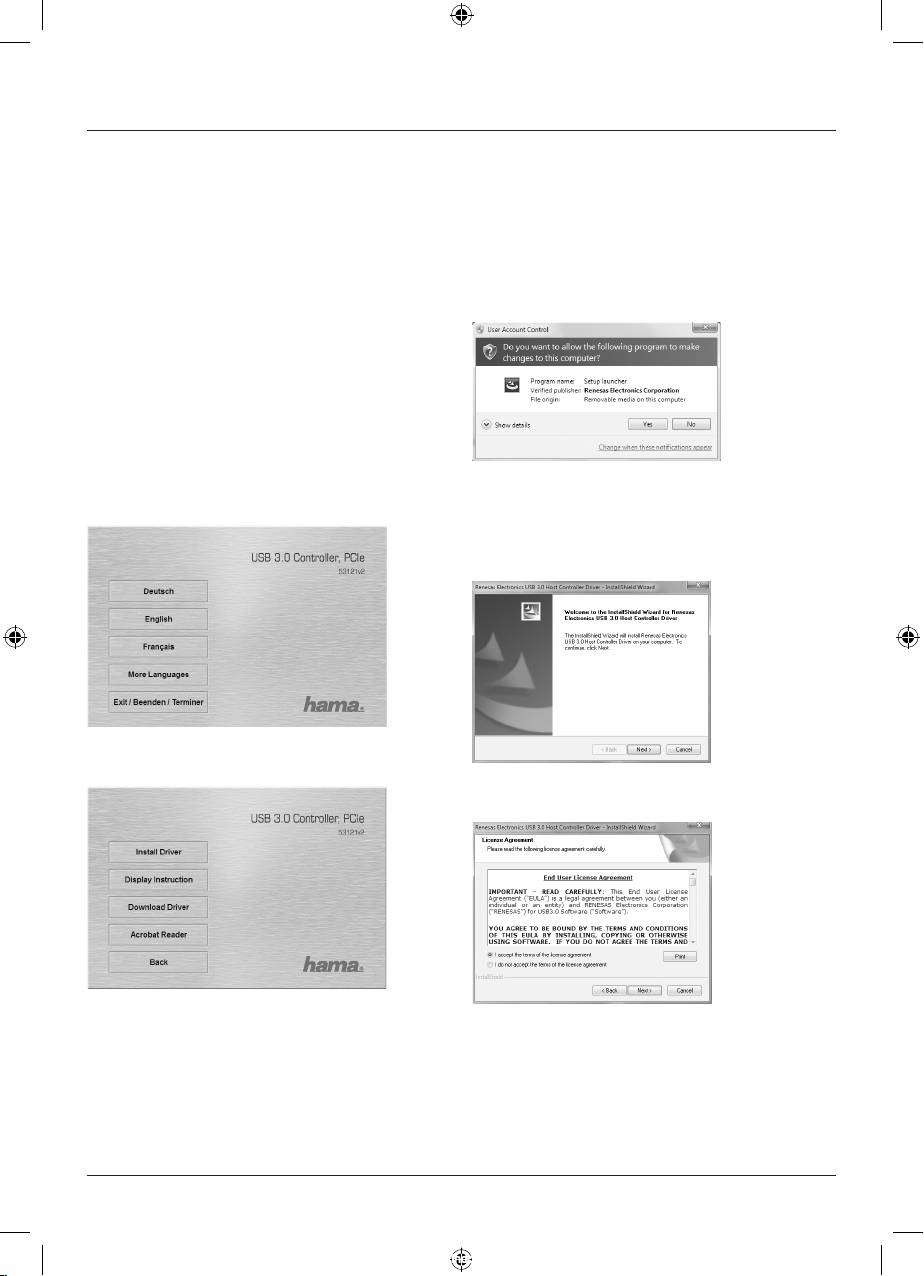
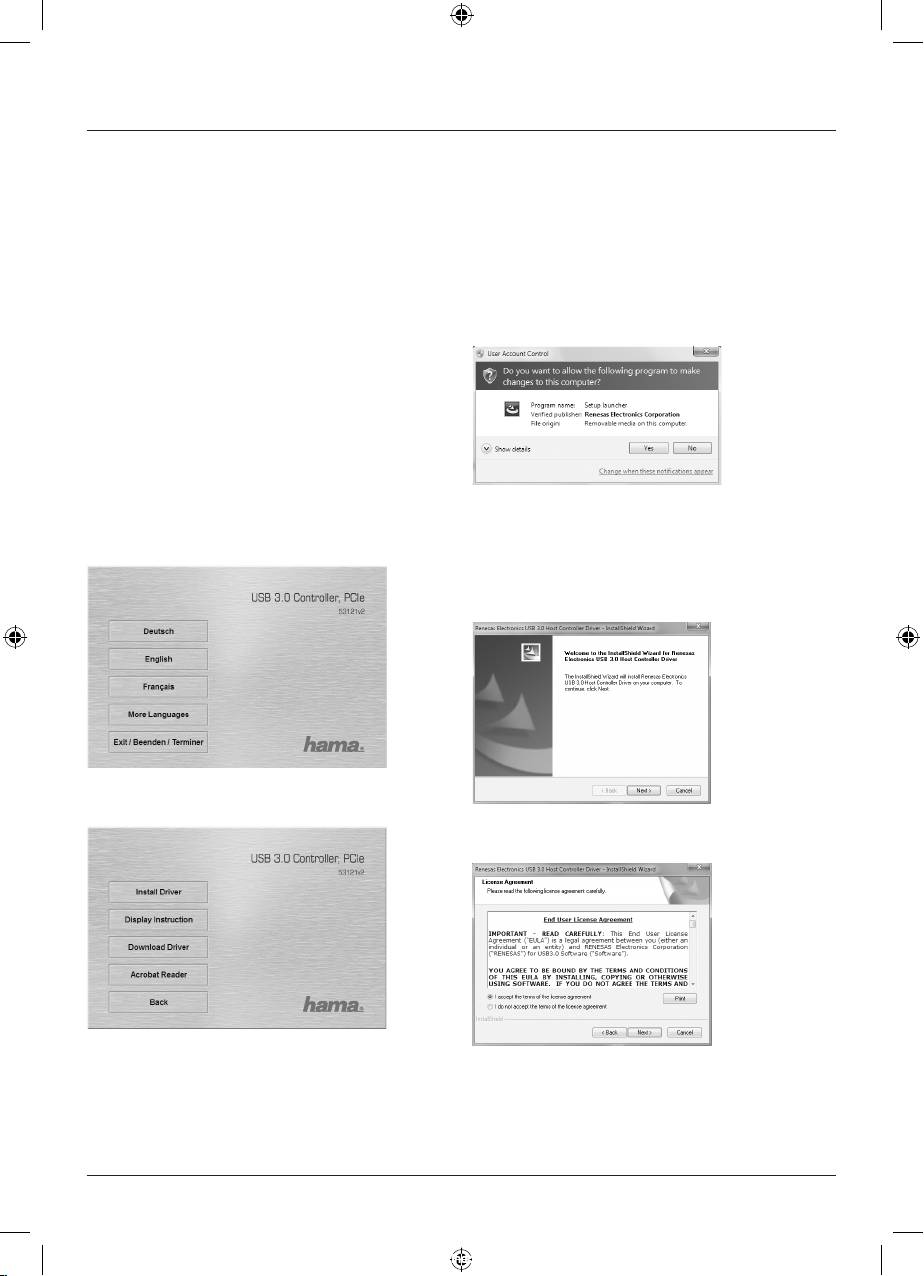
Nachdem die Installation gestartet wurde, erscheint unter
der Treiber CD.
Umständen die in Windows Vista / 7 integrierte
Benutzerkontensteuerung und fordert Sie auf, Ihre
Zustimmung zur Installation des Treibers zu geben.
Klicken Sie auf die Schaltäche Fortsetzen bzw. bei
Windows 7 auf Ja.
Wählen Sie die passende Sprache aus.
Klicken Sie auf Weiter.
Klicken Sie auf Treiberinstallation.
Akzeptieren Sie die Bedingungen der Lizenzvereinbarung,
indem Sie die Option „Ich bin mit den Bedingungen der
Lizenzvereinbarung einverstanden“ auswählen, und
anschließend auf Weiter klicken.
2
00053121man_V2_cs_de_el_en_es_fi_fr_hu_it_nl_pl_pt_ro_ru_sk_sv_tr.indd 2 30.03.12 09:34
Installation und Betrieb der USB 3.0 PCIe Karte.
Bevor Sie die PCIe Karte in Ihren Computer einbauen
(siehe Abschnitt Hardwareinstallation), müssen Sie
zuerst den dazu benötigten Treiber von der CD-ROM
installieren.
Legen Sie dazu die beiliegende Treiber CD in das Lauf-
werk Ihres Notebooks ein. Kurz danach startet das Hama
Installationsprogramm automatisch. Sollte das Programm
nicht starten, so klicken Sie doppelt mit der rechten
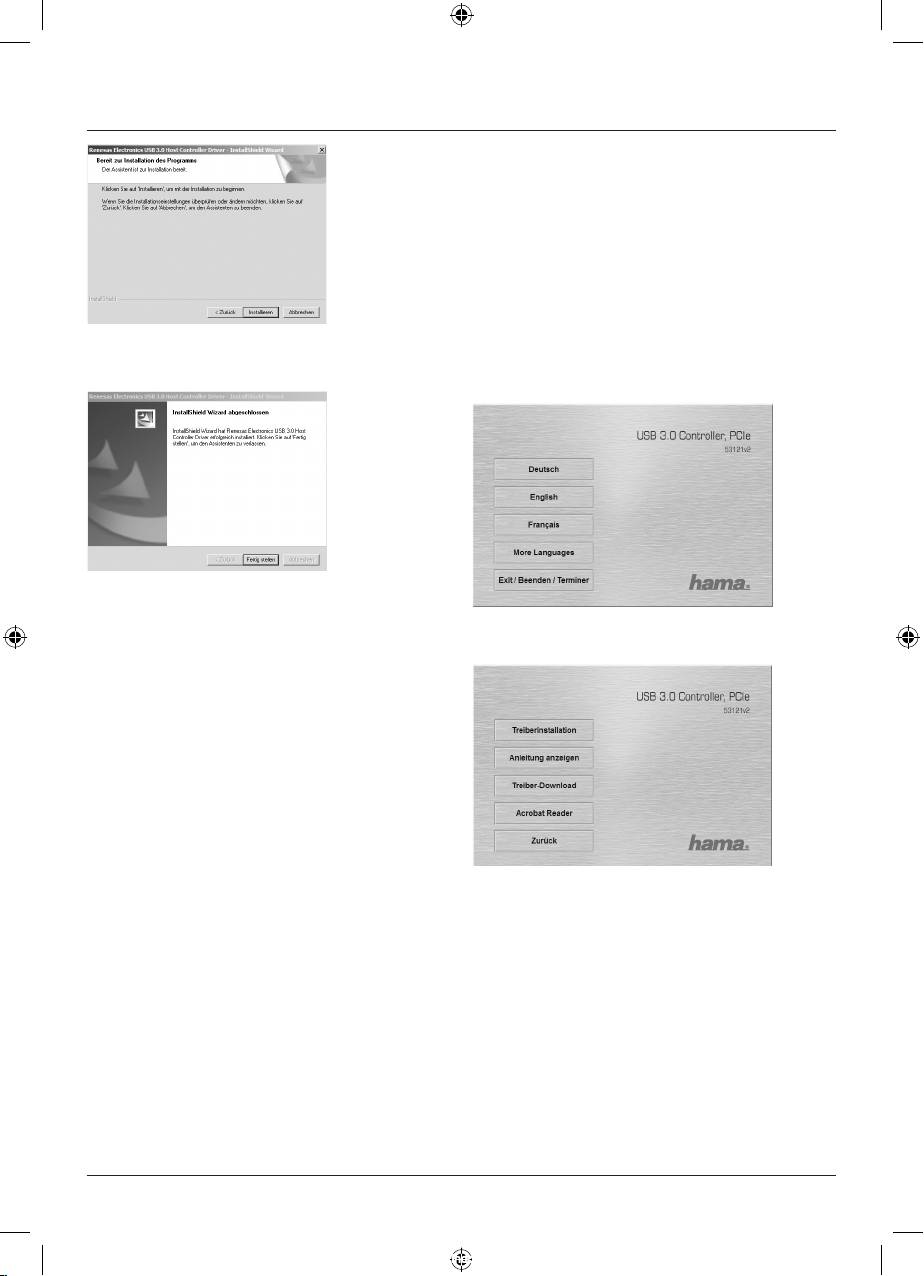
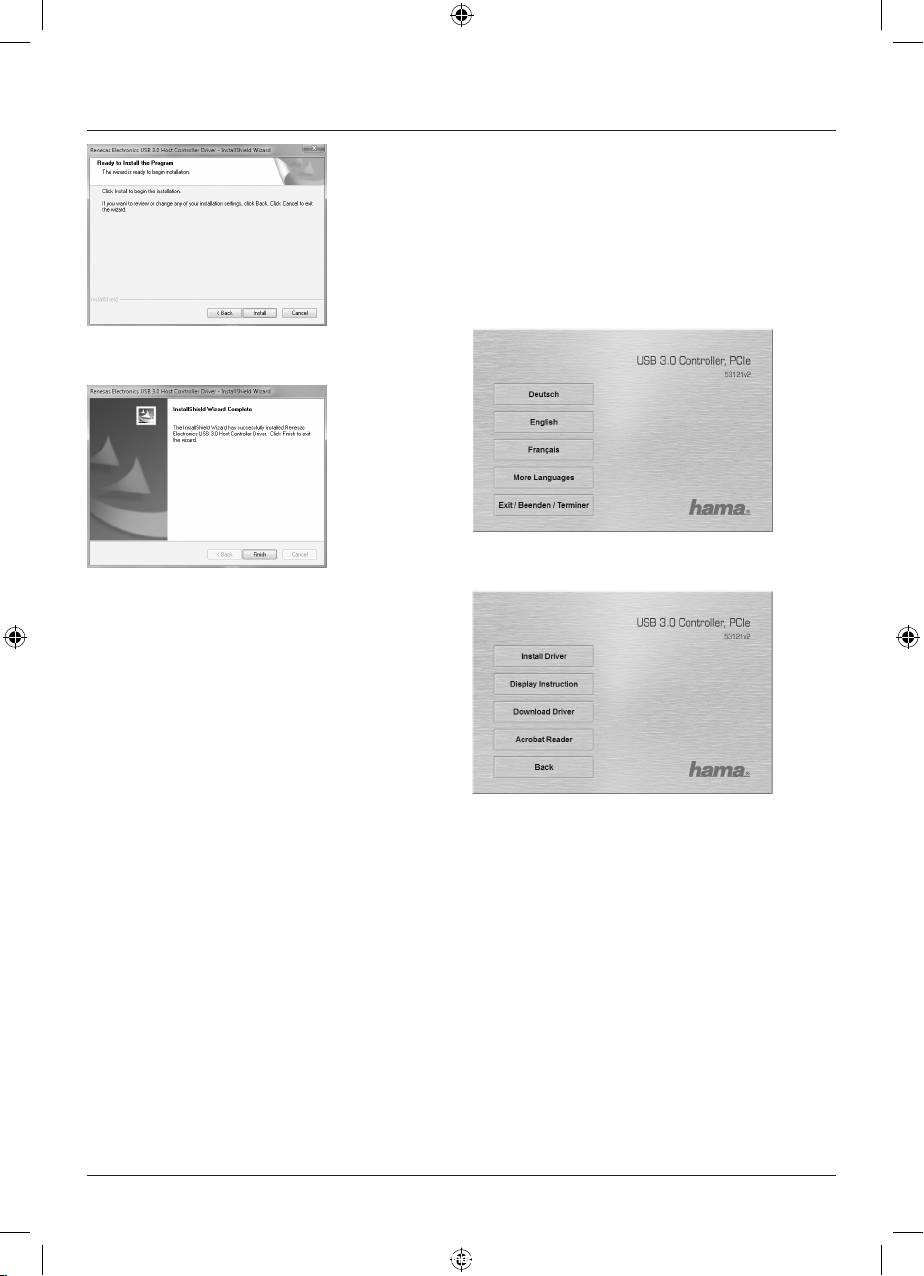
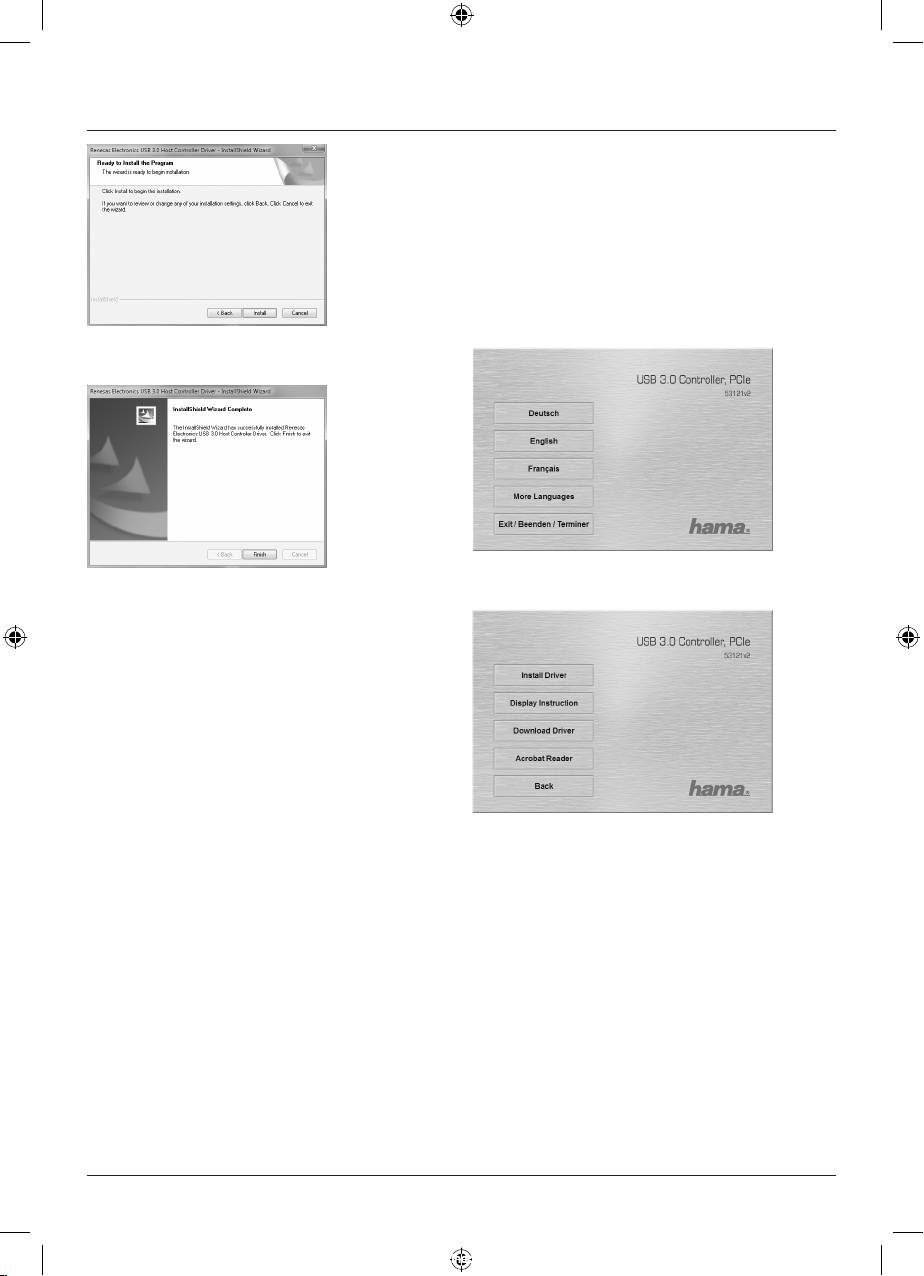
Klicken Sie auf Installieren.
Maustaste auf die Datei autorun.exe im Hauptverzeichnis
der Treiber CD.
Die Installation ist erfolgreich beendet.
Klicken Sie abschließend auf Fertig stellen.
Wählen Sie die passende Sprache aus.
Bauen Sie nun die USB 3.0 PCIe Karte, wie in der Rubrik
Hardwareinstallation beschrieben ein. Starten Sie
anschließend den Computer, Windows erkennt das neue
Gerät und bindet den installierten Treiber in das System
ein.
Ob die PCIe Karte ordnungsgemäß installiert wurde,
können Sie unter Start (Windows Logo) ->
Systemsteuerung -> System und Wartung ->
Geräte-Manager nachsehen. Unter Umständen werden
Sie von der Windows Benutzerkontensteuerung
aufgefordert, dieser Aktion zuzustimmen. Klicken Sie
deshalb auf die Schaltäche -> Fortsetzen. Folgende
Einträge müssen ohne gelbe Ausrufezeichen vorhanden
Klicken Sie auf Treiberinstallation.
sein.
Hinweis:
USB-Controller
Möchten Sie die Bedienungsanleitung in elektronischer
• Renesas Electronics USB 3.0 Host Controller
Form lesen, klicken Sie auf Anleitung anzeigen. Beachten
• Renesas Electronics USB 3.0 Root Hub
Sie, dass zum Anzeigen der Anleitung ein installierter
Adobe Acrobat Reader benötigt wird. Falls dieses
Programm nicht installiert ist, klicken Sie auf Acrobat
Installation unter Windows XP mit Service Pack 3
Reader, um die Software von CD zu installieren. Klicken
Sie auf Treiber-Download um zu überprüfen, ob neue
Vorraussetzung:
Treiber für das Produkt vorhanden sind. Um zur
Stellen Sie sicher, das Ihr Benutzerkonto unter Windows
Sprachauswahl zurückkehren, wählen Sie Zurück.
XP über Administratorenrechte verfügt, ansonsten schei-
tert die Treiberinstallation. Weiterhin ist ein installiertes
Service Pack 3 von Microsoft Vorraussetzung für die
3
00053121man_V2_cs_de_el_en_es_fi_fr_hu_it_nl_pl_pt_ro_ru_sk_sv_tr.indd 3 30.03.12 09:34
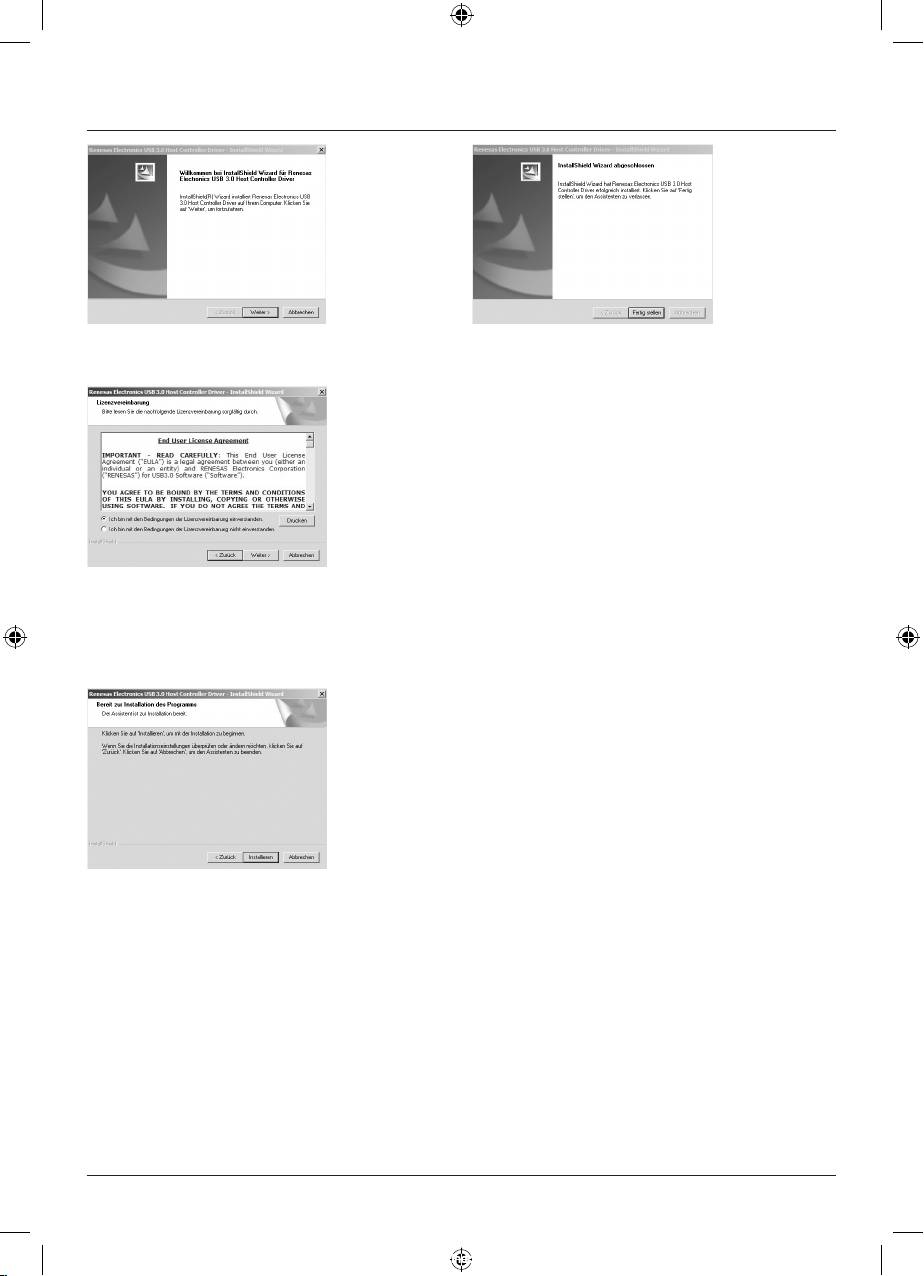
Klicken Sie auf Weiter.
Die Installation ist erfolgreich beendet. Klicken Sie
abschließend auf Fertig stellen.
Bauen Sie die PCIe Karte, wie im Abschnitt
Hardwareinstallation beschrieben ein. Starten Sie
anschließend den Computer, Windows erkennt das neue
Gerät und bindet den installierten Treiber in das System
ein.
Ob die PCIe Karte ordnungsgemäß installiert wurde,
können Sie unter Start -> Systemsteuerung -> Leistung
und Wartung -> System -> Hardware -> Geräte-Manager
nachsehen. Dort müssen folgende Einträge ohne gelbes
Ausrufezeichen vorhanden sein.
Akzeptieren Sie die Bedingungen der Lizenzvereinbarung,
indem Sie die Option „Ich bin mit den Bedingungen der
USB-Controller
Lizenzvereinbarung einverstanden“ auswählen, und
• Renesas Electronics USB 3.0 Host Controller
anschließend auf Weiter klicken.
• Renesas Electronics USB Root Hub
Hardwareinstallation:
Um die Karte zu installieren, müssen Sie Ihren Computer
öffnen. Achten Sie daher unbedingt darauf, dass Sie Ihren
Computer vorher vom Stromnetz getrennt haben. Sollten
Sie mit dem internen Aufbau Ihres Computers nicht so
sehr vertraut sein, lesen Sie bitte im Handbuch Ihres
Computers nach oder fragen Sie einen Fachmann.
• Schalten Sie alle angeschlossenen Geräte und Ihren
Computer ab.
Klicken Sie auf Installieren.
• Stecken Sie den PC aus, bevor Sie mit der Installation
beginnen.
• Öffnen Sie die Abdeckung Ihres Computers.
• Halten Sie die PCIe Karte an den Ecken der Platine und
stecken Sie diese in den freien PCIe- Einsteckplatz.
Hinweis: Achten Sie darauf, dass statische
Elektrizität sowohl die PCIe Karte als auch Ihren
Computer beschädigen kann. Entladen Sie sich durch
Berühren eines metallischen Gegenstandes. Suchen
Sie einen freien PCIe- Einsteckplatz. Entfernen Sie
das Slotblech für diesen Steckplatz. Bewahren Sie die
Schraube gut auf, Sie benötigen sie später zum
Befestigen der PCIe Karte.
4
00053121man_V2_cs_de_el_en_es_fi_fr_hu_it_nl_pl_pt_ro_ru_sk_sv_tr.indd 4 30.03.12 09:34
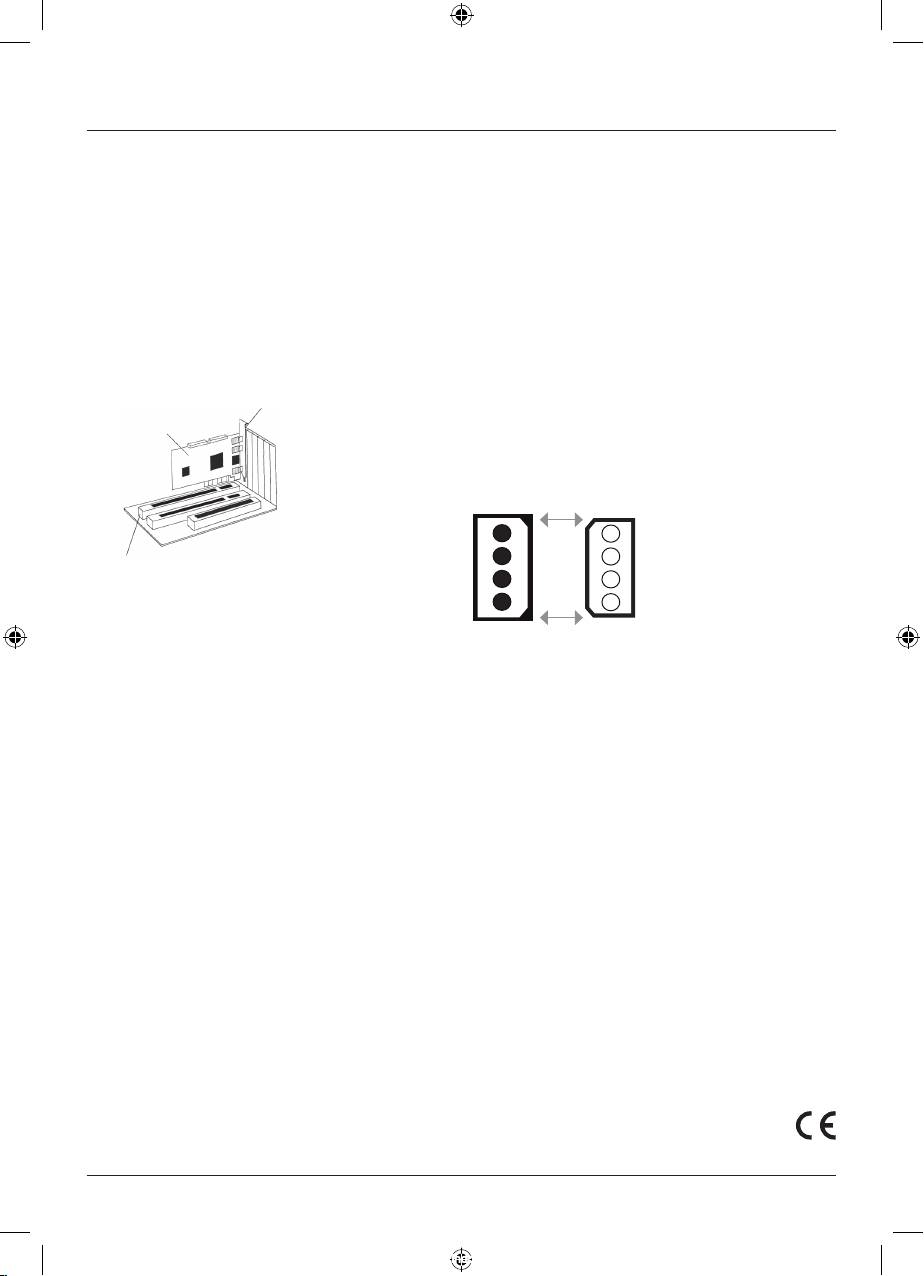
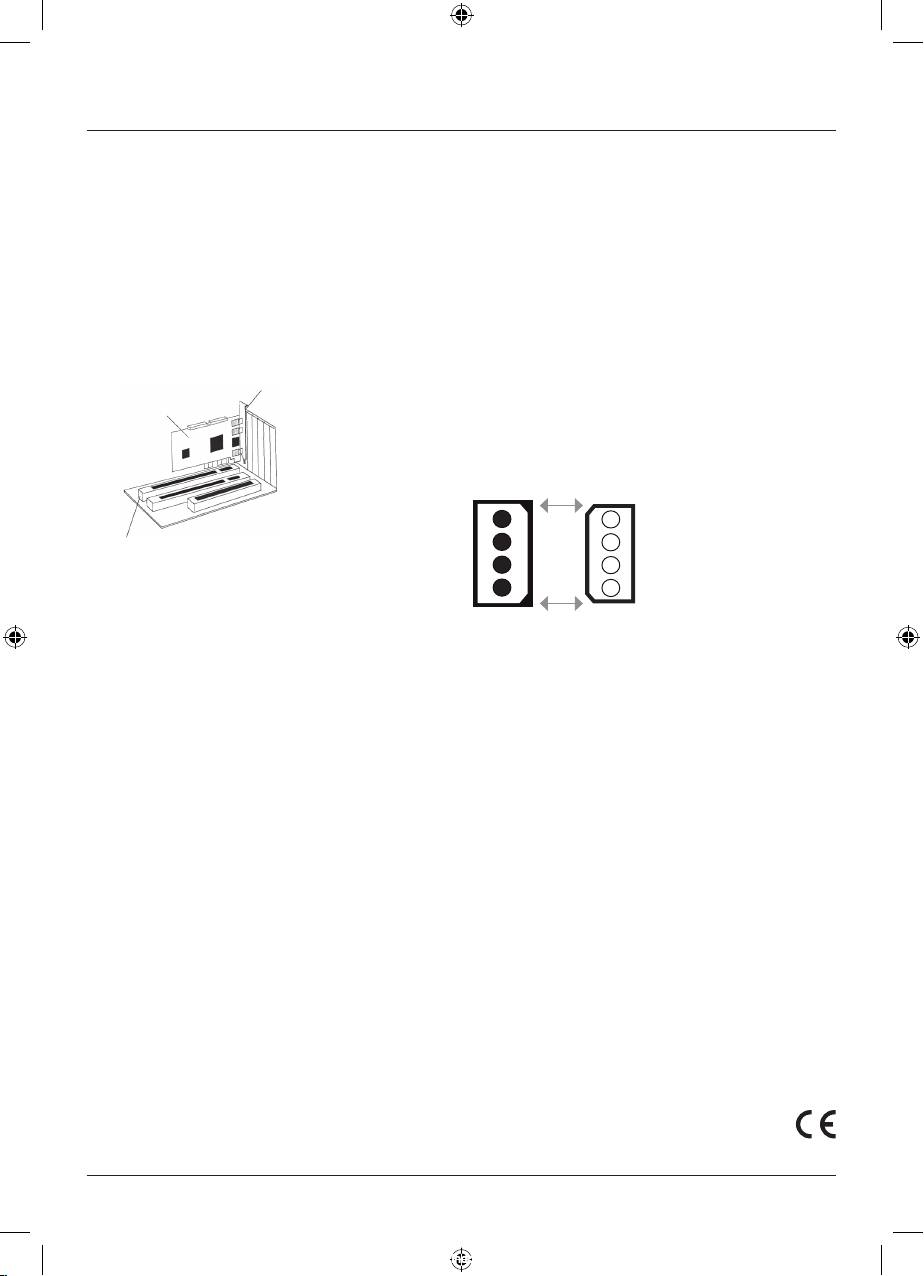
• Drücken Sie die Karte nun vorsichtig in den Einsteck-
Stromversorung: (optional)
platz bis der Haltewinkel au iegt und die vergoldeten
Steckkontakte vollständig im Steckplatz verschwunden
Die Karte ist mit einem internen 4-poligen Stromanschluss
sind.
ausgestattet.
• Befestigen Sie die Karte mit der zuvor entfernten Slot-,
Den Stromanschluss müssen Sie normalerweise nur dann
Blechschraube.
mit der Stromversorgung Ihres Computers verbinden, wenn
• Schließen Sie das Gehäuse Ihres Computers und
Sie USB Geräte verwenden, welche über keine eigene
verbinden Sie ihn wieder mit der Spannungs-
Stormversorungung verfügen.
versorgung.
Stecken Sie vorsichtig ein freies Stromversorgungskabel
• Schalten Sie nun Ihren Rechner wieder ein.
Ihres Computers in den Anschluss ein. Achten Sie beim
Einstecken darauf, dass Sie den Stecker richtig herum ein-
stecken. Der Stecker kann bei richtiger Polung ohne hohen
PCIe Express
Kraftaufwand eingesteckt werden.
Einsteckkarte /
Slot card
Slotblech /
Achtung: ! Bei falsch herum eingesteckten Stecker kann es
Slot plate
zu Zerstörungen am Netzeil, Computer oder Karte kommen!
Die Firma Hama GmbH & Co KG haftet in diesen Fällen
nicht für die Schäden die durch Nichtbeachtung entstehen
können.
4 3 2 1
PCIe Steckplatz / PCIe Slot
!
1 2 3 4
Auswechslung der Slotblende:
(optional bei Benutzung eines Mini-PC´s)
Supportinformationen:
Die Slotblende ist durch 2 Schrauben mit der Karte
verbunden. Lösen Sie diese zwei Schrauben vorsichtig
Bei defekten Produkten wenden Sie sich bitte an Ihren
mit einem geeigneten Schraubenzieher. Gehen Sie dabei
Händler oder der Hama Produktberatung:
äußerst vorsichtig vor, damit Sie die Karte dabei nicht
beschädigen!
Support Hotline – Hama Produktberatung:
Nachdem Sie die Schrauben gelöst und die alte
(deutsch/englischsprachig)
Slotblende entfernt haben, ersetzen Sie diese durch die
Tel. +49 (0) 90 91 / 502 – 115
beiliegende Low-Pro le Slotblende. Befestigen Sie nun
Fax. +49 (0) 90 91 / 502 – 272
diese Blende mit den beiden Schrauben, und drehen
e-mail: mailto:produktberatung@hama.de
diese vorsichtig und behutsam wieder fest. Bauen Sie
nun die Karte, wie im Abschnitt Hardwareinstallation
Produktinformationen oder neue Treiber nden Sie im
beschrieben ein.
Internet unter www.hama.com
Sicherheitshinweise:
Bitte verwenden Sie das Produkt weder in der Nähe von
Heizungen noch in staubiger oder feuchter Umgebung.
5
00053121man_V2_cs_de_el_en_es_fi_fr_hu_it_nl_pl_pt_ro_ru_sk_sv_tr.indd 5 30.03.12 09:34
g Operating Instruction
Package contents
Note:
If you want to read the operating instructions in electronic
• USB 3.0 controller card, PCIe, with 2 ports
form, click Display Instructions. Please note that you must
• Low-prole slot cover for installation in mini PCs
have Adobe Acrobat Reader installed on your computer
• Driver CD-ROM
to display the instructions. If this program has not been
• These printed installation instructions
installed, click Acrobat Reader to install the software
from the CD. Click Download driver to check to see if new
drivers for the product are available. Click Back to return
Software installation:
to language selection.
Installation on Windows Vista and Windows 7
Before installing the PCIe card into your computer
(see the Installing the hardware section), you must rst
install the required driver from the CD-ROM.
Place the enclosed driver CD-ROM into your computer’s
drive. The Hama installation program starts automatically
after a few moments. If the program does not start, use
the right mouse button to double click autorun.exe in the
After installation has started, User Account Control,
main directory of the driver CD.
which is integrated in Windows Vista/Windows 7,
may ask you whether you want to install the driver.
Click Continue, or, on Windows 7, click Yes.
Select the appropriate language.
Click Next.
Click on Install Driver.
Accept the terms and conditions of the license
agreement by selecting “I accept the terms of the
license agreement” and then click “Next” to continue.
6
00053121man_V2_cs_de_el_en_es_fi_fr_hu_it_nl_pl_pt_ro_ru_sk_sv_tr.indd 6 30.03.12 09:34
Before installing the PCIe card into your computer
(see the Installing the hardware section), you must rst
install the required driver from the CD-ROM.
To do so, place the enclosed driver CD into your
computer’s drive. The Hama installation program starts
automatically after a few moments. If the program does
not start, use the right mouse button to double click
autorun.exe in the main directory of the driver CD.
Click Install.
Select the appropriate language.
Installation has been completed successfully.
Then click Finish.
Now install the USB 3.0 PCIe card as described in the
Installing the Hardware section. Next, start up the
computer. Windows detects the new device and
incorporates the driver that was installed into the system.
You can verify whether the PCIe card was successfully
installed by checking under Start (Windows logo) ->
Control Panel -> System and Maintenance ->
Device Manager. In some circumstances, you may be
asked by Windows User Account Control to allow this
Click on Install Driver.
action. Click Continue. The following entries must appear
without a yellow exclamation mark.
Note:
If you want to read the operating instructions in electronic
Universal Serial Bus controllers
form, click Display Instructions. Please note that you must
• Renesas Electronics USB 3.0 Host Controller
have Adobe Acrobat Reader installed on your computer
• Renesas Electronics USB Root Hub
to display the instructions. If this program has not been
installed, click Acrobat Reader to install the software
from the CD. Click Download driver to check to see if new
Installation on Windows XP with Service Pack 3
drivers for the product are available. Click Back to return
to language selection.
Requirements:
Ensure that your user account has administration
privileges for Windows XP, otherwise the driver
installation will not be successful. In addition, Service
Pack 3 from Microsoft must also be installed on your
computer in order to install and operate the USB 3.0
PCIe Card.
7
00053121man_V2_cs_de_el_en_es_fi_fr_hu_it_nl_pl_pt_ro_ru_sk_sv_tr.indd 7 30.03.12 09:34

Click Next.
Installation has been completed successfully.
Then click Finish.
Install the PCIe card into your computer as described
in the Installing the Hardware section. Next, start up the
computer. Windows detects the new device and
incorporates the driver that was installed into the system.
You can check whether the PCIe card was installed
successfully under Start -> Control Panel -> Performance
and Maintenance -> System -> Hardware -> Device
Manager. The following must appear without a yellow
exclamation mark.
Accept the terms and conditions of the license
agreement by selecting “I accept the terms of the
Universal Serial Bus controllers
license agreement” and then click “Next” to continue.
• Renesas Electronics USB 3.0 Host Controller
• Renesas Electronics USB Root Hub
Installing the hardware
You must open your computer to install the card.
Ensure that you have rst disconnected your computer
from the mains power. If you are not familiar with the
internal setup of your computer, please consult your
computer manual or ask a qualied technician.
• Switch off your computer and all connected devices.
• Unplug your PC before beginning installation.
Click Install.
• Open the case of the computer.
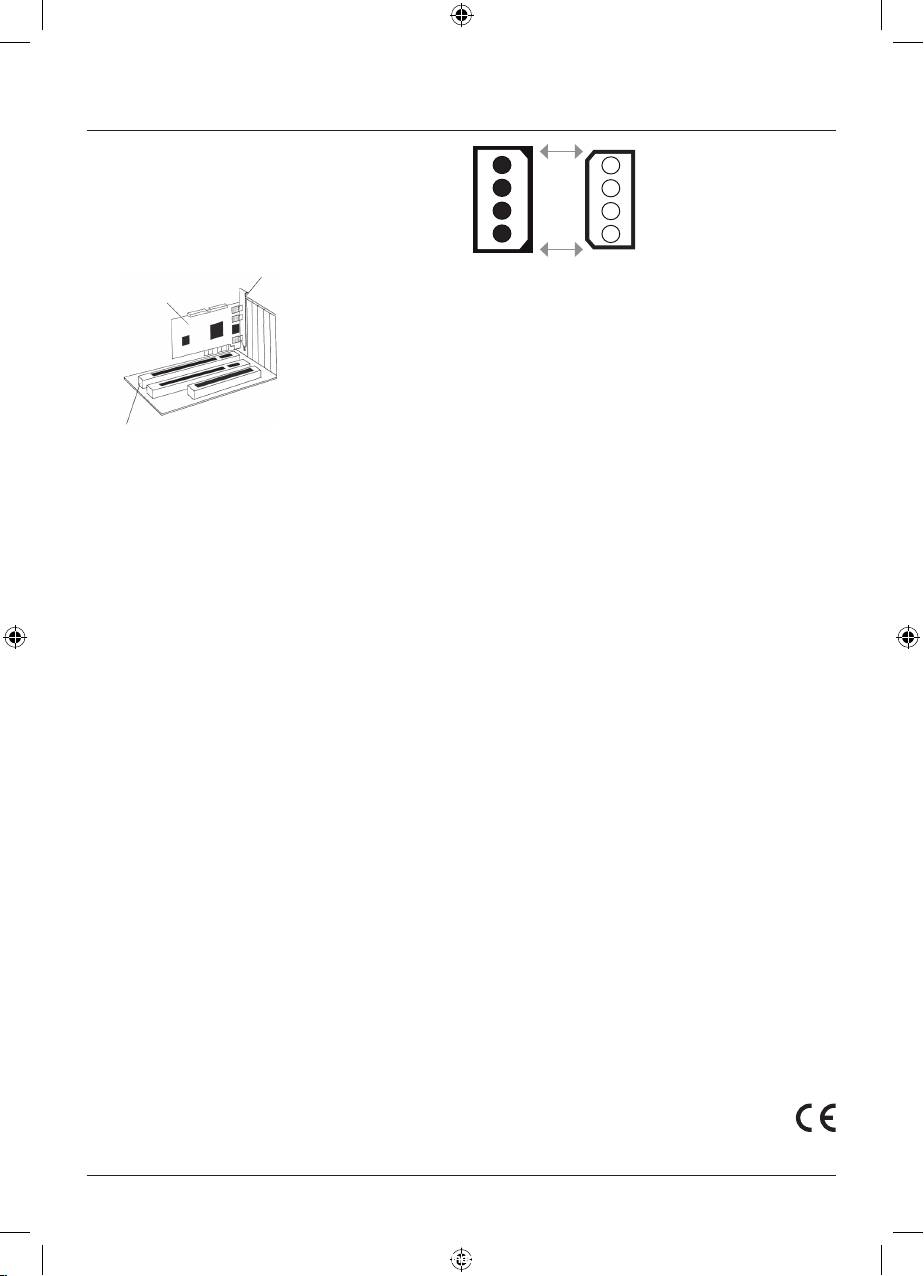
• Hold the PCIe card at the edge of the board and insert
it into the free PCIe slot.
Note: Be aware that static electricity can damage both
the PCIe card and your computer. Ground yourself by
touching a metal object. Find a free PCIe slot. Remove
the plate for this slot. Keep the screw – you will need it
later to secure the PCIe card.
• Carefully push the card into the slot until the holding
bracket is lined up with the casing and the gold-plated
contacts have disappeared into the slot.
• Secure the card using the slot cover plate screw you
removed earlier.
8
00053121man_V2_cs_de_el_en_es_fi_fr_hu_it_nl_pl_pt_ro_ru_sk_sv_tr.indd 8 30.03.12 09:34
• Close the case of your computer, and reconnect it to
4 3 2 1
power.
• Turn your computer back on.
!
1 2 3 4
PCIe Express
Einsteckkarte /
Slot card
Slotblech /
Slot plate
Support information:
Contact your dealer or Hama Product Consulting if you
have a faulty product:
Support Hotline – Hama Product Consulting:
(Languages: German and English)
Tel.: +49 (0) 90 91 / 502 – 115
PCIe Steckplatz / PCIe Slot
Fax: +49 (0) 90 91 / 502 – 272
E-mail: mailto:produktberatung@hama.de
Replacing the slot cover
Product information and new drivers can found on the
(optional for use with a mini PC)
Internet at www.hama.com
The slot cover is connected to the card with two screws.
Loosen the screws carefully using an appropriate screw-
driver. Take special care not to damage the card.
After you have removed the screw and the slot cover,
replace it with the low-pro le slot cover. Attach the cover
using the two screws and tighten them carefully. Install
the card in your computer as described in the section on
hardware installation.
Safety instructions:
Keep this device away from heaters and radiators and
free of dust or moisture when operating.
Power supply (optional)
The card is equipped with an internal four-pin power
connection.
You usually connect the power connection to you
computer’s internal power supply if you use USB devices
that do not have a power supply of their own.
Carefully insert a free power supply cable from your com-
puter into the power connection. Ensure that the plug is
turned correctly when you insert it. With the right polarity,
it can be inserted without exerting much force.
Caution: ! If the plug is turned the wrong way, the power
supply, computer or card may be damaged.
Hama GmbH & Co KG accepts no liability for damage that
arises from a failure to observe these instructions.
9
00053121man_V2_cs_de_el_en_es_fi_fr_hu_it_nl_pl_pt_ro_ru_sk_sv_tr.indd 9 30.03.12 09:34
f Mode d‘emploi
Contenu de l‘emballage :
Remarque :
Cliquez sur Afficher le mode d‘emploi dans le cas où
• Carte PCIe USB 3.0 avec 2 ports
vous désirez lire la version numérique des instructions. Le
• Cache emplacement demi-hauteur à installer dans
programme Adobe Acrobat Reader doit être installé sur
les mini PC
votre ordinateur an de pouvoir consulter le chier. Si tel
• Pilote sur CD-ROM
n‘est pas encore le cas, cliquez sur Acrobat Reader an
• Un exemplaire de la présente notice d’installation
d‘installer le logiciel à partir du CD. Cliquez sur
Téléchargement de pilotes an de consulter la dernière
version du pilote. Sélectionnez Retour an de retourner à
Installation du logiciel :
la fenêtre de sélection de la langue.
Installation sous Windows Vista et Windows 7
Veuillez commencer par installer le pilote nécessaire
à partir du CD avant d‘insérer la carte PCIe dans votre
ordinateur (voir le chapitre Installation de matériel).
Insérez le CD pilote fourni dans le lecteur de votre ordina-
teur. Le programme d’installation automatique de Hama
démarre peu après. Dans le cas où le programme ne
démarrerait pas automatiquement, double-cliquez avec
le bouton droit de votre souris sur le chier autorun.exe
dans le répertoire principal du CD.
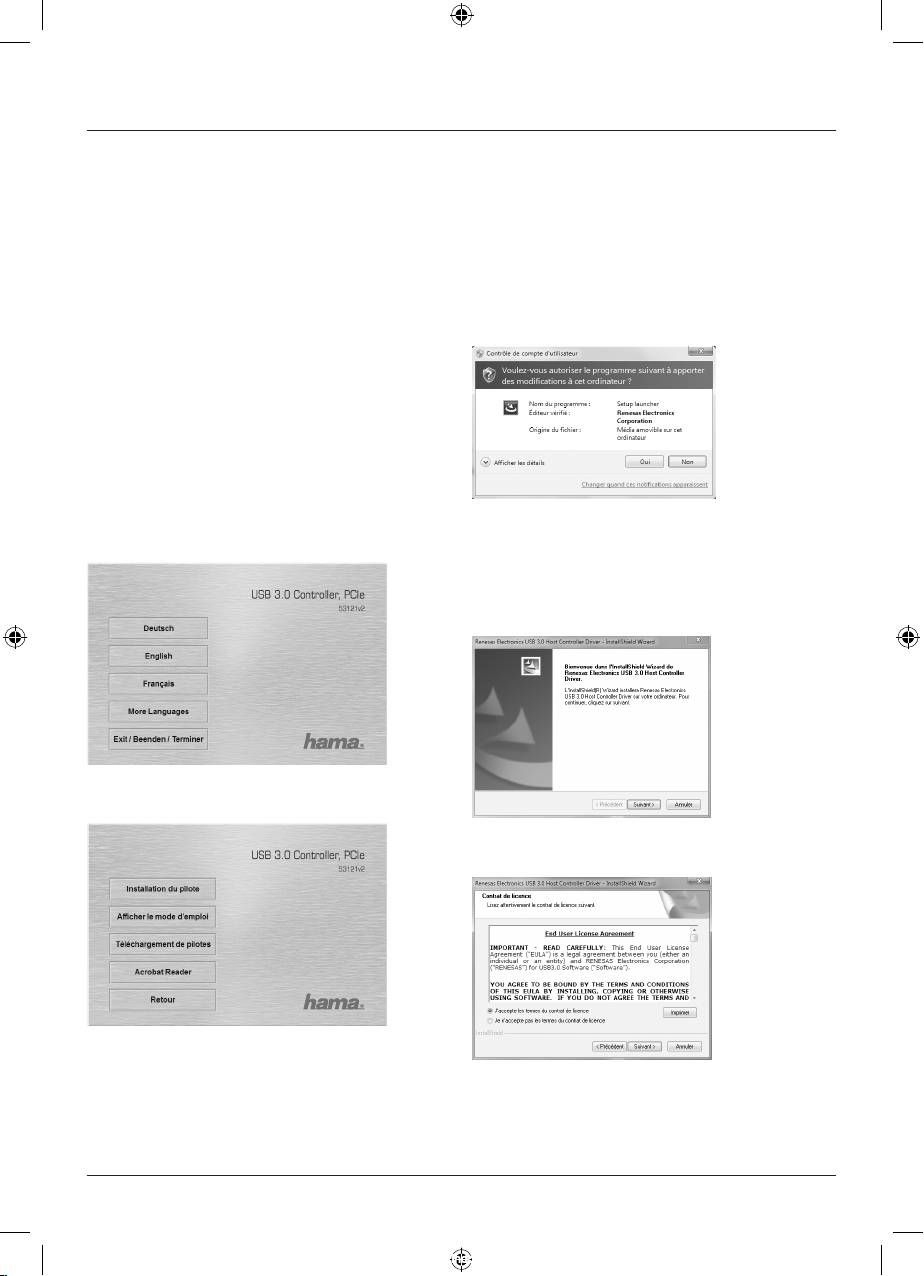
Au début de l‘installation, il est possible que le contrôle
du compte utilisateur de Windows Vista / 7 vous demande
l’autorisation de continuer la procédure d’installation du
pilote. Cliquez sur le bouton Continuer l’installation ou sur
Oui dans Windows 7.
Sélectionnez la langue désirée.
Cliquez sur Suivant.
Cliquez sur Installer du pilote.
Cochez la case « J’accepte les termes du contrat de
licence » le cas échéant, puis continuez en cliquant sur
Suivant.
10
00053121man_V2_cs_de_el_en_es_fi_fr_hu_it_nl_pl_pt_ro_ru_sk_sv_tr.indd 10 30.03.12 09:34
L‘installation du Service Pack 3 de Microsoft est
également une condition préalable pour l‘installation et le
fonctionnement de la carte PCIe USB 3.0.
Veuillez commencer par installer le pilote nécessaire à
partir du CD-ROM avant d‘insérer la carte PCIe dans votre
ordinateur (voir le chapitre Installation de matériel).
Insérez donc le CD pilote fourni dans le lecteur de votre
ordinateur. Le programme d’installation automatique de
Hama démarre peu après. Dans le cas où le programme
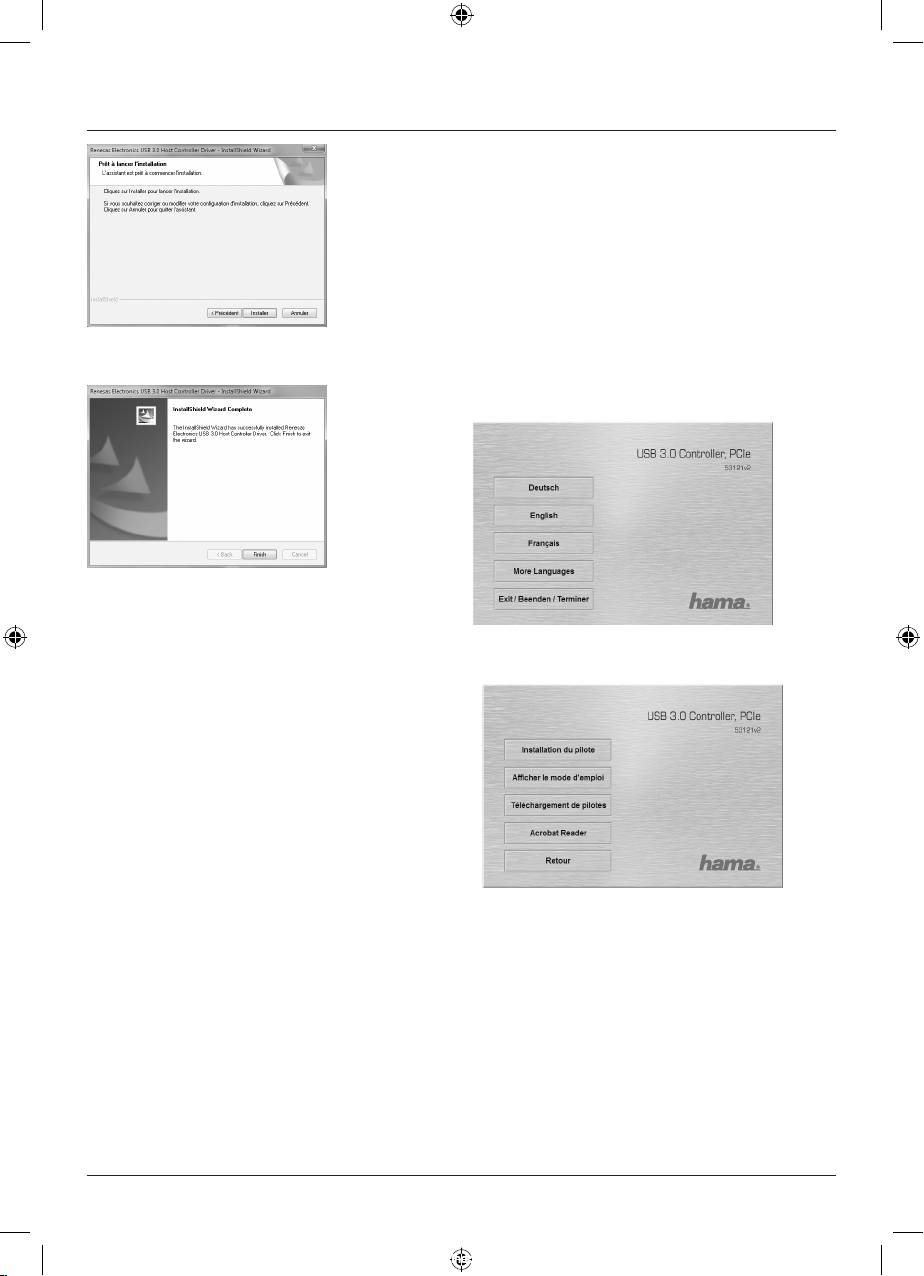
Cliquez sur Installer.
ne démarrerait pas automatiquement, double-cliquez
avec le bouton droit de votre souris sur le chier autorun.
exe dans le répertoire principal du CD.
L’installation s‘est déroulée avec succès.
Cliquez enn sur Terminer.
Vous pouvez alors installer la carte PCIe USB 3.0 en
Sélectionnez la langue désirée.
suivant les étapes décrites sous Installation du matériel.
Démarrez votre ordinateur ; Windows reconnaît le
nouveau périphérique et intègre le pilote installé dans le
système.
Vous pouvez vérier si la carte PCIe a été correctement
installée en consultant Démarrer (Windows Logo) ->
Panneau de configuration -> Systéme et maintenace
-> Gestionnaire de périphériques. Il est possible que le
contrôle du compte utilisateur de Windows vous demande
l’autorisation de continuer la procédure. Cliquez sur le
bouton -> Continuer. Les entrées suivantes doivent être
afchées sans point d’exclamation jaune.
Cliquez sur Installer du pilote.
Contrôllers de bus USB
Remarque :
• Renesas Electronics USB 3.0 Host Controller
Cliquez sur Afficher le mode d‘emploi dans le cas où
• Renesas Electronics USB Root Hub
vous désirez lire la version numérique des instructions. Le
programme Adobe Acrobat Reader doit être installé sur
Installation sous Windows XP avec le Service Pack 3
votre ordinateur an de pouvoir consulter le chier. Si tel
n‘est pas encore le cas, cliquez sur Acrobat Reader an
Conditions préalables :
d‘installer le logiciel à partir du CD. Cliquez sur Téléchar-
Assurez-vous que votre compte utilisateur Windows XP
gement de pilotes an de consulter la dernière version du
dispose des droits d’administrateur, sinon, vous ne
pilote. Sélectionnez Retour an de retourner à la fenêtre
pourrez pas réaliser l‘installation du pilote.
de sélection de la langue.
11
00053121man_V2_cs_de_el_en_es_fi_fr_hu_it_nl_pl_pt_ro_ru_sk_sv_tr.indd 11 30.03.12 09:34
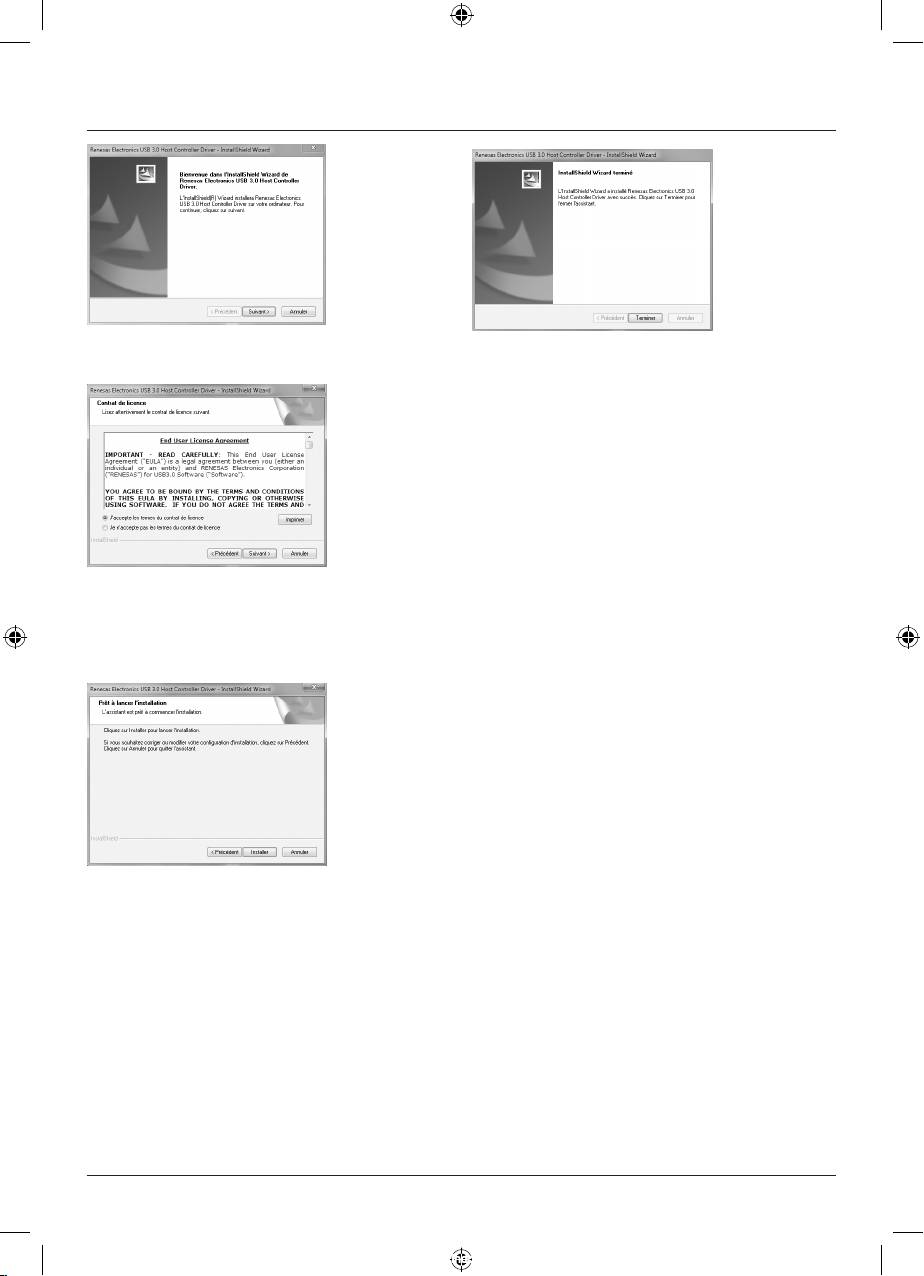
Cliquez sur Suivant.
L’installation s‘est déroulée avec succès.
Cliquez enn sur Terminer.
Installez la carte PCIe dans votre ordinateur en suivant les
étapes décrites sous Installation du matériel.
Démarrez votre ordinateur ; Windows reconnaît le
nouveau périphérique et intègre le pilote installé dans le
système.
Vous pouvez vérier si la carte PCIe a été correctement
installée en consultant Démarrer -> Panneau de configu-
ration -> Performances et entretien -> Système ->
Matériel -> Gestionnaire de maintanence. Les en-
Cochez la case « J’accepte les termes du contrat de
trées suivantes doivent y être afchées sans point
licence » le cas échéant, puis continuez en cliquant sur
d’exclamation jaune.
Suivant.
Contolêurs de bus USB
• Renesas Electronics USB 3.0 Host Controller
• Renesas Electronics USB Root Hub
Installation du matériel :
Vous devez ouvrir votre boîtier d’ordinateur an d’installer
la carte. Contrôlez donc impérativement que votre
ordinateur est hors tension avant de commencer
l’installation. Consultez le manuel de votre ordinateur ou
un spécialiste si vous n’êtes pas bien familiarisé avec
l‘architecture interne de votre ordinateur.
Cliquez sur Installer.
• Mettez votre ordinateur et tous les périphériques
connectés hors tension.
• Débranchez l’alimentation électrique de votre
ordinateur avant de commencer l‘installation.
• Ouvrez le boîtier de votre ordinateur.
• Tenez la carte PCIe par les coins de la platine, puis
insérez-la dans un emplacement PCIe libre de votre
ordinateur.
12
00053121man_V2_cs_de_el_en_es_fi_fr_hu_it_nl_pl_pt_ro_ru_sk_sv_tr.indd 12 30.03.12 09:34
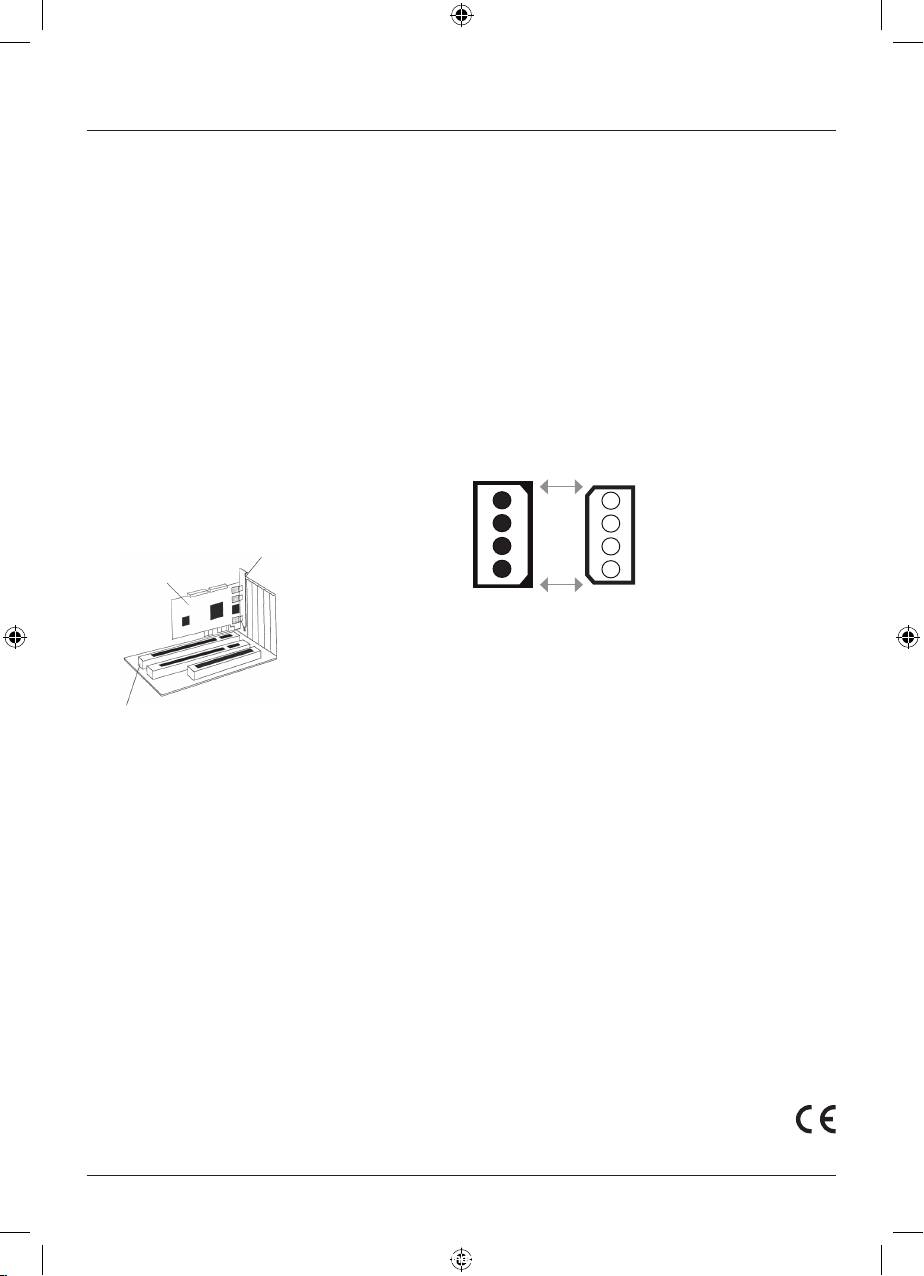
Remarque : notez que de l’électricité statique est
Alimentation électrique : (en option)
susceptible d’endommager votre ordinateur ainsi que
la carte PCI. Déchargez-vous donc de toute électricité
La carte est équipée d'une connexion électrique interne
statique en touchant un objet métallique. Recherchez
à 4 broches.
un emplacement PCIe libre. Retirez le couvercle de
Cette connexion électrique ne doit normalement être
protection de cet emplacement. Conservez
reliée à l'alimentation de votre ordinateur que si vous
soigneusement la vis dont vous aurez besoin plus tard
utilisez des appareils USB ne disposant pas d'une propre
pour xer la carte PCIe.
source d'alimentation électrique.
• Appuyez délicatement sur la carte a n de l’introduire
En chez avec précaution un câble d'alimentation élec-
dans l’emplacement jusqu’à ce que les encoches de
trique libre de votre ordinateur dans la connexion. Veillez
xation reposent dans la rainure et que les
à en cher la che dans le bon sens. Si vous respectez la
connecteurs dorés aient complètement disparu dans
polarité, la che peut être insérée sans forcer.
l’emplacement.
Attention : Le bloc secteur, l'ordinateur ou la carte
• Fixez la carte à l’aide de la vis que vous venez de
peuvent être endommagés si la che n'est pas en chée
retirer.
correctement ! L’entreprise Hama GmbH & Co KG ne peut
• Fermez le boîtier de votre ordinateur et rebranchez-le à
être tenue responsable des dommages causés par le non-
l‘alimentation électrique.
respect de ces consignes.
• Mettez alors votre ordinateur sous tension.
4 3 2 1
PCIe Express
Einsteckkarte /
!
Slot card
Slotblech /
Slot plate
1 2 3 4
Support technique :
En cas de produit défectueux, veuillez vous adresser à
votre revendeur ou au département de conseil produits
de Hama :
PCIe Steckplatz / PCIe Slot
Assistance – Conseil produits Hama : (allemand/anglais)
Tél. +49 (0) 90 91 / 502 – 115
Remplacement du cache :
Fax +49 (0) 90 91 / 502 – 272
(en option en cas d'utilisation d'un mini PC)
E-mail : mailto:produktberatung@hama.de
Le cache est xé à la carte à l’aide de deux vis. Desserrez
Les informations produits et les nouveaux pilotes sont
les deux vis avec précaution à l'aide d'un tournevis
disponibles à l‘adresse suivante :
approprié. Procédez avec la plus grande précaution a n
www.hama.com
de ne pas endommager la carte !
Après avoir desserré les vis, retirez l'ancien cache
emplacement et remplacez-le par le cache demi-hauteur
fourni. Fixez le nouveau cache à l'aide des deux vis et
resserrez-les avec précaution. Installez la carte en su-
ivant les étapes décrites sous Installation du matériel.
Consignes de sécurité :
N‘utilisez pas le produit à proximité de radiateurs ni dans
des environnements excessivement poussiéreux ou
humides.
13
00053121man_V2_cs_de_el_en_es_fi_fr_hu_it_nl_pl_pt_ro_ru_sk_sv_tr.indd 13 30.03.12 09:34
e Instrucciones de uso
Contenido del paquete:
Nota:
Si desea visualizar las instrucciones de manejo en
• Tarjeta PCIe USB 3.0 con 2 conexiones
formato electrónico, haga clic en Display Instructions.
• Panel de ranuras de perl bajo para el montaje en mini
Recuerde que para poder visualizar las instrucciones es
PCs
necesario tener instalado un Adobe Acrobat Reader.
• CD-ROM de controladores
Si no tiene instalado este programa, haga clic en Acrobat
• Las presentes instrucciones de instalación impresas
Reader para instalar el software del CD. Haga clic en
Download Driver para comprobar si hay nuevos contro-
ladores para el producto. Para volver a la selección de
Instalación del software:
idioma, haga clic en Back.
Instalación bajo Windows Vista y Windows 7
Antes de montar la tarjeta PCIe en su ordenador (véase
la sección Instalación del hardware), debe instalar el
controlador necesario del CD-ROM.
Coloque el CD de controladores suministrado en la unidad
de CD de su ordenador. El programa de instalación de
Hama arranca automáticamente poco después. Si el
programa no arranca, haga clic con la tecla derecha del
ratón en el archivo autorun.exe que se encuentra en el
Una vez iniciada la instalación, puede ocurrir que
directorio principal del CD de controladores.
aparezca el Gestor de usuarios integrado en Windows
Vista / 7 y le pida su autorización para la instalación de los
controladores. Para ello haga clic en el botón Continuar
o, con Windows 7, en Sí.
Elija el idioma que desee.
Haga clic en Continuar.
Haga clic en Install Driver.
Acepte las condiciones del acuerdo de licencia: para ello,
elija la opción “Estoy de acuerdo con las condiciones
del acuerdo de licencia” y haga clic en Continuar a
continuación.
14
00053121man_V2_cs_de_el_en_es_fi_fr_hu_it_nl_pl_pt_ro_ru_sk_sv_tr.indd 14 30.03.12 09:34
Antes de montar la tarjeta PCIe en su ordenador (véase
la sección Instalación del hardware), debe instalar el
controlador necesario del CD-ROM.
Para ello, coloque el CD de controladores suministrado
en la unidad de su portátil. El programa de instalación
de Hama arranca automáticamente poco después. Si el
programa no arranca, haga clic con la tecla derecha del
ratón en el archivo autorun.exe que se encuentra en el
directorio principal del CD de controladores.
Haga clic en Instalar.
Elija el idioma que desee.
La instalación ha concluido con éxito. Seguidamente,
haga clic en Finalizar.
Monte ahora la tarjeta PCIe USB 3.0 tal y como se
describe en la rúbrica Instalación del hardware.
A continuación, encienda el ordenador, Windows detecta
el nuevo dispositivo e integra el controlador instalado en
el sistema.
Puede comprobar si la tarjeta PCIe se ha instalado cor-
rectamente en Inicio (símbolo de Windows) -> Control
del sistema -> Sistema y mantenimiento -> Administrador
de dispositivos. En algunos casos puede ocurrir que el
Gestor de usuarios de Windows le pida que conrme su
Haga clic en Install Driver.
conformidad con esta acción. Para ello haga clic en el
botón -> Continuar. Las siguientes entradas no deben
Nota:
llevar el signo de admiración amarillo.
Si desea visualizar las instrucciones de manejo en
formato electrónico, haga clic en Display Instructions.
USB-Controller
Recuerde que para poder visualizar las instrucciones es
• Renesas Electronics USB 3.0 Host Controller
necesario tener instalado un Adobe Acrobat Reader. Si
• Renesas Electronics USB Root Hub
no tiene instalado este programa, haga clic en Acrobat
Reader para instalar el software del CD. Haga clic en
Instalación bajo Windows XP con Service Pack 3
Download Driver para comprobar si hay nuevos contro-
ladores para el producto. Para volver a la selección de
Condición:
idioma, haga clic en Back.
Asegúrese de que su cuenta de usuario de Windows XP
dispone de derechos de administrador, de otro modo,
la instalación no tendrá éxito. Un Service Pack 3 de
Microsoft instalado es condición para la instalación y
funcionamiento de la tarjeta PCIe USB 3.0.
15
00053121man_V2_cs_de_el_en_es_fi_fr_hu_it_nl_pl_pt_ro_ru_sk_sv_tr.indd 15 30.03.12 09:34

Haga clic en Continuar.
La instalación ha concluido con éxito. Seguidamente,
haga clic en Finalizar.
Monte ahora la tarjeta PCIe tal y como se describe en la
sección Instalación del hardware. A continuación,
encienda el ordenador, Windows detecta el nuevo
dispositivo e integra el controlador instalado en el
sistema.
Puede comprobar si la tarjeta PCIe se ha instalado
correctamente en Inicio -> Control del sistema ->
Rendimiento y mantenimiento -> Sistema -> Hardware ->
Administrador de dispositivos. Allí, las siguientes ent-
radas no deben llevar el signo de admiración amarillo.
Acepte las condiciones del acuerdo de licencia: para ello,
elija la opción “Estoy de acuerdo con las condiciones
USB-Controller
del acuerdo de licencia” y haga clic en Continuar a
• Renesas Electronics USB 3.0 Host Controller
continuación.
• Renesas Electronics USB Root Hub
Instalación del hardware:
Para instalar la tarjeta, deberá abrir su ordenador.
Asegúrese de haber desenchufado el ordenador de la red
de corriente. Si no está lo bastante familiarizado con la
estructura interna de su ordenador, consulte el manual de
su ordenador o pregunte a un especialista.
• Apague su ordenador y todos los aparatos
conectados a él.
• Desenchufe el PC de la red de corriente eléctrica antes
Haga clic en Instalar.
de comenzar con la instalación.
• Abra la carcasa de su ordenador.
• Sujete la tarjeta PCIe junto a las esquinas de la platina
e insértela en la entrada libre PCIe.
Nota: Tenga en cuenta que la electricidad estática
puede deteriorar tanto la tarjeta PCIe, como su
ordenador. Descárguese de electricidad estática
tocando un objeto metálico. Busque una entrada PCIe
libre. Retire la chapa del slot de esta entrada. Guarde
el tornillo, lo necesitará posteriormente para jar la
tarjeta PCIe.
16
00053121man_V2_cs_de_el_en_es_fi_fr_hu_it_nl_pl_pt_ro_ru_sk_sv_tr.indd 16 30.03.12 09:34
• Seguidamente, presione con cuidado la tarjeta contra
Suministro de corriente: (opcional)
la entrada hasta que el ángulo de sujeción que está
encima de ella y los contactos dorados hayan
La tarjeta está equipada con una conexión de corriente
desaparecido por completo en la entrada.
de 4 polos.
• Fije la tarjeta con el tornillo retirado de la chapa del
Normalmente, la conexión de corriente se debe conectar
slot.
al suministro de corriente de su ordenador cuando utiliza
• Cierre la carcasa de su ordenador y enchúfelo a la red
dispositivos USB que no disponen de su propia alimenta-
de corriente eléctrica.
ción de corriente.
• Encienda ahora de nuevo su ordenador.
Enchufe con cuidado un cable de alimentación de cor-
riente libre de su ordenador en la conexión. Al hacerlo,
asegúrese de enchufar correctamente el conector.
PCIe Express
Cuando la polaridad es la correcta, el conector se puede
Einsteckkarte /
enchufar sin ejercer fuerza.
Slot card
Slotblech /
Atención: ! Si el conector no se enchufa correctamente,
Slot plate
pueden producirse deterioros en el cable eléctrico, en el
ordenador o en la tarjeta! Hama GmbH & Co KG no se re-
sponsabilizará en tales casos por los deterioros derivados
de la no observación de lo anterior.
4 3 2 1
PCIe Steckplatz / PCIe Slot
!
1 2 3 4
Cambio del panel de ranuras:
(opcional cuando se utiliza un mini PC)
Información de ayuda:
El panel de ranuras está unido a la tarjeta mediante 2
tornillos. Suelte estos dos tornillos cuidadosamente con
Si tiene que hacer alguna reclamación sobre un producto
ayuda de un destornillador adecuado. Proceda con sumo
defectuoso, diríjase a su proveedor o a su distribuidor de
cuidado al hacerlo para no deteriorar la tarjeta.
productos Hama:
Una vez que haya sacado los tornillos y retirado el antiguo
panel de ranuras, sustituya este último por el presente
Línea directa de soporte – Asesoramiento sobre
panel de ranuras de per l bajo. Fije ahora este panel con
productos Hama: (se habla alemán/inglés)
los dos tornillos y apriete éstos de nuevo cuidadosamen-
Tel. +49 (0) 90 91 / 502 – 115
te. Monte ahora la tarjeta tal y como se describe en la
Fax. +49 (0) 90 91 / 502 – 272
sección Instalación del hardware.
e-mail: mailto:produktberatung@hama.de
Indicaciones de seguridad:
Encontrará información para sus productos o nuevos
controladores en www.hama.com
No utilice el producto en las proximidades de las
calefacciones ni en entornos polvorientos o húmedos.
17
00053121man_V2_cs_de_el_en_es_fi_fr_hu_it_nl_pl_pt_ro_ru_sk_sv_tr.indd 17 30.03.12 09:34

o Gebruiksaanwijzing
Inhoud van de verpakking:
Opmerking:
Als u de handleiding in elektronische vorm wilt lezen, klikt
• USB 3.0 PCIe-kaart met 2 aansluitingen
u op Display Instructions. Houd er rekening mee dat u
• Low-prole slot-afdekplaatje voor de inbouw in
voor het weergeven van de handleiding Adobe Acrobat
mini-pc´s
Reader nodig heeft. Als dit programma niet geïnstalleerd
• Driver cd-rom
is, klikt u op Acrobat Reader om de software van de cd te
• Deze installatiehandleiding
installeren. Klik op Download Driver om te controleren of
de nieuwe driver voor het product beschikbaar is. Klik op
Back om terug te keren naar de taalselectie.
Software installeren:
Installatie onder Windows Vista en Windows 7
Voordat u de PCIe-kaart in uw computer bouwt
(zie paragraaf Hardware-installatie) moet u de vereiste
driver van de cd-rom eerst installeren.
Leg de inbegrepen driver-cd in de cd-rom-drive van uw
computer. Kort daarna wordt het installatieprogramma
van Hama automatisch gestart. Als het programma niet
automatisch start, dubbelklikt u met de rechter muistoets
Nadat de installatie gestart is, verschijnt eventueel het
op het bestand autorun.exe in de hoofddirectory van de
in Windows Vista / 7 geïntegreerde
driver-cd.
Gebruikersaccountbeheer, dat u om toestemming vraagt
voor de installatie van de driver. Klik op de knop Verder
resp. bij Windows 7 op Ja.
Selecteer de gewenste taal.
Klik op Verder.
Klik op Install Driver.
Accepteer de voorwaarden van de licentieovereenkomst
door de optie „Ik ga akkoord met de voorwaarden“ te
selecteren en vervolgens op Verder te klikken.
18
00053121man_V2_cs_de_el_en_es_fi_fr_hu_it_nl_pl_pt_ro_ru_sk_sv_tr.indd 18 30.03.12 09:34

Voordat u de PCIe-kaart in uw computer bouwt (zie
paragraaf Hardware-installatie), moet u eerst de vereiste
driver van de cd-rom installeren.
Leg daarvoor de inbegrepen driver-cd in de cd-rom-drive
van uw notebook. Kort daarna wordt het
installatieprogramma van Hama automatisch gestart.
Als het programma niet automatisch start, dubbelklikt u
met de rechter muistoets op het bestand autorun.exe in
de hoofddirectory van de driver-cd.
Klik op Installeren.
Selecteer de gewenste taal.
De installatie is succesvol beëindigd. Klik vervolgens op
Voltooien.
Bouw de USB 3.0 PCIe-kaart nu in, zoals beschreven on-
der Hardware-installatie. Start vervolgens de computer.
Windows herkent het nieuwe apparaat en integreert de
geïnstalleerde driver in het systeem.
Of de PCIe-kaart correct geïnstalleerd is, kan onder Start
(Windows logo) -> Configuratiescherm-> Systeem en
onderhoud -> Apparatuur-Manager nagekeken worden.
Het kan zijn dat u door het Windows
gebruikersaccountbeheer gevraagd wordt deze actie
te bevestigen. Klik daarom op de knop -> Verder.
Klik op Install Driver.
Daar dienen de volgende vermeldingen zonder geel
uitroepteken te zien te zijn.
Opmerking:
Als u de handleiding in elektronische vorm wilt lezen, klikt
USB-controller
u op Display Instructions. Houd er rekening mee dat u
• Renesas Electronics USB 3.0 Host Controller
voor het weergeven van de handleiding Adobe Acrobat
• Renesas Electronics USB Root Hub
Reader nodig heeft. Als dit programma niet geïnstalleerd
is, klikt u op Acrobat Reader om de software van de cd te
Installatie onder Windows XP met Service Pack 3
installeren. Klik op Downlaod Driver om te controleren of
de nieuwe driver voor het product beschikbaar is. Klik op
Systeemeisen:
Back om terug te keren naar de taalselectie.
Controleer of uw gebruikersaccount onder Windows XP
over administratorrechten beschikt, anders lukt het niet
de driver te installeren. Verder is een geïnstalleerde Ser-
vice Pack 3 van Microsoft voorwaarde voor de installatie
en werking van de USB 3.0 PCIe-kaart.
19
00053121man_V2_cs_de_el_en_es_fi_fr_hu_it_nl_pl_pt_ro_ru_sk_sv_tr.indd 19 30.03.12 09:34

Klik op Verder.
De installatie is succesvol beëindigd. Klik vervolgens op
Voltooien.
Bouw nu de PCIe-kaart in zoals beschreven in de
paragraaf Hardware-installatie. Start vervolgens de
computer. Windows herkent het nieuwe apparaat en
integreert de geïnstalleerde driver in het systeem.
Of de PCIe-kaart correct geïnstalleerd is, kan onder Start
-> Configuratiescherm-> Prestaties en onderhoud ->
Systeem -> Hardware -> Apparatuur-Manager nagekeken
worden. Daar dienen de volgende vermeldingen zonder
geel uitroepteken te zien te zijn.
Accepteer de voorwaarden van de licentieovereenkomst
door de optie „Ik ga akkoord met de voorwaarden“ te
USB-controller
selecteren en vervolgens op Verder te klikken.
• Renesas Electronics USB 3.0 Host Controller
• Renesas Electronics USB Root Hub
Hardware-installatie:
Om de kaart te installeren moet uw computer geopend
worden. Zorg er daarbij altijd voor dat u uw computer van
tevoren van het voedingsnet heeft losgekoppeld. Mocht
u niet zeer vertrouwd zijn met de interne opbouw van uw
computer, lees dan het handboek van uw computer of
vraag een deskundige.
• Schakel alle apparaten die op uw computer zijn
Klik op Installeren.
aangesloten en uw computer uit.
• Koppel de pc los van het voedingsnet voordat u met de
installatie begint.
• Open de afdekking van uw computer.
• Houd de PCIe-kaart bij de hoeken van de platine vast
en steek hem in de vrije PCIe-insteekplaats.
Opmerking: houd er rekening mee dat statische
elektriciteit zowel de PCIe-kaart als uw computer kan
beschadigen. Ontlaad uzelf door een metalen
voorwerp aan te raken. Zoek een vrije PCIe-
insteekplaats. Verwijder het plaatje voor de sleuf voor
deze insteekplaats. Bewaar de schroef goed, u heeft
hem later nodig om de PCIe-kaart te bevestigen.
20
00053121man_V2_cs_de_el_en_es_fi_fr_hu_it_nl_pl_pt_ro_ru_sk_sv_tr.indd 20 30.03.12 09:34
