Hama Remote Control Universal 8in1: инструкция
Раздел: Аксессуары для телевизоров
Тип:
Инструкция к Hama Remote Control Universal 8in1
H
O
M
E
E
N
T
E
R
T A
I
N
M
E
N
T
00040098
Universal
Fernbedienung »8in1«
Universal Remote Control
Télécommande universelle
00040098/08.08
All listed brands are trademarks of the corresponding companies. Errors and omissions excepted,
and subject to technical changes. Our general terms of delivery and payment are applied.
Hama GmbH & Co KG
D-86651 Monheim/Germany
www.hama.com
00040098bda.indd 2-4
00040098bda.indd 2-4
08.10.2009 10:24:47 Uhr
08.10.2009 10:24:47 Uhr
2
3
1
4
8
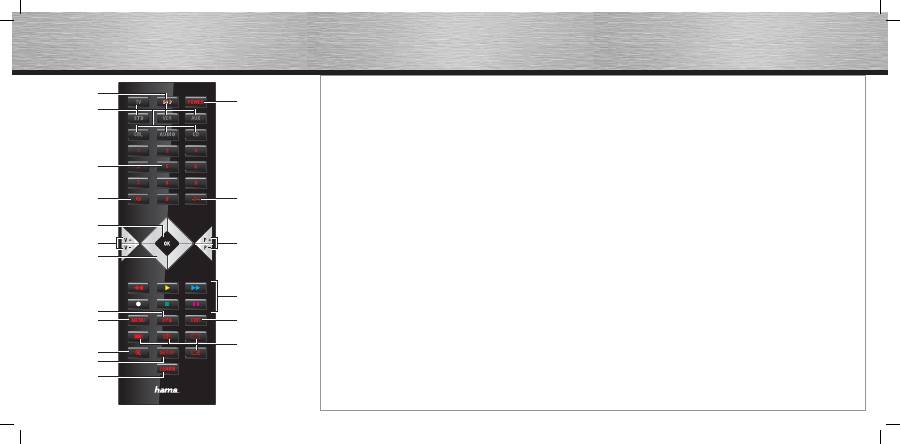
d Bedienungsanleitung
Universal Fernbedienung
Funktionstasten
1. Power: EIN /AUS
2. Anzeige LED
3. Gerätewahl Tasten
4. Zifferntasten Block 0-9
5. AV: Umschalten zu externem Gerät
6. -/--: Umschalten auf zweistellige
Programmzahlen
7. V+/V–: Lautstärkeregler
8. P+/P–:Programmwahl
9. Navigationsring zum Navigieren in
Bildschirm-Menüs
10. OK: zum Bestätigen von Eingaben
11.
E
Schneller Rücklauf / Rot
B
Abspielen / Gelb
F
Schneller Vorlauf / Blau
I
Aufnahme Starten
K
Stopp / Grün
J
Pause / Magenta
12. EXIT: zum Verlassen des Geräte-Menüs
13. EPG: elektronische Programmzeitschrift
anzeigen
(geräteabhängig)
14. Bildschirm-Funktionen aufrufen
15. Menu: Gerätemenü öffnen
16. Setup
17.
H
Stummschaltung
18. Learn: erlernen von Gerätetasten
Allgemeines
Diese Universal-Fernbedienung ist eine
8 in 1 Fernbedienung und kann folgende
Gerätetypen bedienen:
TV, STB, CBL, AUDIO, AUX, VCR, CD, DVD.
(z. B. DVD-Recorder/Player, Videorecorder,
Verstärker, Tuner, etc.).
Die Beschriftung der Tasten bezeichnet nicht
den zu programmierenden Gerätetyp, sie
dient deshalb nur der leichteren Übersicht.
Notieren Sie sich bitte die Codes Ihrer
Geräte, die Sie für die Programmierung
verwendet haben. Falls die Codes z. B. nach
einem Batteriewechsel nicht mehr
gespeichert sein sollten, können Sie die
Fernbedienung so schneller programmieren.
Sie müssen einen vierstelligen Gerätecode
für jedes Gerät, das Sie mit der Universal-
Fernbedienung bedienen möchten, auf eine
Quellentaste (TV, STB, CBL, AUDIO, AUX,
VCR, CD, DVD) programmieren.
Videorecorder: Führen Sie die Codesuche
bitte mit eingelegtem Band durch.
Gerätecodes programmieren
Gerätecode nach Code-Liste eingeben
Die Codes der entsprechenden Geräte sind
der Codeliste, die dieser
Bedienungsanleitung beiliegt zu entnehmen.
• Schalten Sie das betreffende Gerät
manuell
ein.
• Drücken Sie die gewünschte Quellentaste
(TV, STB, CBL, AUDIO, AUX, VCR, CD, DVD)
kurz.
• Halten Sie die Taste Setup (16) für ca.
3 Sekunden gedrückt, bis die rote LED
dauerhaft
aufl
euchtet.
• Geben Sie dann den entsprechenden
vierstelligen Code aus der Code Tabelle
ein.
• Zur Bestätigung jedes Tastendrucks geht
die rote LED kurz aus.
• Wenn die Codeeingabe gültig war, erlischt
die rote LED nach der Eingabe der letzten
Stelle.
• Drücken Sie kurz OK (10) um den Code zu
speichern.
• Wurde ein ungültiger Code eingegeben,
blinkt die rote LED drei Sekunden lang,
bevor sie erlischt. Sollte das Gerät nicht
erwartungsgemäß reagiert, wiederholen
Sie die Programmierung ggf. mit einem
anderen Code. Bitte probieren Sie alle zu
Ihrer Marke angegebenen Codes aus.
• Wählen Sie den Code aus, auf den alle
verfügbaren Befehle Ihrer Fernbedienung
korrekt
reagieren.
• Sollten Sie damit auch keinen Erfolg haben,
dann versuchen Sie es mit der im Kapitel
„Automatischer Suchlauf“ beschriebenen
Suchmethode.
Manueller Code-Suchlauf
• Schalten Sie das betreffende Gerät
manuell
ein.
• Drücken Sie die gewünschte Quellentaste
(3) (TV, STB, CBL, AUDIO, AUX, VCR, CD,
DVD)
kurz.
• Halten Sie die Taste Setup (16) für ca.
3 Sekunden gedrückt, bis die rote LED
dauerhaft
aufl
euchtet.
• Drücken Sie mehrmals nacheinander
(dies kann bis zu 350 Mal sein) die Taste
POWER (1) , nur bei VCR (Videorecordern)
bitte die Taste P+ (8) oder P– (8)
• bis das Gerät, welches gesteuert werden
soll, ausgeschaltet, oder den Kanal
wechselt oder entsprechend reagiert.
Die Code-Suche wird bei der momentan
auf der Gerätegruppe gespeicherten
Codenummer
begonnen.
• Drücken Sie kurz OK (10) um den Code zu
speichern. Aufgrund der umfangreichen
Anzahl der verschiedenen Code-
Nummern sind pro Gerätetyp bis zu 350
unterschiedliche Codes vorprogrammiert.
In Einzelfällen ist es möglich, dass nur
die gebräuchlichsten Hauptfunktionen
verfügbar sind. Bei einigen speziellen
Gerätemodellen kann es sein, dass die
beschriebene Vorgehensweise nicht zum
Erfolg
führt.
Automatischer Suchlauf
Wenn Ihr Gerät nicht auf die Fernbedienung
anspricht, obwohl Sie alle für Ihren
Gerätetyp und die entsprechende Marke
aufgeführten Codes ausprobiert haben,
versuchen Sie es mit dem automatischen
Suchlauf.
Hierdurch können Sie auch solche
Codes solcher Marken fi nden, die in der
Gerätecode-Liste nicht aufgeführt sind.
• Schalten Sie das betreffende Gerät
manuell
ein
• Drücken Sie die gewünschte Quellentaste
(3) (TV, STB, CBL, AUDIO, AUX, VCR, CD,
DVD)
kurz.
• Halten Sie die Taste Setup (16) für ca.
3 Sekunden gedrückt, bis die rote LED
dauerhaft
aufl
euchtet.
• Richten Sie die Fernbedienung auf das
Gerät und drücken Sie einmal kurz die
Taste P+ (8).
• Hat das Gerät keine Programm-Funktion,
drücken Sie statt der P+ (8) die Taste
POWER (1).
• Die Fernbedienung startet nach 6
Sekunden die Code-Suche und sendet im
1-Sekundentakt (siehe auch nächsten
Abschnitt) nacheinander alle Codes. Bei
jedem Senden leuchtet die rote LED auf.
• Sobald das Gerät auf die Fernbedienung
reagiert, drücken Sie OK (10). Haben
Sie es verpasst, rechtzeitig OK zu
drücken, können Sie mit der Taste P– (8)
schrittweise zum Code zurückspringen, auf
den das Gerät reagiert hat.
• Um die Suche abzubrechen, drücken Sie
EXIT
(12).
Wenn die Fernbedienung statt sekündlich nur
alle 3 Sekunden einen neuen Code senden
soll, gehen Sie folgendermaßen vor.
Drücken Sie innerhalb von 6 Sekunden
nach Drücken der Taste P+ (8) (bzw. POWER
(1)) wie in zuvor beschrieben, die Taste
P+ (8) oder P– (8) noch einmal. Die
Fernbedienung sendet jetzt nur alle 3
Sekunden einen neuen Code. Dadurch
gewinnen Sie mehr Zeit, um den Vorgang
abzubrechen, allerdings dauert die
Codesuche dadurch auch länger.
5
10
9
2
3
6
7
12
13
15
16
17
14
18
11
00040098bda.indd 5-Abs1:3
00040098bda.indd 5-Abs1:3
08.10.2009 10:24:52 Uhr
08.10.2009 10:24:52 Uhr

4
5
Codesuche nach Handelsname
• Diese Funktion bietet Ihnen die
Möglichkeit, nach Handelsnamen zu
suchen (siehe Code-Liste).
• Schalten Sie das betreffende Gerät
manuell
ein.
• Drücken Sie die gewünschte Quellentaste
(3) (TV, STB, CBL, AUDIO, AUX, VCR, CD,
DVD)
kurz.
• Halten Sie die Taste Setup (16) für ca.
3 Sekunden gedrückt, bis die rote LED
dauerhaft
aufl
euchtet.
• Geben Sie den einstelligen Code laut
folgender Tabelle ein.
1 Philips
2 Sony, Panasonic, JVC, Toshiba
3 Thomson
4 Telefunken
5 Grundig
6 Nokia
0 Alle anderen Marken für diese
Gerätegruppe
• Drücken Sie mehrfach die Taste P+(8)
(oder bei Videorecordern die Taste POWER
(1)) oder bis das Gerät entsprechend
reagiert. Gehen Sie dabei zügig vor, da
sonst die automatische Codesuche
gestartet
wird.
• Speichern Sie den Code durch Drücken
von OK (10).
• Wurden alle Codes durchsucht, blinkt die
rote LED für ca. 3 Sekunden.
Code-Identifi zierung
Die Code-Identifi zierung bietet Ihnen die
Möglichkeit, bereits eingegebene Codes, die
in der Fernbedienung gespeichert sind, zu
bestimmen. So gehen Sie vor.
• Schalten Sie das betreffende Gerät
manuell
ein.
• Drücken Sie die gewünschte Quellentaste
(3) (TV, STB, CBL, AUDIO, AUX, VCR, CD,
DVD)
kurz.
• Halten Sie die Taste Setup (16) für ca.
3 Sekunden gedrückt, bis die rote LED
dauerhaft
aufl
euchtet.
• Drücken Sie kurz die Taste Setup (16), die
rote LED erlischt kurz beim Tastendruck.
• Um die erste Zahl zu fi nden, drücken Sie
die Zifferntasten von 0 bis 9.
• Wenn die rote LED kurz ausgeht, ist es die
erste gespeicherte Zahl.
• Um die zweite Zahl festzustellen, drücken
Sie wiederum die Zifferntasten von 0 bis 9,
bis die rote LED ausgeht.
• Wiederholen Sie den Vorgang für die dritte
und die vierte Zahl.
• Die rote LED erlischt, sobald die Taste für
die vierte Zahl gedrückt wurde.
• Die Code-Identifi zierung ist jetzt
abgeschlossen.
Codes einer anderen Fernbedienung
erlernen
Wenn einige Funktionen Ihrer ursprünglichen
Fernbedienung in der 40098 fehlen, dann
kann diese diese Funktionen erlernen.
Wenn die Marke des zu steuernden Geräts
nicht in der separaten Codeliste steht,
können Sie die Funktionen der Original-
Fernbedienung des Geräts in Ihre 40098
kopieren. Je nach Format der Übertragungs-
codes der Original-Fernbedienung kann
Ihre Fernbedienung bis zu 150 Tasten
speichern.
Legen Sie die ursprüngliche Fernbedienung
und Ihre 40098 so hin, dass die Sende/
Empfänger Dioden der beiden
Fernbedienungen gegeneinander liegen.
Achten Sie auch auf die gleichmäßige
Höhenausrichtung der beiden Dioden.
Stellen Sie sicher, dass der Abstand
zwischen den 2 Fernbedienungen ungefähr
2,5 cm (Daumenbreite) beträgt.
Kopieren der Tasten
• Halten Sie die Taste Setup (16) für ca.
3 Sekunden gedrückt, bis die rote LED
dauerhaft
aufl
euchtet.
• Taste SETUP (16) loslassen.
• Einmal die Quellentaste (3) (TV, STB, CBL,
AUDIO, AUX, VCR, CD, DVD) die Taste
erlischt und leuchtet wieder auf.
• Einmal die Taste LEARN (18) drücken.
• Einmal die Taste Ihrer 40098 drücken, unter
der Sie eine der Tasten der Original-
Fernbedienung kopieren wollen.
• Die zu kopierende Taste der Original-
Fernbedienung gedrückt halten, bis die
die rote LED erlischt und wieder
aufl euchtet (2 bis 3 Sekunden). Bei einem
Fehler blinkt die rote LED 3 Sekunden lang,
bleibt jedoch im Lernmodus. Versuchen
Sie es erneut oder wechseln Sie zu einer
anderen
Taste.
• Wiederholen Sie das Verfahren für die
anderen Tasten ab Schritt 5.
• Drücken Sie einmal die Taste SETUP (16),
wenn alle gewünschten Tasten kopiert
sind.
• Die rote LED erlischt.
Empfehlungen
• Die Fernbedienungen während des
Lernverfahrenes nicht bewegen.
• Stellen Sie sicher, dass es sich bei der
Raumbeleuchtung nicht um Leucht-
stoffröhren oder Energiesparlampen
handelt, da diese Lichtquellen
Störungen verursachen und die Kopie
beeinträchtigen
können.
• Die 2 Fernbedienungen müssen über einen
Meter von jeder Lichtquelle entfernt sein.
• Vermeiden Sie das Kopieren der Codes
der Tasten V+; V- und sowie der
Abspieltasten (5), denn je nach
Fernbedienung steuern die Codes dieser
Tasten nicht unbedingt dieselben Geräte.
• Wenn der Speicher Ihrer 40098 voll ist,
blinkt die rote LED 3 Sekunden lang. Dann
ist es nicht mehr möglich, andere Codes
zu kopieren, ohne eine Nullrückstellung
durchzuführen.
• Wenn Sie eine Taste kopieren, ist es
möglich, dass die rote LED schwach
blinkt. Lassen Sie in diesem Fall die Taste
nicht los und warten Sie, bis das Blinken
aufhört.
Hinweise:
• Die Batterien der 2 Fernbedienungen
müssen in gutem Zustand sein; tauschen
Sie sie eventuell aus.
• Sie können keine Tasten unter folgenden
Tasten kopieren: LEARN, SETUP,
• Alle Tasten unter einem Modus werden
gelöscht, wenn ein 4-stelliger Code unter
diesem Modus eingegeben wird (auch
für die direkte Eingabe eines Codes, das
Suchen eines Codes oder einer Marke).
00040098bda.indd Abs1:4-Abs1:5
00040098bda.indd Abs1:4-Abs1:5
08.10.2009 10:24:53 Uhr
08.10.2009 10:24:53 Uhr

6
7
Löschen aller kopierten Tasten
• Halten Sie die Taste Setup (16) für ca.
3 Sekunden gedrückt, bis die rote LED
dauerhaft
aufl
euchtet.
• Taste SETUP (16) loslassen.
• Zweimal die Taste LEARN (18) drücken. Die
rote LED erlischt und leuchtet wieder auf.
• Einmal die Taste SETUP (16) drücken, die
rote LED geht aus.
• Alle kopierten Tasten sind nun gelöscht.
Normaler Betrieb
Nachdem Sie die Programmierung Ihrer
Fernbedienung für Ihre Audio/Video-Geräte
vorgenommen haben, arbeitet die
Fernbedienung in den gebräuchlichsten
Hauptfunktionen wie die Original-
Fernbedienung des jeweiligen Gerätes.
Richten Sie Ihre Fernbedienung auf das
gewünschte Gerät und drücken Sie die
entsprechende Quellentaste. Die rote LED
leuchtet kurz auf, bleibt aber nicht an.
Sie aktivieren die Funktionen nun durch
Drücken der entsprechenden Funktionstaste
Ihrer Universal-Fernbedienung.
Bei jedem Tastendruck leuchtet die rote LED
kurz auf.
Unter Umständen ist nicht jede Funktion Ihrer
Original-Fernbedienung auf der Universal-
Fernbedienung direkt verfügbar.
Insbesondere bei neueren Geräten ist es
möglich, dass die Funktionen zunächst unter
anderen Tasten als erwartet abgelegt oder
gar nicht verfügbar sind.
10er- Tastatur und AV:
Die 10er-Tastatur (4) und die Umschalt Taste
(6) um 2-stellige Zahlen (Kanalnummern)
einzugeben.
Mit der AV Taste wählen Sie normalerweise
den AV-Eingang des Fernsehgerätes
für z.B. den STB Receiver oder den
Videorecorder.
Sonderfunktionen
„Elektronisches Programm“
Die Taste EPG (13) entspricht der Funktion
„Elektronik Programm Guide“ und hat
verschiedene Funktionen, je nachdem
auf welchem Gerät diese angewendet wird.
Bei DVD - Codes öffnet die Taste das
Titel - Menü. Bei STB - oder VCR - Codes
können Sie mit der Taste eine
Programmierung vornehmen, sofern Ihr
Videorecorder über eine SHOWVIEW-
Funktion verfügt.
„Punch Through“
Die Punch Through – Funktion ermöglicht
es Ihnen, bestimmte Funktionen an einem
anderen Gerätetyp als dem ausgewählten
auszuführen. Dies sind die Funktionen;
Lautstärke, Stummschaltung sowie die
Abspielfunktionen.
Wenn die Fernbedienung im AUDIO, AUX,
VCR, DVD, CD Modus ist, steuern die Tasten
Lautstärke (7) und Stummschaltung (17)
das TV-Gerät (sofern die anderen Geräte
nicht über eine eigene Lautstärkeregelung
verfügen).
Im TV-Betrieb oder in einem anderen
Betrieb ohne Abspielfunktionen ist, steuern
die Tasten Wiedergabe, Pause, Stopp und
ggf. Aufnahme einen angeschlossenen
Videorecorder, DVD - Player oder DVD
- Rekorder an. Es wird immer das zuletzt
gewählte Gerät angesteuert.
Im Auslieferungszustand ist die Universal-
Fernbedienung so eingestellt, dass die
Funktionen Lautstärke und Stummschaltung
automatisch das TV-Gerät steuern, wenn
gerade eine Quellentaste für ein Gerät mit
Bildübertragung (DVD, Videorecorder etc.)
gedrückt ist.
Lautstärke/Stummschaltung auf einen
anderen Gerätetyp programmieren
• Halten Sie die Setup Taste (16) für ca.
3 Sekunden gedrückt, bis die rote LED
dauerhaft aufl euchtet.
• Drücken Sie die Mute Taste (17) bis die
rote LED kurz ausgeht.
• Drücken Sie eine Quellentaste für das
Gerät, auf das die Lautstärke- und
Stummschaltungs-Funktion übertragen
werden soll. Die rote LED bleibt an.
• Drücken Sie die Mute Taste (17); die rote
LED geht aus.
• Wenn Sie aus Versehen ein Gerät
gewählt haben, das keine eigene
Lautstärkeregelung besitzt, blinkt die rote
LED für 3 Sekunden.
Lautstärke/Stummschaltung auf ein
bestimmtes Gerät programmieren
• Halten Sie die Setup Taste (16) für ca.
3 Sekunden gedrückt, bis die rote LED
dauerhaft aufl euchtet.
• Drücken Sie die Mute Taste (17) bis die
rote LED kurz erlischt.
• Drücken Sie die Quellentaste für das
Gerät, das nur seine eigene Lautstärke-
und Stummschaltungsfunktion haben soll.
• Drücken Sie die - Lautstärke Tasten (7) die
rote LED bleibt an.
• Drücken Sie erneut die Mute Taste (17)
die rote LED geht aus.
Lautstärke/Stummschaltung wieder
zurücksetzen
Falls Sie die Lautstärke und Stummschaltung
wie in den vorangehenden zwei Abschnitten
beschrieben verändert haben, können Sie die
Funktionen wieder auf ihre Werkseinstellung
zurückstellen und so den „Punch-Through“-
Funktion wiederherstellen.
• Halten Sie die Setup Taste (16) für ca. 3
Sek. gedrückt, bis die rote LED dauerhaft
aufl euchtet.
• Halten Sie die Mute Taste (17) gedrückt,
bis die rote LED kurz erlischt.
• Drücken Sie noch einmal die Mute Taste
(17), die rote LED erlischt.
Die Funktionen Lautstärke und Stummschal-
tung „Punch-Through“- Funktion ist jetzt
wieder in den Auslieferungszustand gesetzt.
00040098bda.indd Abs1:6-Abs1:7
00040098bda.indd Abs1:6-Abs1:7
08.10.2009 10:24:53 Uhr
08.10.2009 10:24:53 Uhr

8
9
Fehlerbehebung
Die Fernbedienung funktioniert nicht:
• Überprüfen Sie, ob die Batterien der
Fernbedienung korrekt eingelegt sind und
die Polung +/– übereinstimmt.
• Überprüfen Sie, ob Ihre Geräte korrekt
angeschlossen und eingeschaltet sind.
• Falls die Batterien zu schwach sind,
tauschen Sie diese durch neue aus.
• Es sind mehrere Gerätecodes unter
dem Markennamen meines Geräts
aufgeführt. Wie ermittle ich den richtigen
Gerätecode?
• Um den richtigen Gerätecode für Ihr
Gerät zu bestimmen, probieren Sie die
Codes nacheinander aus, bis die meisten
Funktionen des Gerätes ordnungsgemäß
funktionieren.
Die Geräte reagieren nur auf einige Befehle
der Fernbedienung:
• Testen Sie weitere Codes, bis die Geräte
auf die Befehle entsprechend reagieren.
• Wenn die manuelle Codeeingabe und
die automatische Codesuche nicht zum
Erfolg führen, kann es in besonderen
Einzelfällen vorkommen, dass das Gerät
nicht kompatibel zu Ihrer Universal-
Fernbedienung
ist.
g Operating Instructions
Universal Remote Control
Function buttons
1. Power: ON/OFF
2. LED
3. Device keys
4. Numeric keys block 0-9
5. AV: switch over to external device
6. -/--: switch over to two-digit program
numbers
7. V+/V-: volume control
8. P+/P-: channel
9. navigation in screen-menus
10. OK: for the confi rming of inputs
11.
E
Fast rewind / red
B
To playing / yellow
F
Fast forward / blue
I
record starting
K
Stop / green
J
Pause / magenta
12 . EXIT
13. EPG
14. screen-functions
15. Menu: device menu
16. Setup
17.
H
Muting
18. Learn: learn Mode
General
This universal remote control is one 8 in 1
remote control and can operate following
device types: TV, STB, CBL, AUDIO, AUX,
VCR, CD, DVD. (e.g. DVD-recorder/Player,
video recorders, boosters, tuners, etc.).
The lettering of the keys does not describe
the device type to be programmed, it is used
therefore only for the easier overview.
Note down please the codes of your devices
which you used for the programming. If the
codes should be e.g. to a battery change no
more not stored, you can program the remote
control so more quickly.
They must program a four-digit device code
to a source key (TV, STB, CBL, AUDIO, AUX,
VCR, CD, DVD) for every device which you
would like to operate with the universal
remote control.
Video recorder:
for the code search please
inserted a tape.
Programming device codes
Entering device code after code set
The codes of the corresponding devices are
the code list, to take that is enclosed in this
operating manual.
• Turn on the device manually.
• Press the source key (TV, STB, CBL,
AUDIO, AUX, VCR, CD, DVD) shortly.
• Hold the key setup (16) pressed for approx.
3 seconds until the red LED lights up
permanently.
• You distribute the corresponding four-digit
code then the code table one.
• To the confi rmation of every keystroke the
red LED goes out shortly.
• If the code input was valid, the red LED
goes out according to the input of the last
place.
• Press shortly OK (10) in order to store the
code.
• An invalid code was entered, the red
LED fl ashes for three seconds before it
goes out. Should the device not reacts;
you repeat the programming where
appropriate with another code. Please try
out all codes indicated for your brand.
• Select the code which all available
commands of your remote control react to
correctly.
00040098bda.indd Abs1:8-Abs1:9
00040098bda.indd Abs1:8-Abs1:9
08.10.2009 10:24:54 Uhr
08.10.2009 10:24:54 Uhr

10
11
• You should not have also any success in
this way, then you attempt it with that one
„search run automatic in the chapter“
described search method.
Manual code search run
• Turn on the device manually.
• Press the source key (3) (TV, STB, CBL,
AUDIO, AUX, VCR, CD, DVD) shortly.
• Hold the key setup (16) pressed for approx.
3 seconds until the red LED lights up
permanently.
• You press repeatedly the key POWER (1)
after each other (this can be up to 350
times), only at VCR (Video recorders) asks
the key P+ (8) or P- (8)
• to the device that is supposed to be
operated, off, or changes the channel or
reacts correspondingly. The code-search
is begun with the code number currently
stored on the cluster.
• Press shortly OK (10) in order to store the
code. Due to the extensive number of the
different code numbers different codes
are preprogrammed per device type up to
350. In individual cases it is possible that
only the most common primary functions
are available. With some specifi c device
models it can be that the described
procedure does not lead to the success.
Automatic search run
If your device does not respond to the remote
control although you tried out all codes
performed for your device type and the
corresponding brand, you attempt it with the
automatic search run. Through that you
can fi nd also such codes of such brands
which are not performed in the device code
list.
• Turn on the device manually
• Press the source key (3) (TV, STB, CBL,
AUDIO, AUX, VCR, CD, DVD) shortly.
• Hold the key setup (16) pressed for approx.
3 seconds until the red LED lights up
permanently.
• Focus the remote control on the device
and press the key P+ (8) once shortly.
• If the device does not have any
program-function, you press the key
POWER (1) instead of the P+ (8).
• The remote control starts the code
search after 6 seconds and sends in the
1 second’s clock pulse (see also next
section) after each other all codes. At
every sending the red LED lights up.
• As soon as the device reacts to the
remote control, you press OK (10). You
missed it to press OK in time, you keep
up the key P- to return (8) in a step by
step way for the code which the device
reacted to.
• In order to abort the search, you press
EXIT (12).
When the remote control instead of 1 only
every 3 seconds a new code is supposed to
send, you go on as follows.
You press within 6 seconds according
to pressures of the key P+ (8) (and/or POWER
(1)) how in before described, the key P+ (8) or
P- (8) still once. The remote control sends
now a new code only every 3 seconds.
Through that you win more time in order to
abort the process, however, the code search
through that lasts also longer.
According to code search trade name
• This function offers you the possibility, to
search for trade names (see code set).
• Turn on the device manually.
• Press the source key (3) (TV, STB, CBL,
AUDIO, AUX, VCR, CD, DVD) shortly.
• Hold the key setup (16) pressed for approx.
3 seconds until which red LED lights up
permanently.
• Enter the one-digit code according to
following
table.
1 Philips
2 Sony, Panasonic, JVC, Toshiba
3 Thomson
4 Telefunken
5 Grundig
6 Nokia
0 All other brands for this cluster
• You press the key P+ (8) repeatedly (or at
video recorders the key POWER (1)) or
until the device reacts correspondingly.
Go ahead in this case speedily since
otherwise the automatic code search is
started.
• Store the code from OK (10) through
pressing.
• All codes were searched, the red LED
fl ashes for approx. 3 seconds.
Code-identifi cation
The code identifi cation offers you the
possibility, already to determine entered
codes that are stored in the remote control.
So go ahead.
• Turn on the device manually.
• Press the source key (3) (TV, STB, CBL,
AUDIO, AUX, VCR, CD, DVD) shortly.
• Hold the key setup (16) pressed for approx.
3 seconds until the red LED lights up
permanently.
• You press the key setup (16) shortly, the
red LED goes out shortly during the
keystroke.
• In order to fi nd the fi rst number, you press
the numeric keys from 0 to 9.
• If the red LED goes out shortly, it is the fi rst
stored
number.
• In order to fi nd the second number, you
press in turn the numeric keys from 0 to 9
until the red LED goes out.
• Repeat the process for the third and the
fourth
number.
• The red LED goes out as soon as the key
was pressed for the fourth number.
• The code-identifi cation is now fi nished.
Learning codes of another remote control
If the brand of the device to be operated
does not stand in the separate code list, you
can copy the functions of the original remote
control of the device into yours 40098.
According to format of the line codes of
the original remote control your remote
control can store up to 150 keys.
00040098bda.indd Abs1:10-Abs1:11
00040098bda.indd Abs1:10-Abs1:11
08.10.2009 10:24:54 Uhr
08.10.2009 10:24:54 Uhr

12
13
You put the initial remote control and yours
40098 so there, that the send/receiver diodes
of the two Remote controls lie against each
other. Pay attention also to the regular height
direction of the two diodes. Guarantee that
the distance is about 2,5 cm (Thumb width)
between the 2 remote controls.
Copying of the keys
• Hold the key setup (16) pressed for approx.
3 seconds until the red LED lights up
permanently.
• Making key SETUP (16) go.
• Once the source key (3) (TV, STB, CBL,
AUDIO, AUX, VCR, CD, DVD) the key goes
out and shines again on.
• Pressing the key LEARN (18) once.
• To press the key of yours 40098 once,
under which one you copy the keys of the
original-remote.
• To hold the key of the original remote
control to be copied pressed, the red
LED goes out and again lights up (2 to 3
seconds). With an error fl ashes the red
LED 3 seconds long, stays, however, in the
learning-mode. You attempt it once again
or change to another key.
• Repeat the procedure for the other keys
from step 5.
• Press the key SETUP (16) if all wanted keys
are
copied.
• The red LED goes out.
Recommendations
• Do not move the remote controls during
the
process
• You guarantee, that it during the room light
not around fl uorescent tubes or energy
saving-lamps act since these sources of
light can cause troubles and infl uence the
copy.
• The 2 remote controls must be away over a
meter of every source of light.
• Avoid the copying of the codes of the keys
V+; Of- and as well as the playing keys‘ (5),
because according to
The codes of these keys do absolutely not
control remote control the same devices.
• If the memory of yours 40098 is full, the
red LED fl ashes for 3 seconds. Then it is
not more possible, to copy other codes
without carrying out some accrued
liabilities.
• If you copy a key, it is possible that the red
LED fl ashes weakly. Let in this case
the key not rid and you wait, to which
fl
ashing
stops.
Tips:
• The batteries of the 2 remote controls must
be in good repair; exchange it possibly.
• They can not copy any keys among
following keys: LEARN, SETUP,
• All keys under a mode are put out, when
a four-digit code under this mode is input
(also for the direct input of a code, the
search of a code or a brand).
Delete of all copied keys
• Hold the key setup (16) pressed for approx.
3 seconds until which red LED lights up
permanently.
• Making key SETUP (16) go.
• Pressing the key LEARN (18) twice. The red
LED goes out and lights up again.
• Pressing the key SETUP (16) that red LED
goes from once.
• All copied keys are will be deleting.
Normal use
After you have carried out the programming
of your remote control for yours audio/video
device, the remote control works in the most
common primary functions as the original
remote control of the respective device.
Focus your remote control on the wanted
device and press the corresponding source
key. The red LED will light up shortly.
They activate the functions now through
pressing of the corresponding function key of
your universal remote control.
At every keystroke the red LED lights up
shortly.
Possibly every function of your original
remote control is not directly available on the
universal remote control.
In particular near newer devices it is possible
that the functions are fi rst of all put aside or
not at all available among other keys than
expected.
With the AV Taste you choose usually the
AV input of the TV set for e.g. the STB
receiver or the video recorder.
Special functions
„electronic program“
The key EPG (13) corresponds to the function
„Electronic Program Guide“ and has different
functions, depending on which device this
is used.
At STB - or VCR - codes keep you up the key
a programming carry out, provided that
your video recorder about a SHOWVIEW
- function.
“Punch through”
The punch through function lets you execute
specifi c functions on a device type other
than the one that is selected. These are the
volume, mute, and playback functions.
When the remote control is set to AUDIO,
AUX, VCR, DVD, or CD mode, the Volume (7)
and Mute (17) buttons control the TV device
(provided the other devices do not have their
own volume control).
In TV mode or another mode without
playback functions, the Play, Pause, Stop and
(where applicable) Record buttons control
a connected video recorder, DVD player,
or DVD recorder. The controlled device is
always the last selected device.
By default, the universal remote control is
set so that the volume and mute functions
automatically control the TV set when a
source button for a video device (DVD, video
recorder, etc.) is being pressed.
Programming volume/mute to a different
device type
• Press and hold the Setup (16) button
for approx. 3 seconds until the red LED
remains lit.
00040098bda.indd Abs1:12-Abs1:13
00040098bda.indd Abs1:12-Abs1:13
08.10.2009 10:24:55 Uhr
08.10.2009 10:24:55 Uhr

14
15
• Press and hold the Mute (17) button until
the red LED briefl y goes out.
• Press a source button for the device to
which the volume and mute functions are
to be transferred. The red LED stays on.
• Press the Mute (17) button; the red LED
goes out.
• If you accidentally select a device which
does not have its own volume control, the
red LED fl ashes for 3 seconds.
Programming volume/mute to a specifi c
device type
• Press and hold the Setup (16) button
for approx. 3 seconds until the red LED
remains lit.
• Press and hold the Mute (17) button until
the red LED briefl y goes out.
• Press the source button for the device
which is only to have its own volume and
mute functions.
• Press the “-” Volume (7) buttons; the red
LED stays on.
• Press the Mute (17) button again; the red
LED goes out.
Resetting volume/mute
If you have changed the volume and mute
as described in the previous two sections,
you can reset these functions to their factory
settings and thereby restore the “punch
through” function.
• Press and hold the Setup (16) button
for approx. 3 seconds until the red LED
remains lit.
• Press and hold the Mute (17) button until
the red LED briefl y goes out.
• Press the Mute (17) button again; the red
LED goes out.
The volume and mute “punch through” func-
tions are now returned to their default state.
Debugging
The remote control does not function:
• Check the batteries of the remote control
are correctly inserted and the polarity
+/- is right
• Check your devices are correctly
connected and turned on.
• If the batteries are too weak, you
exchange these through new.
• Several device codes are performed under
the brand name of my device. How do I
determine the correct device code?
• In order to determine the correct device
code for your device, you try out the
codes after each other until most
functions of the device function properly.
The devices react only to some commands of
the remote control:
• You test further codes, to which according
to devices by the commands react.
• If the manual code input and the automatic
code search do not lead to the success,
it can happen in special individual cases
that the device is not compatible to your
universal remote control.
Télécommande universelle
Touches de fonction
1. Power : SOUS / HORS TENSION
2. Affi chage DEL
3. Touches de sélection de l’appareil
4. Touches numériques bloc 0-9
5. AV : commutation vers l’appareil externe
6. -/--: commutation vers les numéros de
programmes à deux chiffres
7. V+/V– : réglage du volume
8. P+/P– : sélection du programme
9. Bague pour la navigation dans les menus de
l’écran
10. OK : confi rmation de saisies
11.
E
retour rapide / voyant rouge
B
lecture / voyant jaune
F
avance rapide / voyant bleu
I
démarrage d’un enregistrement
K
Stop / voyant vert
J
pause / voyant magenta
12. EXIT : pour quitter le menu de l’appareil
13. EPG : consultation du guide électronique
des programmes (dépend du modèle
d’appareil)
14. Consultation des fonctions de l’écran
15. Menu : ouverture du menu de l’appareil
16. Setup (réglage)
17.
H
Commutation en mode silencieux
18. Learn (apprentissage) :
apprentissage des touches d’appareils
Remarques générales
Cette télécommande universelle est une
télécommande 8 in 1 capable de piloter les
types d’appareils suivants : TV, STB, CBL,
AUDIO, AUX, VCR, CD, DVD (enregistreur
DVD/lecteur, magnétoscope, amplifi cateur,
récepteur radio, etc.).
L’inscription des touches ne désigne pas
l’appareil que vous désirez programmer, mais
est utilisée uniquement afi n de faciliter la vue
d’ensemble.
Veuillez noter les codes de vos appareils
que vous avez utilisés lors de la
programmation.
Vous ne perdrez ainsi pas de temps lors
d’une nouvelle programmation de la
télécommande en cas de perte de
l’enregistrement des codes (après un
changement de batterie, par exemple).
Vous devez programmer sur une touche
source (TV, STB, CBL, AUDIO, AUX, VCR,
CD, DVD) avec un code à quatre chiffres
chaque appareil que vous désirez piloter à
l’aide de la télécommande universelle.
Magnétoscope :
recherchez le code avec
une cassette insérée.
Programmation des codes des appareils
Saisie du code de l’appareil selon la liste de
codes
Veuillez consulter la liste de codes jointe
au mode d’emploi pour trouver le code
correspondant à votre appareil.
• Mettez l’appareil que vous désirez utiliser
sous tension manuellement.
• Appuyez brièvement sur la touche de la
source désirée (TV, STB, CBL, AUDIO,
AUX, VCR, CD, DVD).
• Maintenez la touche Setup (16) enfoncée
pendant environ 3 secondes, jusqu’à
ce que la DEL rouge s’allume en
permanence.
• Saisissez ensuite le code à quatre chiffres
correspondant à partir des codes de la
liste.
• La DEL s’éteint brièvement afi n de
confi rmer la saisie de chaque position.
• La DEL rouge s‘éteint après la saisie de la
dernière position dans le cas où le code
saisi est correct.
• Appuyez brièvement sur la touche OK (10)
afi n de sauvegarder le code.
f Mode d‘emploi
00040098bda.indd Abs1:14-Abs1:15
00040098bda.indd Abs1:14-Abs1:15
08.10.2009 10:24:55 Uhr
08.10.2009 10:24:55 Uhr

16
17
• Appuyez sur la touche OK (10) dès que
l’appareil réagit à la télécommande. La
touche P- (8) vous permet de retourner
progressivement vers le code auquel
l’appareil a réagi dans le cas où vous
n’avez pas appuyé sur la touche OK à
temps.
• Appuyez sur la touche EXIT (12) afi n
d’interrompre la recherche.
Procédez comme suit dans le cas où la
télécommande émet un nouveau code toutes
les 3 secondes au lieu d’un par seconde :
Appuyez une nouvelle fois sur la touche
P+ (8) ou P- (8), au maximum dans les 6
secondes, après avoir appuyé sur la touche
P+ (8) (ou POWER (1)) comme décrit plus
haut. La télécommande émet un nouveau
code toutes les 3 secondes. Vous aurez
ainsi plus de temps pour interrompre la
procédure ; la recherche dure toutefois plus
longtemps.
Recherche du code d’après la marque de
l’appareil.
• Cette fonction vous permet de rechercher
le code d’après la marque de l’appareil
(voir la liste de codes).
• Mettez l’appareil que vous désirez utiliser
sous tension manuellement.
• Appuyez brièvement sur la touche de la
source désirée (3) (TV, STB, CBL, AUDIO,
AUX, VCR, CD, DVD).
• Maintenez la touche Setup (16) enfoncée
pendant environ 3 secondes, jusqu’à
ce que la DEL rouge s’allume en
permanence.
• Saisissez le code à un chiffre
conformément aux indications du tableau
ci-dessous :
1 Philips
2 Sony, Panasonic, JVC, Toshiba
3 Thomson
4 Telefunken
5 Grundig
6 Nokia
0 Toutes les autres marques pour
ce groupe d’appareils
• Appuyez plusieurs fois de suite sur la
touche P+ (8) (ou pour un magnétoscope
sur la touche POWER (1)) ou jusqu’à ce
que l’appareil réagisse correctement.
Procédez à vitesse normale, sinon
le système lancerait une recherche
automatique du code.
• Appuyez sur la touche OK (10) afi n de
sauvegarder le code.
• La DEL rouge clignote pendant environ 3
secondes dès que tous les codes ont été
parcourus.
Code d’identifi cation
Le code d’identifi cation vous offre la
possibilité de défi nir des codes que vous
avez déjà saisis et enregistrés dans la
télécommande. Procédez comme suit :
• Mettez l’appareil que vous désirez utiliser
sous tension manuellement.
• Appuyez brièvement sur la touche de la
source désirée (3) (TV, STB, CBL, AUDIO,
AUX, VCR, CD, DVD).
• Maintenez la touche Setup (16) enfoncée
pendant environ 3 secondes, jusqu’à
ce que la DEL rouge s’allume en
permanence.
• Appuyez brièvement sur la touche Setup
(16), la DEL rouge s’éteint brièvement
lorsque vous appuyez sur la touche.
• La DEL rouge clignote pendant trois
secondes, puis s’éteint en cas d’erreur.
Veuillez répéter la procédure de
programmation ou veuillez utiliser un
autre code dans le cas où l’appareil ne
réagit pas correctement.
Veuillez essayer tous les codes
correspondants à la marque de votre
appareil.
• Sélectionnez ensuite le code auquel
toutes les fonctions disponibles de votre
télécommande réagissent correctement.
• Dans le cas où ce procédé ne fonctionne
pas, veuillez utiliser la méthode décrite au
chapitre « Recherche automatique ».
Recherche manuelle du code
• Mettez l’appareil que vous désirez utiliser
sous tension manuellement.
• Appuyez brièvement sur la touche de la
source désirée (3) (TV, STB, CBL, AUDIO,
AUX, VCR, CD, DVD).
• Maintenez la touche Setup (16) enfoncée
pendant environ 3 secondes, jusqu’à
ce que la DEL rouge s’allume en
permanence.
• Appuyez plusieurs fois de suite (il est
possible que vous deviez appuyer jusqu’à
350 fois sur la touche) sur la touche
POWER (1) ; pour un VCR (enregistreur
vidéo) veuillez utiliser la touche P+ (8) ou
P– (8)
• jusqu’à ce que l’appareil que vous
désirez piloter se mette hors tension ou
change de canal ou encore réagisse
correctement. La recherche du code
démarre à partir du numéro de code
sauvegardé actuellement sur le groupe
d’appareils.
• Appuyez brièvement sur la touche OK (10)
afi n de sauvegarder le code. En raison du
nombre important de code, jusqu’à 350
codes différents sont pré-programmés
pour un type d’appareils.
Dans certains cas, il est possible
qu’uniquement les principales fonctions
soient disponibles. Il est possible que la
marche à suivre décrite ici ne fonctionne
pas pour certains modèles spéciaux.
Recherche automatique
Veuillez essayer la procédure de recherche
automatique dans le cas où votre appareil
ne réagit pas à la télécommande, après
que vous ayez essayé tous les codes
correspondants au type et à la marque de
votre appareil. Vous pourrez ainsi trouver les
codes de certaines marques qui ne sont
pas mentionnés dans la liste des codes
d’appareils.
• Mettez l’appareil que vous désirez utiliser
sous tension manuellement.
• Appuyez brièvement sur la touche de la
source désirée (3) (TV, STB, CBL, AUDIO,
AUX, VCR, CD, DVD).
• Maintenez la touche Setup (16) enfoncée
pendant environ 3 secondes, jusqu’à
ce que la DEL rouge s’allume en
permanence.
• Dirigez la télécommande vers l’appareil
et appuyez une fois, brièvement, sur la
touche P+ (8).
• Appuyez sur la touche POWER (1) au
lieu de la touche P+ (8) dans le cas où
l’appareil ne présente pas de fonction de
programme.
• La télécommande lance la recherche du
code environ 6 secondes plus tard, puis
émet tous les codes au rythme d’un par
seconde. La DEL rouge s’allume à chaque
émission.
00040098bda.indd Abs1:16-Abs1:17
00040098bda.indd Abs1:16-Abs1:17
08.10.2009 10:24:56 Uhr
08.10.2009 10:24:56 Uhr

18
19
• Appuyez sur les touches numériques de 0
à 9 afi n de trouver le premier numéro.
• Le premier numéro est sauvegardé dès
que la DEL s’éteint brièvement.
• Appuyez à nouveau sur les touches
numériques de 0 à 9 afi n de trouver le
deuxième numéro, jusqu’à ce que la DEL
rouge s’éteigne.
• Répétez cette procédure pour le troisième
et le quatrième numéro.
• La DEL rouge s’éteint dès que vous avez
appuyé sur la touche pour la quatrième
position.
• La procédure de code d’identifi cation est
ainsi terminée.
Apprentissage des codes d’une autre
télécommande
Dans le cas où certaines fonctions de votre
télécommande d’origine ne sont pas
disponibles sur le modèle 40098, vous
pouvez « apprendre » ces fonctions sur la
nouvelle télécommande. Vous pouvez copier
les fonctions de votre télécommande
d’origine sur le modèle 40098 dans le cas
où la marque de l’appareil que vous désirez
piloter ne fi gure pas dans la liste de codes
fournie. Votre télécommande est capable
d’enregistrer jusqu’à 150 touches en fonction
du format des codes de transmission de la
télécommande d’origine.
Placez votre télécommande d‘origine et
le modèle 40098 de telle sorte que les
diodes d‘émission/de réception des deux
télécommandes soient l‘une en face de
l‘autre. Veillez à ce que les diodes soient à la
même hauteur.
Assurez-vous qu la distance entre les deux
télécommandes ne dépasse pas environ
2,5 cm (épaisseur d’un pouce).
Copie des touches
• Maintenez la touche Setup (16) enfoncée
pendant environ 3 secondes, jusqu’à
ce que la DEL rouge s’allume en
permanence.
• Relâchez la touche SETUP (16).
• Appuyez une fois sur la touche de la
source (3) (TV, STB, CBL, AUDIO, AUX,
VCR, CD, DVD), la touche s’éteint, plus se
rallume.
• Appuyez une fois sur la touche LEARN (18).
• Appuyez une fois sur la touche de la
télécommande 40098 sur laquelle vous
désirez copier une des touches de votre
télécommande d’origine.
• Maintenez la touche de la télécommande
d’origine que vous désirez copier
enfoncée jusqu’à ce que la DEL rouge
s’éteigne , puis se rallume (2 à 3
secondes). En cas d’erreur, la DEL rouge
clignote pendant trois secondes, mais
reste en mode d’apprentissage. Faites
un nouvel essai ou sautez à une autre
touche.
• Répétez la procédure pour les autres
touches à partir de l’étape 5.
• Appuyez une fois sur la touche SETUP
(16) dès que vous avez copié toutes les
touches que vous désiriez copier.
• La DEL rouge s‘éteint.
Recommandation
• Ne déplacez pas les télécommandes
pendant la procédure d’apprentissage.
• Assurez-vous que la pièce dans la quelle
vous vous trouvez n’est pas éclairée à
l’aide de tubes fl uorescents ou de lampes
basse consommation ; ce type d’éclairage
est susceptible de provoquer des
perturbations pouvant gêner la procédure
de copie.
• Les deux télécommandes doivent être
éloignées d’au moins un mètre de toute
source lumineuse.
• Evitez de copier les codes des touches
V+, V- ainsi que des touches de lecture
(5) ; selon le modèle de télécommande,
les codes de ces touches ne pilotent pas
forcément les mêmes appareils.
• La DEL rouge s’allume pendant 3
secondes dès que la mémoire de votre
télécommande 40098 est pleine. Il n’est
donc plus possible de copier d’autres
codes ou d’effectuer une réinitialisation.
• Il est possible que la DEL rouge clignote
faiblement lorsque vous copiez une
touche. Dans ce cas, ne relâchez pas la
touche, mais patientez jusqu’à la fi n du
clignotement.
Remarques :
• Les piles des deux télécommandes
doivent être en bon état ; remplacez-les,
le cas échéant.
• Il n’est pas possible de copier des touches
sur les touches suivantes : LEARN, SETUP.
• Toutes les touches d’un mode seront
effacées lorsque vous saisissez un code
à 4 chiffres sous ce mode (même la saisie
directe d’un code, la recherche d’un code
ou d’une marque).
Suppression de toutes les touches copiées
• Maintenez la touche Setup (16) enfoncée
pendant environ 3 secondes, jusqu’à
ce que la DEL rouge s’allume en
permanence.
• Relâchez la touche SETUP (16).
• Appuyez deux fois sur la touche LEARN
(18). La DEL rouge s’éteint puis se rallume.
• Appuyez sur la touche SETUP (16), la DEL
rouge s’éteint.
• Toutes les touches copiées sont
maintenant effacées.
Programmation d’une
Fonctionnement normal :
Après avoir programmé la télécommande
pour vos appareils audio/vidéo, la
télécommande fonctionne, pour les fonctions
principales, comme la télécommande
d’origine de l’appareil concerné.
Dirigez la télécommande vers l’appareil que
vous désirez piloter et appuyez une fois,
brièvement, sur la touche de la source. La
DEL rouge s’allume brièvement, mais ne reste
pas allumée.
Vous pouvez activer les fonctions
uniquement en appuyant sur la touche de
la fonction correspondante de votre
télécommande universelle.
La DEL rouge s’allume brièvement à chaque
pression.
00040098bda.indd Abs1:18-Abs1:19
00040098bda.indd Abs1:18-Abs1:19
08.10.2009 10:24:56 Uhr
08.10.2009 10:24:56 Uhr

20
21
Il est possible que toutes les fonctions de
votre télécommande d’origine ne soient
pas directement disponibles sur la
télécommande universelle.
En cas de nouveaux appareils, tout
particulièrement, il est possible que les
fonctions doivent être premièrement
programmées sur d’autres touches que les
touches habituelles ou ne soient pas
disponibles du tout.
Clavier à 10 touches et touche AV :
Utilisez le clavier à 10 touches (4) et la touche
majuscule (6) afi n de saisir des numéros à
deux chiffres (numéros de canaux).
Utilisez la touche AV afi n de sélectionner
normalement l’entrée AV de votre
téléviseur pour un récepteur STB ou un
magnétoscope.
Fonctions spéciales
« Guide électronique des programmes »
La touche EPG (13) correspond à la fonction «
Guide électronique des programmes » et a
différentes fonctions selon l’appareil sur
lequel elle est utilisée.
Pour les codes DVD, elle ouvre le menu titre.
Pour les récepteurs STB - ou VCR - vous
pouvez utiliser la touche afi n d’effectuer une
programmation, pour autant que votre
magnétoscope dispose de la fonction
SHOWVIEW.
„Punch Through“
La fonction « Punch through » vous
permet d’exécuter certaines fonctions
sur un appareil d’un autre type que celui
sélectionné. Fonctions prises en charge :
volume, mise en mode silencieux et fonctions
de lecture.
Les touches de volume (7) et de mise
en mode silencieux (17) commandent le
téléviseur (pour autant que les autres
appareils ne disposent pas d’un réglage du
volume propre) lorsque la télécommande est
en mode AUDIO, AUX, VCR, DVD, CD.
En mode TV ou dans un autre mode,
sans fonctions de lecture, les touches
reproduction, pause, stop et (le cas
échéant) enregistrement commandent un
magnétoscope, lecteur DVD ou enregistreur
DVD connecté. La télécommande pilote
toujours le dernier appareil piloté.
En état d’origine, la télécommande
universelle est réglée de telle sorte que les
fonctions volume et mise en mode silencieux
pilotent automatiquement le téléviseur
lorsqu’un appareil de transmission d’images
(DVD, magnétoscope, etc.) est sélectionné à
l’aide de la touche source.
Programmation du volume/de la mise en
mode silencieux sur un appareil d’un autre
type
• Maintenez la touche Setup (16) enfoncée
pendant environ 3 secondes, jusqu’à
ce que la DEL rouge s’allume en
permanence.
• Appuyez sur la touche Mute (17) jusqu’à
ce que la DEL rouge s’éteigne brièvement.
• Appuyez sur la touche de source de
l’appareil vers lequel vous désirez
transmettre les fonctions de volume et de
mise en mode silencieux. La DEL rouge
reste allumée.
• Appuyez sur la touche Mute (17) ; la DEL
rouge s’éteint.
• La DEL rouge clignote pendant 3
secondes dans le cas où vous vous
seriez trompé(e) et auriez sélectionné un
appareil ne disposant pas de réglage du
volume.
Programmation du volume/de la mise en
mode silencieux sur un appareil précis
• Maintenez la touche Setup (16) enfoncée
pendant environ 3 secondes, jusqu’à
ce que la DEL rouge s’allume en
permanence.
• Appuyez sur la touche Mute (17) jusqu’à
ce que la DEL rouge s’éteigne.
• Appuyez sur la touche de source de
l’appareil qui doit disposer uniquement
de ses propres fonctions de volume et de
mise en mode silencieux.
• Appuyez sur la touche de volume (7) ; la
DEL rouge reste allumée.
• Appuyez à nouveau sur la touche Mute
(17) ; la DEL rouge s’éteint.
Réinitialisation du volume/de la mise en mode
silencieux
Après avoir modifi é le contrôle du volume et
de la mise en mode silencieux conformément
aux indications des deux chapitres
précédents, il est possible de remettre les
fonctions en état d’origine et réinitialiser
ainsi la fonction « Punch through ».
• Maintenez la touche Setup (16) enfoncée
pendant environ 3 secondes, jusqu’à
ce que la DEL rouge s’allume en
permanence.
• Appuyez sur la touche Mute (17) jusqu’à
ce que la DEL rouge s’éteigne brièvement.
• Appuyez encore une fois sur la touche
Mute (17) ; la DEL rouge s’éteint.
Les fonctions volume et mise en mode
silencieux ainsi que la fonction « Punch
through » sont ainsi remises en état d’origine.
Elimination des pannes
La télécommande ne fonctionne pas :
• Vérifi ez que les piles sont correctement
insérées dans la télécommande (polarité
+/–).
• Vérifi ez que vos appareils sont
correctement connectés et qu’ils sont
bien sous tension.
• Remplacez les piles en cas de piles
faibles.
• Plusieurs codes d’appareils sont
mentionnés pour un modèle d’une
marque. Comment trouver le bon code ?
• Veuillez essayer successivement les
codes, l’un après l’autre, jusqu’à ce que
la plupart des fonctions de votre appareil
fonctionnent correctement.
Les appareils réagissent uniquement
à certaines commandes de la
télécommande :
• Testez d’autres codes jusqu’à ce que les
appareils réagissent correctement aux
commandes.
• Il est possible que, dans certains cas,
votre appareil ne soit pas compatible
avec la télécommande universelle, dans
le cas où ne parvenez à aucun résultat en
utilisant la saisie manuelle du code et la
recherche automatique du code.
00040098bda.indd Abs1:20-Abs1:21
00040098bda.indd Abs1:20-Abs1:21
08.10.2009 10:24:56 Uhr
08.10.2009 10:24:56 Uhr

22
23
Mando a distancia universal
Teclas de función
1. Power: ON/OFF
2. Indicador LED
3. Teclas de selección de aparatos
4. Bloque de cifras numéricas 0-9
5. AV: Cambiar a aparato externo
6. -/--: Cambiar a números de programa de dos
cifras
7. V+/V–: Regulador de volumen
8. P+/P-: Selección de programa
9. Anillo de navegación para navegar en los
menús de pantalla
10. OK: Para confi rmar entradas
11.
E
Retroceso rápido / rojo
B
Reproducir /amarillo
F
Avance rápido / azul
I
Iniciar grabación
K
Stop / verde
J
Pausa / Fucsia
12. EXIT: Para salir del menú de aparato
13. EPG: Mostrar la guía electrónica de
programas (depende del aparato)
14. Llamar funciones de pantalla
15. Menú: Abrir el menú del aparato
16. Setup
17.
H
Reproducción sin sonido
18. Learn: aprender teclas de aparatos
Generalidades
Este mando a distancia universal es un mando
a distancia 8 en 1 que se puede utilizar con
los siguientes tipos de aparatos: TV, STB, CBL,
AUDIO, AUX, VCR, CD, DVD. (P. ej., grabadora/
reproductor de DVD, grabadora de vídeo,
amplifi cador, sintonizador, etc.).
Los rótulos de las teclas no se refi eren al tipo de
aparato a programar, sirven sólo para facilitar la
vista de conjunto.
Anote los códigos de aparatos que haya
utilizado para la programación. Si, p. ej.,
después de un cambio de pilas los códigos no
permanecen guardados, podrá programar el
mando a distancia más rápidamente.
Para cada aparato que desee operar con el
mando a distancia universal, debe programar un
código de cuatro cifras en una tecla de fuentes
(TV, STB, CBL, AUDIO, AUX, VCR, CD, DVD).
Grabadora de vídeo: Realice la búsqueda de
códigos con una cinta dentro.
Programar códigos de aparatos
Introducir el código de aparato según la lista
de códigos
Los códigos de los aparatos correspondientes
se deben consultar en la lista de códigos que
acompaña a estas instrucciones de manejo.
• Encienda manualmente el aparato en
cuestión.
• Pulse brevemente la tecla de fuentes deseada
(TV, STB, CBL, AUDIO, AUX, VCR, CD, DVD).
• Mantenga pulsada la tecla Setup (16) durante
aprox. 3 segundos hasta que el LED rojo luzca.
• Introduzca el código de cuatro cifras
correspondiente de la tabla de códigos.
• Como confi rmación de pulsación de cada
tecla, el LED rojo se apaga brevemente.
• Si la introducción del código ha sido correcta,
el LED rojo se apaga cuando se ha introducido
la última cifra.
• Pulse brevemente la tecla OK (10) para
guardar el código.
• Si se ha introducido un código no válido,
el LED rojo parpadea tres segundos antes
de apagarse. Si el aparato no reacciona
como se espera, repita la programación, en
caso necesario, pruebe con otro código.
Pruebe todos los códigos indicados para su
marca.
• Elija el código con el que todos los comandos
disponibles de su mando a distancia
reaccionen
correctamente.
• Si aún así no tiene éxito, pruebe con el
método de búsqueda que se describe en el
capítulo “Búsqueda automática”.
e Instrucciones de uso
Búsqueda manual de códigos
• Encienda manualmente el aparato en
cuestión.
• Pulse brevemente la tecla de fuentes deseada
(3) (TV, STB, CBL, AUDIO, AUX, VCR, CD, DVD).
• Mantenga pulsada la tecla Setup (16) durante
aprox. 3 segundos hasta que el LED rojo luzca.
• Pulse sucesivamente (pueden ser hasta 350
veces) la tecla POWER (1) , sólo en caso de
VCR (grabadoras de vídeo) la tecla P+ (8) o
P– (8)
• hasta que el aparato que desee controlar se
apague, o hasta que se cambie el canal o
hasta que reaccione de forma correcta. La
búsqueda de códigos empezará con el
número de código actualmente guardado en
el grupo de aparatos.
• Pulse brevemente la tecla OK (10) para
guardar el código. Debido a la gran cantidad
de números de código distintos, para cada
tipo de aparato hay hasta 350 códigos
distintos preprogramados. En algunos casos
puede ocurrir que sólo se disponga de las
funciones principales más comunes. En
algunos modelos especiales de aparatos
puede ocurrir que el procedimiento descrito
no tenga éxito.
Búsqueda automática
Si su aparato no reacciona al mando a
distancia pese a haber probado los códigos
indicados para su tipo de aparato y la marca
correspondiente, pruebe con una búsqueda
automática. Con ella puede encontrar también
los códigos de marcas que no se indican en la
lista de códigos de aparatos.
• Encienda manualmente el aparato en
cuestión.
• Pulse brevemente la tecla de fuentes deseada
(3) (TV, STB, CBL, AUDIO, AUX, VCR, CD, DVD).
• Mantenga pulsada la tecla Setup (16) durante
aprox. 3 segundos hasta que el LED rojo luzca.
• Oriente el mando a distancia hacia el aparato
y pulse una vez brevemente la tecla P+ (8).
• Si el aparato no tiene función de
programación, en lugar de la tecla P+ (8),
pulse la tecla POWER (1).
• Transcurridos 6 segundos, el mando a
distancia inicia la búsqueda de códigos
y envía sucesivamente todos los códigos
a intervalos de 1 segundo (véase también la
sección siguiente). Con cada envío de código,
el LED rojo se enciende.
• En cuanto el aparato reaccione al mando
a distancia, pulse OK (10). Si no ha pulsado
a tiempo la tecla OK, puede volver paso a
paso pulsando la tecla P– (8) hasta el código
al que el aparato ha reaccionado.
• Para cancelar la búsqueda, pulse EXIT (12).
Si desea que el mando a distancia envíe códigos
cada 3 segundos y no cada segundo, proceda
del siguiente modo.
Antes de que hayan transcurrido 6 segundos
después de pulsar la tecla P+ (8) (o POWER (1))
como se ha descrito antes, pulse de nuevo la
tecla P+ (8) o P– (8). El mando a distancia envía
ahora un nuevo código cada 3 segundos. De
este modo se gana tiempo para interrumpir el
proceso, pero la búsqueda de códigos dura más
tiempo.
00040098bda.indd Abs1:22-Abs1:23
00040098bda.indd Abs1:22-Abs1:23
08.10.2009 10:24:57 Uhr
08.10.2009 10:24:57 Uhr

24
25
Búsqueda de códigos según nombre comercial
• Esta función le ofrece la posibilidad de buscar
en función del nombre comercial de los
aparatos (véase lista de códigos).
• Encienda manualmente el aparato en
cuestión.
• Pulse brevemente la tecla de fuentes deseada
(3) (TV, STB, CBL, AUDIO, AUX, VCR, CD, DVD).
• Mantenga pulsada la tecla Setup (16) durante
aprox. 3 segundos hasta que el LED rojo luzca.
• Introduzca el código de una cifra según la
siguiente tabla de códigos.
1 Philips
2 Sony, Panasonic, JVC, Toshiba
3 Thomson
4 Telefunken
5 Grundig
6 Nokia
0 Todas las demás marcas para este
grupo de aparatos
• Pulse sucesivamente la tecla P+ (8) (en
grabadoras de vídeo, la tecla POWER (1)) o
hasta que el aparato reaccione
correctamente). Hágalo rápidamente pues, de
otro modo, se inicia la búsqueda automática
de
códigos.
• Guarde el código pulsando OK (10).
• Cuando se han explorado todos los códigos, el
LED rojo parpadea durante aprox. 3 segundos.
Identifi cación de códigos
La identifi cación de códigos le ofrece
la posibilidad de determinar códigos ya
introducidos que estén guardados en el mando a
distancia. Proceda del siguiente modo.
• Encienda manualmente el aparato en
cuestión.
• Pulse brevemente la tecla de fuentes deseada
(3) (TV, STB, CBL, AUDIO, AUX, VCR, CD, DVD).
• Mantenga pulsada la tecla Setup (16) durante
aprox. 3 segundos hasta que el LED rojo luzca.
• Pulse brevemente la tecla Setup (16), el LED
rojo se apaga al poco de pulsar la tecla.
• Para encontrar la primera cifra, pulse las
teclas numéricas 0 a 9.
• Cuando el LED rojo se apaga brevemente, ése
es el primer número guardado.
• Para encontrar la segunda cifra, pulse de
nuevo las teclas numéricas 0 a 9 hasta que el
LED rojo se apague.
• Repita el proceso para encontrar la tercera y
la cuarta cifra.
• El LED rojo se apaga en cuanto se ha pulsado
la cuarta cifra.
• La identifi cación del código ha concluido
ahora.
Aprender códigos de otro mando a distancia
Si algunas funciones de su mando a distancia
original faltan en su 40098, éste puede aprender
esas funciones. Si la marca del aparato a
controlar no se encuentra en la lista de códigos
aparte, puede copiar las funciones del mando a
distancia original a su 40098. Dependiendo del
formato del código de transmisión del mando a
distancia original, su mando a distancia puede
guardar hasta 150 teclas.
Coloque el mando a distancia original y su 40098
de modo que los diodos de emisión/recepción de
los dos mandos a distancia queden enfrentados.
Asegúrese de que los diodos están a la misma
altura.
Asegúrese de que la distancia entre los dos
mandos a distancia sea de aproximadamente
2,5 cm (ancho del dedo pulgar).
Copiar las teclas
• Mantenga pulsada la tecla Setup (16) durante
aprox. 3 segundos hasta que el LED rojo luzca.
• Suelte la tecla SETUP (16).
• Pulse una vez la tecla de fuentes (3) (TV, STB,
CBL, AUDIO, AUX, VCR, CD, DVD), la tecla se
apaga y se enciende de nuevo.
• Pulse una vez la tecla LEARN (18).
• Pulse una vez la tecla de su 40098 bajo la
que desee copiar una de las teclas del mando
a distancia original.
• Mantenga pulsada la tecla a copiar del mando
a distancia original hasta que el LED rojo se
apague y se encienda de nuevo (2 a 3
segundos). En caso de fallo, el LED rojo
parpadea durante 3 segundos, pero
permanece en el modo de aprendizaje.
Inténtelo de nuevo o cambie a otra tecla.
• Repita el proceso con las otras teclas a partir
del paso 5.
• Pulse una vez la tecla SETUP (16) cuando
haya copiado todas las teclas que desee.
• El LED rojo se apaga.
Recomendaciones
• No mueva los mandos a distancia durante el
proceso de aprendizaje.
• Asegúrese de que la iluminación de la
habitación no se realiza con tubos
fl uorescentes o con bombillas de ahorro
de energía ya que estas fuentes de luz
puede causar interferencias e infl uenciar
negativamente la copia.
• Los dos mandos a distancia deben estar
alejados más de un metro de cualquier fuente
de
luz.
• Evite copiar los códigos de las tecla V+; V-,
así como de las teclas de reproducción (5),
ya que, dependiendo del mando a distancia,
los códigos de estas teclas no controlan los
mismos
aparatos.
• Cuando la memoria de su 40098 está llena, el
LED rojo parpadea durante 3 segundos.
Después, deja de ser posible copiar otros
códigos sin poner a cero el aparato.
• Cuando copia una tecla, es posible que el
LED rojo parpadee débilmente. En este caso,
no suelte la tecla y espere a que el parpadeo
cese.
Indicaciones:
• Las pilas de los 2 mandos a distancia deben
estar en buen estado; en caso necesario,
cámbielas.
• No se pueden copiar teclas a las siguientes
teclas: LEARN, SETUP,
• Todas las teclas bajo un modo se borran si se
introduce un código de 4 cifras para este
modo (también si se introduce directamente
un código, si se busca un código o una
marca).
Borrar todas las teclas copiadas
• Mantenga pulsada la tecla Setup (16) durante
aprox. 3 segundos hasta que el LED rojo luzca.
• Suelte la tecla SETUP (16).
• Pulse dos veces la tecla LEARN (18). El LED
rojo se apaga y se enciende de nuevo.
• Pulse una vez la tecla SETUP (16), el LED rojo
se
apaga.
• Todas las teclas copiadas están borradas
ahora
Funcionamiento normal
Una vez realizada la programación de su mando
a distancia para sus aparatos de audio/vídeo,
el mando a distancia funciona en sus funciones
principales más comunes como el mando a
distancia del aparato correspondiente.
Oriente su mando a distancia hacia el aparato
en cuestión y pulse la tecla de fuentes
correspondiente. El LED rojo se enciende
brevemente, pero se apaga de nuevo.
Para activar las funciones, sólo tiene que pulsar
la tecla de función correspondiente de su mando
a distancia universal.
Con cada pulsación de tecla, el LED rojo se
enciende brevemente.
00040098bda.indd Abs1:24-Abs1:25
00040098bda.indd Abs1:24-Abs1:25
08.10.2009 10:24:57 Uhr
08.10.2009 10:24:57 Uhr

26
27
Puede ocurrir que no disponga directamente
en el mando a distancia universal de todas las
funciones disponibles en el mando a distancia
original.
Especialmente en el caso de los aparatos
más nuevos, es posible que las funciones
estén guardadas en otras teclas distintas a las
esperadas o que no estén disponibles.
Teclado numérico y AV:
Con el teclado numérico (4) y la tecla de
conmutación (6) se pueden introducir números
de dos cifras (números de canal).
Con la tecla AV se suele elegir la entrada AV
del televisor para, p. ej., el receptor STB o la
grabadora de vídeo.
Funciones especiales
“Programa electrónico”
La tecla EPG (13) corresponde a la función
“Guía electrónica de programas” y tiene
diversas funciones dependiendo del aparato
con la que se utilice.
En caso de códigos DVD, la tecla abre el menú
Títulos. En caso de códigos STB o VCR, con la
tecla puede realizar una programación siempre
que su grabadora de vídeo disponga de una
función SHOWVIEW.
“Punch Through”
La función Punch Through le permite
ejecutar determinadas funciones en un
tipo de aparato distinto al elegido. Estas
funciones son: volumen, reproducción sin
sonido y funciones de reproducción.
Cuando el mando de distancia se encuentra
en el modo AUDIO, AUX, VCR, DVD o CD, las
teclas de volumen (7) y de reproducción sin
sonido (17) controlan el televisor (siempre
que los otros aparatos no dispongan de su
propia regulación de volumen).
En el modo TV o en cualquier modo que no
disponga de funciones de reproducción,
las teclas de reproducción, pausa, stop y
en algunos casos, grabación, controlan
los aparatos conectados como grabadora
de vídeo, reproductor DVD o grabadora
DVD. Siempre se controla el último aparato
elegido.
En el estado de suministro, el mando
a distancia universal está ajustado de
modo que las funciones de volumen y
de reproducción sin sonido controlan
automáticamente el televisor cuando se
pulsa una tecla de fuente para un aparato
con transmisión de imágenes (DVD,
grabadora de vídeos, etc.).
Programar el volumen / la reproducción sin
sonido en otro tipo de aparato
• Mantenga pulsada la tecla Setup (16)
durante aprox. 3 segundos hasta que el
LED rojo luzca.
• Pulse la tecla Mute (17) hasta que el LED
rojo se apague brevemente.
• Pulse la tecla de fuente para el aparato
al que se desee transmitir la función de
volumen y de reproducción sin sonido. El
LED rojo sigue encendido.
• Pulse la tecla Mute (17); el LED rojo se
apaga.
• Si por error elige un aparato que no
dispone de regulación de volumen, el LED
rojo parpadea durante 3 segundos.
Programar el volumen / la reproducción sin
sonido en un tipo de aparato determinado
• Mantenga pulsada la tecla Setup (16)
durante aprox. 3 segundos hasta que el
LED rojo luzca.
• Pulse la tecla Mute (17) hasta que el LED
rojo se apague brevemente.
• Pulse la tecla de fuente para el aparato
que sólo debe tener su propia función de
volumen y de reproducción sin sonido.
• Pulse las teclas de volumen (7), el LED
rojo sigue encendido.
• Pulse de nuevo la tecla Mute (17), el LED
rojo se apaga.
Restablecer el volumen / reproducción sin
sonido
Si ha cambiado el volumen y la reproducción
sin sonido tal y como se ha descrito en los
pasos anteriores, puede reponer las dos
funciones a los ajustes de fábrica y así
restablecer la función “Punch-Through”.
• Mantenga pulsada la tecla Setup (16)
durante aprox. 3 segundos hasta que el
LED rojo luzca.
• Mantenga pulsada la tecla Mute
(17) hasta que el LED rojo se apague
brevemente.
• Pulse de nuevo la tecla Mute (17), el LED
rojo se apaga.
Las funciones de volumen y de reproducción
sin sonido, así como la función “Punch-
Through”, quedan restablecidas al estado de
suministro.
Solución de fallos
El mando a distancia no funciona:
• Compruebe si las pilas están correctamente
colocadas en el mando a distancia y si la
polaridad +/– es correcta.
• Compruebe si sus aparatos están
correctamente conectados y encendidos.
• En caso de que las pilas se estén gastando,
cámbielas por nuevas.
• Hay varios códigos de aparatos bajo el
nombre comercial de mi aparato. ¿Cómo
puedo determinar cuál es el código de
aparato
correcto?
• Para determinar el código de aparato
correcto, pruebe los códigos sucesivamente
hasta que la mayoría de las funciones del
aparato funcionen correctamente.
Los aparatos reaccionan sólo a algunas
funciones del mando a distancia:
• Pruebe otros códigos hasta que los aparatos
reaccionen correctamente a los comandos.
• Si la introducción manual de códigos y la
búsqueda automática de códigos no tienen
éxito, en casos aislados puede ser que el
aparato no sea compatible con el mando a
distancia
universal.
00040098bda.indd Abs1:26-Abs1:27
00040098bda.indd Abs1:26-Abs1:27
08.10.2009 10:24:58 Uhr
08.10.2009 10:24:58 Uhr

28
29
Probeer alle codes die bij uw merk zijn
aangegeven.
• Kies de code waarbij uw toestel die op
alle beschikbare commando’s van uw
afstandsbediening goed reageert.
• Mocht u nog steeds geen succes hebben,
probeer het dan met de in het hoofdstuk
„Automatisch zoeken“ beschreven
zoekmethode.
Handmatig codes zoeken
• Schakel het betreffende toestel met de
hand in.
• Druk kort op de gewenste brontoets (3)
(TV, STB, CBL, AUDIO, AUX, VCR, CD,
DVD).
• Houd de toets Setup (16) gedurende ca.
3 seconden ingedrukt tot de rode LED
permanent brandt.
• Druk meerdere keren na elkaar (dit kan
tot 350 keer zijn) de toets POWER (1) in.
Alleen bij VCR (videorecorder) gebruikt u
de toets P+ (8) of P– (8)
• tot het toestel dat ingesteld moet worden
uitgeschakeld is of van kanaal verspringt
o.i.d. Het zoeken naar de code begint bij
het codenummer dat op dat moment bij de
toestelgroep is opgeslagen.
• Druk kort op OK (10) om de code
op te slaan Door het grote aantal
verschillende codenummers, zijn per
toesteltype tot 350 verschillende codes
voorgeprogrammeerd. Het kan soms zijn
dat alleen de meest gebruikelijke functies
gebruikt kunnen worden. Bij een paar
speciale toestelmodellen kan het zijn dat
u met de beschreven procedure geen
succes heeft.
Automatisch zoeken
Als uw toestel niet op de afstandsbediening
reageert, hoewel u alle voor uw toesteltype
en merk aangegeven codes heeft
uitgeprobeerd, probeer het dan met de
functie automatisch zoeken. Hierdoor kunt u
ook codes van merken vinden die niet in de
lijst met toestelcodes staan.
• Schakel het betreffende toestel met de
hand in.
• Druk kort op de gewenste brontoets (3)
(TV, STB, CBL, AUDIO, AUX, VCR, CD,
DVD).
• Houd de toets Setup (16) gedurende ca.
3 seconden ingedrukt tot de rode LED
permanent brandt.
• Richt de afstandsbediening op het toestel
en druk een keer kort op de toets P+ (8).
• Als het toestel geen programmafunctie
heeft, drukt u in plaats van P+ (8) de toets
POWER (1) in.
• De afstandsbediening begint na ca. 6
seconden met het zoeken naar de code
en stuurt per seconde (zie volgende
paragraaf) één voor één alle codes. Bij
elke keer sturen gaat de rode LED even
branden.
• Zodra het toestel op de afstandsbediening
reageert, drukt u op OK (10). Als u te laat
op OK gedrukt heeft en daardoor de code
gemist heeft, kunt u met de toets P– (8)
stap voor stap naar de betreffende code
teruggaan.
• Om het zoeken af te breken drukt u op
EXIT (12).
Universele afstandsbediening
Functietoetsen
1. Power: AAN/UIT
2. LED-indicatie
3. Toetsen voor toestelkeuze
4. Cijfertoetsen 0-9
5. AV: omschakelen naar extern toestel
6. -/--: omschakelen naar programma met twee
cijfers
7. V+/V– : volumeregeling
8. P+/P-:programmakeuze
9. Navigatiering voor het navigeren in het
beeldschermmenu
10. OK: voor het bevestigen van ingevoerde
gegevens
11.
E
snel terug/rood
B
afspelen/geel
F
snel vooruit/blauw
I
opname starten
K
stop/groen
J
pauze/roze
12. EXIT: voor het verlaten van het toestelmenu
13. EPG: elektronisch programmatijdschrift
(afhankelijk van het toestel)
14. Beeldschermfuncties oproepen
15. Menu: toestelmenu openen
16. Setup
17 .
H
Mute-functie
18. Learn: aanleren van toestel- toetsen
Algemeen
Deze universele afstandsbediening is een
8in1-afstandsbediening en kan gebruikt
worden voor de volgende toesteltypes: TV,
STB, CBL, AUDIO, AUX, VCR, CD, DVD. (bijv.
dvd-recorder/speler, videorecorder,
versterker, tuner, etc.).
De opschriften op de toetsen gelden niet
voor het te programmeren toesteltype, ze
dienen alleen voor een beter overzicht.
Noteer de code van uw toestel die u voor
de programmering heeft gebruikt.
Als de codes bijv. na het vervangen van de
batterijen niet meer opgeslagen zijn,
kunt u de afstandsbediening sneller
programmeren.
U dient een viercijferige toestelcode voor
elk toestel dat u met de universele
afstandsbediening wilt gebruiken op een
brontoets (TV, STB, CBL, AUDIO, AUX, VCR,
CD, DVD) te programmeren.
Videorecorder: zoek naar de code met een
videocassette ín de recorder.
Toestelcodes programmeren
Toestelcode aan de hand van codelijst
invoeren
De codes van de betreffende toestellen
vindt u in de codelijst die bij deze
gebruiksaanwijzing inbegrepen is.
• Schakel het betreffende toestel met de
hand in.
• Druk kort op de gewenste brontoets (TV,
STB, CBL, AUDIO, AUX, VCR, CD, DVD).
• Houd de toets Setup (16) gedurende ca.
3 seconden ingedrukt tot de rode LED
permanent brandt.
• Voer vervolgens de overeenkomstige
viercijferige code uit de codetabel in.
• Ter bevestiging van elke druk op de toets
gaat de rode LED even uit.
• Als de invoer van de code geldig was gaat
de rode LED uit nadat het laatste cijfer is
ingevoerd.
• Druk kort op OK (10) om de code op te
slaan
• Als er een ongeldige code werd
ingevoerd, knippert de rode LED
gedurende drie seconden, voordat hij
uitgaat. Als het toestel niet volgens
verwachting reageert, herhaal dan de
programmering evt. met een andere code.
o Gebruiksanwijzing
00040098bda.indd Abs1:28-Abs1:29
00040098bda.indd Abs1:28-Abs1:29
08.10.2009 10:24:58 Uhr
08.10.2009 10:24:58 Uhr

30
31
Als u wilt dat de afstandsbediening in plaats
van om de seconde, om de 3 secondes een
nieuwe code stuurt, gaat u als volgt te werk.
Druk binnen 6 seconden na het indrukken
van de toets P+ (8) (of POWER (1)) zoals
hiervoor beschreven, de toets P+ (8) of P– (8)
nogmaals in. De afstandsbediening stuurt
nu om de 3 seconden een nieuwe code.
Daardoor heeft u meer tijd om het zoeken
af te breken. Het zoeken duurt daardoor wel
langer.
Codes zoeken aan de hand van de merknaam
• Met deze functie kunt u aan de hand van
de merknaam zoeken (zie codelijst).
• Schakel het betreffende toestel met de
hand in.
• Druk kort op de gewenste brontoets (3)
(TV, STB, CBL, AUDIO, AUX, VCR, CD,
DVD).
• Houd de toets Setup (16) gedurende ca.
3 seconden ingedrukt tot de rode LED
permanent brandt.
• Toets de 1-cijferige code aan de hand van
de volgende tabel in.
1 Philips
2 Sony, Panasonic, JVC, Toshiba
3 Thomson
4 Telefunken
5 Grundig
6 Nokia
0 Alle andere merken voor deze
toestelgroep
• Druk meerdere keren op de toets P+ (8)
(of bij videorecorders de toets POWER (1))
of tot het toestel juist reageert. Ga snel
te werk omdat anders het automatisch
zoeken gestart wordt.
• Sla de code op door op OK (10) te drukken.
• Als alle codes doorzocht zijn, knippert de
rode LED gedurende ca. 3 seconden.
Code-identifi catie
Met de code-identifi catie kunt u codes die u
al ingevoerd heeft en die in de
afstandsbediening opgeslagen zijn
achterhalen. U gaat als volgt te werk.
• Schakel het betreffende toestel met de
hand in.
• Druk kort op de gewenste brontoets (3)
(TV, STB, CBL, AUDIO, AUX, VCR, CD,
DVD).
• Houd de toets Setup (16) gedurende ca.
3 seconden ingedrukt tot de rode LED
permanent brandt.
• Druk kort op de toets Setup (16). De rode
LED gaat even uit op het moment dat u de
toets indrukt.
• Om het eerste getal te vinden, drukt u op
de cijfertoetsen 0 tot 9.
• Als de rode LED even uitgaat, is dat het
eerste opgeslagen getal.
• Om het tweede getal te achterhalen, drukt
u nogmaals op de cijfertoetsen 0 tot 9 tot
de rode LED uitgaat.
• Herhaal de procedure voor het derde en
vierde getal.
• De rode LED gaat uit zodra de toets voor
het vierde getal ingedrukt is.
• De code-identifi catie is nu voltooid.
Codes van een andere afstandsbediening
aanleren
Als somige functies van uw oorspronkelijke
afstandsbediening in de 40098 ontbreken,
dan kan de afstandsbediening deze
functies aanleren. Als het merk van het te
bedienen toestel niet in de separate codelijst
staat, kunt u de functies van de originele
afstandsbediening van het toestel naar
de 40098 kopiëren. Afhankelijk van het
formaat van de overdrachtscode van de
originele afstandsbediening kan uw
afstandsbediening max. 150 toetsen opslaan.
Leg de oorspronkelijke afstandsbediening
en de 40098 zodanig neer dat de zenden/
ontvangen-dioden van de twee
afstandsbediening tegen elkaar aanliggen.
Let erop dat de dioden op dezelfde hoogte
liggen.
Controleer of de afstand tussen de twee
afstandsbedieningen ongeveer 2,5 cm
(duimbreedte) is.
Kopiëren van de toetsen
• Houd de toets Setup (16) gedurende ca.
3 seconden ingedrukt tot de rode LED
permanent brandt.
• Laat de toets SETUP (16) los.
• Druk één keer op de brontoets (3) (TV,
STB, CBL, AUDIO, AUX, VCR, CD, DVD). De
toets gaat uit en weer aan.
• Druk een keer op de toets LEARN (18).
• Druk een keer op de toets van de 40098,
waaronder u een van de toetsen van de
originele afstandsbediening wilt kopiëren.
• De toets van de originele
afstandsbedienig die u wilt kopiëren
ingedrukt tot de rode LED uit- en weer
aangaat (2 tot 3 seconden). Bij een
storing knippert de rode LED gedurende
3 seconden, hij blijft echter in de
aanleermodus. Probeer het nogmaals of
ga naar een andere toets.
• Herhaal de procedure voor de andere
toetsen vanaf stap 5.
• Druk een keer op de toets SETUP (16), als
alle gewenste toetsen gekopieerd zijn.
• De rode LED gaat uit.
Aanbevelingen
• Beweeg de afstandsbedieningen tijdens
het aanleren niet.
• Ga na of uw kamer verlicht wordt met
tl-licht of energiespaarlampen,
aangezien deze lichtbronnen storingen
veroorzaken en het kopiëren negatief
kunnen beïnvloeden.
• De 2 afstandsbedieningen moeten
minstens één meter uit de buurt van elke
lichtbron staan.
• Vermijd het kopiëren van de codes van de
toetsn V+; V- en van de afspeeltoetsen
(5), afhankelijk van de afstandsbediening
bedienen de codes van deze toetsen niet
altijd dezelfde toestellen.
• Als het geheugen van de 40098 vol
is, knippert de rode LED gedurende
3 seconden. Daarna is het niet meer
mogelijk andere codes te kopiëren zonder
de afstandsbediening eerst op nul te
zetten.
• Als u een toets kopieert kan het zijn dat de
rode LED zwak knippert. Laat in dat geval
de toets niet los en wacht tot het
knipperen ophoudt.
00040098bda.indd Abs1:30-Abs1:31
00040098bda.indd Abs1:30-Abs1:31
08.10.2009 10:24:59 Uhr
08.10.2009 10:24:59 Uhr

32
33
Aanwijzingen:
• De batterijen van de 2
afstandsbedieningen moeten in een
goede toestand zijn; vervang ze indien
nodig.
• U kunt geen toetsen onder de volgende
toetsen kopiëren: LEARN, SETUP,
• Alle toetsen onder een modus worden
gewist als er een 4-cijferige code onder
deze modus wordt ingevoerd (ook voor de
directe invoer van een code, het zoeken
naar een code of een merk).
Wissen van alle gekopieerde toetsen
• Houd de toets Setup (16) gedurende ca.
3 seconden ingedrukt tot de rode LED
permanent brandt.
• Laat de toets SETUP (16) los.
• Druk de toets LEARN (18) twee keer in. De
rode LED gaat uit en weer aan.
• Druk een keer op de toets SETUP (16). De
rode LED gaat uit.
• Alle gekopieerde toetsen zijn nu gewist.
Normaal gebruik
Na het programmeren van de
afstandsbediening voor uw audio/video-
apparatuur, kan de afstandsbediening voor
dezelfde gebruikelijke hoofdfuncties als
de originele afstandsbediening van het
betreffende toestel gebruikt worden.
Richt de afstandsbediening op het gewenste
toestel en druk op de gewenste brontoets.
De rode LED gaat kort branden, maar blijft
niet aan.
U activeert de functies vervolgens door
de betreffende functietoets van uw
universele afstandsbediening in te drukken.
Bij elke druk op de toets gaat de rode LED
even branden.
Soms kan niet elke functie van uw originele
afstandsbediening op de universele
afstandsbediening direct gebruikt worden.
Vooral bij nieuwere toestellen kan het zijn
dat de functies onder andere toetsen
dan verwacht liggen of helemaal niet
beschikbaar zijn.
Toetsenbord met 10 toetsen en AV:
Het toetsenbord met 10 toetsen (4) en de
omschakeltoets (6) voor het invoeren van
2-cijferige getallen (kanaalnummers).
Met de AV-toets selecteert u normaliter de
AV-ingang van het tv-toestel, voor bijv. de
STB-receiver of de videorecorder.
Speciale functies
„Elektronisch programma“
De toets EPG (13) komt overeen met de
functie „Elektronik Programm Guide“ en
heeft verschillende functies, afhankelijk
van voor welk toestel de toets gebruikt wordt.
Bij dvd-codes kunt u met de toets het
titelmenu openen. Bij STB- of VCR-codes
kunt u met de toets programmeren, mits uw
videorecorder over een SHOWVIEW-functie
beschikt.
„Punch Through“
Met de Punch Through-functie kunt u
bepaalde functies op een ander toesteltype
gebruiken. Overzicht van de functies: volume,
mute-functie en de afspeelfuncties.
Als de afstandsbediening zich in de AUDIO-,
AUX-,VCR-, DVD-, CD-modus bevindt, regelen
de toetsen het volume (7) en de mute-functie
(17) van het tv-toestel (mits de andere toe-
stellen geen eigen volumeregeling hebben).
In de tv-modus of een andere modus
zonder afspeelfuncties, regelen de toetsen
Weergave, Pauze, Stop en indien aanwezig
Opname deze functies voor een aangesloten
videorecorder, dvd-speler of dvd-recorder.
De toetsen regelen altijd het toestel dat het
laatst geselecteerd is.
Bij levering is de universele
afstandsbediening zo ingesteld dat de
functies volume en mute automatisch het
tv-toestel regelen, als er op dat moment
een brontoets voor een toestel met
beeldoverdracht (dvd, videorecorder etc.)
ingedrukt is.
Volume/mute-functie op een ander
toesteltype programmeren
• Houd de Setup-toets (16) gedurende ca.
3 seconden ingedrukt tot de rode LED
permanent brandt.
• Druk de Mute-toets (17) in tot de rode LED
even uitgaat.
• Druk op een brontoets voor het toestel
waarop de volume- en mute-functie
moet worden ingesteld. De rode LED blijft
branden.
• Druk de Mute-toets (17) in; de rode LED
gaat uit.
• Als u per ongeluk een toestel
geselecteerd heeft dat geen eigen
volumeregeling heeft, knippert de rode
LED gedurende 3 seconden.
Volume/mute-functie op een bepaald toestel
programmeren
• Houd de Setup-toets (16) gedurende ca.
3 seconden ingedrukt tot de rode LED
permanent brandt.
• Druk de Mute-toets (17) in tot de rode LED
even uitgaat.
• Druk op de brontoets voor het toestel dat
alleen op zijn eigen volume- en mute-
functie moet reageren.
• Druk de volumetoetsen (7) in, de rode LED
blijft branden.
• Druk opnieuw de Mute-toets (17) in, de
rode LED gaat uit.
Volume/mute-functie weer resetten
Als u de volume en mute-functie veranderd
heeft zoals hiervoor beschreven, kunnen
de functies weer teruggezet worden in de
fabrieksinstelling, waardoor de „Punch-
Through“-functie weer werkt.
• Houd de Setup-toets (16) gedurende ca. 3
sec. ingedrukt tot de rode LED permanent
brandt.
• Houd de Mute-toets (17) ingedrukt tot de
rode LED even uitgaat.
• Druk nog een keer de Mute-toets (17) in,
de rode LED gaat uit.
De „Punch-Through“-functie is nu weer
teruggezet in de fabriekstoestand.
00040098bda.indd Abs1:32-Abs1:33
00040098bda.indd Abs1:32-Abs1:33
08.10.2009 10:24:59 Uhr
08.10.2009 10:24:59 Uhr

34
35
Verhelpen van storingen
De afstandsbediening doet het niet:
• Controleer of de batterijen van de
afstandsbediening juist geplaatst zijn en
of de polen +/– overeenstemmen.
• Controleer of uw toestellen juist
aangesloten en ingeschakeld zijn.
• Als de batterijen bijna leeg zijn, dient u ze
te vervangen.
• Er staan meerdere toestelcodes onder de
merknaam van mijn toestel vermeld. Hoe
kom ik achter de juiste toestelcode?
• Om de juiste toestelcode voor uw toestel
te achterhalen, probeert u de codes één
voor één uit tot de meeste functies van uw
toestel het naar behoren doen.
De toestellen reageren alleen op een paar
commando´s van de afstandsbediening:
• Probeer andere codes tot de toestellen op
de commando´s reageren.
• Als het handmatig codes invoeren en het
automatisch codes zoeken niet lukt, kan
het zijn dat het toestel niet compatibel is
met de universele afstandsbediening.
Pilot uniwersalny Przyciski
1. zasilanie: włącz /wyłącz
2. Kontrolka LED
3. Przyciski wyboru urządzenia
4. Przyciski numeryczne 0-9
5. AV: Przełączenie na urządzenie zewnętrzne
6. -/--: dwucyfrowe kanały
7. V+/V–: Regulacja głośności
8. P+/P–: Wybór programu
9. Pierścień nawigacyjny do nawigowania w
programie
10. OK: Zatwierdzenie wyboru
11.
E
Szybkie przewijanie w tył / czerwony
B
Odtwarzanie / żółty
F
Szybkie przewijanie w przód / niebieski
I
Nagrywaj
K
Stop / Zielony
J
Pauza / różowy
12 . EXIT: Wyjście z menu
13 . EPG: elektroniczny program telewizyjny (w
zależności od urządzenia)
14 . Wywołanie funkcji obrazu
15 . menu: otwarcie menu urządzenia
16 . Setup
17 .
H
Wyłączenie dźwięku
18. Funkcja uczenia: nauka funkcji
Opis ogólny
Pilot uniwersalny 8 w 1 posiada możliwość
obsługi do 8 różnych urządzeń następujących
typów: TV, STB, CBL, AUDIO, AUX, VCR, CD,
DVD. (np: DVD/ magnetowid, wzmacniacz,
Tuner, etc.).
Opis na przycisku nie zawsze musi
oznaczać urządzenie, do którego pilot został
zaprogramowany. Można temu przyciskowi
przyporządkować również inne funkcje.
Kod dla danego urządzenia należy zanotować.
Ułatwi to sprawę przy wymianie baterii na
nowe, ponieważ kod urządzenia jest już znany,
wystarczy go wtedy tylko wpisać.
Na każde urządzenie, które będzie obsługiwane
za pomocą pilota uniwersalnego należy wpisać
kod przyporządkowując go do odpowiedniego
przycisku oznaczonego symbolem (TV, STB,
CBL, AUDIO, AUX, VCR, CD, DVD).
Magnetowid: Wyszukiwanie kodu należy
rozpocząć przy włożonej kasecie.
Programowanie kodu
Kod urządzenia według listy kodów
Kod dla danego urządzenia należy odczytać z
listy kodów.
Włączyć urządzenie.
Przycisnąć żądany przycisk urządzenia
źródłowego (TV, STB, CBL, AUDIO, AUX, VCR,
CD, DVD).
Przytrzymać klawisz Setup (16) przez około 3
sek., aż zapali się czerwona kontrolka LED.
Wpisać odpowiedni 4 cyfrowy kod z tabeli.
Jako potwierdzenie każdego przyciśnięcia zapali
się czerwona kontrolka LED.
Jeżeli kod był poprawny, po wpisaniu ostatniej
cyfry kontrolka zgaśnie.
Przycisnąć krótko przycisk OK (10), aby zapisać
kod.
Jeżeli został wpisany niewłaściwy kod, przez
3 sek. zabłyśnie kontrolka LED, zanim zgaśnie.
Jeżeli urządzenie nie zareagowało poprawnie,
należy powtórzyć proces programowania z
nowym kodem. wypróbować wszystkie kody
z listy.
Wybrać kod, na którym urządzenie najlepiej
reaguje na zadane komendy.
Jeżeli próby nie przyniosły pożądanego skutku,
należy uruchomić wyszukiwanie automatyczne.
Ręczne wyszukiwanie kodu
Włączyć urządzenie.
Przycisnąć żądany przycisk urządzenia
źródłowego (TV, STB, CBL, AUDIO, AUX, VCR,
CD, DVD).
Przytrzymać klawisz Setup (16) przez około 3
sek., aż zapali się czerwona kontrolka LED.
Przycisnąć wielokrotnie (może to być nawet
q
Instrukcja obs ł ugi
00040098bda.indd Abs1:34-Abs1:35
00040098bda.indd Abs1:34-Abs1:35
08.10.2009 10:24:59 Uhr
08.10.2009 10:24:59 Uhr

36
37
do 350 razy) przycisk POWER (1), lub VCR
(magnetowid) lub P+ (8) lub P– (8)
aż urządzenie, które jest obsługiwane za
pomocą pilota, wyłączy się, zmieni się kanał
lub zareaguje odpowiednio inaczej. Wyszukanie
kodu rozpocznie się na zapamiętanych kodach
dla danej grupy urządzeń.
Przycisnąć krótko klawisz OK (10) aby
zapamiętać kod. do każdego urządzenia
zaprogramowano około 350 kodów. w
pojedynczych wypadkach może się zdarzyć,
że pilot będzie obsługiwał tylko podstawowe
funkcje. Tylko w bardzo odosobnionych
przypadkach może się zdarzyć, że pilot nie
będzie obsługiwał żadnej funkcji.
Automatyczne wyszukiwanie
Jeżeli urządzenie nie odpowiada na pilota, mimo
iż wpisano kod odpowiedni dla danej marki,
należy wypróbować funkcję automatycznego
wyszukiwania kodu. Za pomocą tego typu
wyszukiwania można odnaleźć takie kody,
których nie ma na liście.
Włączyć urządzenie.
Przycisnąć żądany przycisk urządzenia
źródłowego (TV, STB, CBL, AUDIO, AUX, VCR,
CD, DVD).
Przytrzymać klawisz Setup (16) przez około 3
sek., aż zapali się czerwona kontrolka LED.
Skierować pilota na urządzenie i przycisnąć
klawisz P+ (8).
Jeżeli urządzenie nie posiada programów,
zamiast przycisku P+ (8) należy przycisnąć
klawisz POWER (1).
Po 6 sek. pilot rozpocznie wyszukiwanie kodu
i co sek. będzie wysyłał sygnał. Za każdym
wysłaniem sygnału będzie mruga kontrolka LED.
(Patrz akapit poniżej).
Jeżeli urządzenie zareaguje na pilota, należy
przycisnąć klawisz OK (10). Jeżeli klawisz nie
został przyciśnięty w porę, można wówczas za
pomocą przycisków P– (8) powrócić do kodu, na
który urządzenie zareagowało.
Aby zakończyć wyszukiwanie, należy przycisnąć
EXIT (12).
Jeżeli pilot zamiast co sek. co 3 sek. miałby
wysyłać nowy kod, należy postąpić następująco:
W ciągu 6 sek. od przyciśnięcia klawisza P+ (8)
(lub POWER (1)) jak wcześniej opisano, należy
przycisnąć klawisz P+ (8) lub P– (8) ponownie.
Pilot będzie wysyłał teraz co 3 sek. kod. Dzięki
temu można zyskać więcej czasu, aby przerwać
proces. Przez to proces wyszukiwania kodu trwa
odpowiednio dłużej.
Wyszukanie kodu po marce
Funkcja ta daje możliwość, wyszukania kodu po
marce (patrz lista kodów).
Włączyć dane urządzenie.
Przycisnąć klawisz z oznaczeniem urządzenia
źródłowego (3) (TV, STB, CBL, AUDIO, AUX,
VCR, CD, DVD).
Przez około sek. przytrzymać klawisz Setup (16),
aż zapali się czerwona kontrolka LED.
Wpisać jednocyfrowy kod według poniższej
tabeli.
1 Philips
2 Sony, Panasonic, JVC, Toshiba
3 Thomson
4 Telefunken
5 Grundig
6 Nokia
0 Inne marki dla tej grupy
produktów
Przycisnąć wielokrotnie klawisz P+ (8) (lub
w przypadku kamer klawisz POWER (1)) do
momentu aż urządzenie poprawnie zareaguje.
Czynność tę trzeba wykonać szybko, w
przeciwnym razie uruchomiona zostanie
automatyczna wyszukiwarka.
Zapisać kod przyciskając OK (10).
Gdy przeszukane zostaną wszystkie kody,
zamruga czerwona kontrolka LED przez około
3 sek.
Identyfi kacja kodu
Funkcja identyfi kacji kodu daje możliwość
odczytania zapisanego w pilocie kodu. W tym
wypadku należy postąpić następująco.
Włączyć urządzenie.
Przycisnąć żądany przycisk urządzenia
źródłowego (TV, STB, CBL, AUDIO, AUX, VCR,
CD, DVD).
Przytrzymać klawisz Setup (16) przez około 3
sek., aż zapali się czerwona kontrolka LED.
Przycisnąć krótko klawisz Setup (16), aż zgaśnie
czerwona kontrolka LED.
Aby odnaleźć pierwszą cyfrę w kodzie, należy
przycisnąć klawisze numeryczne od 0 do 9.
Jeżeli kontrolka LED szybko zgaśnie, będzie to
oznaczało pierwszą cyfrę.
Aby wyznaczyć drugą cyfrę, należy ponownie
przycisnąć klawisz numeryczny od 0 do 9, aż
zgaśnie czerwona kontrolka LED.
Należy powtórzyć proces w ten sam sposób
kilka razy.
Czerwona kontrolka LED zgaśnie, po odczytaniu
cyfry z czwartej pozycji kodu.
Proces identyfi kacji kodu został zakończony.
Nauka kodu innego pilota
Pilot 40098 daje możliwość nauki kodu innego
pilota. Funkcję tę można wykorzystać, jeżeli
marka danego urządzenia nie została ujęta
na liście. ts nicht in der separaten Codeliste
steht, können Sie die Funktionen der Original-
Fernbedienung des Geräts in Ihre 40098
kopieren. W zależności od kodu transferowego
pilota oryginalnego
można na pilocie zapamiętać do 150 kodów.
Piloty położyć obok siebie tak aby kontrolki
nadajnika i odbiornika leżały na przeciw siebie.
Proszę uważać, aby kontrolki były na tej samej
wysokości.
Proszę się upewnić, że odległość między
pilotami nie jest większa niż 2,5 cm (szerokość
kciuka).
Kopiowanie przycisków
Przytrzymać klawisz Setup (16) przez około 3
sek. aż zapali się czerwona kontrolka LED.
Klawisz SETUP (16) puścić.
Przycisnąć jeden raz klawisz urządzenia
źródłowego (3) (TV, STB, CBL, AUDIO, AUX,
VCR, CD, DVD) kontrolka pod klawiszem będzie
zapalać się i gasnąć.
Przycisnąć jeden raz klawisz LEARN (18).
Przycisnąć klawisz na pilocie 40098 pod którym
zapamiętana będzie nowa funkcja.
Przytrzymać przycisk na pilocie oryginalnym, aż
czerwona kontrolka LED zgaśnie i ponownie się
zapali (2 do 3 sek). W przypadku błędu kontrolka
będzie mrugać.
przez około 3 sek., pilot pozostanie jednak w
trybie nauki. Próbę należy powtórzyć.
Dla innych przycisków proces należy powtórzyć
od kroku 5.
Jeden raz przycisnąć klawisz SETUP (16), jak
wszystkie przyciski zostały już skopiowane.
Czerwona kontrolka LED zgaśnie.
Zalecenia
Podczas procesu nauki nie należy poruszać
pilotów.
Należy się upewnić, że oświetlenie w
pomieszczeniu nie jest pochodzenia
świetlówkowego lub nie pochodzi z żarówek
energooszczędnych.
Obydwa piloty muszą być oddalone od takiego
źródła światła o przynajmniej 1 m.
Unikać kopiowania kodu za pomocą przycisków
V+; V- oraz przycisków odtwarzania (5),
ponieważ zależnie od pilota kody te nie muszą
obsługiwać tych samych urządzeń.
Jeżeli pamięć 40098 jest pełna czerwona
kontrolka LED zapali się na 3 sek. W tym
momencie nie jest możliwe kopiowanie
kolejnych kodów.
Jeżeli kopiowany jest tylko jeden przycisk, jest
możliwe, że czerwona kontrolka LED będzie
bardzo słabo mrugać. W tym wypadku puścić
klawisz i poczekać aż kontrolka przestanie
mrugać.
00040098bda.indd Abs1:36-Abs1:37
00040098bda.indd Abs1:36-Abs1:37
08.10.2009 10:25:00 Uhr
08.10.2009 10:25:00 Uhr

38
39
Uwaga:
Baterie w obydwóch pilotach muszą być
naładowane; W przeciwnym wypadku należy je
naładować.
Pod przyciskami: LEARN, SETUP nie można
zapisywać innych funkcji.
Wszystkie funkcje przycisków w jednym trybie
zostaną skasowane, jeżeli wprowadzony
zostanie w tym trybie 4-cyfrowy kod.
(również przy bezpośrednim wpisaniu kodu,
wyszukania kodu lub marki).
Kasowanie wszystkich skopiowanych
przycisków
Przytrzymać klawisz Setup (16) przez około 3
sek. aż czerwona kontrolka LED zapali się.
Puścić klawisz SETUP (16).
Przycisnąć 2x klawisz LEARN (18). Czerwona
kontrolka LED zgaśnie i zapali się ponownie.
przycisnąć jeden raz klawisz SETUP (16),
czerwona kontrolka LED zgaśnie.
Wszystkie skopiowane przyciski są skasowane.
Programmierung einer
Użytkowanie normalne
Po zakończeniu programowania pilota do
odpowiedniego urządzenia audio/video, pilot
będzie spełniał podstawowe funkcje pilota
oryginalnego.
Pilota skierować na odpowiednie urządzenie i
przycisnąć odpowiedni klawisz źródłowy. Die
rote LED leuchtet kurz auf, bleibt aber nicht an.
Aktywowanie funkcji odbywa się przez
przyciśnięcie odpowiedniego przycisku na
pilocie uniwersalnym.
Przy każdym przyciśnięciu klawisza zapali się
kontrolka LED.
Tylko w nielicznych przypadkach nie każda
funkcja pilota oryginalnego będzie dostępna na
pilocie uniwersalnym.
W szczególności w przypadku nowych modeli,
niektóre funkcje mogą być zapisane pod innym
przyciskiem niż można się spodziewać.
Funkcje szczególne
„Program elektroniczny“
Klawisz EPG (13) odpowiada „Elektronik
Programm Guide“ i ma różne funkcje, w
zależności do jakiego urządzenia został
zastosowany.
W przypadku DVD klawisz ten otwiera menu
- tytułów. W przypadku STB lub VCR za
pomocą tego przycisku można rozpocząć
programowanie. jeżeli magnetowid dysponuje
funkcją SHOWVIEW.
„Punch Through“ Funkcja Punch Through umożliwia wykonywanie określonych funkcji na urządzeniu innego typu niż wybranym. Są to funkcje: regulacja głośności, wyciszenie (mute) i funkcje odtwarzania. Jeżeli pilot znajduje się w trybie AUDIO, AUX, VCR, DVD, CD, przyciski Głośność (7) i Wyciszenie (mute) (17) sterują pracą telewizora (o ile inne urządzenia nie mają własnej regulacji głośności). W trybie TV lub innym trybie bez funkcji odtwarzania przyciski Odtwarzanie, Pauza, Stop i ewent. Nagrywanie uruchamiają podłączony magnetowid, odtwarzacz lub nagrywarkę DVD. Uruchamiane jest zawsze wybrane ostatnio urządzenie. W stanie ustawień fabrycznych pilot uniwersalny jest tak skonfi gurowany, że funkcje regulacji głośności i wyciszenia (mute) sterują automatycznie pracą telewizora, jeżeli naciśnięty jest przycisk urządzenia źródłowego do transmisji obrazów (DVD, magnetowid itp.). Programowanie funkcji regulacji głośności / wyciszenia na inne urządzenie • Trzymać wciśnięty przycisk Ustawienia (setup) (16) przez ok. 3 sekundy, aż czerwona dioda LED zacznie świecić się światłem ciągłym. • Nacisnąć przycisk wyciszenia (mute) (17), aż czerwona dioda LED na krótko zgaśnie. • Nacisnąć przycisk urządzenia źródłowego, na które ma być przeniesiona funkcja regulacji głośności i wyciszenia. Czerwona dioda LED pozostaje włączona. • Nacisnąć przycisk wyciszenia (mute) (17); czerwona dioda LED gaśnie. • Jeżeli wybrano omyłkowo urządzenie bez własnej regulacji głośności, czerwona dioda LED miga przez 3 sekundy. Programowanie funkcji regulacji głośności / wyciszenia na określone urządzenie • Trzymać wciśnięty przycisk ustawień (setup) (16) przez ok. 3 sekundy, aż czerwona dioda LED zacznie świecić się światłem ciągłym. • Nacisnąć przycisk wyciszenia (mute) (17), aż czerwona dioda LED na krótko zgaśnie. • Nacisnąć przycisk urządzenia źródłowego, które ma mieć wyłącznie własną funkcję regulacji głośności i wyciszenia. • Nacisnąć przyciski regulacji głośności (7); czerwona dioda LED świeci się. • Nacisnąć ponownie przycisk wyciszenia (mute) (17); czerwona dioda LED gaśnie. Resetowanie funkcji regulacji głośności / wyciszenia Jeżeli zmieniono funkcję regulacji głośności i wyciszenia wg dwóch opisów powyżej, funkcje te można przywrócić do stanu ustawień fabrycznych i przywrócić tym samym funkcję „Punch-Through“. • Trzymać wciśnięty przycisk Ustawienia (setup) (16) przez ok. 3 s, aż czerwona dioda LED zacznie świecić się światłem ciągłym. • Trzymać wciśnięty przycisk wyciszenia (mute) (17), aż czerwona dioda LED na krótko zgaśnie. • Nacisnąć ponownie przycisk wyciszenia (mute) (17), aż czerwona dioda LED zgaśnie. Funkcje regulacji głośności i wyciszenia oraz „Punch-Through“ są teraz ponownie przywrócone do stanu ustawień fabrycznych.
Usuwanie błędów
Pilot nie działa:
Należy sprawdzić, czy baterie zostały włożone
poprawnie z polaryzacją.
Proszę sprawdzić, czy wszystkie urządzenia
zostały źle podłączone.
Jeżeli baterie są zbyt słabe należy je wymienić.
Kilka kodów urządzeń jest zapisanych pod jedną
marką urządzenia. Jak rozpoznać właściwy kod?
Aby wybrać właściwy kod należy wpisać kilka
kodów i wybrać ten, który będzie odpowiadał na
największą ilość funkcji.
Urządzenie reaguje tylko na niektóre polecenia
pilota:
Należy wytestować inne kody, aż urządzenia
będą odpowiednio reagowały na wszystkie
polecenia.
Jeżeli ręczne wpisywanie kodu i automatyczne
wyszukiwanie kodu nie przyniosły pożądanego
skutku, może się zdarzyć w pojedynczych
wypadkach, że pilot nie jest kompatybilny.
00040098bda.indd Abs1:38-Abs1:39
00040098bda.indd Abs1:38-Abs1:39
08.10.2009 10:25:00 Uhr
08.10.2009 10:25:00 Uhr

40
41
• Caso, ainda assim, não obtenha
sucesso, tente com os métodos de
procura descritos no capítulo „Procura
automática“.
Procura manual do código
• Ligue manualmente o aparelho em
questão.
• Prima brevemente o botão da fonte (3)
(TV, STB, CBL, ÁUDIO, AUX, VCR, CD,
DVD) pretendida.
• Mantenha premido o botão Setup (16)
durante aprox. 3 segundos até o LED
vermelho fi car aceso.
• Prima repetidamente (pode ser até 350
vezes) o botão POWER (1), apenas com
VCR (videogravadores) o botão P+ (8) ou
P– (8),
• até o aparelho a ser controlado se
desligar ou mudar de canal ou reagir de
forma adequada. A procura de código
começa com o número de código
actualmente memorizado no grupo do
aparelho.
• Prima brevemente OK (10) para memorizar
o código. Devido à vastidão de diferentes
números de código, por cada tipo de
aparelho estão pré-programados até 350
códigos diferentes. Em casos isolados é
possível que fi quem disponíveis apenas
as principais funções mais utilizadas. Em
alguns modelos especiais de aparelhos
pode acontecer que o procedimento
descrito não tenha sucesso.
Procura automática
Se o seu aparelho não reagir ao telecomando
apesar de ter experimentado todos os
códigos atribuídos ao seu tipo de aparelho
e à respectiva marca, tente com o método
de procura automática. Através desta
técnica pode também procurar códigos de
marcas que não se encontrem referidas na
lista de códigos.
• Ligue manualmente o aparelho em
questão
• Prima brevemente o botão da fonte (3)
(TV, STB, CBL, ÁUDIO, AUX, VCR, CD,
DVD) pretendida.
• Mantenha premido o botão Setup (16)
durante aprox. 3 segundos até o LED
vermelho fi car aceso.
• Direccione o telecomando para o
aparelho e prima uma vez brevemente o
botão P+ (8).
• Se o aparelho não possuir uma função de
programa, em vez do botão P+ (8) prima o
botão POWER (1).
• Dentro de 6 segundos o telecomando
dá início à procura do código e envia
todos os códigos sequencialmente, em
intervalos de 1 segundo (ver também o
próximo parágrafo). A cada envio, o LED
vermelho acende.
• Logo que o aparelho reaja ao
telecomando, prima OK (10). Se não
conseguiu premir OK atempadamente,
pode regressar gradualmente ao código
ao qual o aparelho reagiu, premindo o
botão P– (8).
• Para interromper a procura, prima EXIT
(12).
Se pretender que, em vez de a cada segundo,
o telecomando envie um novo código apenas
a cada 3 segundos, proceda da seguinte
forma.
No espaço de 6 segundos após premir o
botão P+ (8) (ou POWER (1)) como foi
descrito, prima mais uma vez o botão P+ (8)
ou P– (8). O telecomando envia agora um
novo código a cada 3 segundos. Desta forma
ganha tempo para interromper o processo
mas com a contrapartida de a procura de
códigos também demorar mais tempo.
Telecomando universal
Teclas de função
1. Power: LIGAR / DESLIGAR
2. Indicação LED
3. Botão de selecção do aparelho
4. Botões numéricos 0-9
5. AV: Comutação para aparelho externo
6. -/--: Comutar para números de programas de
dois
dígitos
7. V+/V– : Regulador do volume
8. P+/P–:Selecção de programa
9. Anel de navegação para navegar nos menus
10. OK: Para confi rmar introduções
11.
E
Retrocesso rápido / vermelho
B
Reproduzir / amarelo
F
Avanço rápido / azul
I
Iniciar gravação
K
Parar / verde
J
Pausa / magenta
12. EXIT: Para sair dos menus do aparelho
13. EPG: Mostrar revista electrónica de
programação (depende do aparelho)
14. Consultar funções do ecrã
15. Menu: abrir menu do aparelho
16. Setup
17.
H
Modo silencioso
18. Learn: programação de botões de
aparelhos
Informação geral
Este telecomando universal é o primeiro
telecomando 8 em 1 e pode controlar os
seguintes tipos de aparelhos: TV, STB,
CBL, ÁUDIO, AUX, VCR, CD, DVD. (p. ex.
leitor/gravador de DVD, videogravador,
amplifi cador, sintonizador, etc.).
A inscrição nos botões não designa os tipos
de aparelho a programar, servindo apenas
para uma perspectiva geral mais simples.
Anote os códigos dos seus aparelhos, os
quais utilizou para a programação. Caso o
código já não se encontre memorizado, p. ex.
devido a uma substituição da pilha, já não é
tão rápido programar o telecomando.
É necessário programar nos botões de fonte
(TV, STB, CBL, ÁUDIO, AUX, VCR, CD, DVD)
um código de quatro dígitos para cada
aparelho que pretende controlar através do
telecomando universal.
Videogravador: execute a procura de
códigos com uma cassete inserida.
Programar códigos de aparelhos
Introduzir código do aparelho de acordo com
a lista de códigos
Os códigos dos respectivos aparelhos devem
ser consultados na lista de códigos fornecida
com este Manual de instruções.
• Ligue manualmente o aparelho em questão.
• Prima brevemente o botão da fonte (TV,
STB, CBL, ÁUDIO, AUX, VCR, CD, DVD)
pretendida.
• Mantenha premido o botão Setup (16)
durante aprox. 3 segundos até o LED
vermelho fi car aceso.
• De seguida insira o respectivo código
de quatro dígitos a partir da tabela de
códigos.
• Para confi rmar cada pressão de botão, o
LED vermelho apaga-se brevemente.
• Se a introdução do código for válida, o
LED vermelho apaga-se após a introdução
do último dígito.
• Prima brevemente OK (10) para memorizar
o código.
• Caso tenha sido inserido um código
inválido, o LED vermelho pisca durante
três segundos antes de se apagar. Caso
o aparelho não reaja conforme esperado,
repita a programação, se necessário
utilizando outro código. Por favor
experimente todos os códigos atribuídos à
marca do seu aparelho.
• Seleccione o código com o qual todas as
funções disponíveis do seu telecomando
reagem correctamente.
p
Manual de instruç õ es
00040098bda.indd Abs1:40-Abs1:41
00040098bda.indd Abs1:40-Abs1:41
08.10.2009 10:25:01 Uhr
08.10.2009 10:25:01 Uhr

42
43
Procura de códigos por nome do fabricante
• Esta função oferece-lhe a opção de
procurar pelo nome do fabricante (ver
lista de códigos).
• Ligue manualmente o aparelho em
questão.
• Prima brevemente o botão da fonte (3)
(TV, STB, CBL, ÁUDIO, AUX, VCR, CD,
DVD) pretendida.
• Mantenha premido o botão Setup (16)
durante aprox. 3 segundos até o LED
vermelho fi car aceso.
• Insira o código de um dígito de acordo
com a seguinte tabela.
1 Philips
2 Sony, Panasonic, JVC, Toshiba
3 Thomson
4 Telefunken
5 Grundig
6 Nokia
0 Todas as outras marcas para
este grupo de aparelhos
• Prima repetidamente o botão P+ (8) (ou o
botão POWER (1) nos videogravadores) ou
até o aparelho reagir de forma adequada.
Proceda de forma rápida pois, caso
contrário, é iniciada a procura de códigos
automática.
• Memorize o código premindo OK (10).
• Depois de todos os códigos terem sido
procurados, o LED vermelho pisca por
aprox. 3 segundos.
Identifi cação do código
A identifi cação do código oferece-lhe
a opção de determinar um código já
introduzido, memorizado no telecomando.
Proceda da seguinte forma.
• Ligue manualmente o aparelho em
questão.
• Prima brevemente o botão da fonte (3)
(TV, STB, CBL, ÁUDIO, AUX, VCR, CD,
DVD) pretendida.
• Mantenha premido o botão Setup (16)
durante aprox. 3 segundos até o LED
vermelho fi car aceso.
• Prima brevemente o botão Setup (16), o
LED vermelho apaga-se brevemente ao
premir o botão.
• Para determinar o primeiro dígito, prima
os botões numéricos de 0 a 9.
• Se o LED se apagar brevemente, signifi ca
que foi memorizado o primeiro dígito.
• Para determinar o segundo dígito, volte a
premir os botões numéricos de 0 a 9 até
se apagar o LED vermelho.
• Repita o processo para o terceiro e quarto
dígitos.
• O LED apaga-se logo que seja premido o
botão para o quarto dígito.
• A identifi cação do código está agora
concluída.
Programar códigos de outro telecomando
Se algumas das funções do seu telecomando
original não funcionarem no 40098, é possível
programar estas funções. Se a marca do
aparelho a ser controlado não estiver
mencionada na lista de códigos fornecida,
pode copiar as funções do telecomando
original do aparelho para o seu 40098.
Conforme o formato do código de
transmissão do telecomando original
o seu telecomando pode memorizar até 150
botões.
Posicione o telecomando original e o seu
40098 lado a lado, de modo a que os díodos
emissores/receptores de ambos os
telecomandos fi quem virados um para o
outro. Tenha em atenção o alinhamento
uniforme em altura de ambos os díodos.
Certifi que-se que a distância entre os 2
telecomandos é de aproximadamente 2,5 cm
(largura do polegar).
Copiar os botões
• Mantenha premido o botão Setup (16)
durante aprox. 3 segundos até o LED
vermelho fi car aceso.
• Soltar o botão SETUP (16).
• Premindo o botão de fonte (3) (TV, STB,
CBL, ÁUDIO, AUX, VCR, CD, DVD) o botão
apaga-se e volta aacender.
• Prima uma vez o botão LEARN (18).
• Prima uma vez o botão do seu 40098 para
o qual pretende copiar um dos botões do
telecomando original.
• Manter premido o botão a copiar no
telecomando original até
o LED vermelho se apagar e voltar a
acender (2 a 3 segundos). Em caso de
erro
o LED vermelho pisca durante 3
segundos mas permanece no modo de
programação. Tente novamente ou
experimente outro botão.
• Repita o processo a partir do passo 5 para
todos os outros botões.
• Prima uma vez o botão SETUP (16) após
ter copiado todos os botões desejados.
• O LED vermelho apaga-se.
Recomendações
• Não mover os telecomandos durante o
processo de programação.
• Certifi que-se que a iluminação da sala
não inclui luz fl uorescente ou lâmpadas
de poupança de energia, visto estas
fontes de luz provocarem avarias e
poderem prejudicar o processo de cópia.
• Os 2 telecomandos devem estar afastados
mais de um metro de qualquer fonte de
luz.
• Evite a cópia dos códigos dos botões V+;
V- bem como do botão de reprodução (5),
pois conforme o telecomando, os códigos
destes botões nem sempre controlam os
mesmos aparelhos.
• Quando a memória do seu 40098 estiver
cheia, o LED vermelho pisca durante 3
segundos. Então deixa de ser possível
copiar outros códigos sem efectuar
primeiro um reset.
• Ao copiar um botão, é possível que o LED
vermelho pisque de forma fraca. Neste
caso, não solte o botão e aguarde até que
o LED pare de piscar.
indicações:
• As pilhas dos 2 telecomandos devem
estar em bom estado; se necessário,
substitua estas.
• Não pode copiar códigos nos seguintes
botões: LEARN, SETUP,
• Todos os botões num modo são
eliminados quando, neste modo, é
introduzido um código de 4 dígitos
(também para a introdução directa de
um código, a procura de um código ou de
uma marca).
Apagar todos os botões copiados
• Mantenha premido o botão Setup (16)
durante aprox. 3 segundos até o LED
vermelho fi car aceso.
• Soltar o botão SETUP (16).
• Prima duas vezes o botão LEARN (18).
O LED vermelho apaga-se e voltar a
acender.
• Prima uma vez o botão SETUP (16), o LED
vermelho apaga-se.
• Todos os botões copiados são agora
eliminados.
00040098bda.indd Abs1:42-Abs1:43
00040098bda.indd Abs1:42-Abs1:43
08.10.2009 10:25:01 Uhr
08.10.2009 10:25:01 Uhr

44
45
Funcionamento normal
Após ter efectuado a programação do
telecomando para os seus aparelhos
áudio/vídeo, o telecomando funciona com
as funções principais mais utilizadas do
telecomando original do respectivo aparelho.
Direccione o telecomando para o aparelho
pretendido e prima o respectivo botão da
fonte. O LED acende brevemente mas não
fi ca aceso.
Pode agora activar as funções premindo
o respectivo botão de função no seu
telecomando universal.
De cada vez que prime o botão acende-se
brevemente o LED vermelho.
Em determinadas circunstâncias, nem todas
as funções do seu telecomando original
estão directamente disponíveis no
telecomando universal.
Principalmente nos aparelhos mais
modernos é possível que as funções estejam
atribuídas a outro botão que não o esperado
ou que não estejam sequer disponíveis.
Teclado numérico e AV:
Inserir o número de 2 algarismos (números
dos canais) através do teclado numérico (4) e
do botão de comutação (6).
Com o botão AV pode seleccionar
normalmente a entrada AV do televisor para,
p. ex., o receptor STB ou o videogravador.
Funções especiais
“Programa electrónico”
O botão EPG (13) corresponde à função
“Guia de programa electrónico” e possui
várias funções, conforme o aparelho
com o qual é utilizado.
Nos códigos de DVD o botão abre o menu
Faixas. Com o código STB – ou VCR – pode
efectuar uma programação desde que o seu
videogravador disponha de uma função
SHOWVIEW.
„Punch Through“
A função Punch Through permite-lhe
executar determinadas funções num outro
tipo de aparelho que o seleccionado.
Tais funções são: volume de som, modo
silencioso e as funções de reprodução.
Quando o telecomando se encontra no modo
AUDIO, AUX, VCR, DVD ou CD, os botões
de volume (7) e de modo silencioso (17)
comandam o televisor (desde que os outros
aparelhos não disponham de uma regulação
de volume própria).
No modo TV ou noutro modo sem funções de
reprodução, os botões de reprodução, pausa,
stop e, caso aplicável, gravação comandam
um gravador de vídeo, leitor ou gravador de
DVD ligado. É sempre comandado o último
aparelho seleccionado.
O telecomando universal está ajustado
de fábrica para que as funções de
volume e modo silencioso comandem
automaticamente o televisor, se já estiver
premido um botão de fonte para um aparelho
com transmissão de imagem (DVD, gravador
de vídeo, etc.).
Programar o volume/modo silencioso num
outro tipo de aparelho
• Mantenha premido o botão Setup (16)
durante aprox. 3 segundos até o LED
vermelho fi car aceso.
• Prima o botão Mute (17) até o LED
vermelho se apagar.
• Prima o botão de fonte correspondente ao
aparelho para o qual pretende transmitir
a função de volume e modo silencioso. O
LED vermelho permanece aceso.
• Prima o botão Mute (17); o LED vermelho
apaga-se.
• Se tiver seleccionado por engano um
aparelho que não possui uma regulação
de volume própria, o LED vermelho pisca
durante 3 segundos.
Programar o volume/modo silencioso num
determinado aparelho
• Mantenha premido o botão Setup (16)
durante aprox. 3 segundos até o LED
vermelho fi car aceso.
• Prima o botão Mute (17) até o LED
vermelho se apagar.
• Prima o botão de fonte correspondente
ao aparelho que deverá apenas dispor
da sua própria função de volume e modo
silencioso.
• Prima os botões de volume (7); o LED
vermelho permanece aceso.
• Prima novamente o botão Mute (17); o LED
vermelho apaga-se.
Repor volume/modo silencioso
Se tiver alterado o volume de som ou o
modo silencioso da forma descrita nas
secções anteriores, poderá repor novamente
as funções para o seu ajuste de fábrica,
restabelecendo a função „Punch Through“.
• Mantenha premido o botão Setup (16)
durante aprox. 3 segundos até o LED
vermelho fi car aceso.
• Mantenha premido o botão Mute (17) até
o LED vermelho se apagar.
• Prima novamente o botão Mute (17); o LED
vermelho apaga-se.
As funções de volume de som e modo
silencioso da função „Punch Through“
encontram-se agora novamente em
conformidade com o ajuste de fábrica.
Reparação de avarias
O telecomando n‹o funciona:
• Verifi que se as pilhas do telecomando
estão correctamente inseridas e se a
polaridade +/– está correcta.
• Verifi que se os seus aparelhos estão
correctamente conectados e ligados.
• Caso as pilhas estejam demasiado fracas,
substitua estas por umas novas.
• Existe vários códigos atribuídos à marca
do meu aparelho. Como determino qual o
código de aparelho certo?
• Para determinar o código de
aparelho certo para si, experimente
sucessivamente os códigos até a maioria
das funções do aparelho funcionarem
correctamente.
Os aparelhos só reagem a algumas das
ordens do telecomando:
• Experimente outros códigos até o
aparelho reagir de forma adequada às
ordens.
• Se a introdução manual do código e
a procura automática não forem bem
sucedidas, pode acontecer (casos
isolados) que o aparelho não seja
compatível com o seu telecomando
universal.
00040098bda.indd Abs1:44-Abs1:45
00040098bda.indd Abs1:44-Abs1:45
08.10.2009 10:25:02 Uhr
08.10.2009 10:25:02 Uhr

46
47
Универсальный пульт дистанционного управления
Функции кнопок
1 Power (Питание): ВКЛ/ВЫКЛ
2 Лампа индикации
3 Кнопки выбора устройства
4 Кнопки с цифрами
5 AV: переключение на внешнее устройство
6 -/--: ввод двухразрядного номера канала
7 V+/V–: регулятор громкости
8 P+/P–: переход по программам
9 Кнопки навигации по экранному меню
10 OK: подтвердить команду
11
E
быстрая перемотка назад (красная)
B
воспроизведение (желтая)
F
быстрая перемотка вперед (синяя)
I
включение записи
K
стоп (зеленая)
J
пауза (пурпурный)
12 EXIT: закрыть меню устройства
13 EPG (Справка): открыть меню электронной
программы (зависит от устройства)
14 Открыть экранное меню
15 Menu (Меню): открыть меню устройства
16 Setup (Настройка)
17
H
звук ВКЛ/ВЫКЛ
18 Learn (Копирование): копирование функций
кнопок другого пульта управления
Общие сведения
Универсальный пульт дистанционного
управления предназначен для работы с
восемью типами устройств, а именно:
телеприемники, приемники спутникового
телевидения, приемники кабельного
телевидения, аудиоустройства, приставки,
видеомагнитофоны, проигрыватели CD-дисков
и проигрыватели DVD-дисков. Управляемые
устройства не обязательно программировать на
кнопки с маркировкой их типа. Таким образом,
маркировка кнопок служит только для удобства
визуального контроля.
После программирования запишите
использованные коды для справок. Если коды
будут удалены из памяти пульта, например
после смены батареи, то такая памятка поможет
быстро заново выполнить программирование
пульта.
Кнопки источников сигнала (TV, STB, CBL,
AUDIO, AUX, VCR, CD, DVD) необходимо
запрограммировать с помощью четырехзначных
кодов соответствующих типов устройств.
Поиск кода видеомагнитофона выполняйте
при вставленной видеокассете.
Программирование кодов устройств
Ввод кодов из списка
В списке кодов найдите код типа управляемого
устройства.
Включите управляемое устройство.
Коротко нажмите требуемую кнопку источника
сигнала (TV, STB, CBL, AUDIO, AUX, VCR, CD,
DVD).
Нажмите кнопку Setup (16) и удерживайте ее
около 3 секунд, пока не начнет непрерывно
гореть красная лампа.
Введите четырехзначный код из списка.
При каждом правильном нажатии кнопок
красная лампа мигает.
Если код введен правильно, красная лампа
погаснет сразу после ввода кода.
Чтобы сохранить код в памяти пульта, нажмите
кнопку ОК (10).
Если введен недействительный код, красная
лампа будет мигать 3 секунды, а затем
погаснет. Если управляемое устройство
реагирует неправильно, попробуйте
запрограммировать другой код. Повторите
операцию со всеми кодами, которые
соответствуют марке управляемого устройства.
ы
Выберите тот код, при котором правильно
функционируют все необходимые команды
пульта дистанционного управления.
Если желаемый результат не достигнут,
попробуйте способ программирования,
приведенный в главе „Автоматический поиск
кода“.
u
Руководство по эксплуатации
Поиск кода вручную
Включите управляемое устройство.
Коротко нажмите требуемую кнопку источника
сигнала (3) (TV, STB, CBL, AUDIO, AUX, VCR,
CD, DVD).
Нажмите кнопку Setup (16) и удерживайте ее
около 3 секунд, пока не начнет непрерывно
гореть красная лампа.
Подряд (до 350 раз) нажимайте кнопку POWER
(1). При программировании кнопки VCR
(видеомагнитофон) нажимайте кнопку P+ (8)
или кнопку P– (8).
Продолжайте до тех пор, пока управляемое
устройство не выключится, не сменит канал
или не отреагирует другим соответствующим
образом. Таким образом выполняется поиск по
кодам групп устройств.
Чтобы сохранить код в памяти пульта,
нажмите кнопку ОК (10). Вследствие большого
количества кодов на каждый тип устройств
предварительно запрограммировано до 350
кодов. В некоторых случаях функционировать
будут только наиболее распространенные
команды. Кроме того, этот способ
программирования может не привести
к результату с особо редкими моделями
устройств.
Автоматический поиск кода
Если пульт дистанционного управления
не функционирует, даже после
попытки запрограммировать все коды,
соответствующие типу управляемого
устройства, попробуйте выполнить
автоматический поиск нужного кода. Эта
функция ведет поиск в том числе по кодам,
которые не внесены в прилагаемый список.
Включите управляемое устройство.
Коротко нажмите требуемую кнопку источника
сигнала (3) (TV, STB, CBL, AUDIO, AUX, VCR,
CD, DVD).
Нажмите кнопку Setup (16) и удерживайте ее
около 3 секунд, пока не начнет непрерывно
гореть красная лампа.
Направьте пульт на управляемое устройство и
один раз коротко нажмите кнопку P+ (8).
Если устройство не снабжено функцией
программирование, вместо кнопки P+ (8)
нажмите кнопку POWER (1).
Через 6 секунд пульт начнет поиск кода,
посылая каждую секунду (см. также следующий
параграф) поочередно все коды. При каждой
посылке сигнала загорается красная лампа.
Как только управляемое устройство
отреагирует на сигнал пульта, нажмите кнопку
ОК (10). Если код случайно был пропущен,
нажмите кнопку P– (8), чтобы вернуться к тому
коду, на который отреагировало управляемое
устройство.
Чтобы отменить операцию, нажмите кнопку
EXIT (12).
Пульт управления можно настроить таким
образом, чтобы он отправлял сигнал кода
каждые три секунды, а не каждую секунду. Для
этого выполните следующие операции.
Нажмите кнопку P+ (8) (или POWER (1)) с
описанной выше целью, а затем не позднее чем
через 6 секунд после этого еще раз нажмите
кнопку P+ (8) или кнопку P– (8). Теперь пульт
управления будет отсылать сигнал кода каждые
3 секунды. В этом случае процесс поиска кода
займет значительно больше времени, но при
этом увеличится интервал для своевременного
подтверждения нужного кода.
Поиск кода по изготовителю управляемого
устройства
Функция позволяет найти код по марке
управляемого устройства (см. список кодов).
Включите управляемое устройство.
Коротко нажмите требуемую кнопку источника
сигнала (3) (TV, STB, CBL, AUDIO, AUX, VCR,
CD, DVD).
Нажмите кнопку Setup (16) и удерживайте ее
около 3 секунд, пока не начнет непрерывно
гореть красная лампа.
Введите код настройки согласно таблице ниже.
00040098bda.indd Abs1:46-Abs1:47
00040098bda.indd Abs1:46-Abs1:47
08.10.2009 10:25:02 Uhr
08.10.2009 10:25:02 Uhr

48
49
1 Philips
2 Sony, Panasonic, JVC, Toshiba
3 Thomson
4 Telefunken
5 Grundig
6 Nokia
0 Остальные марки этой группы
устройств.
Подряд нажимайте кнопку Taste P+ (8) (для
видеомагнитофонов – кнопку POWER (1)),
пока устройство не отреагирует. Эту операцию
следует аккуратно, иначе может включиться
режим автоматического поиска кодов.
Чтобы сохранить код в памяти пульта, нажмите
кнопку ОК (10).
Если были перелистаны все коды, красная
лампа будет мигать около 3 секунд.
Идентификация кодов
Функция предназначена для определения
кодов, которые уже занесены в память
пульта дистанционного управления. Порядок
идентификации кода:
Включите управляемое устройство.
Коротко нажмите требуемую кнопку источника
сигнала (3) (TV, STB, CBL, AUDIO, AUX, VCR,
CD, DVD).
Нажмите кнопку Setup (16) и удерживайте ее
около 3 секунд, пока не начнет непрерывно
гореть красная лампа.
Коротко нажмите кнопку Setup (16), красная
лампа погаснет.
Чтобы найти первую цифру кода, нажимайте
кнопки от 0 до 9.
Цифра, при которой красная лампа мигнет,
является первой цифрой кода.
Чтобы найти вторую цифру кода, снова
нажимайте кнопки от 0 до 9, пока не мигнет
красная лампа.
Повторите процедуру для поиска третьей и
четвертой цифры.
Красная лампа погаснет, когда будет найдена
четвертая цифра кода.
Идентификация кода завершена.
Копирование кодов из другого пульта
дистанционного управления
Если в списке кодов нет соответствующего
кода для управляемого прибора или
запрограммированный код не поддерживает
необходимые для него функции, имеется
возможность скопировать функции кнопок
оригинального пульта управления такого
прибора в пульт 40098. В зависимости от
формата кодов старого пульта управления, в
пульт 40098 можно скопировать до 150 кнопок.
Расположите оба оригинальный пульт и пульт
40098 таким образом, чтобы их излучатели
показывали друг на друга. При необходимости
отрегулируйте установку по высоте, чтобы
совместить излучатели обоих пультов.
Расстояние между пультами должно быть около
2,5 см.
Порядок копирования функций кнопок
Нажмите кнопку Setup (16) и удерживайте ее
около 3 секунд, пока не начнет непрерывно
гореть красная лампа.
Отпустите кнопку Setup (16).
Один раз коротко нажмите требуемую кнопку
источника сигнала (3) (TV, STB, CBL, AUDIO,
AUX, VCR, CD, DVD). Лампа кнопки погаснет и
снова загорится.
Один раз нажмите кнопку LEARN (18).
Один раз нажмите кнопку пульта 40098, на
которую требуется скопировать функцию
кнопки оригинального пульта.
Нажмите и удерживайте копируемую кнопку
оригинального пульта с тем, чтобы красная
лампа сначала погасла, а затем загорелась
снова (2-3 секунды). В случае сбоя красная
лампа будет мигать 3 секунды, но пульт
останется в режиме копирования. Повторите
попытку или попробуйте повторить процедуру с
другой кнопкой.
Повторите пункты 5 и 6 с другими кнопками.
По окончании копирования функций всех
требуемых кнопок нажмите кнопку SETUP (16)
один раз.
Красная лампа погаснет.
Примечания
Во время операции копирования не сдвигайте
пульты.
В помещении не должны гореть
люминесцентные и энергосберегающие лампы,
так как они могут создавать помехи процессу
копирования.
Оба пульта должны располагаться не ближе
одного метра от любых источников света.
Не следует копировать функции кнопок V+,
V- и кнопок воспроизведения (5), так как коды
этих кнопок не всегда управляют устройствами
одного и того же типа.
При отсутствии свободно памяти пульта
40098 красная лампа будет мигать в течение 3
секунд. После этого дальнейшее копирование
кодов невозможно, пока не будет произведено
полное удаление данных из памяти.
При копировании функции какой-либо кнопки,
возможно, красная лампа будет слегка мигать.
В этом случае не отпускайте кнопку, пока
мигание не прекратится.
Примечания
Батареи обоих пультов должны находиться
в хорошем состоянии. При необходимости
замените батареи.
Функции кнопок другого пульта невозможно
скопировать на кнопки LEARN и SETUP.
Все функции, скопированные на кнопки
режима будут удалены, если для этого режима
введен четырехзначеный код. Тоже самое
происходит при непосредственном вводе кода,
а также при поиске кода или марки устройства.
Порядок удаления всех скопированных
функций кнопок
Нажмите кнопку Setup (16) и удерживайте ее
около 3 секунд, пока не начнет непрерывно
гореть красная лампа.
Отпустите кнопку Setup (16).
Дважды нажмите кнопку LEARN (18). Красная
лампа погаснет, а затем снова загорится.
Один раз нажмите кнопку (16), красная лампа
погаснет.
Теперь все функции скопированных кнопок
удалены.
Программирование нормального режима
По окончании программирование пульта для
звуковых и видеоустройств работают типичные
функции, как у обычного пульта дистанционного
управления.
Направьте пульт на управляемое устройство и
нажмите соответствующую кнопку источника
сигнала. Красная кнопка коротко загорится и
погаснет.
Функции включаются только путем нажатия
соответствующей кнопки режима.
При каждом нажатии кнопок красная лампа
мигает.
В некоторых случаях в универсальном
пульте могут отсутствовать функции,
которые имеются в оригинальном пульте
дистанционного управления.
Особенно это касается новых моделей
устройств, при которых функции пульта
могут либо находиться в подменю, либо
отсутствовать совсем.
Кнопки с цифрами и кнопка AV
С помощью кнопок с цифрами (4) и кнопкой
переключения (6) можно непосредственно
вводить двухразрядные номера каналов.
Кнопка AV предназначена для включения
AV-входа телеприемника для, например,
приемника спутникового телевидения или
видеомагнитофона.
00040098bda.indd Abs1:48-Abs1:49
00040098bda.indd Abs1:48-Abs1:49
08.10.2009 10:25:03 Uhr
08.10.2009 10:25:03 Uhr

50
51
Дополнительные функции
Электронная программа
Кнопка EPG (13) включает функцию
«Электронная программа», в которой имеются
различные команды в зависимости от
управляемого устройства.
В режиме DVD кнопка открывает меню
оглавления. В режиме приемника спутникового
телевидения (STB) или видеомагнитофона
(VCR) с помощью этой кнопки можно выполнить
программирование, если видеомагнитофон
поддерживает функцию SHOWVIEW.
Функция Punch Through Функция Punch Through позволяет направлять команды на другие типы приборов, если данные команды неактуальны для выбранного прибора. К таким командам относятся регулировка громкости, включение/выключение звука, а также команды воспроизведения. Если пульт дистанционного управления находится в режимах AUDIO, AUX, VCR, DVD, CD, органы регулировки громкости (7) и включения/выключения звука (17) управляют телеприемником, при условии что другие приборы не снабжены собственной функцией регулировки звука. В режиме телеприемника или других режимах без функций воспроизведения кнопки «Воспроизведение», «Пауза», «Стоп» и «Запись» управляют видеомагнитофонов, проигрывателем DVD или записывающим устройством DVD. Команды подаются всегда на прибор, выбранный последним. По умолчанию универсальный пульт управления настроен таким образом, чтобы команды регулировки громкости и включения/выключения звука автоматически подавались на телеприемник, если кнопкой источника сигнала выбрано устройство воспроизведения (видеомагнитофон, проигрыватель DVD и т.д.). Программирование функций регулировки громкости и включения/выключения звука на другой тип устройства • Нажмите кнопку Setup (16) и удерживайте ее около 3 секунд, пока не начнет непрерывно гореть красная лампа. • Один раз нажмите кнопку включения/ выключения звука (17), чтобы красная лампа погасла на короткий момент. • Кнопкой источника сигнала выберите устройство, на которое требуется подавать команды регулировки громкости и включения/выключения звука. Красная лампа должна гореть. • Нажмите кнопку включения/выключения звука (17), при этом красная лампа должна погаснуть. • Если по ошибке выбран прибор без функции регулировки громкости, красная лампа будет мигать в течение 3 секунд. Программирование функций регулировки громкости и включения/выключения звука на определенное устройство • Нажмите кнопку Setup (16) и удерживайте ее около 3 секунд, пока не начнет непрерывно гореть красная лампа. • Один раз нажмите кнопку включения/ выключения звука (17), чтобы красная лампа погасла на короткий момент. • Кнопкой источника сигнала выберите устройство, которое должно иметь только собственные функции регулировки громкости и включения/ выключения звука. • Нажмите кнопку регулировки громкости (7), при этом красная лампа продолжает гореть. • Еще раз нажмите кнопку включения/ выключения звука (17), чтобы красная лампа погасла. Восстановление стандартных настроек регулировки громкости и включения/ выключения звука При необходимости можно восстановить заводские настройки функций регулировки громкости и включения/выключения звука. • Нажмите кнопку Setup (16) и удерживайте ее около 3 секунд, пока не начнет непрерывно гореть красная лампа. • Нажмите и удерживайте кнопку включения/выключения звука (17), чтобы красная лампа погасла на короткий момент. • Еще раз нажмите кнопку включения/ выключения звука (17), чтобы красная лампа погасла совсем. Теперь будут работать стандартные настройки функции Punch-Through для команд регулировки громкости и включения/выключения звука.
Поиск и устранение неисправностей
Не работает дистанционное управление
Проверьте состояние батарей и соблюдение
полярности.
Проверьте правильность соединения и
подключения устройств.
Если батареи разряжены, замените их.
Чтобы найти правильный код для устройства,
попробуйте все коды поочередно, пока
не найдете тот, который поддерживает
наибольшее количество требуемых команд.
Устройство реагирует только на некоторые
команды пульта дистанционного управления
Попробуйте другие коды, пока не найдете код,
поддерживающий наибольшее количество
требуемых функций.
Если режимы ввода кодов вручную и
автоматического поиска кодов не привели
к желаемому результату, возможно,
универсальный пульт управления не совместим
с данным прибором.
00040098bda.indd Abs1:50-Abs1:51
00040098bda.indd Abs1:50-Abs1:51
08.10.2009 10:25:03 Uhr
08.10.2009 10:25:03 Uhr
52
53
Изберете кода, на който Вашето дистанционно управление реагира правилно на всички налични команди. Ако и по този начин не успеете, опитайте с описания в глава „Автоматично търсене” метод за търсене. Ръчно търсене на код Включете съответния уред ръчно. Натиснете за кратко време желания бутон за източник (3) (TV, STB, CBL, AUDIO, AUX, VCR, CD, DVD). Дръжте натиснат бутон Setup (16) в продължение на около 3 сек., докато червеният светодиод започне да свети постоянно. Натиснете многократно последователно (това може да бъде до 350 пъти) бутонът POWER (1), само при VCR (видео- рекордери) моля натискайте бутон P+ (8) или P– (8) Докато уредът, който трябва да се управлява, изключи, или докато каналът се смени или реагира съответно. Търсенето на кода започва при запаметения в момента номер на код за групата уреди. Натиснете за кратко време OK (10), за да запаметите кода. Въз основа на големия брой на различните номера на кодове за тип уред са програмирани предварително около 350 различни кодове. В отделни случаи е възможно на разположение да са само най-често употребяваните основни функции. При някои специални модели уреди може описаният начин на действие да не доведе до успех. Автоматично търсене Ако Вашият уред не се включва с дистанционното управление, макар че сте опитали с всички посочени кодове за Вашия тип и марка уред, опитайте с автоматичното търсене. По този начин можете да намерите и кодове за марки, които не са посочени в списъка с кодовете за уреди. Включете съответния уред ръчно Натиснете за кратко време желания бутон за източник (3) (TV, STB, CBL, AUDIO, AUX, VCR, CD, DVD). Дръжте натиснат бутон Setup (16) в продължение на около 3 сек., докато червеният светодиод започне да свети постоянно. Насочете дистанционното управление към уреда и натиснете за кратко време бутон P+ (8). Ако уредът няма функция за програми, натиснете вместо P+ (8) бутона POWER (1). Дистанционното управление стартира след 6 сек. търсенето на кода и изпраща в интервал от 1 сек. последователно всички кодове (виж също и следващия раздел). При всяко изпращане червеният светодиод светва. След като уредът реагира на дистанционното управление реагира, натиснете OK (10). Ако сте пропуснали да натиснете своевременно OK, можете да преминете с бутон P– (8) на стъпки към кода, на който реагира уредът. За да прекъснете търсенето, натиснете EXIT (12). Универсално дистанционно управление
Функция на бутоните
1. Power: Вкл./изкл.
2. Показание светодиод
3. Бутони за избор на уреди
4. Бутони за цифри блок 0-9
5. AV: Превключване към външен уред
6. -/--: Превключване на номера на програми
с двуцифрени числа
7. V+/V– : Регулатор на силата на звука
8. P+/P–:избор на програма
9. Навигационен пръстен за навигация в
менюто на екрана
10 OK: за потвърждаване на въведени данни
11.
E
Бързо превъртане назад / червено
B
Възпроизвеждане / жълто
F
Бързо превъртане напред / синьо
I
Стартиране на запис
K
Стоп / зелено
J
Пауза / светло пурпурно
12. EXIT: за излизане от менюто за уредите
13. EPG: Показание на електронно списание
за програмите (в зависимост от уредите)
14. Извикване на функциите на екрана
15. Меню: Отваряне на менюто за уредите
16. Setup
17.
H
Изключване на звука
18. Learn: Прехвърляне на информация на
бутони на уреди
Общи положения Това универсално дистанционно управление е устройство 8 в 1 и е предназначено за следните типове уреди: TV, STB, CBL, AUDIO, AUX, VCR, CD, DVD. (напр. DVD-рекордер/плеър, видео- рекордер, усилвател, тунер, и др.). Надписът на бутоните не обозначава типа на уреда, който трябва да се програмира, а служи само за по-добра прегледност. Моля запишете си кода на Вашите уреди, които сте използвали за програмирането. Ако кодовете, напр. след смяна на батерии, не са се запаметили, можете по този начин да програмирате по- бързо дистанционното управление. Трябва да програмирате четирицифров код за всеки уред, който искате да управлявате с дистанционното управление, на бутон за източник (TV, STB, CBL, AUDIO, AUX, VCR, CD, DVD). Видеорекордер: Моля извършвайте търсенето на код с поставена лента. Програмиране на код на уред Въвеждане на код на уреда съгласно списъка с кодовете Кодовете на съответните уреди трябва да се вземат от настоящето ръководство за работа. Включете съответния уред ръчно. Натиснете за кратко време желания бутон за източник (TV, STB, CBL, AUDIO, AUX, VCR, CD, DVD). Дръжте натиснат бутон Setup (16) в продължение на около 3 сек., докато червеният светодиод започне да свети постоянно. След това въведете съответния четирицифрен код от таблицата за кодовете. При потвърждаването на натискането на бутон червеният светодиод изгасва за кратко време. Ако въвеждането на кода е валидно, червеният светодиод изгасва след въвеждането на последната цифра. Натиснете за кратко време OK (10), за да запаметите кода. Ако е въведен невалиден код, червеният светодиод мига в продължение на три секунди, преди да изгасне. Ако уредът не реагира съгласно очакванията Ви, повторете програмирането при необходимост с друг код. Моля, опитайте с всички посочени кодове за Вашата марка уред.
Ръководство на потребителя
BG
00040098bda.indd Abs1:52-Abs1:53
00040098bda.indd Abs1:52-Abs1:53
08.10.2009 10:25:03 Uhr
08.10.2009 10:25:03 Uhr
54
55
Ако дистанционното управление трябва да изпраща нов код вместо на всяка секунда на всеки 3 секунди, постъпете по следния начин: В рамките на 6 сек. натиснете бутона P+ (8) (респ. POWER (1)) както е описано по-горе, натиснете бутон P+ (8) или P– (8) още веднъж. Сега дистанционното управление изпраща нов само на всеки 3 секунди. По този начин ще спечелите повече време, за да прекратите процеса, но търсенето на кода ще трае по-дълго време. Търсене на код по търговско име Тази функция Ви дава възможност, да търсете по търговско име (виж списъка с кодовете). Включете съответния уред ръчно. Натиснете за кратко време желания бутон за източник (3) (TV, STB, CBL, AUDIO, AUX, VCR, CD, DVD). Дръжте натиснат бутон Setup (16) в продължение на около 3 сек., докато червеният светодиод започне да свети постоянно. Въведете кода с една цифра съгласно следната таблица: 1 Philips 2 Sony, Panasonic, JVC, Toshiba 3 Thomson 4 Telefunken 5 Grundig 6 Nokia 0 Всички останали марки за тази група уреди Натиснете многократно бутона P+ (8) (или при видео-рекордери бутона POWER (1) ) или докато уредът започне да реагира съответно. Действайте енергично, иначе ще се стартира автоматичното търсене на код. Запаметете кода чрез натискане на OK (10). Ако търсенето е преминало през всички кодове, червеният светодиод мига в продължение на три секунди. Идентифициране на кода Идентифицирането на кода Ви дава възможност, да дефинирате вече въведени кодове, които са запаметени в дистанционното управление. Извършете следното: Включете съответния уред ръчно. Натиснете за кратко време желания бутон за източник (3) (TV, STB, CBL, AUDIO, AUX, VCR, CD, DVD). Дръжте натиснат бутон Setup (16) в продължение на около 3 сек., докато червеният светодиод започне да свети постоянно. Натиснете за кратко време Setup (16), червеният светодиод изгасва за кратко време при натискането на бутона. За да намерите първата цифра, натиснете бутоните за цифри от 0 до 9. Когато червеният светодиод изгасне за кратко време, е въведена и запаметена първата цифра. За да се определи второто число, използвайте отново бутоните за цифри от 0 до 9, докато изгасне червения светодиод. Повторете процеса за третата и четвъртата цифра. Червеният светодиод изгасва, сред като е бил натиснат бутона за четвъртата цифра. Сега идентифицирането на кода е завършено. Прехвърляне на информацията на кода на друго дистанционно управление Ако някоя от функциите на Вашето оригинално дистанционно управление в 40098 липсва, то информацията от тази функция може да се прехвърли. Ако марката на уреда, който ще се управлява не е записана в списъка за кодовете, можете да копирате функциите на оригиналното дистанционно управление на уреда във вашето 40098. В зависимост от формата на кода за прехвърляне на оригиналното дистанционно управление Вашето дистанционно управление може да запамети до 150 бутона. Поставете Вашето оригинално дистанционно управление и Вашето 40098 така, че диодите на предавател/ приемник на двете дистанционни управления да са един срещу друг. Внимавайте двата диода да са на еднаква височина. Уверете се, че разстоянието между двете дистанционни управления е около 2,5 cm (широчина на един палец). Копиране на бутоните Дръжте натиснат бутон Setup (16) в продължение на около 3 сек., докато червеният светодиод започне да свети постоянно. Пуснете бутон SETUP (16). Натиснете еднократно бутона за източник (3) (TV, STB, CBL, AUDIO, AUX, VCR, CD, DVD), бутонът изгасва и светва отново. Натиснете един път бутона LEARN (18). Натиснете бутона на Вашето 40098, на когото искате да копирате един от бутоните на Вашето оригинално дистанционно управление. Дръжте натиснат бутона на оригиналното дистанционно управление, който ще копирате, докато изгасне червеният светодиод и светне отново (2 до 3 сек.) При грешка червеният светодиод мига в продължение на 3 сек., но остава м модул на „научаване”. Опитайте отново или преминете към друг бутон. Повторете процеса за останалите бутони от точка 5. Натиснете за кратко време бутон Setup (16), след като са копирани всички желани бутони. Червеният светодиод изгасва. Препоръки Не движете дистанционното управление по време на фазата на прехвърляне на информацията. Уверете се, че при осветлението на помещението няма луминисцентно осветление или енергоспестяващи лампи, тъй като тези източници на светлина предизвикват смущения и копията може да се повредят. Двете дистанционни управления трябва да бъдат на разстояние над един метър от всеки източник на светлина. Избягвайте копирането на кода на бутоните V+; V- , както и на бутоните на възпроизвеждане (5), тъй като в зависимост от дистанционното управление кодовете на тези бутони не управляват задължително същите уреди. Когато паметта на Вашето 40098 е пълна, червеният светодиод мига в продължение на 3 сек. Тогава вече не е възможно да се копират други кодове, без да се извърши нулиране. Когато копирате бутон е възможно червеният светодиод да мига слабо. В този случай не пускайте бутона и изчакайте докато мигането спре .
00040098bda.indd Abs1:54-Abs1:55
00040098bda.indd Abs1:54-Abs1:55
08.10.2009 10:25:04 Uhr
08.10.2009 10:25:04 Uhr

56
57
Указания: Батериите на двете дистанционни управления трябва да са в добро състояние, евентуално можете да ги смените. Не можете да копирате бутони на следните бутони: LEARN, SETUP, Всички бутони на един модул се изтриват, когато се въведе 4-цифрен код в този модул (също и за директното въвеждане на код, търсенето на код или марка). Изтриване на всички копирани бутони Дръжте натиснат бутон Setup (16) в продължение на около 3 сек., докато червеният светодиод започне да свети постоянно. Пуснете бутон SETUP (16). Натиснете два пъти бутона LEARN (18). Червеният светодиод изгасва и светва отново. Натиснете един път бутона SETUP (16), червеният светодиод изгасва. Сега всички копирани бутони са изтрити. Програмиране на Нормален режим на работа След като сте извършили програмирането на Вашето дистанционно управление за Вашите аудио/видео уреди, дистанционното управление работи с най-често употребяваните основни функции както оригиналното дистанционно управление на съответния уред. Насочете дистанционното управление към желания уред и натиснете съответния бутон за източник. Червеният светодиод светва за кратко време, но не оставя да свети. Функциите се активират чрез натискане на съответния функционален бутон на Вашето универсално дистанционно управление. При всяко натискане на бутон червеният светодиод светва за кратко. При определени обстоятелство не всяка функция на Вашето оригинално дистанционно управление е директно на разположение. Особено при нови уреди е възможно, функциите най-напред да са заложени при различни от очакваното бутони или въобще да не са на разположение. Клавиатура с 10 бутона и AV: Клавиатурата с 10 бутона (4) и бутона за превключване (6) за въвеждане на двузначни числа (номера на канали). С AV бутона нормално избирате AV-вход на телевизионния уред за напр. STB Receiver или видео-рекордер. Специални функции „Електронна програма“ Бутонът EPG (13) отговаря на функцията „Elektronik Programm Guide“ („Електронен програмен справочник”) и има различни функции в зависимост от това за кой уред ще се използва. При DVD – кодове бутонът отваря менюто за заглавията. При STB - или VCR – кодове с този бутон можете да извършите програмиране, ако Вашият видео-рекордер има SHOWVIEW - функция. „Punch Through“ Функцията Punch Through Ви дава възможност да извършвате определени функции на друг тип уред, различен от избрания. Това са функциите сила на звука, изключване на звука и функции за проиграване. Ако дистанционното обслужване е в режим AUDIO, AUX, VCR, DVD, CD, клавишите сила на звука (7) и изключване на звука (17) управляват телевизора (ако останалите уреди нямат свой собствен регулатор за силата на звука). В TV-режим или друг режим без функции за проиграване клавишите за възпроизвеждане, Pause, Stop и евентуално запис управляват свързания Videorecorder, DVD - Player или DVD - Recorder. Управлява се винаги последно избраният уред. При доставка универсалното дистанционно управление е настроено така, че функциите сила на звука и изключване на звука управляват автоматично TV-приемника, щом бъде натиснат клавиш за уреда с пренос на изображение (DVD, Videorecorder и др.). Програмиране на силата на звука/ изключването на звука на друг тип уред • Задръжте клавиша Setup (16) натиснат за около 3 секунди, докато червеният светодиод светне постоянно. • Натискайте клавиша Mute (17), докато червеният светодиод угасне за кратко. • Натиснете клавиш за уреда, върху който трябва да се прехвърли функцията за сила на звука и изключване на звука. Червеният светодиод продължава да свети. • Натиснете клавиша Mute (17); червеният светодиод угасва. • Ако по невнимание сте избрали уред без собствен регулатор на силата на звука, червеният светодиод мига за 3 секунди. Програмиране на силата на звука/ изключването на звука на определен тип уред • Задръжте клавиша Setup (16) натиснат за около 3 секунди, докато червеният светодиод светне постоянно. • Натискайте клавиша Mute (17), докато червеният светодиод угасне за кратко. • Натиснете клавиш за уреда, който трябва да има само своя собствена функция за сила на звука и за изключване на звука. • Натиснете клавишите за силата на звука (7), червеният светодиод остава да свети. • Натиснете клавиша Mute (17); червеният светодиод угасва. Анулирайте отново включването на силата на звука/изключването на звука Ако сте променили силата на звука и изключването на звука, както е описано в предходните два раздела, можете да върнете функциите отново на техните фабрични настройки и да възстановите функцията „Punch-Through“. • Задръжте клавиша Setup (16) натиснат за около 3 секунди, докато червеният светодиод светне постоянно. • Натискайте клавиша Mute (17), докато червеният светодиод угасне за кратко. • Натиснете още веднъж клавиша Mute (17), червеният светодиод угасва. Функциите сила на звука и изключване на звука и функцията „Punch-Through“ са заложени отново при експедиция.
00040098bda.indd Abs1:56-Abs1:57
00040098bda.indd Abs1:56-Abs1:57
08.10.2009 10:25:04 Uhr
08.10.2009 10:25:04 Uhr

58
59
Отстраняване на грешки Дистанционното управление не функционира: Проверете, дали батериите на дистанционното управление са поставени правилно и полюсите +/– съответстват. Проверете, дали Вашите уреди са свързани правилно и са включени. Ако батериите са много слаби, сменете ги с нови. Въведени са няколко кода за уред под името на марката на моя уред. Как да определя правилния код на уред? За да определите правилния код за Вашия уред, пробвайте последователно кодовете, докато започнат да функционират нормално повечето функции на уреда. Уредите реагират само на някои команди на дистанционното управление: Тествайте други кодове, докато уредите започнат да реагират съответно. Ако ръчното въвеждане на код и автоматичното търсене на код не дадат резултат, в някои случаи може да се окаже, че Вашият уред не е съвместим с Вашето универсално дистанционно управление.
00040098bda.indd Abs1:58-Abs1:59
00040098bda.indd Abs1:58-Abs1:59
08.10.2009 10:25:05 Uhr
08.10.2009 10:25:05 Uhr
