Hama BC-400D: or
or : Hama BC-400D
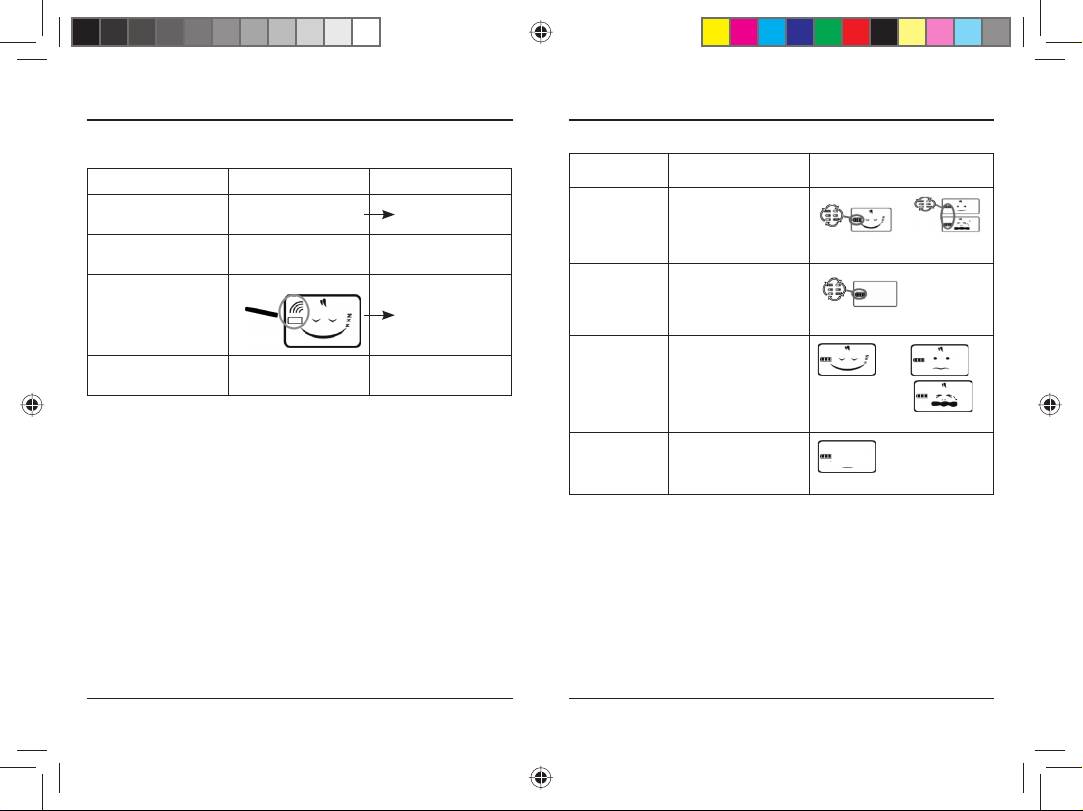
Battery Charging
Charging and Fully charged Indication:
If the battery level becomes almost empty, the units will display the below :
LED Indicator version LCD version
Model Baby Unit Parent Unit
In charging
Flashing red light fast
LED Indicator version Power indicator fl ashes
(Unit is turned
Red light.
on)
No Alert sound Emits a alert tone in every
The battery icon loops.
3 seconds.
In charging
Flashing red light slow
LCD Display version
fl ashing
(Unit is turned
off)
The battery icon loops.
Fully charged
Green light / Flashing
(Unit is turned
green light
No Alert sound and empty
Emits a alert tone in every
or
on)
battery
3 seconds
In this case, user needs to recharge the supplied rechargeable batteries or change for
The battery icon stops looping.
new alkaline AAA batteries.
Fully charged
Red light
Charging the batteries
(Unit is turned
The rechargeable batteries to the Baby unit and Parents unit must not be taken out of
off)
the units for charging.
The battery icon stops looping.
1. Use only the AC adaptors which are included in the package, plug into any nearby
standard household electrical outlet.
Note:
2. Once connect them with the units, charging automatically begins.
• User can also install 3 alkaline AAA batteries instead of the supplied re-chargeable
3. The charging time for completely charging empty battery takes 8 hours when the
batteries.
unit is turned off.
• Or directly operated by the supplied adaptors.
Testing Before First Time Usage
A. Test the Baby unit transmission and the Parents unit reception.
1. Place Baby unit and Parents unit in room where you intend to use it.
2. Set both Baby unit and Parents unit to the corresponding code by pressing the
LINK key at the bottom of the units for different ID code to ensure privacy.
There are more than 65000 ID codes user selection.
28 29
00092661man_de_el_en_es_fr_it_nl_ru_Teil1.indd 30-3100092661man_de_el_en_es_fr_it_nl_ru_Teil1.indd 30-31 03.08.10 13:3203.08.10 13:32
3. Then:
LCD Version LED Indicator version
- The LCD displays standby status. (LCD version)
- The power indicator lights and the power is on. (LED Indicator version)
NOTE:
green light
green light
For the fi rst time usage, turn on both units, they can automatically scan the
corresponding code at once without press any key. If reset the corresponding code for
Constantly changing display-
both units, user has to press the LINK key.
readouts
B. Baby unit emission:
4. The receiver is standby status when no signal is received.
1. Place Baby unit in room where you intend to use it.
2. Push the SENSITIVITY switch to a desired position to turn on the Baby unit
LCD Version LED Indicator version
transmission.
3. As soon as the Baby unit transmits a signal, then:
fl ashing green light
LCD Version LED Indicator version
green light
When you experience interference (buzzing or static, etc.), reset both units to another
corresponding code. ( details please refer to P.11 – scan the
Constantly changing display-
corresponding code for the units )
readouts
IMPORTANT! Test sound reception before use and whenever location of Baby unit is
4. The transmitter is standby status when no signal is transmitted.
changed. (Refer to Testing Before First Time Usage)
Note:
LCD Version LED Indicator version
• Position the Baby unit at least 1 meter away from the baby so that the microphone can
pick up the child‘s sound.
fl ashing green light
• Unwrap and fully extend power cord for best transmission if adaptor is used.
Plug the adaptor into the nearest standard household electrical outlet.
C. Parents unit reception
Operations Procedures
1. Place Parents unit in room where you intend to use it.
A. Power On / Off
2. Slide the VOLUME switch to a desired position and the unit is ready for reception.
1. Connect the Parents unit with the AC adaptor. Plug it into the nearby standard
3. If the unit receives a signal,
electrical outlet or insert 3 AAA alkaline batteries.
2. Turn on at the right side upward of the unit, a click sound to
be heard indicates the unit is turned on.
3. Turn downward, a click sound indicates the unit is off.
30 31
00092661man_de_el_en_es_fr_it_nl_ru_Teil1.indd 32-3300092661man_de_el_en_es_fr_it_nl_ru_Teil1.indd 32-33 03.08.10 13:3203.08.10 13:32
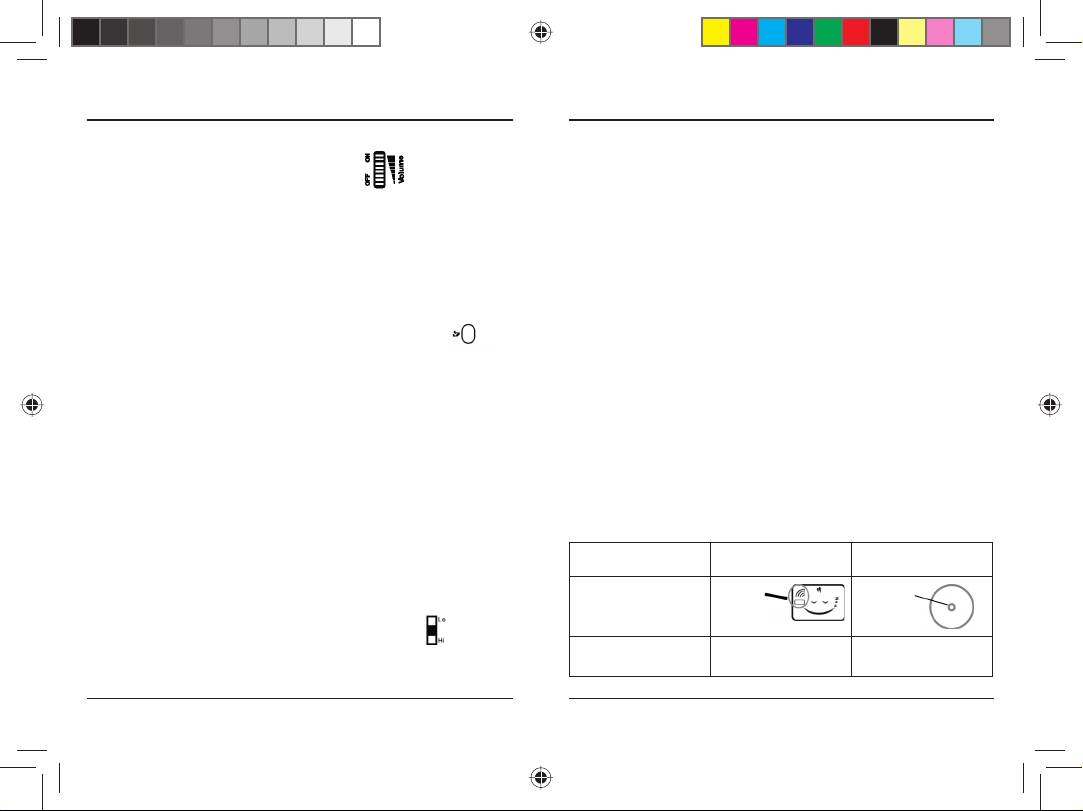
B. Volume Adjustment
Remarks : The default setting of sensitivity level is Hi.
Rotate for adjusting the desired volume level.
1. Turning it upward for increasing volume level.
F. Call Function
2. Turning it downward for decreasing volume level.
Both units can make a call ring tone to call one another.
1. Press PAGE key at the left side of the Parents unit or Baby unit one time to call
C. Talk to Baby unit (Only for Parents unit)
another unit.
TALK key is located at the left side of the Parents unit.
2. Three “BiBi” sound will be heard from Baby unit or Parents unit.
1. Press and hold TALK key to talk to the Baby unit.
3. Each press PAGE key once, you will hear three “Bi Bi” sound. If no press PAGE key
2. Release TALK key and return to the receiving status.
again, the call ring tone will end.
Remark: When the Parents unit is talking to the Baby unit, the call ring tone can also be
Remarks:
heard if press PAGE key of Baby unit.
• When Baby unit call Parents unit, only the Parents unit can be heard three “Bi BI”
sound ( with power LED of Parents unit fl ashes RED light for LED indicator version.)
D. Music Playing & Select Music (optional)
• When Parents unit call Baby unit, only the Baby unit can be heard three “Bi BI” sound
Music play key is located at the left side of the unit. User can activate the
(with power LED of Baby unit fl ashes Red light for LED indicator version.)
music play and/or select a desired music to lull the baby to sleep. There
are six music for selecting.
G. Low Battery Alert
1. Press Play-key for about 3 seconds to activate the Music Playing function, and
When the unit is in low power, the details please refer to page 6 “Battery Charging”.
Music 01 will be played automatically.
2. Press Play-key to change music (01-06 or AL), you can hear the demonstration
Remarks:
of different music. When you have selected the desired music, do not press key
• No low battery alert for Baby unit.
again.
• No transmission and receipt while the unit is in low battery.
Note: Selected music will be shown on the top right corner of the LCD screen for
LCD version.
H. Out of Range Alert (Only for Parents unit )
3. Press Play-key for about 3 seconds again to turn off the music playing function.
When the connection between Parents unit and Baby unit is broken , e.g.
• one of the units is turned off during connection;
Remarks:
• the Baby unit is in low battery;
• Baby unit can play music solely when the Parents unit is turned off. But Music play
• the units are detected out of communication range.
function of Parents unit is not available for use when Baby unit is turned off.
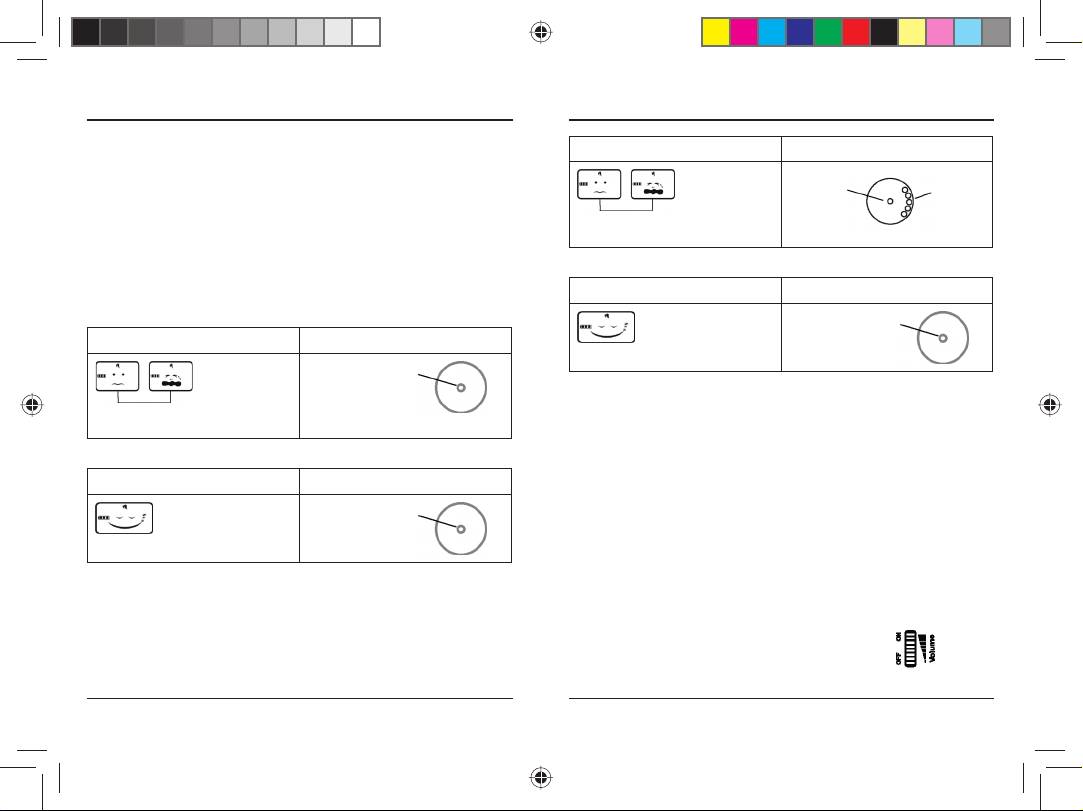
The units will display the below :
• When pressing the TALK key of Parents unit to talk to Baby unit, the music will be
stopped playing.
LCD Version LED Indicator version
• Music playing is not interrupted by call ring tone.
• Music playing could be interrupted by out of range alert.
Parents Unit
fl ashing
fl ashing
red light
E. Sensitivity Level Adjustment (Only for Baby unit)
SENSITIVITY slide switch is located in the battery compartment.
Adjust different detecting sound level sensitivity by switching the
with alart sound will be
with alart sound will be
SENSITIVITY switch to either Lo (normal sensitivity : 1-2 meters) or Hi ( high sensitivity :
heard in every 1 second
heard in every 1 second
2-6 meters) position.
32 33
00092661man_de_el_en_es_fr_it_nl_ru_Teil1.indd 34-3500092661man_de_el_en_es_fr_it_nl_ru_Teil1.indd 34-35 03.08.10 13:3203.08.10 13:32

B. LINK key
Baby Unit
fl ashing
fl ashing
LINK key is located at the bottom of the Parents unit and Baby unit. It is used for
red light
eliminating the corresponding code recorded in the unit and reset a new
corresponding code for the Parents unit and Baby unit. The Parents unit / Baby unit
can connect with another Baby unit / Parents unit with the LINK key to scan a new
corresponding code for them.
For Blue Angel version, when only turn on the Parents unit, out of range alert sound
1. Ensure both units are turned ON. Press the LINK key of the units with a spiky and
should be heard within 30 second.
thin object (such as toothpick).
Note: Under out of range alert mode, the TALK, PAGE and music play key is not available
2. Both units begin to scan corresponding code.
for use.
I. Key Lock / Unlock
LCD Version LED Indicator version
1. Turn the right-hand key lock side switch to LOCK position
of unit to lock key. The TALK key, PAGE key and MUSIC
Scanning the correspon-
Parent unit:
Parent unit:
key are not available for use.
ding code automatically
fl ashing
fl ashing
2. Turn the same switch to UNLOCK position to unlock all the keys.
orange light
J. Belt Clip
The Baby unit and Parents unit can both be carried around using the belt clip provided
on the rear of each unit.
Baby unit:
Baby unit:
fl ashing
fl ashing
How to operate 2 way communication between Parents unit and Baby unit
orange light
The Baby Phone yields high privacy and almost zero-interference to end users. There
are more than 65000 ID code for user selection with the LINK key
positioned at the bottom of the units.
Scanned the correspondi-
Baby unit and parent unit:
Baby unit
NOTE:
ng code successfully
Only scan the corresponding code for both units, they are able to connect to one
another.
red light
normal status
Operating and Setup
or
Parent unit
A. Scan the Corresponding Code
1. Turn on both units. The Baby unit will emit a random ID code to Parents unit
automatically without pressing any key.
green light
2. Once scanned the corresponding code, the units are ready for use. The code is
constantly changing
recorded even thought you turn off the units or recharge the batteries. Or else the
display-readouts
unit is not for use.
with a “Di” sound
with a “Di” sound
34 35
00092661man_de_el_en_es_fr_it_nl_ru_Teil1.indd 36-3700092661man_de_el_en_es_fr_it_nl_ru_Teil1.indd 36-37 03.08.10 13:3203.08.10 13:32
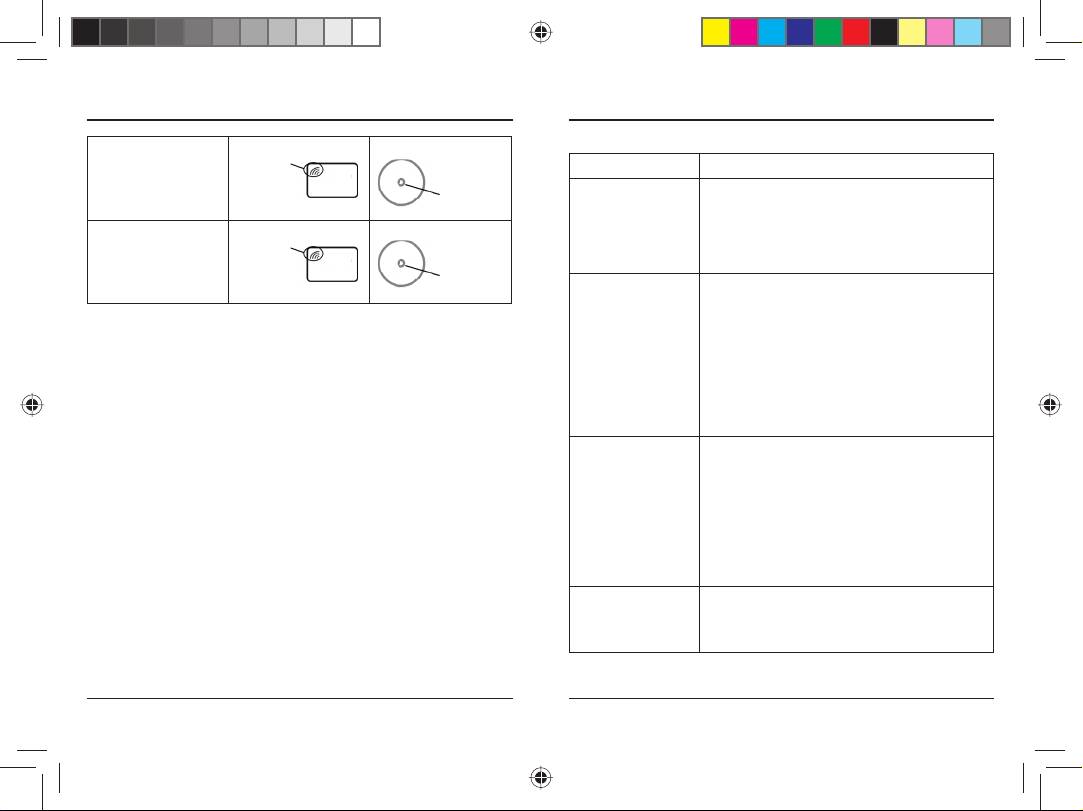
Trouble shooting
Scanned the correspondi-
Parent unit:
Parent unit:
ng code unsuccessfully
still
Problems Solutions
fl ashing
fl ashing
1. No power - Unit is turned off.
orange light
- Check if the batteries are installed properly.
- Make sure the adaptor is connected to the Unit
Baby unit:
Baby unit:
properly if using the adaptor instead of batteries.
still
- The Unit may be in low battery status, change new
fl ashing
batteries.
fl ashing
orange light
2. Message not
- Sound sensitivity level of Baby unit is too low, turn the
transmitted
sound sensitivity switch to “HI” position.
- Units are out of range or lost connection. Ensure the
Remarks: If operated by the supplied adaptor, please fi rst plug in the adaptor, then
distance between the units within communication range.
power on the unit. And then scan the corresponding code with the LINK key if need.
Note: Communication range varies depending on
surrounding conditions such as physical obstructions,
C. 2-Way Communication
interference.
Usually, the detected sound is transmitted from the Baby unit to Parents unit. But
- Make sure the TALK key of Parents unit is not pressed.
Parents unit can talk to Baby unit with its TALK key.
- Make sure the unit is unlocked.
1. Press and hold TALK key of Parents unit and talk to the Baby unit.
- Ensure both units have already scanned the
2. Release the TALK key, the Parents unit is in receiving status and wait for signal from
corresponding code.
Baby unit.
3. No sound signal - Volume level on Parents unit is set too low. Adjust it to
Remarks:
higher volume.
When pressing TALK key, the Parents unit does not receive any sound from Baby unit.
- Sound sensitivity level of Baby unit is too low, Turn
the Sound Sensitivity switch to “HI” positions.
D. Music Control (optional)
- Units are out of range. Ensure the distance between
After activating Music Play function of both units, as long as one of them adjusts music
the units within communication range.
play or changes music(01-06 or AL), the setting for this function of the other unit will
- Make sure the TALK key of Parents unit is not pressed.
change accordingly.
- Make sure the unit is not locked key.
- Ensure both units have already scanned the corresponding
code.
4. Received
- Signal interference due to other nursery monitor on the
conversation or
same ID Code or cordless phone used.
sound from
- Change both units to another ID code by pressing LINK key.
neighbors.
36 37
00092661man_de_el_en_es_fr_it_nl_ru_Teil1.indd 38-3900092661man_de_el_en_es_fr_it_nl_ru_Teil1.indd 38-39 03.08.10 13:3203.08.10 13:32
f Mode d’emploi
Vous venez d’acheter un appareil de surveillance pour bébé de qualité. Veuillez lire
5. Hearing static or
- The both units are positioned too close to each other. Keep
toutes les instructions avant d’utiliser le système de surveillance et conservez-les pour
rustle from Parent unit.
away two units at about 1m.
de futures références.
- The volume is set too high. Lower the volume at the
Parent unit.
Précautions de sécurité
- Reposition or replace batteries.
Quand vous utilisez cet appareil, vous devez toujours suivre les précautions de sécurité
6. Power LED rapidly
The power is too low. Change new batteries or operated by
afi n de réduire les risques d’incendie, de choc électrique ou de blessure.
fl ashes green light
the supplied adaptor.
1. Lisez et suivez attentivement toutes les instructions.
and can not receive or
2. Lisez et suivez toutes les mises en garde sur ce produit et dans le livret
transmit
d’instructions.
3. Ne pas utiliser de liquide ou d’aérosol nettoyant. Utilisez un chiffon humide pour
Technical Specifi cations
nettoyer.
Power Supply Voltage:
4. Ne pas utiliser cet appareil près de l’eau, d’une baignoire, d’une douche ou d’une
Parents unit : 3 AAA batteries or rechargeable batteries &
piscine. L’immersion de cet appareil dans l’eau pourrait causer un choc électrique.
Adaptor: AC230V, DC 7.5V (Europe version)
5. Mettez l’appareil sur une surface stable en sécurité. Si l’appareil tombe, il peut
Adaptor: AC120V, DC 7.5V (US version)
sérieusement s’endommager et/ou blesser quelqu’un.
Baby unit: 3 AAA batteries or rechargeable batteries &
6. Ne pas boucher les fentes et les ouvertures sur l’appareil. Elles sont faites pour la
Adaptor: AC230V, DC 7.5V (Europe version)
ventilation et sont une protection contre la surchauffe.
Adaptor: AC120V, DC 7.5V (US version)
7. Installez l’appareil dans un endroit où personne ne risque de marcher ou de
Operation Frequency: 2.401~2.482GHz
trébucher sur le fi l.
Operating Range: up to 300m in ideal conditions
8. Ne jamais introduire d’objet dans les fentes de cet appareil. Cela pourrait entraîner
up to 100m in ideal conditions (for Blue Angel version)
un risque d’incendie ou de choc électrique. Ne jamais verser un liquide sur
Mic Sensitivity: 1 to 2 meter
l’appareil.
9. Afi n de minimiser le risque de choc électrique, ne jamais démonter cet appareil.
Registration and Safety Certifi cation/General Information
Portez l’appareil chez un réparateur ou chez un technicien qualifi é quand vous avez
This device bears the CE symbol as specifi ed by the provisions of Directive
besoin de faire l’entretien ou une réparation. Ouvrir ou enlever le couvercle peut
R & TTE (1999/5/EC).
vous exposer à un voltage dangereux et à d’autres risques. Si vous le remontez mal,
Hama GmbH & Co. KG hereby declares that this device is in compliance with the basic
cela peut entraîner un risque de choc électrique quand vous utiliserez l’appareil en
requirements and other relevant guidelines and regulations of the 1999/5/EC guideline.
suivant.
You will fi nd the declaration of compliance and declaration of conformity in the Internet at
10. Ne pas exposer l’appareil à des températures extrêmes, dans des endroits à
http://www.hama.com
proximité d’un radiateur chaud, une cuisinière ou dans une voiture où il fait chaud.
11. Ne pas mettre d’objets éclairants comme des bougies, des cigarettes sur
l’appareil.
ATTENTION
Ce produit ne peut remplacer la surveillance d’un adulte responsable.
• Cet appareil de surveillance bébé est conçu comme une aide. Ne pas l’utiliser comme
un appareil de surveillance médical ou comme substitut de véritable surveillance d’un
adulte responsable.
38 39
00092661man_de_el_en_es_fr_it_nl_ru_Teil1.indd 40-4100092661man_de_el_en_es_fr_it_nl_ru_Teil1.indd 40-41 03.08.10 13:3203.08.10 13:32

• Assurez-vous que le récepteur et le câble de l’adaptateur sont hors de portée de
Appareil du bébé
l’enfant. Ne pas mettre le récepteur à l’intérieur du berceau ou du parc du bébé !
Version LCD:
MISE EN GARDE
Pour réduire le risque de choc électrique, ne pas exposer cet appareil à la pluie ou à
l’humidité
Contenu et Caractéristiques
Version LCD:
Piles rechargeables
fournies
Version avec indicateur LED :
Adaptateur AC
(pour l‘appareil des
parents)
Appareil des parents Appareil du bébé
Adaptateur (pour
l‘appareil du bébé
1a. Affi chage LCD (pour la version LCD)
Version avec indicateur LED :
1b. Indicateur de marche : rouge, vert & Orange (Uniquement pour la version
avec indicateur LED)
2. Microphone
3. Enceinte
4. Clip ceinture
5. Touche Verrouillage/Déverrouillage : Verrou
6. Compartiment des piles
7. Bouton d’alimentation / Volume
8. Prise d’alimentation AC/DC
9. Touche PAGE
10. Contrôle de la musique(en option)
11. Touche LINK
Appareil des parents
Appareil du bébé
40 41
00092661man_de_el_en_es_fr_it_nl_ru_Teil1.indd 40-4100092661man_de_el_en_es_fr_it_nl_ru_Teil1.indd 40-41 03.08.10 13:3203.08.10 13:32
Appareil des parents
10. Touche TALK
Version LCD:
11. Touche PAGE
12. Contrôle de la musique (en option)
13. Touche LINK
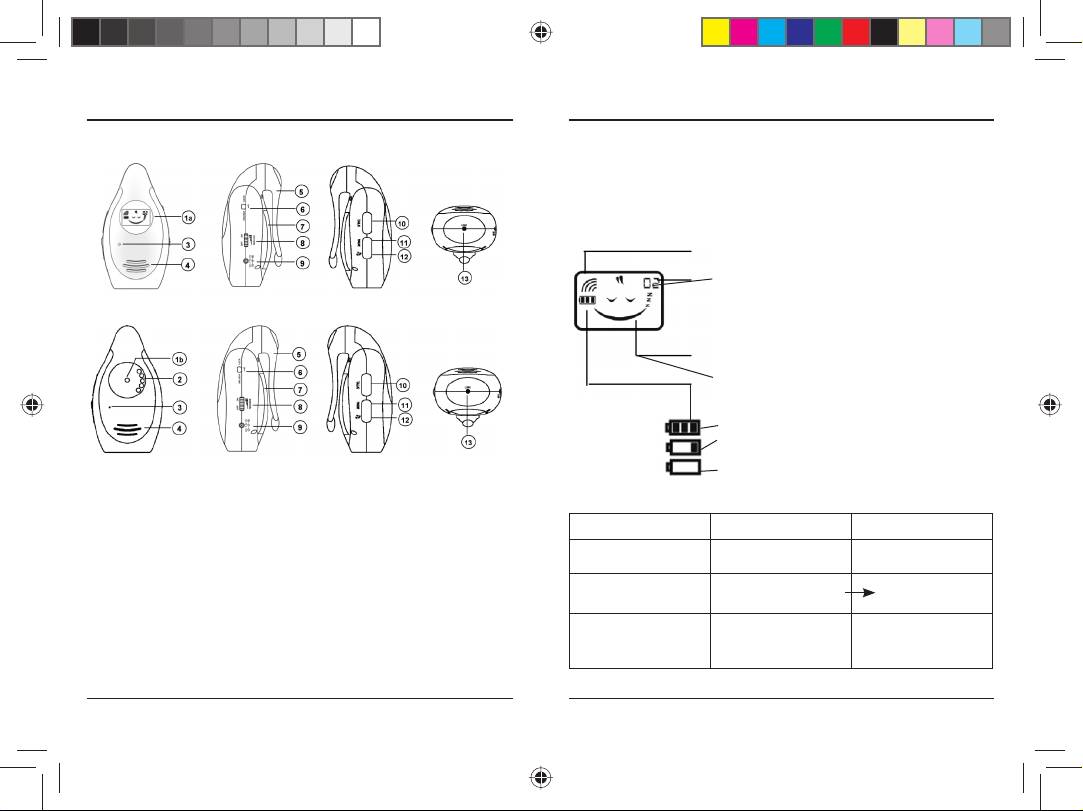
Indications
Version LCD : Ecran principal LCD
Icône d’alarme hors de portée
Musique sélectionnée(pour la version le Mode Musique):
01-06 ou AL
01-06 : Musique 01- Musique 06. La chanson sélectionnée
Version avec indicateur LED :
jouera en continu.
AL : Joue toutes les musiques – En boucle de 01 à 06 en
continu.
Icône “Bébé dort” : (pas de signal et mode économiseur
d’énergie)
Icône des piles:
Piles pleines
Piles fatiguées, signale que vous devez changer les piles
Vide et clignotant, vous devez changer les piles
1a. Affi chage LCD (pour la version LCD)
1b. Indicateur de marche : rouge, vert & Orange (Uniquement pour la version
avec indicateur LED)
Version avec indicateur LED: Index des couleurs de l’indicateur de marche
2. Lumières de son (Uniquement pour la version avec indicateur LED)
- Un ou deux signaux lumineux LED s’allument, ce qui signifi e qu’un son
Indicateur Indication Indication
léger est reçu.
Appareil des parents Appareil du bébé
- Trois ou quatre signaux lumineux s’allument, ce qui signifi e qu’un bruit plus
fort est reçu.
3. Microphone
Lumière verte
Pas de transmission et
4. Enceinte
clignotante
l’alimentation est bonne.
5. Clip ceinture
6. Touche Verrouillage/Déverrouillage : Verrou
Lumière rouge
Les piles sont en
Faible alimentation;
7. Compartiment des piles
clignotante
recharge
Les piles sont en
8. Bouton d’alimentation / Volume
recharge
9. Prise d’alimentation AC/DC
42 43
00092661man_de_el_en_es_fr_it_nl_ru_Teil1.indd 42-4300092661man_de_el_en_es_fr_it_nl_ru_Teil1.indd 42-43 03.08.10 13:3203.08.10 13:32
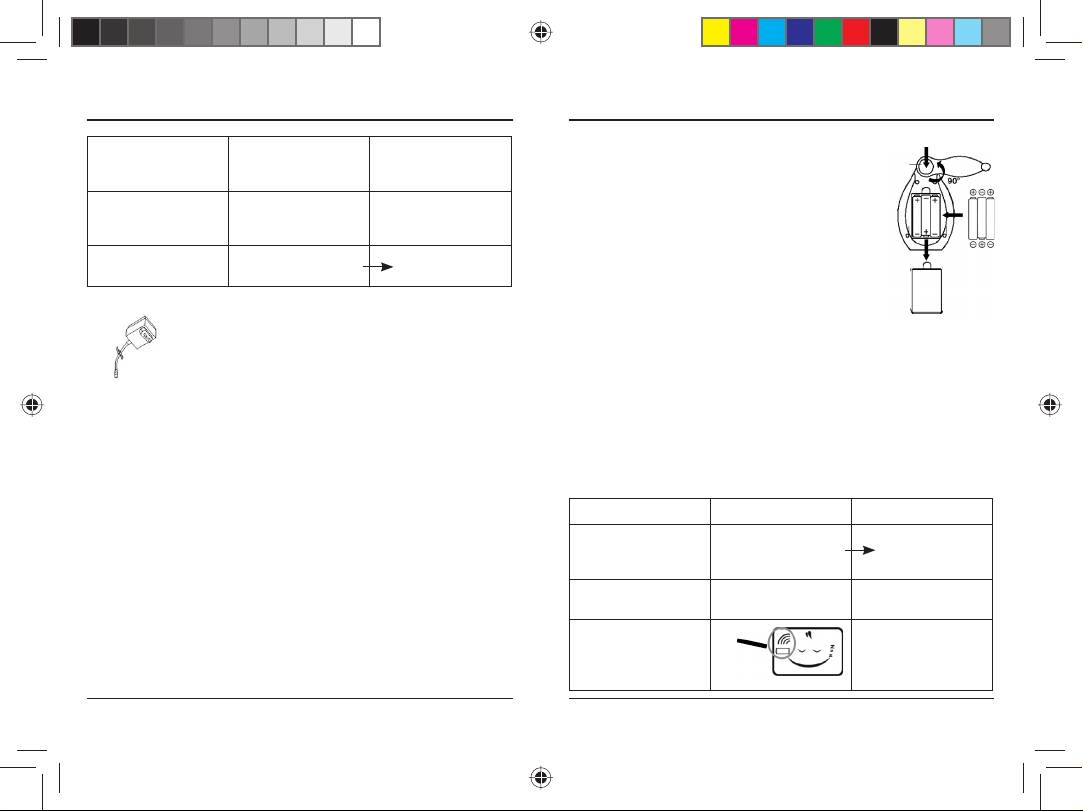
Installation des piles pour l’appareil des parents & pour l’appareil du bébé
Lumière rouge cilgno-
Faible alimentation N/A
Veuillez recharger les piles rechargeables lors de la
tante avec alert toutes les
première utilisation.
3 secondes.
1. Assurez-vous que l’appareil est éteint. Pressez la touche
sur l’attache de ceinture et tournez l’attache de 90° dans
Lumière rouge cilgno-
Hors de portée N/A
un sens ou dans l’autre.
tante avec alert toutes
2. Ouvrez la porte du compartiment des piles.
les 1 secondes.
3. Mettez 3 piles AAA dans le récepteur et le transmetteur
Lumière rouge Chargé quand le
en respectant respectivement les signes +/- inscrits dans
transmetteur est éteint
le compartiment des piles.
4. Remettez les portes du compartiment des piles. Pressez
Adaptateur AC :
et replacez l’attache de ceinture dans sa position initiale.
Les adaptateurs on tune alimentation électrique de faible
voltage, ce qui vous permet d’utiliser l’électricité domestique
Conseil pour les piles :
pour faire fonctionner l’appareil de surveillance bébé.
• Si vous n’utilisez pas le produit pendant un long moment, débranchez les deux
Branchez les adaptateurs AC aux jacks des adaptateurs AC
appareils de la prise domestique. Et enlevez les piles ou les piles usées des appareils,
des appareils des parents et du bébé. Branchez les deux sur
sinon les piles peuvent couler et les endommager.
une prise électrique de votre maison. Il est recommandé d’éteindre les appareils avant
• Les piles non rechargeables ne sont pas faites pour être rechargées.
de brancher ou de débrancher les adaptateurs.
• Uniquement les piles rechargeables peuvent être rechargées sous la surveillance
ATTENTION : Ces adaptateurs ont été spécialement élaborés pour ce produit.
d’un adulte.
Ils ne peuvent être utilisés pour d’autres appareils. Ne jamais utiliser un adaptateur
• Il y a un risque d’explosion si les piles ne sont pas changées correctement.
différent pour cet appareil de surveillance bébé.
• Changez uniquement par des piles du même type ou équivalentes.
Protection de votre vie privée
Recharge des piles
Gardez toujours à l’esprit que vous utilisez des ondes pruliques quand vous utilisez le
Si le niveau des piles faiblit, L’appareil affi chera ce qui suit :
système de sécurité portable sans fi l 2.4GHz. Le son peuvent être diffusés sur d’autres
Modèle Appareil du bébé Appareil des parents
appareils de réception. Les conversations, provenant même des pièces près de la
caméra peuvent être également diffusées.
Version avec indicateur
L’indicateur de marche
LED
est allumé et clignote
ATTENTION: Pour protéger votre vie privée, éteignez toujours la caméra quend vous
en rouge.
ne l’utilisez pas. Il est possible que le moniteur crée des interférences avec d’autres
appareils de fréquence 2.4GHz. Pour éviter ce problème potentiel il y a plus de 65000
Pas de son d’alerte Emet un signal d’alarme
codes d’identifi cation fournis. Si vous subissez des interférences avec un de ces codes,
toutes les 3 secondes.
vous n’avez qu’à simplement en changer.
Version LCD
Clignotant
44 45
00092661man_de_el_en_es_fr_it_nl_ru_Teil1.indd 44-4500092661man_de_el_en_es_fr_it_nl_ru_Teil1.indd 44-45 03.08.10 13:3203.08.10 13:32
