Dell Precision 490 – page 3
Manual for Dell Precision 490
Table of contents
- Notes, Notices, and Cautions Abbreviations and Acronyms
- Contents
- Finding Information What Are You Looking For? Find It Here
- What Are You Looking For? Find It Here
- What Are You Looking For? Find It Here
- What Are You Looking For? Find It Here
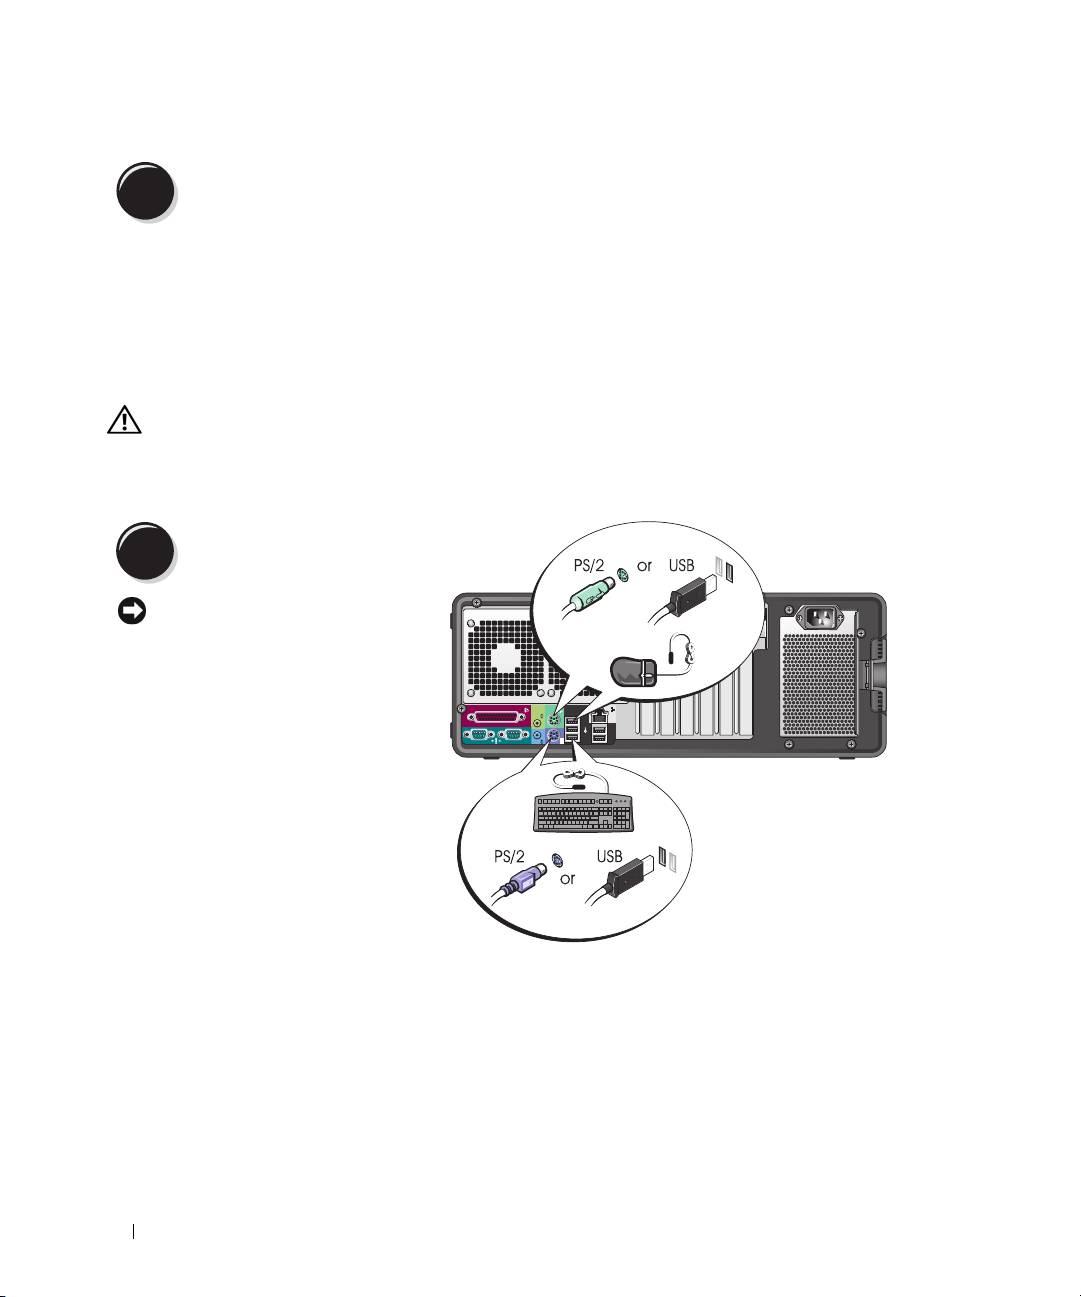
- Setting Up Your Computer (Tower Orientation) Connect the keyboard and the mouse. Connect the modem or the network cable.
- Connect the monitor.
- For single- and dual-monitor capable cards with a single connector
- For dual-monitor capable cards with one DVI connector and one VGA connector For dual-monitor capable cards with two DVI connectors
- Connect the speakers. Connect the power cables and turn on the computer and monitor.
- Install additional software or devices. Setting Up Your Computer (Desktop Orientation) Connect the keyboard and the mouse.
- Connect the modem or the network cable. Connect the monitor.
- For single- and dual-monitor capable cards with a single connector
- For dual-monitor capable cards with one DVI connector and one VGA connector For dual-monitor capable cards with two DVI connectors
- Connect the speakers. Connect the power cables and turn on the computer and monitor. Install additional software or devices.
- About Your Computer Front View (Tower Orientation) 5 IEEE 1394 connector (optional)
- 13 diagnostic lights (4) Use these lights to help you troubleshoot a computer problem based on the
- Back View (Tower Orientation)
- Back Panel Connectors 4 link integrity light
- 11 serial connector Connect a serial device, such as a handheld device, to the serial port. If necessary,
- Front View (Desktop Orientation)
- Back View (Desktop Orientation)
- Inside View
- Inside View – Hard Drive Bay Rotated Out
- System Board Components
- 14 SATA connectors (SATA_4, SATA_3) Cable Colors Locating Your User’s Guide
- Removing the Computer Cover Follow the procedures in "Before You Begin" in your If you have installed a security cable, remove it from the security cable slot. Lay your computer on a flat surface with the cover facing up.
- Pull back the cover latch release. Locate the three hinge tabs on the edge of the computer. Grip the sides of the computer cover and pivot the cover up, using the hinges as leverage points. Release the cover from the hinge tabs and set it aside in a secure location.
- Caring for Your Computer Solving Problems Troubleshooting Tips Resolving Software and Hardware Incompatibilities
- Using Microsoft Windows XP System Restore Creating a Restore Point Restoring the Computer to an Earlier Operating State
- Undoing the Last System Restore Enabling System Restore Using the Last Known Good Configuration Other Options to Help Resolve Additional Device or Software Conflicts
- Dell Diagnostics When to Use the Dell Diagnostics Starting the Dell Diagnostics From Your Hard Drive
- Starting the Dell Diagnostics From the Drivers and Utilities CD Before You Start Testing Beep Codes
- Code Cause
- Error Messages Diagnostic Lights Diagnostic Light Codes Before POST Diagnostic Lights Power Problem Description Suggested Resolution Light
- Diagnostic Lights Power Problem Description Suggested Resolution Light
- Diagnostic Lights Power Problem Description Suggested Resolution Light Diagnostic Light Codes During POST Light Pattern Problem Description Suggested Resolution
- Light Pattern Problem Description Suggested Resolution
- Light Pattern Problem Description Suggested Resolution
- Frequently Asked Questions How Do I... Solution Where to Find Additional Information
- How Do I... Solution Where to Find Additional Information
- Index
- 46 Index
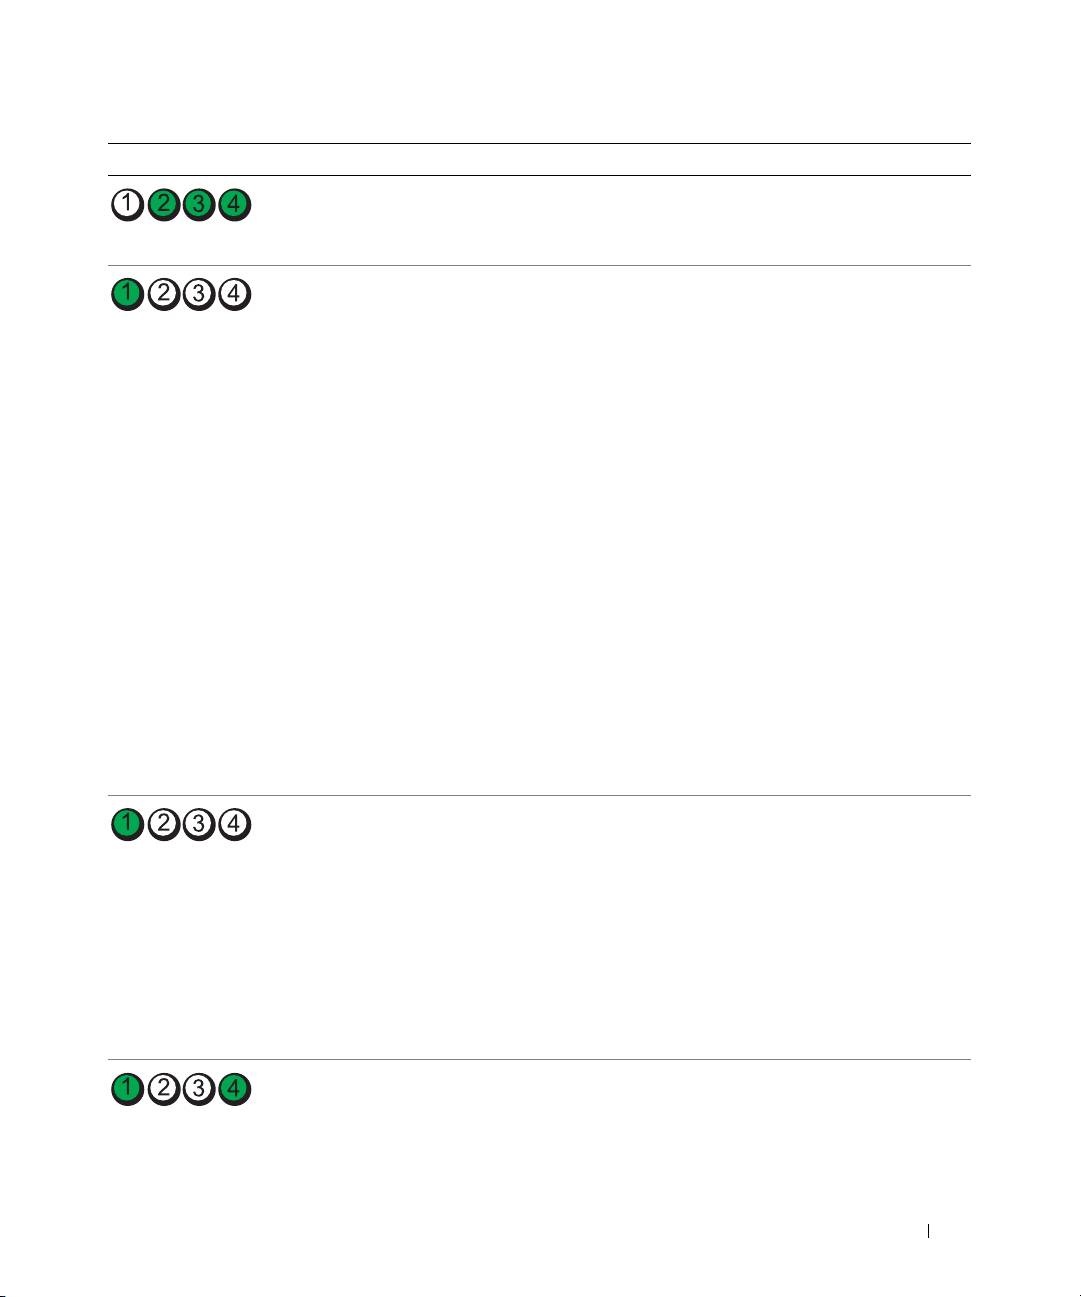
Light Pattern Problem Description Suggested Resolution
A possible USB failure
Reinstall all USB devices, check cable connections,
has occurred.
and then restart the computer.
No memory modules
1
Reseat the memory modules to ensure that your computer
are detected.
is successfully communicating with the memory.
2
Restart the computer.
3
If the problem still exists, remove all the memory modules
and install one memory module in memory module
connector DIMM_1.
4
Restart the computer.
A message appears stating that because your memory
is not paired, the system will operate with reduced
performance and reduced error-correction capability
5
Press <F1> to boot to the operating system.
6
Run the Dell Diagnostics. See your
User’s Guide
for more
information.
7
If the memory module passes, shut down the computer,
remove the memory module, and then repeat the process
with the remaining memory modules until a memory error
occurs during start-up or diagnostic testing.
If the first memory module tested is defective, repeat the
process with the remaining modules to ensure that the
remaining modules are not defective.
8
When the defective memory module is identified, contact
Dell for a replacement
.
No memory modules
• If you have one memory module installed, reinstall it
are detected.
and restart the computer.
• If you have two or more memory modules installed,
remove the modules, reinstall one module, and then
restart the computer). If the computer starts normally,
reinstall an additional module. Continue until you have
identified a faulty module or reinstalled all modules
without error.
• If available, install properly working memory of the same
type into your computer.
• If the problem persists, contact Dell.
System board failure
Contact Dell
for technical assistance
.
has occurred.
Quick Reference Guide 41
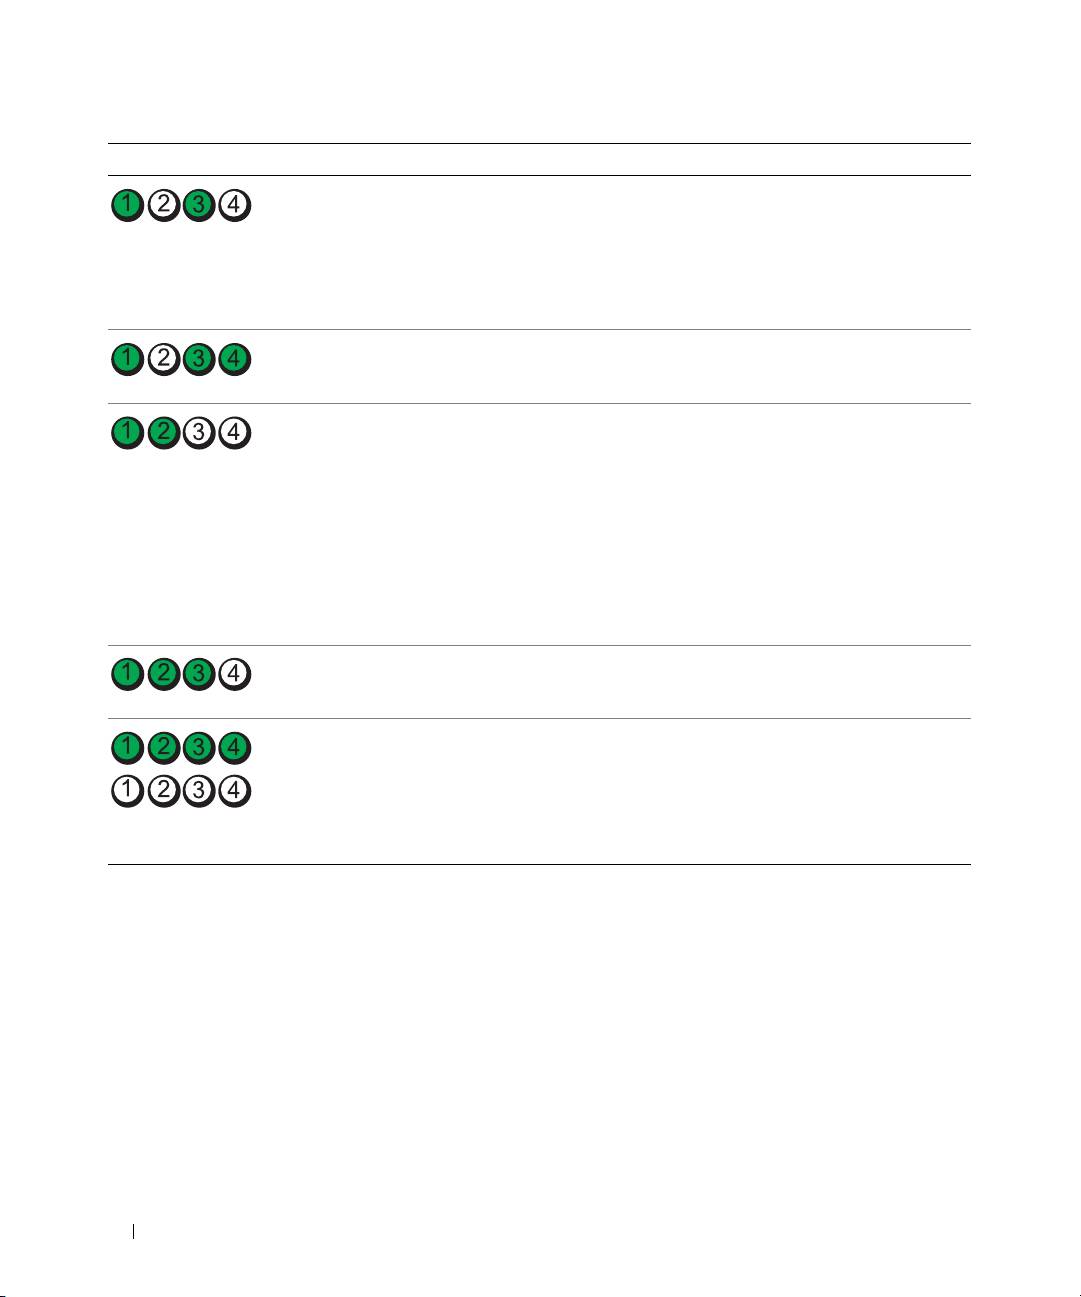
Light Pattern Problem Description Suggested Resolution
Memory modules are detected,
• Ensure that no special memory module/memory
but a memory configuration or
connector placement requirements exist.
compatibility error exists.
• Verify that the memory modules that you are installing
are compatible with your computer.
• Reinstall the memory modules and restart the computer.
• If the problem persists, contact Dell.
Routine system activity
Watch your monitor for on-screen messages.
preceding video initialization.
A possible expansion card failure
1
Determine if a conflict exists by removing a card
has occurred.
(not a graphics card) and restarting the computer.
2
If the problem persists, reinstall the card that you
removed, remove a different card, and then restart the
computer.
3
Repeat this process for each card. If the computer starts
normally, troubleshoot the last card removed from the
computer for resource conflicts (see "Resolving Software
and Hardware Incompatibilities" on page 32).
4
If the problem persists, contact Dell.
Routine system activity
Watch your monitor for on-screen messages.
preceding video initialization.
The computer is in a normal
None.
operating condition after POST.
NOTE: The diagnostic lights
flicker briefly; they are turned off
after the computer successfully
boots to the operating system.
42 Quick Reference Guide

Frequently Asked Questions
How Do I... Solution Where to Find Additional Information
Set up my computer to use
If your computer has the required
See "Setting Up Your Computer
two monitors?
graphics card to support dual-monitor
(Tower Orientation)" on page 9 or
setup, then look in your shipping box
"Setting Up Your Computer
for a Y-cable. The Y-cable has a single
(Desktop Orientation)" on page 14
connector on one end (plug this
for information on connecting dual
connector into the back panel) and
monitors to your computer.
branches into two connectors
(plug these connectors into the
monitor cables).
Connect my monitor when the
If your graphics card has a DVI
See "Setting Up Your Computer
monitor cable connector doesn’t
connector but your monitor has a VGA
(Tower Orientation)" on page 9
seem to fit the connector on the
connector, then you need to use an
or "Setting Up Your Computer
back of my computer?
adapter. An adapter should be included
(Desktop Orientation)" on page 14
in the shipping box.
for information on connecting
monitors to your computer. For
more information, contact Dell.
For information on contacting Dell,
see your User’s Guide.
Quick Reference Guide 43

How Do I... Solution Where to Find Additional Information
Connect my speakers? If you have a sound card installed,
See the documentation that came
connect the speakers to the connectors
with your speakers for more
on the card. "Setting Up Your
information.
Computer (Tower Orientation)" on
page 9 or "Setting Up Your Computer
(Desktop Orientation)" on page 14.
Find the right connectors for
Your tower computer has eight USB
See "About Your Computer" on
my USB or IEEE 1394 devices?
connectors (two on the front, one
page 19 for illustrations of the front
internal, and five on the back) and an
and back views of your computer.
optional front IEEE 1394 connector.
For help locating your User’s Guide,
Your desktop computer has eight USB
see "Finding Information" on page 5.
connectors (two on the front, one
internal, and five on the back) and an
optional front IEEE 1394 connector.
This connector is only available if you
purchased an IEEE 1394 card. To
purchase a card, contact Dell. For more
information on the IEEE 1394 card,
see your User’s Guide.
Locate information about the
Yo u r User’s Guide has a specifications
Go to the Dell Support website at
hardware and other technical
table that provides more detailed
support.dell.com and use one of the
specifications for my computer?
information about your computer and
following support tools: read white
the hardware. To locate your User’s
papers on the latest technology or
Guide, see "Finding Information" on
communicate with other Dell users
page 5.
at the Dell forum chat room.
Find documentation for
The following documentation is
If you lose your documentation, it is
my computer?
available for your computer:
available on the Dell Support website
• User’s Guide
at support.dell.com.
• Product Information Guide
• System Information Label
To locate these documents, see
"Finding Information" on page 5.
44 Quick Reference Guide

Index
B
D
H
beep codes, 36
Dell
hard drive
support site, 7
activity light, 19-20, 24-25
Dell Diagnostics, 35
hardware
C
beep codes, 36
Dell Premier Support
conflicts, 32
cards
website, 6
Dell Diagnostics, 35
slots, 21, 25
diagnostics
Hardware Troubleshooter, 32
CDs
beep codes, 36
operating system, 8
Dell, 35
headphone
lights, 20, 25, 38
connector, 20, 25
computer
beep codes, 36
documentation
Help and Support Center, 7
restore to previous state, 33
End User License
help file
Agreement, 6
conflicts
Windows Help and
ergonomics, 6
software and hardware
Support Center, 7
online, 7
incompatibilities, 32
Product Information Guide, 6
connectors
Quick Reference, 5
headphone, 20, 25
I
regulatory, 6
keyboard, 23
safety, 6
IRQ conflicts, 32
line-in, 23
User’s Guide, 6
line-out, 22
warranty, 6
mouse, 22
K
network adapter, 23
parallel, 22
keyboard
E
power, 21, 25
connector, 23
serial, 23
End User License
sound, 22-23
Agreement, 6
USB, 20, 23-24
ergonomics information, 6
L
error messages
labels
beep codes, 36
Microsoft Windows, 6
diagnostic lights, 38
Service Tag, 6
Index 45

46 Index
lights
problems
T
back of computer, 38
beep codes, 36
troubleshooting
diagnostic, 20, 25, 38
conflicts, 32
conflicts, 32
hard drive activity,
Dell Diagnostics, 35
Dell Diagnostics, 35
19-20, 24-25
diagnostic lights, 38
diagnostic lights, 38
link integrity, 22
restore to previous state, 33
Hardware Troubleshooter, 32
network, 22-23
Product Information Guide, 6
Help and Support Center, 7
network activity, 23
restore to previous state, 33
power, 20, 25
R
U
regulatory information, 6
M
ResourceCD
USB
Microsoft Windows label, 6
Dell Diagnostics, 35
connector, 23
mouse
connectors, 20, 24
connector, 22
User’s Guide, 6
S
safety instructions, 6
N
W
Service Tag, 6
network
warranty information, 6
connector, 23
software
conflicts, 32
Windows XP
Hardware Troubleshooter, 32
sound connectors
Help and Support Center, 7
O
line-in, 23
reinstalling, 8
line-out, 22
operating system
System Restore, 33
CD, 8
support website, 7
reinstalling, 8
System Restore, 33
P
power
button, 20, 24
connector, 21, 25
light, 20, 25
46 Index

Dell Precision™ Workstation 490
Hurtig referencevejledning
Model DCTA
www.dell.com | support.dell.com

Bemærk, bemærkning og forsigtig
BEMÆRK: BEMÆRK angiver, at der findes vigtige oplysninger, der kan være til hjælp, når du anvender computeren.
BEMÆRKNING: BEMÆRKNING angiver enten mulig risiko for beskadigelse af hardware eller tab af data, og fortæller
hvordan du undgår problemet.
FORSIGTIG: FORSIGTIG angiver mulig risiko for ejendomsskade, personskade eller død.
Forkortelser og akronymer
Hvis du ønsker en fuldstændig liste over forkortelser og akronymer, kan du se i Ordliste i din
Brugervejledning
.
®
Hvis du har købt en Dell™-computer i n-serien, gælder referencerne i dette dokument til Microsoft
®
Windows
-operativsystemerne ikke.
____________________
Oplysningerne i dette dokument kan ændres uden varsel.
© 2006 Dell Inc. Alle rettigheder forbeholdes.
Enhver form for reproduktion uden skriftlig tilladelse fra Dell Inc. er strengt forbudt.
Anvendte varemærker i denne tekst: Dell, DELL-logoet og Dell Precision er varemærker tilhørende Dell Inc. Intel, Xeon og Pentium er
registrerede varemærker tilhørende Intel Corporation. Microsoft og Windows er registrerede varemærker tilhørende Microsoft Corporation.
Andre varemærker og mærkenavne kan være anvendt i dette dokument til at referere til enten de enheder, der gør krav på mærkerne og navnene,
eller til deres produkter. Dell Inc. frasiger sig al ejerinteresse i andre virksomheders varemærker og navne.
Model DCTA
Januar 2006 P/N MD504 Rev. A00

Indholdsfortegnelse
Her finder du oplysninger . . . . . . . . . . . . . . . . . . . . . . . . . . . . 51
Klargøring af computeren (opretstående)
. . . . . . . . . . . . . . . . . . . . 55
Klargøring af computeren (liggende)
. . . . . . . . . . . . . . . . . . . . . . 60
Om computeren
. . . . . . . . . . . . . . . . . . . . . . . . . . . . . . . . . 65
Set forfra (opretstående)
. . . . . . . . . . . . . . . . . . . . . . . . . . 65
Set bagfra (opretstående)
. . . . . . . . . . . . . . . . . . . . . . . . . 67
Stik på bagpanel
. . . . . . . . . . . . . . . . . . . . . . . . . . . . . . 68
Set forfra (liggende)
. . . . . . . . . . . . . . . . . . . . . . . . . . . . . 70
Set bagfra (liggende)
. . . . . . . . . . . . . . . . . . . . . . . . . . . . 72
Set indefra
. . . . . . . . . . . . . . . . . . . . . . . . . . . . . . . . . 73
Set indefra – Harddiskplads drejet ud
. . . . . . . . . . . . . . . . . . . 74
Systemkortkomponenter
. . . . . . . . . . . . . . . . . . . . . . . . . . 75
Kablernes farver
. . . . . . . . . . . . . . . . . . . . . . . . . . . . . . 76
Her finder du din brugervejledning
. . . . . . . . . . . . . . . . . . . . . . . 76
Fjernelse af computerdækslet
. . . . . . . . . . . . . . . . . . . . . . . . . . 77
Vedligeholdelse af computeren
. . . . . . . . . . . . . . . . . . . . . . . . . 79
Problemløsning
. . . . . . . . . . . . . . . . . . . . . . . . . . . . . . . . . 79
Fejlfindingstip
. . . . . . . . . . . . . . . . . . . . . . . . . . . . . . . . 79
Afhjælpning af software- og hardwareinkompatibilitetsproblemer
. . . . 79
®
®
Brug af Microsoft
Windows
XP Systemgendannelse. . . . . . . . . . 80
Brug af Sidste kendte fungerende konfiguration
. . . . . . . . . . . . . . 81
Dell Diagnostics
. . . . . . . . . . . . . . . . . . . . . . . . . . . . . . . 82
Før du begynder at teste
. . . . . . . . . . . . . . . . . . . . . . . . . . 83
Bip-koder
. . . . . . . . . . . . . . . . . . . . . . . . . . . . . . . . . . . . . 83
Fejlmeddelelser
. . . . . . . . . . . . . . . . . . . . . . . . . . . . . . . 85
Lysdioder for diagnosticering
. . . . . . . . . . . . . . . . . . . . . . . . . . 85
Diagnosticeringslysdiodekoder før POST
. . . . . . . . . . . . . . . . . . 85
Diagnosticeringslysdiodekoder under POST
. . . . . . . . . . . . . . . . 87
Ofte stillede spørgsmål
. . . . . . . . . . . . . . . . . . . . . . . . . . . . . 90
Indeks . . . . . . . . . . . . . . . . . . . . . . . . . . . . . . . . . . . . . . . . 93
Indholdsfortegnelse 49

50 Indholdsfortegnelse
Her finder du oplysninger
BEMÆRK: Visse funktioner eller medier kan være valgfrie og følger ikke nødvendigvis med computeren.
Nogle funktioner eller medier er muligvis ikke tilgængelige i visse lande.
BEMÆRK: Yderligere oplysninger følger eventuelt med computeren.
Hvad søger du? Find det her
• Et diagnosticeringsprogram til min computer
Cd'en Drivere og hjælpeprogrammer
• Drivere til min computer
(kaldes også ResourceCD)
• Dokumentationen til min computer
Dokumentation og drivere
• Dokumentationen til min enhed
er allerede installeret på
din computer. Du kan
• Desktop System Software (DSS)
bruge cd'en til at
geninstallere drivere,
køre Dell Diagnostics
eller få adgang til
dokumentationen.
Der kan være inkluderet
Readme-filer på din cd
med de nyeste
opdateringer om tekniske ændringer på computeren eller
med avanceret teknisk referencemateriale til teknikere
eller erfarne brugere.
BEMÆRK: Driver- og dokumentationsopdateringer findes
på adressen support.dell.com.
• Sådan opsættes computeren
Quick Reference Guide
• Sådan vedligeholdes computeren
• Grundlæggende fejlfindingsoplysninger
• Sådan køres Dell Diagnostics
• Fejlkoder og diagnosticeringslysdioder
• Sådan fjernes og installeres dele
• Sådan åbnes computerdækslet
BEMÆRK: Dette dokument findes i PDF-format på adressen
support.dell.com.
Hurtig referencevejledning 51
Hvad søger du? Find det her
• Oplysninger om garanti
Dell™ Produktinformationsvejledning
• Betingelser og vilkår (kun USA)
• Sikkerhedsanvisninger
• Lovgivningsmæssige oplysninger
• Oplysninger om ergonomi
• Slutbrugerlicensaftale
• Sådan fjernes og genmonteres dele
Brugervejledning
• Specifikationer
®
®
Microsoft
Windows
XP Hjælp og support
• Sådan konfigureres systemindstillinger
1
Klik på knappen Start, og klik derefter på
Hjælp og support
• Sådan udføres fejlfinding og løses problemer
2
Klik på Bruger- og systemvejledninger, og klik derefter
på
Brugervejledning
Brugervejledningen findes også på cd'en Drivere og hjælpe-
programmer.
®
®
• Servicemærkat og ekspres-servicekode
Servicemærkat og Microsoft
Windows
-licens
• Microsoft Windows-licensmærkat
Disse mærkater findes på din computer.
• Anvend service-
mærkaten til at
identificere din
computer, når du kon-
takter
support.dell.com
eller teknisk support.
• Indtast ekspres-service-
koden for at viderestille dit opkald, når du kontakter
teknisk support.
52 Hurtig referencevejledning

Hvad søger du? Find det her
• Løsninger – Tip til fejlfinding, artikler fra teknikere
Webstedet for Dell Support – support.dell.com
samt online-kurser og ofte stillede spørgsmål
BEMÆRK: Vælg område eller branche for at se det
• Forum – Online-debat med andre Dell-kunder
relevante websted for support.
• Opgraderinger – Opgraderingsoplysninger om
BEMÆRK: Firmakunder, kunder inden for offentlig
komponenter, som f.eks. hukommelse, harddisk
administration eller uddannelsessektoren kan også bruge
og operativsystem
det tilpassede Dell Premier-supportwebsted på adressen
• Kundeservice – Kontaktoplysninger, serviceopkalds-
premier.support.dell.com. Webstedet er muligvis ikke
og ordrestatus, garanti samt reparationsoplysninger
tilgængeligt i alle områder.
• Service og support – Serviceopkaldsstatus og
supporthistorik, servicekontrakt, online-samtaler
med teknisk support
• Reference – Computerdokumentation, detaljer
vedrørende computerens konfiguration,
produktspecifikationer og hvidbøger
• Download – Godkendte drivere, patches og software-
opdateringer
• Desktop System Software (DSS) – Hvis du
geninstallerer operativsystemet på computeren,
skal du geninstallere DSS-hjælpeprogrammet, før
du installerer drivere. DSS indeholder vigtige
opdateringer til dit operativsystem og understøttelse
af Dell™ 3,5"-USB-diskettedrev, optiske drev samt
USB-enheder. DSS er nødvendig for, at din Dell-
computer kan fungere korrekt. Softwaren genkender
automatisk computeren og operativsystemet og
installerer de opdateringer, der er relevante for den
pågældende konfiguration.
• Sådan anvendes Windows XP
Windows Hjælp og support
• Sådan arbejdes der med programmer og filer
1
Klik på knappen
Start
, og klik på
Hjælp og support
.
• Dokumentation til enheder
2
Skriv et ord eller et udtryk, der beskriver dit problem,
(som f.eks. et modem)
og klik på pileikonet.
3
Klik på det emne, der beskriver dit problem.
4
Følg anvisningerne på skærmen.
Hurtig referencevejledning 53
Hvad søger du? Find det her
• Sådan geninstalleres operativsystemet
Operativsystem-cd
Operativsystemet er
allerede installeret på
din computer. For at
geninstallere operativ-
systemet skal du bruge
Operativsystem-cd'en. Se
i din Brugervejledning for
at få anvisninger. Når du
har geninstalleret operativ-
systemet, skal du bruge
cd'en Drivere og hjælpe-
programmer (ResourceCD) til at geninstallere drivere til
de enheder, der fulgte med computeren. Mærkaten med
produktnøglen til operativsystemet findes på computeren.
BEMÆRK: Farven på cd'en varierer, afhængigt af hvilket
operativsystem, du har bestilt.
BEMÆRK: Operativsystem-cd'en kan være valgfri og følger
ikke nødvendigvis med computeren.
• Sådan anvendes Linux
Dell-understøttede Linux-websteder
• E-mail-samtaler med brugere af Dell Precision™-
• Linux.dell.com
produkter og Linux-operativsystemet
• Lists.us.dell.com/mailman/listinfo/linux-precision
• Yderligere oplysninger vedrørende
Linux og min Dell Precision-computer
54 Hurtig referencevejledning
Klargøring af computeren (opretstående)
FORSIGTIG: Før du går i gang med procedurerne i dette afsnit, skal du følge sikkerhedsanvisningerne
i Produktinformationsvejledningen.
Du skal udføre alle trin for at opsætte computeren korrekt.
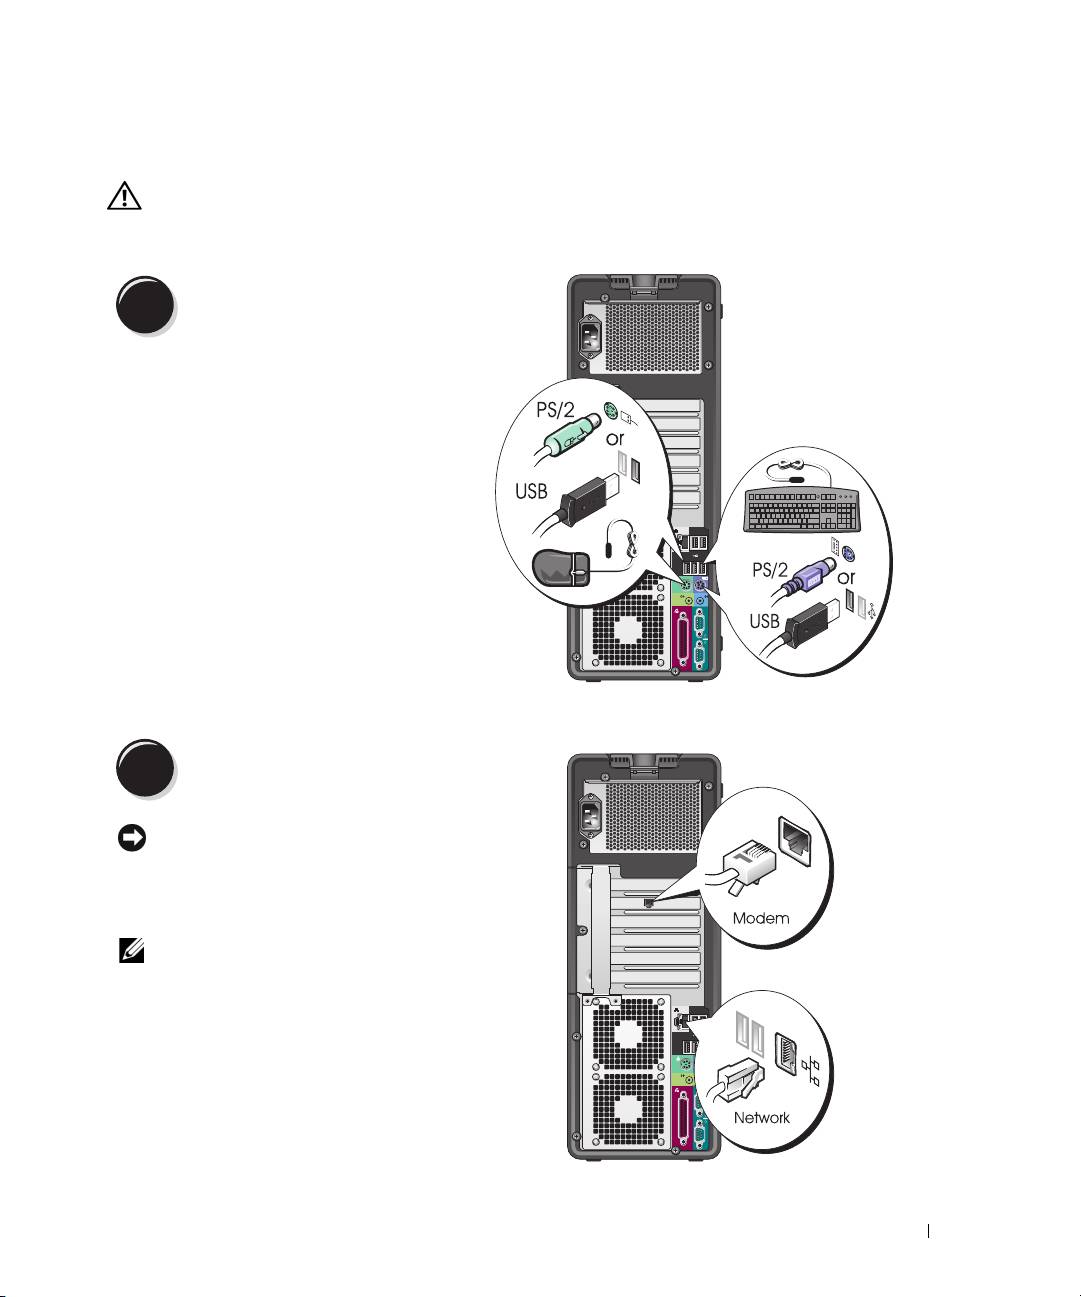
Tilslut tastaturet og musen.
1
Tilslut modem- eller netværkskablet.
2
BEMÆRKNING: Du må ikke slutte et modemkabel
til netværksadapteren. Spændingen fra telefon-
kommunikation kan beskadige netværksadapteren.
BEMÆRK: Hvis der er installeret et netværkskort i
din computer, skal du slutte netværkskablet til kortet.
Hurtig referencevejledning 55
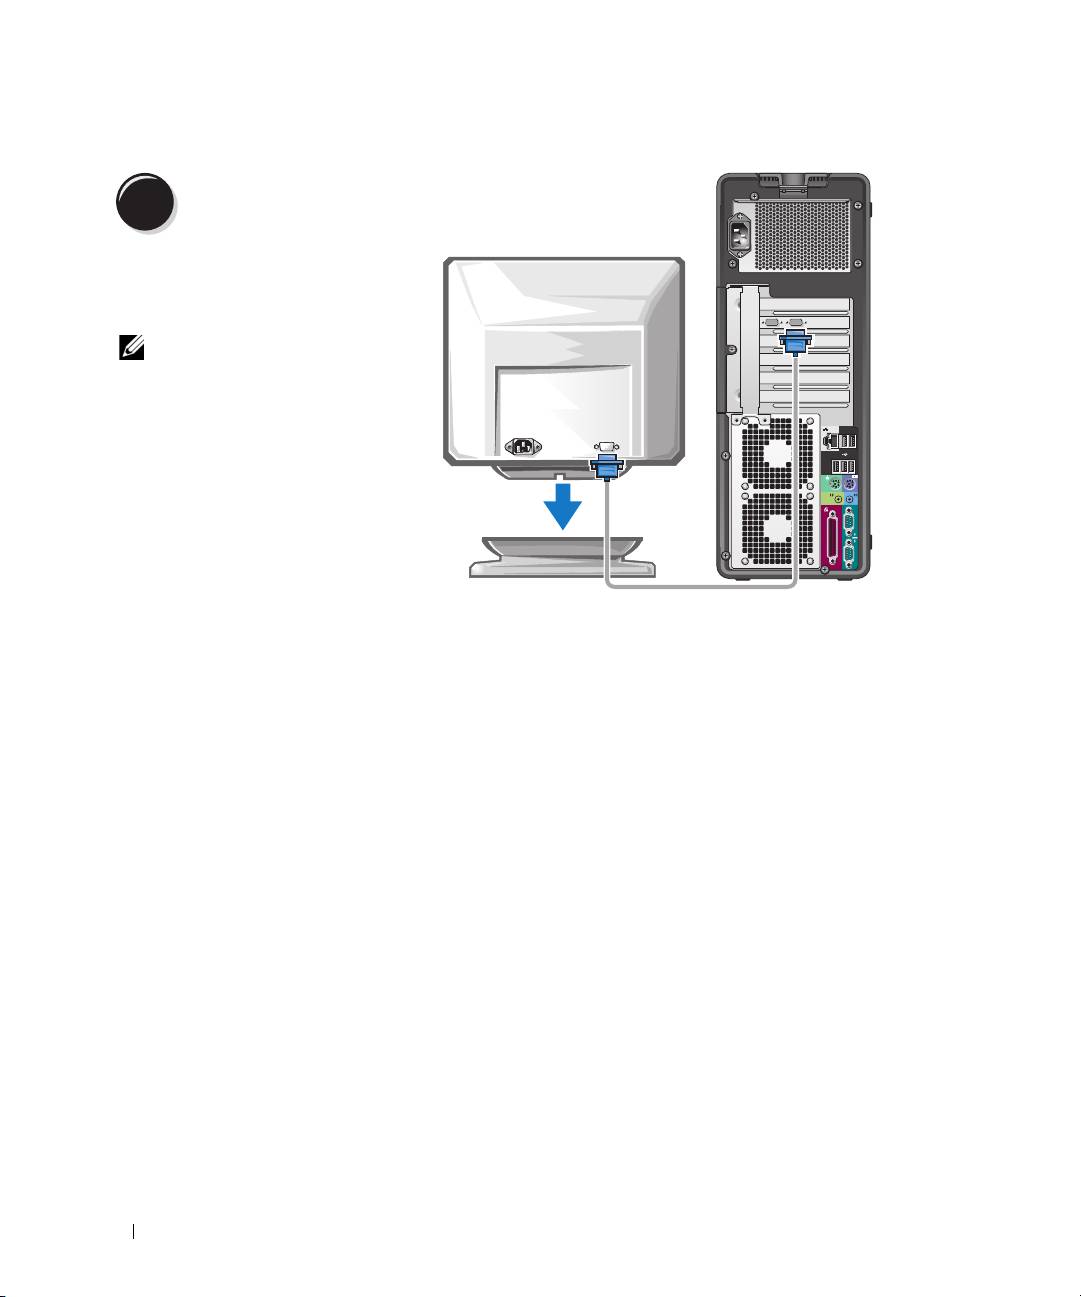
Tilslut skærmen.
3
Du kan tilslutte din skærm på
forskellige måder, afhængigt
af dit grafikkort.
BEMÆRK: Du skal muligvis
bruge den medfølgende
adapter eller det med-
følgende kabel til at slutte
skærmen til computeren.
56 Hurtig referencevejledning
For enkelt- og dobbeltskærmskompatible kort med et enkelt stik
Én VGA-adapter:
VGA
Brug VGA-adapteren, hvis du har et
enkeltskærmsgrafikkort og vil slutte computeren
til en VGA-skærm.
Dual VGA Y-kabeladapter:
Dual DVI Y-kabeladapter:
VGA
DVI
DVI
VGA
Brug det relevante Y-kabel, hvis dit grafikkort har
Brug det relevante Y-kabel, hvis dit grafikkort har et enkelt
et enkelt stik, og du vil slutte computeren til én
stik, og du vil slutte computeren til én eller to DVI-
eller to VGA-skærme.
skærme.
Dobbeltskærmskablet er farvekodet. Det blå stik er til den primære skærm, og det sorte stik er til den anden
skærm. For at muliggøre dobbeltskærmsunderstøttelse skal begge skærme være sluttet til computeren,
når du tænder for den.
Hurtig referencevejledning 57
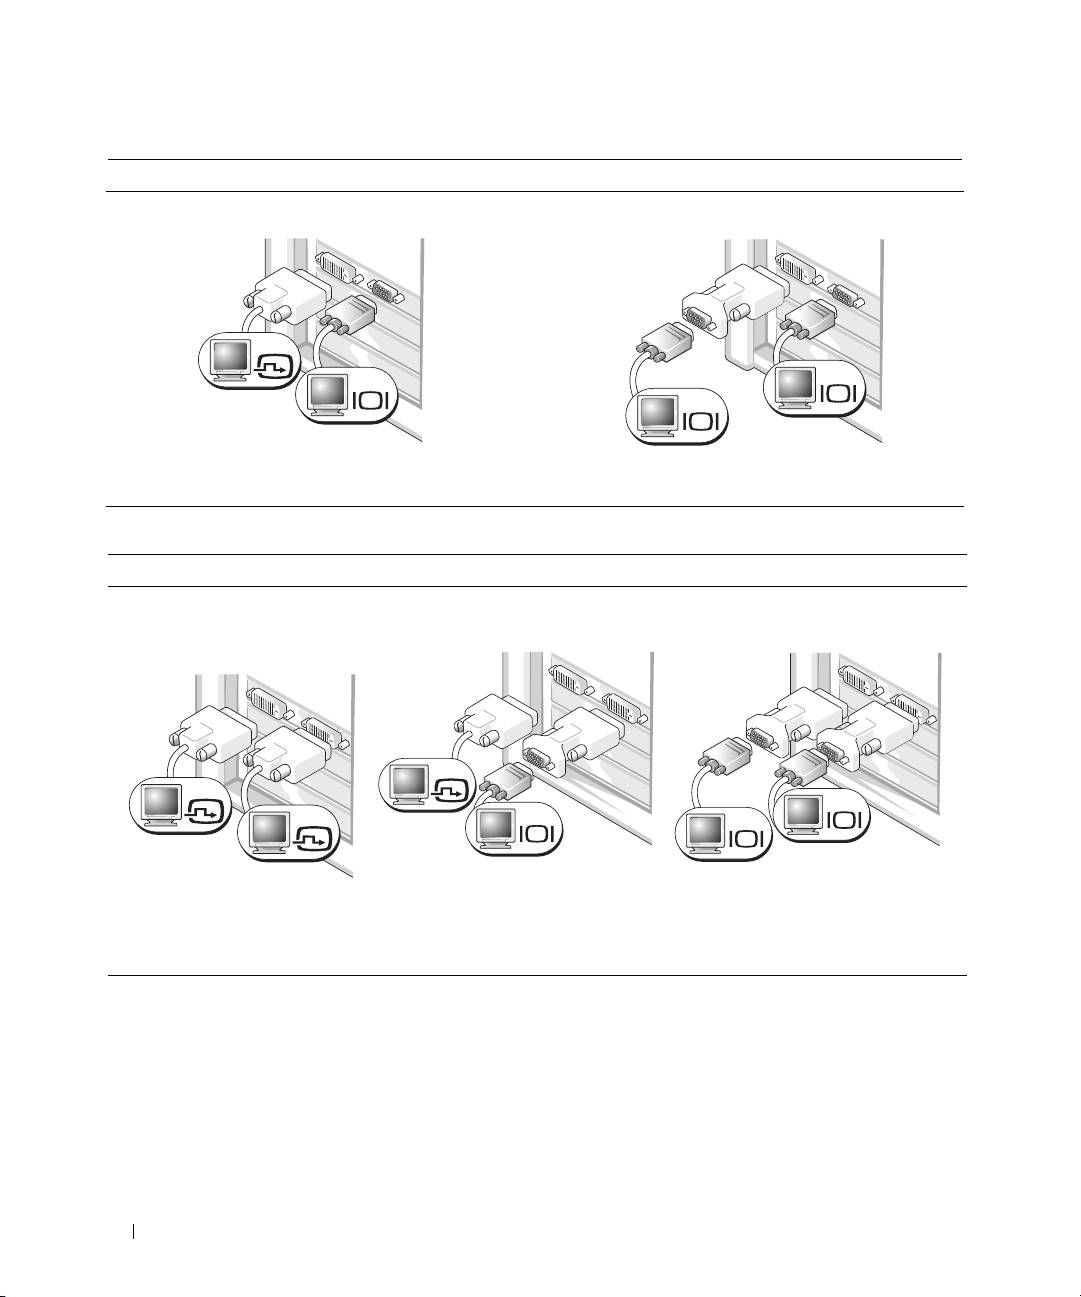
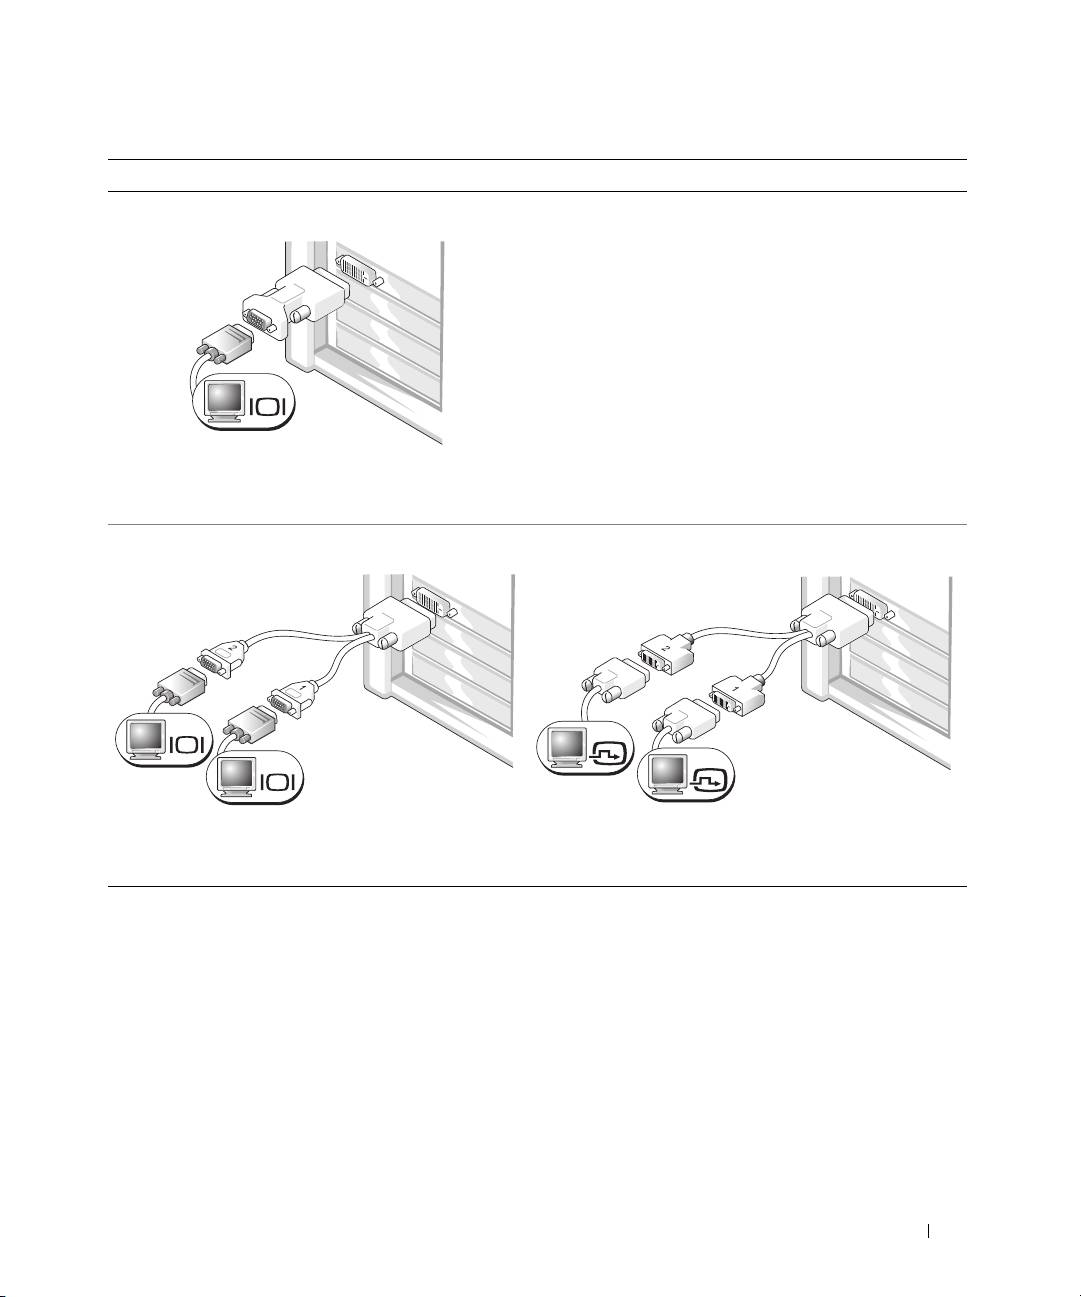
For dobbeltskærmskompatible kort med ét DVI-stik og ét VGA-stik
Ét DVI-stik og ét VGA-stik:
To VGA-stik med én VGA-adapter:
DVI
VGA
VGA
VGA
Brug de relevante stik, hvis du vil slutte
Brug VGA-adapteren, hvis du vil slutte computeren
computeren til én eller to skærme.
til to VGA-skærme.
For dobbeltskærmskompatible kort med to DVI-stik
To DVI-stik:
To DVI-stik med én VGA-adapter:
To DVI-stik med to VGA-adaptere:
DVI
DVI
VGA
DVI
VGA
VGA
Brug VGA-adapteren til at slutte
Brug to VGA-adaptere til at slutte
Brug DVI-stikkene til at slutte
en VGA-skærm til et
to VGA-skærme til DVI-stikkene
computeren til én eller to
af DVI-stikkene på computeren
på computeren.
DVI-skærme.
58 Hurtig referencevejledning
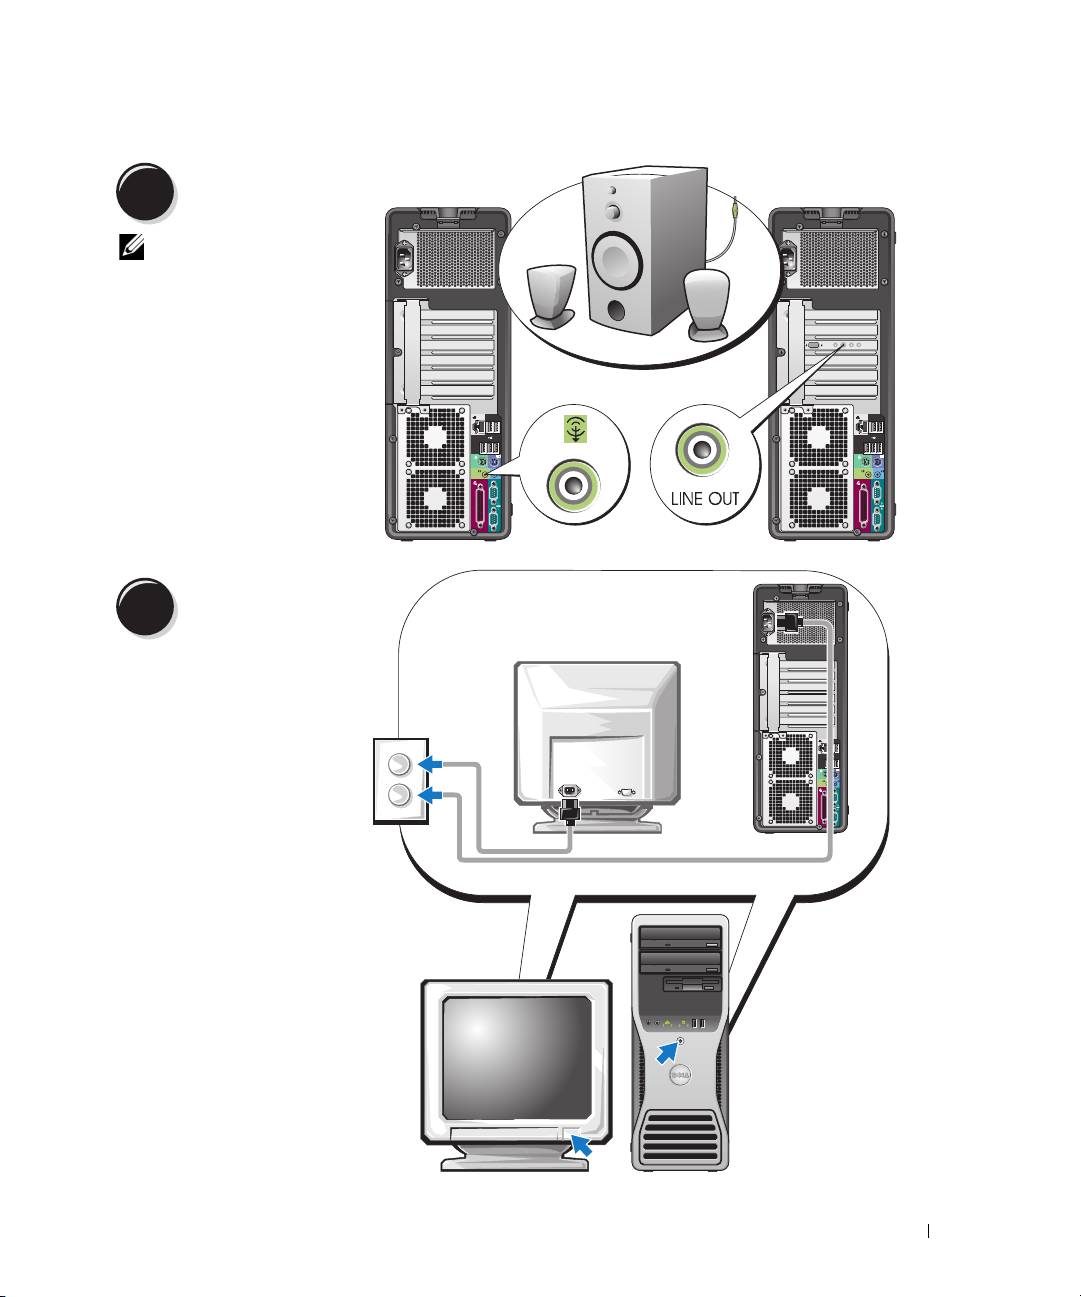
Tilslut højttalerne.
4
BEMÆRK: Hvis der
er installeret et lydkort
i computeren, skal
du slutte højttalerne
til kortet.
Slut strømkablerne
til, og tænd for
5
computeren og
skærmen.
Hurtig referencevejledning 59
Installér yderligere software eller enheder.
6
Før du installerer enheder eller software, der ikke fulgte med computeren, skal du læse dokumentationen,
som fulgte med softwaren eller enheden eller kontakte leverandøren for at sikre dig, at softwaren eller
enheden er kompatibel med computeren og operativsystemet.
Du er nu færdig med at klargøre computeren (opretstående).
Klargøring af computeren (liggende)
FORSIGTIG: Før du går i gang med procedurerne i dette afsnit, skal du følge sikkerhedsanvisningerne
i Produktinformationsvejledningen.
Du skal udføre alle trin for at opsætte computeren korrekt.
Tilslut tastaturet og musen.
1
BEMÆRKNING: Du må
ikke slutte et modemkabel
til netværksadapteren.
Spændingen fra telefon-
kommunikation kan beskadige
netværks-adapteren.
60 Hurtig referencevejledning
