Beurer BY 77: 5. Unit description Camera “Baby”
5. Unit description Camera “Baby”: Beurer BY 77
Table of contents
- ENGLISH
- 1. Getting to know your instrument 2. Explanation of symbols 3. Intended use
- 4. Notes
- 5. Unit description Camera “Baby”
- Parent unit “Monitor” Display description
- 6. Initial use Initial use of camera Initial use of parent unit with battery Initial use of parent unit with mains part plug
- 7. Operation 7.1 Infrared night vision 7.2 Set the volume 7.3 Set the brightness 7.4 Intercom function 7.5 Settings menu Zoom function
- Lullabies Alarm Temperature unit Add camera
- Delete camera View camera Alternating camera image Energy-saving mode
- 8. Useful information about the baby monitor 9. Maintenance and cleaning
- 10. What if there are problems?
- 11. Disposal 12. Technical data
Note
•
Before making a claim, please check the battery in the parent unit and replace it if
necessary.
•
Repairs must only be carried out by Customer Services or authorized suppliers. Un-
der no circumstances should you open or repair the camera or parent unit yourself,
as faultless functionality could no longer be guaranteed thereafter. Failure to comply
will result in voiding of the warranty.
•
If you should have any questions about using the video baby monitor, please contact
either your retailer or Customer Services.
WARNING
Safety notes on handling batteries
•
If a battery has leaked, put on protective gloves and clean the battery compartment
with a dry cloth.
•
If your skin or eyes come into contact with fluid from the battery cell, flush out the
aected areas with plenty of water and seek medical assistance.
•
Risk of explosion! Never throw batteries into a fire.
•
Do not disassemble, split or crush the batteries.
•
Batteries must be charged correctly prior to use. The instructions from the manufac-
turer and the specifications in these instructions for use regarding correct charging
must be observed at all times.
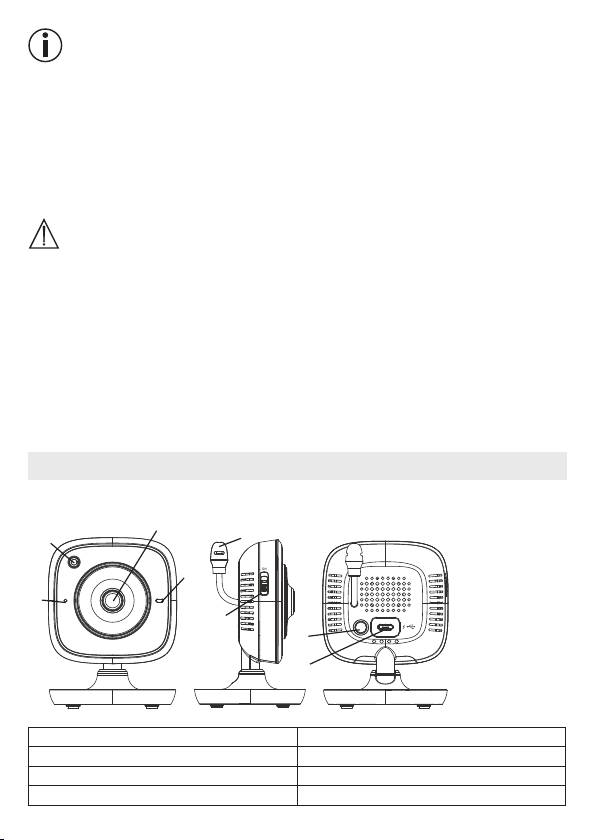
5. Unit description
Camera “Baby”
2
8
1
3
4
PAIR
5
6
7
1. Brightness sensor (night vision function)
5. ON/OFF switch
2. Camera lens 6. Pair button
3. Function light 7. Connection for mains part plug
4. Microphone 8. Temperature sensor
18
