Beurer BM 85: 5. Measuring blood pressure Attaching the cuff
5. Measuring blood pressure Attaching the cuff: Beurer BM 85
Table of contents
- 1. Getting to know your instrument 2. Important notes Signs and symbols
- Notes on use
- Notes on batteries Instructions for repairs and disposal Instructions for storage and maintenance
- 3. Unit description
- Information on the display: USB interface System requirements for the Beurer “HealthManager” PC software.
- 4. Preparing for the measurement Press and hold the START/STOP button
- 5. Measuring blood pressure Attaching the cuff
- Performing the blood pressure measurement Adopting the correct posture
- 6. Evaluating results Cardiac arrhythmia: WHO classification:
- Resting indicator measurement (using HSD diagnostics) GREEN: haemodynamically stable RED: lack of haemodynamic stability
- 7. Displaying and deleting measurements
- Average values Individual measured values Deleting measured values
- 8. Transferring measurements Transfers using the USB interface
- 9. Cleaning and storing the unit 0. Error messages/trouble-shooting 11. Battery
- 12. Technical specifications
- Technical information is subject to change without notification 3. Mains part to allow for updates.
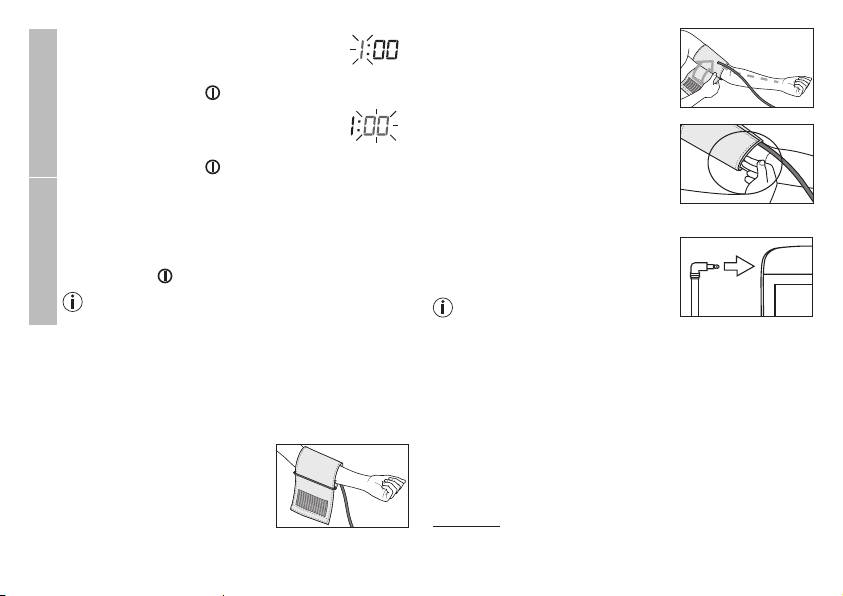
The cuff must be placed on the upper
The hours flash on the display.
arm so that the bottom edge is
•
Select the current hours using the M1/
positioned 2 – 3 cm above the elbow
M2 memory buttons and confirm with the
and over the artery. The line points to
START/STOP button .
the centre of the palm.
Time
The minutes flash on the display.
•
Choose the current minutes using the M1/
Now tighten the free end of the cuff,
M2 memory buttons and confirm with the
but make sure that it is not too tight
START/STOP button .
around the arm and close the hook-
®
and-loop fastener. The cuff should be
The Bluetooth
symbol flashes on the display.
fastened so that two fingers fit under
•
Use the M1/M2 memory buttons to choose whether
®
the cuff.
automatic Bluetooth
data transfer is activated (Blue-
settings
®
®
tooth
symbol flashes) or deactivated (Bluetooth
Now insert the cuff line into the
®
symbol is not shown) and confirm with the START/
connection for the cuff connector.
STOP button .
®
Bluetooth
transfers will reduce the battery capacity.
If the measurement is performed
Bluetooth
on the right upper arm, the line
should be located on the inside of
5. Measuring blood pressure
your elbow. Ensure that your arm is
Please ensure the unit is at room temperature before measu-
not pressing on the line.
ring.
Blood pressure may vary between the right and left arm, which
The measurement can be performed on the left or right arm.
may mean that the measured blood pressure values are diffe-
Attaching the cuff
rent. Always perform the measurement on the same arm.
Place the cuff on to the bare left upper
If the values between the two arms are significantly different,
arm. The circulation of the arm must
please consult your doctor to determine which arm should be
not be hindered by tight clothing or
used for the measurement.
similar.
Important:
The unit may only be operated with the original cuff.
The cuff is suitable for an arm circumference of 22 to 36 cm.
25
