Gorenje tgr65sb6: fbV™ Mkii wiTh Pod X3
fbV™ Mkii wiTh Pod X3: Gorenje tgr65sb6

FBV MkII Advanced User Guide: POD X3
®
fbV™ Mkii wiTh Pod
X3
In this chapter, we’ll cover the specific features for using Line 6 FBV Shortboard™ MkII or FBV
®
®
Express™ MkII to control POD
X3 “Bean” or POD
X3 Pro devices. Instructions are the same
for POD X3 “Bean” and X3 Pro, unless otherwise noted. You should already have your FBV MkII
connected and working with your POD X3. If not, then head on back to “Getting Started” on page 1•1
for instructions. Here we go!
Quick Start
OK, we know you’re too impatient to read through this entire chapter before giving things a test drive!
As you likely already figured out, things pretty much work right out of the box with your FBV MkII
and POD X3, so here are a few quick tips:
• A, B, C, D Channel Buttons: Select to call up one of the four “Channels” in the current Bank
within your POD X3 User folder.
• FBV Shortboard MkII: Press the “Bank” buttons (labeled with the up and down arrows)
to scroll through the User Banks, then press A - D to recall the desired preset within the
selected User Bank.
• FBV Express MkII: Turn the knob on your POD labeled “Press to Save” to scroll through
your User Banks and you’ll see that these A - D Channel buttons let you select a preset
within the current User Bank.
• Pedal: Typically controls either the Wah or Volume of the current preset - press the pedal forward
to activate the toe switch to toggle between Wah or Volume.
• Tap: Tap in a tempo for your active Delay or Modulation effects of the current preset to follow.
• Effects Footswitches (Shortboard only): Press to toggle the labeled effect on/off in the current
preset.
• Function 1 & 2 Footswitches (Shortboard only): By default, these toggle the Comp effect and
Amp on/off, respectively, within the current preset.
Ready to dive deeper? Many more options and tips & tricks await you below!
Calling Up User Presets
This is likely what you’ll be using your FBV MkII controller for most often - freeing up your hands
and recalling those presets you so painstakingly created! It’s all pretty straight-forward here. Your FBV
provides you direct access to presets stored in the POD X3 User folder. You can see that when you
stomp on your FBV to call up a preset that this automatically switches to the User folder, regardless of
whether the previously loaded preset is one stored in this User folder or not.
FBV Shortboard™ MkII
BANK UP/DOWN: Step on Bank Up or Down to ‘cue’ the next User Bank and Channel. For
example, if you currently have preset 1B loaded, press Bank Up and the FBV display flashes the selected
Tone’s name for preset 2B so you know what’s there, but it hasn’t audibly switched you out of 1B yet.
LOAD CHANNEL: Press the Channel A, B, C, or D button to instantly load the respective preset
in the current User Bank. After pressing the Bank Up or Down button, the display will be flashing,
waiting for you to select a Channel - As in the above example, pressing A will load preset 2A, or
pressing B will load 2B, etc.
2•1
FBV MkII Advanced User Guide: POD X3
FBV Express™ MkII
LOAD CHANNEL: Press the A, B, C, or D button to instantly load the respective preset in the
current User Bank. To select one of the 1 - 32 numbered Banks within your POD X3 User folder, turn
the knob on your POD labeled “Press to Save”.
The POD X3 Home Page
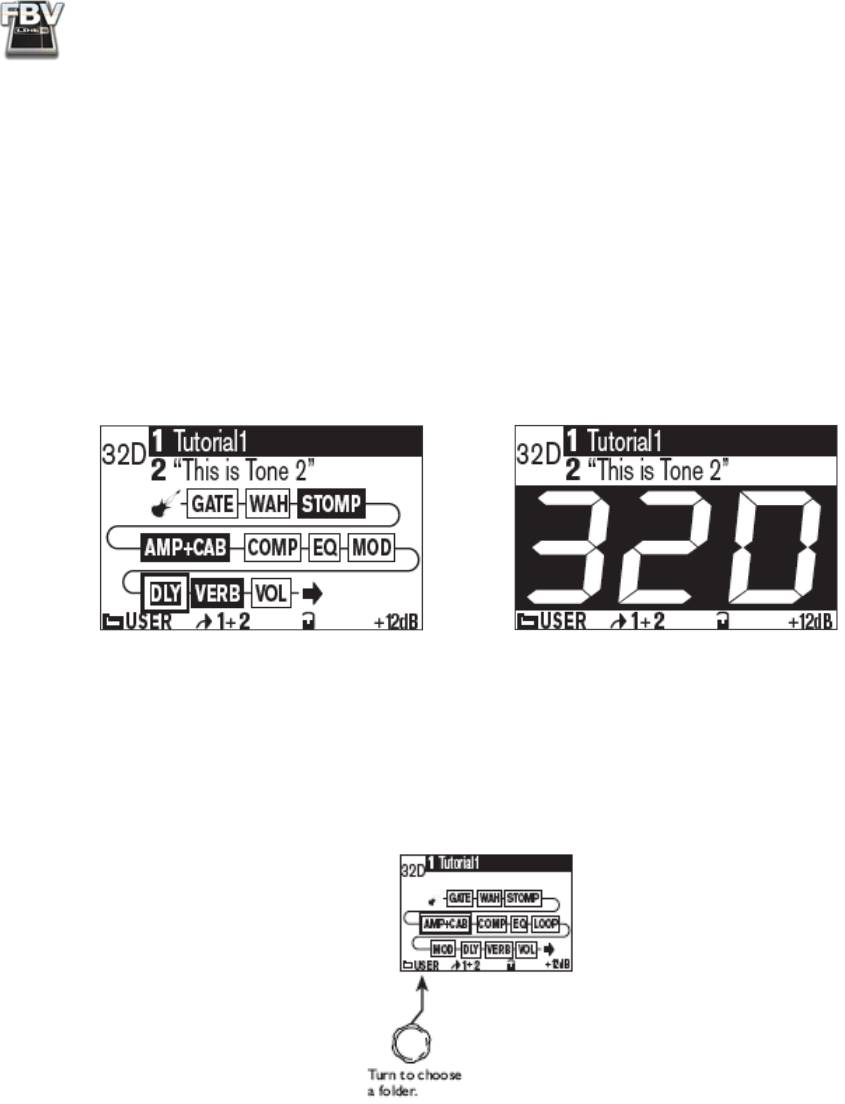
The POD X3 Home page is your main screen where you can see the elements of the current preset.
When POD X3 is set to the User folder you can press the HOME button to toggle between the “Tone
Path” display and the alternate “Big User” display. This Big User display shows the Tone name(s) and
makes it easy to see the preset’s Bank/Channel number from a distance, which can be very helpful
when using your FBV/POD X3 in a live situation - or when wearing those cheap sunglasses of yours:
POD X3 Home Page - Tone Path display and alternate Big User display
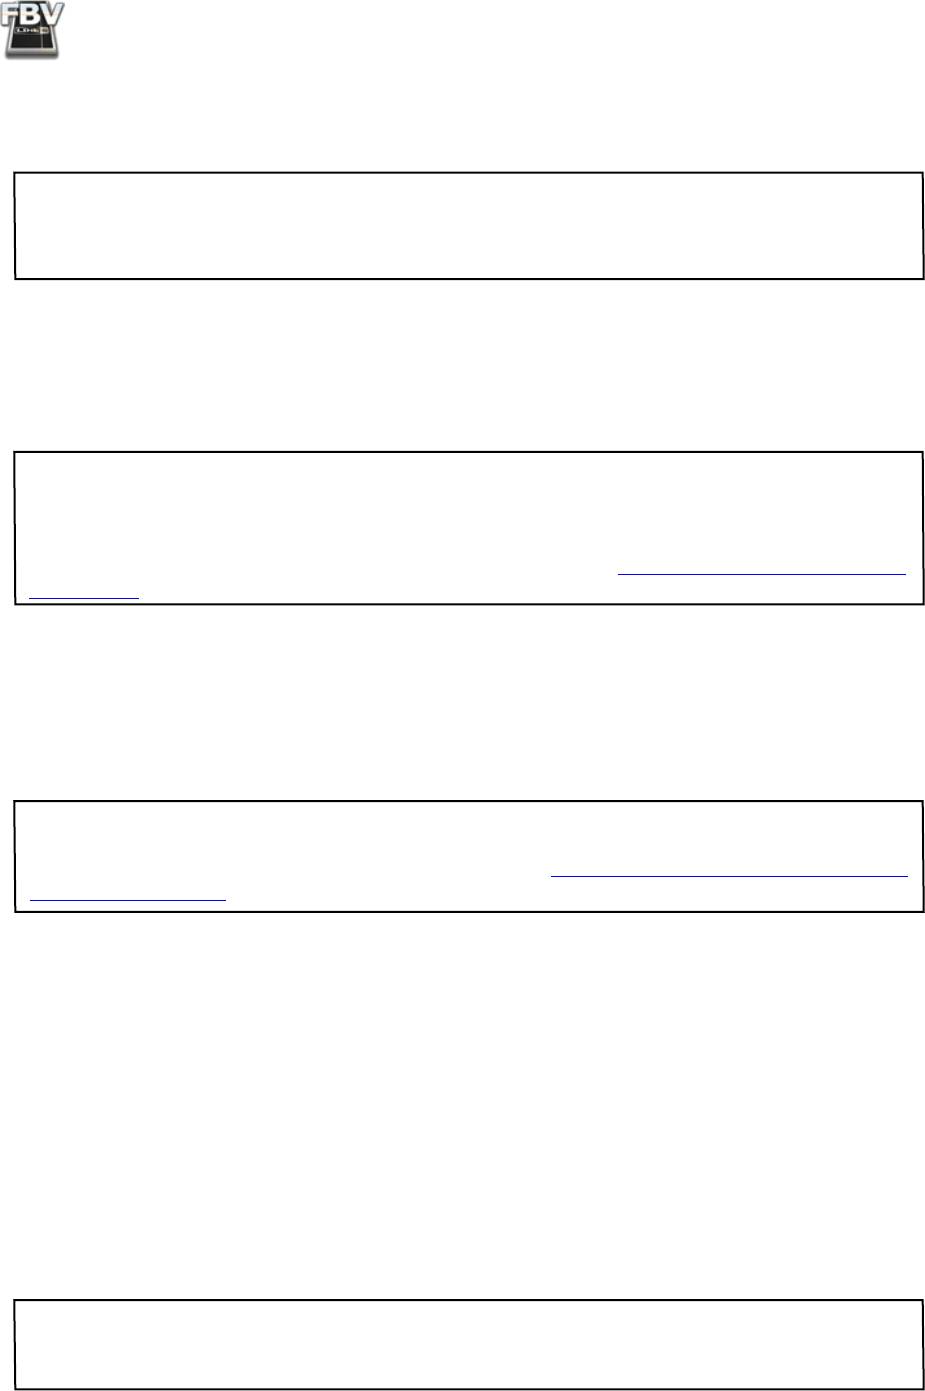
The User Preset Folder
As you’ve probably discovered, POD X3 includes a total of over 350 presets and all are stored nice and
neatly into “folders”. You can navigate through these folders on the POD X3 Home page by turning
the corresponding multi-function knob:
In the User folder are 128 User locations that you can use to store your own custom presets. If you step
on one of the FBV Channel (A, B, C, D) buttons, you’ll see that this automatically switches POD X3
to the User folder, calling up the preset of the current Bank. The big idea here for configuring your
FBV/POD X3 rig is that you create your own tone presets exactly how you like and then store them
in the 128 memory locations within the User folder. These User presets are then accessible from your
FBV.
You can see that we already gave you a head start and created some presets in the lower numbered
Channel locations of the User folder - You can of course modify these as you like. You can also
manually choose another folder on the POD X3 unit and use its on-board knobs to run through the
2•2
FBV MkII Advanced User Guide: POD X3
other presets.* You can modify these as well, and then when you push the SAVE button, choose one
of the 128 locations in the User folder to store your customized preset there to allow it to be accessed
your via your FBV.
*If you have an FBV Shortboard MkII model, note that its LCD display will always show the POD X3
current preset title, even if that preset is within a folder other than the User folder. The FBV effect
switches and pedals will then control this current Tone, but the Bank and A, B, C, D buttons will always
switch the POD X3 back to the User folder automatically to call up one of the 128 User presets.
Controlling Effects & More
Your FBV will also let you dive deeper into the workings of your POD X3 and do things like tune up,
wangle some effects and more.
Note: A POD X3 preset can optionally be composed of two Tones, each with its own set of effects and
effects parameter settings. Just like accessing the effects blocks and parameters directly on the POD X3
itself, using the following footswitch buttons will control only those effects for the currently selected
Tone. To toggle between Tone 1 and Tone 2, use the TONE 2 button on the POD X3, or Shortboard
users can configure the FUNCTION 1 button for Tone switching. See “Controlling Dual Tone Presets”
on page 2•9
.
FBV Shortboard™ MkII
FUNCTION 1: By default, this button toggles the COMP effect on/off. But you can alternatively
configure it to control the Amp+Cab on/off, Tone 1/2 toggle, or FX Loop on/off (for X3 Pro units
only).
TIP: The POD X3 System screen includes an “LP SW” (Loop Switch) setting for each Tone 1 and Tone
2 that allow you to select which of these actions is triggered by the FBV Shortboard FUNCTION 1
switch. This setting is configurable for each User preset - see “POD X3 System Configuration - Pedal
Settings” on page 2•4
.
FUNCTION 2: Toggles the AMP+CAB block on/off.
STOMP: Toggles the STOMP block on/off.
MODULATION: Toggles the MOD block on/off.
DELAY: Toggles the DLY block on/off.
REVERB: Toggles the VERB block on/off.
TAP: Allows you to tap in a tempo for supported Delay and Mod effects to follow. The LED above the
button flashes to indicate the current tempo.
TUNER: Press and hold the TAP button down for 2 seconds to call up the Tuner. The FBV display
then shows you a handy Tuner screen. Press & release the button again to exit the Tuner.
TIP: You can also set the “AUDIO” behavior for the Tuner mode on the POD X3 directly on the POD
X3 Tuner page to either MUTE your audible signal or not. (Sure, everyone likes to hear a guitar in tune,
but they don’t necessarily want to hear you tune it!)
2•3
FBV MkII Advanced User Guide: POD X3
Pedal: The onboard Pedal (as well as a connected Expression Pedal) can actually be assigned to control
either Tone 1, Tone 2, or both Tones, and assigned to different functions (Wah, Volume, Tweak).
Please refer to the following POD X3 System Configuration section for details on how to set up these
pedal behaviors per Tone.
Pedal VOL & WAH Indicators: These two lights at the left of the onboard Pedal indicate the
current mode. When both lights are lit this indicates the Pedal is controlling the assigned TWEAK
parameter. For the TWEAK parameter, you can actually choose from a menu of many effect
parameters to control with the pedal - see the following POD X3 System Configuration section.
FBV Express™ MkII
TAP TEMPO: To tap in a tempo for supported Delay and Mod effects to follow, just tap the currently
lit A, B, C or D channel button. An LED within the Tuner display flashes to indicate the current
tempo.
TUNER: Press an hold the currently lit A, B, C or D channel button for 2 seconds to switch to Tuner
mode. You’ll see the onboard Tuner display become active. To exit tuner mode, simply press and release
any channel button (and you’ll also be returned to the same tone preset). Or, pressing the pedal all
the way forward and clicking the toe switch will exit the Tuner, (as well as toggle the pedal control
between WAH and VOL).
TIP: You can also set the “AUDIO” behavior for the Tuner mode on the POD X3 directly on the POD
X3 Tuner page to either MUTE your audible signal or not. (Sure, everyone likes to hear a guitar in tune,
but they don’t necessarily want to hear you tune it!)
Pedal: The onboard Pedal can actually be assigned to control either Tone 1, Tone 2, or both Tones,
and assigned to different functions (Wah, Volume, Tweak). Please refer to the following POD X3
System Configuration for details on how to set up these pedal behaviors per Tone.
Pedal VOL & WAH Indicators: These two lights at the left of the onboard Pedal indicate the
current mode. When both lights are lit this indicates the Pedal is controlling the assigned TWEAK
parameter. For the TWEAK parameter, you can actually choose from a menu of many effect
parameters to control with the pedal - see the following POD X3 System Configuration section.
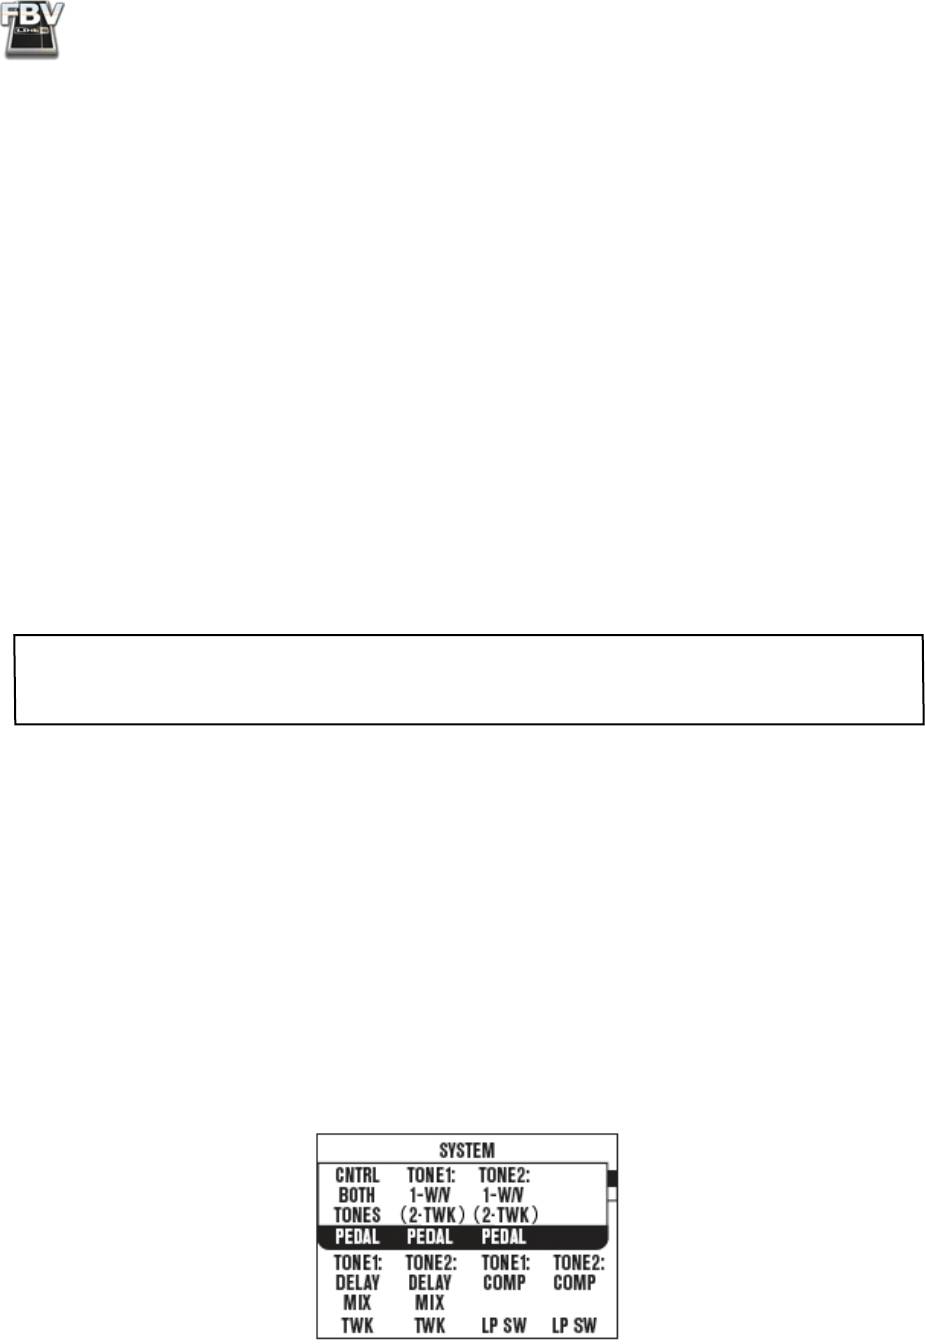
POD X3 System Configuration - Pedal Settings
There are several options you’ll want to check on the first page of the POD X3 SYSTEM screen for
your FBV Shortboard or Express Pedal behaviors. On the POD X3, press and hold the OUTPUTS/
Hold for System button to get to the SYSTEM screen.
Page 1 of the POD X3 System screen
2•4
FBV MkII Advanced User Guide: POD X3
The three PEDAL settings on the top row configure the behaviors of the Wah/Volume/Tweak Pedal
on your FBV MkII device for the current preset. Note that a Pedal has several “modes” of operation,
configurable to switch between controlling Wah/Volume/Tweak. The Pedal also has the ability to
perform in these modes independently per Tone 1/Tone 2.
• FBV Shortboard MkII - Includes one onboard pedal, which is pedal “1”. When no Expression
pedal is connected to FBV Shortboard, the pedal “2” options are not active (as indicated by these
settings shown in parentheses (as displayed in the above System screen).
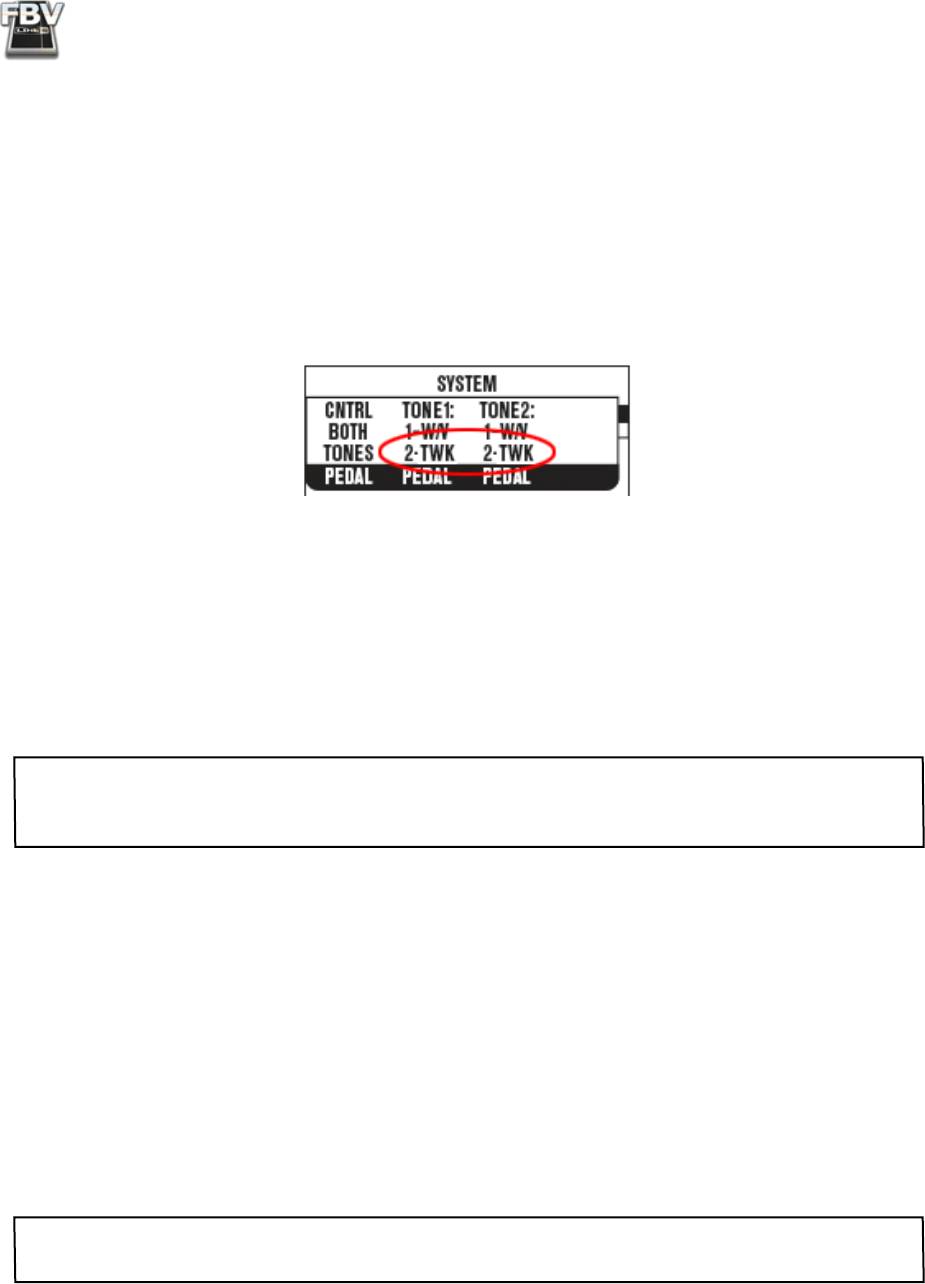
• When an Expression pedal is connected to FBV Shortboard, it becomes pedal “2”, and
you’ll see the options for pedal 2 become active (displayed without parentheses in the
System screen), as shown here:
POD X3 System screen - Shortboard with Expression pedal
• FBV Express MkII - Includes one onboard pedal, which is pedal “1”. There is no option for
connecting a 2nd pedal, therefore, the pedal 2 options will be displayed in parentheses in the
System screen to indicate they are not active.
All of these PEDAL, TWK and LP SW System settings are specific to the current preset - that is, you
configure each of these settings and SAVE them with your current settings to have your FBV pedal(s)
function however you like for each individual preset.
Note: Any preset location on your POD X3 can consist of either one or two separate Tones (Tone 1 and
Tone 2.) The System settings here always allow you to view and edit settings for “Tone 2” even though
the specific preset you are editing may not currently have Tone 2 active.
PEDAL CNTRL - Use this left-most PEDAL System setting to have the pedal affect either TONE
1, TONE 2 or BOTH TONES. (The default mode is BOTH TONES for all current Presets.) We’ve
offered lots of flexibility here for allowing you to set pedal functions independently for each Tone in a
preset, so please note the behaviors here:
TONE 1 ONLY - Pedal 1 (and pedal 2, if connected) affects only Tone 1 and follows Tone 1’s
PEDAL “mode” settings, regardless of Tone 2’s Pedal mode settings and on/off state.
TONE 2 ONLY - Pedal 1 (and pedal 2, if connected) only affects Tone 2 and follow Tone 2’s
PEDAL mode settings, regardless of Tone 1’s PEDAL mode settings and on/off state.
BOTH TONES - Pedal 1 (and pedal 2, if connected) affects Tone 1 according to Tone 1’s PEDAL
mode settings, and simultaneously affects Tone 2 following Tone 2’s PEDAL mode settings.
Note: For more about the FBV pedal options and behaviors with Dual Tone Presets, be sure to read the
following section titled “Using Pedals with Tone 1 and Tone 2”.
2•5

FBV MkII Advanced User Guide: POD X3
TONE1 PEDAL - Use this TONE1 setting to configure the two “modes” of operation for Pedal 1 &
Pedal 2 (if Pedal 2 is connected) for Tone 1. The settings here are strictly for Tone 1, and the value you
have set for the PEDAL CNTRL setting (see previous) determines whether Tone 1 will be controlled
or not by your pedal(s). Note that the pedal options differ if you have an FBV Shortboard with an
Expression pedal connected.
The PEDAL TONE1 options for FBV Express and Shortboard without an Expression pedal are
as follows:
• 1-W/V 2-VOL - Pedal 1 controls the Wah or Volume effect’s Position parameter, with the toe
switch toggling between controlling these two effects for Tone 1. Pedal 2 options are not active.
• 1-TWK 2-VOL - Pedal 1 controls the Tweak parameter that is currently assigned for Tone 1.
(See the following TONE1 TWK section.) Pedal 2 options are not active.
• 1-W/V 2-TWK - Pedal 1 controls the Wah or Volume effect’s Position parameter, with the toe
switch toggling between controlling these two effects for Tone 1. Pedal 2 options are not active.
The PEDAL TONE1 options for FBV Shortboard with an Expression pedal are as follows:
• 1-W/OFF 2-VOL - Pedal 1 controls the Wah, with the toe switch toggling the Wah effect on/
off. Pedal 1 performs no function when the Wah is off. Pedal 2 controls the Volume at all times.
• 1-TWK 2-VOL - Pedal 1 controls the Tweak parameter that is currently assigned for Tone 1.
(See the following TONE1 TWK description.) The toe switch performs no function. Pedal 2
controls the Volume for Tone 1.
• 1-W/V 2-TWK - Pedal 1 controls the Wah or Volume effect’s Position parameter, with the toe
switch toggling between controlling these two effects for Tone 1. Pedal 2 controls the Tweak
parameter that is currently assigned for Tone 1. (See the following TONE2 TWK description.)
TONE2 PEDAL - Use these TONE2 settings to configure the two “modes” of operation for Pedal
1 & Pedal 2 (if Pedal 2 is connected) for Tone 2. The options for the PEDAL TONE2 are the same
as those described in the TONE1 PEDAL section above, but the settings here are strictly for Tone 2,
to provide you with independent pedal behaviors per Tone. The values you have set for the PEDAL
CNTRL setting (see previous description) determine whether Tone 2 will be controlled or not by your
pedal(s). Also note the TONE2 TWK options below to configure what the TONE2 “Tweak” pedal
options perform.
TONE1 TWK - (Tweak) If you’ve assigned one of the TONE1 PEDAL options to control TWK, this
is where you choose the parameter that will be controlled with that TWK-assigned pedal. The list of
available parameters is too long to list here - turn the knob and see what you find!
TONE2 TWK - (Tweak) If you’ve assigned one of the TONE2 PEDAL options to control TWK, this
is where you choose the parameter that will be controlled with that TWK-assigned pedal. The list of
available parameters is too long to list here - turn the knob and see what you find!
TONE1 LP SW (Shortboard only) - This LP SW (“Loop Switch”) setting allows you to choose what
the FBV Shortboard FUNCTION1 switch actually controls for Tone 1. (Note that we’ve recently
expanded this to offer more than just a “Loop Switch” option, so don’t the name fool you!) Your
options for Tone 1 are:
• COMP - Toggles Compressor block on/off.
• AMP - Toggles Amp+Cab block on/off.
2•6

FBV MkII Advanced User Guide: POD X3
• LOOP - (POD X3 Pro only) Toggles the FX Loop on/off.
• DUAL - Performs the same toggling behavior between Tone 1 and Tone 2 as the TONE 2
(Hold For Dual) button on your POD X3 hardware, including the Hold For Dual function to
enable/disable Dual Tone via footswitch.
Note: You’ll see that changing to the DUAL option automatically also changes the TONE2 LP SW
option to DUAL - this is necessary since both perform the same function.
TONE2 LP SW (Shortboard only) - This LP SW (“Loop Switch”) setting allows you to choose what
the FBV Shortboard FUNCTION2 switch actually controls for Tone1. Your options for Tone 1 are:
• COMP - Toggles Compressor block On/Off.
• AMP - Toggles Amp block On/Off.
• LOOP - (POD X3 Pro only) Toggles the FX Loop On/Off.
• DUAL - Performs the same toggling behavior between Tone 1 and Tone 2 as the TONE 2
(Hold For Dual) button, including the Hold For Dual function to enable/disable Dual Tone via
footswitch.
TIP: Remember, these SYSTEM settings are specific to each User preset, so be sure to SAVE so that your
edited settings are retained for the particular preset you are modifying!
Using FBV Pedals with Tone 1 and Tone 2
Let’s take a look at the many options and behaviors available for using your FBV pedal (and optional
Expression pedal) with Dual Tone presets. As described above, the TONE1 and TONE2 PEDAL
mode options (Wah/Volume/Tweak) provide independent pedal assignments per Tone, (as well as per
pedal, if you have FBV Shortboard with an optional Expression pedal connected). Therefore, when
configuring these pedal options for a Preset, think about what you want to control in each Tone path.
Here are a some possibilities:
• Controlling a Wah in Tone 1 or Tone 2 only
• Controlling a Wah in both Tones simultaneously with a single pedal
• Controlling a Wah in Tone 1 with pedal 1 and a Wah in Tone 2 independently with pedal 2
• Controlling a Tweak parameter in Tone 1 or Tone 2 only
• Controlling a common Tweak parameter in both Tones simultaneously with a single pedal
• Controlling two different Tweak parameters in each Tone simultaneously with a single pedal
• Controlling a Tweak parameter in Tone 1 with pedal 1 and different Tweak parameter in Tone
2 with pedal 2
When you have a Dual Tone preset loaded, and PEDAL CNTRL set to BOTH TONES with the same
mode settings for both the PEDAL TONE1 and PEDAL TONE2, then this FBV pedal and its toe
switch will actually control this same effect for both Tones simultaneously (clever, eh?) For example,
if you choose “1-W/V” for both PEDAL TONE1 and PEDAL TONE2, then your onboard FBV pedal
will control the Wah or Volume effects for both Tones simultaneously. And clicking the toe switch will
also simultaneously toggle between the Wah & Volume for both Tones.*
2•7
FBV MkII Advanced User Guide: POD X3
Likewise, if you set pedal 2 modes to “2-TWK” for both Tone 1 & 2, then the assigned Tweak parameters
are simultaneously controlled for both Tones by pedal 2. It is also possible to actually set the TWK
assignment independently, so that the specific parameter controlled by pedal 2 is independent for each
Tone. For example, Tone 1 can be set to Tweak the Reverb Mix while Tone 2 Tweaks the Delay Mix,
resulting in the pedal adjusting both these parameters simultaneously!
*Note: It is possible to save a Dual Tone preset where the Wah effect block state is “on” in one Tone and
“off” in the other. If the PEDAL CNTRL System setting is set to BOTH TONES, and the PEDAL is
assigned to “1-W/V” for both Tone 1 & 2, the behavior for the pedal still remains “linked”, therefore,
clicking the pedal’s toe switch toggles each Tone’s Wah effect to the opposite on/off state. You have the
option of setting the Wah block’s on/off state using your POD onboard controls, and then saving the settings
to the preset.
Likewise, the PEDAL “1-W/V” mode specifically dictates that the pedal toe switch toggles between
controlling the Wah and Volume effects. Therefore, if both PEDAL TONE1 & PEDAL TONE2 are set to
“1-W/V”, it is possible to manually set these two effects’ on/off states oppositely per Tone, resulting in toe
switch toggling them both oppositely at the same time. The moral of the story here is that you can choose
exactly how to configure each Tone and Save your User preset to achieve the behavior you want!
As you can see from the above examples, you can get some really weird effects by configuring your
pedal(s) independently for Tone 1 and Tone 2 (and weird can be good!). The best practice is to create
several different User presets and save the pedal configurations exactly how you want for each. This
allows you to call up not only different sounds and effect combinations, but different methods of
control over effects at the same time.
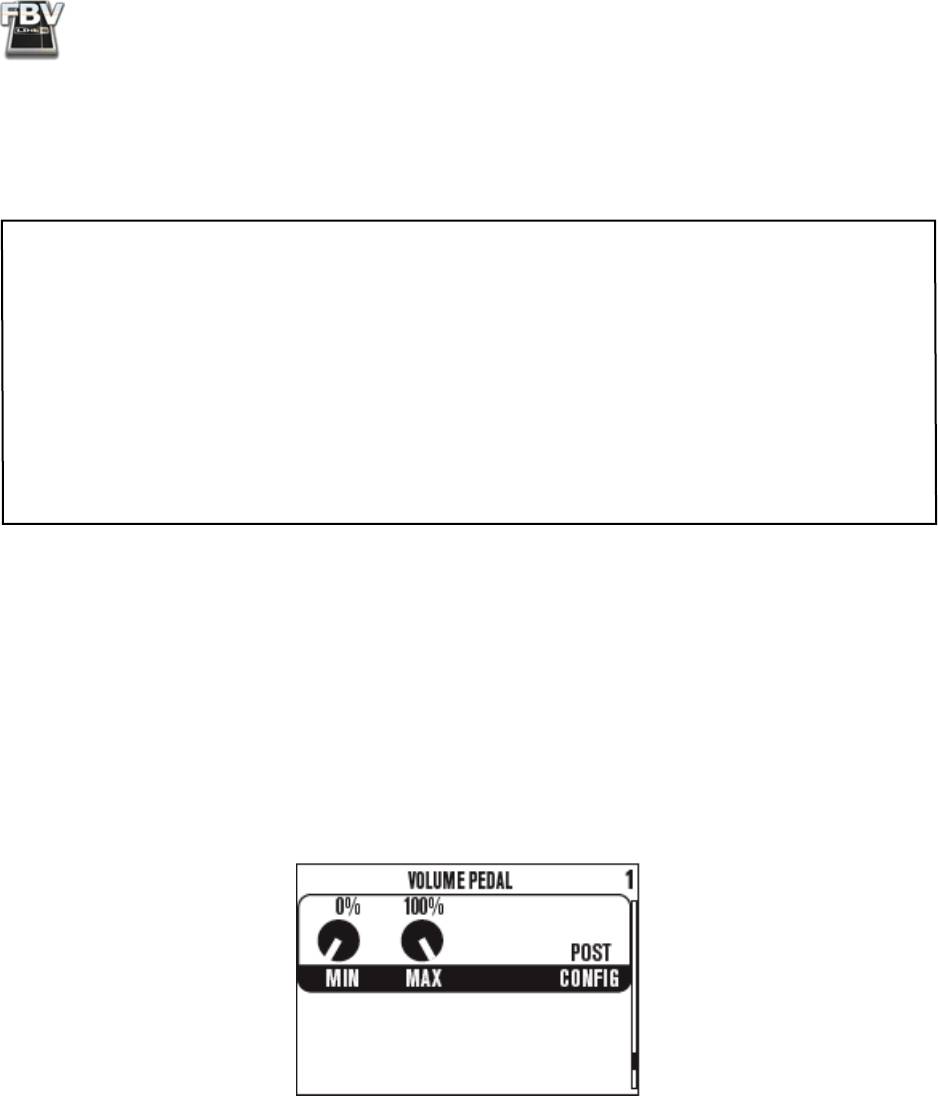
Setting the Volume Pedal’s Min & Max Volume
The POD X3 Volume effect can of course be controlled by the pedal(s) of your FBV MkII, and your
POD X3 provides a few options for the Volume effect. To get to these settings, go to the POD X3 Home
page, select the VOL effect block and double-click the ON/OFF button to enter the VOL edit screen:
The POD X3 Volume page
• MIN – Determines how much volume you’ll hear when the volume pedal is at its minimum
(heel down) setting. Set it to 0% to have silence in the heel down position.
• MAX – Determines how much volume you’ll hear when the volume pedal is at its maximum
(toe down) setting.
• CONFIG – Allows you to choose the position of the volume effect within the POD X3 signal
flow: Pre (before the Amp+Cab), or Post (after the Amp+Cab).
Just like in the world of guitar effects stomp boxes and amps, the position of your Volume pedal in
relation to some effects will impact the sound. For example, lowering the volume before a distortion
2•8

FBV MkII Advanced User Guide: POD X3
effect results in less gain - placing the volume after a distortion effect reduces the overall volume level
without affecting the gain. With the Volume in the Pre position, and using the Delay effect, you can
swell in your guitar volume and then roll the pedal back and still hear the delay repeats - but placing
the Volume pedal Post conversely turns down the original signal AND the delay repeats... Get it?
Note that this VOL effect block is the same volume that is accessed by the POD X3 Tone Volume
knob and, therefore, each Tone has its own independent VOL effect. So, if your preset has two Tones,
then you can press the TONE 2 button to independently configure these three settings for Tone 1 and
Tone 2. These VOL settings are also configurable for each preset, so you can set and save these settings
differently for each User preset.
Controlling Dual Tone Presets
One of the coolest features of your POD X3 is that it offers two completely independent Tone Paths.
It is possible for you to configure a “Tone Pair”, using Tone 1 for a guitar or bass that plugs into the
POD X3 Input 1 jack and Tone 2 for a Mic plugged into Input 2. Alternatively, you can create a “Tone
Blend”, where you utilize both Tone 1 and Tone 2 on a single input, such as to process a guitar with
two amps, with each Tone having its own set of effects, speaker cabinet and mic! You’ll see that your
POD X3 already comes loaded with Single Tone presets, as well as Tone Pairs and Tone Blends, so you
can take a look at how these are constructed - as well as modify them to your heart’s content, and save
your own creations as presets within the User folder.
For a thorough understanding of all this business of creating Dual Tones, please check out the “Dual
Tone Concept”
section of your POD X3 Pilot’s Handbook.
Your FBV MkII allows you to navigate through the 128 memory locations within the User folder. As
mentioned above, some User presets might be composed with only a Tone 1, while others both a Tone
1 and Tone 2. This makes no difference as far as your FBV Channel (A, B, C, D) or Bank buttons are
concerned, since the FBV unit will simply call up a channel location regardless if it holds a preset with
one or two Tones active. However, it is important to take a look at what the other buttons on the FBV
Shortboard MkII control when a Dual Tone preset is loaded.
FBV Shortboard MkII units include effect buttons (STOMP, MOD, DELAY, etc.) which allow you to
modify the selected Tone of the currently loaded preset - stepping on one of these effect buttons will
toggle on/off ONLY the function for the currently selected Tone. You can optionally configure your
FBV MkII Shortboard FUNCTION 1 switch to perform the same functions as the TONE 2 button
on the POD X3 unit. This allows you to toggle between Tone 1/Tone 2 as the “selected” Tone, as
well as allows you to hold down the button to toggle the Dual Tone feature on/off. To configure the
FUNCTION 1 button’s assignment, go to the SYSTEM screen on your POD X3 and access the LP SW
options for Tone 1 and Tone 2 (see the LP SW descriptions starting on page 2•6 ).
TIP: When calling up one of the factory-created “Tone Pair” type of Dual Tone User presets, you’ll see
we added an “L” and an “R” at the ends of many titles for Tone 1 and Tone 2 respectively. (Call up preset
12A as an example.) Adding a unique identifying character to each Tone’s title like this is handy when
using an FBV Shortboard since this provides you with an easy reference on your FBV LCD screen for
which of the two Tones is the one currently being controlled.
That about covers it! Armed with the above knowledge, you should now have vast control over the
power embedded in your POD X3 or POD X3 Pro, all without your hands leaving your guitar. For more
helpful information, please visit the Line 6 Online Support web page.
2•9

