Gorenje tgr65sb6: fbV™ Mkii wiTh 3rd ParTy sofTware
fbV™ Mkii wiTh 3rd ParTy sofTware: Gorenje tgr65sb6

FBV MkII Advanced User Guide: Controlling 3rd Party Software
fbV™ Mkii wiTh 3rd ParTy sofTware
Once you have things connected and powered up (if you haven’t, then head on back to “Getting
Started” on page 1•1), you should now be ready to put your Line 6 FBV Shortboard™ MkII or FBV
Express™ MkII device to work to remotely control your favorite software applications! Here we’ve
included some helpful tips and examples for how to configure MIDI and DAW software applications to
respond to your FBV MkII device.
About USB MIDI Ports & Channels
®
®
When connected to the USB port of your Mac
or Windows
computer, your FBV MkII device
establishes one USB “MIDI In” port and four USB “MIDI Out” ports on your computer. These are not
“physical” ports that require you to use a mess of MIDI cables - your FBV communicates all its MIDI
data across your USB cable to these “virtual” software MIDI ports.
The FBV MIDI In port is utilized by your FBV MkII device to receive MIDI information, and its primary
function is to allow your FBV to communicate with Line 6 Monkey and FBV Control applications.
You likely will not be using this MIDI In port with other software, since your desired use of your FBV is
to transmit MIDI commands, which it does via its MIDI Out ports. You’ll be able to access these FBV
MIDI Ports within the Options or Preferences settings of any software on your computer that supports
MIDI communication.
®
Windows
MIDI Port Communication
®
It is important to note that the Windows
USB Class Compliant driver, which is used for your FBV
®
®
MkII device on Windows
7, Vista
and XP, inherently will not allow more than one application utilize
one USB MIDI port at a time. The Line 6 FBV Control application, when open, uses the FBV MIDI
In port and the MIDI Out port 4 for communication with your FBV device. Therefore, if you have
®
another MIDI/DAW software application also currently running on your Windows
computer that is
configured to also use these same FBV MIDI ports, only one application will be permitted to do so.
If you already have your MIDI/DAW software running, and it has the FBV MIDI In port enabled,
trying to then launch the Line 6 FBV Control application will typically result in the FBV Control
application failing to detect the connected FBV device, since it is “in use” already by the other software.
One possible solution is to disable the use of the FBV MIDI In port and FBV MIDI Out 4 port within
your MIDI/DAW software to permit you to still use it while also using the FBV Control application.
(You should be OK keeping the MIDI/DAW software enabled for receiving from the FBV MIDI Out
ports 1 through 3, which allows you to still send MIDI Control commands from FBV to your software.)
Otherwise, you should exit all other MIDI/DAW applications when using the FBV Control software
to provide full MIDI port access to the FBV Control software for editing your FBV control settings.
Note: The Line 6 Monkey application also utilizes the FBV MIDI ports for its ability to detect and update
your connected FBV device. It is always recommended that you exit the Line 6 FBV Control, as well as
any MIDI/DAW software, before launching Line 6 Monkey.
Setting your Software to Receive Communication from your FBV MkII
Most MIDI and DAW applications have options within their “Preferences” or “MIDI Options” dialogs
where you’ll need to select your FBV MkII device and/or the FBV USB MIDI port to allow the
application to receive your FBV device’s commands. These options may be presented differently in
your MIDI/DAW software.
6•1
FBV MkII Advanced User Guide: Controlling 3rd Party Software
Control Surface Options
Some applications specifically offer a selector to choose one or more connected “Control Surface” or
“MIDI Controller” devices, and you should first look to see if your software offers this type of option.
You should see 4 selectable options for your connected FBV MkII device - one for each MIDI Out Port.
Note the slight differences for how your FBV MkII MIDI Out ports appear within computer operating
systems (for FBV Express MkII, you’ll see “Express” in place of “Shortboard” in these titles):
Mac OS® X Windows® 7 & Vista® Windows® XP
MIDI Out Port 1
FBV Shortboard Mk II (Port 1) FBV Shortboard Mk II USB Audio Device
MIDI Out Port 2
FBV Shortboard Mk II (Port 2) MIDIIN2 FBV Shortboard Mk II USB Audio Device [2]
MIDI Out Port 3
FBV Shortboard Mk II (Port 3) MIDIIN3 FBV Shortboard Mk II USB Audio Device [3]
MIDI Out Port 4
FBV Shortboard Mk II (Port 4) MIDIIN4 FBV Shortboard Mk II USB Audio Device [4]
MIDI In Port 1
FBV Shortboard Mk II (Port 1) FBV Shortboard Mk II USB Audio Device
TIP: Also see “Ableton Live® - FBV MkII Setup Tutorial” on page 6•4 for examples of how FBV MkII
appears as a selectable MIDI Controller in the Live Preferences dialog.
You’ll want to select the FBV MIDI Out Port to which your FBV Controls are transmitting. By default,
all FBV MkII Control assignments are configured to transmit to the FBV MIDI Out Port 1, but you can
change this MIDI Out Port setting per Control within the Line 6 FBV Control application’s Control
Properties List (see page 3•3).
Note: You do not need to select the FBV MIDI In Port within any of your MIDI/DAW software, since you
will not want to feed MIDI from your software to the FBV device. (The Line 6 FBV Control and Monkey
applications utilize the FBV MIDI In for communication, but no settings are necessary for this.)
In many cases, this is all the configuration needed, and the MIDI/DAW software will then receive your
FBV MIDI commands. Some applications, however, offer additional options to choose the brand or
type of MIDI controller device to communicate properly with it. For applications that offer this, you’ll
want to look for the option to choose a “generic” controller device. Further, some applications also
allow you to rename your MIDI Device port names, giving them more “friendly” titles. See your MIDI
software’s Help documentation for specific instructions. You can also check the following sections to
see examples of a few popular MIDI application examples.
MIDI Input Options in your Software
In some MIDI and DAW applications’ Preferences or MIDI Options, you may see only a set of “MIDI
Input” settings (rather than a specific “Control Surface” or “MIDI Control” option, as described above).
If your MIDI/DAW software’s documentation instructs you to use this for selecting MIDI controller
devices, then you’ll want to select the FBV MIDI Port to which your Controls are transmitting. By
default, all your FBV MkII Control assignments are transmitted to the FBV MIDI Out Port 1, but
you can change this MIDI Out Port setting per Control within the Line 6 FBV Control application’s
Control Properties List (see page 3•3).
6•2

FBV MkII Advanced User Guide: Controlling 3rd Party Software
MIDI Channels
Each USB MIDI Port carries 16 MIDI channels. By default, your FBV MkII device is configured to
transmit its MIDI data to Channel 1 on the selected MIDI Port for each Control. However, you can set
any individual FBV Control to transmit its MIDI control data to any MIDI Channel (see the “Control
Properties List” section on page 3•3).
You may find that your software offers options to choose one specific MIDI channel from the selected
MIDI port, so you will want to be sure to configure any such MIDI channel options to match those that
your FBV Controls are transmitting to. This allows you to set your FBV MkII controller to transmit
all its MIDI commands out one common MIDI port, yet with some of its individual controls fed to
different channels, thus allowing your MIDI/DAW software to “filter” and receive only the desired
commands. Consult your software’s documentation for info on its MIDI channel options.
MIDI Learn Functionality
Many MIDI and DAW software applications make using an external MIDI controller very easy by way
of a “MIDI Learn” functionality built into their software. With a MIDI Learn feature, you typically
click on the desired knob/slider/switch in the GUI of the software to place it in a “Learn” mode. Then
you simply access the control on your FBV MkII device and the software instantly maps the accessed
FBV switch/pedal to control the selected parameter. For example, Propellerhead Reason and Ableton
Live applications provide exactly this type of functionality for most of their parameters - including
their transport buttons, mixer faders, track options, and even their synth & effects parameters!
For applications that offer this “MIDI Learn” capability, you’ll want to be sure that your FBV MkII
footswitch and pedal controls have MIDI commands assigned so that the target software has something
to “learn”. The nice thing about a MIDI Learn feature is that, typically, you need to only configure
your controller to transmit MIDI CC commands of any Value - the software simply listens and learns
whatever it receives when in “learn” mode. Some applications’ parameters might also require a specific
“Switch Type” setting though (Single, Toggle or Momentary). As always, it is a good idea to read
through your MIDI/DAW software’s documentation on its MIDI Learn options for details (or, some
applications have such a feature with a different name). Please see the tutorials for several popular
DAW applications later in this chapter for some helpful examples!
For use with your MIDI Learn software, you can set each FBV MkII control to send a different MIDI
CC command and the software will utilize this communication with FBV. To configure these settings,
use the Line 6 FBV Control application’s “Control Properties List” section options (see page 3•3 ), or try
loading the “FBV-Default.fbv” preset we’ve provided as a starting point, and customize it as needed.
Manual MIDI Control Assignment
For applications that do not offer a “MIDI Learn” feature, then the process is more of a manual one,
where you’ll need to acquire MIDI reference documentation from the software manufacturer that
lists specifically what MIDI Commands and Values are already assigned for the parameters within the
software. Typically, applications utilize MIDI CC commands for their parameters, Bank & Program
Change commands for switching patches, and sometimes MMC or Mackie commands for transport
buttons. With the manufacturer’s MIDI reference documentation in hand, you can then use the Line
6 FBV Control application to assign your desired FBV Footswitch/Pedal controls to trigger the desired
software parameters.
You’ll want to consult the documentation that comes with your MIDI/DAW software for details on
how to access its MIDI Control setup and the necessary MIDI command assignments, since most
applications differ in how they offer these options.
6•3
FBV MkII Advanced User Guide: Controlling 3rd Party Software
®
Ableton Live
- FBV MkII Setup Tutorial
We’ve provided a step-by-step tutorial here for how to configure the popular Ableton Live software’s
functions to be controlled by an FBV Shortboard or Express MkII device. For this example, we’re using
Ableton Live version 8, but the steps are similar for most recent Ableton Live versions (including the
Live Lite Line 6 version you might have received with your other Line 6 gear!) Ableton also offers a
free downloadable demo of Live at www.ableton.com/downloads should you want to try it out. This
tutorial should help you grasp the basics for how to set up other MIDI/DAW software for your FBV
MkII Controller, however, most such applications vary to some degree in their MIDI options and
features, so be sure to check your software’s documentation for more specifics!
Note: For the following steps, we’re running a Mac®, but the steps are the same if you are using Windows®
7, Vista® or XP, unless otherwise noted.
FBV Control Assignment Configuration
The first step, before even launching Ableton Live, is that we’ll need to configure a set of MIDI
assignments for the footswitches and pedals of our FBV device. Ableton Live, like many other DAW
applications, utilizes MIDI CC commands to access most of its parameters. Therefore, we’re going to
assign MIDI CC commands to our FBV footswitch and pedal controls using the Line 6 FBV Control
application, and save these settings as an FBV preset:
• Connect your FBV MkII device to your computer and launch Line 6 FBV Control.
• Go to File > Open and load the “Blank.fbv” preset.
• Go to File > Save As and let’s title this new preset “Live.fbv”.
Ableton Live incorporates a “MIDI Learn” type of functionality for setting up MIDI Control devices
(see “MIDI Learn Functionality” on page 6•3 for more about this). So, this means it really does not matter
specifically what MIDI CC numerical Value we assign to each Control, as long as each Control is
sending a unique CC Value.
For this example, we’ll configure several FBV Controls as follows (you can do the same on either an
FBV Shortboard or Express MkII device):
• Assign the A, B, C & D footswitch Controls to use MIDI CC’s 001 thru 004, respectively.
• Set the Switch Mode for the A, B, C & D Controls to “Single”, since we want each press of a
footswitch to send the same single MIDI CC command each time.
• Assign the Pedal Wah and Pedal Vol Controls to use MIDI CC’s 5 and 6, respectively.
• Set the Port and Channel for all of the above Controls to “1”, since we want to transmit all our
MIDI commands to the FBV USB MIDI Out Port 1, Channel 1.
• For all other FBV Controls, we’ll keep them to “Unassigned” since we won’t be using them right
now.
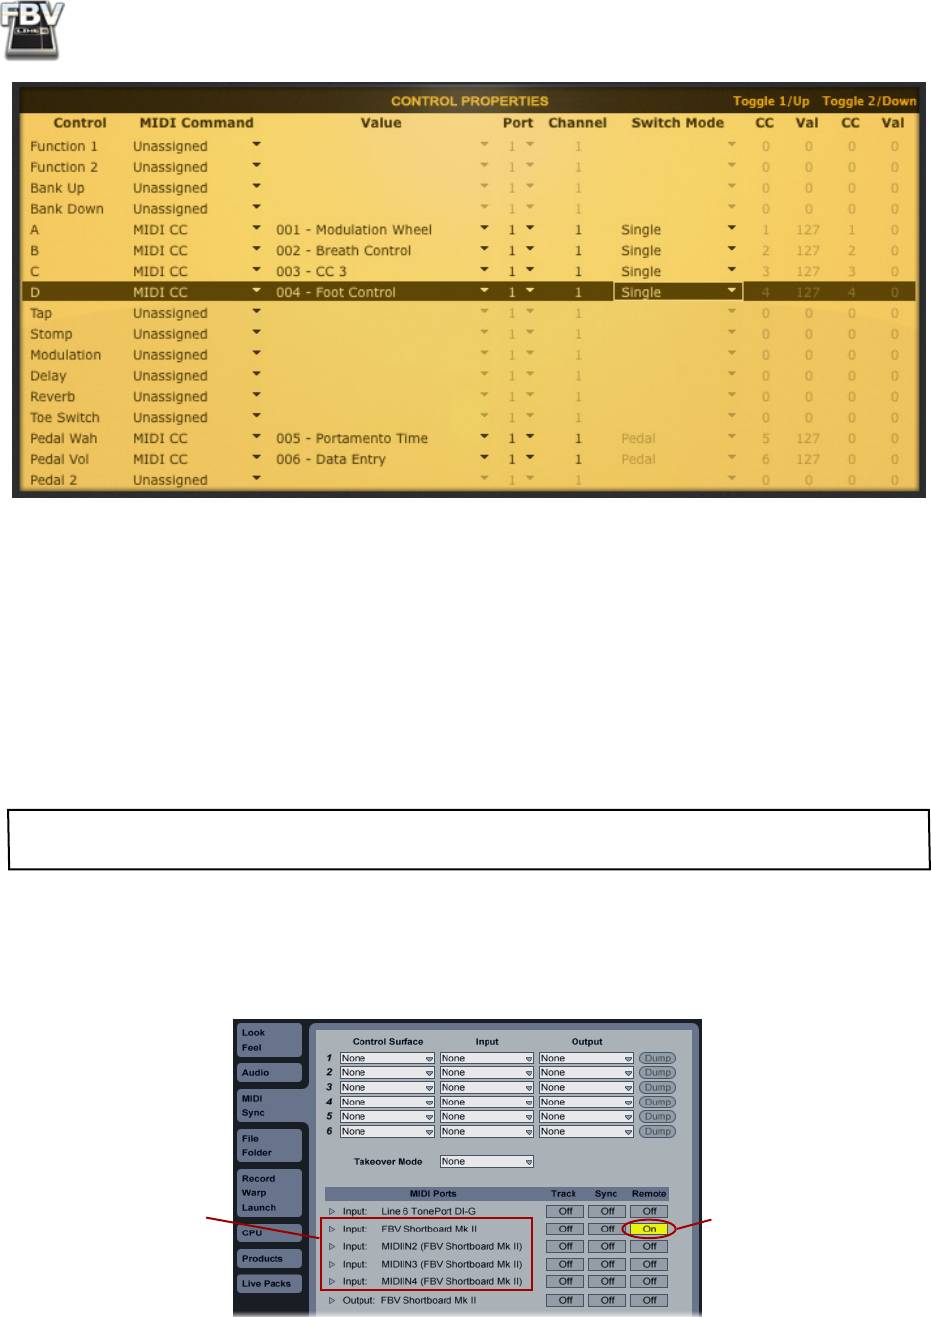
The result should appear in the Control Properties list like this:
6•4
FBV MkII Advanced User Guide: Controlling 3rd Party Software
Once you have all these settings created, go to File > Save to save the preset, and exit the FBV Control
application.
Ableton Live MIDI Input Device Configuration
Next, we need to configure Ableton Live to receive MIDI commands from the FBV Controller device:
®
Launch the Ableton Live software, and go to Ableton Live > Preferences > MIDI/Sync page (Mac
)
®
or Options > Preferences > MIDI/Sync page (Windows
). Here you will see that Live automatically
detects all four of the FBV MIDI Out Ports. You might see additional devices’ MIDI Ports appear here
as well, depending what other MIDI hardware/software you have installed on your computer.
®
®
Note that the names of these Ports will appear differently if you are running Mac OS
X, Windows
XP,
®
Vista
or 7, as shown below.
• Click on the Remote button to the right of the first FBV MIDI Out Port so it is “On”, and then
deselect any other active “On” buttons in the Track, Sync and Remote columns so that all others
are “Off”, as shown in the following screen shots. This allows Ableton to receive MIDI Control
commands from your FBV MIDI Out Port 1.
Turn first FBV Port ON,
You’ll see all 4 FBV
and all other Track,
MIDI Out Ports listed
Sync & Remote buttons
here as available
OFF
“Inputs” into Live
Mac OS® X
6•5
FBV MkII Advanced User Guide: Controlling 3rd Party Software
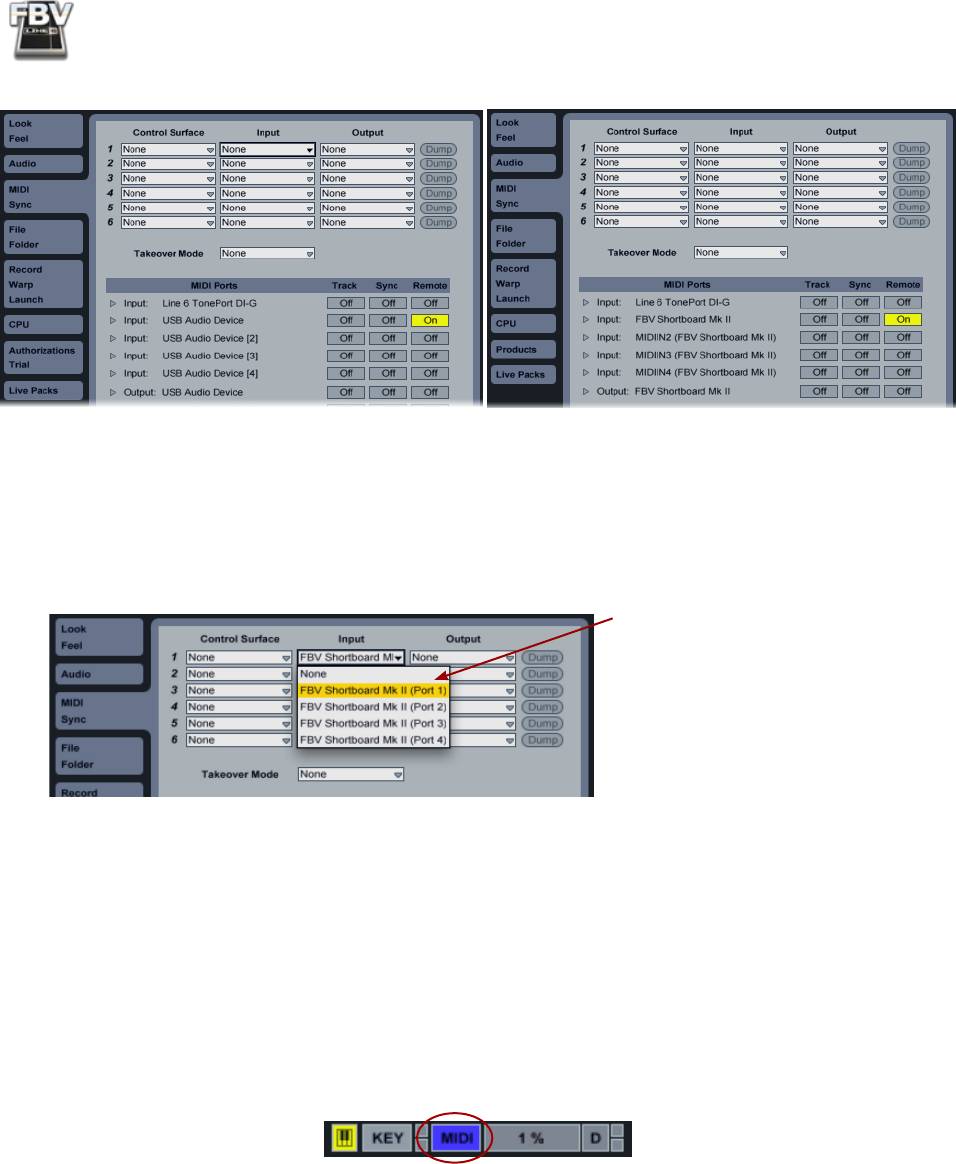
The same applies in Windows® XP, Vista® & 7, but you’ll see the FBV Port names are listed differently
Windows® XP Windows Vista® & Windows® 7
• Now go to the Input menu in the top row of the dialog and select the same FBV Port 1 device.
This allows Live to utilize your FBV as a MIDI Controller Input device. Once again, you’ll see
®
®
these FBV port names listed differently, as shown above for Mac
versus Windows
, so just
choose the first FBV USB MIDI port in the menu list:
Select the first FBV Port in this
top Input menu. Leave all other
control Surface, Input and
Output menus set to “None”
so that Live is only receiving
MIDI Control data from your
FBV
• Close the Preferences dialog - this completes MIDI input device configuration steps.
Map FBV Controls
Next we need to “map” the FBV Controls to a few of the Live functions. Live refers to this process as
“manual mapping”, and we need to enter the Live “MIDI Map Mode” (some other applications refer
to this type of process as “MIDI Learn”).
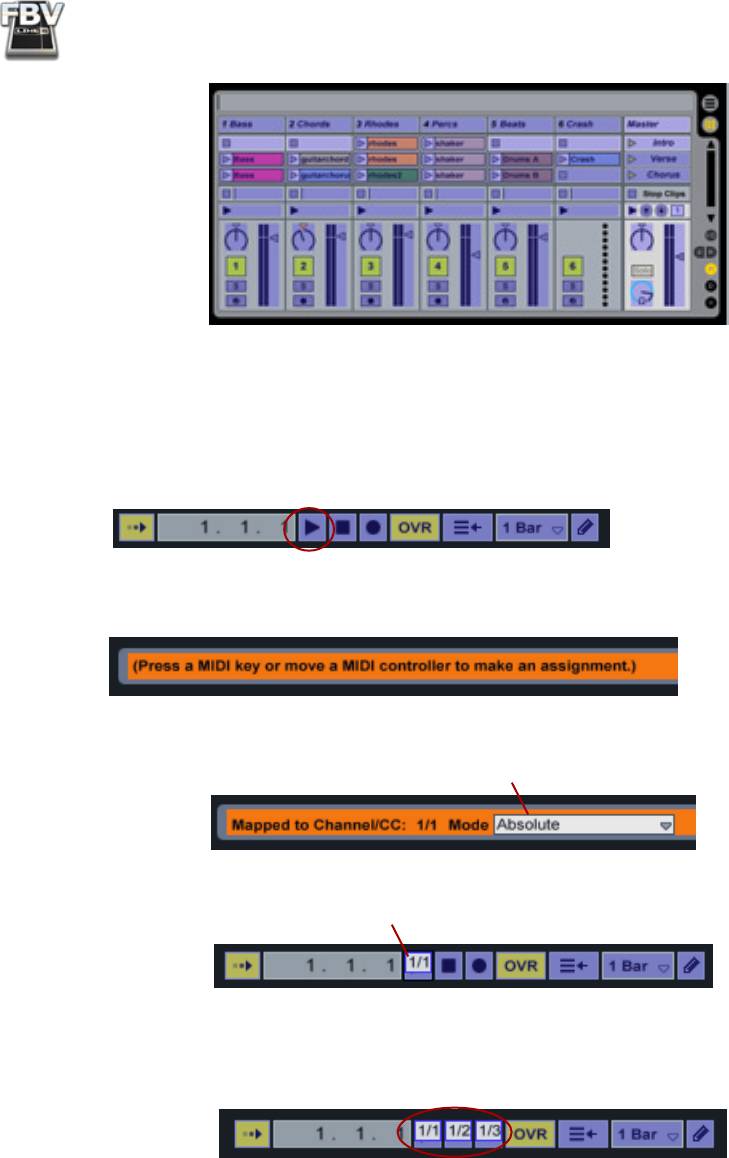
• To enter MIDI Map Mode, click on the MIDI button at the top right of the Live screen:
• You will then see many of the Live controls become highlighted - as our screen shot shows
highlighted in blue here (your Live settings or version might use a different highlight color).
These highlighted controls indicate that they are “map-able” (able to be controlled remotely).
6•6
FBV MkII Advanced User Guide: Controlling 3rd Party Software
• To map one of the Live highlighted controls, simply click on it - Live then waits to receive a
MIDI command. For this step, we’re going to map the Live Transport Play, Stop and Record
buttons to the FBV A, B & C footswitches, respectively.
At the top of the Live software screen, click on the Live Transport Play button
You’ll see text at the bottom of Live’s screen indicating it is
waiting to receive a MIDI Controller message
Stomp on your FBV “A” footswitch. Then you’ll see the text indicate the message was
received, and the Play button is now mapped. Keep “Absolute” as the Mode
You’ll also see that the Play button now has a “1/1” overlaid on top. This indicates it is mapped to
MIDI Channel 1, MIDI CC #1, which is of course what we configured the FBV “A” switch to send
While still in MIDI Map Mode, repeat these steps again for the Transport Stop and Record buttons,
mapping the FBV “B” and “C” buttons to them. Once done, you should see the Transport buttons
show the proper mapped indicators, like this:
6•7

FBV MkII Advanced User Guide: Controlling 3rd Party Software
If you have the Live MIDI Mappings panel open, you’ll also see these mappings you just created
there. Note that if you want to delete any of them, select the mapping in this list and hit the Delete
button on your computer keyboard.
• Press the MIDI Map Mode button again at the top right of the Live screen to exit Map Mode.
Now press your FBV’s A, B and C buttons to try them out. You should see Live’s Transport react
accordingly! Repeat the above steps again if you like, and map the FBV “D” button to any other
of Live’s “switch” type controls.
Note: The Ableton Live Transport design incorporates separate Play and Stop buttons, which each
respond to a MIDI CC “Single” Switch Mode. Some application’s Transports incorporate a single, dual-
function Play/Stop button. To alternately trigger the two functions for this type of switch, you can set
the FBV Control MIDI CC Switch Mode to “Toggle” in the FBV Control application. Alternatively,
some applications respond to MMC or Mackie type commands rather than MIDI CC commands for their
Transport functions - Please check your software’s documentation for details.
It is worth noting here that there is nothing preventing you from mapping any one FBV Control to
more than one parameter in your targeted MIDI/DAW software, and the result will typically be that
FBV will control all mapped parameters simultaneously - which may or may not be the behavior you
are after! One such useful implementation is to map one FBV footswitch to both the Live Transport
Play and Record buttons, which then provides you a handy “one-touch” record switch since it toggles
them both on simultaneously.
Mapping the FBV Pedal Controls to Live’s Parameters
Next, we’ll map the FBV’s Pedal Controls. The FBV “Pedal Wah” and “Pedal Volume” Controls each
send a stream of MIDI CC values, so you can map to any available Live parameter that has a range,
such as an effect knob or slider, to control it in real-time. We’ll first map the FBV Pedal Wah Control
to Live’s Chorus effect - Dry/Wet parameter. This will allow us to change the Dry/Wet mix of Live’s
Chorus effect in real-time. Note that this also makes it possible to “write” parameter automation in
real-time using the FBV Pedal (more on that later).
• On your FBV device, make sure the onboard Pedal is set to “Wah” (the Wah LED indicator is
on). If it isn’t, press the Pedal all the way forward and click the toe switch.
• In Ableton Live, first record or load an audio file in an audio track so that you have something
to play and hear your effect in action.
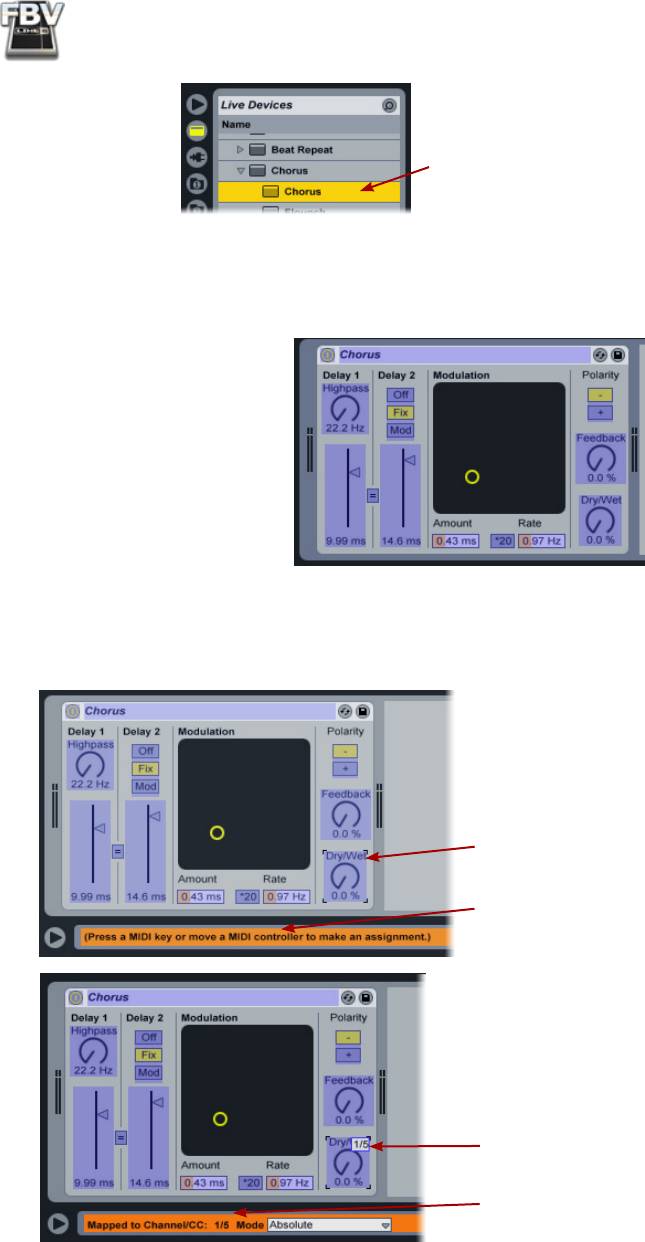
• Load the Chorus as an insert effect on this audio track - You can do this by selecting
Effects>Chorus>Chorus in the Live Devices panel and then drag this Chorus effect on top of
your audio track to insert it.
6•8
FBV MkII Advanced User Guide: Controlling 3rd Party Software
Drag the Chorus effect to your
Audio track to insert it.
• You’ll then see the Chorus effect module appear in Live’s lower effects panel. Now place Live
into MIDI Map Mode (see the instructions above, at the start of this section). Once in Map
Mode, you will see the Chorus effect’s “map-able” parameters highlighted.
• We’re going to map to the Chorus Dry/Wet knob. Just click on the knob and Live will then wait
to receive a MIDI Control command. Move your FBV Pedal until you see the text at the bottom
of Live’s screen indicate that the Dry/Wet parameter was successfully mapped:
Click on the Dry/Wet knob.
The text at the bottom field of Live indicates
it is waiting for you to press a Control on your
FBV device to map it.
The newly mapped MIDI Channel/CC is now
displayed.
The text shows mapping details.
• Since we configured the FBV Pedal Wah control to send MIDI CC 5, you should see that Live’s
Chorus Mix knob is mapped to Channel 1, CC 5.
6•9
FBV MkII Advanced User Guide: Controlling 3rd Party Software
Exit Live’s MIDI Map Mode and give it a try - You should see the Chorus Dry/Wet knob respond to
your FBV Pedal movement! Now it’s your turn. Switch your FBV pedal so the “VOL” LED indicates it
is set for the Pedal Volume Control and go ahead and map it to a different effect parameter following
the same steps we just did here. You’ll see that you can switch between using the two mappings you just
made for the Pedal Wah versus Pedal Volume Controls by toggling the pedal’s toe switch.
FBV Shortboard MkII Users: If you have an optional Expression Pedal connected, you can follow the
above steps to additionally map it to another parameter as well!
®
Mapping to an AU or VST
Effect Parameter
As with most other DAW software, with Ableton Live you are not just limited to mapping your FBV
footswitch and pedal controls to Live’s parameters. Once a 3rd party AU or VST Plug-In is loaded in
the software, it is also possible to map to the Plug-In’s parameters. In this example we’ll show you how
to map the FBV Pedal Wah Control to the Line 6 POD Farm Plug-In’s Wah Position parameter. This
allows you work the FBV pedal and control the POD Farm Wah effect in real-time! These steps would
be similar for the Line 6 POD GearBox Plug-In, or most any 3rd party AU or VST Plug-In effect you
might have available.
• Switch your FBV on-board pedal so that the “WAH” LED is lit, indicating you are using the
Pedal Wah Control.
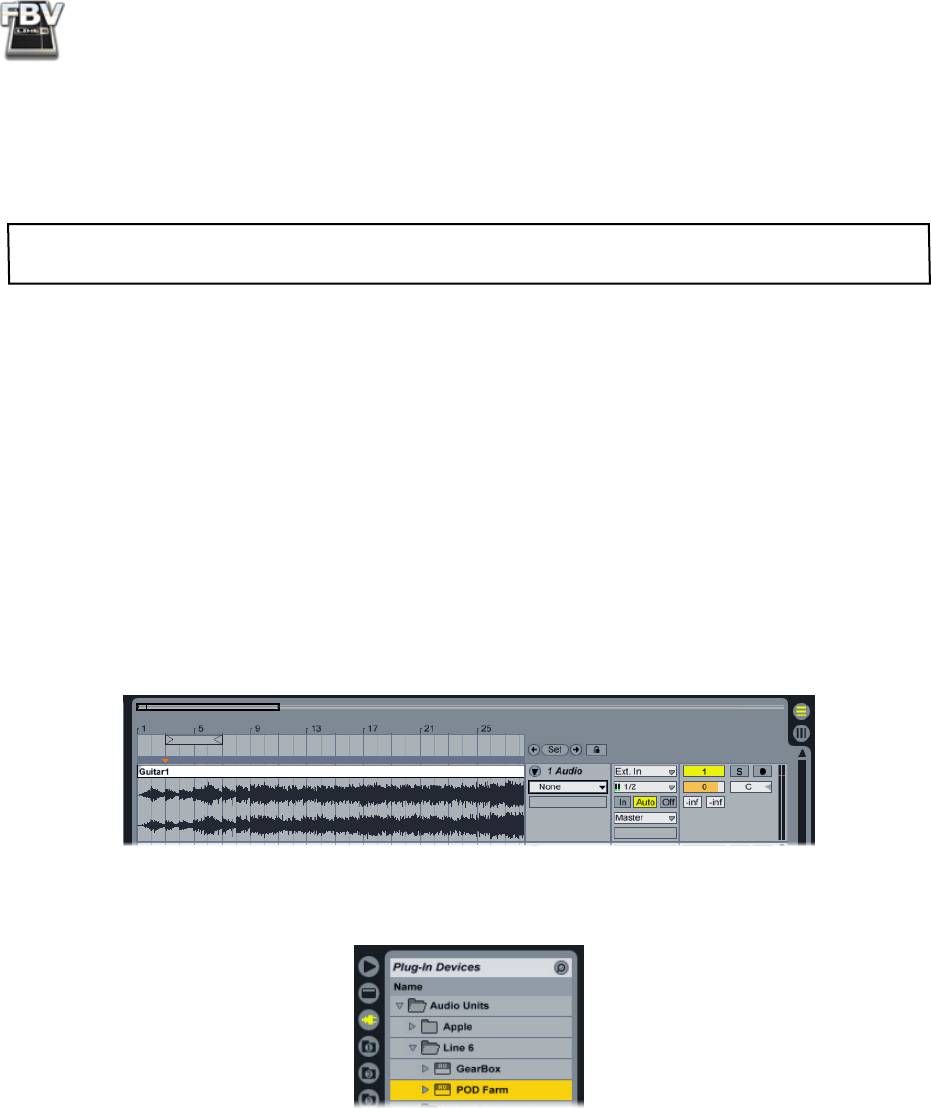
• In Ableton Live, record or load an audio file in an audio track. A recorded clean rhythm guitar
would work nicely here. We’re working in Live’s “Arrangement View” here.
• In Live’s Plug-In Devices Browser panel, select your Plug-In and drag it on top of your audio
track.
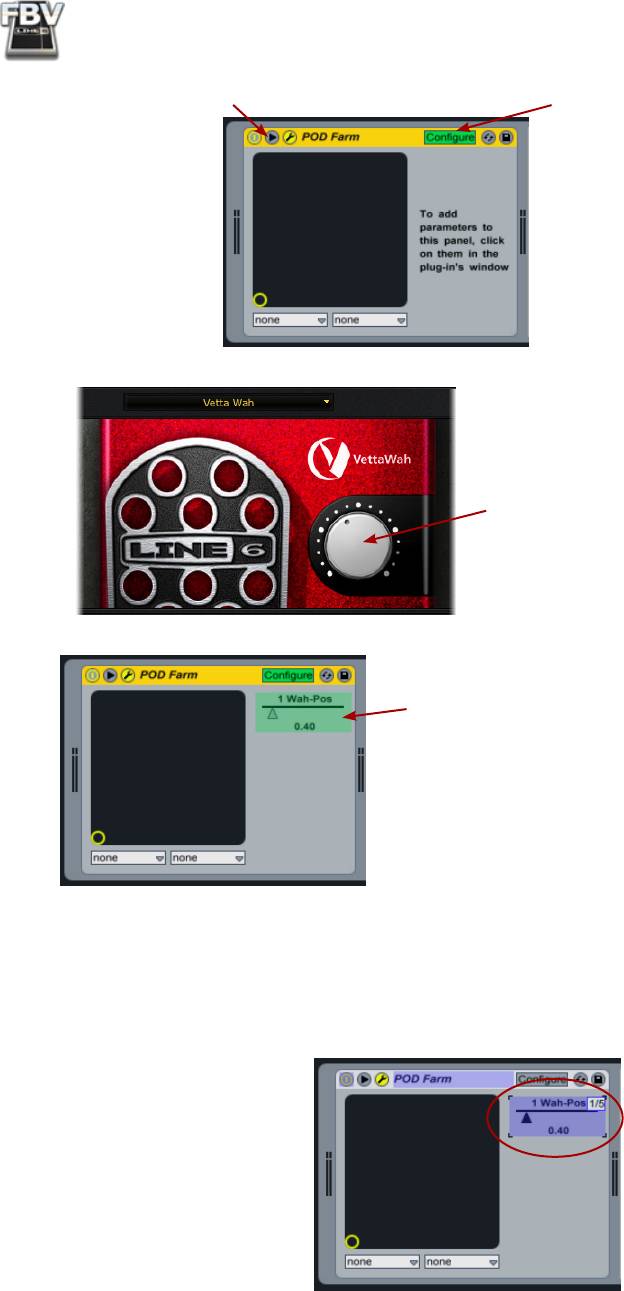
• You’ll see the effect module load into Live’s lower panel. If you click on the little arrow at the
top of this effect module, you’ll see it expands to expose a Configure option. This allows you to
add parameters from the Plug-In’s edit window so that it is accessible within the effect module
display.
6•10
FBV MkII Advanced User Guide: Controlling 3rd Party Software
Click the arrow here to expand the
Click the Configure button to add a
effect module...
POD Farm Plug-In parameter to this
module
Now, in the POD Farm Plug-In window,
click directly on the Wah edit panel’s
Position knob to select this parameter.
Once you’ve selected the Plug-In parameter, you’ll
see a slider appear in the Line effects module for
that parameter.
• Now just follow the same steps as in the previous examples to enter Live’s MIDI Map Mode,
click on the parameter in the effect module, and then move your FBV Pedal to map it. For our
example, we now have successfully mapped Channel 1, MIDI CC 5 from our FBV Pedal to the
Wah Position parameter. Exit MIDI Map Mode.
Go ahead and hit Play in Live and work the FBV pedal and you’ll hear the mapped effect parameter
do its thing. You might also see the control for the selected parameter within the effect’s own window
move in response as well. In our case, the POD Farm Plug-In Wah Position knob moves in response.
But wait - it gets better! Read on for more fun with mapped parameters!
6•11
FBV MkII Advanced User Guide: Controlling 3rd Party Software
Control Automation Recording with your FBV Pedal
Once you have a parameter mapped to your FBV pedal, in many cases the DAW software will also
allow you to “record” your pedal moves in real-time as an automation envelope on your track. The
perfect example for this is for us to use the POD Farm Plug-In Wah mapping we just created in Ableton
Live, and record our FBV Wah pedal moves to add some snarky wah action on our guitar track. Other
DAW applications differ in the exact way they offer track and effects automation, so be sure to check
your DAW software’s documentation. But this example should give you the basic idea. With the FBV
Pedal successfully mapped to the POD Farm Plug-In Wah (or the Plug-In parameter of your choice)
try the following steps:
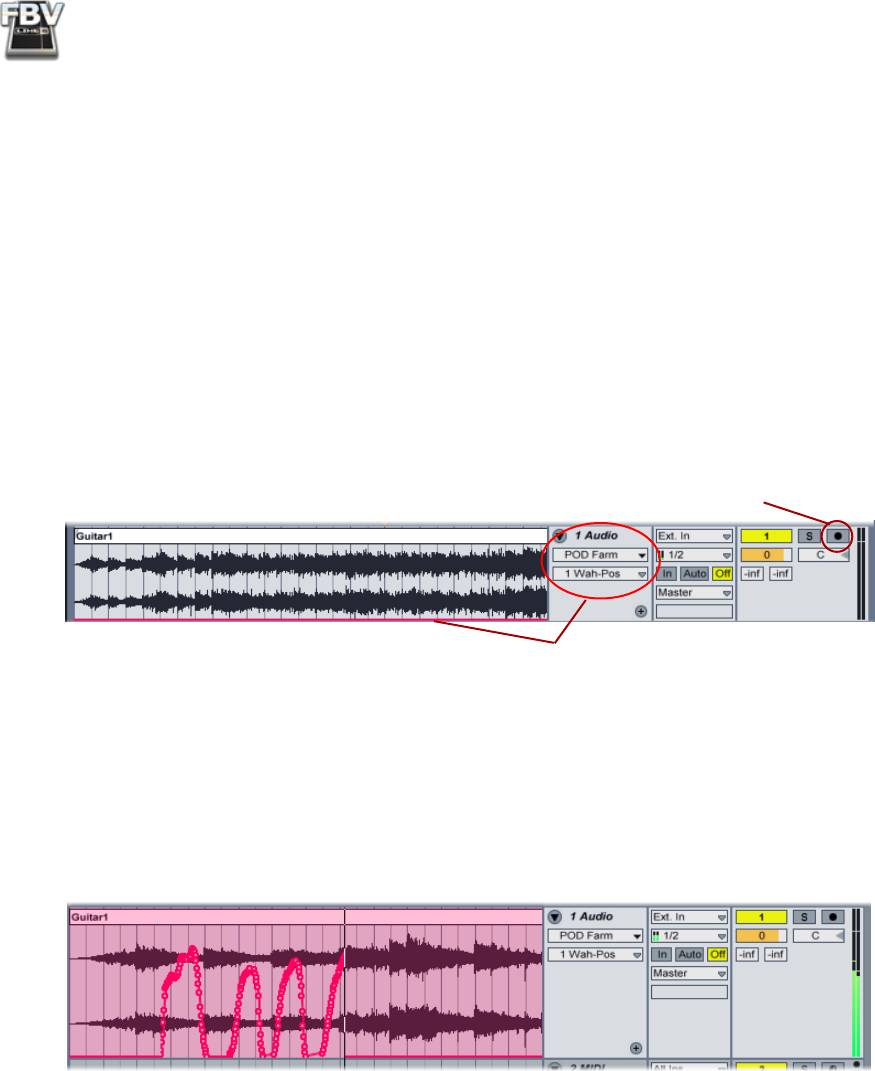
• In Live’s Arrangement View, you’ll want to make sure your audio track is not armed for recording
(since we only want to record automation on this track, not audio). You should also see the POD
Farm - Wah parameter shown here on the track. Note that right now when you move your FBV
Pedal, an existing, flat envelope line across the track moves up and down in response.
Keep this track Record Arm button “off” for these steps
Once we mapped the POD Farm Wah-Position parameter in the previous steps, our Live
audio track shows this parameter in its automation selector, and shows an (unedited)
envelope across the track. If you move your FBV pedal, you’ll see this envelope line respond
• Rewind to the start of the track, click Live’s main Transport Record and then Play button.
Once Live starts rolling, just start working the FBV pedal as desired to “record” the Wah pedal
automation to your track. You’ll see envelope “edit points” added, capturing your pedal moves
as you go.
• Stop Live and then play the track back and you’ll hear that your Wah pedal performance was
captured in real-time. Not happy with that take? Just undo, or zoom in and use your mouse to
manually adjust the edit points to fine-tune the wah performance.
6•12
FBV MkII Advanced User Guide: Controlling 3rd Party Software
®
Apple GarageBand
- FBV MkII Setup Tutorial
Apple GarageBand uses its own proprietary protocol for controlling most of its software parameters,
therefore, the FBV MkII MIDI controllers unfortunately cannot access all GarageBand functions
directly. However, there are a few Pedal assignments that will allow you to control the current
GarageBand track’s Volume and Pan parameters. Additionally, there are some 3rd party software
®
utilities you can install on your Mac
that will allow you to utilize FBV’ footswitch buttons to control
GarageBand’s transport functions.
To configure FBV’s Pedals, launch the Line 6 FBV Control application and load the “FBV-Default.
fbv” preset.
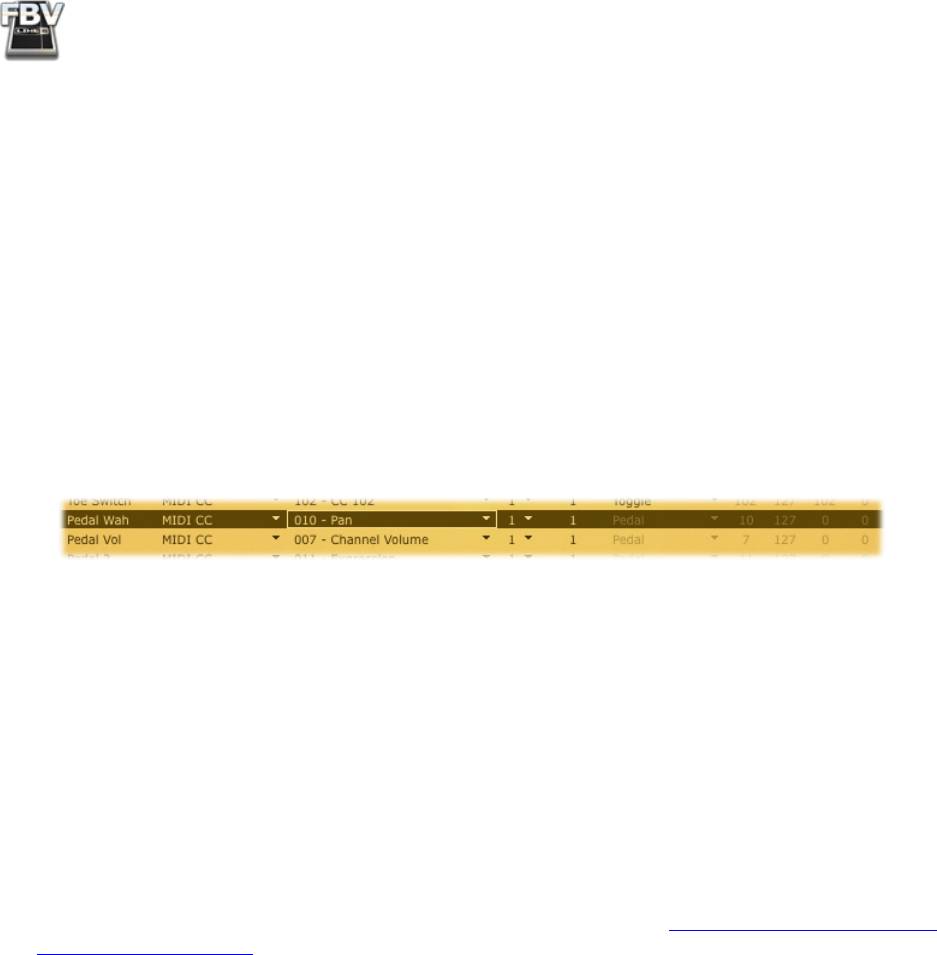
• Set the Pedal Wah controller’s Value to CC 010.
• Keep the Pedal Vol controller settings as is (MIDI CC 007).
• Note that the pedals are also set to transmit to the FBV USB MIDI Out port 1. Your settings
should appear like this:
Now simply open GarageBand and load one of your Songs. When you move your FBV Pedal you
should see that the Pedal, when set to “Volume” adjusts the selected track’s Volume level, and when
the Pedal is set to Wah, it will control the track’s Pan setting. If you have a Shortboard and an optional
Expression pedal connected, you can alternatively set Pedal 2 to MIDI CC Value 010 and then dedicate
your Pedal Volume to control the track volume, and Pedal 2 to control the track Pan.
In order to control the Transport functions in GarageBand with the FBV you will need to have version
2.0.1 of Garageband or later. You’ll also need to use the Line 6 FBV Control application to set whatever
FBV footswitches you want to control the GarageBand transport to send MIDI CC values, and likely
their Switch Type settings to “Momentary”. As noted above, the Garageband software does not offer
control of transport or most other functions natively, so you will need to download add-on software
that permits MIDI messages to control the parameters within GarageBand.
GarageRemote is one such 3rd party software and is available here: http://www.muratnkonar.com/
otherstuff/garageremote/
Once GarageRemote is installed and set up, start GarageRemote’s ‘Listener’ (it is off by default) so that
it can relay MIDI notifications to GarageBand. GarageBand responds to MIDI CC’s 007 and 010 for
current track volume and pan. You can use the Line 6 FBV Control application to create these MIDI
CC settings, and save this as an FBV Preset so you can load the settings to your FBV at any time.
6•13
FBV MkII Advanced User Guide: Controlling 3rd Party Software
®
Apple Logic
- FBV MkII Setup Tutorial
Line 6 FBV MkII devices’ Footswitch and Pedal controllers can be configured to trigger Logic
Transport functions, mixer faders, software instrument & plug-in parameters and more! To follow are
the instructions for configuring an FBV MkII to function with Logic Pro 8 (the steps should be similar
for other recent versions of Logic as well).
Line 6 FBV Control Application Settings
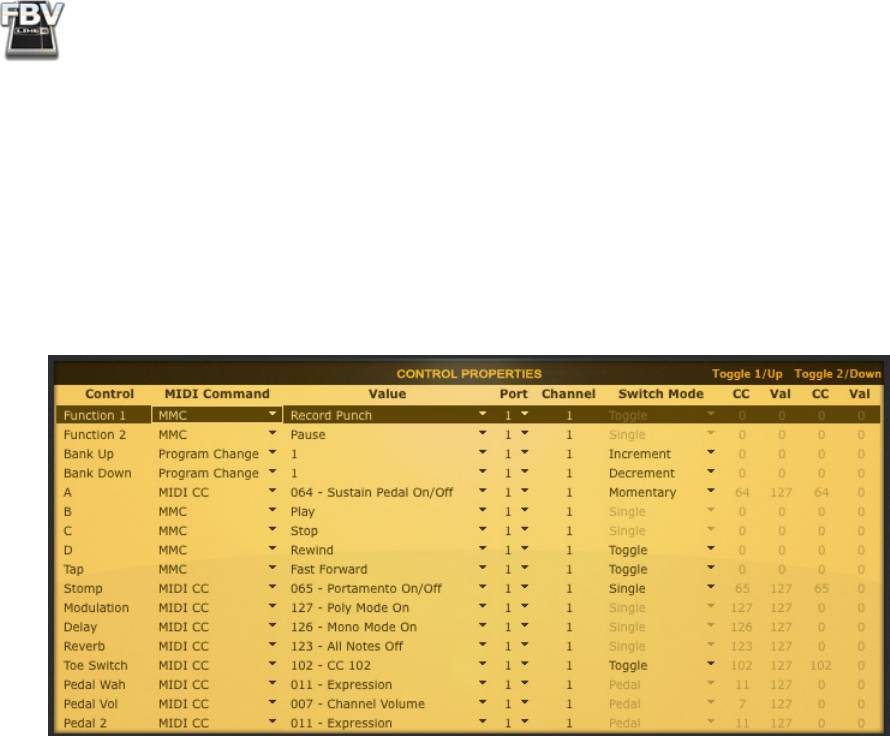
First, launch the Line 6 FBV Control Application and load the FBV-Default.fbv preset.
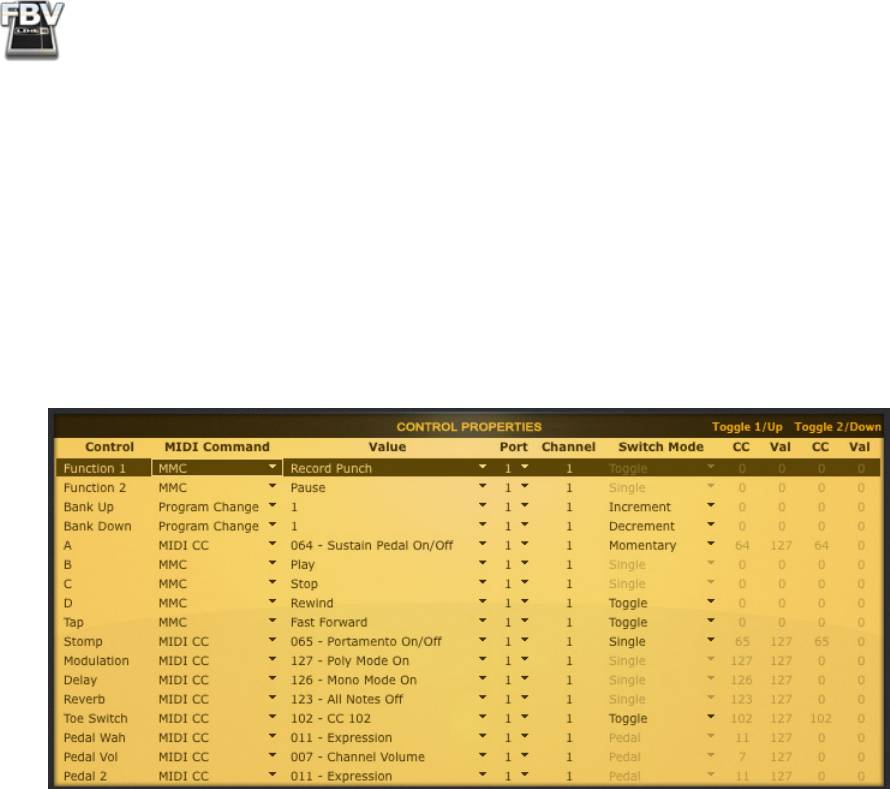
• Above shows the FBV-Default preset settings for an FBV Shortboard MkII. For an FBV Express
MkII you’ll see only the A, B, C, D footswitch and Pedal rows. This preset assigns MIDI commands
to all the device’s MIDI Controllers for us so that we can then map them in Logic.
• Note that some Footswitch controllers (B, C, D and others) are set to transmit MMC (MIDI
Machine Control) commands. These can be mapped to specifically control the Logic transport.
You can alternatively set other Footswitch controllers to send the desired MMC messages to
have them each control a Logic Transport function if you prefer.
• If you make any changes to the settings in FBV Control application, it is a good idea to go to File
> Save As and this as a new preset - perhaps titled something clever, such as “Logic.fbv”.
Mapping Controllers with the Logic MIDI Learn Function
Logic Pro includes support for several MIDI “Control Surface” devices, which are typically large
hardware units including faders, knobs, and other controls to emulate a large analog mixing console.
The Line 6 FBV MkII units are not included as Logic-supported Control Surface devices, however,
you can still easily map any of your FBV controllers to Logic or Plug-In parameters by using the
Logic MIDI Learn feature! To follow we’ll show you how to map your FBV Pedal to control the Wah
Position parameter of an inserted POD Farm AU Plug-In. These same steps can be followed to map
any other pedal or footswitch controller on your FBV MkII device to any Logic parameter as well. It
is recommended that you read through the Logic Control Surface Support documentation as well to
learn more about the Logic MIDI Learn and controller capabilities.
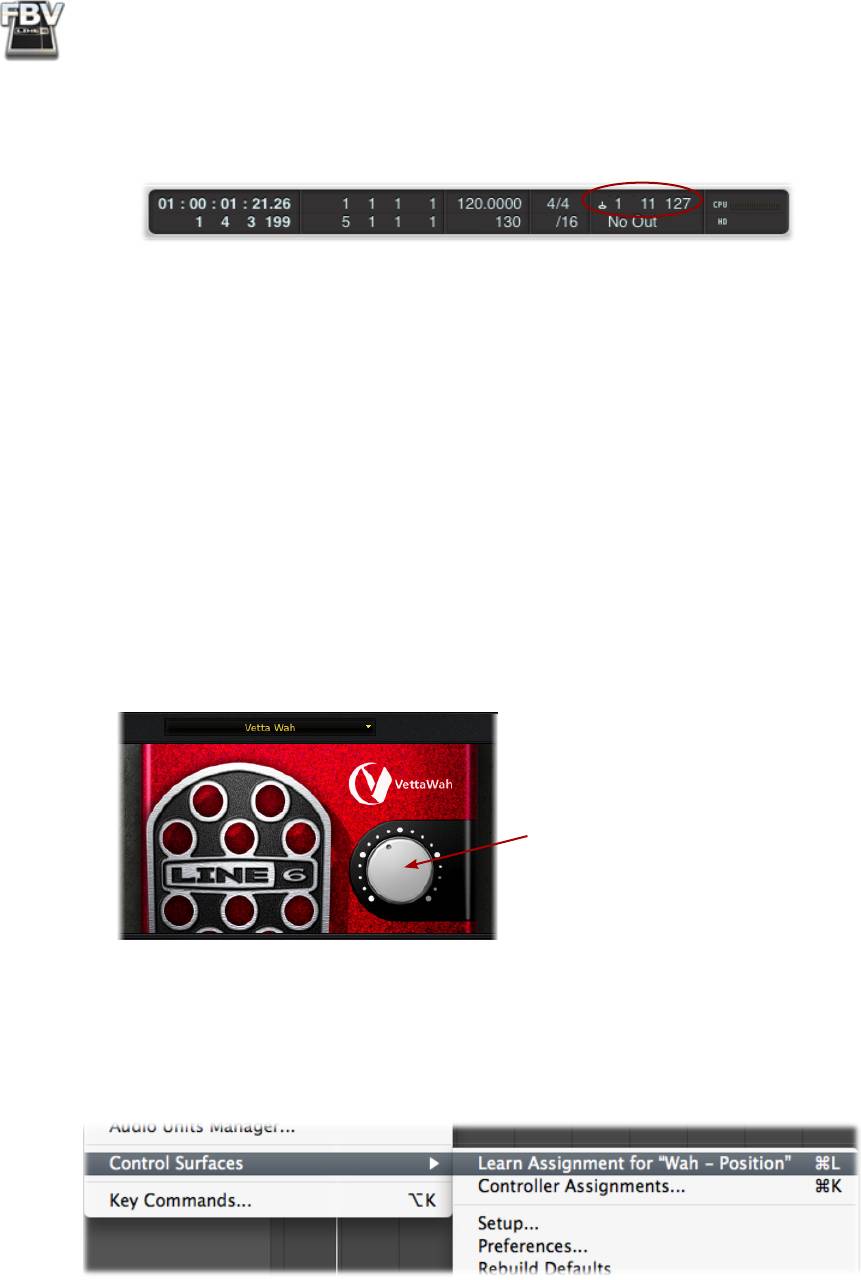
First, here’s a handy tip in Logic: The Logic Pro transport always shows you when MIDI data is
being received, and specifically the MIDI Channel, command type and value. For example, watch
6•14
FBV MkII Advanced User Guide: Controlling 3rd Party Software
the transport indicator and activate the pedal or footswitch on your FBV, and you’ll see this MIDI In
information displayed. In this screenshot, we just moved our Wah Pedal all the way forward, so we see
the MIDI In show us that Logic last received on MIDI Channel 1, CC 11 with a Value of 127:
This indicator can be very helpful to confirm Logic is receiving MIDI from your device, and specifically
it’s MIDI command & values without always having to go back to the Line 6 FBV Control application
dialog!
For this example, we’ll map the Pedal of FBV to the POD Farm Plug-In’s Wah Position parameter. If
you do not happen to have the POD Farm Plug-In, you can insert any Logic or Audio Units effects
Plug-In and perform the same steps:
• Make sure your FBV pedal is set to “Pedal Wah” (the Wah LED indicator on your FBV unit
should be lit).
• Create an Audio track in your Logic session, and record or insert an audio file so you’ll have
something to hear your Plug-In effect applied to. A nice clean guitar recording wold work nicely
here.
• Click on an Effects Insert slot for this Logic Audio track and insert the POD Farm Plug-In.
• In the POD Farm Plug-In window, load a Tone preset, and add one of the Wah models to your
tone. Click on the Wah within the Signal Flow View to display Wah effect’s edit settings in the
edit panel.
The Wah effect’s Position knob
The POD Farm Plug-In Edit Panel, Wah effect
• Now click directly on the POD Farm Wah Position knob in the edit panel with your mouse and
move it a bit - this allows the Wah Position parameter to be “selected”.
• Next, (before you click on anything else) go to the Logic > Preferences > Control Surfaces
menu, and you want to select Learn Assignment for “Wah - Position”.
• As you can see by the name of the “Learn Assignment...” menu command, Logic automatically
detected the POD Farm Plug-In “Wah - Position” parameter since it was the last item you selected
with your mouse in the previous step.
6•15
FBV MkII Advanced User Guide: Controlling 3rd Party Software
TIP: Alternatively, you can use the Command+L key shortcut instead of going to the Logic Preferences
menu.
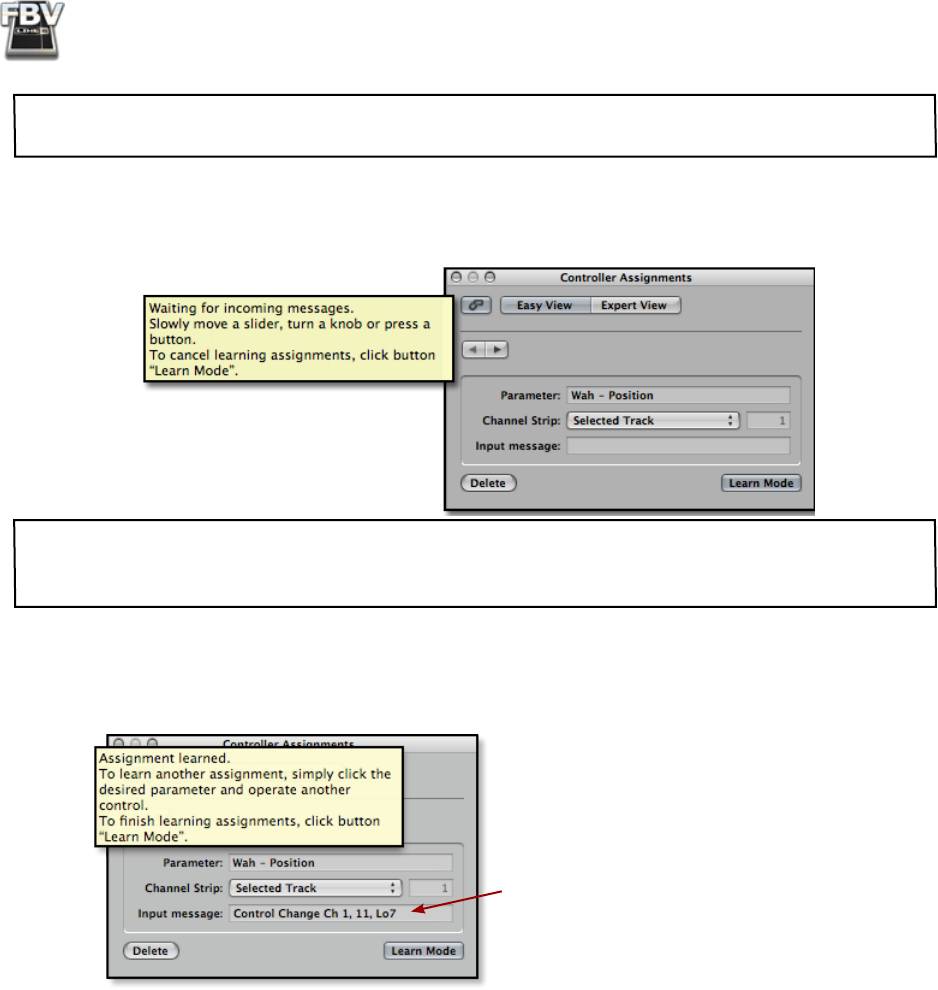
• When you select this “Learn Assignment...” menu command, it launches the Logic Controller
Assignments dialog, and a message informs you that it is waiting for you to access your MIDI
Controller so that it can “Learn” the MIDI command from it.
Note that the Controller Assignment dialog also offers an “Expert View” - this offers many more options
and allows you to further manually map MIDI controllers. Please see the Logic documentation for this
dialog if you want to explore this further! The Easy View works great for instantly mapping a controller.
• Now move your FBV Pedal, and you should see the Controller Assignment dialog receive and
“Learn” the MIDI Control message (which is configured to transmit MIDI CC 11, with a Value
range of 0 - 127, as part of the FBV-Default preset we previously selected in the Line 6 FBV
Control application).
You’ll see the “Learned” MIDI
Control command listed here.
• Exit the Controller Assignments dialog and give the FBV Pedal a try. You should see the Position
knob within the GearBox Plug-In window move in response. Press Play in Logic to hear your
audio track play, and when you move the pedal, you should hear the Wah effect do its thing on
your track!
• Note that you can also set your Logic Audio track to record automation for this POD Farm Plug-
In, Wah Position parameter, and you can use the pedal to record a Wah “performance” too.
You should be able to repeat the above steps to access any mappable parameter in Logic with any of
your FBV Controllers - Mixer faders, Pan knobs, solo switch, Software Instrument knobs, other Plug-In
parameters, etc.
Controlling the Logic Transport Functions
To set your FBV footswitches to control the Logic transport controls, you need to set Logic to “listen”
for the MMC commands that your FBV footswitches are now configured to transmit:
6•16
FBV MkII Advanced User Guide: Controlling 3rd Party Software
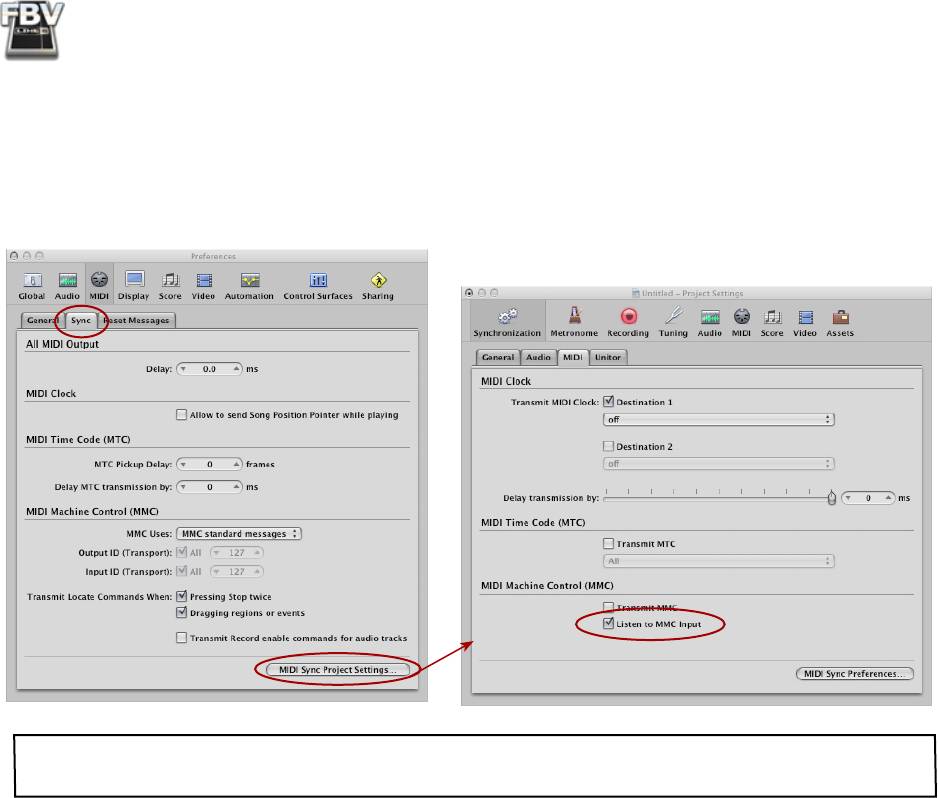
• Launch Logic and go to Preferences > MIDI.
• Select the Sync tab.
• Click the MIDI Sync Project Settings… button at the bottom right of the Sync tab - this
launches the Song Settings dialog.
• In the section labeled MIDI Machine Control (MMC), check the Listen to MMC Input option.
Note that this is a per-Song option in Logic. To make this option “global”, you must modify your Logic
template file with this MMC setting.
6•17
FBV MkII Advanced User Guide: Controlling 3rd Party Software
Cakewalk SONAR™ - FBV MkII Setup Tutorial
Line 6 FBV MkII devices’ Footswitch and Pedal controllers can be configured to trigger many of
Cakewalk SONAR functions, software instrument & plug-in parameters and more by taking advantage
of the SONAR built in ACT (Active Controller Technology) features! To follow are the instructions
for configuring an FBV MkII to function with SONAR 8 Producer (the steps should be similar for
other recent versions of SONAR as well).
Line 6 FBV Control Application Settings
First, before launching SONAR, connect your FBV to your computer’s USB port, launch the Line 6
FBV Control Application and load the FBV-Default.fbv preset.
• Above shows the FBV-Default preset settings for an FBV Shortboard MkII. For an FBV Express
MkII you’ll see only the A, B, C, D footswitch and Pedal rows. This preset assigns MIDI commands
to all the device’s MIDI Controllers for us so that we can then map them in SONAR.
• You likely do not need to make any changes to these default settings, but if you do make any
changes, it is a good idea to go to File > Save As and this as a new preset - perhaps titled
something clever, such as “SONAR.fbv”.
• Exit the FBV Control application.
Configure SONAR MIDI Device Settings
To set SONAR so that it can receive surface controller MIDI data from your FBV MkII, you’ll need
to select your device in the SONAR MIDI Device Settings dialog. Be sure to always have your FBV
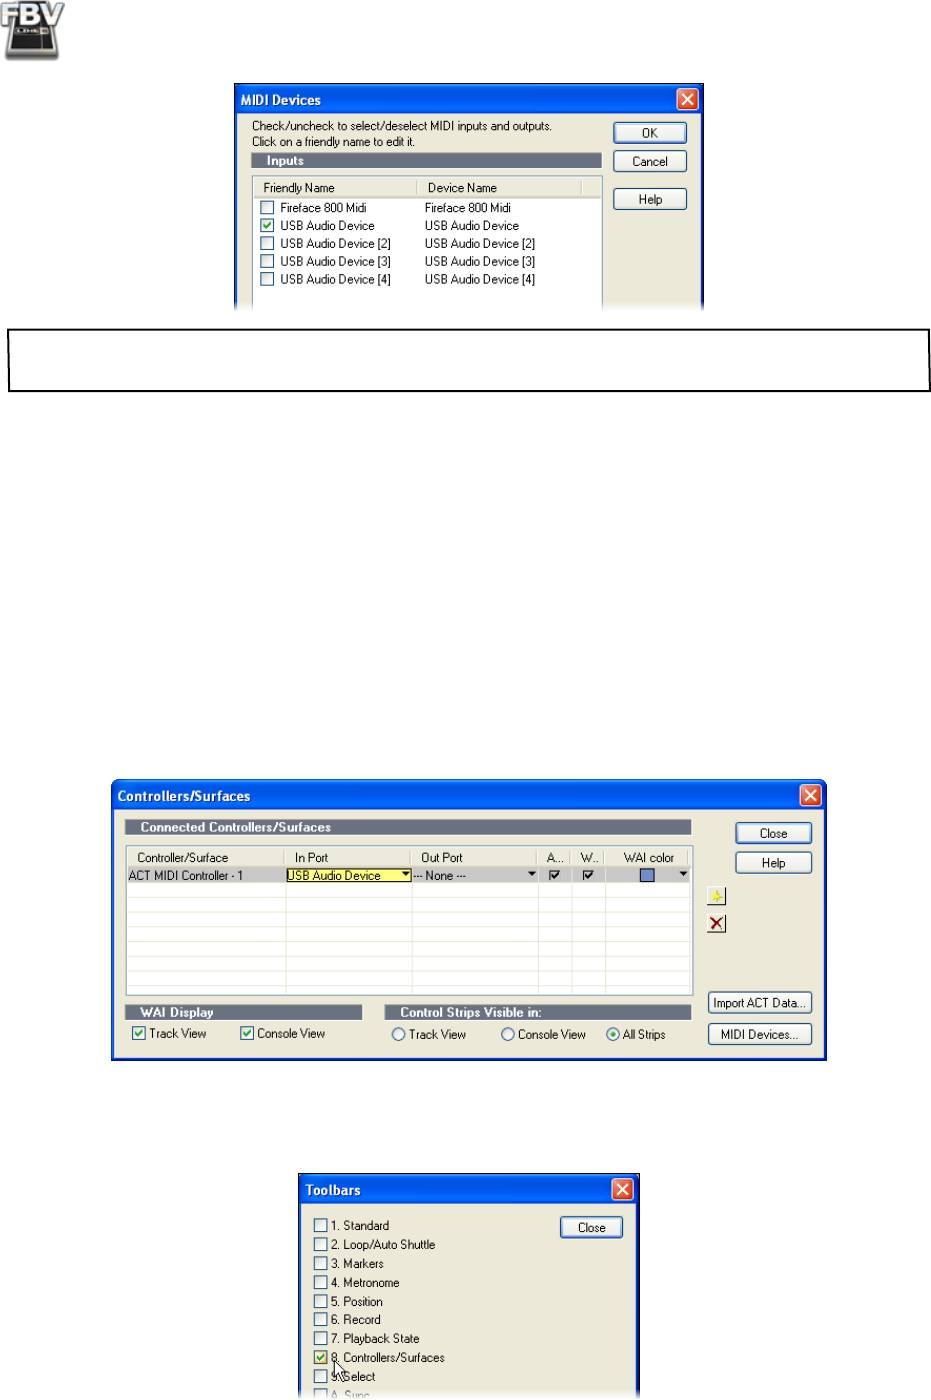
device connected to your USB port before launching SONAR. Launch SONAR and go to the SONAR
Options/MIDI Devices and check the first FBV MIDI Out Port as the MIDI Input device and choose
OK.
6•18
FBV MkII Advanced User Guide: Controlling 3rd Party Software
Note that if you are using Windows® 7 or Vista®, your MIDI Out Ports will appear as “FBV Shortboard
MIDI Out” or “FBV Express MkII MIDI Out”.
Use FBV MkII as a Surface Controller in SONAR
SONAR includes its own ACT MIDI Controller Plug-In feature, which allows you to easily create,
customize and save mappings for any MIDI surface controller. The SONAR ACT feature is very
powerful and it is recommended that you read the SONAR documentation. We’ll show you how to
create your own mappings for FBV’s Footswitch or Pedal controllers. Open or create a new project in
SONAR, and then follow these steps:
• Go to the SONAR Options > Controllers/Surfaces.
• In the Controllers/Surfaces dialog, click the “Add new Controller/Surface” button. For
Controllers/Surfaces, choose “ACT MIDI Controller”, and for Input Port choose your first FBV
MIDI Out port . You can set the Output Port option to “None”, then click “OK”. Your settings
should now look like this:
• Close the Controllers/Surfaces dialog when done.
• Next, go to Views > Toolbars and ensure the Controllers/Surfaces box is selected, then close the
window. You’ll see this adds some handy ACT options to your SONAR Toolbar.
6•19
FBV MkII Advanced User Guide: Controlling 3rd Party Software
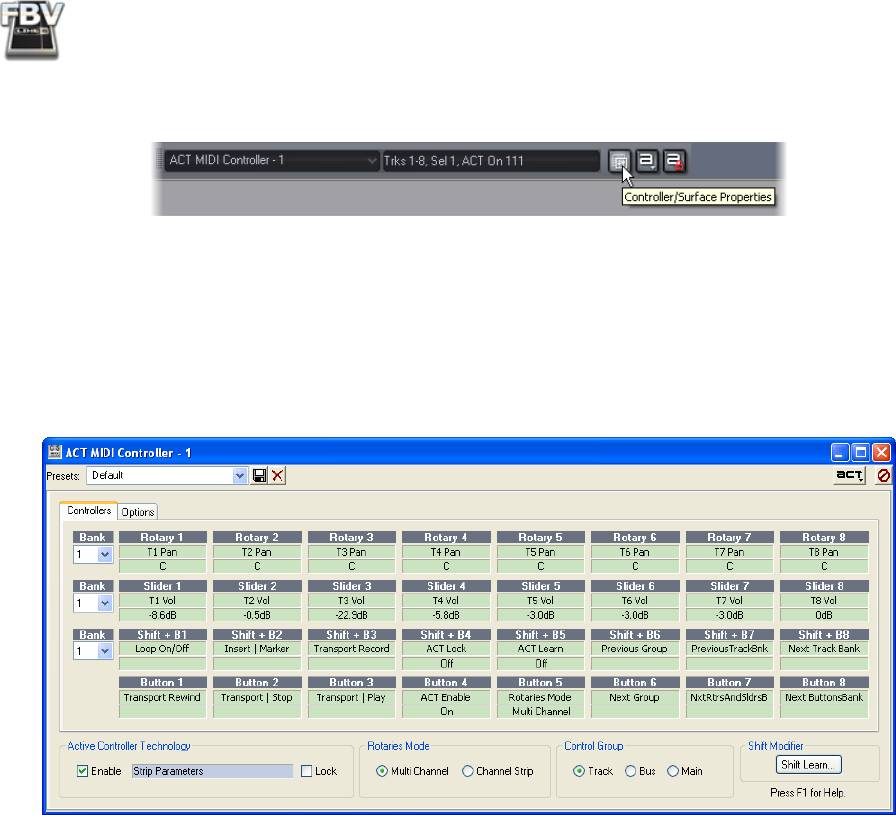
• In the ACT Controllers toolbar options, click the Controllers/Surfaces Properties button that
is at the right end of the Control Surfaces toolbar.
• In the ACT MIDI Controller dialog, select the Default preset from the Presets menu. When
this preset is loaded, you’ll see that the “cells” in the dialog allow access to numerous SONAR
parameters. Also, when you click on a Plug-In or Software Instrument edit window to shift the
“focus” to it, the parameters for that plug-in/instrument become available in the ACT dialog
cells. However, your FBV Controllers are not yet mapped to control any of these parameters with
the Default preset. To configure a mapping, you can use the MIDI Learn function.
The ACT MIDI Control dialog - Default preset selected (the SONAR main window has “focus”)
Using the SONAR ACT MIDI Learn Function
Here is an example of how to map the FBV Pedal Wah controller to the Wah Position parameter of the
Line 6 GearBox Plug-In, allowing you to remotely control the GearBox Wah in real-time as you hear
the input monitor recording signal or playback of your audio track. These mapping steps are the same
to map any knob, button, footswitch controller to any other available parameter in the ACT MIDI
Controller dialog as well.
• Open the SONAR ACT MIDI Controller dialog with the Default preset loaded, as described
above. Leave this dialog open and where you can see it.
• Create an audio track in your SONAR project, and record or insert an audio file so you’ll have
something to hear your Plug-In effect applied to. A nice clean guitar recording wold work nicely
here.
• Click on an FX Bin Insert slot for this audio track and insert the GearBox Plug-In.
• In the GearBox Plug-In window, load a Tone preset, and click on the Wah pedal effect to make
sure it is “on” and to show the Wah effect’s edit settings in the edit panel.
6•20
FBV MkII Advanced User Guide: Controlling 3rd Party Software
The GearBox Plug-In Edit Panel, Wah effect
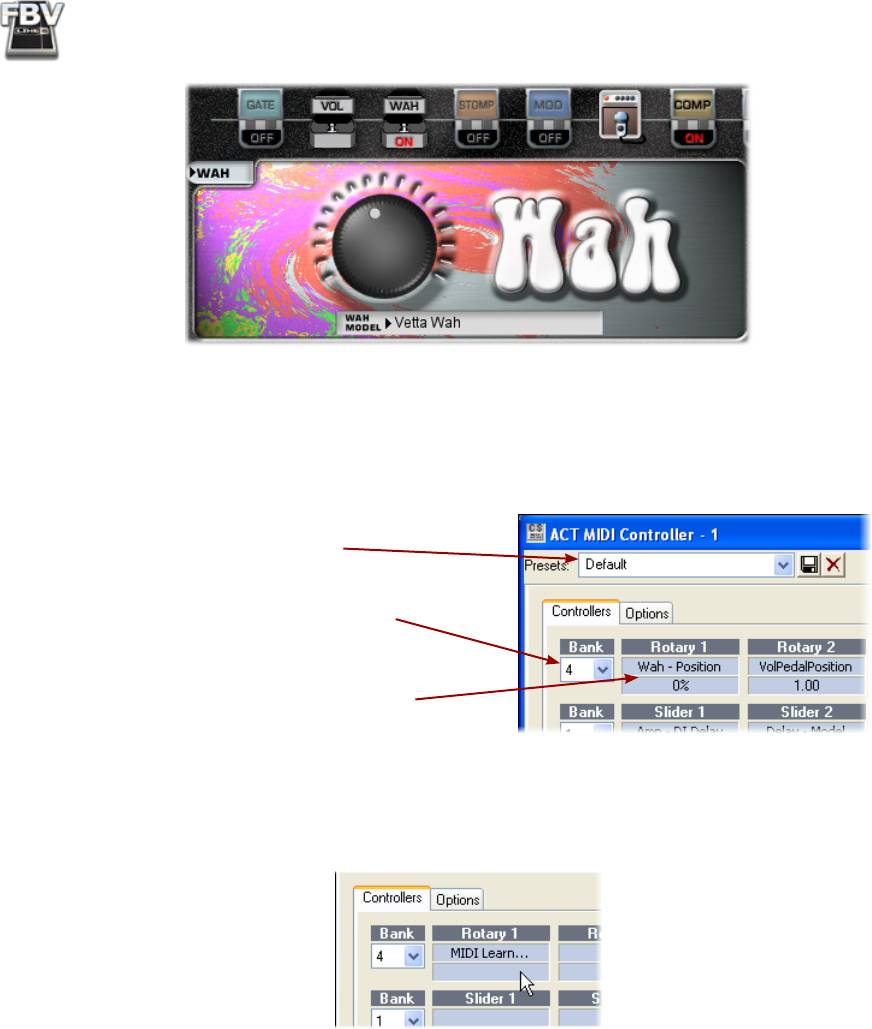
• With your “focus” still on the GearBox Plug-In window, you should now see the many GearBox
Plug-In parameters shown in the cells of the ACT dialog. We specifically want to access the Wah
- Position parameter. To see this you’ll need to select Bank 4 of the top row of “Rotary” cells, and
the Wah - Position parameter should appear in the Rotary 1 controller slot.
The Default preset is selected.
In the Controllers tab, select Bank 4 for the
top row of cells.
The GearBox Plug-In Wah-Position
parameter appears in the Rotary 1 slot.
• Click on the lower cell of the Rotary 1 controller slot and this places it in “MIDI Learn” mode,
where it then waits to receive a MIDI command from the assigned MIDI surface control device
(your FBV).
• Now move your FBV Wah Pedal and you should immediately see the Rotary 1 cells switch out
of MIDI Learn mode, meaning your Pedal’s MIDI command was “learned”, thus mapping your
controller to the parameter.
• Now just move your pedal and you should see the big Wah position knob move in response in the
GearBox Plug-In window. Play your track and you’ll hear the Wah do its thing.
• Repeat the above steps to use MIDI Learn to map any other controllers from your FBV MkII
device to other SONAR, plug-in, or instrument parameters. When done, type a new title in the
Preset field at the top of the ACT dialog and click the Save button to save all these new mapped
settings as a SONAR ACT preset.
The SONAR ACT feature offers a great deal more functionality for MIDI control - please be sure to
read the SONAR Help documentation for details!
6•21
FBV MkII Advanced User Guide: Controlling 3rd Party Software
®
Propellerhead Reason
- FBV MkII Setup Tutorial
The FBV MkII devices of course do not include the note keys & knobs like a Line 6 KB37 “keyboard”
controller offers, to allow you to play the Reason instrument devices, record MIDI performances, etc.
However, FBV MkII devices do offer Footswitch & Expression Pedal controllers, which can be used to
trigger and control lots of parameters in Reason! To configure an FBV for this functionality, you’ll need
to set it up in Reason as a “Generic MIDI Control Surface” (although, for the record, we hate to think
®
®
of our beloved FBV “generic”!) Just follow these steps - which are the same in Windows
or Mac
OS
X, unless otherwise noted.
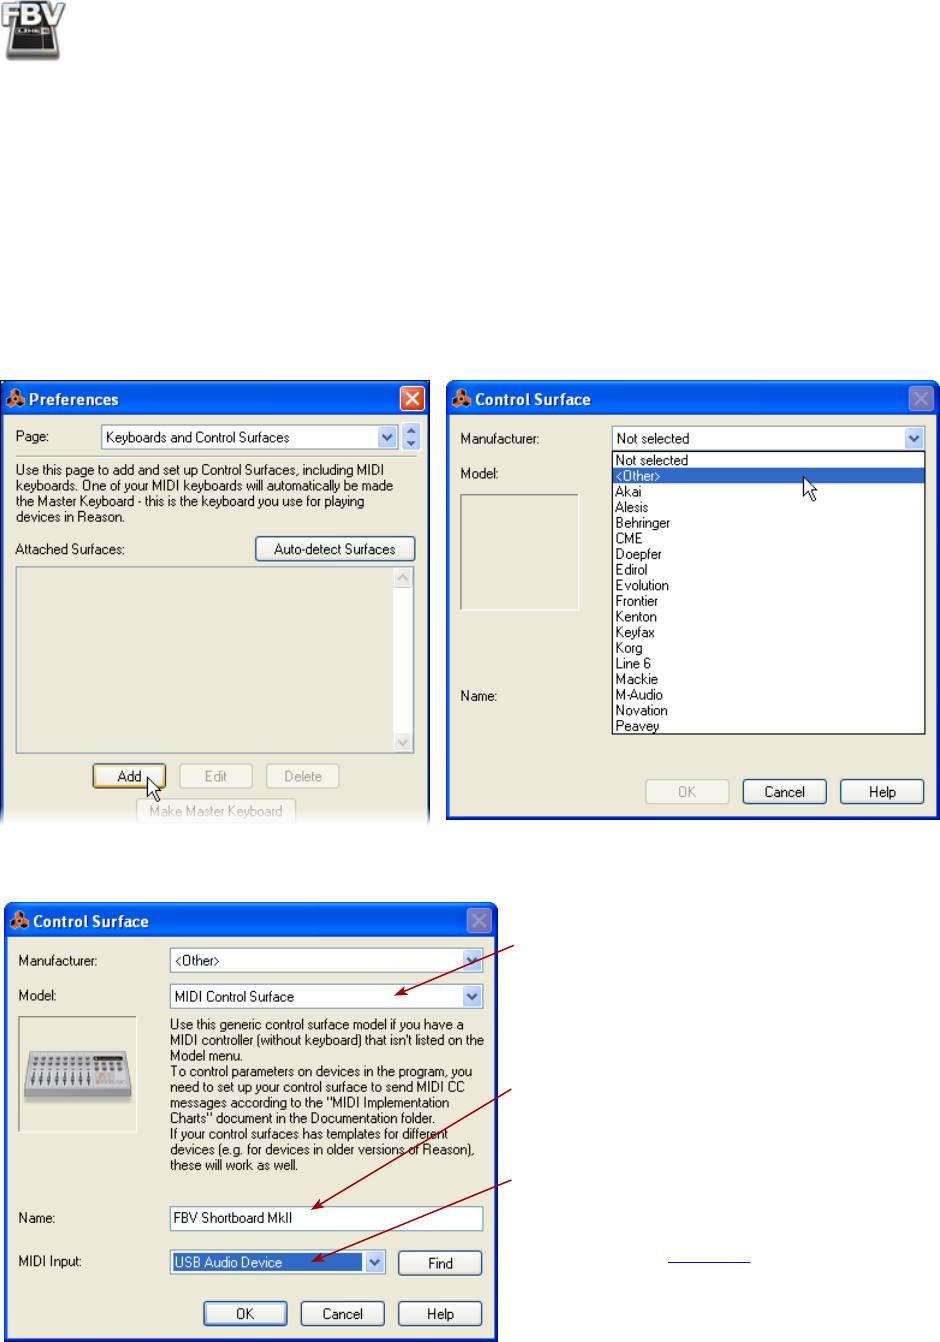
• In the Reason Preferences dialog, select Keyboards and Control Surfaces and click the Add
button, then select <Other> in the list of devices.
• Make the following settings in the Control Surface dialog:
Select MIDI Control Surface as the Model.
Type in a name for your device (this is how
it will appear in the Reason MIDI Controller
menus).
Choose the USB MIDI Port that you want
Reason to receive from. We’ll choose the
first FBV MIDI Out Port (note that your
port names appear differently on Mac® or
Windows® - see page 6•1).
Click OK when done.
6•22
FBV MkII Advanced User Guide: Controlling 3rd Party Software
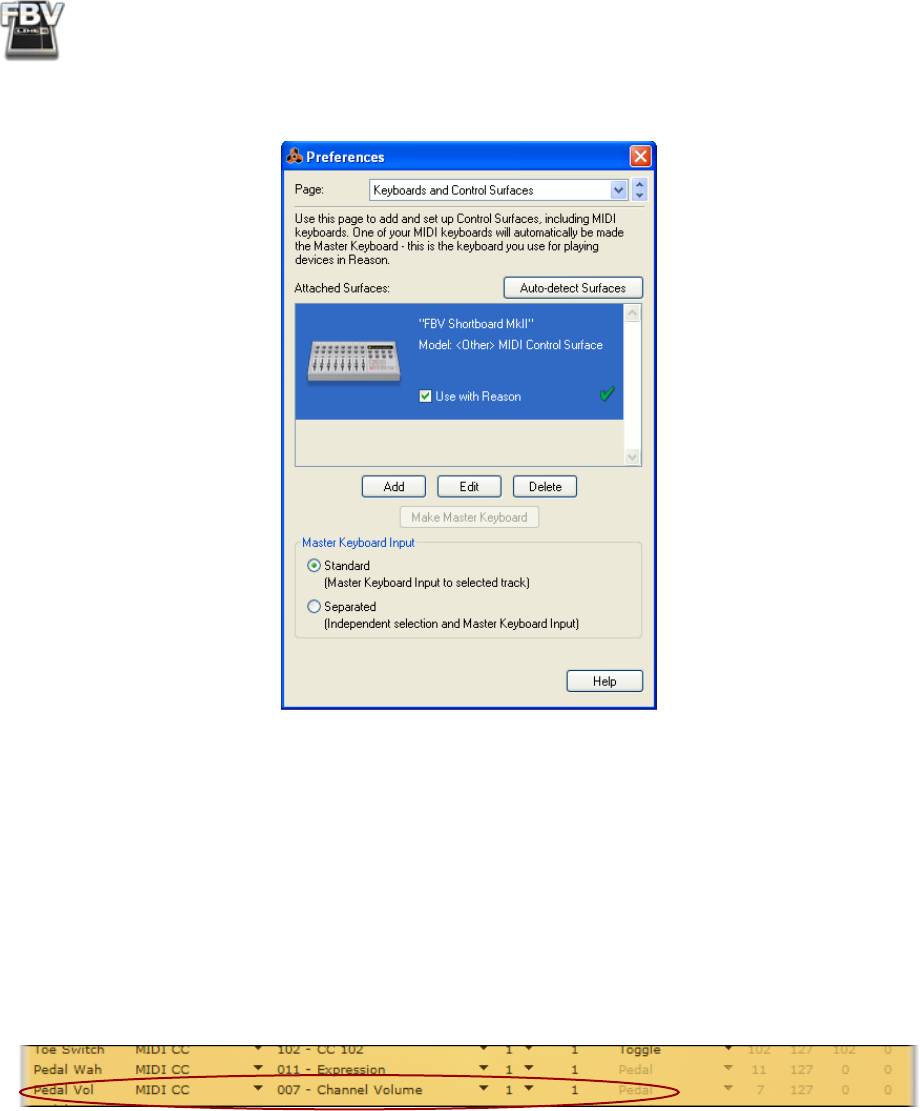
• You should now see your FBV device configured accordingly. Exit the Preferences if all settings
appear as shown here:
Please see the next section for how to map your FBV MIDI controllers to Reason parameters.
Configuring FBV MIDI Controllers with Remote Override
Reason also offers its “Remote Override” feature, which is an easy way to allow Reason to “learn” the
MIDI message coming from your MIDI control device and instantly map it to a Reason parameter. You
can use the Remote Override options for your FBV MkII when configured as a Generic MIDI Control
device, as described in the previous section.
First we’ll need to make sure your FBV footswitch and pedal controllers are configured to send MIDI
CC messages out the MIDI Port we selected in the Generic MIDI Control setup steps. With the Reason
application closed, launch the Line 6 FBV Control application and load the “FBV-Default.fbv” preset.
• When the FBV-Default preset is loaded, you can see the FBV Pedal Vol controller is already set
to transmit MIDI CC 007. Note that the Pedal Vol is set to transmit its command to the FBV
MIDI Out port 1, which is what we want since this is the port we selected in the Reason Generic
Controller setup steps for Reason to receive MIDI. Exit the FBV Control application. We’ll next
show how to map this Pedal to a Reason parameter.
• Make sure your FBV pedal is set to utilize the Pedal Vol controller (the “Volume” LED indicator
on your FBV unit should be lit).
6•23
FBV MkII Advanced User Guide: Controlling 3rd Party Software
®
• Launch Reason and load one of your Reason projects. Right click (Windows
) or Ctrl+click
®
(Mac
) on any Reason component’s knob or slider that you want to control with your Pedal.
We’ll choose the FREQ knob of one of the Reason synth devices.
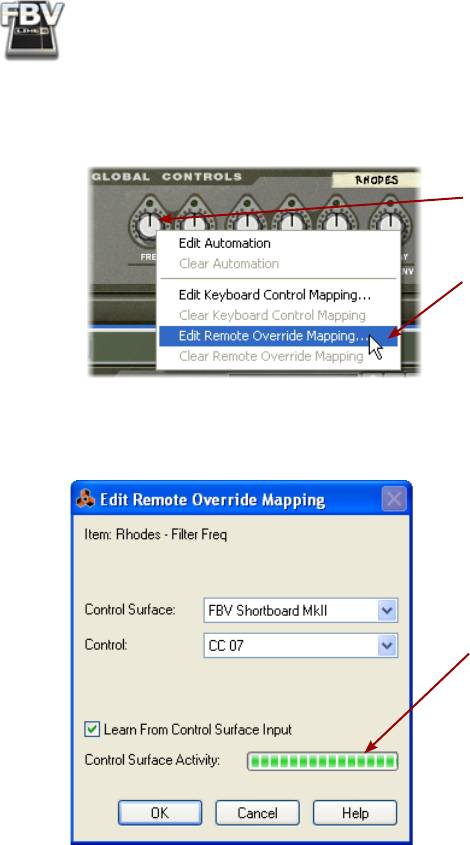
Right click (Windows®) or Ctrl+click
(Mac®) directly on the knob you want to
control...
Then choose Edit Remote Override
Mapping.
• In the dialog, just check the box for “Learn From Control Service” and Reason will wait to
receive a MIDI CC message from your assigned MIDI Control Surface.
Move your FBV Pedal and you should
see the Control Surface Active indicator
receive a MIDI signal.
Once it does, the Control Surface
and Control fields above will fill in
automatically with the “learned” MIDI
device name and CC value, as shown here.
Click OK once the step is complete.
• And that does it! Now if you move your Pedal, you should see the selected knob move in response.
You can follow these same steps to map any FBV controller directly to any assignable Reason
knob, slider, switch, etc.
The Reason Remote Override feature offers several other features - it is recommended you check
the Reason Help documentation covering all that this powerful feature offers for your Line 6 MIDI
Controllers!
6•24

FBV MkII Advanced User Guide: Controlling 3rd Party Software
®
Digidesign Pro Tools
LE Transport Control - FBV MkII Setup Tutorial
We’ve provided a step-by-step tutorial here for how to configure an FBV Shortboard or Express MkII
®
device to remotely control the Transport of the Digidesign Pro Tools LE
8 software. (The steps are
similar for other Pro Tools versions as well.) Configuring a MIDI Controller device such as FBV MkII
for this task in Pro Tools is not too obvious, but pretty simple once you know the steps, and it can be
very helpful to have foot control over your Transport functions for recording and punch-ins!
Note: For the following steps, we’re running a Mac®, but the steps are the same if you are using Windows®
XP or Vista®, unless otherwise noted.
FBV Control Assignment Configuration
The first step, before even launching Pro Tools, is that we’ll need to configure a set of MIDI assignments
for the footswitches and pedals of our FBV device. Pro Tools utilizes MIDI Machine Control (MMC)
commands to access its Transport functions remotely. Therefore, we’re going to assign MMC commands
to our FBV footswitch controls using the Line 6 FBV Control application, and save this as an FBV
preset.
• Connect your FBV MkII device to your computer and launch Line 6 FBV Control.
• Go to File > Open and load the “Blank.fbv” preset.
• Go to File > Save As and let’s title this new preset “PT-Transport.fbv”.
For this example, we’ll configure several FBV Controls as follows (you can do the same on either an
FBV Shortboard or Express MkII device):
• Assign the A, B, C & D footswitch Controls’ MIDI Command settings all to “MMC”.
• Set the A Control’s Value setting to “Play”.
• Set the B Control’s Value setting to “Stop”
• Set the C Control’s Value setting to “Record Punch (Pro Tools)”
• Set the D Control’s Value setting to “Rewind”. Note that for Rewind, you have the option of
choosing a Switch Mode, each of which offers a different behavior:
• “Single” initiates rewind action on each footswitch press, and keeps rewinding.
• “Momentary” initiates rewind action on the footswitch press, but stops rewinding when you
release the footswitch.
• “Toggle” alternates between initiating rewind and stopping rewind on each successive
footswitch press.
• Optionally, you can assign the “Fast Forward” Value to one of your footswitches instead of one
of the above (or for an additional footswitch if you have a Shortboard. However, note that the
MMC “Pause” value simply performs the same action as “Stop” (since Pro Tools’ Transport has
no Pause button).
• Set the Port and Channel for all of the above Controls to “1”, since we want to transmit all our
MIDI commands to the FBV USB MIDI Out Port 1, Channel 1.
• For all other FBV Controls, we’ll keep them to Unassigned since we won’t be using them for this
example.
6•25

FBV MkII Advanced User Guide: Controlling 3rd Party Software
The result should appear in the Control Properties list like this:
• When settings are complete, exit the Line 6 FBV Control application and leave your FBV
connected to your computer.
Configure Pro Tools LE for FBV MkII device
The next step is to make a few settings within Pro Tools to allow it to receive the MMC commands
from your FBV MkII device. Launch Pro Tools and open or create a new session, then make the
following settings:
• Go to the Setup menu and select Peripherals.
• In the Peripherals dialog, choose the Machine Control screen and make the following settings:
• For MIDI Machine Control (Master) - check the Enable box, click on the menu to the right
and from the “Predefined” sub-menu, choose your connected FBV MkII device, and set the
ID to 125. Keep the Preroll set to 90 frames.
• For MIDI Machine Control (Slave) - check the Enable box, and keep the ID set to 126.
• Exit the Peripherals dialog.
6•26
FBV MkII Advanced User Guide: Controlling 3rd Party Software
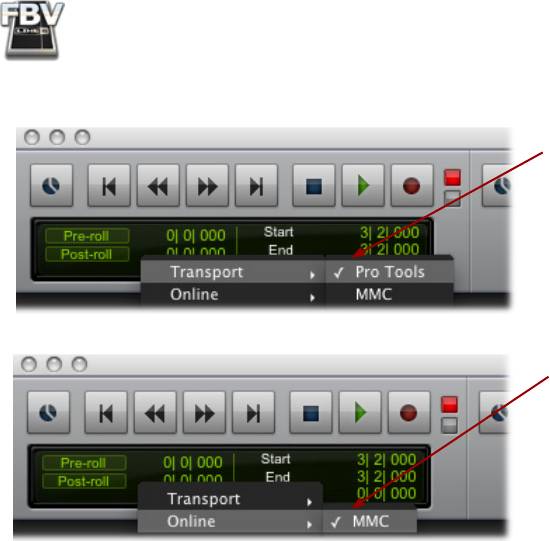
Next, we need to access the small “Pro Tools” menu on the Transport.
In the Pro Tools - Transport sub-menu,
select “Pro Tools” so that it is checked.
Now, in the Pro Tools - Online sub-
menu, select “MMC” so that it is
checked.
...And that is it! Now just try pressing your FBV’s A, B, C & D buttons and you should see it control
the Pro Tools transport accordingly.
6•27

FBV MkII Advanced User Guide: Controlling 3rd Party Software
®
Steinberg Cubase
- FBV MkII Setup Tutorial
Line 6 FBV MkII devices can be configured to control numerous Cubase parameters, including
transport functions, mixer parameters and more! To follow are the instructions for configuring FBV
®
®
MkII to function with Steinberg Cubase
4 on Windows
, however, the steps should be similar for
®
®
®
®
other recent Cubase
and Nuendo
versions on both Windows
and Mac
as well.
Line 6 FBV Control Application Settings
First, before launching Cubase, connect your FBV to your computer’s USB port, launch the Line 6
FBV Control Application and load the FBV-Default.fbv preset.
• Above shows the FBV-Default preset settings for an FBV Shortboard MkII. For an FBV Express
MkII you’ll see only the A, B, C, D footswitch and Pedal rows. This preset assigns MIDI commands
to all the device’s MIDI Controllers for us so that we can then map them in Cubase.
• The above steps assign MIDI commands to all the device’s MIDI Controllers for us so that we
can then map them in Cubase. The steps configure some of the FBV footswitches to transmit
MMC (MIDI Machine Control) commands to control Cubase transport, and MIDI CC messages
to trigger other Cubase functions.
• You likely do not need to make any changes to these default settings, but if you do make any
changes, it is a good idea to go to File > Save As and this as a new preset - perhaps titled
something clever, such as “Cubase.fbv”.
• Exit the FBV Control application.
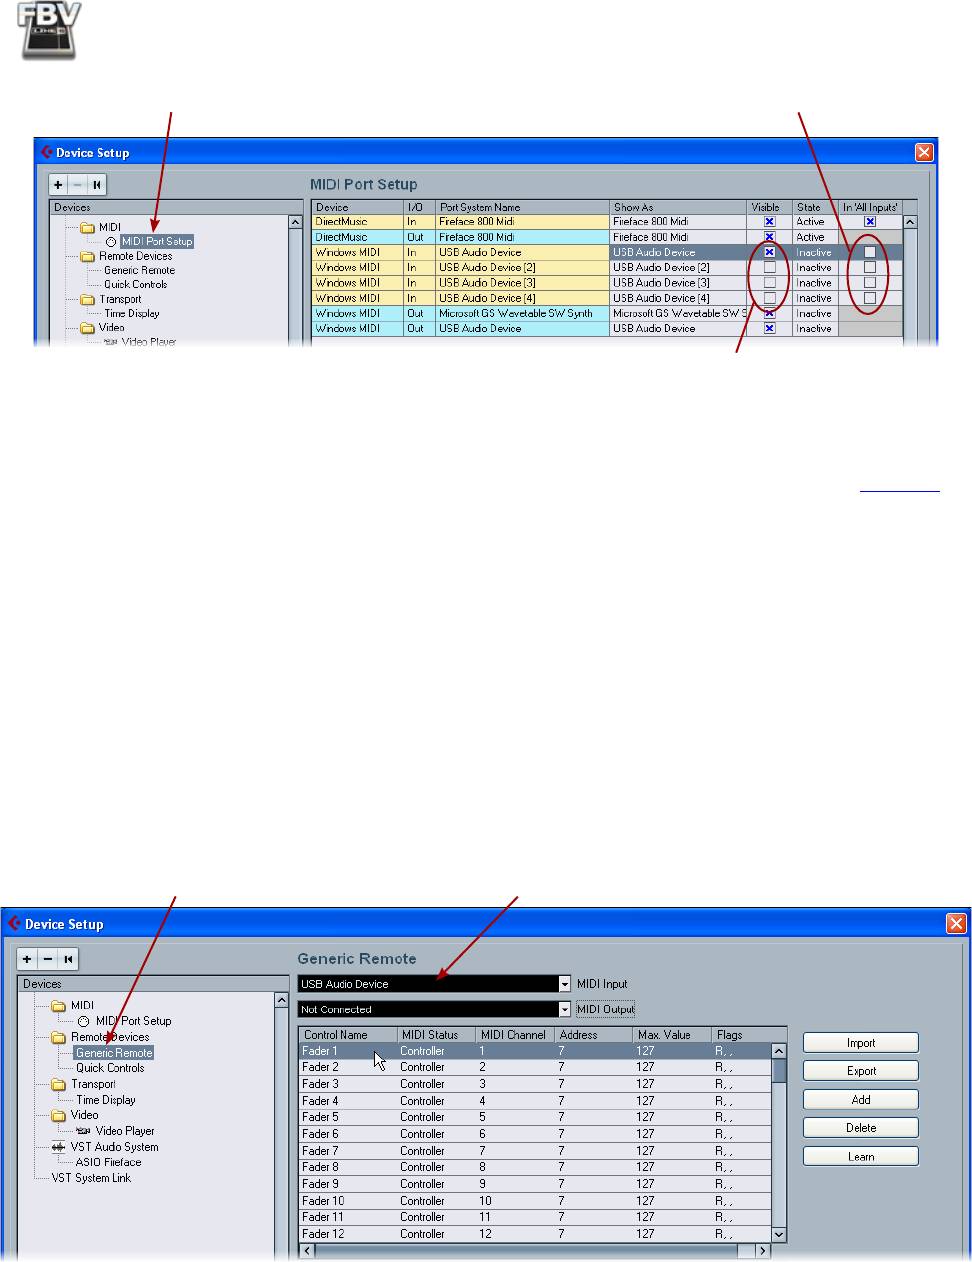
Cubase MIDI Port Setup
Since you are using your FBV MkII device as a MIDI controller device, you’ll want to exclude it from
the Cubase “All Inputs” MIDI Port settings. This way, if you choose the “All Input” option for one of
your MIDI tracks, the track will not receive input from your FBV device and record its MIDI controller
data into the track. To configure this setting, go to the Cubase Devices > Device Setup dialog. Since
the settings we used in the Line 6 FBV Control application configured all FBV controllers to transmit
to the FBV USB MIDI Out port 1, we can select just this first FBV MIDI port in Cubase, and de-select
FBV MIDI ports 2, 3 & 4.
6•28
FBV MkII Advanced User Guide: Controlling 3rd Party Software
Select MIDI Port Setup Uncheck the “All Inputs” box for all the
FBV USB MIDI Ports
Check the first FBV USB MIDI port, and uncheck the
FBV ports 2, 3, & 4
®
Note that since we’re using Windows
XP in this example, the FBV MIDI ports appears as “USB Audio
®
®
®
Device”. They will appear named differently if using Windows
7, Vista
or Mac OS
X (see page 6•1).
Cubase Parameter Control
Cubase offers support for many 3rd party MIDI Control Surface devices - large hardware units designed
to emulate analog mixing consoles with dozens of hardware faders, knobs and buttons. Your Line
6 FBV MkII device is not one of these “Steinberg-supported” Control Surface devices, however, it
is still possible to map any of your FBV MIDI controllers to the many Cubase parameters. This is
accomplished by configuring your FBV MkII device as a “Generic Remote” device. To accomplish this,
go to the Cubase Devices > Device Setup dialog once again:
• If you do not already see the “Generic Remote” under the Remote Devices in the left panel,
click on the “+” button at the top left of the dialog and choose Generic Remote from the menu
to add it.
Select Generic Remote Select the first FBV USB MIDI port as the MIDI Input
6•29

FBV MkII Advanced User Guide: Controlling 3rd Party Software
• In the top right panel you will now see a list of Cubase parameters that you can map your FBV
device’s controllers to. The easiest way to do this mapping is to use the Learn function. For
example, to map the “Fader 1” parameter at the top of the list to your FBV’s Pedal Vol, follow
these steps:
• Make sure your FBV pedal is set to Pedal Vol (the “Volume” LED indicator on your FBV is
lit).
• In the Cubase Device Setup dialog, click directly on the “Fader 1” Control Name in the
top right panel.
• Move your FBV pedal.
• Press the Learn button at the right of the dialog.
• You should see the MIDI Channel and other settings in the Fader 1 row change, indicating
it has “Learned” the MIDI CC message that your FBV Pedal Vol controller is transmitting
(which is MIDI CC 011, on MIDI Port 1, Channel 1, per the settings in the Line 6 FBV
Control application).
• Now look at the Cubase Mixer window and watch the channel strip for track 1 - you should
see its fader respond to the FBV pedal moves.
• Repeat the above steps to map other FBV controllers from your device to other Cubase parameters
in the list.
• Note that you’ll need to use pedal controllers to map to the Cubase fader, knob and slider
type parameters, and footswitch buttons to map to the Cubase switch type parameters.
• Also, these Cubase parameters typically need to receive MIDI CC type commands, so you’ll
want to make sure that your FBV footswitch or pedal controller is transmitting this type of
MIDI message, using the Line 6 FBV Control application.
The lower right panel also allows you to map to more channel strip parameters, beyond track 1 - 16.
It is also possible to customize these Generic Remote parameter lists using the other options in this
dialog. Please see the Cubase Help documentation for details.
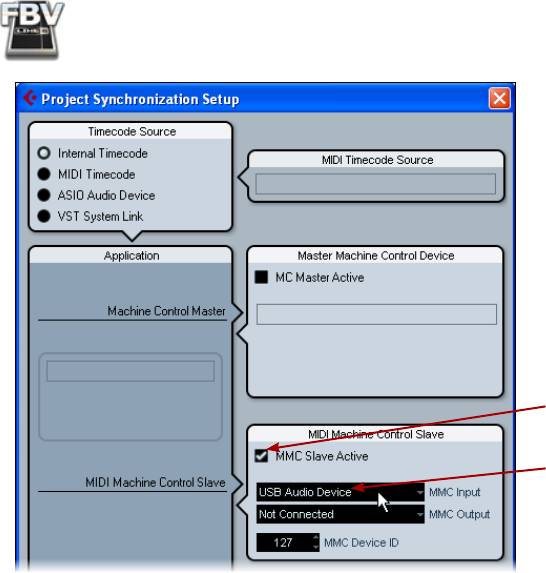
Cubase Transport Control
Cubase allows control of its transport by way of a simple MIDI Machine Control Slave option -
meaning it will listen for MMC commands from a selected device and respond accordingly. Since we
assigned MMC commands to several FBV footswitch buttons in the FBV Control application, all we
need to do is set Cubase to listen to your FBV MkII device for the MMC commands.
Go to the Cubase Transport menu and select Project Synchronization Setup.
6•30
FBV MkII Advanced User Guide: Controlling 3rd Party Software
Check the box for MMC Slave Active
Choose your first FBV USB MIDI Port
for the MIDI Input
Click OK to exit the dialog
Now try your FBV footswitches that you assigned to transmit MMC commands, and you should see the
Cubase transport respond.
With the 3rd party application examples covered in this chapter you should now be pretty well
informed on how to get your Line 6 FBV MkII device configured as a USB MIDI controller. Most
other DAW applications that offer remote MIDI control can be configured similarly. Please see the
following chapter for more helpful tips and Line 6 online resources!
6•31

