Gorenje tgr65sb6: fbV™ Mkii wiTh line 6 GearboX™
fbV™ Mkii wiTh line 6 GearboX™: Gorenje tgr65sb6
FBV MkII Advanced User Guide: Controlling Line 6 GearBox
fbV™ Mkii wiTh line 6 GearboX™
This chapter is specifically for using your Line 6 FBV Shortboard™ MkII or FBV Express™ MkII to
control the Line 6 GearBox™ software. Let’s jump right in!
What is GearBox?
In case you’re wondering... The Line 6 GearBox software is available free to owners of Line 6 USB
audio interface products (POD Studio™, TonePort™, GuitarPort™ devices).* GearBox provides a
full-featured User Interface on your computer where you can access all those famous Line 6 guitar &
bass amp, preamp, speaker cabinet, mic, and effects models. Using your Line 6 USB audio interface,
®
this essentially provides you legendary POD
tone right on your computer, which you can use to record
into your favorite audio software, jam along with your favorite songs, or sign up for the GuitarPort
Online subscription service!
*Note: GearBox can also be used with POD®xt and POD® X3 as the connected USB audio interface
device, however, it is recommended to connect your FBV MkII to these POD® devices directly via the
RJ45 cable connection rather than connecting your FBV via USB to your computer. When you control
your POD directly with your FBV MkII, you’ll see the GearBox controls respond as well!
®
®
To get GearBox, connect your Line 6 USB audio interface to your Mac
or Windows
computer, launch
Line 6 Monkey and let the little monkey fellow show you the enlightened path to the download. Or,
go directly to the http://line6.com/software/ page and download it from there.
If you have not already done so, also go ahead and download and install the Line 6 FBV Control
application. You’ll need this to load and edit the MIDI control information your FBV device will use
to communicate with GearBox. See the “The Line 6 FBV Control Application” on page 3•1 for details.
Get Connected
To run GearBox, you’ll of course need to connect your Line 6 USB audio interface to your computer,
and you’ll additionally want to connect your FBV MkII device to another USB port. Once connected,
follow these steps to configure GearBox to receive MIDI control data from your FBV MkII device.
®
• Launch GearBox from /Applications/Line 6/GearBox (Mac
), or Start menu\Programs\Line
®
6\GearBox (Windows
)
®
• In GearBox, go to GearBox > Preferences > MIDI/Control (Mac
), or Edit > Preferences >
®
MIDI/Control (Windows
)
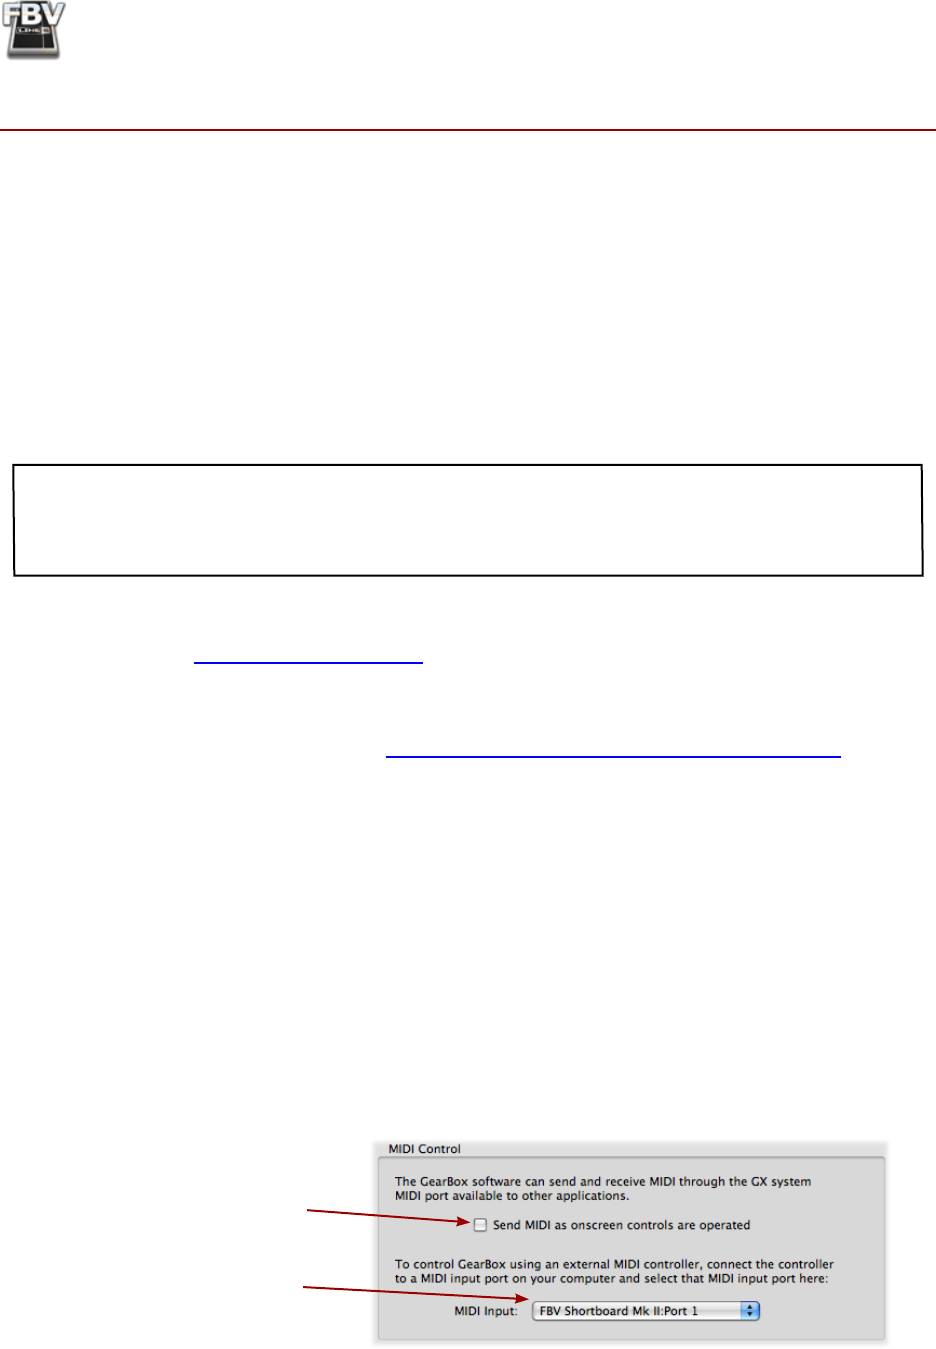
• In the MIDI Control settings, de-select the “Send MIDI” option and choose the first available
Port of your connected FBV MkII device.*
Uncheck the “Send MIDI...”
option
Select the first Port of your FBV
MkII device here
• Click OK to exit the dialog.
5•1
FBV MkII Advanced User Guide: Controlling Line 6 GearBox
* Note that the FBV MkII MIDI Out port names appear within differently depending on your computer
operating system (for FBV Express MkII, you’ll see “Express” in place of “Shortboard” in these titles):
Mac OS® X Windows® 7 & Vista® Windows® XP
MIDI Out Port 1
FBV Shortboard Mk II (Port 1) FBV Shortboard Mk II USB Audio Device
MIDI Out Port 2
FBV Shortboard Mk II (Port 2) MIDIIN2 FBV Shortboard Mk II USB Audio Device [2]
MIDI Out Port 3
FBV Shortboard Mk II (Port 3) MIDIIN3 FBV Shortboard Mk II USB Audio Device [3]
MIDI Out Port 4
FBV Shortboard Mk II (Port 4) MIDIIN4 FBV Shortboard Mk II USB Audio Device [4]
This completes the configuration needed within the GearBox software. Next we need to configure
your FBV MkII to send the specific MIDI commands to trigger the desired GearBox functions. The
easiest way to do this is to select the GearBox.fbv FBV control preset that we’ve provided with the
Line 6 FBV Control application.
• Launch the Line 6 FBV Control application from /Applications /Line 6/Line 6 FBV Control
®
®
(Mac
), or Start menu\Programs\Line 6\Line 6 FBV Control (Windows
)
• Go to File > Open and choose the GearBox.fbv preset file from these locations:
®
• /Documents/Line 6/FBV/Presets (Mac
)
®
• /My Documents\Line 6\FBV\Presets (Windows
)
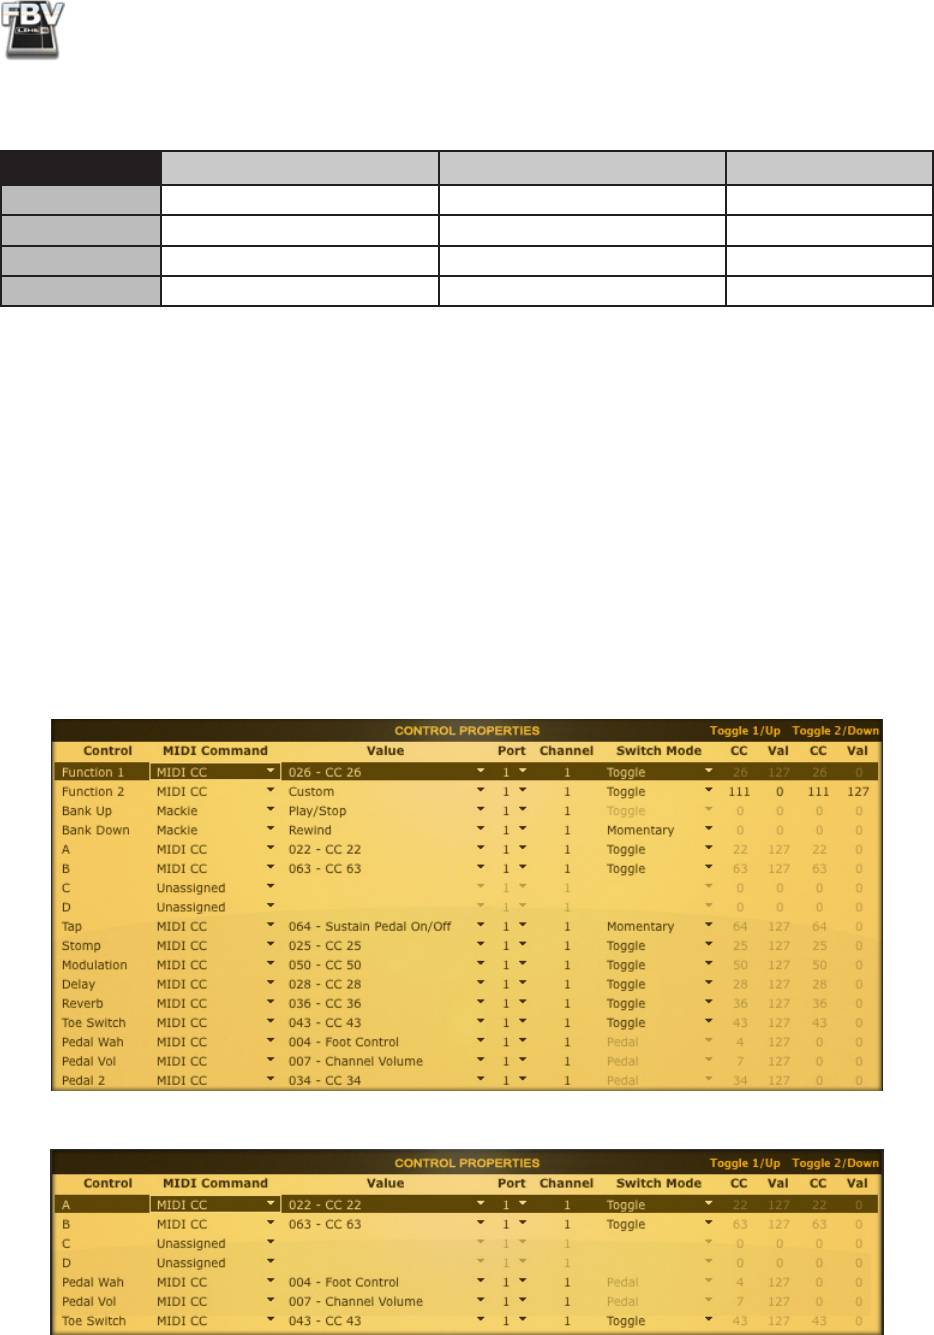
This automatically loads the complete set of GearBox MIDI control assignments into the internal
memory of your FBV MkII device. The Control Properties list should now display all these settings:
GearBox.fbv preset settings loaded on FBV Shortboard MkII
GearBox.fbv preset settings loaded on FBV Express MkII
5•2
FBV MkII Advanced User Guide: Controlling Line 6 GearBox
As a handy reference, the following table tells what each FBV control will actually trigger in GearBox
when using this GearBox.fbv preset:
FBV Shortboard MkII
FBV Control GearBox Function
FUNCTION 1 Comp effect on/off
FUNCTION 2 Amp/Preamp on/off
BANK UP Player Transport - Play/Stop toggle
BANK DOWN Player Transport - Rewind
A Gate effect on/off
B EQ effect on/off
C No assignment
D No assignment
TAP Tap Tempo
STOMP Stomp effect on/off
MODULATION Modulation effect on/off
DELAY Delay effect on/off
REVERB Reverb effect on/off
TOE SWITCH* Wah effect on/off
PEDAL WAH Wah Position
PEDAL VOL Volume Position
PEDAL 2 Delay Mix Level
* The Toe Switch additionally has a hard-wired function to toggle between the Pedal’s, “Wah” and
“Vol” assignments.
FBV Express MkII
FBV Control GearBox Function
BANK UP Player Transport - Play/Stop toggle
BANK DOWN Player Transport - Rewind
A Gate effect on/off
B EQ effect on/off
C No assignment
D No assignment
TOE SWITCH* Wah effect on/off
PEDAL WAH Wah Position
PEDAL VOL Volume Position
* The Toe Switch additionally has a hard-wired function to toggle between the Pedal’s, “Wah” and
“Vol” assignments.
With these settings you should now be up and running - try stomping on your FBV footswitches and
pedal and you should see, and hear, GearBox respond!
5•3

FBV MkII Advanced User Guide: Controlling Line 6 GearBox
Customize Your GearBox Control
The above settings are great, but now you want more control you say? No problem! Many GearBox
functions are capable of being controlled remotely, via MIDI commands. All you need to do is edit the
settings within the Line 6 FBV Control application, entering the MIDI command assignments for the
desired GearBox functions.
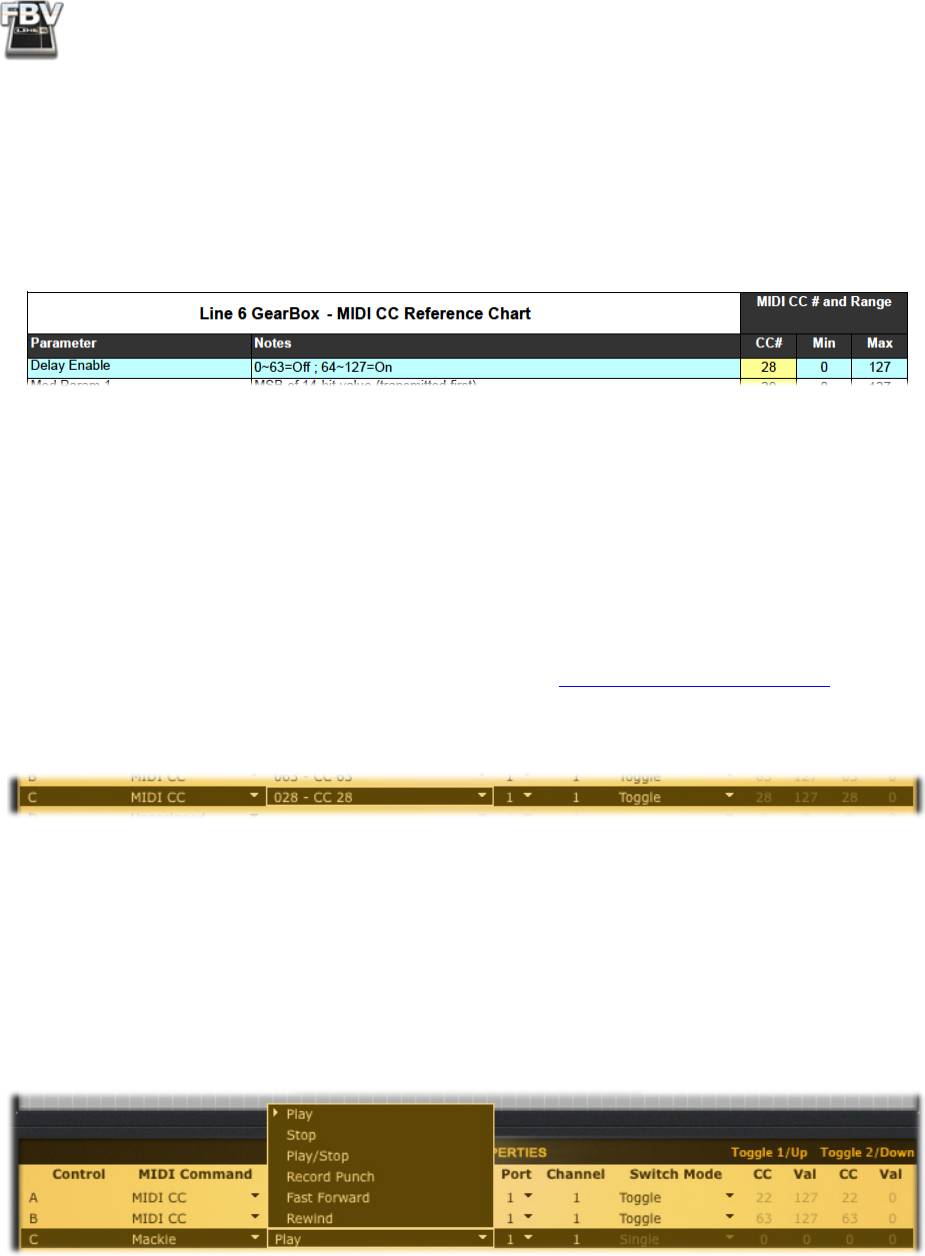
First you’ll need to see what the necessary MIDI commands are for all of the GearBox functions. This
information is available in the handy Line 6 MIDI CC Reference document, available for download
from the FBV MkII Online Help page. Take a look at the document’s GearBox MIDI CC Reference
Chart for the list of GearBox functions and their MIDI CC number and value assignments. Also see
the GearBox Model Tables for the list of Amp & Effects models’ MIDI CC assignments.
Configure your FBV Pedal to Control a GearBox Knob Parameter
There are also lots of knobs in GearBox, and you can configure your FBV MkII Pedal (as well as the
optional Expression Pedal on a Shortboard) to just about any of these GearBox knobs! For example,
say you want to have your FBV PEDAL WAH control adjust the GearBox Modulation Mix parameter
rather than the Wah Position parameter. Looking at the GearBox MIDI CC Reference Chart, the
Modulation Mix parameter lists its MIDI CC assignment as CC #56, with Min. and Max Range Values
of 0 to 127:
This tells you that you need to create these settings in the Line 6 FBV Control application for the
“PEDAL WAH” row in the Control Properties:
• MIDI Command: MIDI CC
• Value: CC# 056
• MIDI Port: 1 (Optionally, you can choose any available port here, but your GearBox MIDI In
setting needs to match to receive the command - see “Get Connected” on page 5•1.)
• MIDI Channel: 1 (GearBox receives MIDI on Channel 1 only.)
The Min. and Max Range Values shown in the MIDI CC Reference chart tell you that this parameter
can be controlled from 0 to 100% (the equivalent of 0 to 127 in MIDI CC value terms). Therefore,
there are no other settings you need to create for the Pedal to control the full range of the Modulation
Mix parameter. You can follow these same steps to configure your FBV pedal for any other parameter
you see in the GearBox MIDI CC Reference Chart.
TIP: Want to set your Pedal to control the GearBox Bender Position knob, to foot-control some wild
pitch bending? In the Line 6 FBV Control - Control Properties, set one of your Pedal settings to “MIDI
CC” for the MIDI Command and “CC 79” for the Value. In GearBox, you probably want to set the
Bender effect’s Mix knob to 100% so you hear only the pitch effected signal, and set the Heel and Toe
knobs to the desired amount of pitch change (these are in semi-tones), and “wham” on that pedal!
5•4
FBV MkII Advanced User Guide: Controlling Line 6 GearBox
Configure a Footswitch to Toggle your Amp or Effects On/Off
The GearBox.fbv preset already configures the GearBox amp and effects items to be “toggled” on/off,
but if you want to change the assignment of any switch, you can refer to the Line 6 MIDI Continuous
Controller Reference PDF, and take a look at the GearBox MIDI CC chart. Look up the desired GearBox
effect parameter and note its CC number. For example, say you want to make your “C” labeled FBV
footswitch toggle the GearBox Delay effect on and off. In the GearBox MIDI CC chart, you’ll see this
has CC #28 listed as the assignment:
You can also see in the Notes column that the CC Values of 0-63 will set the Delay “Off”, and 64-
127 will set the Delay “On”. But you do not need to manually configure these CC toggle values, since
setting the Switch Mode for your FBV footswitch control to “Toggle” will set them automatically for
you, so that the MIDI message sent alternates between “127” (On) and “0” (Off) for each successive
press of the footswitch. Therefore, the settings you want to enter into the FBV Control application’s
Control Properties list for the “C” footswitch control are as follows:
• MIDI Command: MIDI CC
• Value: CC# 028
• MIDI Port: 1 (Optionally, you can choose any available port here, but your GearBox MIDI In
setting needs to match to receive the command - see “Get Connected” on page 5•1.)
• MIDI Channel: 1 (GearBox receives MIDI on Channel 1 only.)
• Switch Mode: Toggle
Configure a Footswitch to Control the GearBox Player Transport
The Player module within GearBox allows you to load and play audio files from a CD or your computer
hard drive, or to play GuitarPort Online membership Lessons & Tracks. If you want to keep your hands
on your guitar while jamming along with the Player, then you can assign any of your FBV footswitches
to control the Player’s Rewind, Play, Stop or Fast Forward transport options. To do so, simply set the
MIDI Command to “Mackie” and then choose the desired function in the Value column, as shown
here:
OK, you should now be all set with your FBV with GearBox, so stop mousing around on that computer
and focus on the music!
5•5

