Gorenje tgr65sb6: fbV™ Mkii wiTh line 6 Pod farM™ 2
fbV™ Mkii wiTh line 6 Pod farM™ 2: Gorenje tgr65sb6

FBV MkII Advanced User Guide: Controlling Line 6 POD Farm 2
fbV™ Mkii wiTh line 6 Pod farM™ 2
This chapter covers the use of your Line 6 FBV Shortboard™ MkII or FBV Express™ MkII to remotely
control numerous parameters within the Line 6 POD Farm™ 2 standalone application and POD
Farm™ 2 Plug-In. This allows you to expand the possibilities of POD Farm 2 even further by using
your FBV MkII pedal to control a Wah, Volume or Pitch Bender effect, toggle any effects on/off,
navigate your custom POD Farm 2 Setlists, control POD Farm 2 Plug-In parameters while writing
DAW automation, and more! If you have not already done so, please connect your FBV Shortboard
or Express MkII to your computer’s USB port and launch Line 6 Monkey to make sure your FBV is
updated with the latest Device Firmware version - please see “Updating & Registering with Line 6
Monkey” on page 1•1.
What is POD Farm 2?
In case you’re wondering... Line 6 POD Farm 2 is the software available for owners of Line 6 USB audio
interface products.* The POD Farm 2 standalone application provides a full-featured computer User
Interface where you can access all those famous Line 6 guitar & bass amp, preamp, speaker cabinet,
mic, and effects models. Using your Line 6 USB audio interface, this essentially provides you legendary
POD tone right on your computer, which you can use to record into your favorite audio software or
jam along with your favorite songs. Further, POD Farm 2 also includes the POD Farm 2 Plug-In and
POD Farm Elements Plug-Ins, which run as audio effects plug-ins within all major DAW applications
®
®
on your Mac
or Windows
computer. The POD Farm 2 standalone application and the POD Farm
2 Plug-In both support external MIDI control, and your FBV MkII device is the perfect USB MIDI
controller device for the task!
*Note: The POD Farm 2 standalone application requires a Line 6 POD Studio™, TonePort™ or
GuitarPort™ device. A POD Farm 2 license can also be purchased as an “Add-On” for a Line 6 POD®xt,
POD® X3 units or for an iLok USB key to allow POD Farm 2 Plug-In to be run with one of these
devices.
®
®
To purchase POD Farm 2, connect your Line 6 USB audio interface to your Mac
or Windows
computer, launch Line 6 Monkey and let the little monkey fellow show you the enlightened path to
the download. Or, go directly to the http://line6.com/software/ page and download it from there.
If you have not already done so, also download and install the Line 6 FBV Control application. You’ll
need this to load and edit the MIDI commands your FBV device will use to communicate with POD
Farm 2. See the “The Line 6 FBV Control Application” on page 3•1 for download instructions.
About USB MIDI Ports & Channels
First, it is helpful to learn how all this MIDI communication works between your FBV MkII device
®
®
and your computer. When connected to the USB port of your Mac
or Windows
computer, your
FBV MkII device establishes one USB “MIDI In” port and four USB “MIDI Out” ports. These are
not “physical” hardware ports that require you to use a mess of MIDI cables - your FBV communicates
all its MIDI data across your USB cable to these “virtual” software MIDI ports. If you are going to be
controlling the POD Farm 2 standalone application, you’ll access these FBV MIDI Ports within the
Preferences of the POD Farm 2 standalone application (see “POD Farm 2 Standalone Application -
MIDI Input Configuration” on page 4•7). If you are to be controlling POD Farm 2 Plug-In, you’ll need to
configure the DAW hot software in which you are using the Plug-In to receive MIDI from these FBV
MkII MIDI Ports (see “POD Farm 2 Plug-In - MIDI Input Configuration” on page 4•8).
4•1

FBV MkII Advanced User Guide: Controlling Line 6 POD Farm 2
MIDI Communication with your Software
With your FBV MkII device USB-connected to your computer, you typically just need to set your
software application to receive MIDI control data from the specific MIDI Out port and MIDI channel
®
®
to which your FBV device is transmitting. For example, in the Ableton Live
or Live
Lite software,
the Preferences > MIDI/Sync dialog offers options to choose one or more MIDI controller devices. In
your MIDI/DAW software, you’ll see FBV MIDI Ports 1 through 4 from which to receive MIDI Control
data.
Note: These four ports appear titled differently depending on your specific Mac® or Windows® operating
system version - Please see the setup examples in the following sections.
By default, all your FBV MkII Control assignments are transmitted to the FBV MIDI Out Port 1.
However, you can set any individual FBV control to transmit its MIDI control data to any FBV MIDI
Out port 1 through 4 (see the FBV Control application’s Control Properties List section on page 3•1).
®
Windows
MIDI Port Communication
®
It is important to note that the Windows
USB Class Compliant driver, which is used for your FBV
MkII device on Windows, inherently allows only one application to utilize each MIDI port at a time.
The Line 6 FBV Control application, when open, uses the FBV MIDI In port and the MIDI Out port
4 for communication with your FBV device. Therefore, if you have another DAW software application
®
currently running on your Windows
computer that is configured to also use these same FBV MIDI
ports, only one application will be permitted to do so.
If you already have POD Farm 2 standalone application or your DAW software running, and one
has the FBV MIDI In port enabled, trying to then launch the Line 6 FBV Control application will
typically result in the FBV Control application failing to detect the connected FBV device, since it
is “in use” by the other software. One possible solution is to disable the use of the FBV MIDI In port
and FBV MIDI Out 4 port within your POD Farm 2 or DAW software. (You should be OK keeping
the POD Farm 2 or DAW software enabled for receiving from the FBV MIDI Out ports 1 through 3,
which allows you to still send MIDI Control commands from FBV to your software.) Otherwise, it is
recommended to exit all other applications when using the FBV Control software to provide full MIDI
port access for editing your FBV control settings.
Note: The Line 6 Monkey application also utilizes the FBV MIDI ports for its ability to detect and update
your connected FBV device. It is always recommended that you exit the Line 6 FBV Control, as well as
any MIDI/DAW software, before launching Line 6 Monkey.
MIDI Channels
Each USB MIDI Port carries 16 MIDI “channels.” You can think of MIDI channels just like channels
on your TV - your TV is capable of receiving many “channels”, but you’ll only be able to see the
program you want to watch if you tune your TV set to the specific channel. Same thing here in the
world of MIDI. By default, your FBV MkII device will transmit its MIDI data to Channel 1 on the
selected MIDI Port for each control. However, you can set any individual FBV control to transmit
to any MIDI Channel (see the FBV Control application’s Control Properties List section on page 3•1).
You may find that your software offers options to receive only on a specific MIDI channel from the
selected MIDI port, so you will want to be sure to configure any such MIDI Channel options to match
those to which your FBV controls are transmitting. POD Farm 2 will receive MIDI on all 16 channels
(however, when using POD Farm 2 Plug-In, you might need to set your DAW or MIDI track to receive
from the channel to which your FBV is transmitting).
4•2
FBV MkII Advanced User Guide: Controlling Line 6 POD Farm 2
POD Farm 2 Pre-configured MIDI Assignments
POD Farm 2 standalone application and POD Farm 2 Plug-In come with a complete folder of Tone
Presets that include “pre-configured” MIDI control assignments. To access these Tone Presets, select
the “POD Farm 2” titled folder within the Presets View.
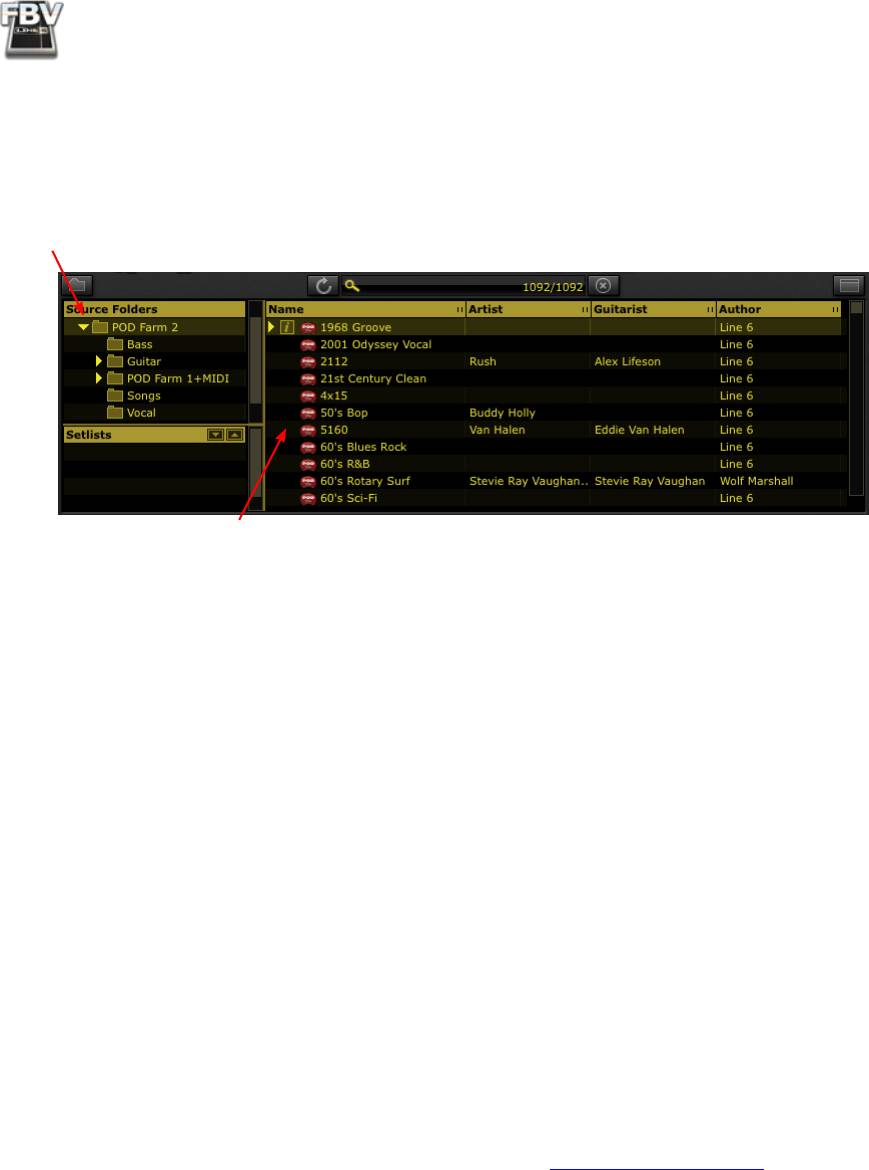
Select the “POD Farm 2” folder (or any of its sub-folders) within the Source Folders pane
The Tone Presets available within these folders include “pre-
configured” MIDI control assignments
The POD Farm 2 Presets View
The pre-configured MIDI assignments allow any MIDI controller device to access several useful
parameters for these POD Farm 2 Tones. Note that these Tones’ MIDI assignments are “Local” MIDI
assignments - meaning, they are saved individually with each Tone Preset, and accessible within POD
Farm 2 Plug-In, as well as in the POD Farm 2 standalone application.
Additionally, the POD Farm 2 standalone application includes several pre-configured “Global” MIDI
assignments. These Global MIDI assignments, as the name suggests, are configured for POD Farm 2
system settings. These Global assignments are available regardless of the current Tone Preset, and
persist within the POD Farm 2 application (it is not necessary to save your Tones to retain them).
With a Line 6 FBV MkII controller device, we’ve made things simple by providing a “POD Farm 2”
FBV Control preset to configure your FBV device to access these Tones’ MIDI assignments instantly
(see the next section).
“POD Farm 2” FBV MkII Control Presets
To provide a nice “jump start,” we’ve created “POD Farm 2” FBV MkII control presets that can be
loaded on your device using the Line 6 FBV Control application. These FBV MkII control (.fbv file)
presets load a complete set of MIDI commands on your device for instant POD Farm 2 functionality! It
is recommended that you download and load the FBV control preset on your FBV MkII device before
proceeding with configuring the POD Farm 2 standalone application or Plug-In for your FBV MkII
device. These Presets are available for download from the POD Farm Online Help site:
• For FBV Shortboard MkII - Download the file named “POD Farm 2-Shortboard.fbv.”
• For FBV Express MkII - Download the file named “POD Farm 2-Express.fbv.”
Once you’ve downloaded the FBV control preset file for your device, launch the Line 6 FBV Control
application to load the preset on your FBV MkII:
4•3
FBV MkII Advanced User Guide: Controlling Line 6 POD Farm 2
• On Mac, go to /Applications/Line 6 and double-click on Line 6 FBV Control
• On Windows, go to Start button menu\Programs\Line 6\Line 6 FBV Control
For additional info, please see “The Line 6 FBV Control Application” on page 3•1.
This automatically loads the complete set of “POD Farm 2” MIDI control settings into the internal
memory of your FBV MkII device. These settings allow you to instantly access many useful “pre-
configured” MIDI control assignments that already exist within POD Farm 2 (as covered in the
previous section). You can view the existing MIDI assignments for any Tone Preset by looking in the
POD Farm 2 “MIDI Assignments View” display (see “The POD Farm 2 MIDI Assignments View” on
page 4•10). MIDI Bank & Program Change settings are also included in the FBV MkII presets to allow
footswitches to navigate Setlists and their Tone Presets. Further, you can also customize these MIDI
assignments individually for any POD Farm 2 Tone, and/or use the POD Farm 2 “MIDI Learn” feature
to easily create your own MIDI assignments (see “MIDI Learn in POD Farm 2” on page 4•10).
With the “POD Farm 2” FBV control preset loaded in your FBV Shortboard or Express MkII device,
the application’s Control Properties list will display all its MIDI settings.
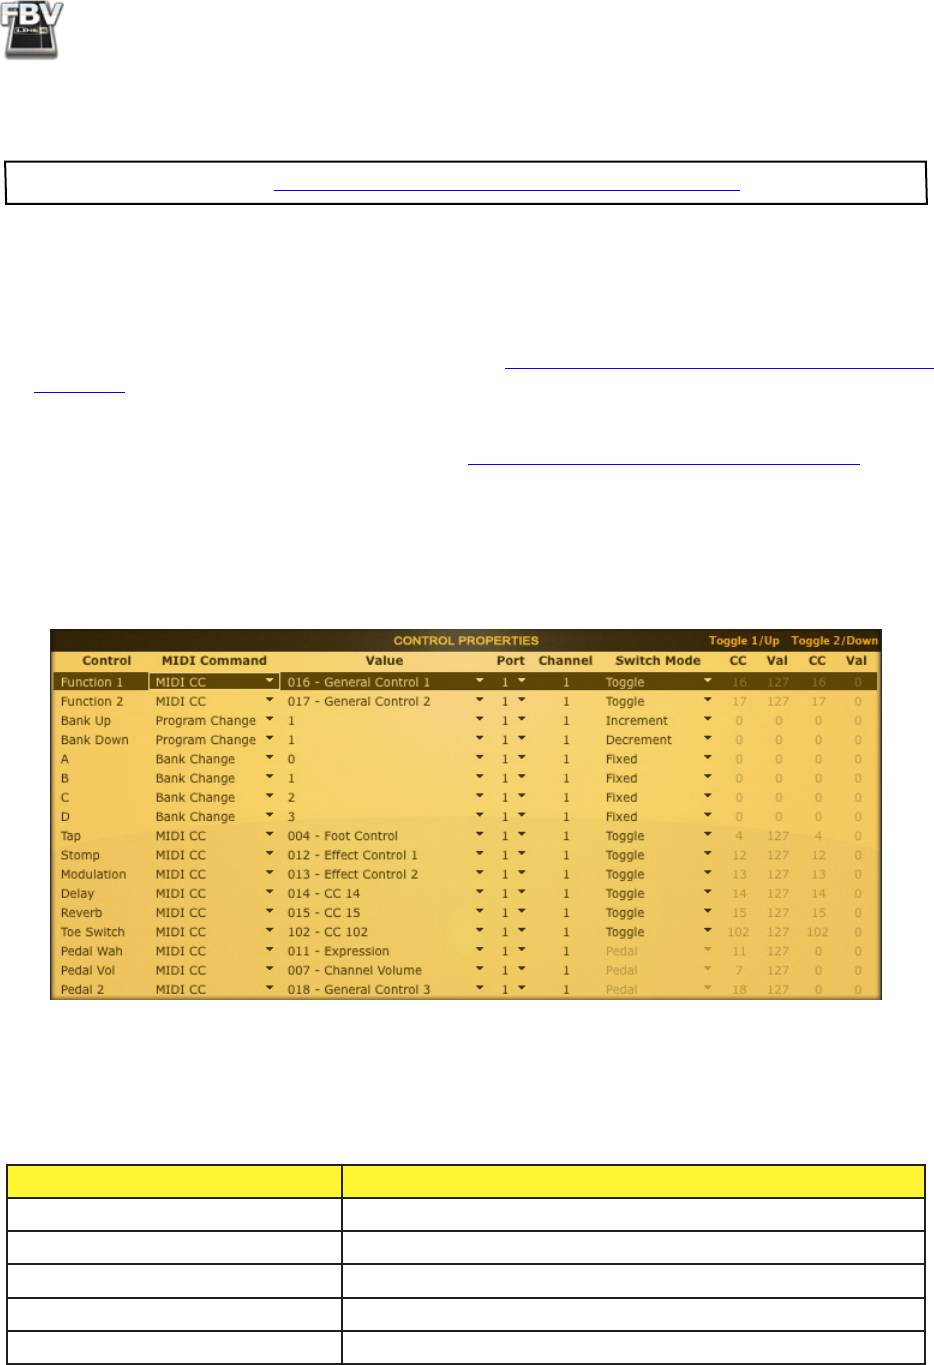
FBV Shortboard MkII
POD Farm 2-Shortboard.fbv preset settings, when loaded in the FBV Control application
The above FBV Shortboard MkII MIDI control settings perform the following functions with POD
Farm 2:
FBV Shortboard MkII Control POD Farm 2 Pre-configured Model & Parameter
Bank Up Next Tone Preset within selected Setlist
Bank Down Previous Tone Preset within selected Setlist
A Selects Setlist 0, and recalls the “0” numbered Tone Preset within
B Selects Setlist 1, and recalls the “0” numbered Tone Preset within
C Selects Setlist 2, and recalls the “0” numbered Tone Preset within
4•4
FBV MkII Advanced User Guide: Controlling Line 6 POD Farm 2
FBV Shortboard MkII Control POD Farm 2 Pre-configured Model & Parameter
D Selects Setlist 3, and recalls the “0” numbered Tone Preset within
Tap Not in use
Stomp “Stomp” effects (Distortions, Dynamics, Filters) - On/Off
Modulation Mods - On/Off
Delay Delays - On/Off
Reverb Reverbs - On/Off
Toe Switch Wahs - On/Off, Bender effect On/Off
Pedal Wah Wahs - Adjusts Position knob
Pedal 2 No assignment
FBV Shortboard MkII Control POD Farm 2 Pre-configured Global Parameter
(POD Farm 2 Standalone Only)
Function 1 A/B Switch - Toggles between Tone A and Tone B
Function 2 Tuner View - Toggles Tuner View display On/Off
Tap Tap Tempo - Sets System Tempo
Pedal Volume Adjusts the Mixer Tone A Level and Tone B Level
Pre-configured functions provided in POD Farm 2 by the POD Farm 2-Shortboard.fbv preset settings
• Bank Up & Bank Down footswitches - These two footswitches navigate through the Tone
Presets within the currently selected Setlist.
• A, B, C & D footswitches - These footswitches each select the correspondingly numbered
Setlist, as shown in the above table. Each also automatically loads the first Tone Preset within
the selected Setlist (the Preset with “0” to its left). This allows you to then use the Bank Up &
Down footswitches to navigate through all the Tone Presets within the selected Setlist.
Note that no Setlists exist within POD Farm 2 by default, therefore, the Bank Up & Down and A, B, C
& D footswitches will not perform any function until you create up to four Setlists and add Tone Presets
into the Setlists. Please see the POD Farm 2 Basic User Guide for info on creating & managing Setlists
(accessible via the POD Farm 2 Help button, or from the POD Farm Online Help site).
• Effect labeled footswitches and Pedal Wah - These trigger the functions listed above within
some of the POD Farm 2 Tone Presets. Note that not all Tone Presets include all these effects
models and assignments - In most Tone Presets, a few effects models and MIDI assignments exist.
• Toe Switch - As listed in the table above, the Toe Switch may be assigned to either toggle a Wah
model on/off, or the Bender model on/off in some of the Tone Presets within the “POD Farm
2” Source Folder. The Toe Switch additionally has a “hard-wired” function to toggle your FBV
Shortboard MkII “Pedal 1” function between the “Pedal Wah” and “Pedal Volume” assignments.
• Pedal 2 - This control accesses no pre-configured assignment setting. But, since the FBV preset
sets Pedal 2 to transmit a MIDI CC command, you can still utilize the POD Farm 2 MIDI Learn
feature to map these FBV controls to POD Farm 2 functions.
• Function 1, Function 2 & Tap - These controls are all set to access “Global” MIDI assignments,
which only exist as pre-configured MIDI assignments in the POD Farm 2 standalone application
and not in the Plug-In. (However, you can use MIDI Learn to create Global MIDI assignments
4•5
FBV MkII Advanced User Guide: Controlling Line 6 POD Farm 2
manually within POD Farm 2 Plug-In for any of your FBV MkII controls!) You’ll see more about
Local & Global assignments and MIDI Learn in the following sections.
• Pedal Volume - Adjusts both the Tone A Level and Tone B Level faders within the POD Farm 2
Mixer View simultaneously. If your current POD Farm 2 configuration is a single Tone, then only
the Tone A Level fader is controlled. Note that this is a Global MIDI assignment.
FBV Express MkII
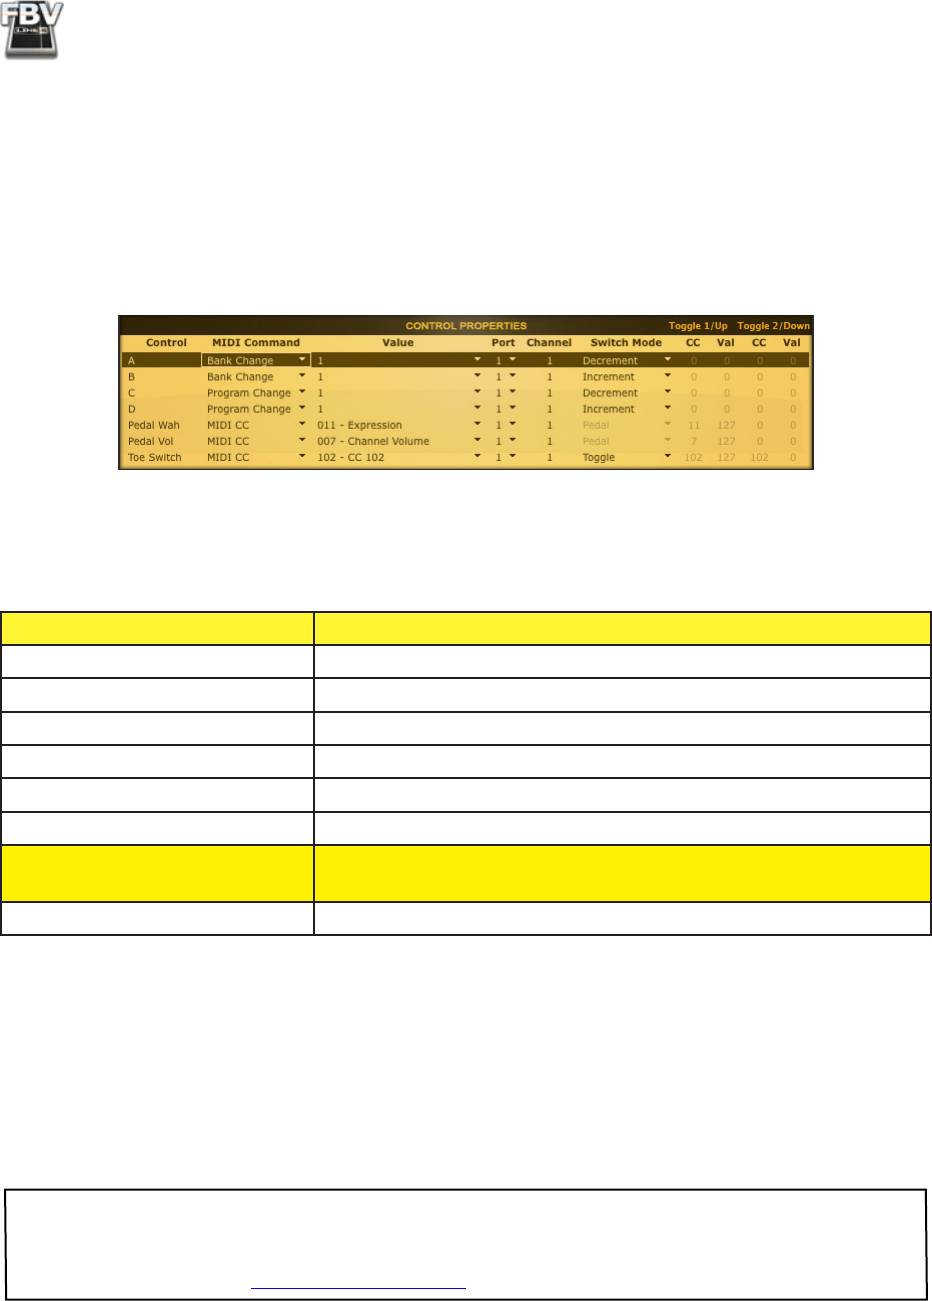
POD Farm 2-Express.fbv preset settings, when loaded in the FBV Control application
The above FBV Express MkII MIDI Controller settings perform the following functions with POD
Farm 2:
FBV Express MkII Control POD Farm 2 Pre-configured Model & Parameter
A Selects the previous Setlist, and loads the first Tone Preset within
B Selects the next Setlist, and loads the first Tone Preset within
C Loads the previous Tone Preset within the selected Setlist
D Loads the next Tone Preset within the selected Setlist
Pedal Wah Wahs - Adjusts Position knob
Toe Switch Wahs - On/Off, or Bender effect On/Off
FBV Express MkII Control POD Farm 2 Pre-configured Global Parameter
(POD Farm 2 Standalone Only)
Pedal Volume Adjusts the Mixer Tone A Level and Tone B Level
Pre-configured functions provided in POD Farm 2 by the POD Farm 2-Express.fbv preset settings
• A & B footswitches - These footswitches select the previous and next correspondingly numbered
Setlist, respectively. Each also automatically loads the first Tone Preset within the selected Setlist
(the preset with the number “0” to its left). This allows you to then use the C & D footswitches
to load Tone Presets within the selected Setlist.
• C & D footswitches - These footswitches select the previous and next correspondingly numbered
Tone Preset within the currently selected Setlist, respectively.
Note that no Setlists exist within POD Farm 2 by default, therefore, the A, B, C & D footswitches will
not perform any function until you create Setlists and add Tone Presets into the Setlists. Please see the
POD Farm 2 Basic User Guide for info on creating and managing Setlists (accessible via the POD Farm
2 Help button, or from the POD Farm Online Help site).
• Toe Switch - As listed in the table above, the Toe Switch may be assigned to toggle a Wah model
on/off, or the Bender model on/off in some of the Tone Presets within the POD Farm 2 Source
4•6
FBV MkII Advanced User Guide: Controlling Line 6 POD Farm 2
Folder. The Toe Switch additionally has a “hard-wired” function to toggle your FBV Shortboard
MkII “Pedal 1” function between the “Pedal Wah” and “Pedal Vol” assignments.
• Pedal Wah - Adjusts the “Position” knob for Wah models within some of the POD Farm 2 Tone
Presets. In a few Tone Presets, one pedal may also control the Bender model’s “Position” knob,
for some cool pitch bending action.
• Pedal Volume - Adjusts both the Tone A Level and Tone B Level faders within the Mixer View
simultaneously. If your current POD Farm 2 configuration is a single Tone, then only the Tone A
Level fader is controlled. Note that this is a “Global” MIDI assignment and only exists as a “pre-
configured” MIDI assignment in the POD Farm 2 standalone application and not in the Plug-In.
(However, you can use MIDI Learn to create this and other Global MIDI assignments manually
with your FBV Express MkII!)
With these settings made on your FBV MkII, exit the FBV Control application and proceed with the
steps to configure POD Farm 2 standalone application or Plug-In.
POD Farm 2 Standalone Application - MIDI Input Configuration
To use your FBV MkII device with the POD Farm 2 standalone application, you’ll first need to configure
POD Farm 2 to receive MIDI from your connected FBV MkII device’s MIDI port(s).
If you want to control POD Farm 2 Plug-In, please proceed to “POD Farm 2 Plug-In - MIDI Input
Configuration” on page 4•8
. MIDI control of POD Farm 2 Plug-In requires configuring MIDI settings
within your DAW software.
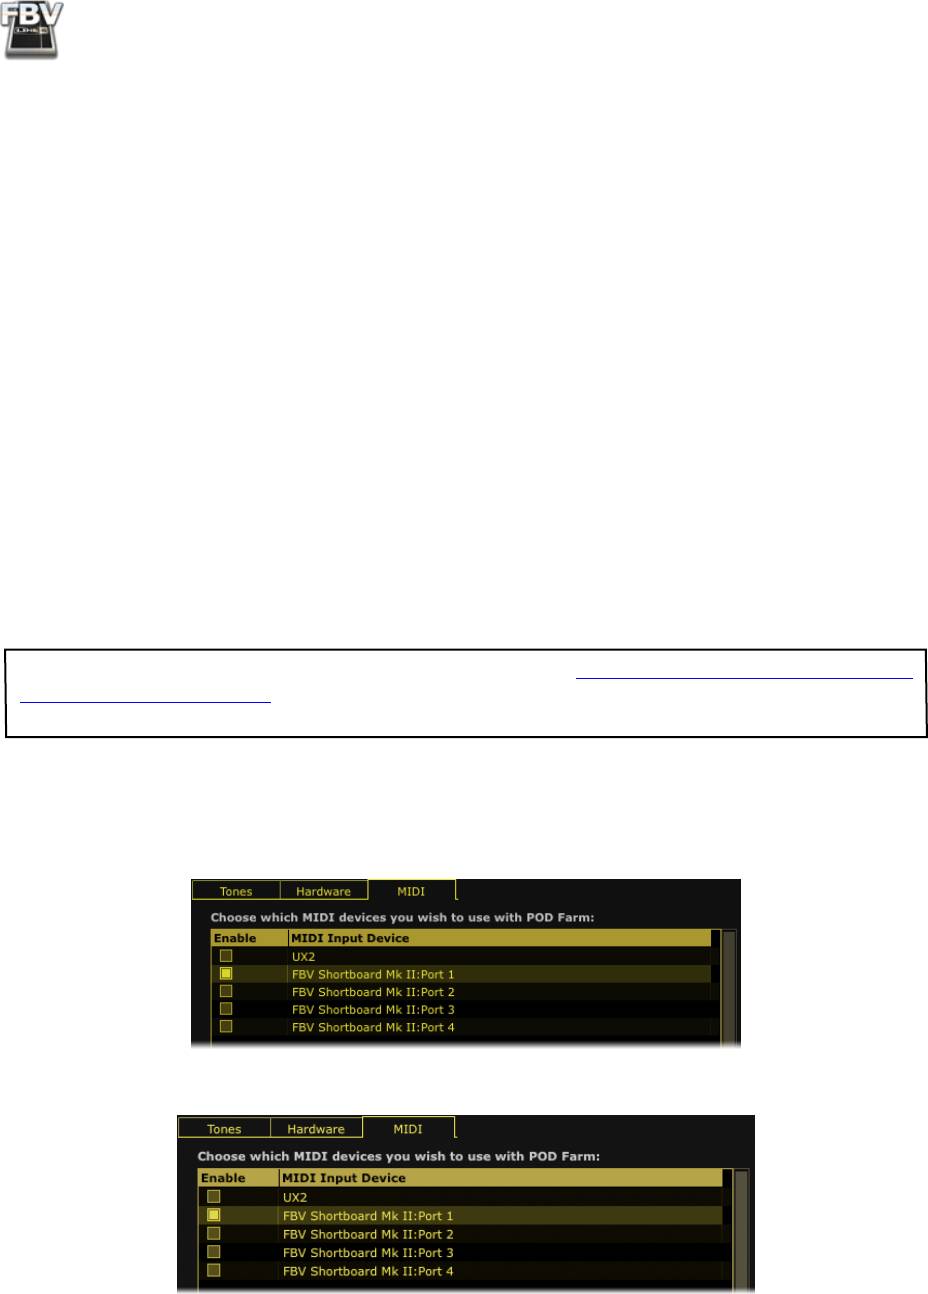
• Launch the POD Farm 2 Preferences dialog and go to the MIDI tab. Here you will be able to
select any connected MIDI controller device or port. Note that you’ll see the four FBV MIDI
Out ports named differently, depending on your computer’s operating system:
Preferences - MIDI dialog on Mac OS® X
Preferences - MIDI dialog on Windows® 7 & Windows® Vista
4•7
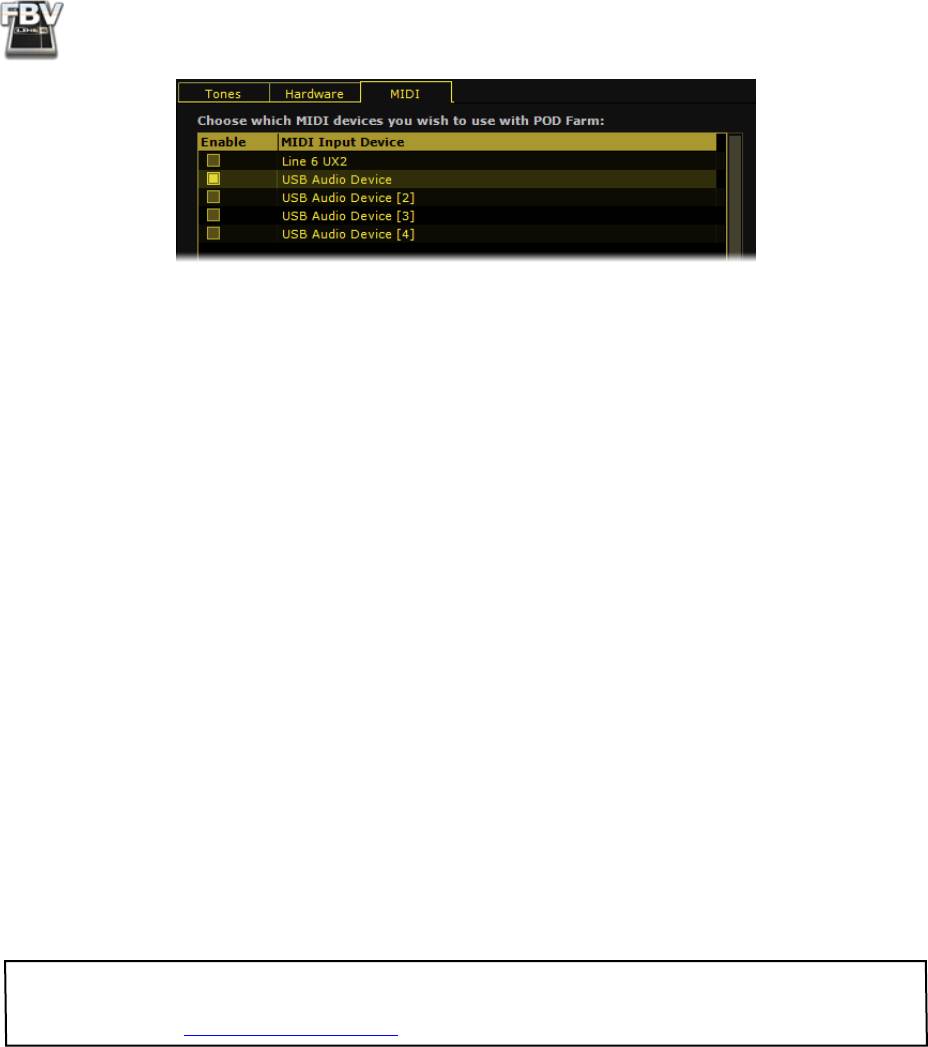
FBV MkII Advanced User Guide: Controlling Line 6 POD Farm 2
Preferences - MIDI dialog on Windows® XP
• As the initial default, you’ll see all ports for all Line 6 MIDI devices already selected. You may
want to de-select all except the ones you want to use for POD Farm 2 control. Your settings will
then be remembered on subsequent uses of the application.
• In the above example you can see that we’ve chosen to receive MIDI from only the Port 1 output
of the connected Line 6 FBV Shortboard MkII controller. (Note that our connected Line 6 UX2
device is also an option, since its Footswitch 1 & 2 connections can be configured to send MIDI
commands as well, but we’ll just be using FBV MkII, port 1 for this example.)
• Click OK to exit the POD Farm 2 Preferences and complete the MIDI input configuration steps.
POD Farm 2 Plug-In - MIDI Input Configuration
POD Farm 2 Plug-In, like all audio effects Plug-Ins, is utilized within your DAW software’s audio tracks.
POD Farm 2 Plug-In can receive MIDI from your FBV MkII USB MIDI Ports to allow remote MIDI
control of its many parameters, however, it is necessary to route the MIDI communication through
your DAW software to access POD Farm 2 Plug-In. This configuration can be slightly different among
DAW applications, so it is recommend that you consult your DAW’s documentation for details. The
process typically entails choosing to receive MIDI from your FBV MkII MIDI Port(s) within the DAW
application, and then routing the MIDI in to one of the DAW’s MIDI tracks and out to the audio track
where POD Farm 2 Plug-In is inserted.
®
To follow, we’ve provided a brief tutorial using the popular Ableton Live
DAW application for
configuring an FBV MkII device to access the parameters within POD Farm 2 Plug-In. The steps are
similar using other DAW applications, so this should serve as a good introduction.
TIP: For tutorials on setting up external MIDI control of POD Farm 2 Plug-In within several popular
DAW applications, please be sure to grab the POD Farm 2 Recording Setup Guide - available for
download from the POD Farm Online Help site!
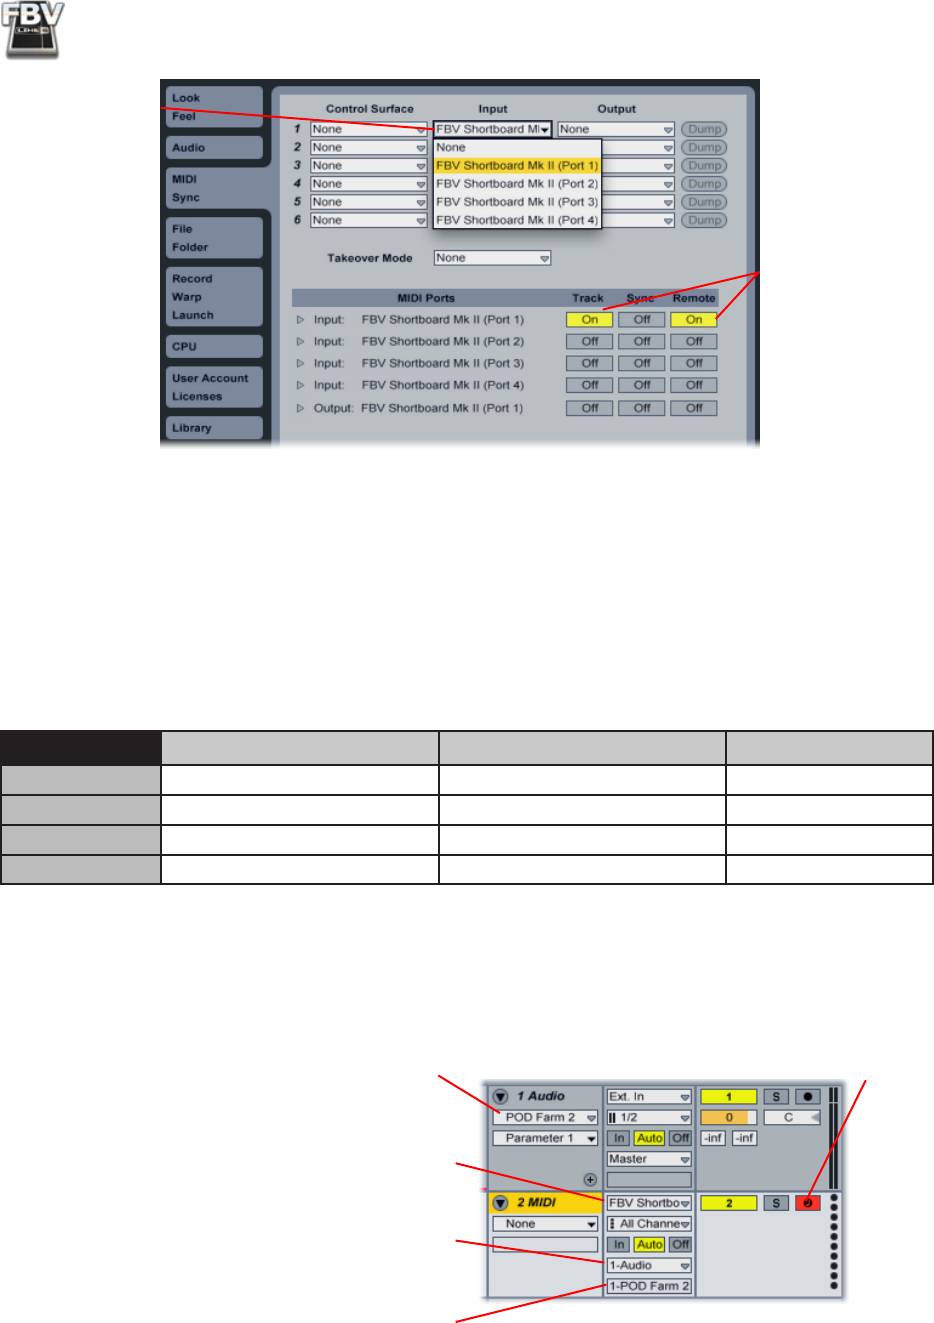
With your FBV MkII device connected to your computer, launch the Ableton Live software, and go to:
®
• Mac
- Ableton Live menu > Preferences > MIDI/Sync page
®
• Windows
- Options menu > Preferences > MIDI/Sync page
Here you will see that Ableton Live automatically detects your FBV MkII MIDI Out ports. You might
see additional devices’ MIDI Ports appear here as well, depending what other MIDI hardware/software
you have installed on your computer.
4•8
FBV MkII Advanced User Guide: Controlling Line 6 POD Farm 2
Select your FBV
MIDI Out Port
here (each FBV
port can be
selected for up to
4 MIDI Inputs if
desired)
Click both the
“Track” and
“Remote” buttons
to “On” for your
MIDI Input Port*
®
Ableton Live - Selecting FBV MkII as MIDI Inputs (Mac
OS X)
*It is only necessary to turn on the MIDI In “Remote” option to allow Live to receive MIDI control
data from the selected MIDI port. However, to allow Live to receive MIDI into a MIDI track you need
to turn on the “Track” option - You’ll need MIDI track input to route MIDI control data directly to
POD Farm 2 Plug-In.
Note that when selecting the FBV MkII MIDI ports within your DAW, you’ll see the USB MIDI port
names titled differently, depending on your specific computer operating system (for FBV Express MkII,
you’ll see “Express” in place of “Shortboard” in these titles):
Mac OS® X Windows® 7 &
Vista® Windows® XP
MIDI Out Port 1 FBV Shortboard Mk II (Port 1) FBV Shortboard Mk II USB Audio Device
MIDI Out Port 2 FBV Shortboard Mk II (Port 2) MIDIIN2 FBV Shortboard Mk II USB Audio Device [2]
MIDI Out Port 3 FBV Shortboard Mk II (Port 3) MIDIIN3 FBV Shortboard Mk II USB Audio Device [3]
MIDI Out Port 4 FBV Shortboard Mk II (Port 4) MIDIIN4 FBV Shortboard Mk II USB Audio Device [4]
The next step is to insert POD Farm 2 Plug-In on one of your DAW audio tracks, and then configure
your DAW tracks to route the MIDI data into POD Farm 2 Plug-In. For example, here is how to
configure this in Ableton Live, where POD Farm 2 Plug-In is inserted on Audio track 1:
Be sure to Arm the MIDI track
POD Farm 2 Plug-In is inserted
to allow MIDI throughput
on Audio track 1
On a new MIDI track, set the Input to receive
from the FBV MkII MIDI Port from which you are
transmitting commands
Set the Output to be the Audio track where your
POD Farm 2 Plug-In is inserted
The POD Farm 2 Plug-In should then appear as the
“MIDI Output Channel” destination
Configuring Ableton Live for FBV MkII MIDI Input to POD Farm 2 Plug-In
4•9
FBV MkII Advanced User Guide: Controlling Line 6 POD Farm 2
Once the above MIDI routing is configured, you are now ready to put that FBV MkII to use with the
POD Farm 2 Plug-In!
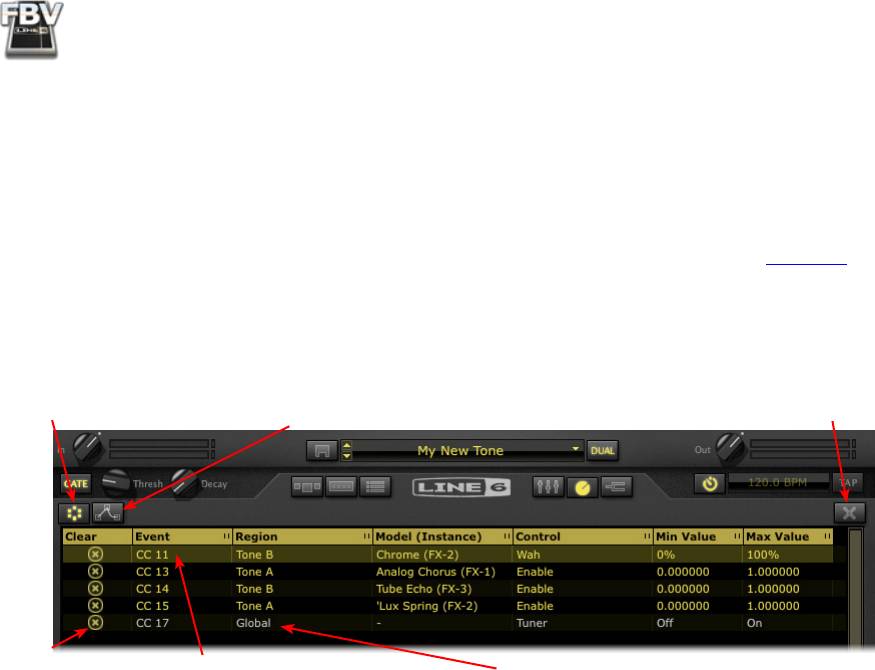
The POD Farm 2 MIDI Assignments View
The MIDI Assignments View displays all MIDI control assignments for the current Tone Preset within
the POD Farm 2 standalone application and POD Farm 2 Plug-In. As covered on page 4•3, if you’ve
loaded the “POD Farm 2” FBV control preset within your FBV MkII device, then you’ll be able to
access the “pre-configured” MIDI assignments within the POD Farm 2 Tone Presets. Use the MIDI
Assignments View to reference each MIDI assignment and each specific MIDI command and value
required to control the assigned parameters. Use the Clear buttons to remove any existing assignment.
MIDI Assignments button Automation Assignments button (standalone app. only) Clear All options
Clear button “Global” MIDI Assignment
“Local” MIDI assignment
(in yellow text)
(in white text)
The POD Farm 2 MIDI Assignments View
Local and Global MIDI Assignments
Note that “Local” MIDI assignments are specific to (and, therefore, saved with) the current POD
Farm 2 Tone Preset. Many Tone Presets found in the POD Farm 2 Source Folder have Local MIDI
assignments already saved with each Tone Preset file. “Global” MIDI assignments persist within the
POD Farm 2 standalone application or current Plug-In instance, regardless of the Preset in use. The
POD Farm 2 standalone application also includes several pre-configured Global MIDI assignments.
Local and Global MIDI assignments can be created manually using your FBV MkII controller and the
POD Farm MIDI Learn feature (see next section). For more details on the MIDI Assignments View,
please refer to the POD Farm 2 Basic User Guide.
MIDI Learn in POD Farm 2
The POD Farm 2 MIDI Learn feature allows you to easily “map” your FBV MkII device’s footswitches
or pedals to practically any POD Farm 2 parameter. You can use MIDI Learn to “customize” any POD
Farm 2 Tone Preset to include any number of MIDI assignments from your FBV MkII device. The steps
for using MIDI Learn are quite simple:
• In POD Farm 2 (standalone application or Plug-In), load a Tone Preset, or configure a Tone with
the desired models.
• Double-click on any model in the Signal Flow View to load its Edit Panel in the Panel View.
• Within the Edit Panel, right click (Windows) or Ctrl+click (Mac) directly on the model’s knob,
slider or switch that you want to control remotely and select the MIDI Control menu.
4•10

FBV MkII Advanced User Guide: Controlling Line 6 POD Farm 2
• In the MIDI Control sub-menu, click MIDI Learn. This places POD Farm 2 into MIDI Learn
mode, where it waits to receive a command from your connected MIDI control device.
• Now just stomp the footswitch or wangle the pedal on your FBV that you want to “map” to the
selected parameter, and the FBV control will instantly be “learned” by POD Farm 2.
All POD Farm 2 parameters that offer MIDI Learn will “learn” any MIDI CC, Note-On or Pitch Bend
type messages. Before using MIDI Learn, you must, therefore, assign these MIDI message types to the
FBV MkII’s controls using the Line FBV Control application. Also note that most “on/off” switch
parameters within POD Farm 2 will require that you set your controls’ MIDI CC switch modes to
“Toggle” (to toggle the parameter between on and off) or to “Momentary” (to set the parameter to “on”
only when the switch is held).
Also worth noting is that most popular DAW applications offer their own “MIDI Learn” capabilities,
which are separate from the POD Farm 2 MIDI Learn functions covered here. Within DAW
applications that offer MIDI control features, it is usually possible to use your FBV MkII to remotely
access numerous DAW mix and track parameters, including POD Farm 2 Plug-In and other Plug-
In parameters via the DAW application’s track options. We’ve covered these capabilities within the
“FBV™ MkII with 3rd Party Software” chapter.
For more information on POD Farm 2 MIDI control, please see the additional POD Farm 2
documentation, available from the POD Farm Online Help site.
4•11

