Gorenje tgr65sb6: The line 6 fbV ConTrol aPPliCaTion
The line 6 fbV ConTrol aPPliCaTion : Gorenje tgr65sb6
FBV MkII Advanced User Guide: FBV Control Application
The line 6 fbV ConTrol aPPliCaTion
The previous “Getting Started” chapter should have already gotten you up and running with your
Line 6 FBV™ MkII controller. In this chapter, we’ll provide you with an overview of the features and
functions found in the Line 6 FBV Control application’s user interface. It is also good idea to read
through this chapter before going on to the POD Farm 2, GearBox or 3rd Party Software chapters,
since you’ll be using the FBV Control application for all those setups. The following chapters provide
additional specifics about controlling your software.
What’s in it for Me?
Your new FBV Shortboard™ or FBV Express™ MkII is a pretty sophisticated piece of gear, capable of
®
controlling not only Line 6 Amp and POD
devices (via an RJ45 cable connection), but also capable
of controlling any software on your computer that receives common MIDI control messages (via a
standard USB connection). The Line 6 FBV Control application is specifically for the latter function
- it provides a simple yet powerful set of features to allow you to “program” specifically what type of
MIDI message is sent from each of the footswitch and pedal controls to your desired software. Further,
you can then store these control assignments as FBV Preset files, stored on your computer for recall
anytime. Go ahead and tweak all you like to allow your FBV MkII hardware to do those naughty MIDI
controller things you always wanted to try!
Graphical User Interface
In software speak, the main window of the Line 6 FBV Control application is referred to as the
“Graphical User Interface” (or “GUI” if you want to sound hip around your software buddies). Here
we’ve laid out descriptions for all the important things you need to know as you start clicking around
in there. Refer to the numbered descriptions below for details.
3•1
FBV MkII Advanced User Guide: FBV Control Application
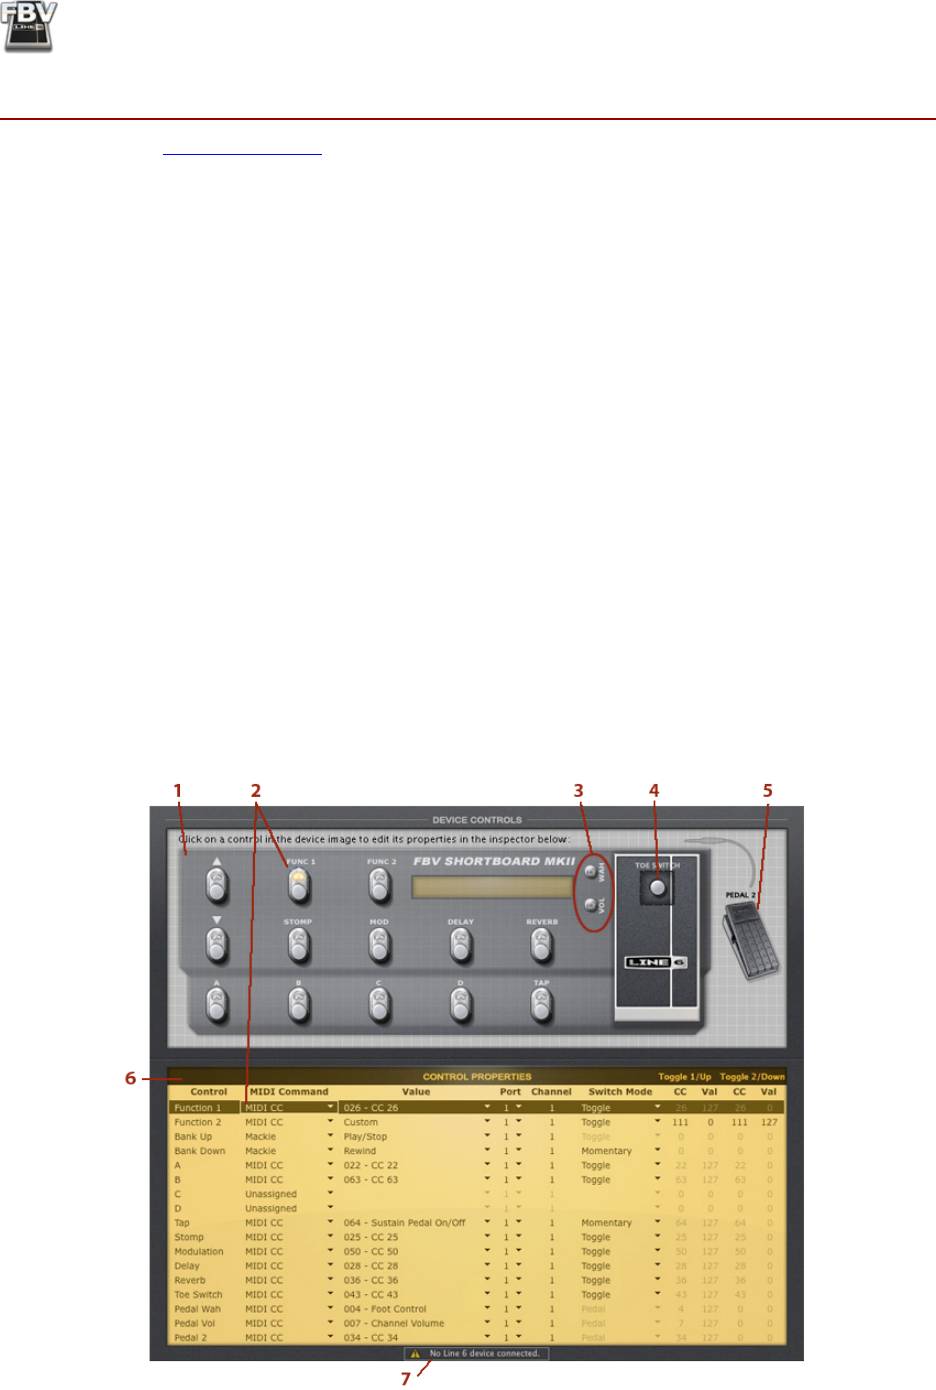
Device Controls
1 - FBV Image: A graphical image of your selected FBV MkII device is displayed here. To edit the
MIDI assignment for any control on your FBV, click directly on the footswitch or pedal in this image,
or on the corresponding row in the Control Properties list below to select it. See the Control Properties
List description on page 3•3 for edit options.
Note: The FBV Control application will automatically detect and select your USB-connected FBV device
(Shortboard or Express MkII). However, you have some other options when launching with no FBV
device or multiple FBV devices connected. See “Preferences” on page 3•9 for details.
2 - Footswitches: Click directly on any footswitch here to select it and its related row in the Control
Properties List where you can edit its MIDI assignment. Note that all the footswitches on your FBV
MkII hardware can be set to send any type of MIDI message available in the Control Properties list’s
columns - regardless of how the footswitch is labeled on your FBV hardware chassis. If you don’t want
a particular footswitch to send any MIDI command at all, just choose “Unassigned” in the MIDI
command column. (Also see “Footswitch LED Behaviors” on page 3•6 for info on these indicators.)
3 - Pedal Wah and Pedal Vol: These provide you with two assignable functions for your Shortboard
or Express unit’s on-board pedal (we’ll refer to this as “Pedal 1” in this document). To edit the
assignments for these Pedal 1 functions, click directly on the WAH or VOL indicator items in the
image, respectively (or directly on their rows in the Control Properties list). You can assign these Pedal
1 functions to send any MIDI CC value you like so you can toggle between controlling two different
functions in your software by pressing the pedal full forward and clicking the Toe Switch Also see
the next description about the Toe Switch for related functions. When the WAH LED is lit on your
FBV hardware, this indicates that the Pedal “Wah” assignment is in use. When VOL LED is lit, this
indicates Pedal “Vol” is in use.
4 - Pedal 1 Toe Switch: Click here to select the “Toe Switch” that is located beneath the on-board
pedal. This switch actually has two functions:
• The Toe Switch can be assigned with any MIDI command, just like any other FBV Footswitch.
This can be especially handy for some related Pedal-based effect parameters.
• Additionally, as a fixed, non-editable behavior, the Toe Switch will toggle Pedal 1 to utilize
either the “Pedal Wah” or “Pedal Vol” assignment, as configured in the Control Properties list.
The WAH and VOL LED lights on your FBV unit will indicate which function is currently in
use. The Toe Switch always performs this action, regardless of the settings made to the Toe
Switch options in the Control Properties list. This is an “internal” switch behavior and the Toe
Switch does not transmit a MIDI command when performing this function. The only MIDI
command transmitted from the Toe Switch is what you have assigned in the Control Properties
List for this control.
Also see the “3 - Pedal Wah and Vol” description above for more about pedal settings.
5 - Pedal 2 (Shortboard only): FBV Shortboard MkII offers an “Expression Pedal” jack on the back
where you can connect an optional expression pedal (such as the Line 6 EX-1). To edit the assignment
for the expression pedal, click directly on this Pedal 2 area in the image, or directly on the Pedal 2 row
in the Control Parameter list below. You can configure Pedal 2 to send any MIDI CC and value range
to continuously control a “knob” or “slider” parameter in your software.
3•2
FBV MkII Advanced User Guide: FBV Control Application
6 - Control Properties List: This list displays all editable Footswitch and Pedal controllers for your
selected FBV Shortboard/Express MkII device. As mentioned in the above descriptions, you can click
directly on a switch on the Device Controls - FBV Image, or click on any row here in the Control
Properties List to select it and edit its MIDI settings. To follow are descriptions for each column and
the options provided:
• Control: The static name of the physical Footswitch or Pedal, as labeled on your FBV MkII
device. Note that this is just a label for the Control - you can choose whatever MIDI command
you like for each Footswitch or Pedal Control, regardless of the name we’ve given each Control.
• MIDI Command: The type of MIDI message the Control will transmit. You can choose between
the following types of MIDI commands for all Footswitches (note that Pedal Wah, Pedal Vol,
and Pedal 2 Controls offer only the MIDI CC and Unassigned options):
• Unassigned: Sends no MIDI data. Basically, this is to disable the Control. If you don’t plan
on using some footswitches or pedals within the preset you are creating, it is best to set these
to Unassigned to avoid unexpectedly triggering functions in your targeted software!
• Bank Change: A numerical value typically used to load a Patch or Preset Bank.
• Program Change: A numerical value typically used to load a Preset within a selected Bank.
• MIDI Continuous Control (MIDI CC): A set of Value and Range numbers commonly
used by MIDI software and hardware to provide access to parameters.
• MIDI Machine Control (MMC): Specific commands for commonly used for controlling
things such as transport parameters and mechanical functions (Play, Stop, Record, etc.)
• Mackie: Specific commands in the “Mackie Universal Controller” format, commonly used
for transport parameters and mechanical functions (Play, Stop, Record, etc.), for MIDI
software that supports the Mackie Control format.
Note: FBV MkII devices transmit only the above types of MIDI Commands - they are not configurable to
transmit MIDI Note data or MIDI SysEx dumps.
Value: Allows you to choose a value for the selected MIDI Command. These options differ depending
on the type of MIDI Command selected - see MIDI Command descriptions above.
• If the MIDI Command is Bank Change or Program Change, with either Increment or
Decrement as the Switch Mode, you can incrementally select a value of 1 thru 127* to select
and load correspondingly numbered Banks/Presets.
*Note: It is actually possible to select a value of “0” for the Bank or Program Change command type when
set to the Increment/Decrement Switch Modes, however, this is not recommended since this is not a valid
option for most MIDI applications to receive.
• If the MIDI Command is Bank Change or Program Change, with Fixed as the Switch Mode,
you can select any value of 0 thru 127 to load the corresponding Bank/Preset.
• If the MIDI Command is MIDI CC, you can choose a value of 0 through 127, or Custom. If
Custom is selected, the Toggle 1/Up and Toggle 2/Down options in this control row become
selectable, so that the each Toggle action can be defined with its own separate MIDI CC value.
• If the MIDI Command is MMC, you can choose between the options Play, Stop, Play/Stop,
Record Punch-Pro Tools, Pause, Fast Forward, or Rewind.
• If the MIDI Command is Mackie, you can choose between the options Play, Stop, Play/Stop,
Record Punch, Pause, Fast Forward, or Rewind.
3•3
FBV MkII Advanced User Guide: FBV Control Application
Toggle1/Up Toggle2/Dn CC/Val Columns: These columns become selectable when the MIDI
Command is set to “MIDI CC” and Value is set to “Custom”. Individual values can be then be entered
manually here to specify the Toggle 1/Up and Toggle 2/Down switch behaviors. (See “Footswitch
Control Behaviors” on page 3•5 for details.)
Port: The FBV Control software MIDI Out port the data is to be sent out. The FBV MkII device offers
four independent USB MIDI Out Ports that are selectable by other MIDI software on your computer to
receive the MIDI Commands FBV is transmitting. You can choose Port 1, 2, 3, 4 or All independently
for any Control.
TIP: If you want to use your FBV to control more than one software application at the same time on your
computer, then you can set Controls to different Ports to allow each application to “listen” strictly on its
own MIDI Port to receive only the intended Commands.
Channel: The MIDI Channel the data is sent out on the selected Port(s). You can choose any single
channel, 1 thru 16. If the you select “All” in the Ports column for the Control, the current MIDI
Channel setting is used for all four MIDI Ports.
Switch Mode: The options available here are dependent on the currently selected MIDI Command.
(There are no Switch Mode options for the Pedal Wah, Pedal Vol, or Pedal 2 controls.)
• If the MIDI Command is Bank Change or Program Change, the options available here are
Increment, Decrement, or Fixed:
• Increment: Sets the footswitch to increment thru Banks/Presets by the amount of 1 to 127*,
as set in the Value column.
• Decrement: Sets the footswitch to decrement thru Banks/Presets by the amount of 1 to
127*, as set in the Value column.
*Note: It is actually possible to select a value of “0” for the Bank or Program Change command type when
set to the Increment/Decrement Switch Modes, however, this is not recommended since this is not a valid
option for most MIDI applications to receive.
• Fixed: Sets the Footswitch action to jump to a specific Bank/Preset number 0 through 127,
as set in the Value column .
Note: Any FBV Bank Change command always also transmits a Program Change as part of its MIDI
message. This provides the behavior where the first preset is automatically recalled within the new, selected
Bank. For example, if your software is currently on Bank #1 and preset #23, if your FBV Control is
configured to send Bank Change_Increment_Value 1, this results in recalling Bank #2 and preset #1 in
your target software.
• If the MIDI Command is MIDI CC, the options are Single, Momentary, or Toggle to provide
these types of switch behaviors. Please also see “Footswitch Control Behaviors” on page 3•5 for the
details on these switch modes.
• If the MIDI Command is MMC or Mackie, there are no selectable Switch Mode options.
However, you will see that some MMC and Mackie commands will automatically set themselves
to be “Toggle” behaviors, such as “Play/Stop” which alternates between sending these two
messages.
3•4
FBV MkII Advanced User Guide: FBV Control Application
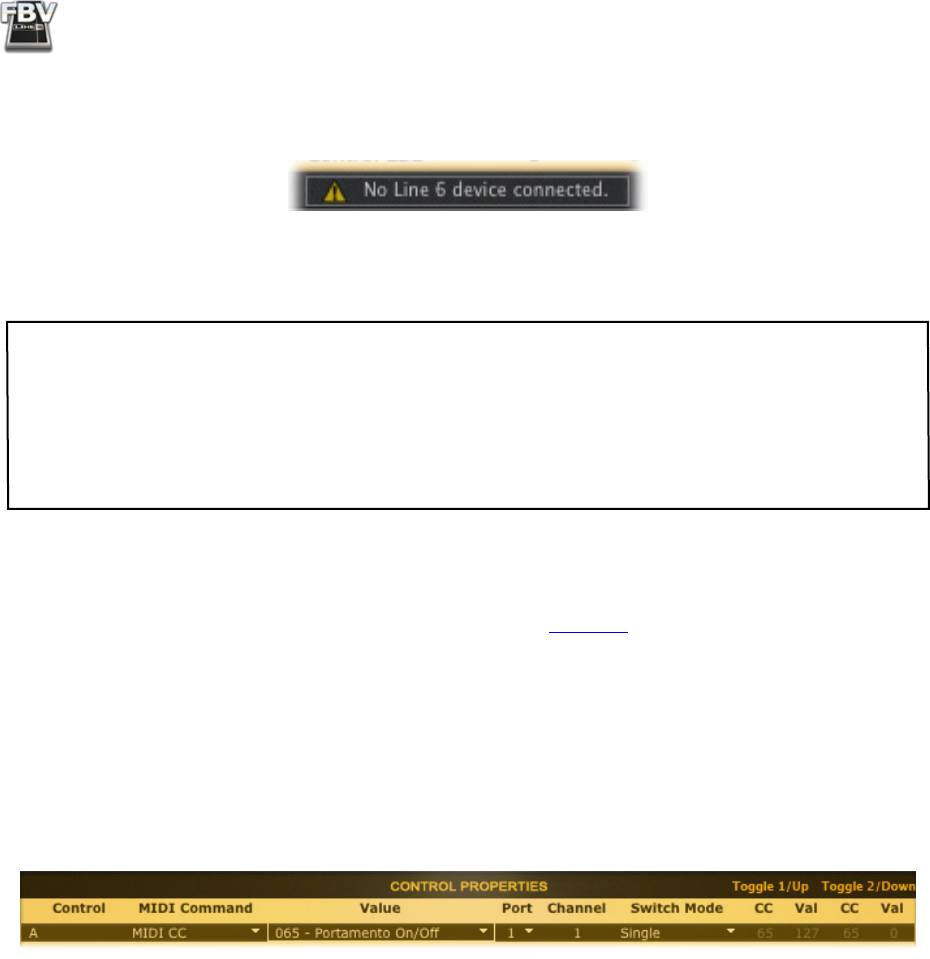
7 - No Device Connection Indicator: If no FBV MkII device is detected when you launch the Line 6
FBV Control application, you’ll see this alert at the bottom of the application window, meaning that
you either neglected to connect the FBV unit’s USB cable, or there is a problem detecting the device:
If your FBV is disconnected, you can plug it into your computer’s USB port while the Line 6 FBV
Control application is still open, and the application will automatically detect it momentarily.
Note to Windows® Users: An inherent behavior of the Windows® 7, Vista® & XP USB Class Compliant
driver is that it does not permit more than one application at a time to utilize a common USB MIDI device’s
MIDI port. The Line 6 FBV Control application utilizes the FBV MIDI In Port to send your edited
Control settings to the FBV device. Therefore, you’ll want to avoid setting your MIDI/DAW software
to enable the FBV MIDI In port if you want to be able to have FBV Control open at the same time and
communicate with your FBV. (You typically only need to enable one of the FBV MIDI Out ports 1 through
4 within your MIDI/DAW software to receive MIDI commands from FBV.)
Footswitch Control Behaviors
As described within the Control Properties List section on page 3•3 , the FBV MkII footswitch controls
offer several different behaviors based on the type of MIDI Command and Value selected. When
selecting MIDI CC as the Command type, you’ll have the choice between three different Switch Mode
options; Single, Toggle, or Momentary. Each footswitch control is actually capable of transmitting
either one or two MIDI CC commands (depending on the Switch Mode), which is handy for some
software parameters. Different software manufacturers might utilize one switch mode or the other for
their specific parameters, so you’ll need to check their documentation to determine the best switch
mode choice. But we can provide some helpful examples of how these three switch modes work here.
For this example, let’s say you’ve selected the following options for the “A” footswitch control:
By selecting the “065” Value, this actually sets both the MIDI CC assignments for the footswitch
control to CC #65. At the far right you can see this indicated in the “Toggle 1/Up” and “Toggle 2/
Down” CC and Val fields (even though they are not editable, you can see the numerical settings that
are in use). The specific Values are automatically configured for 127 and 0, respectively. With these
settings, the resulting behaviors for each Switch Mode setting are as follows:
• Single: Always transmits only the Toggle 1/Up CC number and Value when the footswitch is
pressed (CC 65 and Value 127 in our example).
• Toggle: Alternates transmitting the first and second CC & Value on each successive press (like
an on/off switch). So, in our example, it will send CC 65/127 on the first press, and CC 65/0 on
the next. Some software parameters utilize this type of switch mode for things such as toggling a
function on and off. Typically, the Value of 0 - 64 toggles the parameter to its “off” state, and a
Value of 65 - 127 toggles it to its “on” state. However, you will also find that some software titles
utilize MIDI CC commands with the Momentary Switch Mode to toggle parameters on/off (see
next bullet). You’ll want to check your documentation (or just try different Switch Modes with
your software) to see which Modes work for your application.
3•5

FBV MkII Advanced User Guide: FBV Control Application
• Momentary: Transmits the first CC & Value when the control is pressed down, then the second
CC & Value when the control is released. This type of Momentary switch action is commonly
used for a parameter such as a piano’s sustain pedal, where you want the sustain parameter “on”
only while holding the footswitch down, and “off” when released. In our example, it will send
CC65/127 while the switch is being pressed, and CC65/0 when the switch is released.
MIDI CC - Custom Option: Additionally, when you have selected the MIDI CC Command type,
you’ll also see that you can choose “Custom” rather than a CC number within the Value field. This
allows you to then edit the “Toggle1/Up” and Toggle 2/Down” fields to manually enter in whatever you
want for the first and second CC & Value settings. As mentioned above, the Momentary and Toggle
Switch Mode options allow the footswitch to transmit each of these CC values, alternating between
the two. This is useful if you want some very specific actions, such as alternating between triggering
one software parameter with one stomp, and then another parameter with the following stomp of the
switch.
TIP for FBV Shortboard MkII: Whenever you press a footswitch or move a pedal, the LCD display on
your FBV device will also show abbreviated text indicating the MIDI message sent.
Footswitch LED Behaviors
The top portion of every footswitch on your FBV MkII device includes an LED indicator. When using
your FBV with the USB connection, these LEDs light up following the type of MIDI Command and
Switch Mode that is sent by this footswitch.
Generally, the following Switch Mode settings produce these footswitch LED behaviors:
• The Switch Mode “Single” setting results in the LED lighting up every time the footswitch is
pressed, with the LED not remaining lit on release of the switch. This indicates that the same
MIDI Value is sent on each press.
• The Switch Mode “Toggle” setting results in the LED alternating between staying on or off on
each successive press of the footswitch, to indicate that alternating MIDI Values are sent on
each press.
• In the case of a MIDI CC type command, a MIDI CC value of 0 to 64 means “On”, resulting
in the LED remaining lit. A MIDI CC value of 65 to 127 means off, resulting in the LED
being off.
• Like the “Toggle” switch behavior above, the “Momentary” Switch Mode also sends two CC
Values. However, The “Momentary” setting results in the LED remaining on while the footswitch
is held down, since this is when the “On” MIDI Value is sent. The LED turns off upon release of
the footswitch, since this is when the “Off” Value is sent.
• When the footswitch control is set to “Unassigned”, the footswitch LED is never lit when pressed
or released, to indicate that no message is sent.
• For all other control settings, the footswitch LED lights up when pressed only, and does not
remain lit.
It is important to note here that these LED behaviors are based only on these above control settings,
as configured in the Control Properties list. The FBV MkII device does not receive or respond to MIDI
data from your MIDI/DAW software.
3•6

FBV MkII Advanced User Guide: FBV Control Application
Pedal Control Behaviors
The on-board pedal of your FBV MkII (as well as an optional, connected Expression pedal on an
FBV Shortboard MkII) supports transmitting a MIDI CC type message, and will “sweep” the range of
parameter from 0 to 100%. Obviously, the Pedal control is best used when assigned to a knob or slider
type parameter in your software, so that you can have “hands-free” operation over it. Setting a Pedal
function is pretty straightforward - simply choose MIDI CC as the MIDI Command and then select
the MIDI CC number that corresponds to the target software parameter. The “range” Values of 0 to
127 are automatically set for you, to allow adjustment from 0 to 100% of the mapped parameter. (Some
MIDI applications further allow you to set different minimum and/or maximum settings within the
software itself - see your software’s documentation.)
Note that your on-board Pedal actually has two configurable Control settings in the Control Properties
list - Pedal Wah and Pedal Vol. You can set each of these Controls independently, and then use the
Toe Switch to toggle between the two mapped parameters! Please see the Pedal Wah and Pedal Vol
descriptions on page 3•2 for details.
Opening and Saving FBV Presets
The Line 6 FBV Control application allows you to create, edit and save all the current settings within
the application GUI as a “patch”, or FBV preset file stored on your computer hard drive. This means
you can backup the complete settings currently loaded in your FBV Shortboard or Express MkII
hardware’s internal memory, or numerous customized versions of those settings, as individual FBV
presets and load any one of them into your FBV’s memory at any time. To follow are some details on
how to manage FBV presets.
As mentioned earlier, whenever your FBV MkII device is USB-connected to your computer, and the
Line 6 FBV Control application is launched with the device selected, the contents of the FBV device’s
internal memory is automatically loaded into the Control application’s GUI. Additionally, whenever
you edit any single setting in the Control application, the changes are automatically written to the
internal memory of the FBV MkII device’s internal memory.
TIP: Even though all the settings within the Line 6 FBV Control application GUI are automatically stored
on your connected FBV device, it is a good idea to always do a “Save” or “Save As” your current FBV
device’s settings as an FBV preset on your computer once you have completed editing the settings. This
ensures you always have a “backup” of all your customized settings that you can easily load again later!
If you want to be able to open an existing FBV preset file to review or edit its settings without
automatically loading the preset onto your FBV MkII device’s internal memory, disconnect your FBV
device from the USB port before launching the FBV Control application.
Open an Existing FBV Preset
• With your FBV Shortboard or Express MkII device connected to your computer’s USB port,
launch the Line 6 FBV Control application.
• Go to the File > Open menu within the application.
• By default, this should open to these directories:
®
• Documents/Line 6/FBV (Mac
)
®
• My Documents\Line 6\FBV (Windows
)
3•7

FBV MkII Advanced User Guide: FBV Control Application
• In the above directories you will find the “factory” FBV Presets we’ve included (e.g. - “FBV-
Default.fbv”). Simply select one of these files and click open.
• This will load the FBV Preset into the FBV Control application’s GUI and automatically load it
into the internal memory of your FBV MkII device.
Note that your FBV Shortboard/Express MkII device holds one complete FBV preset at a time. When
opening a new preset file as described in these steps, it will REPLACE all the USB MIDI Control
assignments in your FBV device’s internal memory with those from the newly opened .fbv preset file.
Before opening a new preset file, you may want to Save the current settings as an FBV preset to your
computer if you want to be able to recall these settings again later.
Saving an FBV Preset
While working in the Line 6 FBV Control application, you can Save all the current settings within the
Control application’s GUI as an FBV preset file to your computer’s hard drive at any time. It is a good
idea to do so whenever you have a set of commands you don’t want to forget so you can load them into
your FBV device later on (remember the mantra - “Save early and Save often!”).
®
®
FBV Control follows the typical Mac
and Windows
software conventions:
• To Save the changes made to the current FBV Preset, overwriting the previous settings of this
file, choose File > Save from the application’s menu.
• To Save a the changes made to the current FBV Preset as a new FBV Preset file, choose File >
Save As from the application’s menu. You’ll then be prompted to name the file, and where to
save it. To keep your FBV Preset files tidy and easy to find, you probably want to always save them
in the directory where we already stored the factory presets during installation:
®
• Documents/Line 6/FBV (Mac
)
®
• My Documents\Line 6\FBV (Windows
)
TIP: You’ll see the name of your currently loaded preset appear with an asterisk following its title (e.g. -
“FBV-Default.fbv*”) at the top of the application window whenever the preset is in an “unsaved” state.
Editing and Saving FBV Presets with No Connected FBV Device
As mentioned above, you actually do not need to have your FBV Shortboard/Express MkII device
USB-connected to run the Line 6 FBV Control application to edit or save preset files. You can still use
the above steps to Open, Save or Save As FBV Presets on your computer. You might find this handy if
you just want to do some edits or look over the settings of the FBV Preset files stored on your computer
without also loading the Preset into your FBV device’s internal memory. To load any of these presets
into the internal memory of your FBV MkII device, you’ll need to connect it to your computer’s USB
port, and then open a saved FBV Preset as described above to have it auto-load into your FBV device’s
memory.
When you launch the Line 6 FBV Control application without an FBV MkII device connected, you
will need to instruct the application what type of device model format (Shortboard or Express MkII)
to work in. This provides the perfect segue to the next section, where we’ll look at these options in the
application Preferences.
3•8
FBV MkII Advanced User Guide: FBV Control Application
Preferences
As is the case with most other software applications, we’ve placed a few of those more “geeky” settings
away in the Preferences. To get to the Line 6 FBV Control application’s Preferences dialog:
®
• Mac
- Line 6 FBV Control > Preferences
®
• Windows
- File > Preferences
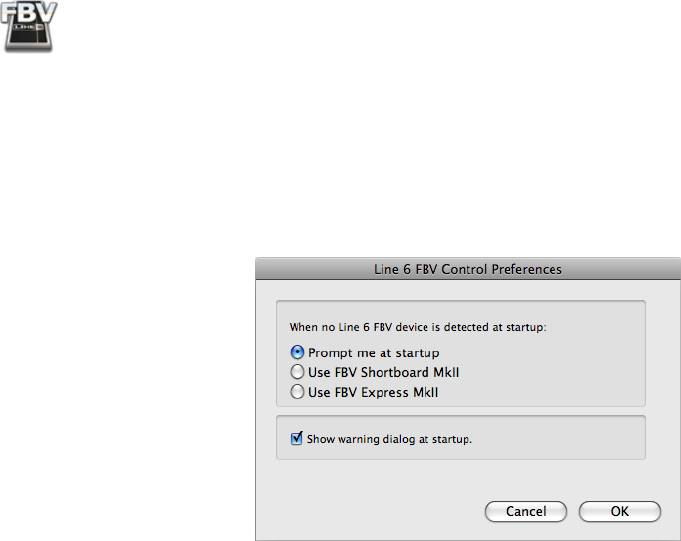
‘No Device’ Prompt
When no Line 6 FBV device is detected at startup, then the Line 6 FBV application has the option
of displaying either an FBV Shortboard or Express MkII device configuration for its GUI. By default,
you’ll always be prompted on startup with a dialog to choose which you prefer. If you do not want to
be prompted, select the preferred device here. Alternatively, you can check that little “Do this every
time” box at the bottom of the prompt dialog itself to set this behavior, and you can change it here in
the Preferences any time.
Note that this does not affect how the Line 6 FBV application launches when your FBV MkII device
is connected - It will automatically display the GUI for the connected FBV device type. Further, if
you have more than one FBV MkII device type connected to your computer at the same time, such as
both a Shortboard and Express MkII, then you’ll be prompted to select which you want the Line 6 FBV
Control application to work with (so go ahead and buy a few FBV units if you like!).
Show Warning Dialog at Startup
This checkbox refers to that dialog that pops up when Line 6 FBV Control application starts, informing
you about the important, automatic behavior where the changes you make within the software have
instant effect on the memory stored within your connected FBV device. If you grow weary of this
warning dialog, then you can uncheck this box here in the Preferences. Or, if you’ve hastily checked
that “Don’t show again” box in the prompt dialog itself but want to the reminder back, you can come
to the Preferences and check this box here to have the prompt appear again.
3•9
FBV MkII Advanced User Guide: FBV Control Application
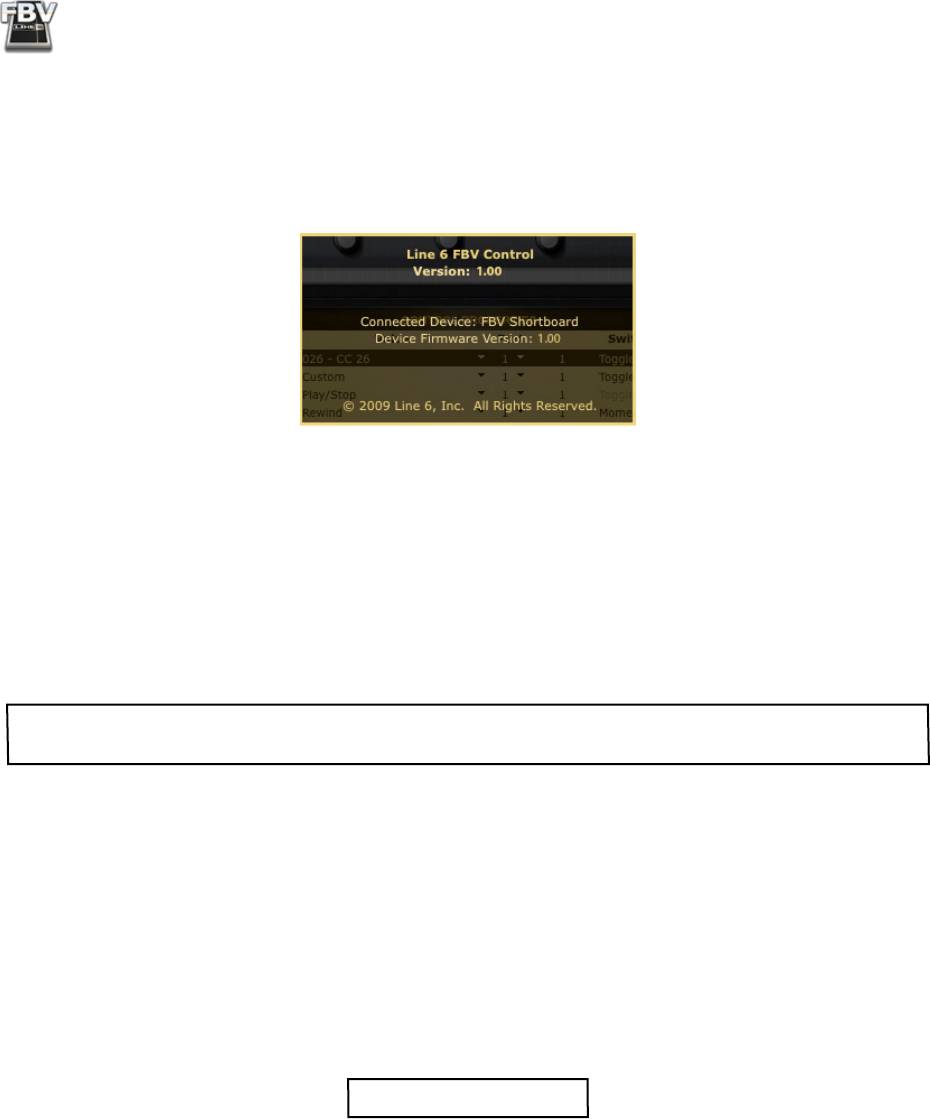
The ‘About Line 6 FBV Control Application’ Dialog
This dialog provides you with some helpful information about the application. To launch it go to:
®
• Mac
- Line 6 FBV Control > About Line 6 FBV Control
®
• Windows
- Help > About Line 6 FBV Control
Here you’ll see the following compelling information:
• The version number of the Line 6 FBV Control application.
• The FBV MkII device that is detected and currently in use by the application (or “None”, if you
don’t have an FBV connected).
• The Device Firmware Version of the connected FBV MkII unit.
• Some copyright info that those legal folks of ours insist on.
Click anywhere on the dialog to exit.
TIP: Remember that you can run the Line 6 Monkey application with your FBV connected to your
computer to check for and install the latest software & firmware versions for your device!
The FBV Shortboard MkII LCD Display
When you connect your FBV Shortboard MkII to your computer’s USB port, you’ll see the device’s
LCD screen read “USB MODE” to indicate the FBV is now ready to operate as a USB MIDI Controller
device.
Each time you press a footswitch or move a pedal, the LCD display will show abbreviated text informing
you of the MIDI message that was just sent by this control. This text remains displayed until you
press another control. For example, the display might show the following for a MIDI CC Command
assignment:
CH 1 CC 111 VAL 127
This indicates that the control is transmitting out MIDI Channel 1, sending a MIDI CC 111 Command,
with a CC Value of 127. If the Switch Mode setting for this control is set to “Toggle”, then you’d see
the CC Value alternate with each successive click between the Toggle 1 and Toggle 2 CC Values, as
configured in the Control Properties list. When using a pedal, you’ll see the MIDI CC Value change in
real time, indicating the stream of CC values the pedal is actually sending.
Likewise, other MIDI Command settings result in the LCD displaying similarly abbreviated text to
indicate the message being sent (e.g. “MMC PLAY” to indicate an MMC type Command, or “CH 1
PGM 1” to indicate a Program Change).
3•10

