Gorenje G51101FWC: инструкция
Раздел: Бытовая, кухонная техника, электроника и оборудование
Тип: Газовая Плита
Инструкция к Газовой Плите Gorenje G51101FWC

PS 151D - G 51101 FC / EN RU / 2012 03 19 / SAP 384196
AE44
ОП035
GB
GAS COOKER
RU
ПЛИТА ГАЗОВАЯ

1
EN
RU
OPERATING AND MAINTENANCE INSTRUCTIONS
Dear customer!
Thank you for purchasing the appliance from our new range of gas cookers. The
following information will help you understand the features of the appliance and use it
safely. We hope the appliance will serve you successfully for a long period of time.
!
. ,
. ,
,
, “...”,
.
IMPORTANT PRECAUTIONS
This appliance is not connected to a kitchen hood.
It must be installed and connected according to the standing regulations and
relevant installation instructions. Special attention is drawn on room ventilation
requirements.
Make sure the technical information regarding gas type and voltage indicated on
the rating plate agree with the type of gas and voltage of your local distribution
system.
The product is assembled and set up by the manufacturer for use of natural gas
according to data on the type label
Installation, repairs, adjustments or resetting of the appliance to another type of
gas may be performed by authorized persons only (see Certificate of Warranty)
Installation of the appliance and resetting to another type of gas must be endorsed
in the Certificate of Warranty by the authorized service. Failure to do so would
render the warranty void.
Do not store any flammable objects in the bottom drawer of the appliance.
The appliance must not be used for any other purposes other than for the
preparation of food. Using the appliance for any other purposes may result in life
threatening concentration of combustion by-products, or cause malfunction. The
warranty does not apply to faults resulting from the incorrect use of the appliance.
It is recommended to have the appliance checked by the authorized service
personnel every two years. Such professional maintenance will extend the useful
life of the appliance.
If you should smell gas, immediately shut the gas pipe cock and cut the gas
supply. In such cases the appliance may be used only after the cause of such gas
escape is discovered and removed by qualified personnel and the room thoroughly
ventilated.
When using gas for cooking, heat and moisture are generated into the room, so
make sure it gets sufficient air supply: keep a window open or install a mechanical
ventilation device (a vapor hood with mechanical extraction). Prolonged operation
of the appliance may require extensive ventilation, for instance opening the
window or boosting the performance of the hood with a mechanical fan.
,
, .
,
.
, ,
,
.
, , , ,
, ()
.
„ “
.
„ “
.
, ,
, ,
.
, ,
. , -,
,
.
.
,
- .
, ,
, .
750 , - 100 .
-
.
18
TECHNICAL DATA
GAS COOKER
G 51101 FC
Dimensions: height / width / depth (mm)
: / / ()
Burner input power
Left front (kW)
() ()
1,00
Left rear (kW)
() ()
1,75
Right rear (kW)
() ()
2,70
Right front (kW)
() ()
1,75
Oven
К
Oven burner (kW)
К ()
2,70
Oven light (W)
()
Electric ignition(W)
()
Min. / max. oven temperature
MТЧ./mКб.
150 - 330°C
Voltage (V)
()
Total power input – gas (kW)
– ()
9,90
Total power input – electric (W)
К ()
Gas type - natural gas
-
G20-20
Class
II
2H3B/P
Gas connection standard
ISO 228-1/ G 1/2
SAP 384196
17
ACCESSORIES
G 51101 FC
Wire self
(.)
+
Backing try
(.)
+
Grill pan
(.)
Grill accessories
Vzpour catch
Set of adjustable feets
()
+
Nozzles for PB G 30 – 30mbar
- G 30 – 30
+
Nozzles for G20-20mbar
G20-20
ACCESSORIESG TO ORDER
cover - lid -254190 – white – metal - painted
-254702 – glass
- 254190 – – -
-254702 – –
2
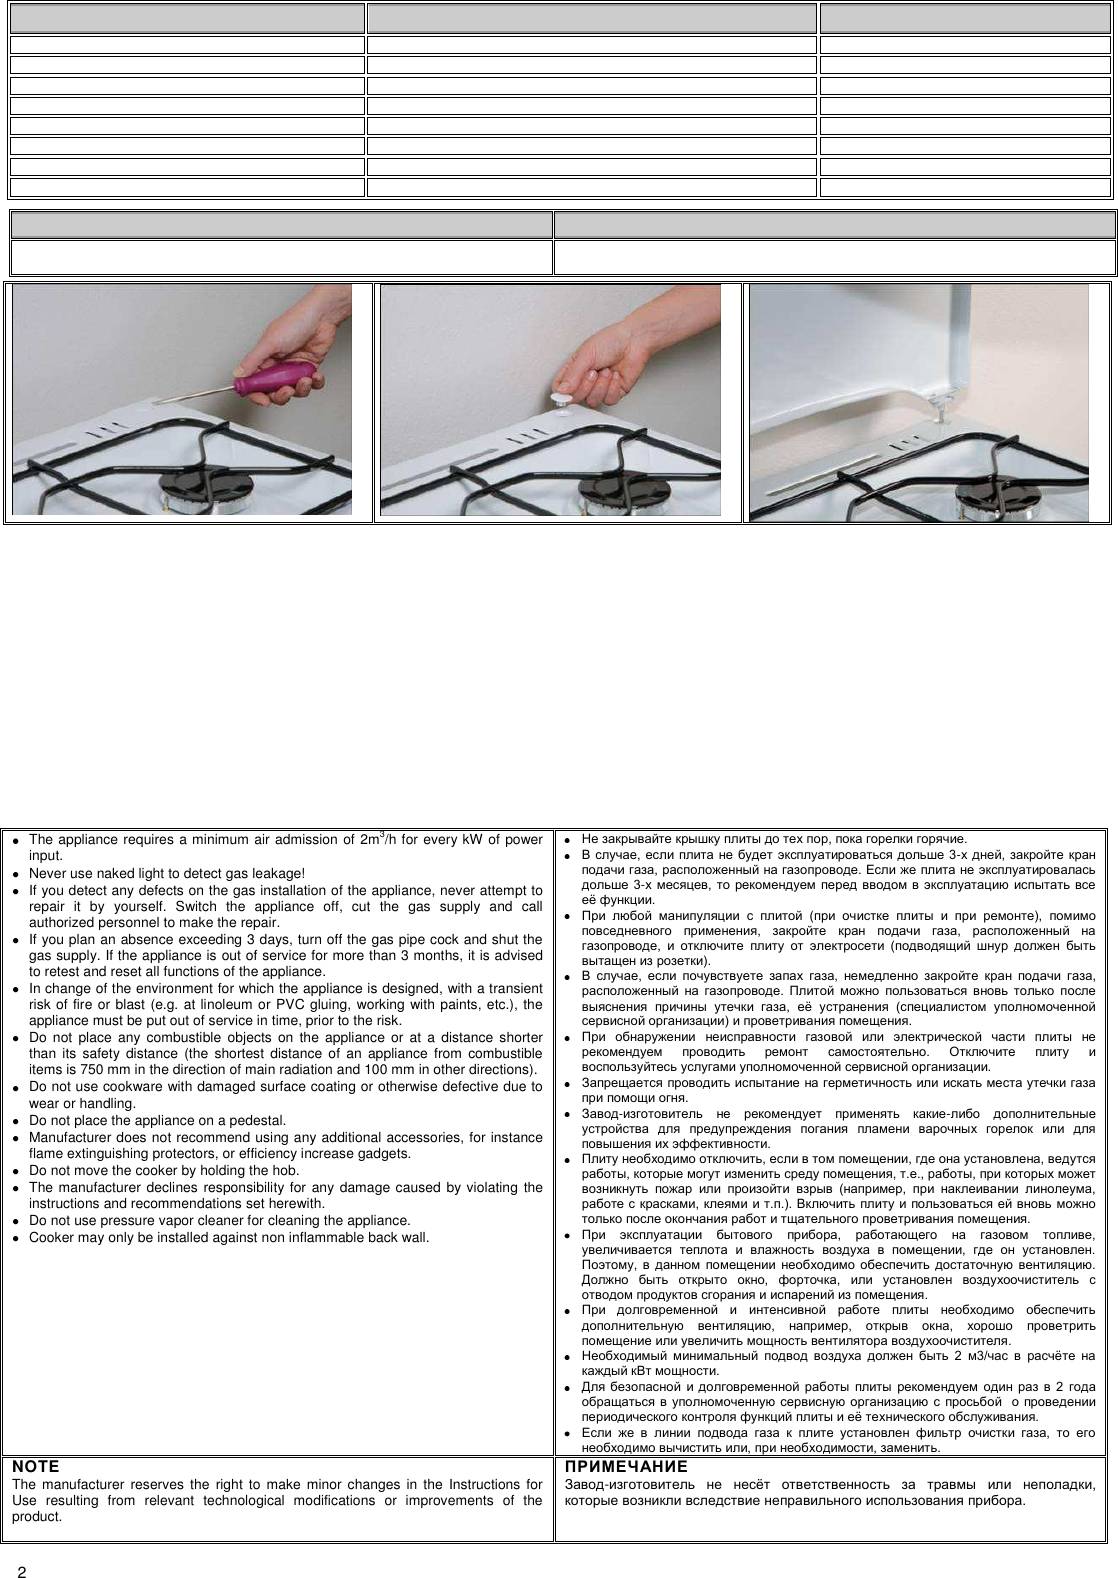
The appliance requires a minimum air admission of 2m
3
/h for every kW of power
input.
Never use naked light to detect gas leakage!
If you detect any defects on the gas installation of the appliance, never attempt to
repair it by yourself. Switch the appliance off, cut the gas supply and call
authorized personnel to make the repair.
If you plan an absence exceeding 3 days, turn off the gas pipe cock and shut the
gas supply. If the appliance is out of service for more than 3 months, it is advised
to retest and reset all functions of the appliance.
In change of the environment for which the appliance is designed, with a transient
risk of fire or blast (e.g. at linoleum or PVC gluing, working with paints, etc.), the
appliance must be put out of service in time, prior to the risk.
Do not place any combustible objects on the appliance or at a distance shorter
than its safety distance (the shortest distance of an appliance from combustible
items is 750 mm in the direction of main radiation and 100 mm in other directions).
Do not use cookware with damaged surface coating or otherwise defective due to
wear or handling.
Do not place the appliance on a pedestal.
Manufacturer does not recommend using any additional accessories, for instance
flame extinguishing protectors, or efficiency increase gadgets.
Do not move the cooker by holding the hob.
The manufacturer declines responsibility for any damage caused by violating the
instructions and recommendations set herewith.
Do not use pressure vapor cleaner for cleaning the appliance.
Cooker may only be installed against non inflammable back wall.
, .
, 3- ,
, .
3- ,
.
( ),
, ,
, (
).
, , ,
.
, (
) .
.
.
.
- -
.
, , ,
, , .., ,
(, ,
, ..).
.
, ,
, .
, .
, ,
.
, , ,
.
2 3/
.
2
.
,
, , .
NOTE
The manufacturer reserves the right to make minor changes in the Instructions for
Use resulting from relevant technological modifications or improvements of the
product.
- ,
.
3
Different models are equipped with different accessories. Any additional
accessories (grids, baking trays, grill pans, adjustable feet) are available in
authorized shops or our service outlets.
.
(, , ,
)
.
CONTROL PANEL
1 - Left front burner control knob
2 - Left rear burner control knob
3 - Right rear burner control knob
4 - Right front burner control knob
5 - Oven control knob
1 -
2 -
3 -
4 -
5 -
BEFORE FIRST USE
Before using the appliance for the first time, remove protective and packing
material from the cooker.
Various parts and components of the range and package are recyclable. Handle
them in compliance with the standing regulations and national legislation.
Before first use of the oven set the temperature selector to the maximum position
and leave the oven in operation with the door shut for about 30 minutes. Provide
proper room ventilation. This process will remove any agents and odors remaining
in the oven from the factory treatment.
Be sure that the power cords of adjacent or other appliances do not come into
contact with burner, oven door or other hot parts of the range while in operation.
.
,
“ ...”.
/
/,
30 . ,
,
.
,
.
ATTENTION!
Before first using of oven remove all stickers from oven door.
!
.
The manufacturer declines responsibility for any injuries to persons or
damages to the appliance resulting from improper usage of the appliance.
,
.
16
EN
RU
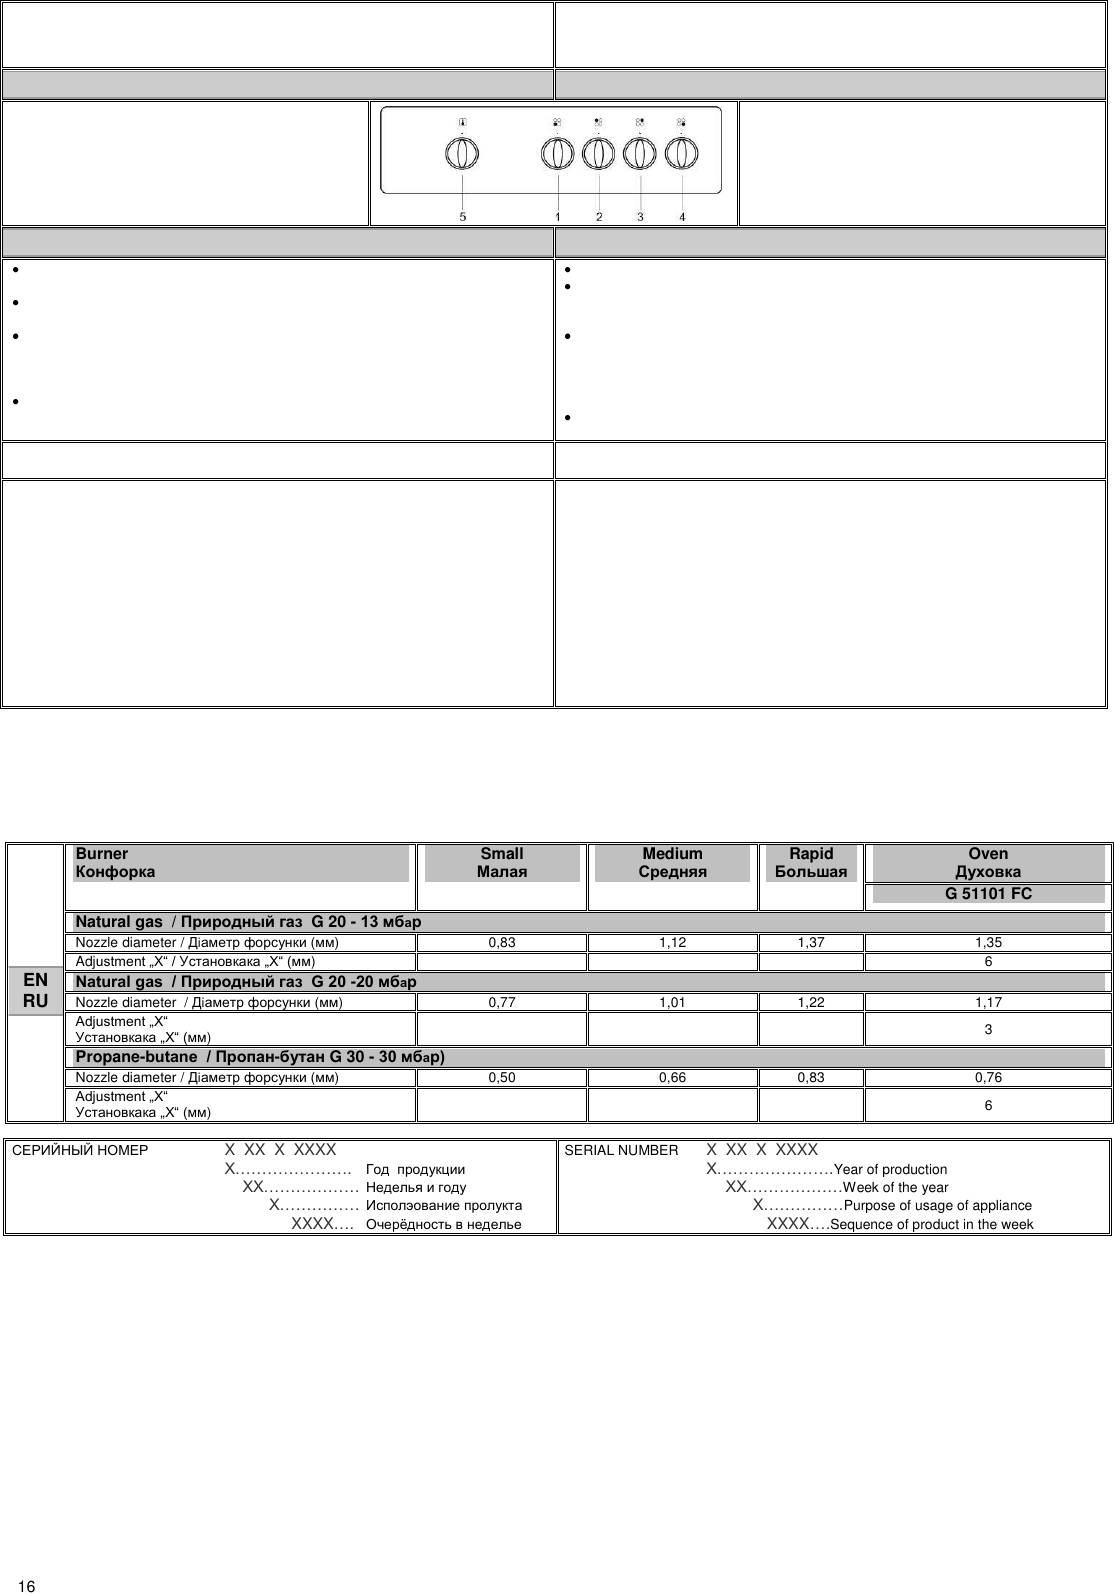
Burner
Small
Medium
C
Rapid
Oven
G 51101 FC
Natural gas / G 20 - 13
Nozzle diameter / i ()
0,83
1,12
1,37
1,35
AdjЮЬЭmОЧЭ „Б“ / „Б“ ()
6
NКЭЮЫКХ РКЬ / G 20 -20
Nozzle diameter / i ()
0,77
1,01
1,22
1,17
AНУЮЬЭmОЧЭ „Б“
„Б“ ()
3
Propane-ЛЮЭКЧО / - G 30 - 30 )
Nozzle diameter / i ()
0,50
0,66
0,83
0,76
AНУЮЬЭmОЧЭ „Б“
„Б“ ()
6
X XX X XXXX
Б………………….
ББ………………
Б……………
XXXX….
SERIAL NUMBER X XX X XXXX
Б………………….Year of production
ББ………………Week of the year
Б……………Purpose of usage of appliance
XXXX….Sequence of product in the week
15
NOTE:
Leveling screws are unnecessary if the appliance height and horizontal position are
acceptable.
:
() ,
.
NOTICE
The manufacturer reserves the right to make minor changes in these instructions for
use resulting from technological changes which have no impact on the functioning of
the appliance.
:
,
,
.
4
OPERATION
O
CAUTION:
The appliance is not a toy and may be operated only by adult persons in
accordance with these instructions. Do not leave small children without supervision
in a room where the appliance is installed.
Gas cooker is an appliance whose operation requires supervision.
Never close the lid while the hob burners or oven burner ar still in operation.
The maximum baking pan load inserted in guides is 3kg, and the maximum baking
pan load placed on a grid is 7kg.
The baking plates and roasting pans are not designed for a long-term storage of
food (exceeding 48 hours). For longer storage use convenient dishes.
!
!
!!!
- ,
.
, ,
.
, , ,
, .
,
, 3 , К
7 .
( 48 ).
.
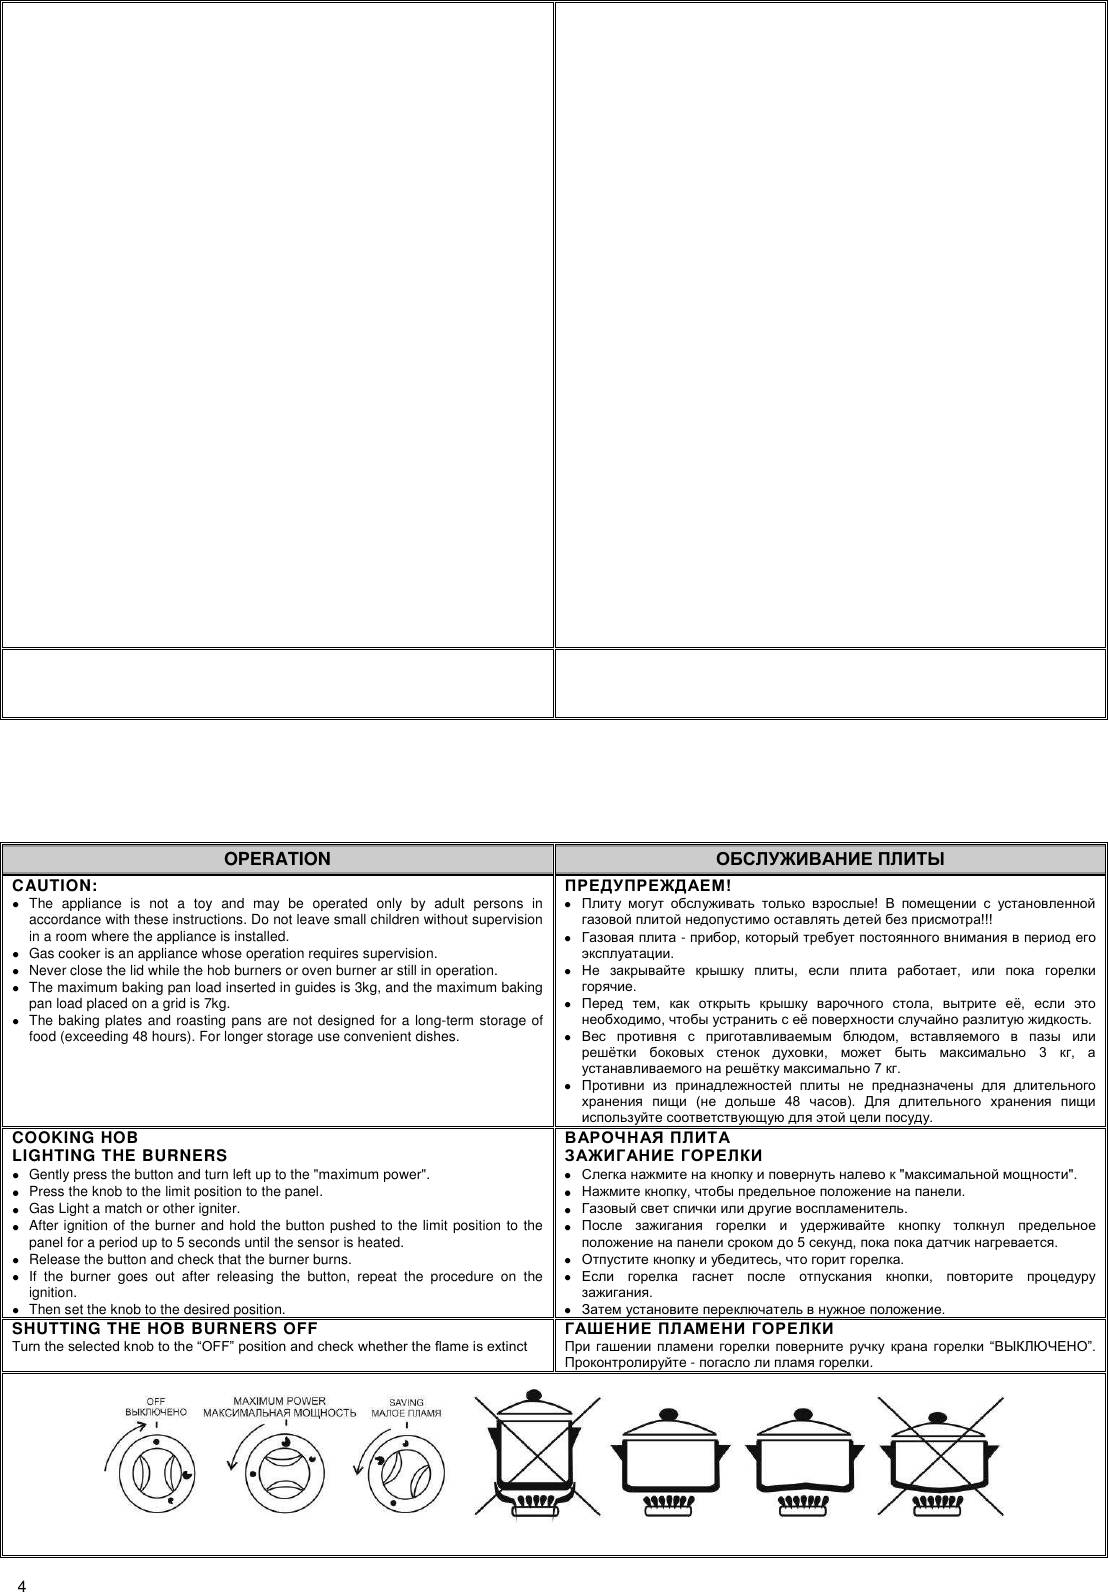
COOKING HOB
LIGHTING THE BURNERS
Gently press the button and turn left up to the "maximum power".
Press the knob to the limit position to the panel.
Gas Light a match or other igniter.
After ignition of the burner and hold the button pushed to the limit position to the
panel for a period up to 5 seconds until the sensor is heated.
Release the button and check that the burner burns.
If the burner goes out after releasing the button, repeat the procedure on the
ignition.
Then set the knob to the desired position.
" ".
, .
.
5 , .
, .
,
.
.
SHUTTING THE HOB BURNERS OFF
TЮЫЧ ЭСО ЬОlОМЭОН kЧШЛ ЭШ ЭСО “OFF” ЩШЬТЭТШЧ КЧН МСОМk аСОЭСОЫ ЭСО ПlКmО ТЬ ОбЭТЧМЭ
“”.
- .
5
COOKING
Use low and wide cookware for preparing food on gas burners. Make sure the
burner flames heat the dish bottom and do not go beyond its rim.
The appliance is fitted with different size burners. For optimum (economical)
consumption of gas use the recommended cookware bottom diameters:
- small burner - ПЫШm Ø 120 ЭШ Ø 160 mm,
- medium burner - ПЫШm Ø 160 ЭШ Ø 220 mm,
- large burner - ПЫШm Ø 220 ЭШ Ø 280 mm.
Rotation of control knob sets the gas heating power (flame size) between the
“MAБIMUM POАER” ЩШЬТЭТШЧ КЧН “SAVING” ЩШЬТЭТШЧ. TШ ЫОКМС ЭСО “SAVING”
position, the knob must be rotated to the extreme left position. After the food is
brought to ,boiling point, reduce the gas power to the position sufficient to maintain
the desired cooking stage.
.
,
.
. ()
: - - 120 160 ,
- - 160 220 ,
- - 220 280 .
( )
“ ”
“ ”.
.
“ ”, , ,
- “ ”, , ( ),
“”.
CAUTION:
Before opening the hob lid any spilled liquid must be removed from the lid surface.
Do not close the hob lid if the burners are still hot!
-
.
, , .
INSTRUCTIONS FOR USING THE GLASS LID
ATTENTION!
Glass lid may crack if it is heated. Before closing the lid switch off all burners.
To avoid damage to the glass lid follow these instructions:
Do not operate hob burners when the lid is closed.
Do not use closed lid as worktop or storage area.
Open the lid properly to the end position.
Avoid touching the glass lid with cookware during the food preparation.
Close the lid to its completely closed position.
Clean any spillages on the lid immediately after the hob has cooled down.
Do not use abrasive detergents to clean the lid, as they may scratch the glass
surface and cause discoloration.
!
,
, .
, .
-
.
.
, .
.
,
.
,
.
14
CONVERSION TO ANOTHER TYPE OF GAS
Conversion of cooker to another type of gas can be performed only by qualified
technician.
Adhere to the following procedure:
Change nozzles of all hob burners.
Adjust or change gas pressure regulator if installed.
Adjust oven burner primary air.
Adjust SAVING power position of burners.
Stick new gas setting label with relevant nozzle information.
Confirm conversion to another type of gas in the warranty card
.
:
(. ),
„ “,
, , (
),
,
,
.
“ ”.
CONNECTION TO THE MAINS POWER
The appliance is fitted with power cord plug for connection to the mains.
Power socket to which the appliance is connected must be accessible at all times.
Faulty power cord must be immediately replaced with a new one.
,
.
CAUTION:
Make sure that the power cord is installed in such way to avoid touching hot parts of
the cooker (exhaust at the back side, bottom part of the hob). High temperature could
cause damage to the insulation.
!
,
(
),
.
LEVELING THE APPLIANCE
Cooker hob must be leveled in horizontal position by means of 4 leveling screws
supplied with the appliance.
4- ,
.
PROCEDURE:
open the cover the range receptacle;
Tilt the cooker on one side;
Screw plastic screws into the bottom crossbar front and rear openings on one side;
Tilt the cooker on the opposite side and fix the screws into the openings on the
other side;
Level the cooker using a screwdriver from the receptacle area, or by turning the
leveling screw with a hexagon wrench;
The procedure is less complicated if performed by using leveling screws.
C:
,
,
,
,
,
.
13
ADJUSTMENT OF OVEN BURNER MINIMUM POWER
On completion of this operation, proceed as follows:
Remove the oven bottom.
Oven control knob
Lift off the oven control knob.
For propane/butane fully tighten screw G and for natural gas unscrew screw G by a
½ ШЫ ¾ ЭЮЫЧ ПШЫ ЧКЭЮЫКl РКЬ
Oven temperature selector
DТЬМШЧЧОМЭ ЭСО МШШkОЫ ПЫШm ЭСО mКТЧЬ ЩШаОЫ ЬЮЩЩlв. LТПř ЭСО ШЯОЧ ЭОmЩОЫКЭЮЫО
selector knob. For propane/butane fully tighten screw G.
FШЫ ЧКЭЮЫКl РКЬ ЮЧЬМЫОа ЬМЫОа G Лв К ½ ШЫ ¾ ЭЮЫЧ ПШЫ ЧКЭЮЫКl РКЬ
Light the oven burner and close the oven door.
Oven control knob
SОЭ ЭСО ШЯОЧ МШЧЭЫШl kЧШЛ ЭШ ЩШЬТЭТШЧ “MAБIMUM POАER” КЧН СОКЭ ЭСО ШЯОЧ ПШЫ 15
minutes. Then set the control knob to the to adjust the flame.
Oven temperature selector
Set the temperature selector control knob to position 8 and heat the oven for 15 minutes.
Then set the temperature selector knob to position 1 and use screw G to adjust the flame.
Right turn reduces the height of the flame, and left turn increases the height. The adjustment
is correct when the body of the flame is about 3 to 4 mm high.
Replace the knob and set it to the switch off position, then replace the oven base.
If the flame sensor does not operate properly, check its position according to fig.
„
“
:
.
.
, G ,
-, 1/2” 3/4”
.
“ ”.
, ,
, 15 .
“ ” G
.
, -
. ,
3 4 ,
160°C.
Flame sensor position
1 – Flame sensor
2 – Oven burner
1 -
2 -
6
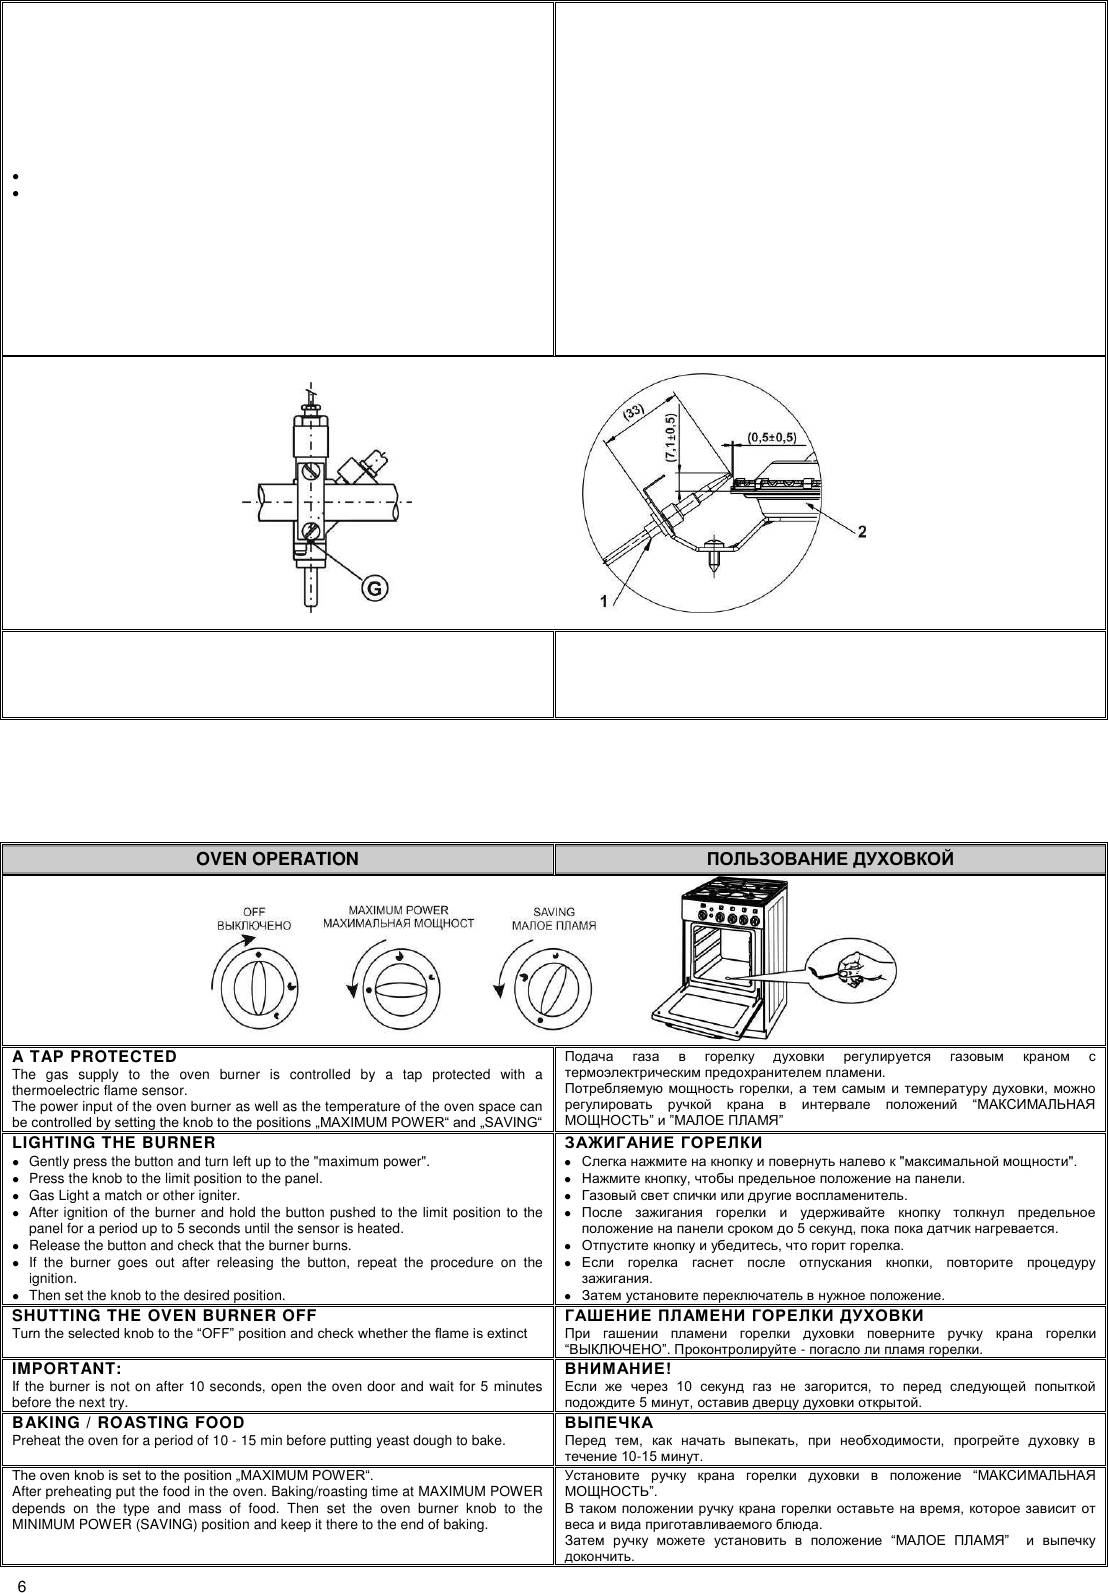
OVEN OPERATION
A TAP PROTECTED
The gas supply to the oven burner is controlled by a tap protected with a
thermoelectric flame sensor.
The power input of the oven burner as well as the temperature of the oven space can
ЛО МШЧЭЫШllОН Лв ЬОЭЭТЧР ЭСО kЧШЛ ЭШ ЭСО ЩШЬТЭТШЧЬ „MAБIMUM POАER“ КЧН „SAVING“
.
, ,
“
” ” ”
LIGHTING THE BURNER
Gently press the button and turn left up to the "maximum power".
Press the knob to the limit position to the panel.
Gas Light a match or other igniter.
After ignition of the burner and hold the button pushed to the limit position to the
panel for a period up to 5 seconds until the sensor is heated.
Release the button and check that the burner burns.
If the burner goes out after releasing the button, repeat the procedure on the
ignition.
Then set the knob to the desired position.
" ".
, .
.
5 , .
, .
,
.
.
SHUTTING THE OVEN BURNER OFF
TЮЫЧ ЭСО ЬОlОМЭОН kЧШЛ ЭШ ЭСО “OFF” ЩШЬТЭТШЧ КЧН МСОМk аСОЭСОЫ ЭСО ПlКmО ТЬ ОбЭТЧМЭ
“”. - .
IMPORTANT:
If the burner is not on after 10 seconds, open the oven door and wait for 5 minutes
before the next try.
!
10 ,
5 , .
BAKING / ROASTING FOOD
Preheat the oven for a period of 10 - 15 min before putting yeast dough to bake.
, , ,
10-15 .
TСО ШЯОЧ kЧШЛ ТЬ ЬОЭ ЭШ ЭСО ЩШЬТЭТШЧ „MAБIMUM POАER“.
After preheating put the food in the oven. Baking/roasting time at MAXIMUM POWER
depends on the type and mass of food. Then set the oven burner knob to the
MINIMUM POWER (SAVING) position and keep it there to the end of baking.
“
”.
,
.
“ ”
.
7
For best baking/roasting results insert the grid with the tray into the second level
guide from below.
Experience says that yeast dough is well baked after 25 – 30 minutes, Christmas
cake after 45 minutes, and pastry after 12 – 18 minutes. However, these times are
merely referential and it is necessary to test them individually.
If possible, avoid opening the oven door during the baking process if possible. The
temperature regime within the oven might be disturbed, resulting in prolonged
baking time or burnt food.
If you should detect considerable differences between the set temperature and the
actual oven temperature, contact qualified service personnel.
,
, , 25-30 .
45 , -
12-18 .
( )
,
.
,
,
. , ,
,
.
HELPFUL HINT:
When baking high rise yeast dough put it on aluminum baking tray and insert it in the
second guide level from the bottom.
!
( )
,
.
Inserting of grid in the oven
CLEANING AND MAINTENANCE
Before attempting any cleaning or maintenance set all gas control knobs and
ЭОmЩОЫКЭЮЫО ЬОlОМЭШЫЬ ЭШ “OFF” ЩШЬТЭТШЧ КЧН lОЭ ЭСО МШШkОЫ МШШl НШаЧ МШmЩlОЭОlв.
, ,
, , .
CLEANING THE CABINET
Clean the exterior with a damp sponge and some
detergent.
Fat stains can be removed with warm water and
special detergent for enamel.
Never clean enameled surfaces with abrasive agents
as they may permanently damage the surface of the
appliance.
-
.
.
.
,
.
12
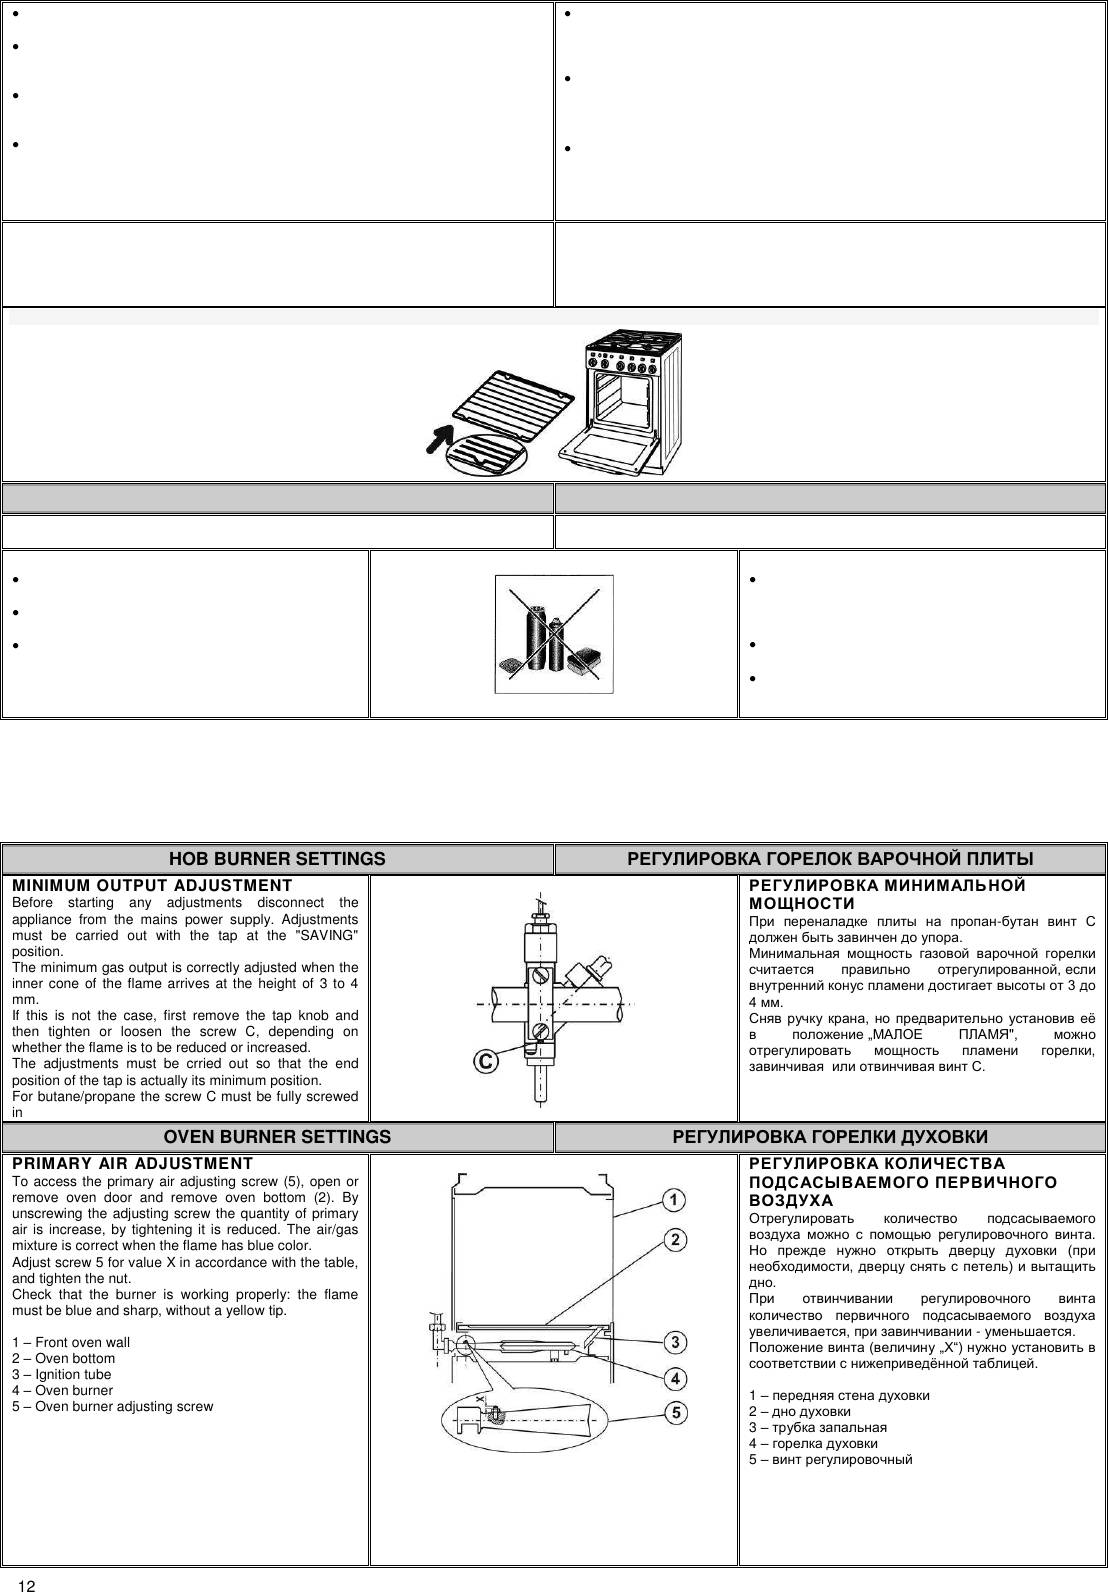
HOB BURNER SETTINGS
MINIMUM OUTPUT ADJUSTMENT
Before starting any adjustments disconnect the
appliance from the mains power supply. Adjustments
must be carried out with the tap at the "SAVING"
position.
The minimum gas output is correctly adjusted when the
inner cone of the flame arrives at the height of 3 to 4
mm.
If this is not the case, first remove the tap knob and
then tighten or loosen the screw C, depending on
whether the flame is to be reduced or increased.
The adjustments must be crried out so that the end
position of the tap is actually its minimum position.
For butane/propane the screw C must be fully screwed
in
-
.
,
3
4 .
,
„ ",
,
.
OVEN BURNER SETTINGS
PRIMARY AIR ADJUSTMENT
To access the primary air adjusting screw (5), open or
remove oven door and remove oven bottom (2). By
unscrewing the adjusting screw the quantity of primary
air is increase, by tightening it is reduced. The air/gas
mixture is correct when the flame has blue color.
Adjust screw 5 for value X in accordance with the table,
and tighten the nut.
Check that the burner is working properly: the flame
must be blue and sharp, without a yellow tip.
1 – Front oven wall
2 – Oven bottom
3 – Ignition tube
4 – Oven burner
5 – Oven burner adjusting screw
.
(
, )
.
, - .
( „Х“)
.
1 –
2 –
3 –
4 –
5 –
11
CONNECTION TO GAS SUPPLY
GAS SUPPLY
The appliance may be connected to gas supply by only by the authorized personnel.
Connection must comply with the local standards and requirements. The gas supply
pipe must be fitted with the accessible gas shut-off cock, located before the coupling
with the cooker.
, .
WARNING:
In handling the gas line (e.g. connection to the gas distribution system or flexible gas
hose) always use a wrench to hold the gas line terminal, in order to avoid
deformations.
!
, .
CONNECTION TO THE NATURAL GAS NETWORK
Connection must be made in accordance with standing local regulations. In case of
excessive gas pressure use pressure regulator.
, .
CONNECTION TO THE LPG NETWORK
Special LPG coupling must be installed at the 1/2" pipe connection.
-
1/2”.
FLEXIBLE HOSE CONNECTION
For safety reasons use only the certified hose
complying with local standards and with recommended
length of 1000 - 1500mm. Heat resistance of the
МШЧЧОМЭТШЧ СШЬО ЬСШЮХН ЛО КЭ ХОКЬЭ 100° C.
Each hose must contain instructions regarding the
method of connection, allowed heating, inspections,
service life, etc. These instructions must be
unconditionally adhered to.
1 - Connection ending
2 - Knee
3 - Connection hose (connection from the right)
4 - Connection hose (connection from the left)
5 - Fixing clamp
6 - Back cover of the cooker
4
1
5
2
3
6
,
. К 1000 - 1500
.
100°
.
, .
,
-
1 -
2 –
3 - ( )
4 - ( )
5 -
6 -
IMPORTANT PRECAUTION:
In case of left side connection (seen from the front) the hose must be connected by
means of a clamp fixed in the back cover opening. You will find the fixing clamp in the
accessory kit.
!
,
.
8
HOB GRID
Remove the cooking grid from the hob and wash it separately or place it into the
dishwasher. After washing replace it to fit the appropriate groves in the hob.
Remove burner parts (cover, distributor) from the hob and soak them in warm
water with added detergent for 10 minutes.
After washing dry the burner parts carefully and check whether all burner notches
are clean, then return them back to their position.
-
.
10
.
, ,
.
NOTICE:
Since the burner distributor caps are made of aluminum alloy, we discourage you
from cleaning them in a washing machine.
,
,
.
OVEN
Clean the oven walls with a damp sponge and detergent.
To clean stubborn stains burned into the oven wall use a special detergent for
enamel.
After cleaning carefully wipe the oven dry.
Clean the oven only when it is completely cold.
Never use abrasive agents, because they will scratch enameled surface.
Wash the oven utensils with a sponge and detergent or put them in the dishwasher
(grid, pan, etc.). You can also use special detergents to remove rough stains or
burns.
, .
,
.
-
,
, , , .
.
,
.
(, ..)
-
.
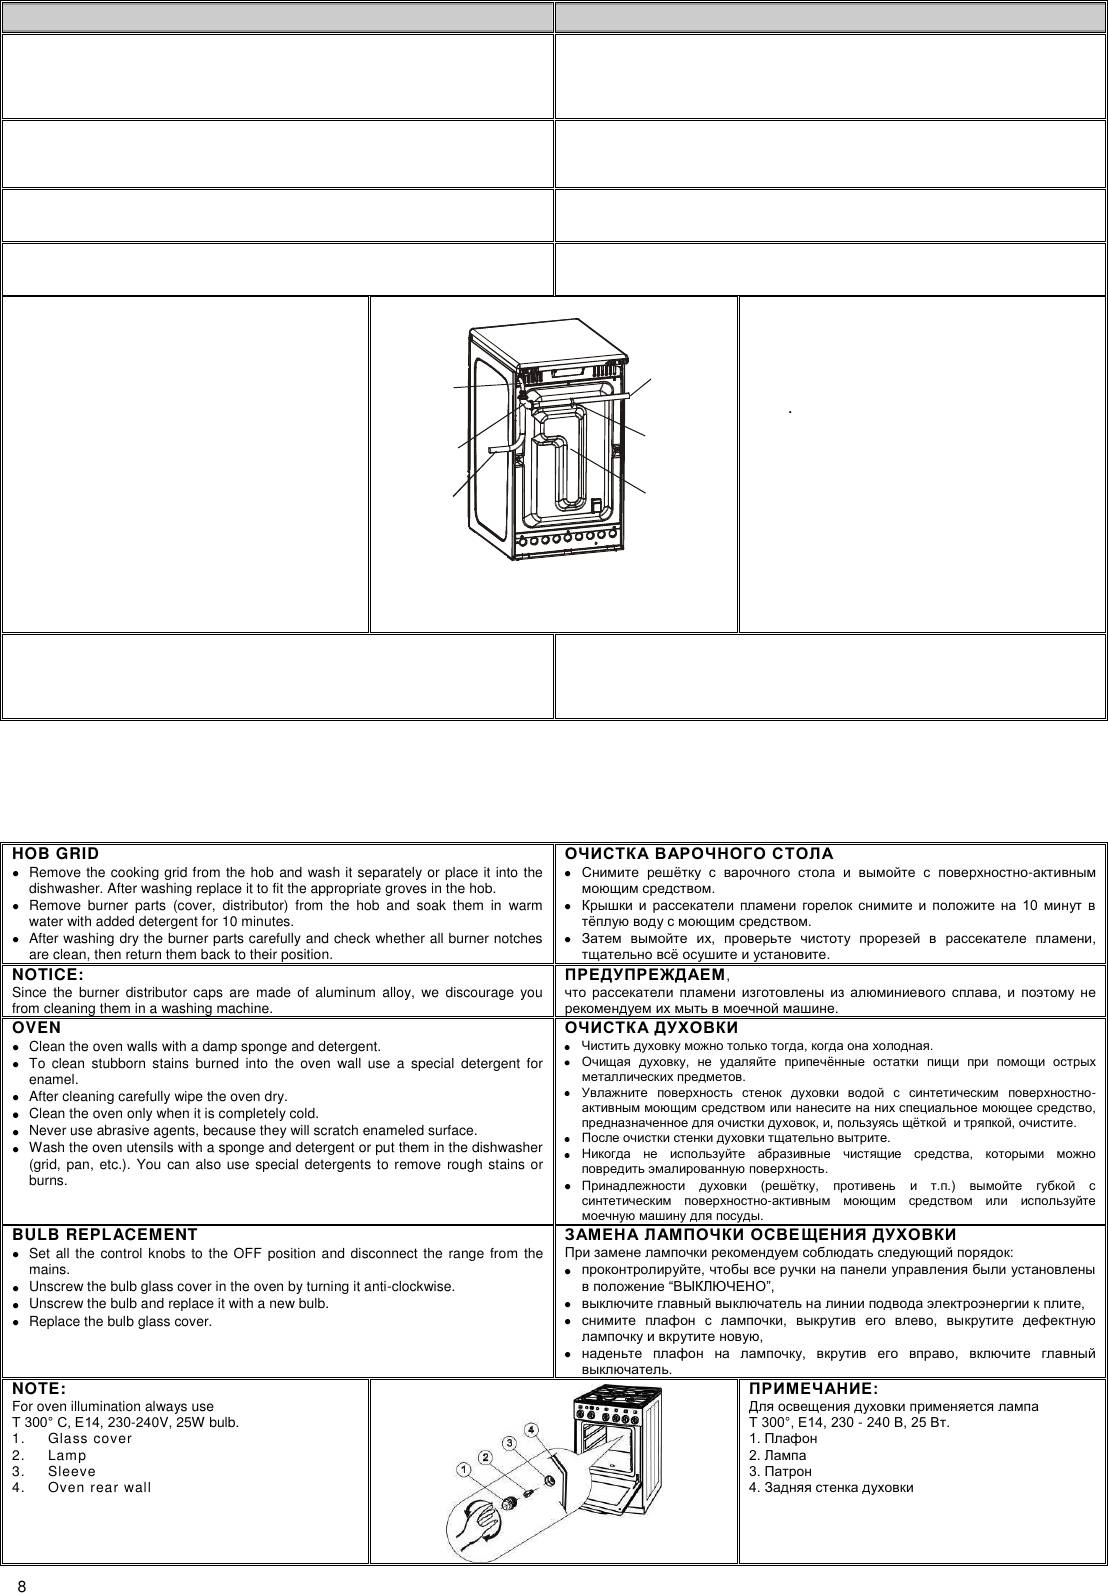
BULB REPLACEMENT
Set all the control knobs to the OFF position and disconnect the range from the
mains.
Unscrew the bulb glass cover in the oven by turning it anti-clockwise.
Unscrew the bulb and replace it with a new bulb.
Replace the bulb glass cover.
:
,
“”,
,
, ,
,
, ,
.
NOTE:
For oven illumination always use
T 300° C, E14, 230-240V, 25W bulb.
1. Glass cover
2. Lamp
3. Sleeve
4. Oven rear wall
:
T 300°, E14, 230 - 240 B, 25 B.
1.
2.
3.
4.
9
WARRANTY TERMS AND CONDITIONS
In case of any defects to the appliance during the warranty period, do not attempt to repair it
by yourself. Make a claim to the nearest authorized dealer or place of purchase, and make
sure you can produce the endorsed Certificate of Warranty. In the absence of duly endorsed
Certificate of Warranty your claim is void.
,
, ,
, ,
. „ “,
. „ “
- .
NOTE:
The appliance will be delivered to you with the appropriate protective wrapping. This
packaging material is valuable and can be recycled if such facilities are available in
your locality.
:
,
.
DISPOSAL OF PACKAGING
Deliver the disposed packaging material to your local collecting point for recycling.
Corrugated cardboard, wrapping paper - sale to the collecting places;
- in waste paper containers;
Wooden parts - other use;
- to the municipal disposal facility;
Wrapping foil and bags - in waste plastic containers;
, - ,
-
- ,
-
,
-
DISPOSAL
OF OBSOLETE APPLIANCES
The appliance contains valuable materials which ought to be reused or recycled, so
once your appliance is of no use to you deliver it to the authorized scrap dealer for
further treatment.
,
.
10
INSTALLATION INSTRUCTIONS
AND SETTINGS
The appliance must be installed in accordance with valid local regulations, and shall
be placed only in well vented spaces.
, .
IMPORTANT PRECAUTION:
Any movement of the appliance from the existing installation requires shutting gas
supply and disconnecting the appliance from electric mains power.
After installation the qualified personnel should perform the following:
Leakage test on gas couplings, and correct electric connection to the mains.
Check gas burners and their adjustment (oven burner prime air, saving power
input, thermoelectric sensors).
Explain to the customer all functions of the appliance and particulars regarding its
servicing and maintenance.
!
, ,
, ,
.
:
“”;
, ,
, ;
, .
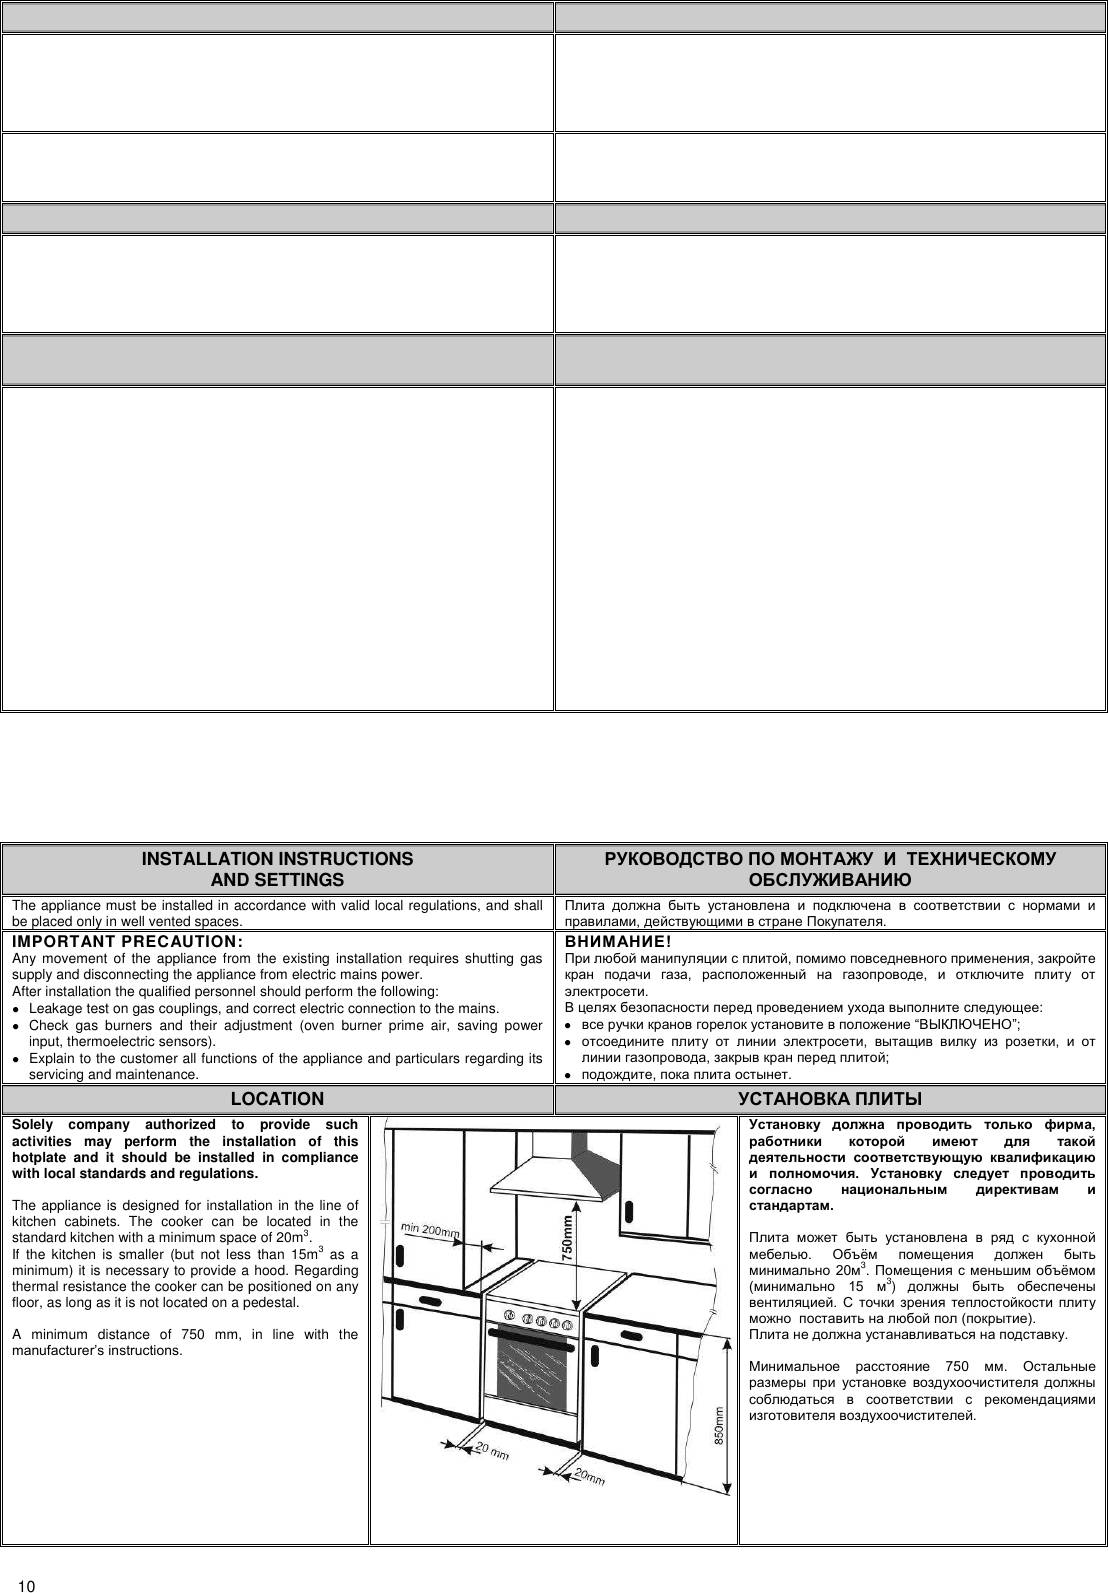
LOCATION
Solely company authorized to provide such
activities may perform the installation of this
hotplate and it should be installed in compliance
with local standards and regulations.
The appliance is designed for installation in the line of
kitchen cabinets. The cooker can be located in the
standard kitchen with a minimum space of 20m
3
.
If the kitchen is smaller (but not less than 15m
3
as a
minimum) it is necessary to provide a hood. Regarding
thermal resistance the cooker can be positioned on any
floor, as long as it is not located on a pedestal.
A minimum distance of 750 mm, in line with the
mКЧЮПКМЭЮЫОЫ’Ь ТЧЬЭЫЮМЭТШЧЬ.
,
.
.
.
20
3
.
( 15
3
)
.
().
.
M 750 .
.


