Dell Precision 490 Desktop: Back View (Tower Orientation)
Back View (Tower Orientation): Dell Precision 490 Desktop
Table of contents
- Notes, Notices, and Cautions Abbreviations and Acronyms
- Contents
- Finding Information What Are You Looking For? Find It Here
- What Are You Looking For? Find It Here
- What Are You Looking For? Find It Here
- What Are You Looking For? Find It Here
- Setting Up Your Computer (Tower Orientation) Connect the keyboard and the mouse. Connect the modem or the network cable.
- Connect the monitor.
- For single- and dual-monitor capable cards with a single connector
- For dual-monitor capable cards with one DVI connector and one VGA connector For dual-monitor capable cards with two DVI connectors
- Connect the speakers. Connect the power cables and turn on the computer and monitor.
- Install additional software or devices. Setting Up Your Computer (Desktop Orientation) Connect the keyboard and the mouse.
- Connect the modem or the network cable. Connect the monitor.
- For single- and dual-monitor capable cards with a single connector
- For dual-monitor capable cards with one DVI connector and one VGA connector For dual-monitor capable cards with two DVI connectors
- Connect the speakers. Connect the power cables and turn on the computer and monitor. Install additional software or devices.
- About Your Computer Front View (Tower Orientation) 5 IEEE 1394 connector (optional)
- 13 diagnostic lights (4) Use these lights to help you troubleshoot a computer problem based on the
- Back View (Tower Orientation)
- Back Panel Connectors 4 link integrity light
- 11 serial connector Connect a serial device, such as a handheld device, to the serial port. If necessary,
- Front View (Desktop Orientation) 8 power button Press to turn on the computer.
- 13 diagnostic lights (4) Use these lights to help you troubleshoot a computer problem based on the Back View (Desktop Orientation)
- Inside View
- Inside View – Hard Drive Bay Rotated Out
- System Board Components
- 14 SATA connectors (SATA_4, SATA_3) Cable Colors Locating Your User’s Guide
- Removing the Computer Cover 1 2 3
- 4 5 6 7
- Caring for Your Computer Solving Problems Troubleshooting Tips Resolving Software and Hardware Incompatibilities
- Using Microsoft Windows XP System Restore Creating a Restore Point Restoring the Computer to an Earlier Operating State
- Undoing the Last System Restore Enabling System Restore Using the Last Known Good Configuration Other Options to Help Resolve Additional Device or Software Conflicts
- Dell Diagnostics When to Use the Dell Diagnostics Starting the Dell Diagnostics From Your Hard Drive
- Starting the Dell Diagnostics From the Drivers and Utilities CD Before You Start Testing Beep Codes
- Code Cause
- Error Messages Diagnostic Lights Diagnostic Light Codes Before POST Diagnostic Lights Power Problem Description Suggested Resolution Light
- Diagnostic Lights Power Problem Description Suggested Resolution Light
- Diagnostic Lights Power Problem Description Suggested Resolution Light
- Light Pattern Problem Description Suggested Resolution
- Light Pattern Problem Description Suggested Resolution
- Frequently Asked Questions How Do I... Solution Where to Find Additional Information
- How Do I... Solution Where to Find Additional Information
- Index
- 46 Index
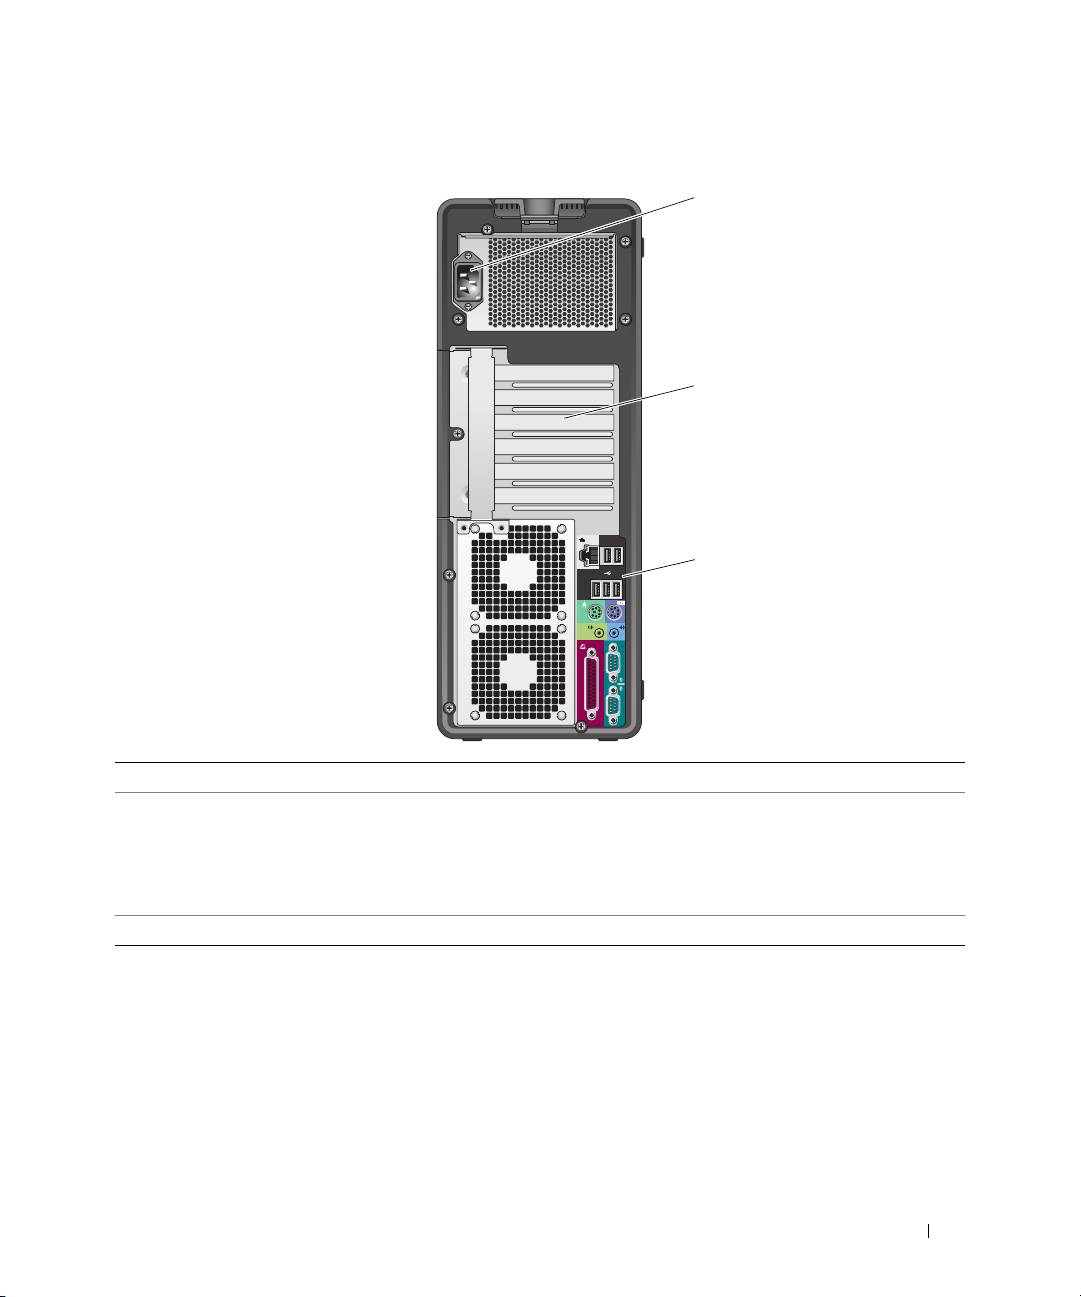
Back View (Tower Orientation)
1
2
3
1 power connector Insert the power cable.
2 card slots Access connectors for any installed PCI, PCI-X, or PCI Express cards.
NOTE: The center four slots support full-length cards: one PCI-X slot, one PCI
Express x8 slot (wired as x4), one PCI Express x16 slot, and one PCI slot); and the top
and bottom slots support half-length cards: one PCI-X slot and one PCI Express x8
slot (wired as x4).
3 back panel connectors Plug serial, USB, and other devices into the
appropriate connectors
.
Quick Reference Guide 21
Top 10 manuals
100.00
NZXT HALE90 1000W99.99
Samsung SM-R38099.97
AEG BSB 18C99.97
Dell 2700W99.97
Smeg KSEC70X99.96
Beurer HDE 4099.96
Pyramida KH 50 v.299.96
MSI CSM-H81M-P3299.96
AEG HR 562799.95
Melissa 640-048