Beurer BM70: . Measuring blood pressure 5.2 Correct posture 5.1 Positioning cuff 5.3 Select memory 5.4 Measuring blood pressure
. Measuring blood pressure 5.2 Correct posture 5.1 Positioning cuff 5.3 Select memory 5.4 Measuring blood pressure: Beurer BM70
Table of contents
- 2. Important information Signs and symbols 1. Getting to know your instrument
- Advice on use
- Storage and Care Repair and disposal Advice on batteries
- 3. Unit description Icons in the display: 4. Prepare measurement Inserting battery
- PC interface System requirements for the Beurer “Health Manager” Setting date and time computer software Mains operation
- . Measuring blood pressure 5.2 Correct posture 5.1 Positioning cuff 5.3 Select memory 5.4 Measuring blood pressure
- WHO classification: 5.5 Evaluating results Cardiac arrhythmia:
- Table for classification of blood pressure values (unit of measurement mmHg) for adults: : Haemodynamic stability 5.6 Resting indicator measurement (using HSD diagnostics) : Lack of haemodynamic stability
- 7. Cleaning and storing the instrument 8. Rectifying faults 6. Saving, retrieving and deleting results
- 9. Specifications
- 10. Adapter
5
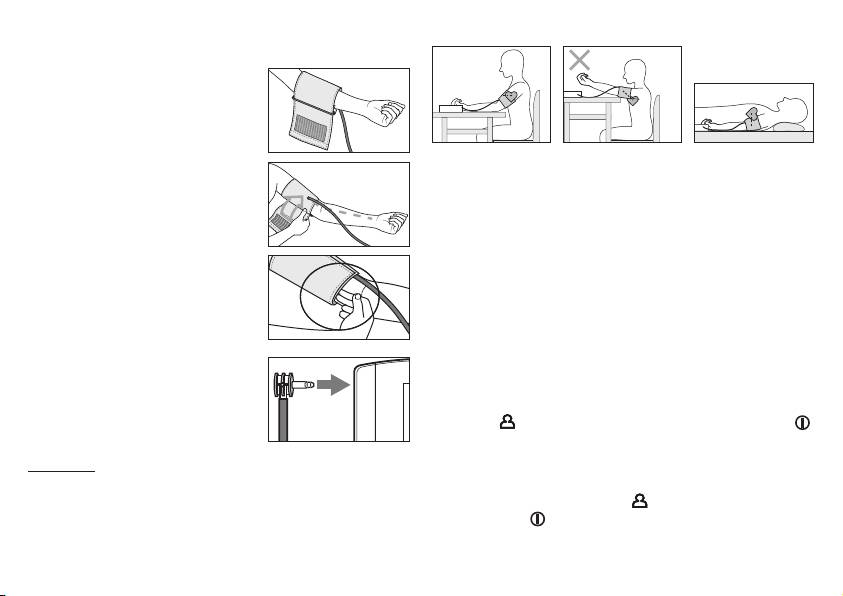
. Measuring blood pressure
5.2 Correct posture
5.1 Positioning cuff
Fit the cuff round your bare left upper
arm. Blood circulation in the arm
should not be restricted by tight
clothing or other objects.
•
Rest for approx. 5 minutes before each measurement. Other-
The cuff should be placed on the
wise there may be divergences.
upper arm so that the lower edge is 2
•
You can perform the measurement either sitting or lying down.
to 3 cm above the bend of the elbow
Always make sure that the cuff is on a level with your heart.
and above the artery. The tube should
•
To carry out a blood pressure measurement, make sure you
be in line with the centre of the palm.
are sitting comfortably with your arms and back leaning on
Now place the free end of the cuff
something. Do not cross your legs. Place your feet flat on the
snugly, but not too tightly, around the
ground.
arm, and fix it with the Velcro fastener.
•
In order not to distort the result, it is important to keep still
The cuff should be fitted tight enough
during the measurement and not talk.
to allow just two fingers to fit beneath
5.3 Select memory
the cuff.
You have two memories (60 memory spaces each) in order to
Insert the cuff tubing into the socket
save the test results of 2 different people separately, or else
for the cuff attachment.
save measurements in the morning and evening separately.
Select the required memory space by pressing the user selec-
tion button
. Confirm your selection with the On/Off button .
5.4 Measuring blood pressure
Important: The instrument should only be operated with the
•
Put on the cuff as described previously and assume the posi-
original cuff. The cuff is suitable for an arm circumference of 24
tion in which you want to carry out the measurement.
to 36 cm. A larger cuff for upper arm circumferences from 34 to
•
Press the
user selection button
to select a memory zone,
46 cm is available from retailers or the service address under
and press the
key 2x to start measurement in the chosen
order no. 162.797.
memory zone. After checking the display with all digits light-
ing up, the monitor will automatically inflate. Following the
19
