Tefal VC400830: инструкция
Раздел: Бытовая, кухонная техника, электроника и оборудование
Тип: Пароварка
Инструкция к Пароварке Tefal VC400830
User Instructions
Gebrauchsanleitung
Mode d’emploi
Istruzioni per l’uso
√‰ËÁ›Â˜ ¯Ú‹Ûˆ˜
Руководство для
пользователя
Instrukcja obsługi
Kullanım kılavuzu
Iнcтрукцiя користувача
1
2
3
4*
5
7
4
5
4
6
8
9
18
10
19
11
12
13
14
1716* 16 15
17
VC 7000 - VC 7001 VC 4002 - VC 4003 - VC 4004
* depending on the model • je nach Modell • selon modèle • seconda del modello • ανάλογα µε το µοντέλο
• в зависимости от модели • zależnie od modelu • modele bağl olarak •
залежно від моделі
1 2 3
4 5 6
7 8 9
10 11 12
13 14
10
min.
60
20
min.
min.
50
30
min.
min.
40
min.
15
16
min.
10
60
min.
20
min.
50
min.
30
min.
40
min.
17
min.
10
60
min.
20
min.
50
min.
30
min.
40
min.
18
19 20
10
min.
60
20
min.
min.
50
30
min.
min.
40
min.
21
22 23
24
25
Vinegar Water
26
27

ENGLISH
Protection of the environment
• Your appliance is designed for many years use. However, when you
decide to replace your appliance, do not forget that you can contribute
towards protecting the environment by disposing of it at your local
waste disposal centre (for appliances fitted with an electronic
programmer).
Please follow the instructions for use carefully.
This appliance produces boiling hot steam.
Safety instructions
• This appliance complies with the safety regulations and conditions in effect,
and with the following:
- EMC directive 89/336/CEE modified by directive 93/68/CEE
- Low Voltage Directive 72/23/CEE modified by directive 93/68/CEE.
• Check that the power supply voltage corresponds to that shown on the
appliance (alternating current).
• Given the diverse standards in effect, if the appliance is used in a country
other than that in which it is purchased, have it checked by an approved
service centre.
• Do not place the appliance near a heat source or in a hot oven, as serious
damage could result.
• Use a flat, stable and heat resistant work surface, away from any water
splashes.
• Never leave the appliance in operation unattended. Keep away from
children.
• Do not leave the cord hanging.
• Always plug the appliance into an earthed socket.
• Do not unplug the appliance by pulling on the cord.
• Do not use the appliance if:
- the appliance or the cord is damaged.
- the appliance has fallen or shows visible damage or does not work properly.
In the event of the above, the appliance must be sent to an approved Service
Centre.
• If the power supply cable is damaged, it must be replaced by the
manufacturer, the after-sales service or a similarly qualified person in order
to avoid any danger.
• Burns can occur by touching the hot surface of the appliance, the hot water,
the steam or the food.
• Always unplug the appliance:
- immediately after use,
- when moving it,
- prior to any cleaning or maintenance.
• Never immerse the appliance in water !
• Do not place the appliance near a wall or a cupboard - the steam produced
by the appliance can cause damage.
• Do not move the appliance when it is full of liquids or hot foods.
• This appliance is designed for domestic use only. In case of professional
use, inappropriate use or failure to comply with the instructions, the
manufacturer accepts no responsibility and the guarantee does not apply.
• Do not touch the appliance while it is producing steam and use a cloth to
remove the lid, rice bowl and steam bowl.
3

ENGLISH
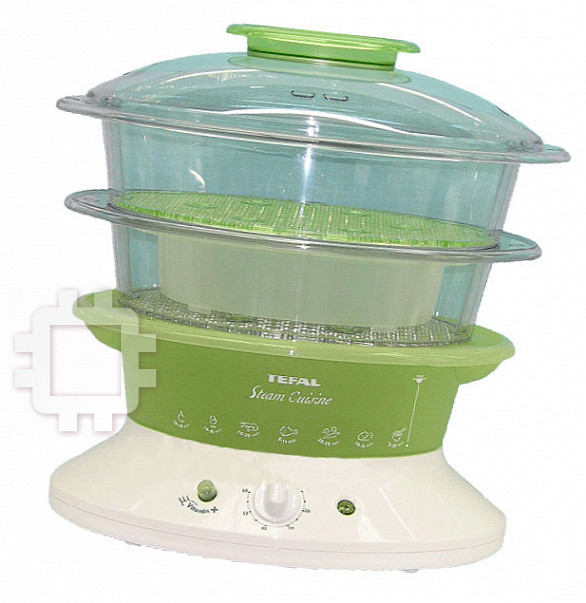
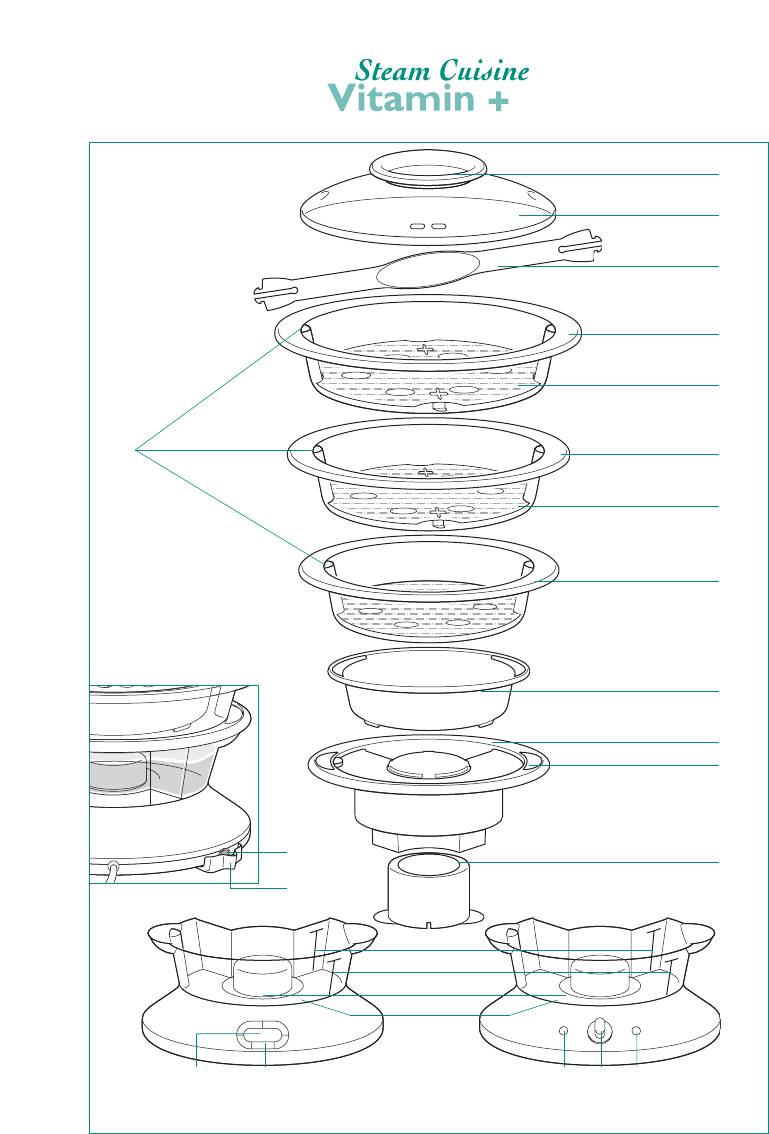
Description
1 Lid handle
10 Removable turbo ring scale remover
2 Lid
11 Interior maximum water level
3 Clip-on handle
12 Exterior maximum water level
4 Steam basket (2 or 3 depending on the
13 Heating element
model)
14 Water tank (capacity 1.1 l)
5 Removable base with built-in egg hol-
15 On/off light
der (only on upper basket(s))
16 60-minute timer
6 Rice bowl
17 “VITAMIN+” touchpad: for extra fast
7 Steam conduit
cooking and more vitamins
8 Juice collector
18 Steam vent
9 Water inlet
19 Condensation tray
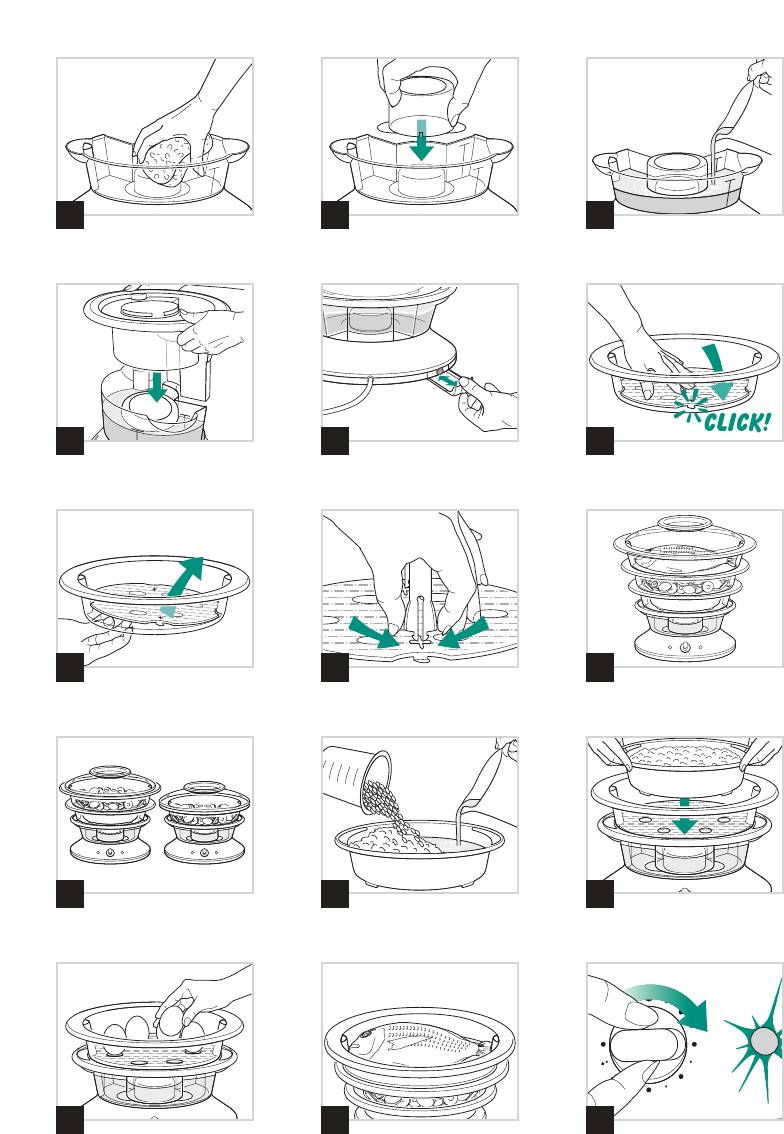
Preparation
Make sure there is water in the
Prior to use
tank prior to use.
Using warm soapy water, wash all the
Fit the condensation tray to the rear of the
removable parts and the inside of the water
appliance - Fig.
5
tank. Rinse and dry - Fig.
1
Make sure that the condensation
Do not immerse the water tank in
tray is empty before each use.
water when cleaning.
Positioning the removable bases
Preparing the steam cooker
The upper basket(s) have bases which can
Place the cooker on a stable surface.
be removed to obtain a larger cooking
Place the turbo ring around the heating
space or to cook larger foods.
element, in the direction indicated in
To position the bases:
the diagram - Fig.
2
Place the basket on the table.
Keep away from any objects which
Hold the base right side up (hooks toward
could be damaged by the steam.
the bottom).
Centre the base inside the basket.
The turbo ring must always be in
Press on the hooks until the base is locked
place before filling the tank with water.
into place - Fig.
6
Filling the water tank
To remove the bases, push up from
Pour the water directly into the water tank,
underneath - Fig.
7
up to the maximum level as well as into
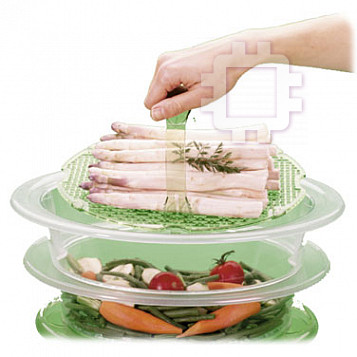
Your steam cooker comes with a clip-on
the turbo ring - Fig.
3
handle which makes it easy to remove the
Place the juice collector on the tank until
cooked food from the basket without
firmly in place - Fig.
4
damaging it (fish, asparagus tips, etc.)
If the juice collector does not fit into place,
Clip the tip of the clip-on handle on the
check the position of the turbo ring. It may
base - Fig.
8
be the wrong way up.
Squeeze the tip of the handle to unclip it.
Use fresh water with each use.
The lower basket is fitted with a
Do not put water into the steam
fixed base.
conduit.
Only use the clip-on handle on the
Do not use seasoning or any other
top basket.
liquid other than water in the water tank.
4

Reduce your cooking time with the
When you use the clip-on handle
"VITAMIN+" touchpad
with a basket, do not clip the base into
Exclusive: your appliance is fitted with a
that basket, simply lay the base, in order
“VITAMIN+” touchpad which reduces
to remove it more easily.
cooking time up to 50% compared with
classic steamers for a better preservation of
Make sure that the handle hooks
vitamins - Fig.
16
are properly in place.
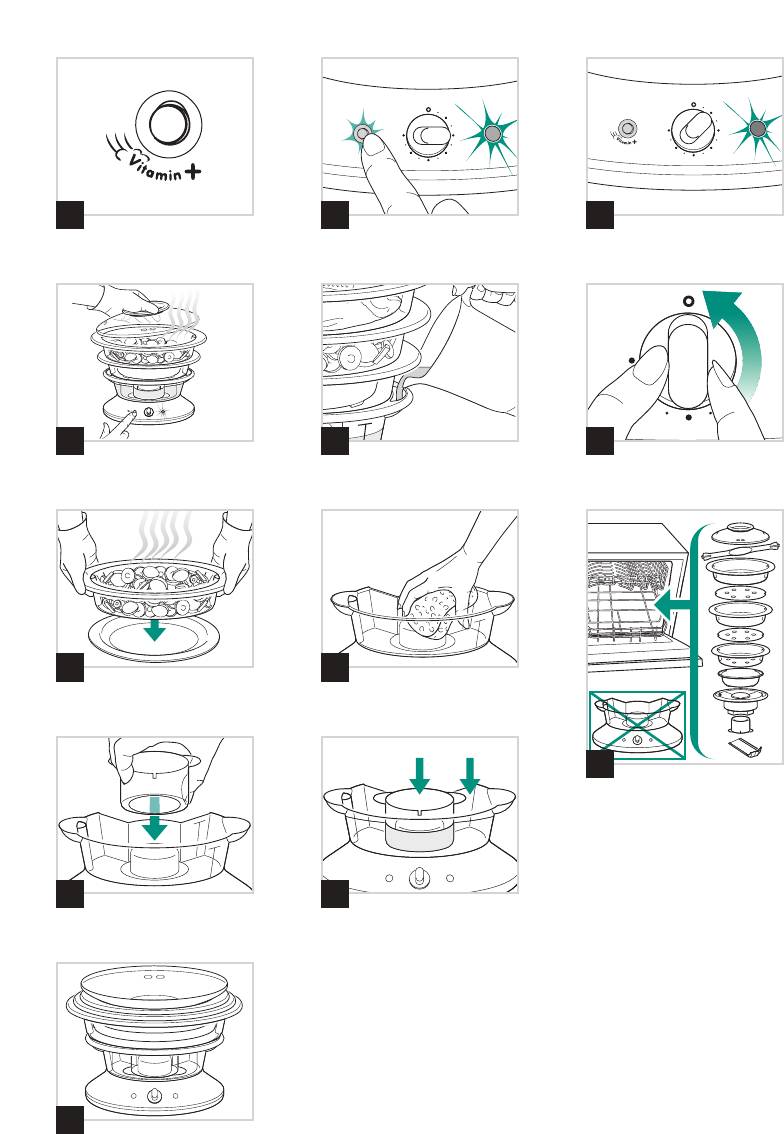
At the start of cooking, press the
Positioning the baskets
“VITAMIN+” touchpad, the light comes
Place the food in the basket. Always place
on automatically - Fig. . This allows a
17
the smallest basket on the juice collector.
faster start to cooking, thanks to a bigger
Then place them from smallest to biggest,
steam outlet.
fitting them correctly into each other
Once the ideal temperature is reached, the
- Fig.
9
“VITAMIN+” touchpad light goes out
Put the lid on (the lid fits on all the
automatically - Fig.
18
baskets) - Fig.
10
After opening the lid (e.g. : if adding more
To cook rice
food) you can press the “VITAMIN+”
Put the rice and the water in the rice bowl
touchpad again to quickly return the
- Fig. (see the table of cooking times).
11
steamer to the ideal temperature - Fig.
19
Place the rice bowl in the steam basket
In some cases, it is normal, when you
- Fig.
12
press the “VITAMIN+” touchpad for the
To cook eggs
light to stay off or turn off very quickly.
Place the eggs in the built-in egg holders
This means that the ideal temperature has
- Fig.
13
been reached in the baskets.
To cook a whole fish
It is normal to see a small amount
Place the fish in the upper basket and the
of steam coming from the steam vent at
vegetables in the lower basket(s) - Fig.
14
the rear of your appliance.
If steam is coming out of the
Once the “VITAMIN+” touchpad
appliance, check that the baskets are correctly
light has come on, you cannot switch it off
fixed in place and in the right order.
manually. The light goes out automatically.
For best results, do not put too much
It is not advisable to press the
food in the baskets.
“VITAMIN+” button more than once
So as not to scald yourself with the
during cooking.
steam from the lid, preferably place the
During cooking
steam holes towards the back.
Check the water level during cooking
using the external water level indicator.
Steam cooking with the timer
If necessary, add more cold water through
Choose the cooking time
the water inlets - Fig.
20
Plug the appliance in.
Do not touch the appliance or
Set the timer for the recommended
foods during cooking as they will be hot.
cooking times (see table of cooking times).
When the red light is on, the steam
At the end of cooking
cooking has begun - Fig.
15
A signal sounds.
The red in-use light goes out.
In order to set the
To stop the appliance ahead of time, turn
timer, the appliance must be plugged in.
the timer to the O position - Fig.
21
5

Re-heating
Removing scale build-up from the
You can reheat food (see the table of
appliance
cooking times).
Position the turbo ring upside down on the
heating element - Fig.
25
If there is no more water, the
Fill the inside of the turbo ring with white
appliance stops producing steam.
vinegar up to the max mark.
Removing the food from the steam baskets
Fill the water tank with cold water up to
Lift the lid by the handle.
the same level - Fig.
26
Remove the steam basket.
Do not heat up (to avoid any descaling
Place the steam basket on a plate - Fig.
22
odour). Leave overnight to descale.
Rinse out the inside of the water tank with
Use oven gloves to handle the
warm water several times.
baskets and the lid.
Descale the appliance after
Afterwards
approximately every 8 uses.
Unplug the appliance.
Let it cool completely before cleaning it.
Do not use other scale-removing
Check that the juice collector has
products.
cooled sufficiently before removing it.
Over time the strong coloured
natural juices from foods such as carrots
Cleaning and maintenance
and beetroot may stain the juice collector.
Cleaning the appliance
This is normal. It may be cleaned by
Empty the water tank and clean it with a
soaking in mild bleach (not abrasive)
damp cloth and warm soapy water.
straight after cooking.
Rinse and dry - Fig.
23
All the other removable parts can be put in
Storing the baskets
the dishwasher - Fig.
24
To take up as little space as possible, your
baskets can be stored inside each other
Do not use abrasive cleaning
- Fig.
27
products.
Do not immerse the water tank in
water.
Clean the turbo ring regularly.
Always use a prewash or lowest
heat setting.
Do not forget to empty and wash
your condensation tray.
6

Table of cooking times
Cooking times are approximate and may vary depending on the size of the food, the space between the
food, the amount of food, individual preferences, and the mains voltage.
For food with different cooking times: place the largest or the food which takes the longest cooking time in
the lowest basket, during cooking, add the second or third basket with food that need a shorter cooking time.
At the start of cooking, press the “VITAMIN+” touchpad for extra fast cooking and for more vitamins.
Fish • Shellfish Type Amount Cooking Time Recommendations
Thin fillet of fish Fresh 450 g 5 -10 min. Do not lay pieces of fish on top of
Frozen 450 g 10 - 15 min. each other.
Thick fillets or steaks Fresh 400 g 10 - 15 min.
Whole fish Fresh 600 g 20 - 25 min.
Mussels Fresh 1 kg 10 - 15 min. Discard any that have not opened.
Prawns Fresh 200 g 2 - 5 min. According to your taste.
Scallops Fresh 100 g 2 - 5 min. According to your taste.
Meat • Poultry
Chicken breast (boneless) Strips 500 g 10 - 15 min.
Whole 450 g 15 - 20 min.
Chicken drumsticks Fresh 4 30 - 35 min.
Turkey escalope Fresh 600 g 15 - 20 min.
Pork fillet Fresh 700 g 10 - 15 min. Cut in 1 cm slices.
Lamb steaks Fresh 500 g 10 - 15 min.
Sausages Knackwurst 10 5 min.
Frankfurter 10 10 - 15 min. Pierce before cooking.
Vegetables
Asparagus Fresh 600 g 10 - 15 min. Cut the base off.
Broccoli Fresh 400 g 19 min. Cut in small florets.
Frozen 400 g 13 min.
Celeriac Fresh 350 g 15 - 18 min. In cubes or slices.
Mushrooms Fresh 500 g 11 min. Cut the base off and wash well.
Cauliflower florets Fresh 1 average 20 - 25 min. Cut in small florets.
(Red - Green) cabbage Fresh 600 g 15 - 18 min. Sliced or shredded.
Courgettes Fresh 600 g 7 - 10 min. Sliced.
Spinach Fresh 300 g 8 - 10 min. Toss half way through cooking.
Frozen 300 g 15 - 20 min.
Fine greens beans Fresh 500 g 20 - 25 min.
Frozen 500 g 25 - 30 min.
Peas Fresh 400 g 20 min.
Frozen 400 g 25 min.
Carrots Fresh 500 g 10 min. Sliced thin.
Corn on the cob Fresh 500 g 30 min.
Leeks Fresh 500 g 8 min. Sliced thin.
Mange tout Fresh 500 g 10 - 15 min.
Peppers Fresh 300 g 10 - 15 min. Cut into wide strips.
Old potatoes Fresh 600 g 20 - 25 min. Sliced or cut into cubes.
New potatoes Fresh 600 g 35 - 40 min. Depends on size and variety.
small whole
Onions small whole Fresh 400 g 8 min.
Rice • Grains • Pasta
White Rice American Long Grain 150 g 300 ml 25 - 30 min. Wash the rice before cooking.
White Rice Basmati Rice 150 g 300 ml 25 min. Use boiling water in the rice
White Rice Easy Cook White Rice 150 g 300 ml 18 - 20 min. bowl.
Brown Rice 150 g 300 ml 35 min.
Couscous 200 g 350 ml 10 min. Soak the couscous 5 min. in
boiling water before cooking.
Bulgar Wheat 150 g 300 ml 15 min. Use boiling water.
Pasta (spaghetti) 200 g 400 ml 20 - 25 min. Use boiling water.
Other Foods
Eggs Hard-boiled 6 15 min. Well grease the ramekins.
Solf-boiled 6 8 - 10 min.
Fruits Fresh 10 - 15 min.
Re-heating
Meat Pieces 10 - 15 min.
Pasta 10 - 15 min.
Vegetables 5 - 10 min.
7

DEUSCH
Umweltschutz
• Ihr Gerät ist für eine lange Lebensdauer ausgerichtet. Möchten Sie
jedoch Ihr Gerät eines Tages ersetzen, vergessen Sie bitte nicht, wie
wichtig es ist, zum Umweltschutz beizutragen.
• Bevor Sie Ihr Gerät entsorgen muss die Batterie der Zeitschaltuhr
entfernt und an eine spezialisierte Sammelstelle oder an eine
zugelassene Service Stelle gegeben werden (betrifft Modelle mit
elektronischem Programmschalter)*.
• Die zugelassenen Service Stellen nehmen Ihre ausgedienten Geräte
zurück und entsorgen diese entsprechend den geltenden
Umweltschutzbedingungen.
Die Gebrauchsanleitung aufmerksam durchlesen und die Bedienungshinweise befolgen!
Das Gerät produziet sehr heissen Dampf!
Sicherheitshinweise
• Dieses Gerät entspricht den geltenden Sicherheitsbestimmungen und den
Richtlinien:
- 89/336/CEE, geändert durch 93/68/CEE.
- 72/73/CEE, geändert durch 93/68/CEE.
• Beachten Sie, dass die Netzspannung der, auf dem Typenschild des Gerätes
angegebenen Spannung entspricht (Wechselstrom).
• Sollte das Gerät in einem vom Kaufland abweichenden Land benutzt werden,
das Gerät, aufgrund der Vielfalt von geltenden Bestimmungen, vor der
Benutzung von einer lokalen zugelassenen Service Stelle überprüfen lassen.
• Das Gerät nicht in der Nähe einer Hitzequelle oder in einem heißen
Backofen abstellen, es könnte schwer beschädigt werden.
• Stellen Sie es auf einer stabilen, horizontalen Fläche ab und schützen Sie es
vor Wasserspritzern.
• Das Gerät während des Betriebs niemals unbeaufsichtigt lassen. Kinder
fernhalten.
• Die Zuleitung nicht herunterhängen lassen.
• Das Gerät immer an eine Steckdose mit Erdleitung anschließen.
• Das Gerät nicht an der Zuleitung aus der Steckdose ziehen.
• Das Gerät nicht in Betrieb nehmen, wenn:
- das Gerät oder die Zuleitung defekt ist,
- das Gerät heruntergefallen ist und sichtbare Schäden oder
Funktionsstörungen aufweist. In diesem Fall das Gerät zur nächstliegenden
zugelassenen Service Stelle bringen.
• Bei Zuleitungsschäden muss diese, um jegliche Gefahr auszuschließen, vom
Hersteller, seinem Kundendienst oder einem Fachmann ausgetauscht werden.
• Das Berühren der heißen Geräteflächen, des heißen Wassers, des Dampfes
oder der heißen Speisen kann Verbrennungen verursachen.
• Immer das Gerät vom Netz trennen:
- sofort nach dem Gebrauch,
- zum Transport des Gerätes,
- vor jeder Reinigung und Pflege.
• Das Gerät niemals in Wasser tauchen!
• Das Gerät nicht in der Nähe einer Wand oder eines Hochschrankes
abstellen: der austretende Dampf könnte Beschädigungen verursachen.
• Das Gerät nicht mit heißen Flüssigkeiten oder Speisen transportieren.
• Dieses Gerät ist nur für den Hausgebrauch ausgerichtet; eine professionnelle,
unsachgemäße und nicht der Gebrauchsanleitung entsprechende Benutzung
schließt jegliche Haftung und Garantie des Herstellers aus.
• Das Gerät während der Dampfproduktion nicht berühren. Zum Abnehmen
des Deckels, des Reisbehälters und des Garbehälters ein Küchenhandtuch
8
benutzen.
DEUSCH
Beschreibung
1 Deckelgriff
11 Innere Wassserstandsanzeige
2 Deckel
12 Äußere Wasserstandsanzeige
3 “Clip-it” Griff
13 Heizelement
4 Dampf Garbehälter (2 oder 3, je nach
14 Wasserbehälter (Kapazität 1.1l)
Modell)
15 Funktionsleuchte
5 Herausnehmbares Sieb mit integriertem
16 Zeitschaltuhr 60 Minuten
Eierträger (nur als oberster Garbehälter)
17 VITAMIN + Taste : zum sehr schnellen
6 Reis Garbehälter
Garen und zur Konservierung der
7 Dampfaustritt
Vitamine
8 Auffangbehälter
18 Dampfabzugsöffnung
9 Wasser-Einfüllöffnung
19 Kondensations-Schacht
10 Herausnehmbarer Dampf-Turbo Ring
mit Entkalkungsfunktion
Vorbereitung
Das Wasser vor jeder Benutzung erneuern.
Vor der Benutzung
Kein Wasser in den Dampfaustritt
Alle abnehmbaren Teile und den
geben.
Wasserbehälter mit lauwarmem Wasser
Nur klares Wasser verwenden.
unter Zusatz eines milden Spülmittels
Keine Gewürze oder andere Flüssigkeiten
reinigen. Gut abspülen und abtrocknen
hinzufügen.
- Abb.
1
Vor dem Einschalten prüfen, dass
Den Wasserbehälter nicht ins
Wasser im Behälter ist.
Wasser tauchen.
Setzen Sie den Kondensations-Schacht am
Den Dampfgarer zusammensetzen
hinteren Teil Ihres Gerätes ein - Abb.
5
Das Gerät auf eine stabile Fläche stellen.
Überzeugen Sie sich, dass der
Den Turbo Ring um das Heizelement legen
Kondensations-Schacht vor Gebrauch
und dabei die in der Zeichnung vorgegebene
Richtung beachten - Abb.
2
leer ist.
Die Siebe einsetzen
Gegenstände, die vom Dampf
Der(die) obere(n) Behälter ist (sind) mit
beschädigt werden könnten, vom Gerät
einem herausnehmbaren Sieb ausgestattet,
fernhalten.
das die Vergrößerung des nutzbaren
Der Turbo Ring muss immer vor dem
Garraumes und das Garen von voluminösen
Einfüllen des Wassers eingesetzt werden.
Speisen ermöglicht.
Den Behälter mit Wasser füllen
Zum Einsetzen der Siebe:
Das Wasser direkt in den Wasserbehälter
Den Garbehälter auf einen Tisch stellen.
füllen – dabei den maximalen Füllstand
Das Sieb mit den Haken nach unten
nicht überschreiten – und den Turbo Ring
zeigend in die Hand nehmen und mittig in
einsetzen - Abb.
3
den Garbehälter einsetzen.
Den Auffangbehälter in den
Die Haken des Siebes andrücken bis diese
hörbar einrasten - Abb.
6
Wasserbehälter stellen und auf korrekte
Positionierung achten - Abb.
4
Zum Entfernen der Siebe, diese von unten
Sollte der Auffangbehälter nicht einrasten,
nach oben herausdrücken - Abb.
7
die Positionierung des Turbo Ringes
Ihr Dampfgarer ist mit einem “clip-it”
prüfen.
Griff ausgestattet. Dieser Griff erleichtert
9

das Herausnehmen der Speisen am Ende
Um Verbrennungen durch den
des Garvorganges, ohne diese zu verletzen
Deckel zu vermeiden, die Dampflöcher
(z.B. Fisch, Spargelspitzen…).
vorzugsweise nach hinten ausrichten.
Das Endstück des “clip-it” Griffes an das
Sieb anclipsen - Abb.
8
Dampfgaren mit Zeitschaltuhr
Zum Entfernen das Endstück des Griffes
Die Garzeit einstellen
zusammendrücken.
Das Gerät an das Netz anschließen.
Der untere Garbehälter ist mit
Die Zeitschaltuhr entsprechend der Garzeit
einem festsitzenden Sieb ausgestattet.
(siehe Gartabelle) einstellen.
Die rote Funktionsleuchte leuchtet auf, und
Den “clip-it” Griff nur für den
das Garen beginnt - Abb.
15
oberen Garbehälter benutzen.
Das Gerät muss vor dem Einstellen
Beim Benutzen des “clip-it” Griffes
der Zeitschaltuhr an das Netz angeschlossen
das Sieb zum leichteren Herausnehmen
werden.
nicht einrasten.
Die Garzeit anhand der VITAMIN +
Prüfen, dass die Haken des Griffes
Taste verkürzen
richtig sitzen.
Exklusiv: Ihr Gerät ist mit einer
Den(die) Garbehälter einsetzen
VITAMIN + Turbotaste ausgestattet,
Die Speisen in den(die) Garbehälter geben.
welche die Kochzeit gegenüber
Immer den kleineren Garbehälter auf den
herkömmlichen Dampfgarern bis zu 50%
Auffangbehälter setzen.
reduziert. Hierdurch können Vitamine
Dann die Garbehälter vom kleinsten bis
besser erhalten werden - Abb.
16
zum größten übereinandersetzen und
Zu Beginn des Garens auf die VITAMIN +
richtig anpassen - Abb.
9
Taste drücken; die entsprechende Leuchte
Den Deckel auflegen. Der Deckel passt auf
leuchtet auf - Abb. . Diese Funktion
17
alle Garbehälter - Abb.
10
beschleunigt durch eine verstärkte
Dampfproduktion den Garbeginn.
Sie können auch Reis garen
Sobald die ideale Gartemperatur erreicht
Den Reis und Wasser in den Reisbehälter
ist, erlischt die Leuchte der VITAMIN +
geben (siehe Gartabelle) - Abb.
11
Taste automatisch - Abb.
18
Den Reisbehälter in den Garbehälter
Nach dem Öffnen eines Garbehälters
stellen. - Abb.
12
können Sie zum raschen Erzielen der
Sie können auch Eier kochen
idealen Gartemperatur erneut auf die
Die Eier in den integrierten Eierträger
VITAMIN + Taste drücken - Abb.
19
geben - Abb.
13
In manchen Fällen kann es vorkommen,
Sie können einen ganzen Fisch garen
dass sich bei Druck auf die VITAMIN +
Den Fisch in den obersten Garbehälter und
Taste die Leuchte nicht einschaltet oder
das Gemüse in den(die) unteren
nach sehr kurzer Zeit wieder erlischt. Dies
Garbehälter geben - Abb.
14
ist normal, die ideale Temperatur im
Garbehälter ist erreicht.
Falls dem Gerät Dampf entweichen
sollte, prüfen, ob die Garbehälter richtig und
Es ist normal, wenn eine kleine
in der richtigen Reihenfolge aufeinander
Dampfmenge aus der Dampfabzugsöffnung
sitzen.
an der Hinterseite Ihres Gerätes entweicht.
Für ein optimales Garergebnis, die
Wenn die VITAMIN + Taste
Behälter nicht mit Speisen überladen.
aufleuchtet, können Sie die Leuchte nicht
manuell löschen. Sie erlischt automatisch.
10

Alle anderen abnehmbaren Teile können in
Vermeiden Sie es, die VITAMIN +
die Spülmaschine gegeben werden - Abb.
24
Taste während des Garens mehr als
Keine scheuernden
einmal zu drücken.
Reingungsmittel verwenden.
Während des Garens
Den Wasserfüllstand während des Garens
Den Wasserbehälter niemals in
anhand der äußeren Wasserfüllstandsanzeige
Wasser tauchen.
kontrollieren.
Den Turbo Ring in regelmäßigen
Falls notwendig, etwas Wasser in die
Abständen reinigen.
Einfüllöffnungen nachgießen - Abb.
20
Denken Sie daran, Ihren
Das Gerät und die Speisen
Kondensations-Schacht zu entleeren und
während des Garvorganges nicht
berühren. Sie sind sehr heiß.
zu säubern.
Garzeitende
Ihr Gerät entkalken
Ein Signal ertönt.
Den Turbo Ring umgekehrt auf das
Die rote Funktionsleuchte erlischt.
Heizelement legen - Abb.
25
Um den Garvorgang zu unterbrechen, die
Das Innenteil des Turbo Ringes bis zum
Zeitschaltuhr auf O drehen - Abb.
21
Strich mit weißem Essig füllen.
Den Behälter bis zum gleichen Niveau mit
Aufwärmen
Wasser füllen - Abb.
26
Sie können mit dem Gerät Speisen
Für eine geruchfreie Entkalkung, eine
aufwärmen (siehe Gartabelle).
Nacht in kaltem Zustand ziehen lassen.
Befindet sich kein Wasser im Gerät,
Den Behälter innen mehrmals mit klarem,
wird kein Dampf mehr produziert.
lauwarmem Wasser ausspülen.
Die Speisen aus dem Garbehälter
Das Gerät nach jeder 8. Benutzung
entfernen
entkalken.
Den Deckel am Griff greifen.
Keine anderen Entkalkungsmittel
Abnahme des Garbehälters.
verwenden.
Garbehälter auf einen festen Untergrund
stellen - Abb.
22
Im Zeitablauf kann es zu
Einfärbungen des Saft-Auffangbehälters
Küchenhandschuhe zur
durch Gemüse-Farbstoffe, z.B. von
Handhabung der Garbehälter, des Griffes
Karotten oder Rote Bete, kommen.
und des Deckels benutzen.
Dies ist normal.
Nach dem Gebrauch
Nach dem Kochen kann man mit Hilfe
Den Netzstecker ziehen.
von sanften Reinigungsmitteln (nicht
Lassen Sie Ihren Steamer vor dem
scharfe Reinigungsmittel verwenden) die
Reinigen vollständig abkühlen.
Verfärbungen entfernen.
Vor dem Herausnehmen des
Aufbewahren der Garbehälter
Auffangbehälters prüfen, dass dieser
Zum Platzsparen können die Garbehälter
genügend abgekühlt ist.
ineinander gestapelt aufbewahrt werden
- Abb.
27
Reinigung und Pflege
Das Gerät reinigen
Den Wasserbehälter leeren, und mit einem
Schwamm und etwas milder Seifenlauge
reinigen.
Gut nachspülen und trocknen - Abb.
23
11
Оглавление
- Table of cooking times
- Gartabelle
- Table des temps de cuisson
- Tabella dei tempi di cottura


