Gorenje MO-20 DGE – страница 3
Инструкция к Микроволновой Печи С Грилем Gorenje MO-20 DGE
Оглавление
41
To Cook with Convection
To cook with convection, press CONVECTION
button repeatedly to enter the desired convection
temperature.(110℃~200℃)
Suppose you want to cook at 180℃ for 40
minutes.
1. Press CONVECTION button repeatedly to
select cooking temperature as shown on
screen.
2. Use the MENU/TIME dial to enter cooking
time.
3.
Press START/QUICK START button to
start.
NOTE: You can check the convection
temperature while cooking is in progress by
pressing the CONVECTION button.
To Preheat and Cook with Convection
Your oven can be programmed to combine
preheating and convection cooking operations.
Suppose you want to preheat to 170℃and then
cook 30 minutes.
1. Press CONVECTION button repeatedly, to
select cooking temperature as shown on
screen.
2. Press START/QUICK START button to
start. Beeps will sound when the designated
temperature is reached.
3. Open the door and place container of food
at the center of the turntable.
4.
Use the MENU/TIME dial to enter cooking
time.
5. Press START/QUICK START button to
start.
8. MICROWAVE +CONVECTION
This oven has four pre-programmed settings that
make it easy to cook with both convection heat
and microwave automatically .the longest time
you can set here is 9 hours and 30 minutes.
Press MICRO.+CONVECTION button repeatedly
to program convection temperature:
temperature(℃)
COMB1
110
COMB2
140
COMB3
170
COMB4
200
3. Press START/QUICK START button to
start.
4. NOTE:
You can check the convection temperature while
cooking is in progress by pressing the
MICRO.+CONVECTION button.
9. MULTI-STAGE COOKING
Your oven can be programmed for up to 3
automatic cooking sequences.
Suppose you want to set the following cooking
program.
Microwave cooking
Convection cooking
1. Press POWER LEVEL button to set power
level.
2. Rotate the MENU/TIME dial to program
cooking time.
3. Press CONVECTION button to set
convection temperature.
4. Rotate the MENU/TIME dial to program
cooking time.
5. Press START/QUICK START button to
start.
Note: If need to defrost the food before cooking,
you can only set Jet defrost program in the first
stage of multi-stage cooking program.
Quick start, Auto menu, Preheat program of
convenction can not be set in multi-stage
cooking program.
Suppose you want to bake a cake for 24 minutes
on COMB3.
1. Press MICRO+CONVECTION button
repeatedly until display the desired
temperature.
2. Use the MENU/TIME dial to enter cooking
time as desired.

42
10. AUTO COOK
For the following foods or cooking operation, you
do not need to input cooking power and time. Try
to focus on telling the oven what you want to
cook and how much the food weighs.
Steps:
1. Press STOP/CANCEL button.
2. Press AUTO COOK button in order to select
the number of the desired food displayed in
the table below
3. Press START/QUICK START button.
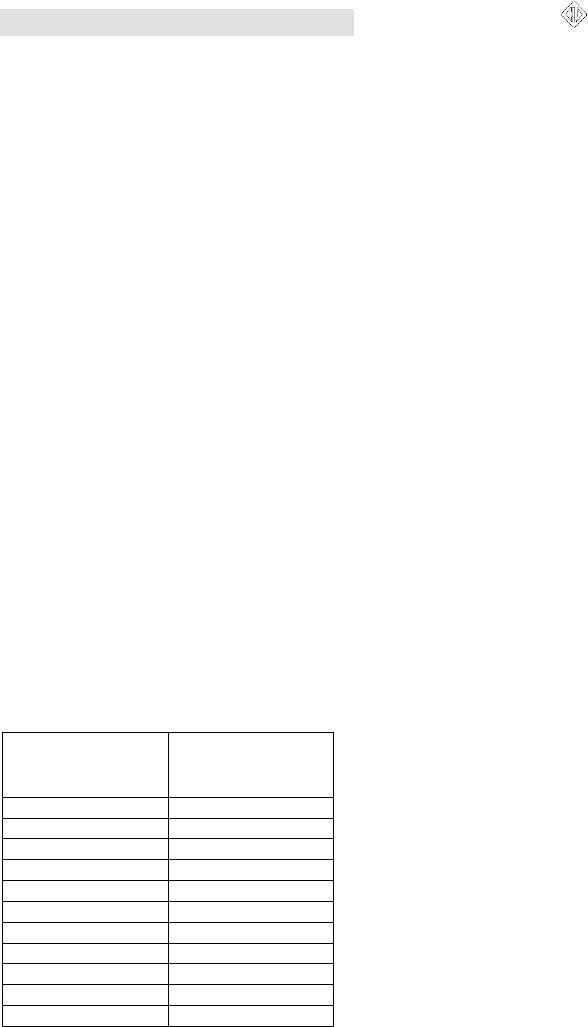
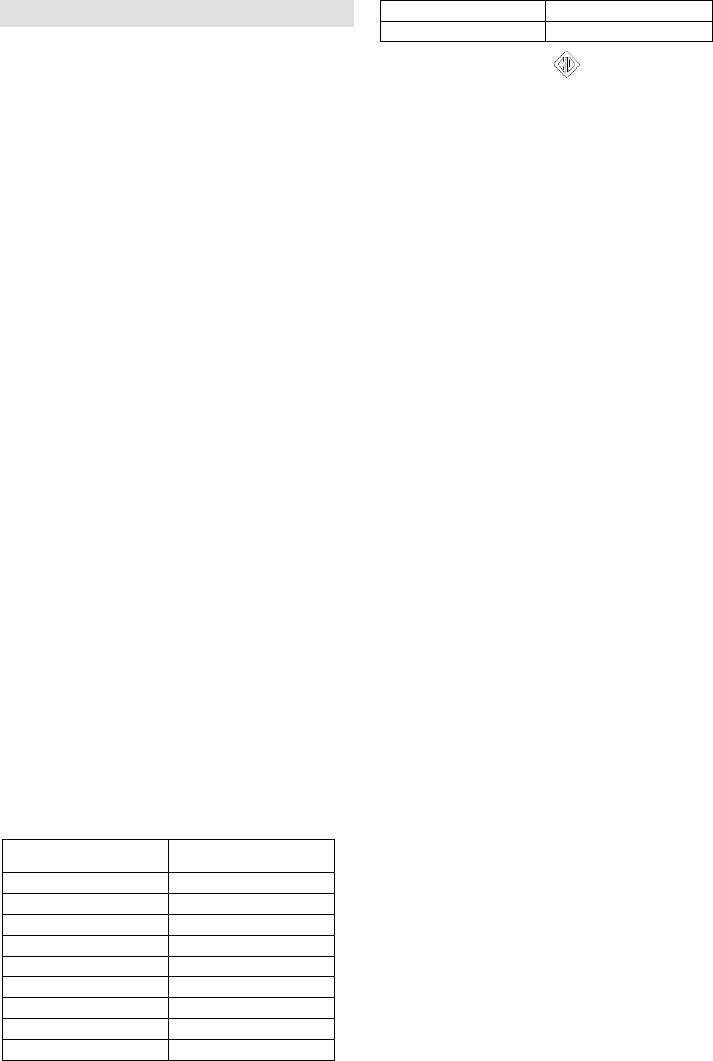
Cooking menu:
Code
Food
Note
1
Potato
(each 230g)
The result of auto cook depends on
factors such as the shape and size of
food, your personal preference as to the
doneness of certain foods and even how
well you happen to place food in the
oven. If you find the result at any rate not
quite satisfactory, please adjust the
cooking time a little bit accordingly.
For milk/coffee and potato, parameters on
display are not weight but number of
servings.
For chicken, beef/mutton and steaks, the
oven STOPs and beeps during cooking to
remind you to turn food over for uniform
cooking, after that, press START/QUICK
START to resume.
2
Milk/Coffee
(200 ml/cup)
3
Popcorn
(99g)
4
Auto reheat
(g)
5
Spaghetti
(g)
6
Pizza (g)
7
Chicken (g)
8
Cake (475g)
9
Jet defrost
To set: In standby or preset mode, hold down the
STOP/CANCEL button for 3 seconds, a beep
sounds and lock indicator lights. In the locked
mode, all buttons are disabled.
To cancel: Hold down the STOP/CANCEL button
for 3 seconds until lock indicator on display goes
off.
11. JET DEFROST
Suppose you want to defrost frozen food for 5
minutes.
1. In standby mode, rotate the MENU/TIME
dial anti-clockwise to select corresponding
code (09).
2. Press CLOCK/WEIGHT button once.
3. Rotate the MENU/TIME dial to enter
defrost time (maximum of 95 minutes).
4. Press START/QUICK START to start.
Note: During defrosting process, the system will
STOP and signal to remind you to turn over the
food, after that, press START / QUICK START to
resume.
12. CHILD LOCK
Use to prevent unsupervised operation of the
oven by little children. The child lock indicator will
show up on display screen, and the oven can not
be operated while the Child Lock is set.

43
Centre in your country (you find its phone
Care of your microwave oven
number in the worldwide guarantee leaflet). If
1. Turn the oven off and remove the power
there is no Customer Care Centre in your
plug from the wall socket before cleaning.
country, go to your local Gorenje dealer or
2. Keep the inside of the oven clean. When
contact the Service department of Gorenje
food splatters of spilled liquids adhere to
domestic appliances.
oven walls,wipe with a damp cloth. The use
of harsh detergent or abrasives is not
For personal use only!
recommended.
3. The outside oven surface should be
cleaned with a damp colth. To prevent
damage to the operating parts inside the
oven, water should not be allowed to seep
into the ventilation openings.
4. Do not allow the Control Panel to become
wet. Clean with a soft, damp cloth, Do not
use detergents, abrasives or spray-on
cleaners on the control Panel.
5. If steam accumulates inside or around the
outside of the oven door, wipe with a soft
cloth.This may occur when the microwave
oven is operated under high humidity
conditions and in no way indicates
malfunction of the unit.
6. It is occasionally necessary to remove the
glass tray for cleaning. Wash the tray in
warm sudsy water or in a dishwasher.
7. The roller ring and oven cavity floor should
be cleaned regularly to avoid excessive
noise. Simply wipe the bottom surface of
the oven with mild detergent, water or
window cleaner and dry. The roller ring may
be washed in mild sudsy water or sish
washer. Cooking vapours collect during
repeated use but in no way affect the
bottom surface or roller ring wheels.
When removing the roller ring from cavity
floor for cleaning, be sure to replace it in the
proper position.
8. Remove odors from your oven by
combining a cup of water with the juice and
skin of one lemon in a deep microwaveable
bowl. Microwave for 5 minutes, wipe
thoroughly and dry with a soft cloth.
9. When it becomes necessary to replace the
oven light, please consult a dealer to have it
replaced.
Environment
Do not throw away the appliance with the normal
household waste at the end of its life, but hand it
in at an official collection point for recycling. By
WISHES YOU A LOT OF PLEASURE
doing this, you help to preserve the environment.
WHILE USING YOUR APPLIANCE
Guarantee & service
If you need information or if you have a problem,
please contact the Gorenje Customer Care
Additional recommendations for cooking with
microwave, grill and useful advices can be
found on web side:
http://microwave.gorenje.com

44
Energia- .................................. 230V~50Hz,1200W
................................................................................................................... 800W
Grill-...................................................................................................................................... 1200W
................................................................................................................... 2200W
.............................................................................................................. 2450MHz
......................................................................... 452mm(Sz) X 262mm(M) X 393mm(M)
......................................................... 315mm(Sz) X 195mm(M) X 325mm(M)
- .......................................................................................................................... 20 liter
.................................................................................................. Kb. 14,4 kg
..................................................................................................................... Lc < 58 dB(A)
b)
be van-e csukva. Ha nincs, nem fog
1.
-zavarok (interferencia)
a)
- -
csatlakoztatva van-e az elektromos
b)
a)
-
b) - -
szakadt--
c) - -
a
2.
a) Elle
-

45
1.
-e minden
2.
-e rajta
- l
-
-
-
3. 14,4
kg
4. - -
5.
6.
-8
hogy legyen.
7.
8.
FIGYELEM:
9.
legyen.
10.
FIGYELEM:
FONTOS
-
L
FIGYELEM:
FIGYELEM:
FIGYELEM:
FIGYELEM:
felrobbanhatnak.
FIGYELEM:
vagy
A
cm,
el s
-
csomago
Barna: -
-
- -
E
-
amely N

46
FONTOS:
-
-
- Ne haszn
-
emellett pedig a
-
- talt olyan
megrepedhet.
-
be
9.
1.
10.
11.
2.
n
3.
4.
12.
5.
-
6. Ne teg
benne.
13.
7.
tartalmazza, pl. leves-
-
8.
47
14.
-
- vagy
15.
16.
a)
vannak.
b)
c)
-
48
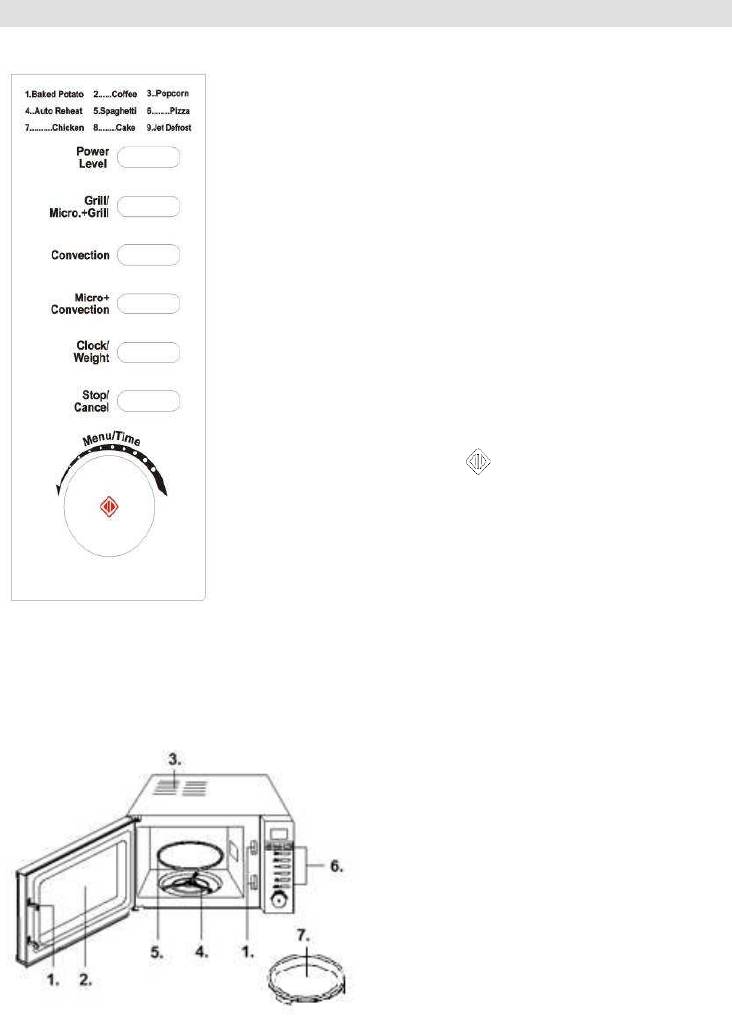
POWER LEVEL
-
GRILL / MICRO + GRILL
CONVECTION
( )
MICRO + CONVECTION
CLOCK
gomb)
PAUSE / CANCEL
START / QUICK START
-
fokozat mellett)
Press once to temporarily stop cooking, or twice to cancel
cooking altogether.
It is also used for setting child lock.
1 .
2 .
3 .
4 .
5 .
6 .
49
1.
pl. 16:30
a) Nyomjuk meg a STOP / CANCEL gombot.
b)
c) Nyomjuk meg ism
d)
gombot
yamatot.
2.
a)
Példa:
percig.
1. -re.
2. Nyomjuk meg a "Start/Reset" gombot.
b)
Példa:
1. Nyomjuk meg a "POWER LEVEL"
-fokozatot;
2. -re.
3. Nyomjuk meg a "START / QUICK
START" gombot.
-
95 perc.
A "Power level"
gomb
-
1x
100%
2x
90%
3x
80%
4x
70%
5x
60%
6x
50%
7x
40%
8x
30%
9x
20%
10x
10%
11x
00%
3. QUICK START
--
10 perc.
-
4. GRILL
grillezni.
1. Nyomjuk meg a STOP/CANCEL gombot.
2. Nyomjuk meg egyszer a GRILL / MICRO +
GRILLgombot.
3. Forgassuk el a MENU / TIME gombot 12:00
percre.
4. Nyomjuk meg a START / QUICK START
gombot.
--a
az 1. kombin
1. Nyomjuk meg a STOP/CANCEL gombot.
2. Nyomjuk meg egyszer a GRILL / MICRO +
GRILLgombot.
3. Forgassuk el a MENU / TIME gombot 25:00
percre.
4. Nyomjuk meg a START/QUICK START
gombot.
.
--a
1. Nyomjuk meg a STOP/CANCEL gombot.
2. a GRILL / MICRO +
GRILLgombot.
3. Forgassuk el a MENU / TIME gombot 12:00
percre.
4. Nyomjuk meg a START/QUICK START
gombot.

50
7.
8.
30 perc, a
30 perc.
(110℃~200℃).
℃-on szeretnénk sütni, 40
percen keresztül.
1. ami a
nyomjuk meg
gombot.
2.
MENU/TIME gombot.
3.
START/QUICK START gombot.
t.
℃-ra szeretnénk
előmelegíteni a sütőt, majd pedig 30 percig
szeretnénk sütni.
1. ami a
nyomjuk meg
gombot.
2.
3.
4.
MENU/TIME gombot.
5.
a START/QUICK START gombot.
℃)
COMB1
110
COMB2
140
COMB3
170
COMB4
200
1.
2.
3.
a START/QUICK START gombot.
9.
1. -
nyomjuk meg a POWER LEVEL gombot.
2.
forgassuk el a MENU/TIME gombot.
3.
CONVECTION gombot.
4.
forgassuk el a MENU/TIME gombot.
5.
a START/QUICK START gombot.
nunk
be.
A Quick start, Auto menu, Preheat programok

51
10. AUTO COOK
ek
-
1. Nyomja meg a STOP / CANCEL gombot.
2. Nyomja meg a CLOCK / WEIGHT gombot
egyszer. MENU / TIME 12:00-ig.
3. Nyomja meg a START / QUICK START
gombot.
1
Burgonya
(230g/adag)
az adagokat jelzik.
arra, hogy az
START/QUICK START gombot.
2
(200
3
Pattogatott
kukorica
(99g)
4
Auto
5
Spagetti (g)
6
Pizza
7
Csirke (g)
8
(475g)
9
Gyros
11.
1. Nyomja meg a STOP / CANCEL gombot.
2. Forgassa el MENU / TIME
-
3. Nyomja meg a CLOCK / WEIGHT gombot
4. Nyomja meg a START / QUICK START
gombot.
nyomjuk meg a START / QUICK START gombot
12.
STOP / CANCEL
STOP / CANCEL
jelzi.

52
Krnyezetvdelem
A feleslegess vlt kszlk szelektv
hulladkknt kezelend. Krjk, hivatalos
1.
jrahasznost gyjthelyen adja le, gy
hozzjrul a krnyezet vdelmhez.
2.
garancial
3.
4.
5.
m
6.
7.
rendsze
8. Az eset
A
SOK
9.
http://microwave.gorenje.com

53
Instrukcję obsługi należy uważnie przeczytać i zachować.
Charakterystyki techniczne
Zasilanie elektryczne .............................................................................................. 230V~50Hz,1200W
............................................................................................................................. 800W
Mo ................................................................................................. 1200W
Konwekcja ................................................................................................................................. 2200W
bocza: .......................................................................................................... 2450MHz
................................................................. 452262mm(V) X 393mm(G)
ory): ....................................................... 315mm(Sz) X 195mm(V) X 325mm(G)
............................................................................................................... 20
Waga netto: ...................................................................................................................... 14,4 kg
................................................................................................................ Lc < 58 dB (A)
cenia w odbiorze fal
radiowych i telewizyjnych
Kuchenka mikrofalowa mo
a)
uszczelek.
b)
jak najdalej od kuchenki mikrofalowej.
c)
Przed wezwaniem serwisu
1.
a)
gastro
z gniazdka zasilania elektrycznego i po
pomieszczeniach.
b)
Instalacja
1.
elektryczne.
w
2.
drzwiczek.
2.
a)
b)
-
- uszkodzone drzwiczki,
przeciwnym razie emisja enerii
- wgniecenia lub dziury w szkle (oknie) na
drzwiczkach lub wy
- wgniecenia w komorze kuchenki.
problemu, mimo wykonania w/w
serwisowego.
elektronicznych (waste electrical and
electronic equipment - WEEE).

54
3.
14,4 kg
na twardej, stabilnej
w stanie
4.
wysokich temperatur i pary.
5.
niczego.
6.
ustawiona ta
7. podstawy
obrotowej talerza.
8.
elektrycznych, u
mikrofalowej przez dzieci powinno
czerwonym.
UWAGA: Podczas korzystania z funkcji
mikrofale + grill dochodzi do znacznego
wzrostu temperatury. W tym wypadku zaleca
grilowania).
UWAGA:
powierzchn
UWAGA: Wykonywanie jakichkolwiek
UWAGA:
szczelnych pojem
Kuchenka mikrofalowa wymaga mocy 1,2 kVA
UWAGA:
pracownika punktu serwisowego lub
wykwalifikowanej osoby.
sensorycznymi lub
UWAGA: Kuchenka mikrofalowa jest
10A.
poinstruowane na temat korzystania z tego
WANE:
Kuchenka mikrofalowa powinna
Zieleno- uziemienie
Niebieski: neutralny
cm
przestrzeni, po bokach przynajmniej 10 cm a
przewodnik koloru zielono-
przeznaczonych do zastosowania w
kuchenkach mikrofalowych.
uziemienia.
pojemnikach plastykowych lub papierowych,
czarnym.

55
4. W w
itp.
dlate
5.
gotowaniem ki.
6.
.
7.
.
8.
na szklanym talerzu.
odpowiedniego naczynia.
Do czyszczenia drzwiczek kuchenki,
powierzchni us
:
szmatek.
resztki jedzenia.
mikr
W przypadku uszkodzenia przewodu
producent, autoryzowany serwis lub
odpowiednio do tego celu wykwalifikowana
osoba.
kuchenki
Zapewni to bezpieczne i najskuteczniejsze
1.
na swoim miejscu.
2.
.
3. N
zenie.
-
uchwytami.
-
.
- klamer drucianych powlekanych papierem do
.
-
.
- rych powierzchnia nie jest
.
-
.
-
zastosowania w kuchenkach mikrofalowych.
9.
enta.
10.
.
11.
56
12. P
rozprowadzona.
13.
zez kolejnych 30 - 60
14.
marmolady lu
przygotowywaniem. Do podgrzewania
tworzyw sztucznych.
15.
16.
a)
sztucznyc
b)
.
c) N
rozdzielczej.

57
Opis kuchenki
(na
zegar)
POWER LEVEL
(przycisk ustawienia mocy mikrofali )
GRILL / MICRO + GRILL
(
gotowania.)
CONVECTION
(
pieczenia przy pomocy konwekcji.)
MICRO + CONVECTION
kombinacji pieczenia).
CLOCK
(Przycisk ustawienia zegara,
czasu gotowania)
STOP / CANCEL
mikrofalowej)
START / QUICK START
1 .
2 . Okno kuchenki
3 . Odwietrznik
4 .
5 . Szklany talerz
6 .
7. Talerz
58
1. ZEGAR
24 godzinny zegar elektroniczny.
Aby
a) Clock/Weight
wybieramy 12 lub 24 godzinny zapis
MENU / TIME";
b)
Clock/Weight
MENU / TIME" ustawiamy minuty;
c)
Clock/Weight
czas;
2. OGRZEWANIE ZA
MIKROFALI
a)
(100% moc)
minut.
1. Ustawiamy czas na "5:00".
2. Naciskamy "START/RESET".
3. Ogrzewanie z
1. Naciskamy sensor "POWER LEVEL",
wybieramy 60% mocy;
2. Ustawiamy czas na "10:00".
3. Naciskamy "START / QUICK START".
ogrzewania, naj
95 minut.
przycisku "Micro"
Moc mikrofali
1x
100%
2x
90%
3x
80%
4x
70%
5x
60%
6x
50%
7x
40%
8x
30%
9x
20%
10x
10%
11x
00%
3. QUICK START
Funkcji tej
/ QUICK
START
/ QUICK START.
czas gotowania wynosi 10 minut.
4. GRILL
Najd
zapiekanych kanapek i
czasie 12 minut
1. STOP/ CANCEL;
2. jednokrotnie GRILL /
MICRO + GRILL
3. MENU / TIME i
czas na 12:00;
4.
przycisk START/ QUICK START.
5. COMBINATION 1
Najd
Gotowanie kombinowane (30 % promienie
gotowywania ryb oraz lazanii.
gotowania kombinowanego w czasie 25 minut,
1. STOP/ CANCEL;
2. GRILL /
MICRO + GRILL
3. dwukrotnie MENU /
TIME
4.
przycisk START/ QUICK START.
6. COMBINATION 2
Najd
Gotowanie kombinowane (55 % promienie
mikrofalowe, 45
gotowania kombinowanego w czasie 12 minut,
1. STOP/ CANCEL;
2. rzycisk GRILL /
MICRO + GRILL

59
3. MENU /
5.
TIME, 12:00 minut.
START (uruchomienie/ szybkie
4.
przycisk START/ QUICK START.
8. MIKROFALE + KONWEKCJA
7. KONWEKCJA
powietrze k.
ma
i 30 minut.
temperatur gotowania. Najd
pieczenia przy pomocy konwekcji,
Gotowanie w trybie konwekcji
przycisk CONVECTION
temperaturze przez 40 minut.
1.
2.
3.
START (uruchomienie/ szybkie
UWAGA: Za p
Odgrzewanie i gotowanie w trybie konwekcji
konwekcyjnym.
minut.
1.
.
2.
START (uruchomienie/ szybkie
uru
temperatura,
.
3.
na .
4.
czas gotowania.
temperatura
(℃)
COMB1 (kombinacja 1)
110
COMB2 (kombinacja 2)
140
COMB3 (kombinacja 3)
170
COMB4 (kombinacia 4)
200
24 minuty w kombinacji 3.
1.
MICRO.+ CONVECTION (mikrofale +
2.
3.
START (uruchomienie/ szybkie
pieczenie.
UWAGA:
9. PIECZENIE W KILKU FAZACH
:
1. POWER LEVEL (moc),
2. TIME (menu/ czas)
gotowania.
3. CONVECTION
nasta temperatur
konwekcji.

60
4.
gotowania..
5.
START (uruchomienie/ szybkie
ielostopniowego programu.
Auto (program automatyczny) oraz Preheat
wielostopniowym programie przygotowania
jedzenia.
10. AUTO COOK
1.
2.
3.
Lp.
Produkt
Uwaga
1
Ziemniaki
(230g/jednostka)
oraz
czas gotowania.
W przypadku mleka/ kawy i
W przypadku drobiu, baraniny,
ania
gotowane jedzenie. Aby
QUICK START.
2
Mleko/ kawa
(200 ml/
3
kukurydza (99g)
4
Auto
5
Spaghetti (g)
6
Pizza
7
Kurczak (g)
8
Ciasto
9
Szybkie
auto
-
3. CLOCK / WEIGHT i
4. START / QUICK START.
Uwaga:
START.
12. BLOKADA ZABEZPIECZENIE
korzystania z niej. Gdy kuchenka mikrofalowa
W celu zablokowania kuchenki mikrofalowej
przez 3 sekundy STOP
/ CANCEL.
kuchenka jest zablokowana. W tym stanie
W celu jej odblokowania przez 3 sekundy
nacSTOP / CANCEL , po
odblokowana.
11.
1. STOP / CANCEL.
2. MENU / TIME w kierunku


