Hotpoint-Ariston TCS 73B GP: Care and maintenance
Care and maintenance: Hotpoint-Ariston TCS 73B GP
6
GB
Care and maintenance
Disconnecting the power supply
!
Disconnect the dryer when not in use or during cleaning
and maintena
nce operations.
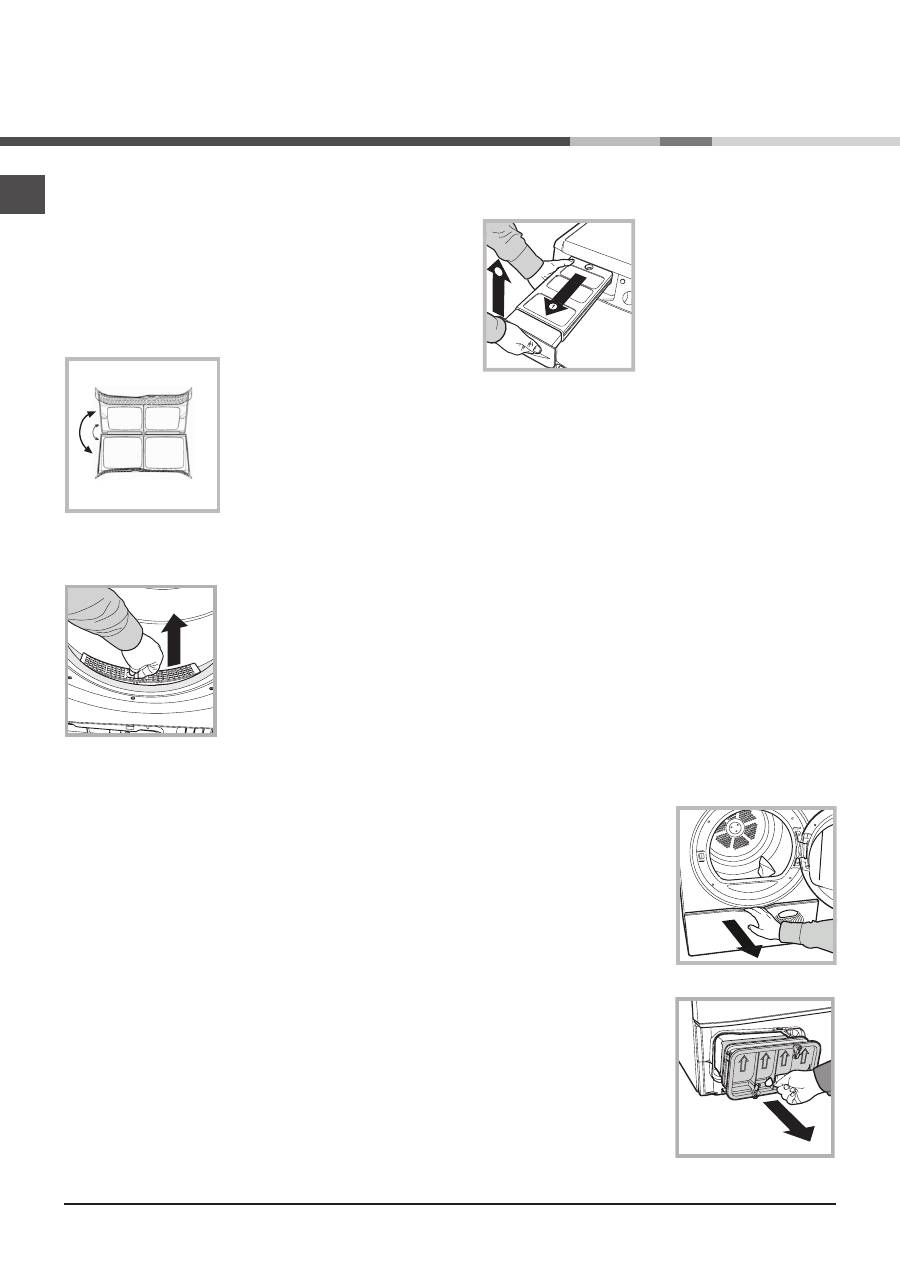
Cleaning the filter after each
cycle
The filter is a fundamental component of the
dryer: its function is to collect lint and fluff that
form during drying.
Clean the filter once
drying is completed, by
rinsing it under running
water or cleaning it with a
vacuum cleaner. Should
the filter become clog-
ged, the flow of air inside
the dryer will be seriously
hampered: drying times becomes longer and
more energy is consumed. Moreover, the dryer
may become damaged.
The filter is located in
front of the dryer seal
(see Picture).
Removing the filter:
1. Pull the filter’s plastic
handle upwards
(see
Picture).
2. Clean the fluff off the
filter and replace it correctly. Ensure that the
filter is pushed fully home.
!
Do not use the dryer unless the filter has
been replaced in its holder.
Checking the drum after each cycle
Rotate the drum manually to remove smaller items (handker-
chiefs) that could have been left inside the dryer.
Cleaning the drum
!
Avoid using abrasives, steel wool or stainless steel cleaning
agents to clean the drum. A coloured film may appear on the
stainless steel drum surface: it may be caused by a combina-
tion of water and/or cleaning agents such as wash-softeners.
This coloured film does not affect the dryer’s performance.
Emptying the water container after
each cycle
2
Remove the water container and
empty it into a sink or other
suitable drain outlet, then
replace it correctly.
Always check the water contai-
ner and empty it before starting
a new drying cycle.
Failure to empty the water container may cause
the following:
- The dryer stops heating (thus the load may still be
damp at the end of the drying cycle).
- The “Empty water container” LED activates to
show that the water container is full.
Priming the Water Collection System
When your dryer is new, the Water Container will
not collect Water until the system is primed, this
will take 1 or 2 drying cycles. Once primed it will
collect Water during every cycle.
Cleaning the condenser unit
•
Remove the condenser (see Picture
below) unit regularly (monthly) and clean off
any fluff deposits from the plates by rinsing it
with cold water running on the rear end of the
condenser.
Removing the condenser:
1.
Disconnect the dryer from the power
supply and open the
door.
2.
Open the conden-
ser cover (see Picture
below), unlock the three
catches by turning them
90° anti-clockwise, then
pull on the grip to remo-
ve the condenser.
3.
Clean the surface
of the seals and replace
the unit with the arrows
pointing upwards, while
making sure that the
catches are securely
fixed.
2
Quick Tips
!Remember to clean your filter and
condenser unit after each load.
! Remember to empty your water
container after each load.
! Doing this will keep your machine
working at its BEST!
Water container
Condenser unit
Condenser cover
Catches
Filter
Handle
Air intake
Tap
Rear
Front
Condenser unit
Cleaning the tumble dryer
• The external metal, plastic and rubber parts can be clea-
ned with a damp cloth.
• Clean the front air intake grille regularly (every 6 months)
with a vacuum cleaner to remove any lint, fluff or dust
deposits. Furthermore, remove any lint deposits from the
front part of the condenser filter and from the door filter
area, using a vacuum cleaner every so often.
!
Do not use solvents or abrasives.
!
Have the dryer checked regularly by authorised technical
personnel in order to ensure that the electrical and mechani-
cal parts work safely (see Assistance).
GB
7
Disconnecting the power supply
!
Disconnect the dryer when not in use or during cleaning
and maintena
nce operations.
Cleaning the filter after each
cycle
The filter is a fundamental component of the
dryer: its function is to collect lint and fluff that
form during drying.
Clean the filter once
drying is completed, by
rinsing it under running
water or cleaning it with a
vacuum cleaner. Should
the filter become clog-
ged, the flow of air inside
the dryer will be seriously
hampered: drying times becomes longer and
more energy is consumed. Moreover, the dryer
may become damaged.
The filter is located in
front of the dryer seal
(see Picture).
Removing the filter:
1. Pull the filter’s plastic
handle upwards
(see
Picture).
2. Clean the fluff off the
filter and replace it correctly. Ensure that the
filter is pushed fully home.
!
Do not use the dryer unless the filter has
been replaced in its holder.
Checking the drum after each cycle
Rotate the drum manually to remove smaller items (handker-
chiefs) that could have been left inside the dryer.
Cleaning the drum
!
Avoid using abrasives, steel wool or stainless steel cleaning
agents to clean the drum. A coloured film may appear on the
stainless steel drum surface: it may be caused by a combina-
tion of water and/or cleaning agents such as wash-softeners.
This coloured film does not affect the dryer’s performance.
Emptying the water container after
each cycle
2
Remove the water container and
empty it into a sink or other
suitable drain outlet, then
replace it correctly.
Always check the water contai-
ner and empty it before starting
a new drying cycle.
Failure to empty the water container may cause
the following:
- The dryer stops heating (thus the load may still be
damp at the end of the drying cycle).
- The “Empty water container” LED activates to
show that the water container is full.
Priming the Water Collection System
When your dryer is new, the Water Container will
not collect Water until the system is primed, this
will take 1 or 2 drying cycles. Once primed it will
collect Water during every cycle.
Cleaning the condenser unit
•
Remove the condenser (see Picture
below) unit regularly (monthly) and clean off
any fluff deposits from the plates by rinsing it
with cold water running on the rear end of the
condenser.
Removing the condenser:
1.
Disconnect the dryer from the power
supply and open the
door.
2.
Open the conden-
ser cover (see Picture
below), unlock the three
catches by turning them
90° anti-clockwise, then
pull on the grip to remo-
ve the condenser.
3.
Clean the surface
of the seals and replace
the unit with the arrows
pointing upwards, while
making sure that the
catches are securely
fixed.
2
Quick Tips
!Remember to clean your filter and
condenser unit after each load.
! Remember to empty your water
container after each load.
! Doing this will keep your machine
working at its BEST!
Water container
Condenser unit
Condenser cover
Catches
Filter
Handle
Air intake
Tap
Rear
Front
Condenser unit
Cleaning the tumble dryer
• The external metal, plastic and rubber parts can be clea-
ned with a damp cloth.
• Clean the front air intake grille regularly (every 6 months)
with a vacuum cleaner to remove any lint, fluff or dust
deposits. Furthermore, remove any lint deposits from the
front part of the condenser filter and from the door filter
area, using a vacuum cleaner every so often.
!
Do not use solvents or abrasives.
!
Have the dryer checked regularly by authorised technical
personnel in order to ensure that the electrical and mechani-
cal parts work safely (see Assistance).
Оглавление
- Installation
- Warnings
- Care and maintenance
- Description of the tumble dryer
- How to carry out a drying cycle
- Programmes and options
- Laundry
- Troubleshooting
- Assistance
- Mode d’emploi
- Installation
- Précautions
- Soin et entretien
- Description du sèche-linge
- Comment effectuer un cycle de séchage
- Programmes et options
- Linge
- Problèmes et solutions
- Assistance
- Instruções para a utilização
- Instalação
- Advertências
- Cuidados e manutenção
- Descrição da máquina de secar roupa
- Como efectuar uma secagem
- Programas e opções
- Roupa
- Roupa Problemas e soluções
- Assistência
- Руководство по эксплуатации
- Установка
- Предупреждения
- Уход и обслуживание
- Описание сушильной машины
- Порядок выполнения цикла сушки
- Программы и дополнительные функции
- Типы белья
- Неисправности и методы их устранения
- Сервисное обслуживание
- Нұсқаулық
- Орнату
- Ескертулер
- Күтім көрсету және техникалық қызмет көрсету
- Кептіргіш сипаттамасы
- Кептіру циклын орындау жолы
- Бағдарламаларжәне опциялар
- Кірлер
- Ақаулықтарды жою
- Көмек
