Gorenje SMO-23 DGW: инструкция
Раздел: Бытовая, кухонная техника, электроника и оборудование
Тип: Микроволновая Печь С Грилем
Характеристики, спецификации
Инструкция к Микроволновой Печи С Грилем Gorenje SMO-23 DGW
Оглавление
SMO 23 DGW
SMO 23 DGB
Mikrovalovna pečica
Navodila za uporabo
SI
Mikrovalovna pećnica
Upute za uporabu
BIH HR
Mikrotalasna rerna
Uputstvo za upotrebu
BIH SRB MNE
Микробрановата печка
Упатства за употреба
MK
Microwave oven
Instruction manual
GB
Mikrowellengerät
Gebrauchsanweisung
D
Micro-ondes
Notice d'utilisation
F
Mikrohullámú sütő
Használati utasítás
H
Kuchenka mikrofalowa
Instrukcja obsługi
PL
Microunde
Manual de utilizare
RO
Microondas
Instruçőes de utilizçăo
P
Mikrovlnná rúra
Návod na obsluhu
SK
Mikrovlnná trouba
Návod na použití
CZ
Микровълновата фурна
Инструкции за употреба
BG
Мікрохвильова піч
I
нцтрукція з експлуатації
UA
Микроволновая печь
Инструкция по эксплуатации
RUS
Forno a microonde
Istruzioni d'uso
I
Mikrobřlgeovn
Brugsanvisning
DK
Mikrobřlgeoven
Bruksanvisning
SE
Mikrovĺgsugnen
Bruksanvisning
NO
Mikroaaltouuni
Käyttöohje
FI
Mikrovilnu krasnij
Lietotaja rokasgramata
LV
Mikrobangu krosnele
Naudojimo instrukcija
LT
Mikrolaineahi
Kasutusjuhend
EE
2
SL Navodila za uporabo .............................................. 3
HR Upute za uporabu ................................................ 10
SRB MNE Uputstvo za upotrebu ......................................... 17
MK ........................................ 24
EN Instruction manual .............................................. 31
DE Gebrauchsanweisung ......................................... 39
FR Notice d'utilisation .............................................. 47
HU .............................................. 55
PL ............................................... 63
RO Manual de utilizare ............................................... 71
PT ........................................ 78
SK ............................................... 85
CZ .................................................. 92
BG ................................... 99
UK ................................. 107
RU ......................... 114
IT Istruzioni d'uso ................................................... 121
DK Brugsanvisning ................................................ 128
SE Bruksanvisning .................................................. 135
NO Bruksanvisning ................................................. 142
FI K ......................................................... 150
LV .............. 157
LT Naudojimo instrukcija ........................................ 164
EE Kasutusjuhend ................................................... 170

3
NAVODILA ZA UPORABO SI
Pozorno preberite navodila in jih shranite!
Specifikacije
Poraba el. Energije ............................... 230V~50Hz,1400W
................................................................................................................................ 900W
: ........................................................................................................................... 1000W
Delovna frekvenca: ................................................................................................................ 2450MHz
Zunanje mere: ............................................................................ 483mm278mm(V) X 378mm(G)
Mere komore (notranjosti) p ............................................... 340mm220mm(V) X 320mm(G)
.................................................................................................................... 23litrov
...................................................................................................14,1 kg
Raven hrupa: .................................................................................................................. Lc < 58 dB (A)
Radijske motnje (interference)
ejemniku, TV
a)
b) Postavite radijski sprejemnik, TV sprejemnik
c) Za radijski sprejemnik, TV sprejemnik itd.
1.
e ekran ugasne:
a)
Namestitev
1.
2.
b)
primer:
- nagnjena vrata,
prekinje
-
varovalkah ni videti napake, preskusite
- udrtine ali luknje v steklu (oknu) na vratih
ter na zaslonu,
2.
-
oddaja mikrovalovne energije:
a)
Ne up
pravilno nastavljena.
3. M14,1 kg;
b) o vrata trdno zaprta in
niso, se mikrovalovna energija ne bo
4.
temperature in pare.
5.
6. Da bi
Opomba:
njo pa 10cm.
Aparat je namenjen izklj
7. Ne odstranjujte pogonske gredi vrtljivega
gospodinjstvu, in sicer za segrevanje hrane
podstavka.
8. Kot pri vseh drugih aparatih je tudi pri tem
energije. Aparat uporabljajte le v zaprtih
potreben skrben nadzor, ko ga uporabljajo
prostorih.
otroci.
evropsko smernico 2002/96/EG o odpadni
electrical and electronic equipment -
WEEE). Smernica opredeljuje zahteve za
zbiranje in r
in elektronsko opremo, ki veljajo v celotni
Evropski Uniji.

4
OPOZORILO: TA APARAT JE
10
POTREBNO OZEMLJITI.
9.
10. 4
posvetujete s serviserjem oz. ustreznim
strokovnjakom.
POZOR:
varovalko 250V, 10A.
Ko v mikrovalo
POMEMBNO
zato v tem primeru ravnajte posebej
pomen:
previdno.
Zeleno-rumena: ozemljitveni vod
Modra: nevtralni vod
Rjava: fazni vod
preverite temperaturo vsebine.
odgovarjajo barvnim oznakam na terminalih
lupini ali celih trdo kuhanih jajc, saj lahko
- -
eksplodirajo, tudi potem, ko je segrevanje v
E ali s
simbolom za ozemljitev.
-
N.
-
z gobo ali mehko krpo.
L.
morebitne ostanke hrane.
Pomembna varnostna
navodila
o dobo aparata
OPOZORILO: Ko aparat deluje v
uporabi.
zelo visokih temperatur, ki nastajajo,
uporabljati aparat le pod skrbnim nadzorom
izogib nevarnosti zamenjati le proizvajalec,
OPOZORILO:
usposobljen strokovnjak.
dokler ga ne popravi za to poklicana oseba.
Varnostna navodila za
OPOZORILO: Popravilo aparata sme
o
OPOZORILO:
segrevajte v zaprtih oz. zatesnjenih
nekateri varnostni ukrepi, ki jih, podobno kot pri
ta eksplodira.
OPOZORILO: : Aparat ni namenjen, da bi ga
1.
sposobnostmi in tudi ne
plad
valj vedno na svojem mestu.
nadzoruje ali jim
2.
svetuje oseba, ki je odgovorna za njihovo
varnost.
obleke, papirja ali drugih predmetov in je ne
Otroci naj se ne igrajo z aparatom.
uporabljajte za sterilizacijo.
3. Nikoli ne vklopite p
ico naj bo
vsaj 8 cm prostora, ob straneh vsaj 10cm,
5
4.
npr. papirja, kuharskih knjig ipd.
5. Ne kuhajte hrane, ki je obdana z
porazdeli.
d
13.
vilicami.
6. Ne vstavljajte nobenih predmetov v odprtine
7.
8. Ne kuhajte hrane neposredno na steklenem
14. Pri pripravi hrane bodite pozorni, da se
podstavku. Preden hrano postavite v
marmelada ali mleto meso, segrejejo zelo
hitro. Ko segrevate ali kuhate hrano z
visoko vsebnostjo masti ali sladkorja, ne
POMEMBNO:
15.
- Ne uporabljajte kovinskih ponev ali
- Ne uporabljajte posode s kovinsko
o vrh posode in
obrobo.
- Ne uporabljajte s papirjem prekritih
boste morda potrebovali kuhinjske rokavice.
16.
- Ne uporabljajte posode iz melamina,
saj vsebujejo material, ki vsrkava
a) Pazite, da hrane ne kuhate predolgo.
mikrovalovno energijo. To lahko
Skrbno nadzorujte potek segrevanja,
papirja, plastike ali drugih lahko
segrevanje / kuhanje.
vnetljivih oz. gorljivih materialov.
- Ne uporabljajte posode brez
b)
ustreznega premaza za uporabo v
c) e
-
npr. v
steklenici, saj lahko ta med
varovalkami.
-
le termometre, ki so namenjeni prav
9.
uporabljajte le v skladu z navodili njihovega
proizvajalca.
10.
11.
potem, ko odstranite pokr
12. Pred uporabo vedno preverite temperaturo
6
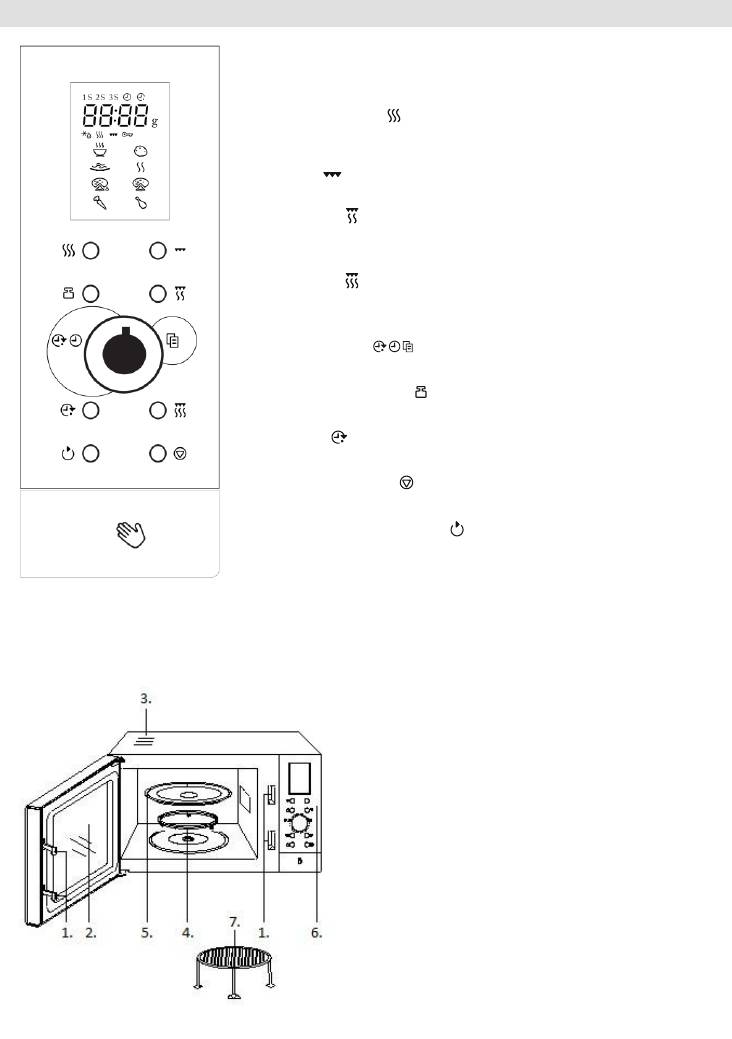
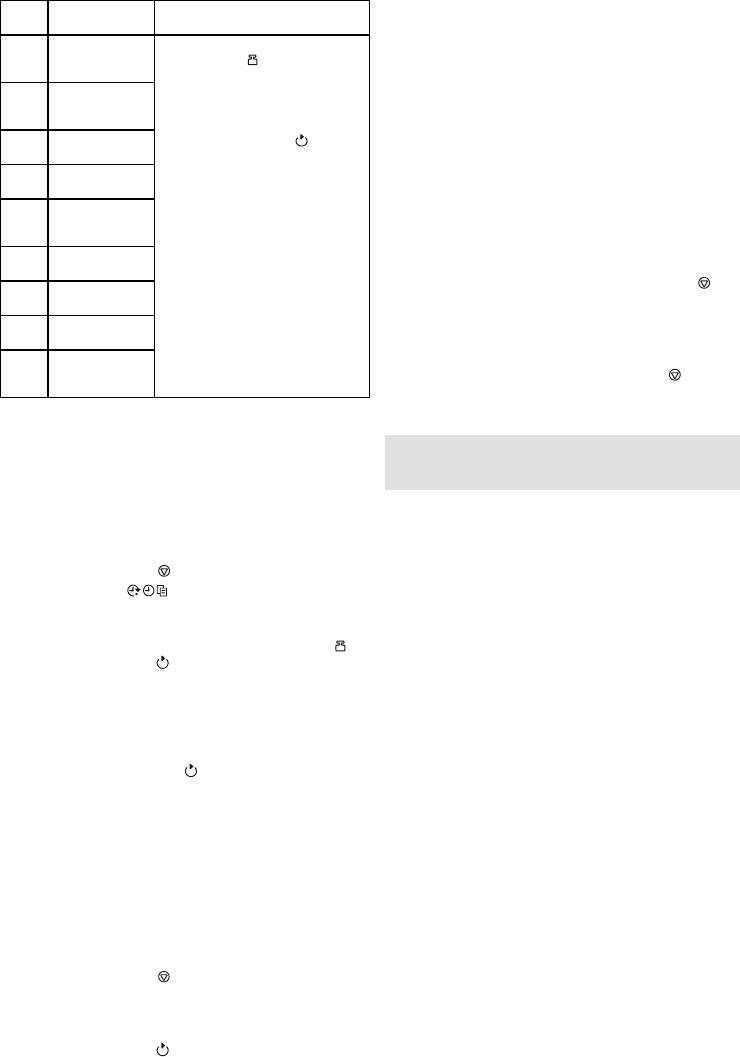
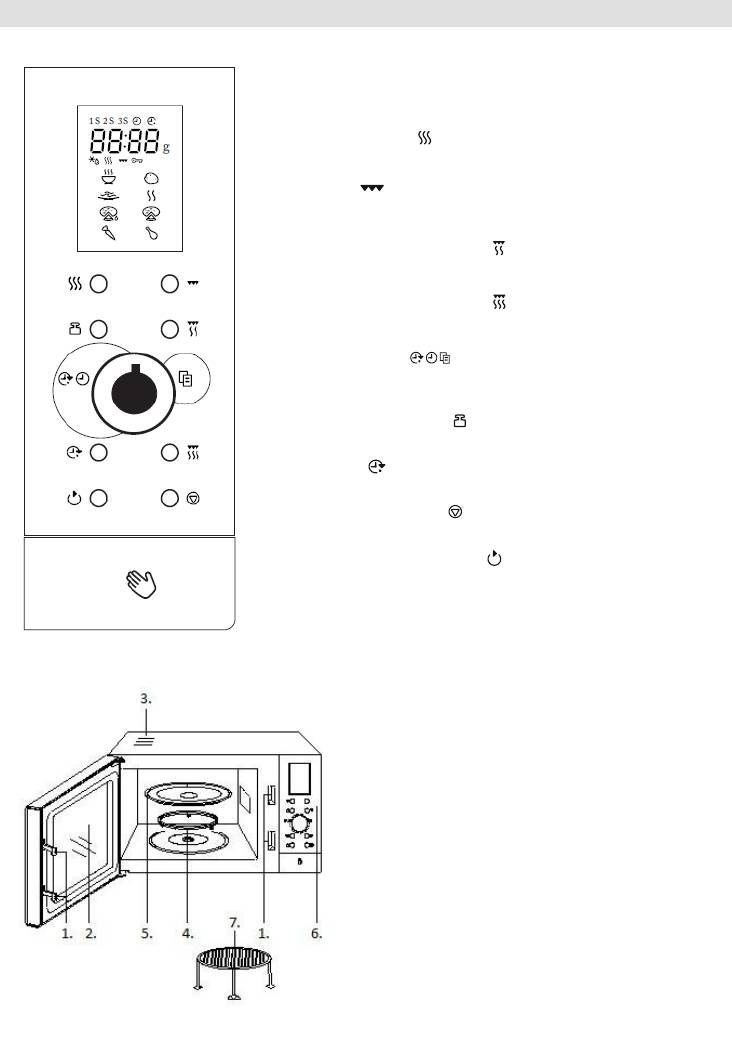
1. Zapiralo vrat
2.
3. ventilator za
evanje
4.
5. Stekleni pladenj
6.
7.
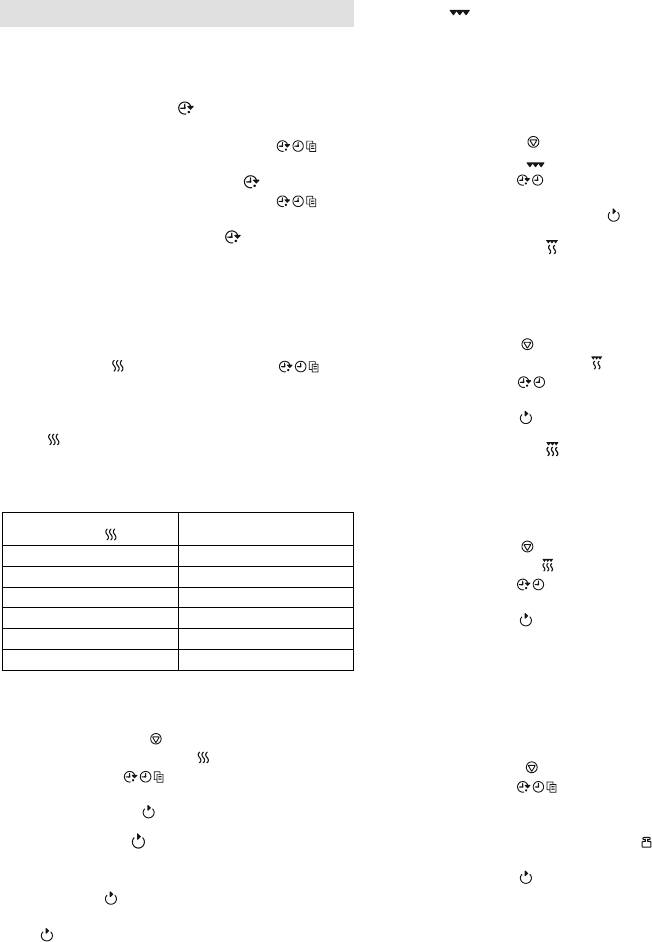
PRIKAZOVALNIK
(pri
MICROWAVES
(
GRILL
(
COMBI. 1
mikrovalovi)
COMBI. 2
(gumb za nastavitev kombinaranega
mikrovalovi)
MENU / TIME
WEIGHT ADJUST
CLOCK
(gumb za nastavitev ure)
STOP / CANCEL
(gumb za prekinitev priklic delovanja)
START / QUICK START
(gumb z
7
Navodila za upravljanje
1. Ura
-urno digitalno uro. Za vnos
a) Pritisnite tipko . Napis na
priripati. Uro
nastavite z zasukom gumba , da
.
b) Ponovno pritisnite tipko . Minute
nastavite z zasukom gumba , da
c) Znova pritisnite tipko
nastavljen.
emeniti nastavite ure, ponovite
zgornji postopek.
2. S
pritisnite gumb , nato pa z gumbom
kuhanja je 95 minut.
Za nastavitev stopn
gumb .
Nastavite lahko 5
na tipko
1x
100%
2x
80%
3x
60%
4x
40%
5x
20%
6x
00%
4.
zrezke, kebabe, klobase ter
jedi.
1. Pritisnite gumb .
2. Pritisnite gumb .
3. Obrnite gumb
12:00.
4. .
5. Combination 1
kombinirano kuhati hrano 25
minut:
1. Pritisnite tipko .
2. Enkrat pritisnite na tipko .
3. Zavrtite gumb in nastavit 25:00
minut.
4. Pritisnite tipko
6. Combination 2
kombinirano kuhati hrano 12
minut:
1. Pritisnite tipko .
2. Pritisnite na tipko .
3. Obrnite gumb 12:00
minut.
4. Pritisnite tipko .
7. Auto cook (samodejni meni)
v samodejnem meniju je potrebno
Primer:
vam pomagala
1. Pritisnite gumb .
Primer:
2. Trikrat pritisnite gumb .
1. Prtitisnite tipko .
3. obrnite na 1:00 (eno
2. Obrnite gumb v levo, in izberite
minuto).
4. Pritisnite tipko
hrana.
3. Quick start
3. izberete
To funkcijo uporabljamo za hitro pogrevanje
oziroma kuhanje hrane. V pripravljenosti
4. Pritisnite tipko
pritisnite tipko p
tipko .
8
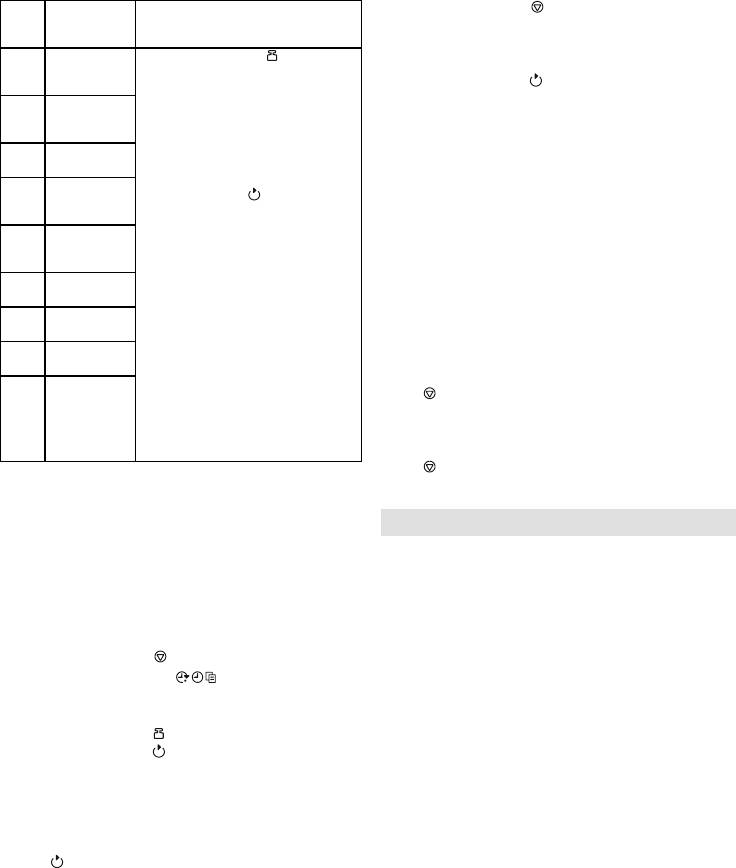
Koda
Vrsta hrane
Opomba
A01
Kava / Juhe (200
ml/skodelica)
pritisnite gumb .
bodo opomnili, da lahko obrnete
meso. Za nadaljevanje peke zaprite
vratca in pritisnite gumb .
Preden skuhate testenine, dodajte
vrelo vodo.
faktorjev, kot so oblika in velikost
hrane, lastne preference
hrana nikakor ne bo ku
A02
Krompir
(230g/enota)
A03
Testenine (g)
A04
Pogrevanje (g)
A05
Odmrzovanje
pizze (g)
A06
Pizza (g)
A07
Zelenjava (g)
A08
Meso (g)
A09
Samodejno
odmrzovanje (g)
Pozor: Z omenjenim programom
kuhanja nastaviti
funkcij Auto Defrost (samodejno odmrzovanje),
Express Cook (hitro kuhanje) in Auto Cook
(samodejno kuhanje).
Med posameznim programom bodo svetili
signalni indikatorji, ki bodo pokazali program
kuhanja, ki se trenutno izvaja.
10. ZAKLEPANJE PRED OTROCI
Uporaba je
uporabe ice pred otroci.
je seveda ne odklenemo.
3
3
sekunde in
odklenjena.
8. Odmrzovanje hrane (weight defrost)
1.
do 1800 g.
2.
PRIMER: cev.
1. Pritisnite gumb .
-
2. obrnite v nasprotni smeri
urinega kazalca, da do oznake
samodejnega odmrzovanja -
3.
3.
4. Pritisnite gumb .
zite, da se voda ne
Pozor:
Med postopkom odmrzovanja se bo sistem
4.
zaust
hrano obrnete. Za nadaljevanje odmrzovanja
ponovno pritisnite gumb .
detergentov, grobih (abrazivnih) sredstev ali
9. VESTOPENJSKO KUHANJE
5. tranjosti ali okoli zunanjih
3 programe kuhanja) .
mehko krpo. Do tega lahko pride, ko
grame
kuhanja:
Mikrovalovno kuhanje.
.
6. eklen
Kombinirano kuhanje 1.
vodi z nekaj detergenta ali v pomivalnem
1. Pritisnite gumb .
stroju.
2. Vnesite program mikrovalovnega kuhanja.
7.
3. .
4. Vnesite program kombiniranega kuhanja 1.
5. Pritisnite gumb .
oddaja hrup. Preprosto ob
9
topli vodi z nekaj detergenta ali v
hlapi od kuhanja, vendar to ne vpliva na
ponovno namestili.
8.
odstranite tako, da v globoko posodo za
limone. Posodo nato za pet minut postavite
-to vklopite. Po
ko
krpo.
9.
se, prosimo, obrnite na prodajalca.
OKOLJE
za recikliranje. Tako pripomorete k ohranitvi
okolja.
GARANCIJA IN SERVIS
e obrnite na
lokalnega Gorenjevega prodajalca ali Gorenjev
oddelek za male gospodinjske aparate.
Samo za osebno uporabo!
spletni strani:
http://microwave.gorenje.com

10
UPUTE ZA UPORABU HR
Pozorno proučite upute, te ih sačuvajte.
Specifikacija
Potr .............................................................................................. 230V~50Hz,1400W
Radna snaga ............................................................................................................................... 900W
......................................................................................................................................... 1000W
Radna frekvencija: ................................................................................................................. 2450MHz
Vanjske dimenzije: ...................................................................... 483mm278mm(V) X 378mm(G)
Dimenzije otv ............................. 340mm220mm(V) X 320mm(G)
..................................................................................................................... 23 litara
..................................................................................................14,1 kg
Razina buke: .................................................................................................................... Lc < 58 dB (A)
Prije nego pozovete servisera
a)
1. oliko se
b) Postavite radio prijamnik, TV prijamnik itd.
a)
c) Za radio prijamnik, TV prijamnik itd.
te nakon 10 sekundi ponovno ga
Postavljanje
b)
ins
1. Provjerite, da li ste
2.
2.
- vrata koja vise,
odaje mikrovalnu energiju:
-
a) Provjerite, da li je programski sat
-
pravilno postavljen.
(prozoru) vrata ili na ekranu,
b)
-
tijesno zatvorena i sigurnosna brava
Ukoliko opazite bilo koje od gore
UPOTREBLJAVAJTE. Mikrovalovna
Ukoliko uz gore navedene upute
14,1 kg; postavite je na
niste uspjeli otkloniti neprilike,
ob
serviseru.
3.
temperature ili pare.
Napomena:
4.
5. Kako bi osigurali kvalitetno provjetravanje,
a nad njom 10 cm.
koristite samo u zatvorenom prostoru.
6. NE skidajte vodilice okretnog pladnja.
7.
Radijske smetnje
upotrebljavaju dijeca.
(interferencija)
UPOZORENJE: OVAJ UREĐAJ MORA
Mo
BITI UZEMLJEN.
8.

11
9. Za djelovanje
bar 1010cm. Ne
1,4
posavjetujete sa serviserom ili
Ukoliko zagrijavat
POZOR:
nadzirite proces zagrijavanja radi sigurnosti,
zapali.
za
Zeleno- uzemljenje
plamen.
Plava: neutralna
struja
Da bi izbjegli opekline, prije uporebe
- -na
sta
slovom E ili simbolom za uzemljenjem.
-
N ili je
crne boje.
-
L ili je
crvene boje.
tkaninom.
UPOZORENJE:
temperature, koja se razvija, dijeca smije
UPOZORENJE: Ukoliko su vrata ili brtva
osoba.
UPOZORENJE: Svaki popravak ili servis,
jak.
servisera, a pri kojem je potrebno odstraniti
titu od mikrovalnog
isijavanja, je opasno i nesigurno.
UPOZORENJE:
zagrijavajte u zatvorenim odnosno
lagano eksplodirati.
UPOZORENJE: Ovaj aparat nije
u) sa
sposobnostima niti osobama koje nemaju
dovoljno iskustva i znanja, osim ako im je
osoba odgovorna za njihovu sigurnost dala
zadovoljava
8 cm prostora, sa strane

12
9.
upotrebljavajte u skladu s uputama njihovog
uporabu
10.
11.
na u posudi
1. ica radi neka stakleni pladanj,
svom mjestu.
12. Prije uporabe stvarno provjerite
2.
njoj tkanine, papir ili druge predmete i ne
upotrebljavajte ju za sterilizaciju.
3.
temperatura ravnomjerno razdijelila.
4.
13.
npr. papir, knjige o kuhanju itd.
5.
jetrica it
probodete vilicom.
6. Ne stavljajte nikakve predmete u otvore s
14. Pri pripremanju hrane budite oprezni, da se
7.
nogice, zasun, vijke td.
marmelada ili mljeveno meso, zagriju
8. Ne kuhajte hranu neposredno na staklenom
veoma brzo. Kada zagrijavate ili kuhate
postolju. Prije nego hranu postavite u
Kuhinjska pomagala, koje ne
15. Pomagala, koje koristite kod pripremanja
-
-
okvirom.
- Ne upotrebljavajte papirom prekrivenu
kuhanje.
16.
-
a) Pazite, da hranu ne kuhate predugo.
Pozorno nadzirite proces zagrijavanja,
toga usporava zagrijavanje/kuhanje
od papira, plastike ili drugih lako
-
gorivih materijala.
b)
c)
ostavite vra
-
jer bi se za vrijeme grijanja mogla
raspuknuti.
-
termometre za meso ili slatstice.
13
1. Sigurnosni sustav za zatvaranje vrata
2.
3. Otvor
4.
5. Stakleni pladanj
6.
7.
EKRAN
MIKROVALOVI
GRILL
(Pritisnite ovaj gumb za postavljanje grill kuhanje programa.)
KOMBINACIJA 1
()
KOMBINACIJA 2
()
MENU / TIME
i vremena kuhanja)
WEIGHT ADJUST
CLOCK
PAUSE / CANCEL
START / QUICK START
izabrati vrijeme kuhanja na maksimalnoj snazi)
14
Uputstva za upravljanje
1. Sat
-satni digitalni sat. Za unos
a) Pritisnite tipku . Natpis na ekranu
okretanjem tipke .
b) Ponovno pritisnite tipku i podesite
minute okretanjem tipke .
c) Ponovno pritisnite tipku , i novo
ponovite gornji postupak.
2. Zagrijavanje mikrovalnim zrakama
gumb e,
vrijeme kuhanja.
kuhanja je 95 minuta.
Stupanj snage mikrovalova birate pritiskom na
gumb .
.
Broj pritisaka
na tipku " "
Snaga mikrovalnih
zraka
1x
100%
2x
80%
3x
60%
4x
40%
5x
20%
6x
00%
4. Grill
tanjih komada mesa, odrezaka, kebaba,
emiti hranu , za
koju trebate 12 minuta.
1. Pritisnite gumb .
2. Pritisnite gumb .
3. Okretanjem gumba podesite vrijeme
na 12:00.
4. .
5. Combination 1
Kombinirano djelovanje (30% mikrovalne zrake,
pripremu riba i lazanja.
hranu kuhati kombinirano 25
minuta:
1. Pritisnite gumb .
2. Jednom pritisnite gumb .
3. Okretanjem gumba podesite vrijeme
25:00 minuta.
4. Pritisnite za poak djelovanja.
6. Combination 2
je 95 minuta.
Kombinirano djelovanje (55% mikrovalne zrake,
pripremiti hranu kombiniranima
12 minuta:
1. Pritisnite gumb .
Na primjer
2. Dvaput pritisnite gumb .
razini mikrovalne snage od 60%.
3. Okretanjem gumba podesite vrijeme
1. Pritisnite gumb .
12:00 minuta.
2. Pritisnite gumb 3 puta.
4. Pritisnite gumb za poak djelovanja.
3. na 1:00.
4. .
7. Auto cook
3. Quick Start
Ova funkcija koristi se za brzo podgrijavanje,
tablice izaberete samo vrstu namirnice i podesite
odnosno kuhanje hrane. U stanju pripremljenosti
pritisnite tipku - peica
100% snage. Za poveanje vremena v
Primjer:
pritisnite tipku . Najd kuhanja je 10
1. Pritisnite gumb .
minuta.
2. Okretanjem gumba ulijevo birate
redni broj pod kojim se nalazi izabrana
hrana.
3. ritiskom na tipku izaberete
inu hrane.
4. Pritisnite tipku za poak djelovanja.
15
(kod)
Vrsta hrane
Napomena
A01
Kava / Juha
(200 ml/)
Pritiskom na gumb birate
obroka.
nekom trenutku prekida rad i to
te hranu
preokrenuti; zatim zatvorite vrata
i pritisnite gumb za nastavak
kuhanja.
kuhanja.
Rezultat automatskog kuhanja
osobni ukus g
da rezultat pripreme nije po
kuhanja.
A02
Krumpir
(230g/jedinica)
A03
pageti (g)
A04
Podgrijavanje
(g)
A05
pice (g)
A06
Pizza (g)
A07
(g)
A08
Meso (g)
A09
Automatsko
odmrzavanje
(g)
1. Pritisnite gumb .
2. Unesite program mikrovalnog kuhanja.
3. .
4. Unesite program kombiniranog kuhanja 1.
5. Pritisnite gumb .
Napomena:
funkcije Auto Defrost
(samostalno odmrzavanje), Express Cook (brzo
kuhanje), i Auto Cook (samostalno kuhanje).
faza kuhanja, odnosno programirana funkcija se
trenutno odvija.
10. SIGURNOSNA BLOKADA
nje nekontrolirane uporabe
tipku 3 se
tipku
8. AUTOMATSKO ODMRZAVANJE
1.
djelovanja automatski se
2.
je od 100g do 1800g.
PRIMJER: 600g
.
Pritisnite gumb .
krpom. Uporaba grubih
u suprotnom
smjeru od kazaljki na satu, do oznake
automatskog odmrzavanja -
3.
Pritisnite gumb .
Pritisnite gumb .
Napomena:
4. Ne dopu
upozoriti da okrenete hranu. Za nastavak
postupka odmrzavanja morate ponovno pritisnuti
gumb .
5.
9.
te je
redoslijedom.
funkcije kuhanja:
6. Povremeno izvadite i stakleni pladanj te ga
mikrovalno kuhanje;
kombinirano kuhanje 1.
7.
16
uporabom nakupi se vlaga, koja izlazi iz
8.
m
posudu, prikladnu za uporabu u mikrovalnoj
jednog limuna. Zatuim posudu stavite u
9.
osposobljenim serviserom.
Okolina
Simbol na proizvodu ili na njegovoj
proizvodom ne smije postupiti kao s
proizvoda. Za detaljnije informacije o recikliranju
i trgovinu u kojoj ste kupili
proizvod.
Garancija i servis
ntra, obratite se lokalnom
trgovcu Gorenja, ili odjelu Gorenja za male
Nije za profesionalnu uporabu!
mikrovalovima i grilom, te korisne savjete,
http://microwave.gorenje.com

17
UPUTSTVO ZA UPOTREBU SRB MNE
Pažljivo pročitajte uputstva i sačuvajte ih.
Specifikacije
ije: ............................................................................................. 230V~50Hz,1400W
Izlazna snaga: ............................................................................................................................. 900W
: ........................................................................................................................................ 1000W
Radna frekvencija: ................................................................................................................. 2450MHz
Dimenzije: ................................................................................... 483mm278mm(V) X 378mm(G)
.................................. 340mm220mm(V) X 320mm(G)
..................................................................................................................... 23litara
....................................................................................................P14,1 kg
.................................................................................................................. Lc < 58 dB (A)
Radio-smetnje (interferencije)
servisera
smetnje u p-prijemnika, TV
1.
ugasi:
a)
a)
b) Stavite radio-
dal
c) Za radio-prijemnik, TV prijemnik itd. koristite
b)
prekinut dovod struje na glavnom
Postavljanje
1.
aparatom.
2.
2. , proverite da li je
emituje mikrotalasnu energiju:
a) Proverite da li je tajmer za
na primer:
programiranje starta i rada pravilno
- iskrivljena vrata,
-
b) Prov
-
zatvorena i sigurnosne brave
vratima, kao i na ekranu,
-
Ako primetite bilo koje od gore
3. Mikrotalasna p14,1 kg; postavite
Napomena:
4.
temperature i pare.
Aparat je namen
5. icu.
6. Da biste obezbedili dovoljnu ventilaciju,
elektromagnetne energije. Aparat koristite
samo u zatvorenim prostorijama.
10cm.
7. NEMOJTE skidati pogonsku osovinu
rotacionog tanjira.

18
8. Kao kod svih drugih aparata, i ovde je
UPOZORENJE: Ovaj aparat nije namenjen
a koriste
deca.
UPOZORENJE: ZA OVAJ APARAT JE
mentalnim sposobnostima, ili nedostatkom
POTREBNO UZEMLJENJE.
iskustva i znanja, osim pod nadzorom ili na
9.
osnovu instrukcija za upotrebu aparata
datih od strane osobe koja odgovara za
10. 4 kVA ulazne snage.
njihovu bezbednost.
Deca moraju da budu pod nadzorom da se
ne bi igrala sa aparatom.
serviserom odnosno odgovaraj
8
cm prostora, sa strane bar 10 cm, a iznad
10
ventilaciju.
Koristite samo pomagala adekvatna za
Zeleno- vod za uzemljenje
sno posudi,
Plava: neutralni vod
nadgledajte proces pripreme zbog
Braon:
posuda na zapali.
odgovaraju oznakama u boji na terminalima
- -
E ili
plamen.
simbolom za uzemljenje.
Kada u mikrotalasnoj
-
N ili je crne
boje.
-
L ili je
crvene boje.
bebe ili teglica sa hranom za bebe i
jaja u ljusci ili cela tvrdo kuvana jaja, jer
upotrebu
UPOZORENJE: Kada aparat deluje u
kombinovanom modu, zbog veoma visokih
temperatura koje nastaju, deca smeju
tite samo blaga i
nadzorom odraslih (samo za aparate sa
UPOZORENJE: Ako su vrata ili zaptivci na
eventualne ostatke hrane.
negativno
UPOZORENJE: Svaka popravka ili servis
upotrebe.
UPOZORENJE:
nemojte pripremati u zatvorenim odnosno
zaptivenim posudama ili zaptivenoj

19
9. ce koristite
uputstva za bezbednu
samo u skladu sa uputstvima njihovog
upotrebu
10.
U daljem tekstu nabrojana su neka pravila i neke
11.
aparata i koje treba uzimati u obzir radi
kad
1.
valjka, spoj
uvek na svom mestu.
da sam poklopac posude nije vreo.
2.
12. Pre upotrebe, uvek proverite temperaturu
svrhe osim za pripremu hrane, nemojte
namirnica, posebno ako hranu dajete deci.
e
nemojte je koristiti za sterilizaciju.
3. nicu ako je
4.
13.
5. Nemojte kuvati hranu sa opnom, npr.
npr. osnova za supu, treba da posle
sta
6. Nemojte stavljati nikakve predmete u otvore
7.
14. U pripremi namirnica, imajte na umu da se
zavrtnje itd.
marmelada ili mleveno meso veoma brzo
8. Nemojte kuvati hranu neposredno na
pripremaju. Kada grejete ili kuvate
staklenom tanjiru. Pre nego
15.
zagrejati jer hrana emituje toplotu. To
-
pokriveni plastikom. Kada hvatate takve
- Nemojte koristiti posude sa metalnom
ivicom.
rukavice.
- Nemojte koristiti papirom prekrivene
16.
kesica.
a) Pazite da hranu ne kuvate predugo.
- Nemojte koristiti posude od melamina,
ite tok pripreme kada su u
drugih lako zapaljivih materijala.
prouzrokovati da se posuda raspukne ili
b)
oprlji, a pored toga usporava grejanje /
kuvanje.
c)
- Nemojte koristiti posudu bez
-
u posudi koja ima
-
koristiti samo termometre koji su
namenjeni upravo upotrebi u
20
1. Sigurnosni sistem za zatvaranje vrata
2.
3. Ventilacioni otvori ili ventilator za
provetravanje
4. Rotacioni tanjir
5. Stakleni tanjir
6. Kontrolna tabla
7.
EKRAN
MICROWAWE
(dugme za regulisanje snage mikrotalasa)
GRILL
(Pritisnite ovaj gumb za postavljanje grill kuhanje
programa.)
COMBI. 1 (Kombinacija)
()
COMBI. 2 (Kombinacija)
()
MENU / TIME
kuvanja)
WEIGHT / ADJUST
(D)
CLOCK
PAUSE / CANCEL
START / QUICK START
brzo izabrati vreme kuvanja na maksimalnoj snazi)


