Hach-Lange DR 6000 Basic User Manual – страница 8
Инструкция к Hach-Lange DR 6000 Basic User Manual

Σφάλμα που
Σφάλμα που
Αιτία Ανάλυση
Αιτία Ανάλυση
εμφανίζεται
εμφανίζεται
Η σταθερή διεύθυνση του
Ελέγξτε τη σύνδεση και
Ρύθμιση δικτύου ή
DR 6000 δεν είναι
Μεταβείτε στη λειτουργία
επικοινωνήστε με το
σφάλμα FTP
Ο απομακρυσμένος
αποδεκτή.
"Αυτόματα".
διαχειριστή.
διακομιστής δεν είναι
Το όνομα διακομιστή που
Εισαγάγετε το σωστό
διαθέσιμος!
Ρύθμιση δικτύου: Ο
καταχωρήθηκε είναι
όνομα διακομιστή.
Σφάλμα κατά την
πελάτης DHCP δεν είναι
Εισαγάγετε ξανά τη
εσφαλμένο.
ανάκληση της τοπικής
συνδεδεμένος στο
διεύθυνση IP.
διεύθυνσης IP.
διακομιστή DHCP
Αδυναμία πρόσβασης
Απρόσιτο στην αρχική
∆οκιμάστε ξανά τη
στο διακομιστή
σελίδα ιντρυμεντς.
σύνδεση αργότερα.
Σφάλμα κατά τη
Ρύθμιση δικτύου:
διαδικτύου.
∆οκιμάστε να
ρύθμιση
Αδυναμία ρύθμισης
δημιουργήσετε ξανά
τη
προεπιλεγμένης
προεπιλεγμένης πύλης
σύνδεση.
πύλης.
για σταθερή διεύθυνση IP
Σφάλμα κατά τη ρύθμιση
Σφάλμα κατά τη
Ελέγξτε τις ρυθμίσεις.
δικτύου
ρύθμιση οδηγού
Προσδιορίστε τον
Ο κατάλογος
δικτύου!
κατάλογο προορισμού.
προορισμού δεν υπάρχει.
Ρύθμιση δικτύου:
Σφάλμα κατά τη
Αδυναμία ρύθμισης
Εισαγάγετε ξανά τη
ρύθμιση μάσκας
μάσκας υποδικτύου για
μάσκα υποδικτύου.
υποδικτύου.
σταθερή διεύθυνση IP
Βεβαιωθείτε ότι το
Σφάλμα στη σύνδεση
Σφάλμα στο FTP
όργανο είναι
FTP.
συνδεδεμένο στο δίκτυο.
Απενεργοποιημένη
ρύθμιση δικτύου, κατά
Απενεργοποιημένο
την πρόσβαση αρχική
Ενεργοποιήστε την
δίκτυο.
σελίδα της συσκευής
ηλεκτρονική σύνδεση.
μέσω της πλαϊνής
γραμμής
Βεβαιωθείτε ότι το
όργανο είναι
Αδυναμία πρόσβασης
Σφάλμα κατά τη ρύθμιση
συνδεδεμένο στο δίκτυο.
στον απομακρυσμένο
δικτύου
Η σταθερή διεύθυνση του
διακομιστή.
DR 6000 δεν
είναι
αποδεκτή.
Ελληνικά 141
Ανταλλακτικά
Περιγραφή Αρ. κατ.
Λυχνία αλογόνου A23778
Λυχνία δευτερίου A23792
Γενικός προσαρμογέας κυψελίδας LZV902.99.00020
Καλώδιο ρεύματος EU YAA080
Καλώδιο ρεύματος CH XLH051
Καλώδιο ρεύματος UK XLH057
Καλώδιο ρεύματος US 1801000
Καλώδιο ρεύματος Κίνα/Αυστραλία XLH069
Ασφάλεια A23772
Στοιχείο φίλτρου LZV915
Κάλυμμα για τη σκόνη LZV886
Προστασία διεπαφής USB LZV881
Ελληνικά 142

English
Technical data
Performance specifications
Changes reserved!
Long-term stability Zero point at 546 nm for 10 hours ≤ 0.0034 Abs
5000 measurement values (result, date, time, sample
Performance specifications
Data log
ID, user ID)
50 scans, 50 time scans
Operating mode Transmittance (%), Absorbance and Concentration
User programs 200
Deuterium lamp (UV) and halogen lamp (visual
Source lamp
range)
Physical and environmental specifications
Wavelength range 190–1100 nm
Width 500 mm (19.69 in)
Wavelength Accuracy ± 1 nm (wavelength range 200–900 nm)
Height 215 mm (8.46 in)
Wavelength
Depth 460 mm (18.11 in)
< 0.1 nm
reproducibility
Weight 11 kg (24.25 lb)
Wavelength resolution 0.1 nm
10–40 °C (50–104 °F), maximum 80 % relative
Ambient operating
Wavelength calibration Automatic
humidity
requirements
(without condensate formation)
Wavelength selection Automatic, based on method selection
–25–60 °C (–13–140 °F), maximum 80 % relative
Ambient storage
humidity
Scanning speed 900 nm/min (in 1-nm steps)
requirements
(without condensate formation)
Spectral bandwidth 2 nm (1.5–2.9 nm at 656 nm, 1 nm for D2 line)
Additional technical data
Photometric measuring
Power connection 100–240 V/50–60 Hz
± 3 Abs (wavelength range 200–900 nm)
range
Power consumption 150 VA
5 mAbs at 0.0–0.5 Abs
Photometric accuracy
< 1 % at 0.50–2.0 Abs at 546 nm
Fuse T 2A H; 250 V (2 units)
< 0.5 % to 2 Abs
Photometric linearity
≤ 1 % at > 2 Abs with neutral glass at 546 nm
KI solution at 220 nm
Stray light
< 3.3 Abs / < 0.05 %
190–199 nm +/- 0.0100 Abs
Photometric drift against
200–349 nm +/- 0.0054 Abs
blank reading
350–899 nm +/- 0.0034 Abs
(30-min baseline stable)
900–1100 nm +/- 0.0100 Abs
English 143
Performance specifications
General information
Use only shielded cable with maximum length of 3 m:
Safety notes
2× USB type A
1× USB type B
Read the entire user manual carefully before you unpack, set up or
Interfaces
Use only shielded cable (for example STP, FTP, S/
operate the device. Observe all danger and warning notes. Non-
FTP)
observance could lead to serious injury of the operator or to damage to
with maximum length of 20 m:
the device.
1× Ethernet
To make sure that the protection provided by this instrument is not
Housing rating IP20 with closed cell compartment cover
impaired, do not use or install this instrument in any manner other than
that specified in these operating instructions.
Protection class Class I
DANGER
Indicates a potentially or imminently hazardous situation that, if not avoided, can
result in death or serious injury.
WARNING
Indicates a potentially or imminently dangerous situation that, if it is not avoided,
can lead to death or to serious injuries.
CAUTION
Indicates a possible dangerous situation that can have minor or moderate injuries
as the result.
WARNING
Indicates a situation that, if it is not avoided, can lead to damage to the device.
Information that requires special emphasis.
Note: Information that supplements aspects from the main text.
English 144
Warning labels
Safety around source lamps
Observe all marks and labels that are attached to the device. Non-
The source lamps are operated at high temperatures.
observance may result in personal injury or damage to the device. For
To avoid the risk of electrocution, make sure the instrument is
symbols attached to the device, corresponding warning notes are found
disconnected from the power source before changing the lamps.
in the user manual.
This symbol may be attached to the device and references the
CAUTION
operation- and/or safety notes in the user manual.
Health hazard caused by ozone.
Hazardous levels of ozone can be generated when the UV lamp is not cooled.
This symbol on the device is an indication of hot surfaces.
WARNING
Electrical equipment marked with this symbol may as of August 12,
Health hazard caused by UV light.
2005 Europe-wide no longer be disposed of in unsorted house or
industrial waste. According to valid provisions (EU Directive 2002/96/
UV-Licht can cause eye and skin damage. Protect eyes and skin from direct
EC), from this point consumers in the EU must return old electrical
exposure to UV light.
devices to the manufacturer for disposal. This is free for the
Do not look directly at an energized lamp without UV safety glasses.
consumer.
Note: Contact the manufacturer or supplier to find out how
you can return worn out devices, electrical accessories
CAUTION
supplied by the manufacturer and all auxiliary articles for
Burn hazard, allow the lamp(s) to cool down for at least 30 minutes before they
correct disposal or recycling.
are serviced/replaced.
RFID module (not available on all models)
RFID technology is a radio application. Radio applications are subject to
WARNING
national conditions of authorization. The use of the DR 6000 (model with
The manufacturer is not responsible for any damages due to misapplication or
RFID module) is currently permitted in the following countries: EU, CH,
misuse of this product including, without limitation, direct, incidental and
NO, HR, RS, MK, TR, CY, US, CA, AU, NZ. We point out that the use of
consequential damages, and disclaims such damages to the full extentpermitted
the DR 6000 (model with RFID module) outside of the named regions
under applicable law.
may contravene national law. The manufacturer reserves the right also
The user is solely responsible to identify critical application risks and install
to obtain authorization in other countries. For questions about use in
appropriate mechanisms to protect processes during a possible equipment
your area, please contact your distributor.
malfunction.
English 145
The DR 6000 contains an RFID module for the reception and
Chemical and Biological Safety
transmission of information and data. The RFID module operates with a
frequency of 13.56 MHz.
DANGER
WARNING
Potential danger with contact with chemical/biological substances.
The spectrophotometer may not be used in dangerous environments.
Working with chemical samples, standards and reagents can be dangerous.
Make yourself familiar with the necessary safety procedures and the correct
The manufacturer and its suppliers reject any express or indirect guarantee for
handling of the chemicals before use and read and follow all relevant safety data
use with high-risk activities.
sheets.
Follow the following safety information, in addition to any local guidelines
Normal operation of this device may require the use of chemicals or
in force.
samples that are biologically unsafe.
Safety information for the correct use of the instrument:
• Observe all cautionary information printed on the original solution
• Do not operate the instrument in hospitals or comparable
containers and safety data sheets prior to their use.
establishments in the vicinity of medical equipment, such as pace
• Dispose of all consumed solutions in accordance with the local and
makers or hearing aids.
national regulations and laws.
• Do not operate the instrument near highly flammable substances,
• Select the type of protective equipment suitable to the concentration
such as fuels, highly combustible chemicals and explosives.
and quantity of the dangerous material being used.
• Do not operate the device near combustible gases, vapors or dust.
• Do not vibrate or jolt the instrument.
• The instrument can cause interference in immediate proximity to
televisions, radios and computers.
• Do not open the instrument.
• Guarantee is voided if the instrument is not used in accordance with
the guidelines present in this document.
English 146
Product overview
Installation
The DR 6000 is a UV-VIS-spectrophotometer with a wavelength range
of 190 to 1100 nm. The visible spectrum (320 to 1100 nm) is covered by
a halogen lamp and a deuterium lamp produces the light in the
WARNING
ultraviolet spectrum (190 to 360 nm).
Electrical dangers and fire hazard.
The instrument is supplied with a complete range of application
Only use the supplied power cable.
programs and supports several languages.
Only qualified experts may perform the tasks described in this section of the
manual, while adhering to all locally valid safety regulations.
The DR 6000 spectrophotometer contains the following programs and
operating modes:
• Stored programs (pre-installed tests)
WARNING
Removable power cables must not be replaced with inadequately dimensioned
• Barcode Programs
power cables.
• User Programs
• Favorites
Unpacking the instrument
• Single Wavelength
The DR 6000 spectrophotometer package is supplied with the following
items:
• Multi Wavelength
• DR 6000 spectrophotometer
• Wavelength Scan
• Dust cover
• Time course
• USB dust cover, fitted as standard
The DR 6000 spectrophotometer provides digital readouts of
concentration, absorbance and percent transmittance.
• Power cord for EU
When selecting a user-generated or programmed method, the menus
• Universal cell adapter
and prompts serve to direct the user through the test.
• Operator RFID tag (not available on all models)
This menu system can also produce reports, statistical evaluations of
• Basic DR 6000 user manual, LINK2SC user manual
generated calibration curves and reports on instrument diagnostic
Further information, detailed user manuals and documentation are
checks.
available on the website of the manufacturer.
Note: If any of these items are missing or damaged, please contact the
manufacturer or a sales representative immediately.
English 147
Operating environment
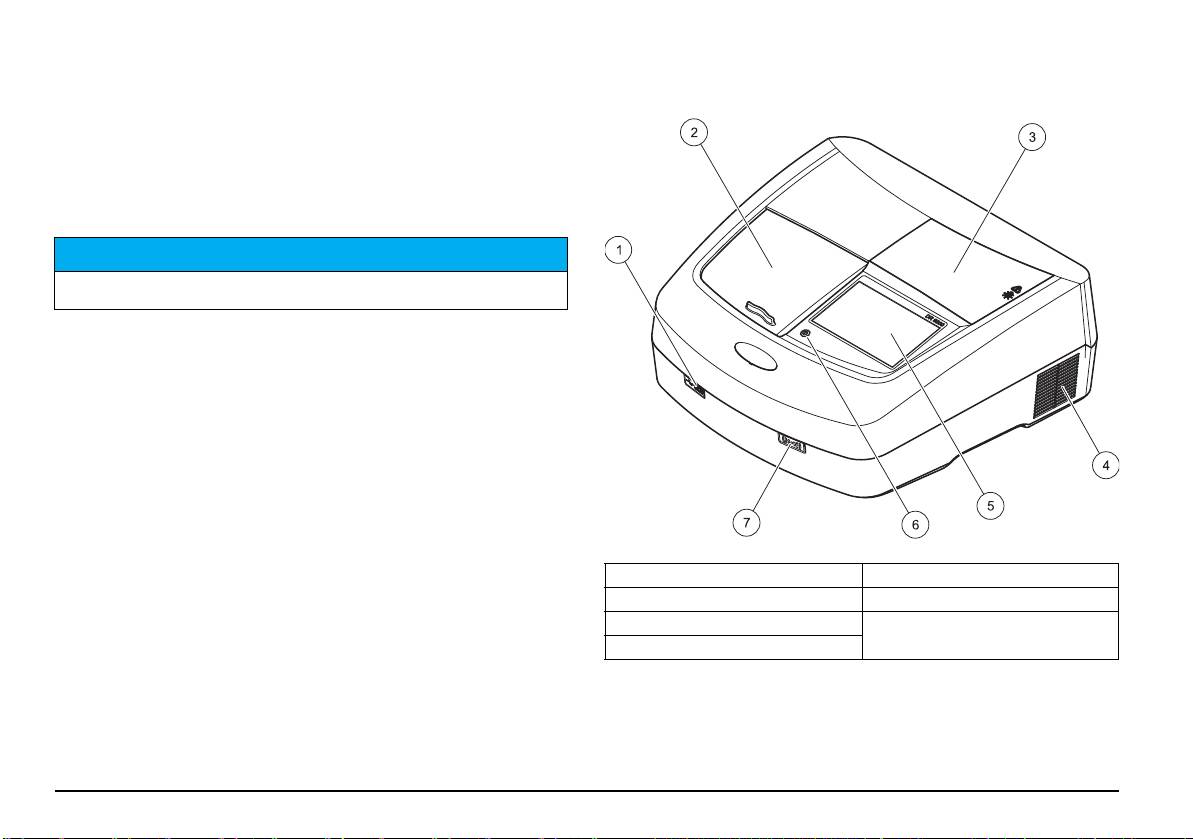
Front and back view
Observe the following points so that the device functions faultlessly and
Figure 1 Front view
thus has a long service life.
• Place the device securely on an even surface. Push no objects
under the device.
• Position the device so that the power cord is not impaired.
• The ambient temperature must be 10–40 °C (50–104 °F).
NOTICE
Protect the instrument from extreme temperatures from heaters, direct sunlight
and other heat sources.
• The relative humidity should be less than 80 %; moisture should not
condense on the instrument.
• Leave at least a 15 cm clearance at the top and on all sides for air
circulation to avoid overheating of electrical parts.
• Do not use or store the device in extremely dusty, humid or wet
places.
• Keep the surface of the instrument, the cell compartment and all
accessories clean and dry at all times. Immediately remove
splashes or spilt materials on or in the instrument (refer to
Maintenance, page 166).
1 USB port type A 5 Touch screen
2 Cell compartment cover 6 Power save key
3 Lamp compartment cover
7 RFID module (not available on all
models)
4 Fan outlet
English 148
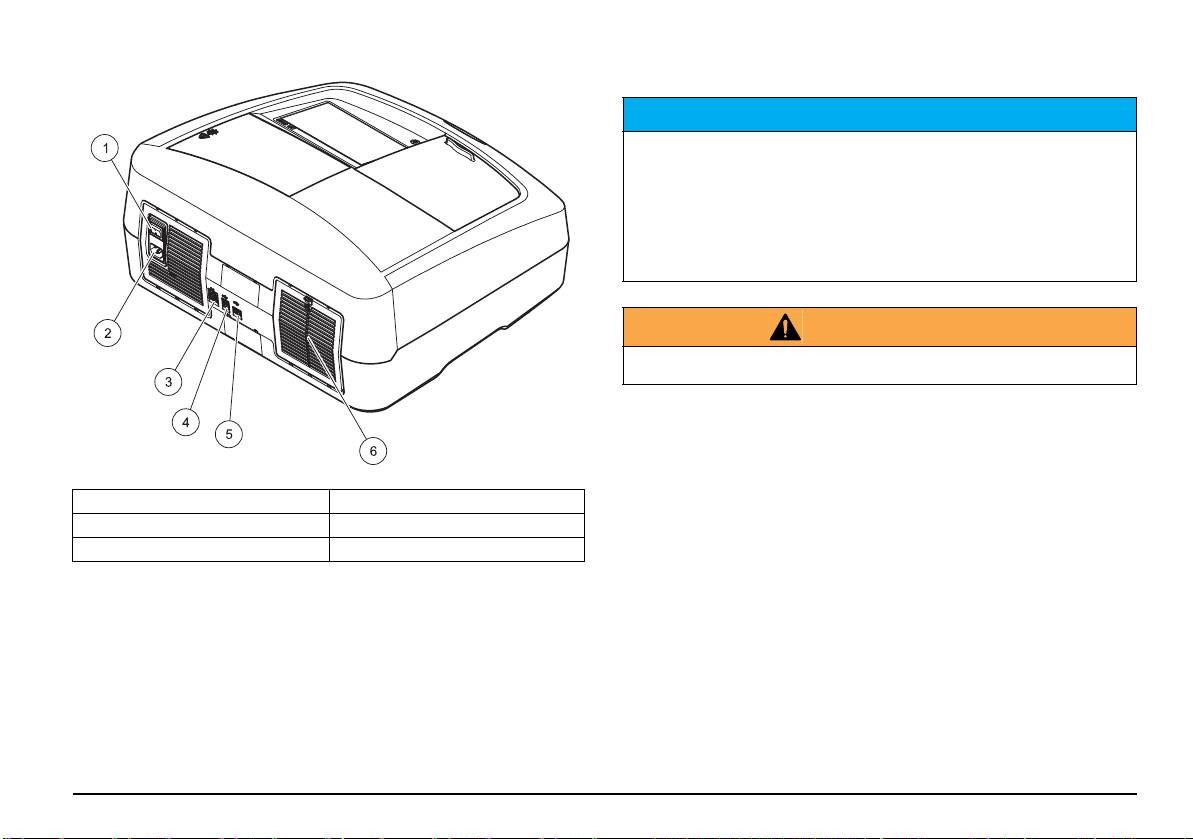
Figure 2 Back view
Power connections
NOTICE
Use only a grounded socket for the connection of this device to the power supply.
If you are not sure if the sockets are grounded, have this checked by a qualified
electrician. The power plug serves in addition to the power supply to isolate the
device quickly from the power source where necessary. During the disconnection
from the power source it must be made sure that the correct power plug is pulled
(for example by labeling the sockets). This is recommended for long-term storage
and can prevent potential dangers in the event of a fault. Therefore make sure
that the socket to which the device is connected is easy to reach by each user at
all times.
WARNING
Electrical dangers and fire hazard.
Only use the supplied power cable.
1. Plug the power cable into the back of the instrument (Back view,
page 149).
2. Insert the plug of the power cable into a grounded mains socket
(100–240 V~ / 50–60 Hz).
3. Switch the power button to "On" to turn on the instrument (Back
1 On/off switch 4 USB port type B
view, page 149).
2 Socket for power cable 5 USB port type A
3 Ethernet port 6 Filter pad cover
English 149
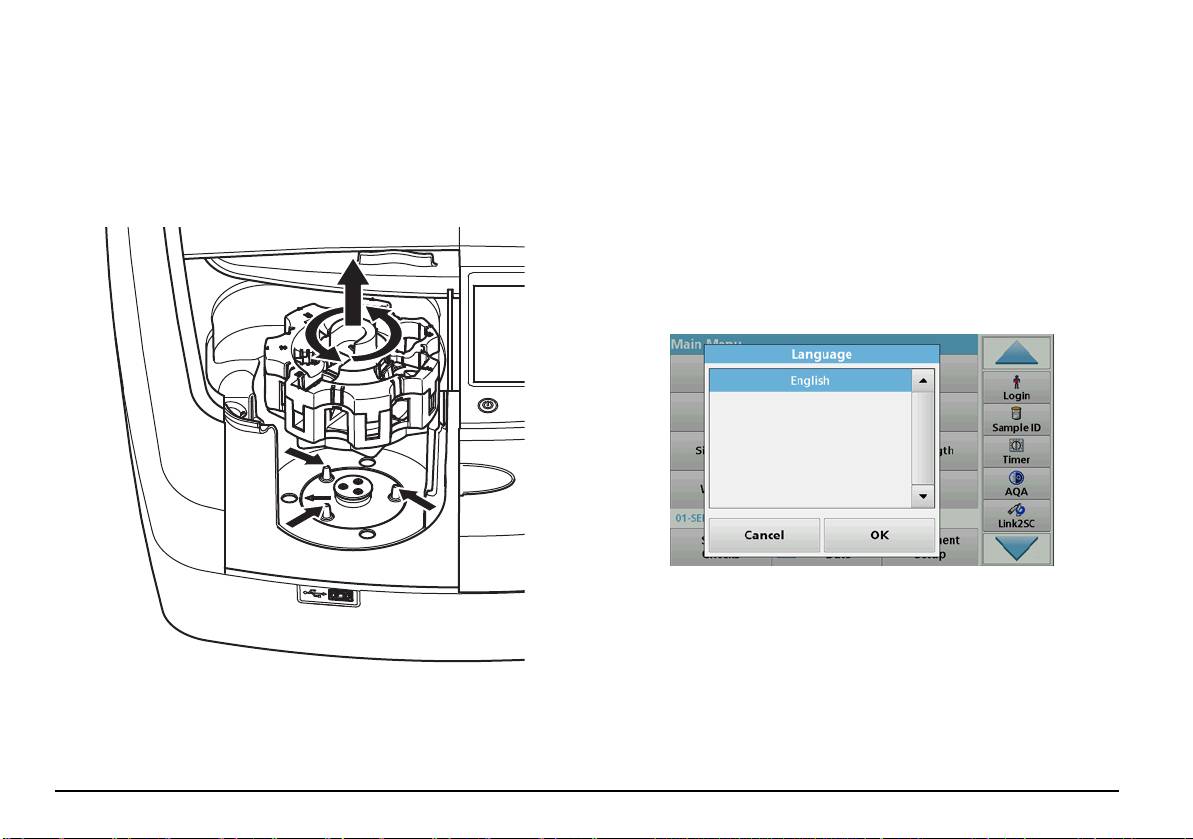
How to position the universal cell adapter
Startup
1. Open the cell compartment.
2. Raise the universal cell adapter by approx. 1 cm.
Switch on the instrument, startup process
3. Rotate the universal cell adapter such that the guide of the required
1. Connect the power cable to a power socket.
cell profile faces left toward the cell compartment (1).
2. Switch on the instrument via the power switch on the back.
4. Press the universal cell adapter down until it snaps into place.
3. The device automatically starts an approximately 45 second long
startup process. The display shows the logo of the manufacturer. At
Figure 3 How to position the universal cell adapter
the end of the startup process, a startup melody is heard.
Note: Wait approximately 20 seconds before switching on again so as
not to damage the electronics and mechanics of the instrument.
Language selection
The DR 6000 software includes several language options. The first time
the instrument is switched on, the language selection screen will be
shown automatically after the startup process.
1. Select the required language.
2. Press OK to confirm the language selection. The self-check will
then start automatically.
English 150
Change the language setting
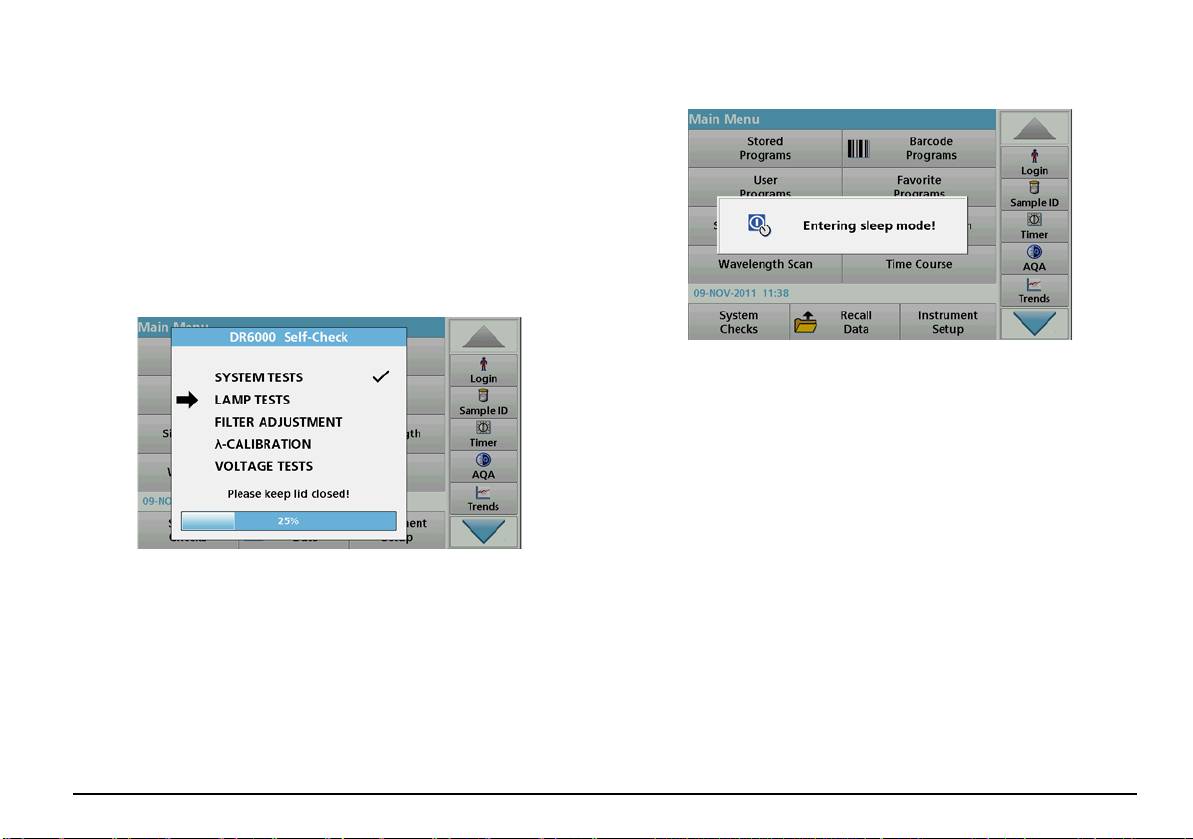
Sleep mode
The device works in the selected language until the option is changed.
1. Turn the instrument on.
2. During the startup process, touch the display at any point until
(approximately 45 seconds) the list for the selection of a language
is shown.
3. Select the required language.
4. Press OK to confirm the language selection. The self-check will
then start automatically.
Self-check
The instrument can be put into sleep mode.
1. Press the power save key beneath the display.
The "Sleep mode" message is shown. The display will then switch
off automatically.
2. Press the power save key again to switch back on.
The self-check will start automatically.
After that, the instrument is ready to use.
Power off the instrument
1. Press the power switch on the back of the instrument.
Each time the instrument is powered up, a test program begins.
This procedure, which takes approximately two minutes, checks the
system, lamp, filter adjustment, wavelength calibration and voltage.
Each checked function is marked accordingly on the display.
The Main Menu is displayed when diagnostics are completed.
Note: In the event of further error messages during the test program,
refer to Troubleshooting, page 167.
English 151
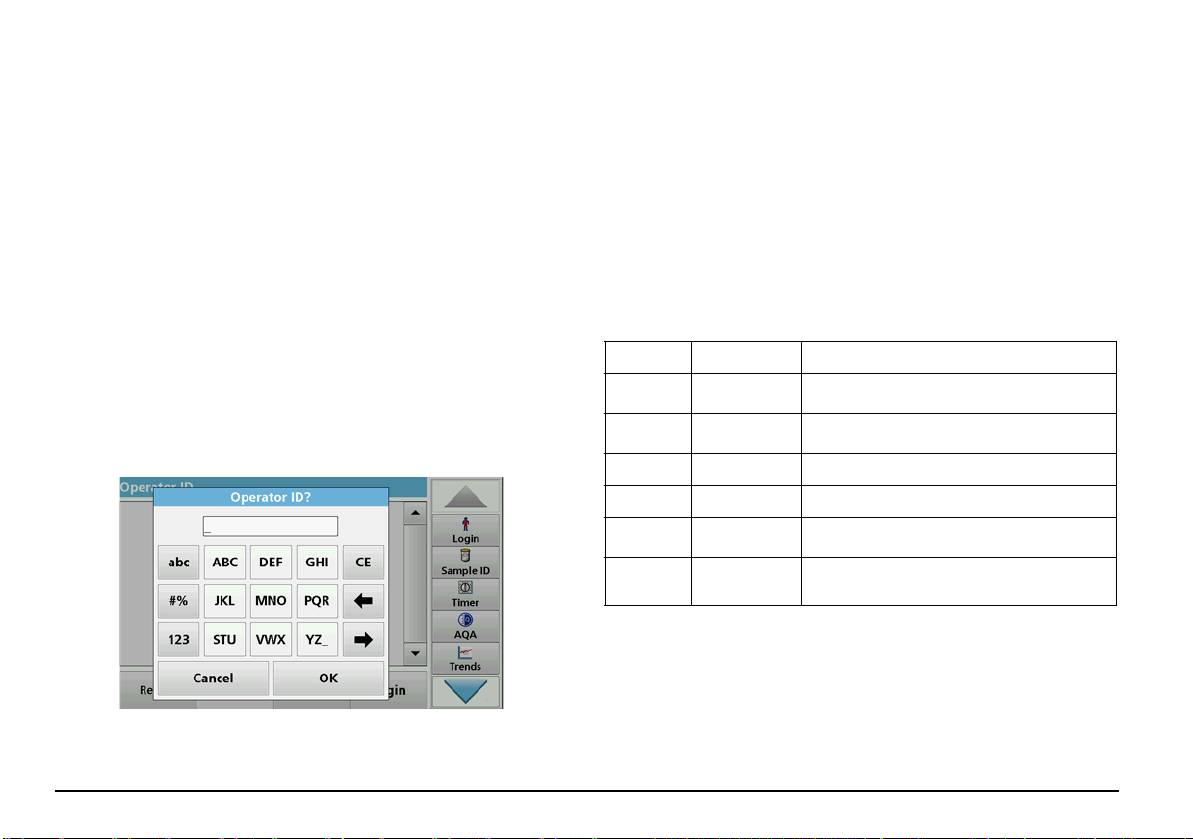
This display is used to enter letters, numbers and symbols as needed
Standard programs
when programming the instrument. Unavailable options are disabled
(grayed out). The symbols left and right on the display are described in
Overview
Table 1.
Tips for using the touch screen
The designations of the center keypad change according to the selected
entry function. Touch each key repeatedly until the required character is
The entire display reacts to touch. Make selections by tapping with a
shown on the display. A space can be entered by using the underscore
fingernail, fingertip, eraser or stylus. Do not touch the display with sharp
on the YZ_ key.
objects (for example a ballpoint pen tip).
Press Cancel to cancel an entry, or press OK to confirm an entry.
• Do not place anything on top of the screen, to prevent damage or
scratches on the screen.
Note: It is also possible to use a USB keyboard (with US keyboard
layout) or a hand-held USB barcode scanner (refer to Replacement
• Press buttons, words or icons to select them.
parts, page 170).
• Use scroll bars to move up and down long lists very quickly. Press
and hold the scroll bar, then move up or down to move through the
Table 1 Alphanumeric keypad
list.
• Highlight an item from a list by pressing it once. When the item has
Icon / key Description Function
been successfully selected, it will be displayed as reversed text
Toggles the character input mode between upper
(light text on a dark background).
ABC/abc Alphabetic
and lower case.
Punctuation, symbols and numerical sub- and
Use of the alphanumeric keypad
# % Symbols
superscripts may be entered.
123 Numeric For entering regular numbers.
CE Clear Entry Clear the entry.
Deletes the current character and goes back one
Left Arrow Back key
position.
Right
Next Navigates to the next space in an entry.
Arrow
English 152
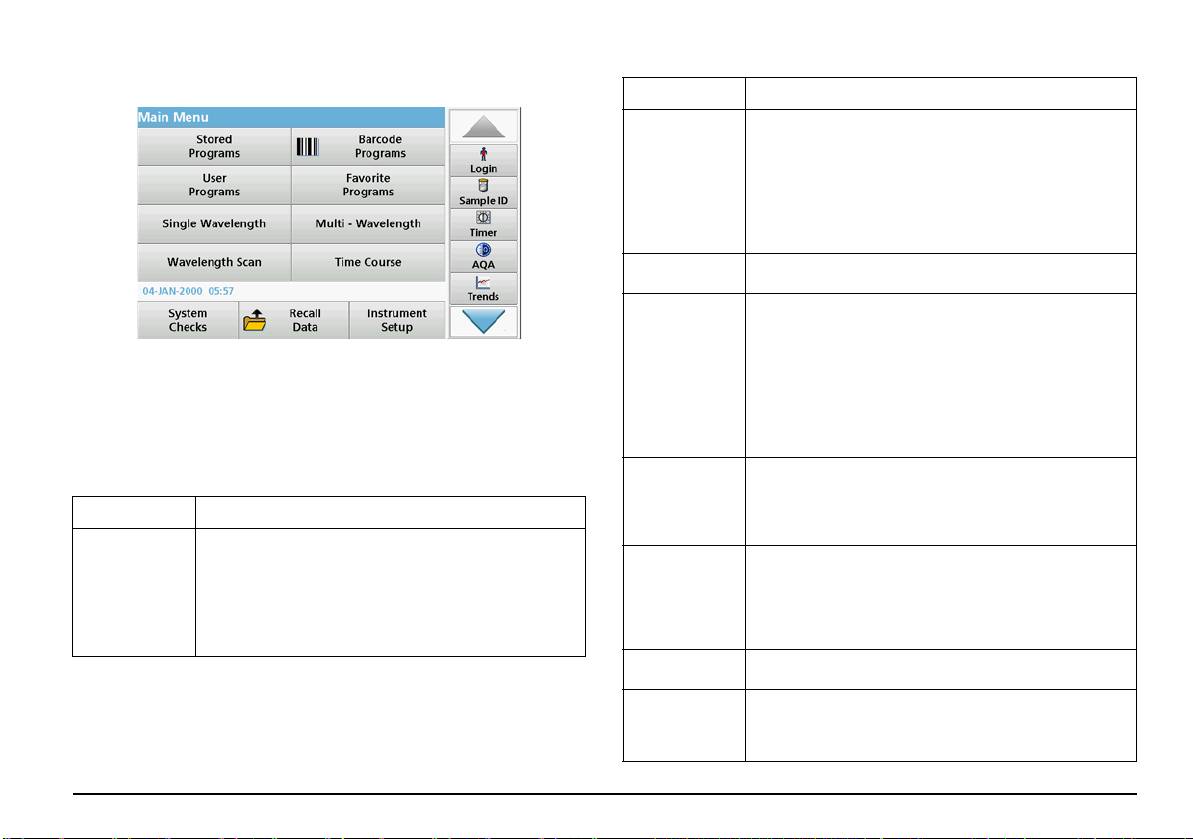
Main menu
Table 2 Main Menu options
Option Function
User programs make "made to measure analysis" possible:
• Users can program methods they have
developed themselves
User Programs
• Existing HACH- and HACH-LANGE procedures
can be stored as user programs. These
procedures can then be modified according to
separate requirements.
List of methods/tests created by the user to suit his own
Favorites
requirements.
Single wavelength readings are:
Absorbance readings: The light absorbed by the sample is
measured in absorbance units.
Transmittance reading (%): Measures the percent of the
Single
original light that passes through the sample and reaches the
Wavelength
A variety of modes may be selected from the Main Menu. The following
detector.
table briefly describes each menu option.
Concentration readings: A concentration factor can be
You find a toolbar on the right in the display. Press to activate the
entered to enable the measured absorbance values to be
converted into concentration values.
various functions.
In the Multi Wavelength mode, absorbance (Abs) or
Table 2 Main Menu options
percentage transmittance (%T) is measured at up to four
Multi
wavelengths and absorbance differences and absorbance
Option Function
Wavelength
relationships are calculated. Simple conversions into
concentrations can also be carried out.
Stored programs are pre-programmed methods that make
Stored
use of HACH chemicals and HACH-LANGE pipette tests.
A wavelength scan shows how the light from a sample is
Programs /
The working procedures for HACH-LANGE tests are
absorbed over a defined wavelength spectrum. This function
Barcode
included in the test packs.
Wavelength
can be used to determine the wavelength at which the
Programs
Scan
maximum absorbance value can be measured. The
Further information, as well as illustrated, step-by-step
(HACH-LANGE
absorbance behavior is displayed graphically during the
process instructions for analyses using HACH programs, are
programs)
scan.
available on the website of the manufacturer.
The time scan records the absorbance or % transmittance at
Time course
a wavelength over a defined time.
The "System check" menu offers a number of options,
including optical checks, output checks, lamp history,
System checks
instrument update, service time, settings for analytical quality
assurance and instrument backup.
English 153
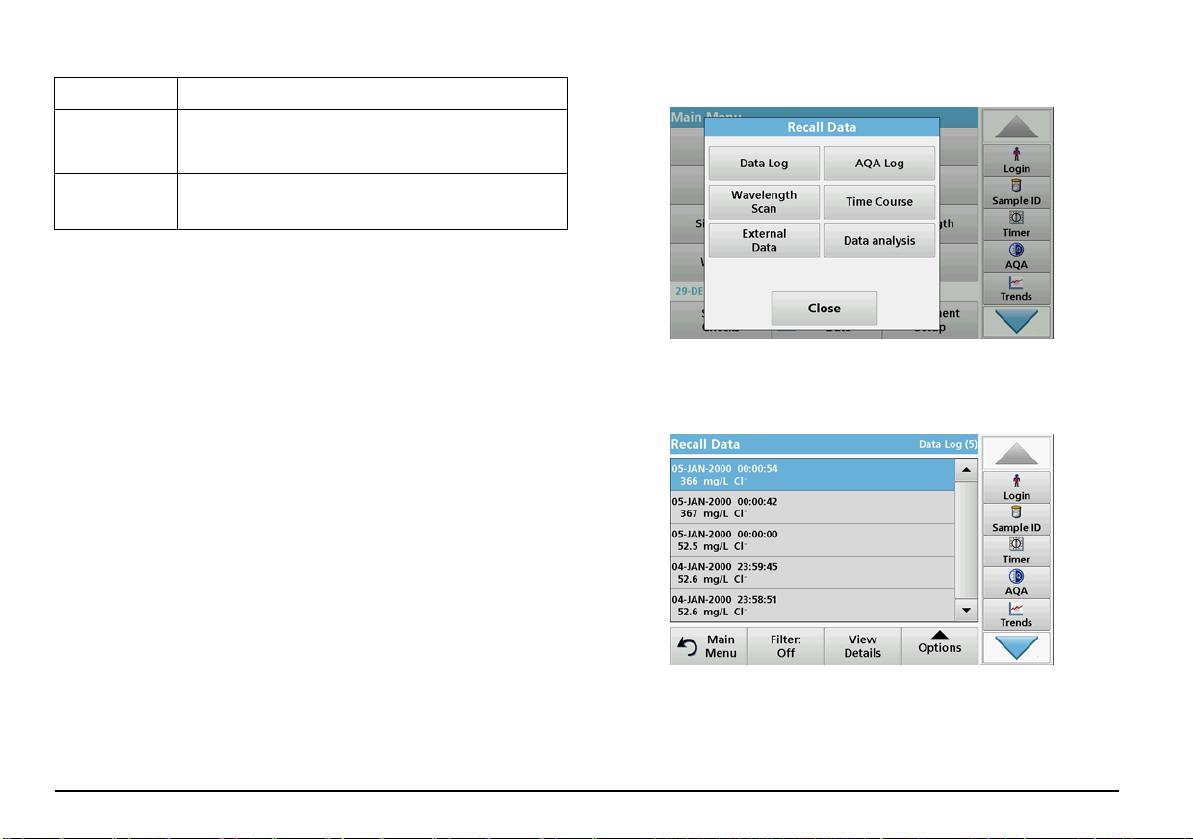
Table 2 Main Menu options
Recall stored data from the data log
Option Function
Recall
measurement
Stored data can be called up, filtered, sent and deleted.
data
In this mode, user-specific or method-specific settings can
Instrument
be entered: operator ID, sample ID, date & time, sound, PC
Setup
& printer, password, energy-saving mode and stored data.
Save, recall, send and delete data
The data log
The data log can store up to 5000 readings saved by the following
programs:
• Stored Programs,
• Barcode Programs,
1. Press Recall Data in the Main Menu.
• User programs,
• Favorites,
• Single Wavelength and
• Multi Wavelength.
A complete record of the analysis is stored, including the Date, Time,
Results, Sample ID and Operator ID.
2. Press Data Log.
A listing of the stored data is displayed.
English 154
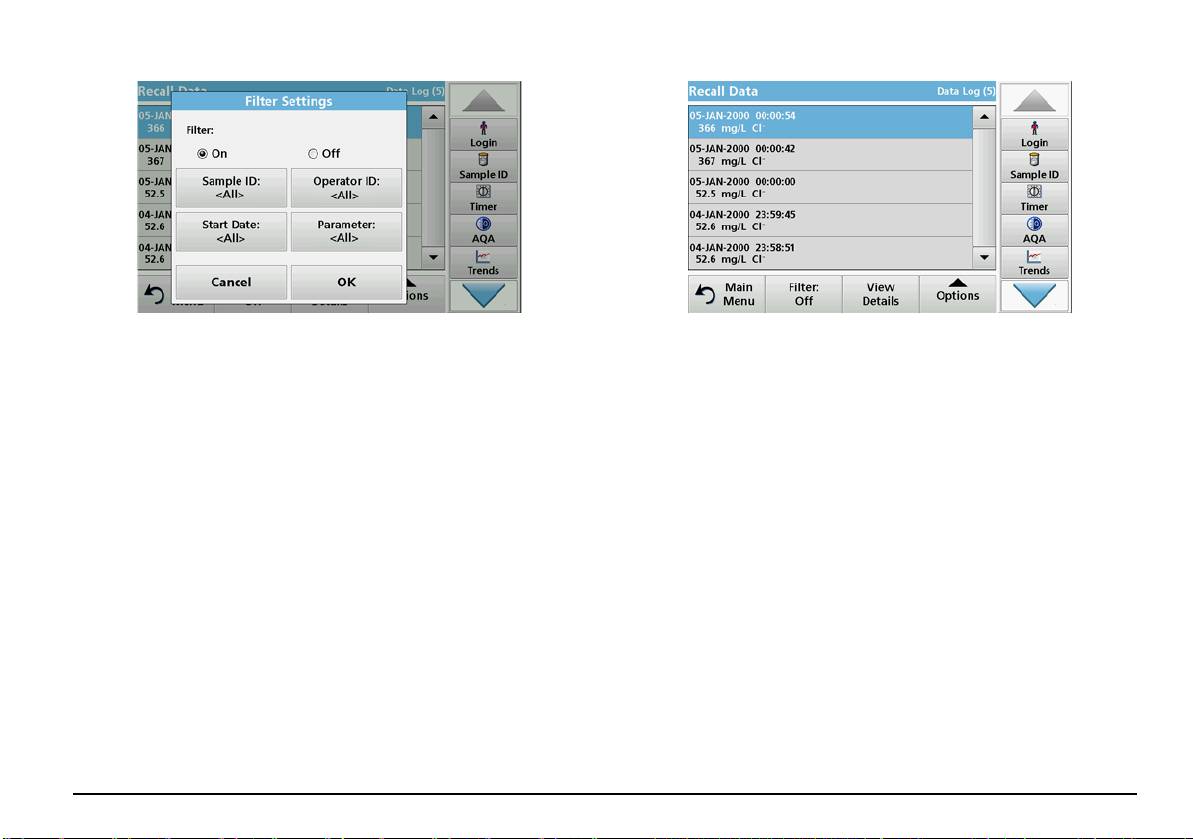
3. Press Filter: On/Off.
5. Press OK to confirm the selection.
The function Filter Settings is used to search for specific items.
The chosen items are listed.
4. Activate On. The data can now be filtered using the following
selection criteria.
Send data from the data log
• Sample ID
Data is sent from the internal data log as an XML (Extensible Markup
Language) file or as a CSV (Comma Separated Value) file, to a directory
• Operator ID
with the name DataLog on a USB mass storage device or a network
• Start Date
drive. The file can then be processed using a spreadsheet program. The
• Parameter
file name has the format: DLYear-Month-
Day_Hour_Minute_Second.csv or DLYear-Month-
or any combination of the four.
Day_Hour_Minute_Second.xml.
English 155
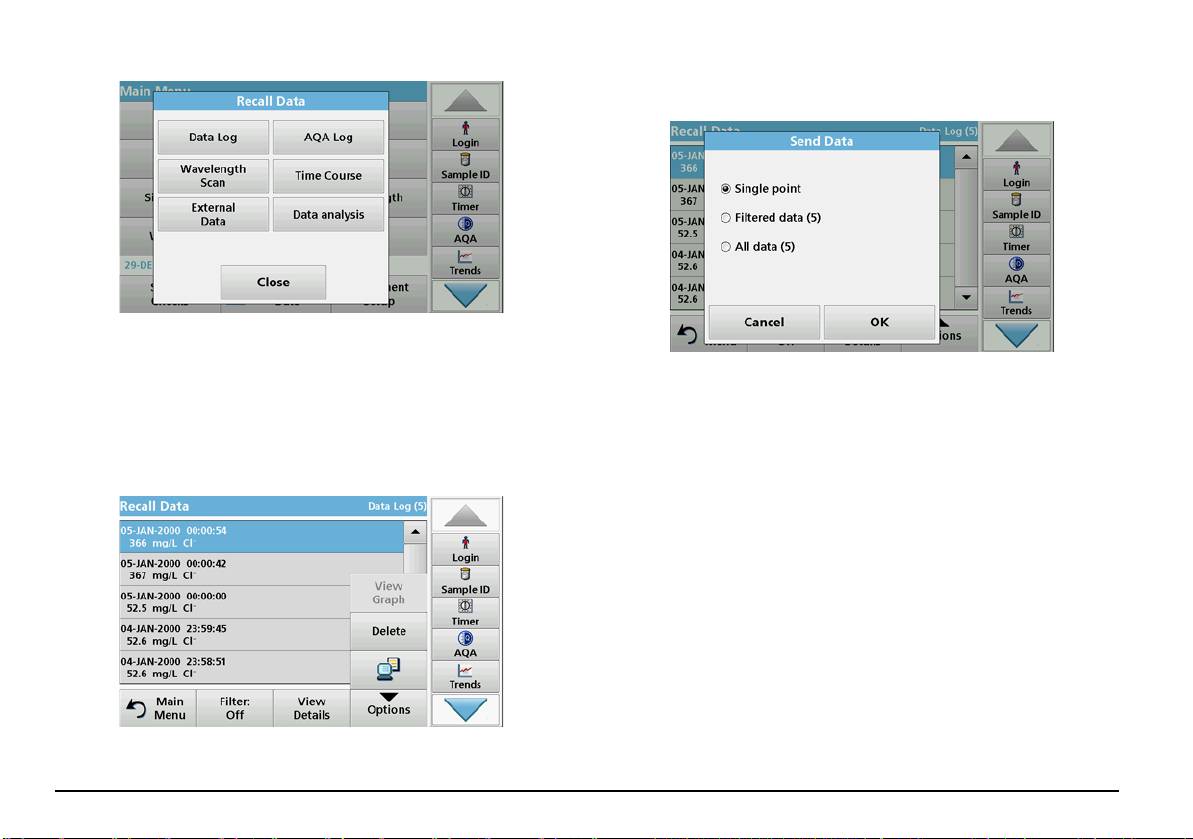
4. Tap on Options and then on the
PC&Printer symbol.
1. Plug the USB storage device into the USB A interface on the
DR 6000 or connect the DR 6000 with a network drive.
2. Press Recall Data from the Main Menu.
5. Select the data to be sent.
The following options are available:
3. Select the data category to be transferred, e.g. Data Log.
• Single point: only this selected reading will be sent
A list of the selected measurement data is displayed.
• Filtered data: only readings that correspond to the set filters
will be sent
• All data: all data in the selected data category will be sent.
6. Press OK to confirm.
Note: The number in parentheses is the total number of data sets
assigned to this selection.
English 156
Stored Programs
4. Follow the chemical procedural instructions. Further information are
available on the website of the manufacturer.
Over 200 pre-programmed processes can be recalled via the Stored
Note: To display the procedural instructions in the display, press the
Programs menu. Stored Programs do not include any barcode tests.
info icon. This option is not available for all tests.
Select a saved test/method; entering user-specific basic
Analysis of samples
data
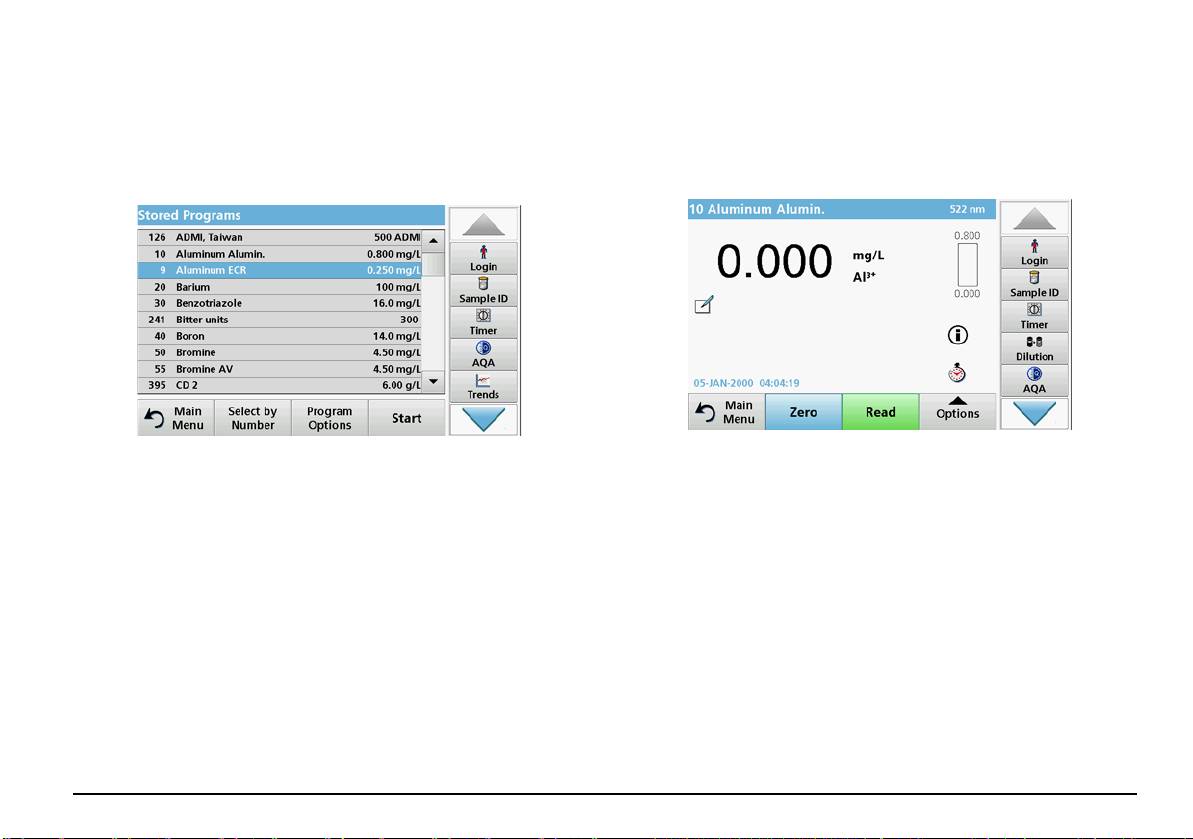
1. Press Stored Programs and select a program.
1. Press Stored Programs in the Main Menu to view an alphabetical
list of stored programs with program numbers.
Note: If available, the procedural instruction is indicated on the
display via the Info icon.
The "Stored Programs" list will appear.
2. Highlight the required test.
2. Insert the zero solution cell into the cell compartment.
Note: Select the program by name or scroll through the list using
3. Press Zero.
the arrow keys. Highlight the program or press Select by No. to
search for a specific program number. Press OK to confirm.
3. Press Start to run the program. The respective measurement
window is displayed.
Note: All corresponding data (wavelength, factors and constants) is
already preset.
English 157
Perform a barcode test
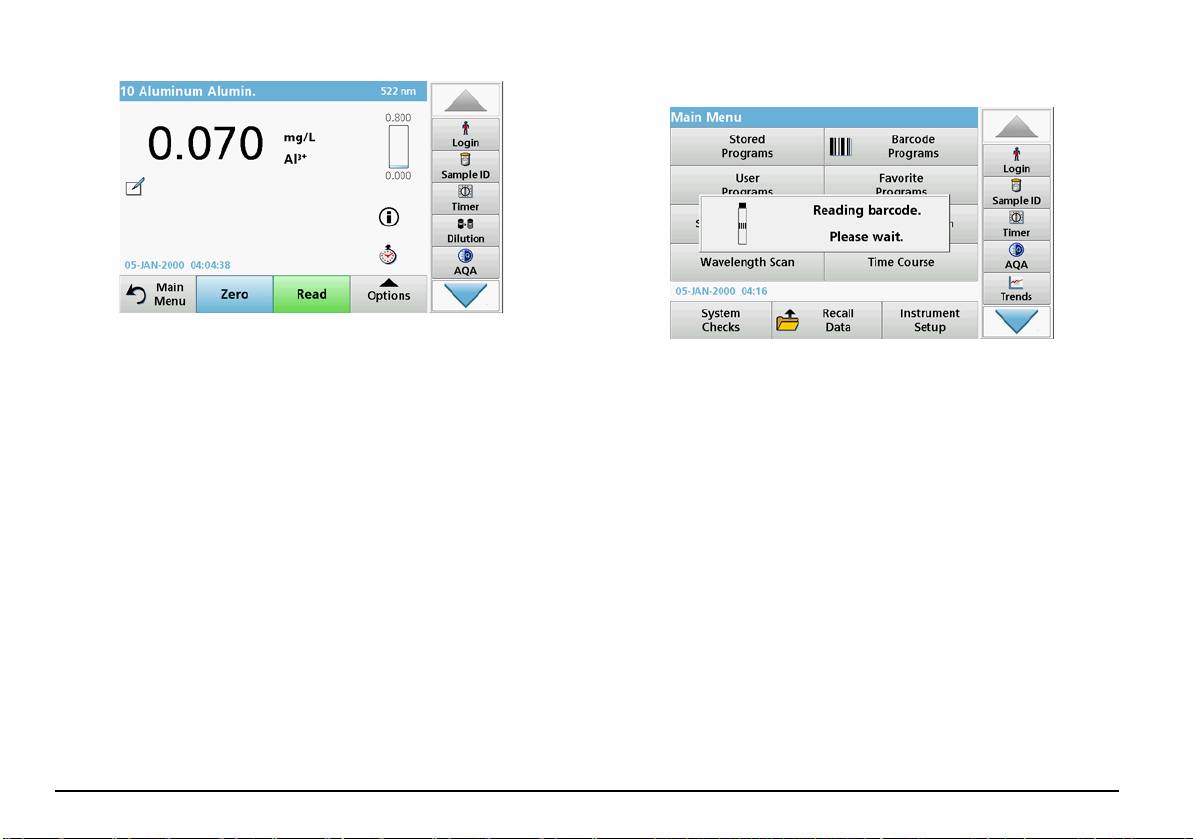
4. Remove the zero solution cell from the cell compartment. Insert the
sample cell into the cell compartment.
1. Prepare the barcode test in accordance with the work instruction
5. Press Read. The result will be displayed.
and insert the cell into the cell compartment (1).
Note: To define a sample dilution, press the Dilution key in the
• When a coded cell is inserted into the cell compartment (1)
toolbar.
(How to position the universal cell adapter, page 150), the
corresponding measurement program is automatically
6. For data storage, refer to section The data log, page 154.
activated in the main menu.
Barcode Programs
A special barcode reader in cell compartment #1 automatically reads the
barcode on the 13 mm cuvette/vial as the cuvette/vial completes a single
rotation. The instrument uses the barcode identification to automatically
set the correct wavelength for the analysis and calculates the result
immediately with the help of stored factors.
In addition, readings are recorded at 10 different positions during a
rotation. A special outlier-elimination program is run and then the
average of the measured values is calculated. Cell and round cell faults
and contaminations are detected and therefore a very precise result is
determined.
English 158
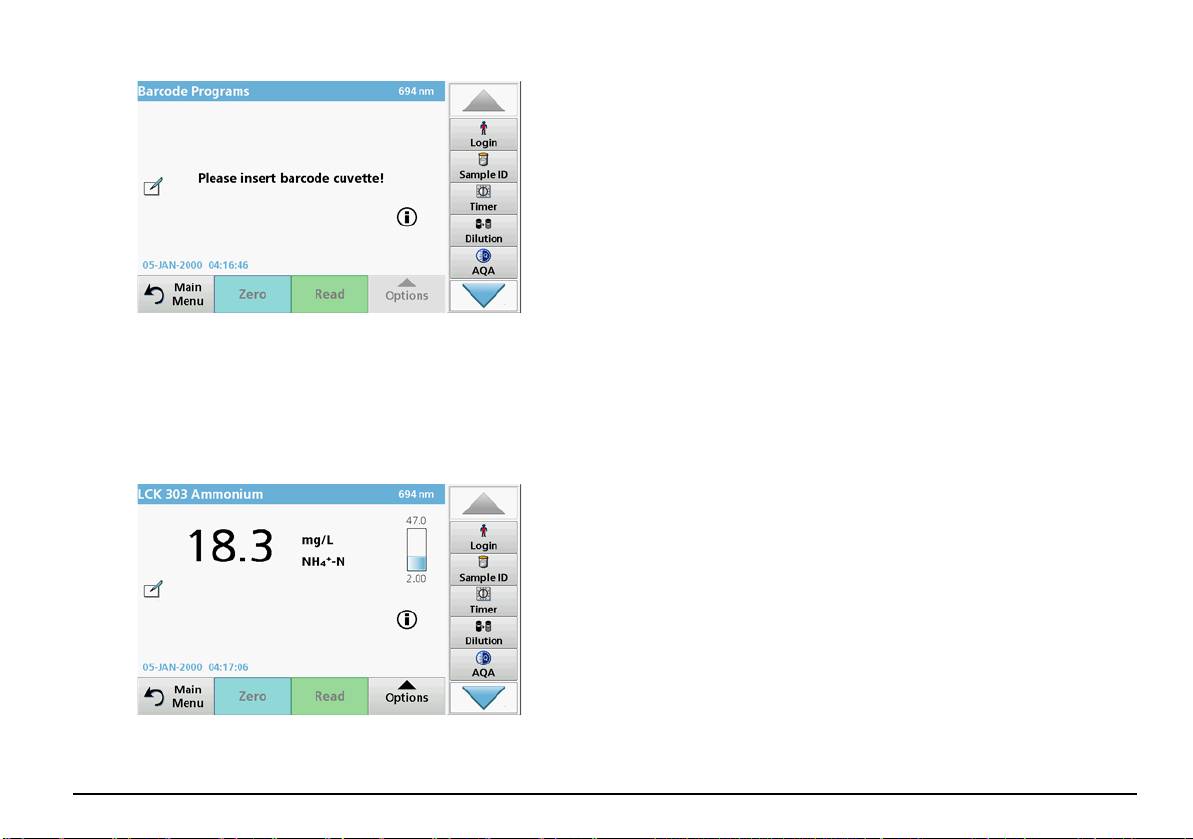
The measurement is started automatically and the results are shown.
Note: To define a sample dilution, press the Dilution key in the toolbar.
To evaluate other cell tests and other parameters insert the prepared cell
into the cell compartment and read off the result.
Note: The control bar, which is shown on the right on the display, shows
the relationship of the measurement result with the measurement range.
The blue bar shows the reading result independently of any dilution factor
that was entered.
Expanded programs
Single Wavelength (absorbance, concentration and
transmittance readings)
The Single Wavelength mode can be used in three ways. For sample
• Otherwise select in the main menu the menu option Barcode
readings at a single wavelength, the instrument can be programmed to
Programs and insert a zero cell (depending on work
measure the absorbance, % transmittance or concentration of the
instruction) into the cell compartment (1).
analyte.
Note: To obtain further information on the Help Guide ("Information"
• Absorbance readings: The light absorbed by the sample is
symbol).
measured in absorbance units.
• % Transmittance measures the percent of the original light that
passes through the sample and reaches the detector.
• Turning on the concentration factor allows selection of a specific
multiplier for converting absorbance readings to concentration. In a
graph of concentration versus the absorbance, the concentration
factor is the slope of the line.
Set up Single Wavelength mode
1. Press Single Wavelength in the Main Menu.
2. Press Options for Parameter Setup.
English 159
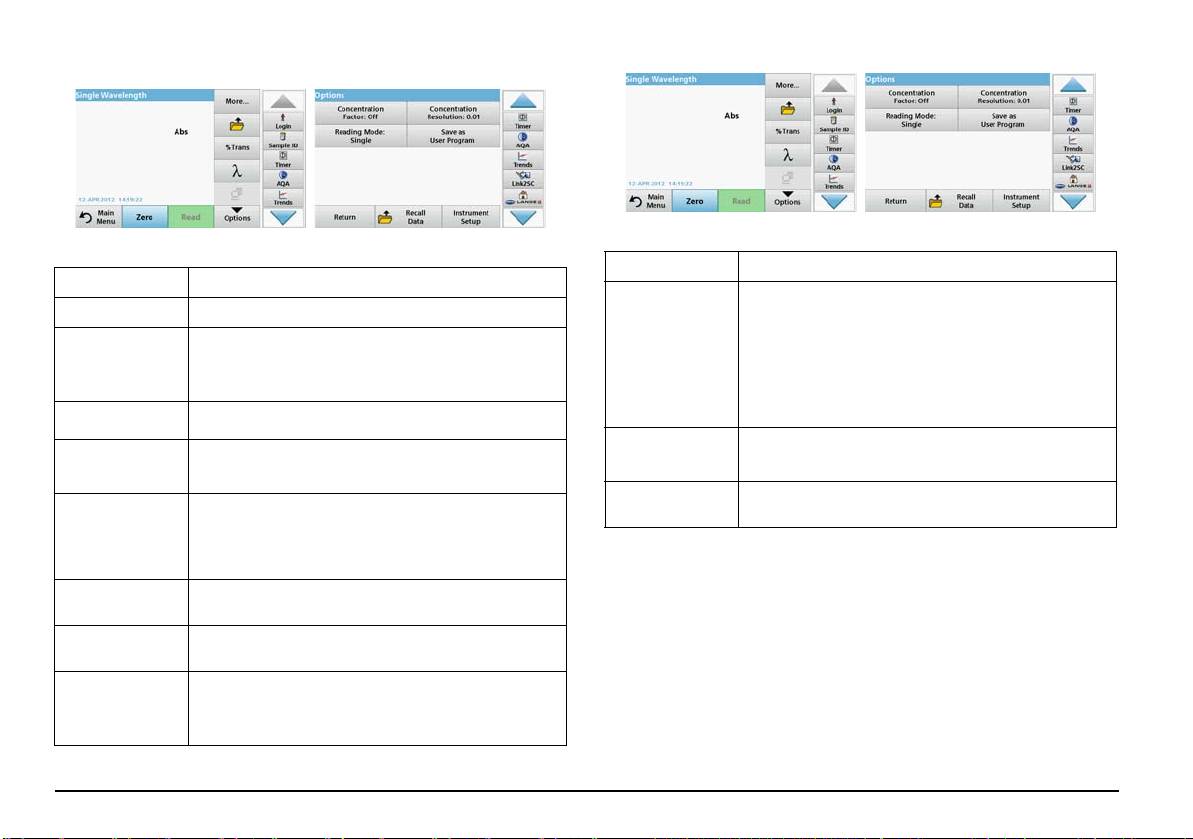
Table 3 Options for Single Wavelength (Continued)
Table 3 Options for Single Wavelength
Options Description
Options Description
Single Reading: One measurement result is shown after
tapping on Read.
More For further Options
Continuous Readings: After the zero measurement, all
Recall saved measurement data, wavelength scans or time
readings are displayed automatically and continuously.
Recall
courses, refer to Save, recall, send and delete data,
Reading Mode
measurement data
Carousel 1 inch square: Optional measurement of
page 154.
symbol
carousel insert with up to 5 square cells.
Carousel 1 cm square: Optional measurement of carousel
Switches from % transmittance to concentration or
insert with up to 7 square cells.
% Trans/Abs
absorbance in reading mode.
Recall saved measurement data, wavelength scans or time
Recall
To input the wavelength setting. Use the alphanumeric
courses, refer to Save, recall, send and delete data,
measurement data
λWavelength
keypad to enter the reading wavelengths. A wavelength in
page 154.
the range of 190–1100 nm can be entered.
Instrument Setup
Basic data of the instrument, refer to Save, recall, send and
This functions as a stopwatch. It helps to make sure that
mode
delete data, page 154.
the steps of an analysis are correctly timed (e. g. reaction
Timer icon
times, wait times, etc., can be exactly specified). When the
specified time has elapsed, a sound is emitted. The use of
the timer has no influence on the reading program.
Concentration
Multiplication factor for converting absorbance values into
Factor: Off/On
concentration values.
Concentration
To select the number of decimal places.
Resolution
To store the selected parameters as a User Program, refer
Save as User
to Single Wavelength (absorbance, concentration and
Program
transmittance readings), page 159.
English 160
