Nikon SD-9: инструкция
Раздел: Аксессуары для фото- и видеотехники
Тип:
Инструкция к Nikon SD-9
Оглавление
- Примечания по работе с батареями
- Обеспечение безопасности пользователя ВНИМАНИЕ! ОСТОРОЖНО ПРЕДОСТЕРЕЖЕНИЯ при работе с блоком питания
- МЕРЫ ПРЕДОСТОРОЖНОСТИ при работе с блоком питания МЕРЫ ПРЕДОСТОРОЖНОСТИ при работе с батареями Никогда не нагревайте батареи и не бросайте их в огонь,3. так как это может
- Обеспечение безопасности пользователя Немедленно выньте такие батареи из устройства,18. так как они могут допускать утечку корродирующей взорваться.
- Подготовка Номенклатура ■
- Отодвиньте крышку батарейного отсека, нажав на кнопки разблокирования, расположенные на краю батарейного отсека.
- Указания по использованию SD-9
- Прикрепление SD-9 к камере ■ Вставьте комплектный винт для крепления камеры в штативное гнездо SD-9.
- Технические характеристики
Jp
High-Performance Battery Pack
En
De
SD-9
Fr
Es
Se
Fi
......................................
Ru
使用説明書
P. 1–10
...............................
User’s Manual
PP. 11–20
Nl
....................
Benutzerhandbuch
S. 21–30
..................
Manuel d’utilisation
PP. 31–40
Pt
....................
Manual del usuario
PP. 41–50
.....................
Användarhandbok
P. 51–60
It
.....................................
Käyttöohje
PP. 61–70
...
CTP. 71–80
Pl
................
Gebruikshandleiding
P. 81–90
................
Manual do utilizador
P. 91–100
Ck
.............................
Manuale d’uso
PP. 101–110
.......................
Instrukcja obsługi
PP. 111–120
Ch
...........................................
P. 121–131
......................................
P. 133–142
Kr
......................................
P. 143–153
S9

電池の取扱い上のご注意
•
電池交換の際は、
4
本
1
組は必ず同じメーカーの同じ種類の新品電池を使って
ください。
•
電池を交換するときは、スピードライトの電源を
OFF
にしてから、+
/
−を
Jp
間違えないよう正しく入れてください。
•
電池の両極に油や汚れなどが付着していると、接触不良の原因になりますので、
ご注意ください。
•
電池には、低温になるほど性能が低下する性質、使用しないでおくと電圧が
回復する性質、使わなくても自己放電する性質があります。ご使用になる前
に電池の容量を確認し、電池は早めに交換することをおすすめします。
•
電池は、高温・多湿になる場所を避けて保管してください。
•
一般的に、スピードライトは非常に大きな電流を消費するため、充電池では
仕様に記載されている充電回数前に電池が使えなくなる場合があります。
1
安全上のご注意
ご使用の前に「安全上のご注意」をよくお読みの上、正しくお使いください。この「安
全上のご注意」は製品を安全に正しく使用していただき、あなたや他の人々へ
の危害や財産への損害を未然に防止するために、重要な内容を記載しています。
Jp
お読みになった後は、お使いになる方がいつでも見られるところに必ず保管し
てください。
表示と意味は次のようになっています。
この表示を無視して、誤った取り扱いをすると、人が死
危
険
亡または重傷を負う可能性が高いと想定される内容を示
"
しています。
この表示を無視して、誤った取り扱いをすると、人が死
警
告
亡または重傷を負う可能性が想定される内容を示してい
"
ます。
この表示を無視して、誤った取り扱いをすると、人が傷
注
意
害を負う可能性が想定される内容および物的損害の発生
"
が想定される内容を示しています。
お守りいただく内容の種類を、次の絵表示で区分し、説明しています。
絵表示の例
△記号は、注意(警告を含む)を促す内容を告げるものです。
図の中や近くに具体的な注意内容(左図の場合は感電注意)が
!
描かれています
。
#
記号は、禁止(してはいけないこと)の行為を告げるもので
す。図の中や近くに具体的な禁止内容(左図の場合は分解禁止)
$
が描かれています。
●記号は、行為を強制すること(必ずすること)を告げるものです。
図の中や近くに具体的な強制内容(左図の場合は電池を取り出す)
'
が描かれています。
2
警
告
パワーアシストパックについて
水かけ
水につけたり、水をかけたり、雨にぬらしたりしないこと
(
禁止
発火したり感電の原因となります。
Jp
分解したり修理・改造をしないこと
分解禁止
$
感電したり、異常動作をしてケガの原因となります。
落下などによって破損し、内部が露出したときは、露出部に手を触
接触禁止
れないこと
%
感電したり、破損部でケガをする原因となります。
すぐに修
電池を抜いて、販売店またはニコンサービス機関に修理を依頼してくだ
理依頼を
&
さい。
電池を取
熱くなる、煙が出る、こげ臭いなどの異常時は、速やかに電池を取
る
り出すこと
'
そのまま使用すると火災、やけどの原因となります。
すぐに修
電池を取り出す際、やけどに十分注意してください。電池を抜いて、販
&
理依頼を
売店またはニコンサービス機関に修理を依頼してください。
引火・爆発のおそれのある場所では使用しないこと
禁止
プロパンガス、ガソリンなどの引火性ガスや粉塵の発生する場所で使用
#
すると、爆発や火災の原因となります。
幼児の口に入る小さな付属品は、幼児の手の届かないところに置く
こと
保管注意
"
幼児の飲み込みの原因となります。
万一飲み込んだ場合は、直ちに医師にご相談ください。
注
意
パワーアシストパックについて
ぬれた手でさわらないこと
感電注意
!
感電の原因になることがあります。
製品は幼児の手の届かない所に置くこと
保管注意
"
なめて感電したり、ケガの原因となることがあります。
強い衝撃を与えないこと
注意
"
内部が故障し、破裂、発火の原因になることがあります。
シンナーやベンジンなどの有機溶剤を使ってふかないこと
溶剤清掃
また、ナフタリン、しょうのうの入った場所に保管しないこと
#
禁止
製品を破損し、火災や感電の原因となることがあります。
電池を
保管するときには電池を外すこと
'
取る
発火、液もれの原因となることがあります。
3
安全上のご注意
■
危
険
電池について
電池からもれた液が目に入ったときは、すぐにきれいな水で洗い、
危険
医師の治療を受けること
Jp
"
そのままにしておくと、目に傷害を与える原因となります。
電池からもれた液が皮膚や衣服に付いたときは、すぐにきれいな水
危険
で洗うこと
"
そのままにしておくと、皮膚がかぶれたりする原因となります。
警
告
電池について
使用説明書に表示された電池を使用すること
警告
"
液もれ、発熱、破裂の原因となります。
新しい電池と使用した電池、種類やメーカーの異なる電池をまぜて
禁止
使用しないこと
#
液もれ、発熱、破裂の原因となります。
外装チューブをはがしたり、キズをつけないこと
また、外装チューブがはがれたり、キズがついている電池は絶対に
警告
"
使用しないこと
液もれ、発熱、破裂の原因となります。
電池は幼児の手の届かないところに置くこと
保管注意
幼児の飲み込みの原因となります。
"
万一飲み込んだ場合は、直ちに医師にご相談ください。
水かけ
水につけたり、濡らさないこと
(
禁止
液もれ、発熱の原因となります。
危
険
ニッケル水素充電池について
電池を火に入れたり、加熱しないこと
禁止
#
液もれ、発熱、破裂の原因となります。
電池をショート、分解しないこと
分解禁止
$
液もれ、発熱、破裂の原因となります。
新しい電池と使用した電池、種類やメーカーの異なる電池をまぜて
禁止
使用しないこと
#
液もれ、発熱、破裂の原因となります。
電池の「+」と「−」の向きを間違えないようにすること
警告
"
液もれ、発熱、破裂の原因となります。
専用充電器を使用すること
危険
"
液もれ、発熱、破裂の原因となります。
ネックレス、ヘアピンなどの金属製のものと一緒に持ち運んだり保
危険
管しないこと
"
ショートして液もれ、発熱、破裂の原因となります。
4
警
告
ニッケル水素充電池について
ニッケル水素充電池の充電は、メーカー指定の充電器で、付属の注
意事項を守って行うこと
Jp
警告
"
「+」「−」を逆にしての逆充電、電池が熱いままの充電はしないこと
破裂、発火、液もれの原因となります。
変色・変形、その他、今までと異なることに気づいたときは使用し
使用禁止
ないこと
#
液もれ、発熱の原因となります。
充電の際に所定の充電時間を超えても充電が完了しない場合には、
警告
充電をやめること
"
液もれ、発熱の原因となります。
電池をリサイクルするときや、やむなく廃棄するときは、テープな
どで接点部を絶縁すること
注意
"
他の金属と接触すると、発熱、破裂、発火の原因となります。
お住まいの自治体の規則に従って、正しく廃棄してください。
電池に表示された警告・注意を守ること
警告
"
液もれ、破裂、発火の原因となります。
注
意
ニッケル水素充電池について
電池に強い衝撃を与えたり、投げたりしないこと
注意
"
液もれ、発熱、破裂の原因となります。
警
告
リチウム電池、アルカリ電池、オキシライド乾電池について
電池を火に入れたり、加熱しないこと
禁止
#
液もれ、発熱、破裂の原因となります。
電池をショート、分解しないこと
分解禁止
$
液もれ、発熱、破裂の原因となります。
電池に表示された警告・注意を守ること
警告
"
液もれ、発熱、破裂の原因となります。
電池の「+」と「−」の向きを間違えないようにすること
警告
"
液もれ、発熱、破裂の原因となります。
リチウム電池、アルカリ電池、オキシライド乾電池は充電しないこと
禁止
#
液もれ、発熱の原因となります。
電池を廃棄するときは、テープなどで接点部を絶縁すること
警告
他の金属と接触すると、発熱、破裂、発火の原因となります。
"
お住まいの自治体の規則に従って、正しく廃棄してください。
電池を
使い切った電池はすぐに器具から取り出すこと
'
取る
液もれ、発熱、破裂の原因となります。
5
ご使用の前に
このたびはパワーアシストパック
SD-9
をお買い上げくださいまして、ありがと
うございます。本製品はニコンスピードライト
SB-900
専用の外部電源です。単
3
形電池
4
本または
8
本を使いスピードライトに安定した電源を供給できるので、
Jp
発光回数を大幅に増やし、発光間隔を短縮することができます。
ご使用の前に本書をよくお読みの上、正しくお使いください。また、ご使用の
スピードライトの使用説明書もあわせてお読みください。
■
使用できるスピードライト
SB-900
■
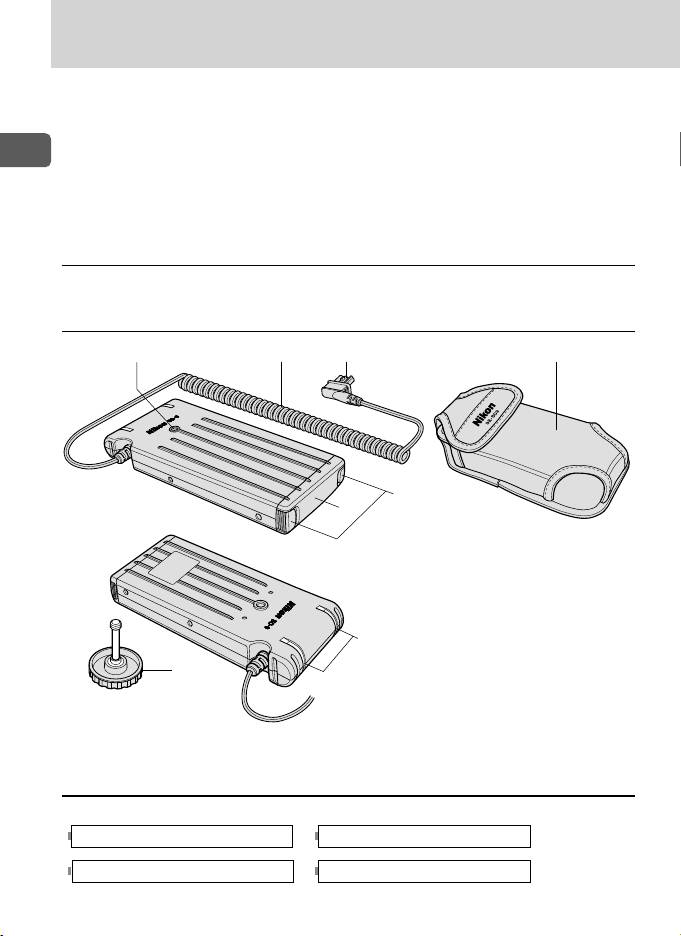
各部の名称
132
7
5
4
1.
三脚ネジ穴
2.
電源コード
3.
3
ピンプラグ
4.
電池ケース
6
5.
ロック解除ボタン
8
6.
作動表示ランプ
7.
ソフトケース
SS-SD9
(付属品)
8.
カメラ固定用ネジ(付属品)
■
使用できる電池
次の同じ種類の単
3
形電池
4
本または
8
本を使います。
アルカリ電池(
1.5V
) リチウム電池(
1.5V
)
オキシライド乾電池(
1.5V
) ニッケル水素充電池(
1.2V
)
6
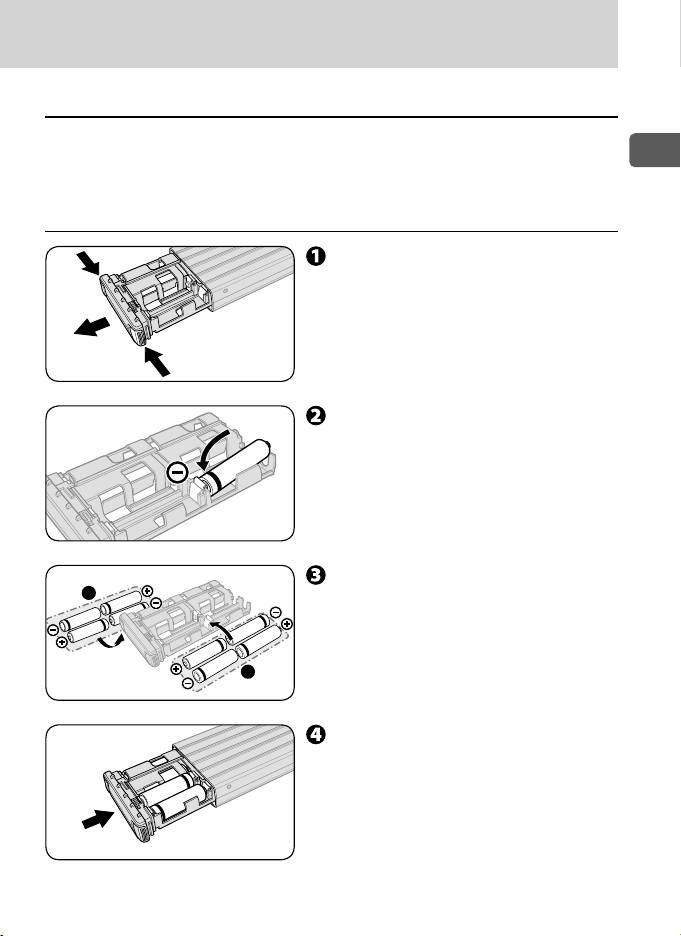
■
電池を入れる
SD-9
は単
3
形電池
4
本1組で、電池4本または8本で使います。
Jp
•
電池4本1組(
8
本
2
組)は、必ず同じメーカーで同じ種類の電池を使ってく
ださい。
■
電池の入れ方
電池ケース両端のロック解除ボ
タンを同時に押して、電池ケー
スを引き出す
+、−表示の向きに、−側から
電池を入れる
•
電池は必ず−側から入れてください。
•
電池を抜くときは、ケース裏側から押
し上げて抜いてください。
電池を
4
本または
8
本入れる
•
A
、
B
は、それぞれ同じメーカーで同
じ種類の電池を
4
本(
8
本)入れてく
ださい。
電池ケースを押し込む
•
カチッと音がして電池ケースが止まる
まで押し込んでください。
7
B
A
使い方
■
スピードライトへの接続
Jp
■
作動表示ランプ
■
コードの収納方法
8
B
A
3
ピンプラグを
SB-900
の外部電源コネク
ターに差し込む
•
2
つの作動表示ランプ(
および )は、それぞれ
の電源回路ごとに動作します。
•
SB-900
の電源が
ON
の状態で、
SB-900
と同期し
て
SD-9
は昇圧動作をします。昇圧中は赤色で点灯
し、昇圧完了後、消灯します。
•
連続発光などによって過熱のおそれがある場合、
作動表示ランプが赤色に点滅して警告します(昇
圧動作をしません)。温度が正常の範囲に戻ると消
灯します(再び昇圧可能になります)。
電源コードは図のように収納できます。
■
カメラへの固定
付属のカメラ固定用ネジを三脚ネジ穴
Jp
に入れる
三脚ネジ穴の中間のネジに合わせてカ
メラ固定用ネジを回し、ネジ穴を通す
v
SD-9
の三脚ネジ穴についてのご注意
•
SD-9
の三脚ネジ穴は中ほどにネジがきら
れています。カメラ固定用ネジを無理に押
し込むとネジ穴をキズつける原因になるの
で、カメラ固定用ネジは軽く回しながら通
してください。
•
カメラ固定用ネジを抜くときも同様です。
カメラ固定用ネジをカメラの三脚ネジ
穴に合わせ、しっかり締めて固定する
9

仕様
■
主な仕様
SB-900
との組み合わせ使用時
※
1
※
2
※
1
使用電池 最短発光間隔
発光回数
/発光間隔
Jp
単
3
形アルカリ電池×
4
本約
1.9
秒
280
回以上/
1.9
〜
30
秒
単
3
形リチウム電池×
4
本約
2.4
秒
500
回以上/
2.4
〜
120
秒
単
3
形オキシライド乾電池×
4
本約
1.4
秒
280
回以上/
1.4
〜
30
秒
単
3
形ニッケル水素充電池
約
1.2
秒
350
回以上/
1.2
〜
30
秒
(
eneloop
)×
4
本
単
3
形アルカリ電池×
8
本約
1.2
秒
450
回以上/
1.2
〜
30
秒
単
3
形リチウム電池×
8
本約
1.6
秒
840
回以上/
1.6
〜
120
秒
単
3
形オキシライド乾電池×
8
本約
1.0
秒
450
回以上/
1.0
〜
30
秒
単
3
形ニッケル水素充電池
約
0.8
秒
520
回以上/
0.8
〜
30
秒
(
eneloop
)×
8
本
※
1
:
発光間隔は、
30
秒(リチウム電池使用時は
120
秒)に
1
回の発光を行ったときのフ
ル発光相当からレディーライト点灯までの時間です。
※
2
:
発光回数は、
30
秒(リチウム電池使用時は
120
秒)に
1
回の発光を行ったときの、
フル発光相当から
30
秒以内にレディーライトが点灯する回数です。
•
SD-9
、
SB-900
共に同じタイプの電池を使用。
•
データは常温(
20
℃)、新品電池使用時のものです。電池の新旧および、同じ銘柄でも電
池性能の変更等によってデータが異なることがあります。
•
昇圧完了後は消費電流がほとんど発生しないので、電池交換の頻度が少なくて済みます。
ただし、長期間使用しないときは、必ず電池を抜いてください。
大きさ(
W
×
H
×
D
):約
180.5
×
73
×
23mm
(本体)
質量:約
205g
(電池含まず)
•
仕様・性能は予告なく変更することがありますので、ご了承ください。使用
説明書の誤りなどについての補償はご容赦ください。
•
「オキシライド乾電池」は松下電器産業株式会社の商標または登録商標です。
•
その他記載の会社名、製品名は各社の商標、登録商標です。
10

Notes on handling batteries
When replacing batteries, replace all four batteries of each set at the same time. •
Do not mix battery types or brands or use old with new batteries.
When installing batteries, turn off the power of the Speedlight and never reverse •
the polarity of the batteries.
If the battery terminals become soiled, remove dirt and smudges before use, as •
En
this may cause contact failure.
Battery power tends to weaken as the temperature drops. It also gradually •
decreases when batteries are not used for a long time and recovers after a short
break following intensive use. Be sure to check battery power and replace the
batteries with fresh ones if you notice any delays in the recycling time.
Do not store batteries in locations subject to high temperatures and high humidity. •
Because flash photography consumes a large amount of battery power, batteries •
may not operate fully before reaching the end of their stated lifespan or number
of charges as specified by the battery manufacturer.
11

For your safety
Before using your product, please read the following safety precautions carefully
and thoroughly to ensure correct and safe use and to help prevent damage to your
Nikon product or injury to yourself or others.
For quick reference by those who use the product, please keep these safety
instructions near the product.
En
In this manual, safety instructions are indicated with these symbols:
WARNING
Disregarding instructions marked with this symbol could result in personal injury, or
death and property damage.
CAUTION
Disregarding instructions marked with this symbol could result in property damage.
WARNINGS for Battery pack
The unit should never be submerged in water or exposed to rain, 1.
moisture or saltwater. If water or moisture gets inside the unit, this could
cause the unit to catch on fire or cause an electric shock.
Never attempt to disassemble or repair the flash unit by yourself,2. as this
could result in you receiving an electric shock and could also cause the unit to
malfunction; such malfunction could lead to personal injury.
If the unit is dropped and damaged, do not touch any exposed interior 3.
metal parts. If touched they could cause an electric shock or malfunction, and
this could lead to personal injury. Disconnect the power or remove the batteries and
be sure that you do not touch any of the product's electrical components, and then
take the flash unit to your local Nikon dealer or authorized service center for repair.
If you detect heat, smoke or notice a burning smell, immediately stop 4.
operation and remove the batteries to prevent the unit from catching
on fire or melting. Allow the flash unit to cool down so that you can safely
touch it and remove the batteries. Then bring the unit to your local Nikon
dealer or authoriz ed service center for repair.
Do not use the unit in the presence of flammable or explosive gas.5. If
the flash unit is operated in areas where there is a flammable gas, including
propane, gasoline and dust, it could cause an explosion or fire.
Keep the unit away from children to prevent them from putting the unit 6.
in or near their mouth, or otherwise touching a dangerous part of the
product; as such contact could cause an electric shock or lead to personal injury.
CAUTIONS for Battery pack
Do not touch the unit with wet hands,1. as this could cause an electric shock.
Keep the unit away from children to prevent them from putting the unit 2.
in or near their mouth, or otherwise touching a dangerous part of the
product; as such contact could cause an electric shock or lead to personal injury.
12

Do not apply strong physical shocks to the unit,3. as this could cause a
malfunction that could cause the unit to explode or catch on fire.
Never use active agents that contain flammable substances such as 4.
paint thinner, benzene or paint remover to clean the unit, and never
store the unit in locations containing chemicals such as camphor
and naphthalene, as this could damage the unit, cause a fire or cause an
En
electric shock.
Remove any batteries from the unit before storing the unit for a long 5.
time to prevent the unit from catching on fire or leaking corrosive liquids.
WARNINGS for Batteries
If corrosive liquids seep from the batteries and get in your eyes, 1.
immediately wash your eyes with running water and consult with a
doctor. Your eyes could be seriously damaged if they are not treated quickly.
If corrosive liquids seep from the batteries and come in contact with 2.
your skin or clothes, wash immediately with running water. Prolonged
contact could injure your skin.
Never heat or throw batteries into a fire,3. as this could cause the batteries
to leak corrosive liquids, generate heat or explode.
Do not short-circuit or disassemble the batteries4. because this could cause
the batteries to leak corrosive liquids, generate heat or explode.
Do not mix battery types, brands or old and new batteries,5. as this could
cause the batteries to leak corrosive liquids, generate heat or explode.
Do not install batteries in the reverse direction6. as this could cause the
batteries to leak corrosive liquids, generate heat or explode.
Be sure to use the battery charger specified by the battery maker to 7.
avoid the possibility of batteries leaking corrosive liquids, generating
heat or exploding. Do not charge batteries installed in the reverse
direction or heated, as this could cause the batteries to leak corrosive liquids,
generate heat or explode.
Do not carry or store batteries along with metallic materials such as 8.
necklaces or hair pins because such materials could cause the batteries to
short-circuit, leak corrosive liquids, generate heat or explode.
Be sure to use only batteries specified in this instruction manual,9. to
avoid the possibility of batteries leaking corrosive liquids, generating heat
or exploding.
Always follow the warnings and instructions printed on the batteries10. to
avoid activities that could cause the batteries to leak corrosive liquids, generate
heat or explode.
Never open the casing surrounding batteries or use batteries whose 11.
casing has been breached as such batteries could leak corrosive liquids,
generate heat or explode.
13

For your safety
Keep batteries out of the reach of children12. to help avoid the possibility
of them being swallowed. If a battery is accidentally swallowed, immediately
consult with a doctor.
Batteries should not be submerged in water, exposed to rain, moisture 13.
or saltwater. If water or moisture gets inside the batteries, this could cause
them to leak corrosive liquids or generate heat.
En
Do not use any battery that appears abnormal in any way, including 14.
a change in color or shape. Such batteries could leak corrosive liquids or
generate heat.
Stop recharging rechargeable batteries if you notice that recharging is 15.
not completed within the specified time to help prevent the possibility of
the battery leaking corrosive liquids or generating heat.
When recycling or disposing of batteries, be sure to insulate their 16.
terminals with tape. If the battery's positive and negative terminals
shortcircuit after coming into contact with metallic objects, it could cause fire,
heat generation or an explosion. Dispose of used batteries in accordance with
local government regulations.
Non-rechargeable batteries such as alkaline-manganese, lithium and 17.
Oxyride™ batteries should never be charged in a battery charger
because they could leak corrosive liquids or generate heat.
Remove dead batteries from your equipment immediately,18. as they could
leak corrosive liquids, generate heat or explode.
Do not apply strong physical shocks to batteries,19. as this could cause the
batteries to leak corrosive liquids, generate heat or explode.
14

En
15
Preparation
Thank you for purchasing the Nikon High-performance Battery Pack SD-9. The SD-9
is an external power source for the Nikon Speedlight SB-900. You can install four or
eight AA-type batteries in the SD-9 to ensure a stable power supply for the SB-900,
and can get a greatly increased number of flashes and a shortened recycling time.
Please read this user’s manual as well as the manuals provided with your camera
En
and Speedlight before use.
Compatible Speedlight ■
Nikon Speedlight SB-900
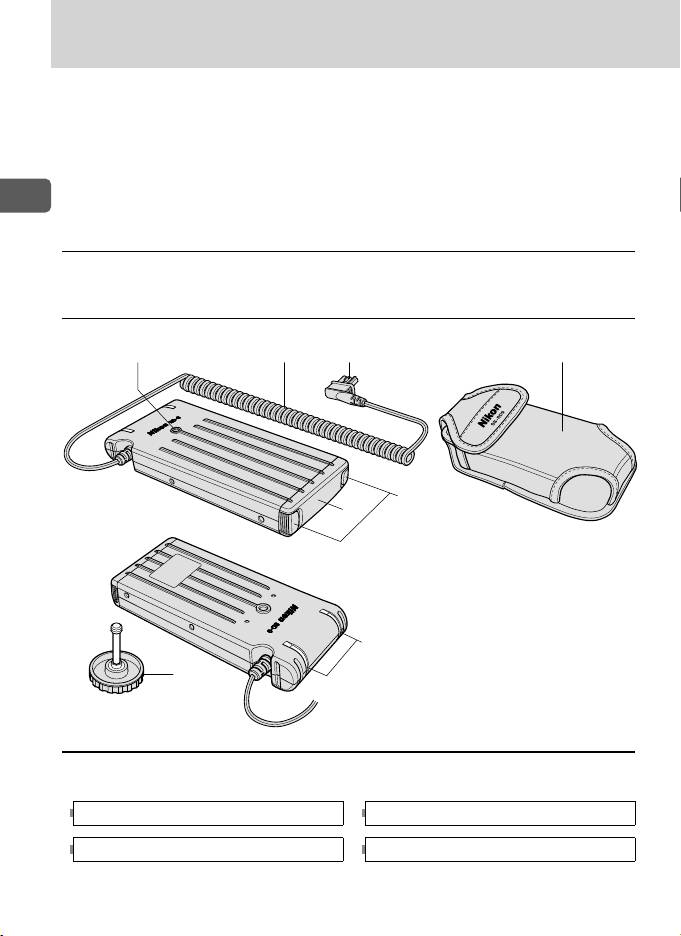
Nomenclature ■
132
7
5
4
1 Tripod socket
2 Power cord
3 3-pin plug
4 Battery case
5 Lock release buttons
6 Ready-lights
6
7 Soft case SS-SD9 (supplied)
8
8 Camera attach screw
(supplied)
Usable batteries ■
Use the same type of four or eight AA-type penlight batteries of any of the
following types.
Alkaline-manganese (1.5 V) Lithium (1.5 V)
Oxyride™ (1.5 V)
Ni-MH (Nickel Metal Hydride) (1.2 V)
16
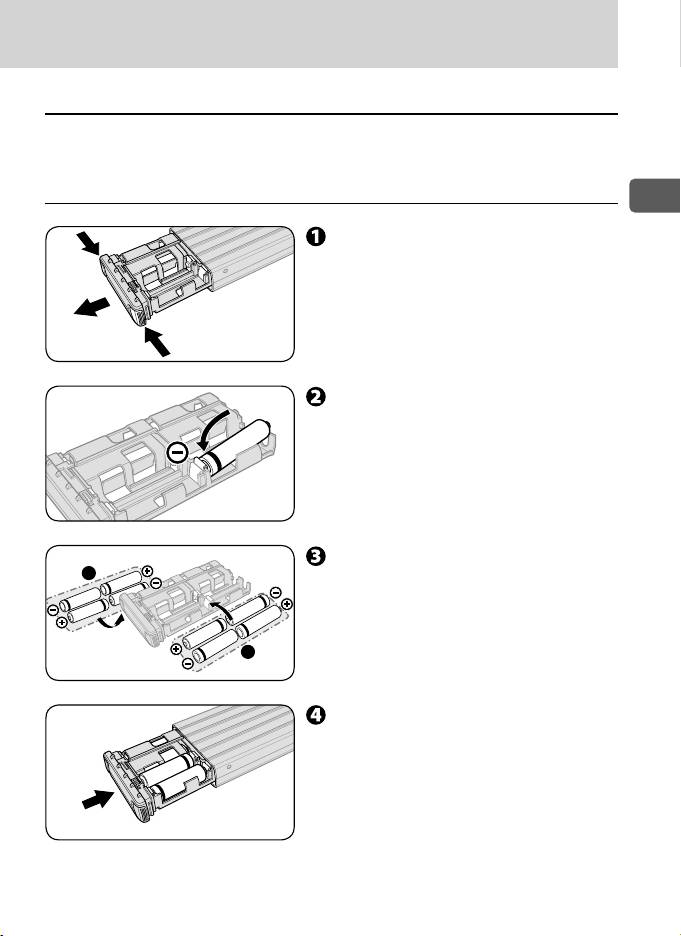
Insert batteries ■
For the SD-9, use one or two set(s) of four AA-type batteries.
Use batteries of the same type and brand for a set. •
Inserting the batteries ■
En
Slide the battery case while
pressing the lock release buttons
at the edge of the battery case.
Install batteries according to the
illustration inside the battery case.
Insert battery from the – pole. •
To remove a battery, push it from •
the flip side of the battery case.
Insert four or eight batteries.
Insert the batteries of same type •
and brand for the both A and B
sets.
Push the battery case until it
stops with a click.
17
B
A
How to use the SD-9
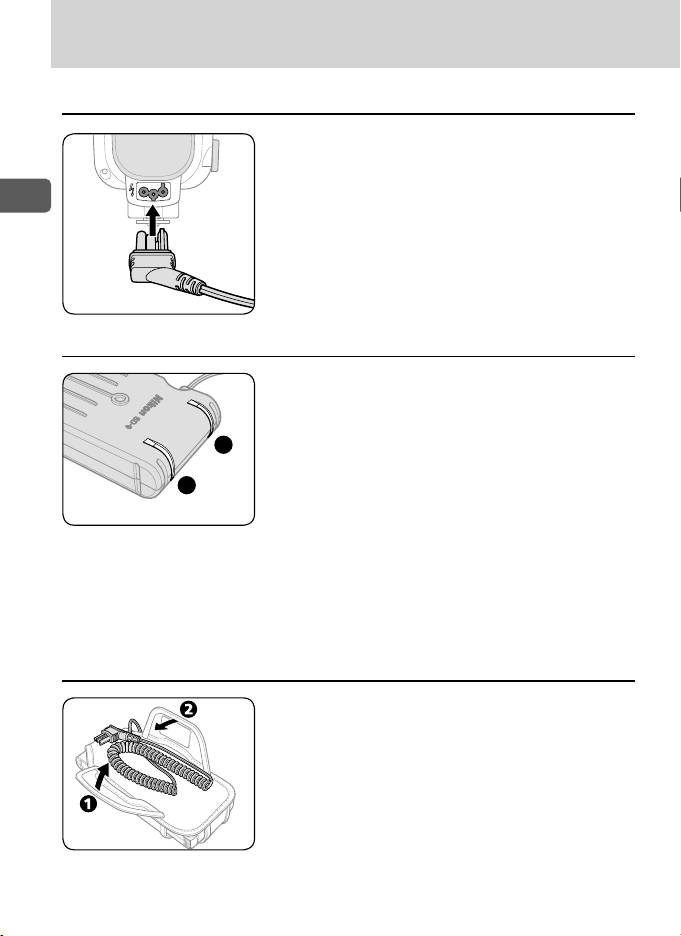
Hooking the SD-9 up to the SB-900 ■
Plug the 3-pin plug of the SD-9’s power
cord into the SB-900’s external power
source terminal.
En
Ready-light ■
Each of two ready-lights (A and B) lights up •
for each circuit.
When the SB-900’s power is on, the SD-9 •
starts to charge the power in sync with the
SB-900, and the ready-light lights up in red.
The ready-light goes off when the power
charge is completed.
The ready-light blinks in red when there •
is danger of the SD-9 overheating because
of its repeating flash operation (power
charge does not start). It stops blinking
when the SD-9 is cooled down to normal
temperature (power charge is available).
Casing the power cord ■
Case the SD-9's power cord to the SD-9
body as shown in the figure.
18
B
A
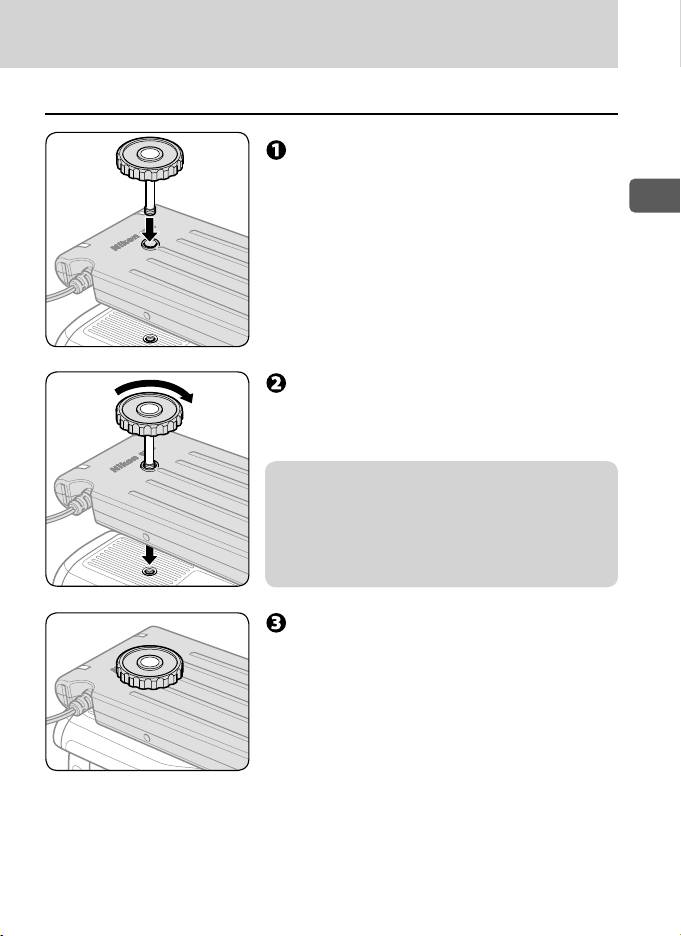
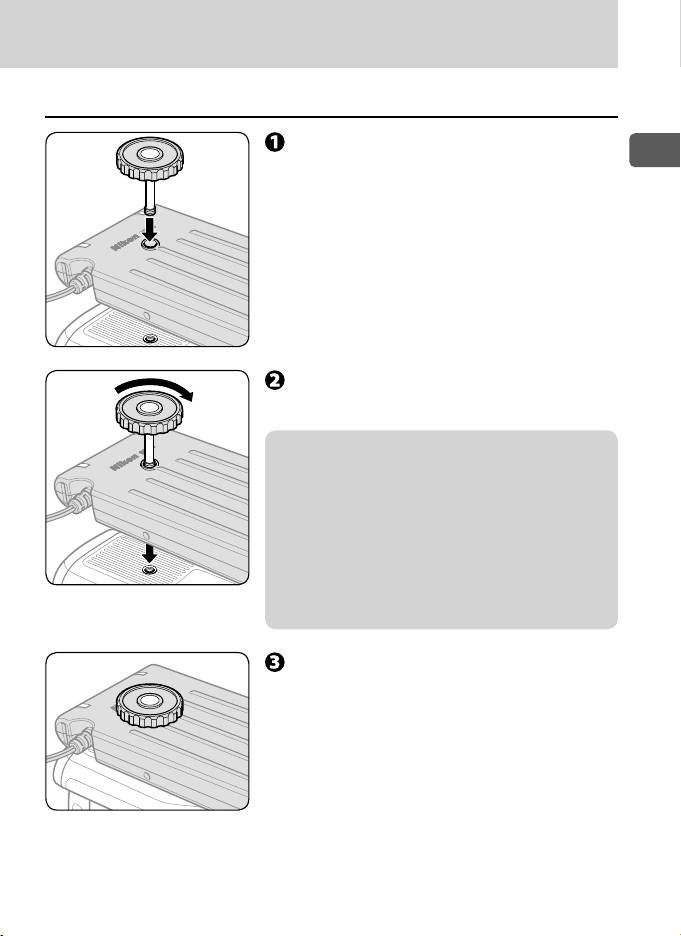
Attach the SD-9 to the camera ■
Insert the supplied camera attach
screw to the SD-9’s tripod socket.
En
Rotate the camera attach screw
according to the screw thread of the
tripod socket.
v Notes on SD-9’s tripod socket
SD-9’s tripod socket has a screw thread. Rotate the •
camera attach screw while inserting it to the tripod
socket to avoid to damaging the thread.
Follow the same procedure when unscrewing the •
camera attach screw from the tripod socket.
Insert the camera attach screw to the
camera’s tripod socket and fix both
SD-9 and camera using the screw.
19
