Nikon 18-105mm-f-35-56G-ED-AF-S-VR-DX: инструкция
Раздел: Аксессуары для фото- и видеотехники
Тип: Объектив
Инструкция к Объективу Nikon 18-105mm-f-35-56G-ED-AF-S-VR-DX
Оглавление
- Примечания по безопасности использования
- Обозначения на иллюстрации
- Основные возможности Установка объектива Снятие объектива Использование бленды HB-32 1 Установка бленды
- Снятие бленды Ручной режим фокусировки Фокусировка (Рис. A)
- Получение хороших результатов съемки с использованием автофокусировки Режим подавления вибраций (VR) Установка диафрагмы
- Уход за объективом Встроенная вспышка и виньетирование
- Стандартные принадлежности Дополнительные принадлежности Несовместимые принадлежности Технические характеристики
- Примечания по использованию широкоугольных объективов AF Nikkor

AF-S DX NIKKOR
18-105mm f/3.5-5.6 ED VR
使用説明書
P. 2-11
Jp
User’s Manual
PP. 12-19
En
Benutzerhandbuch
S. 20-27
De
Manuel de l’utilisateur
P. 28-35
Fr
Manual del Usuario
PP. 36-43
Es
Anvädarhandbok
S. 44-51
Se
Pykoводство пользoвaтеля
СТР. 52-59
Ru
Gebruikshandleiding
P. 60-67
Nl
Manuale d’uso
PP. 68-75
It
P. 76-85
Ck
P. 86-93
Ch
P. 94-103
Kr

安全上のご注意
ご使用の前に「安全上のご注意」をよくお読みのうえ、正しくお使いください。この「安全上のご注意」は製品を安
全に正しく使用していただき、あなたや他の人々への危害や財産への損害を未然に防止するために、重要な内容を記
載しています。お読みになった後は、お使いになる方がいつでも見られる所に必ず保管してください。
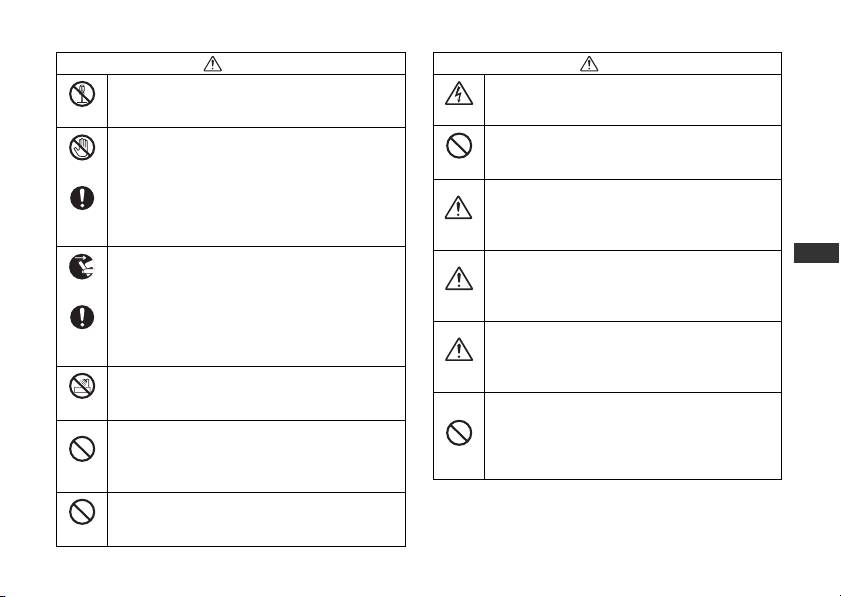
表示について
表示と意味は次のようになっています。
この表示を無視して、誤った取り扱いをすると、人が死亡または重傷を負う可能性が想定される内容を
警告
示しています。
この表示を無視して、誤った取り扱いをすると、人が傷害を負う可能性が想定される内容および物的損
Jp
注意
害の発生が想定される内容を示しています。
En
De
お守りいただく内容の種類を、次の絵表示で区分し、説明しています。
Fr
絵表示の例
Es
記号は、注意(警告を含む)を促す内容を告げるものです。図の中や近くに具体的な注意内容(左図の場合は
Se
感電注意)が描かれています。
Ru
記号は、禁止(してはいけないこと)の行為を告げるものです。図の中や近くに具体的な禁止内容(左図の場
Nl
合は分解禁止)が描かれています。
It
記号は、行為を強制すること(必ずすること)を告げるものです。図の中や近くに具体的な強制内容(左図の
Ck
場合は電池を取り出す)が描かれています。
Ch
Kr
2
警告
注意
分解したり修理・改造をしないこと
ぬれた手でさわらないこと
感電したり、異常動作をしてケガの原因となります。
感電の原因になることがあります。
分解禁止
感電注意
製品は幼児の手の届かないところに置くこと
落下などによって破損し、内部が露出したときは、
ケガの原因になることがあります。
接触禁止
放置禁止
露出部に手を触れないこと
感電したり、破損部でケガをする原因となります。
逆光撮影では、太陽を画角から十分にずらすこと
カメラの電池を抜いて、販売店またはニコンサー
太陽光がカメラ内部で焦点を結び、火災の原因に
すぐに修理
ビス機関に修理を依頼してください。
なることがあります。画角から太陽をわずかに外
使用注意
依頼を
しても火災の原因になることがあります。
Jp
使用しないときは、レンズにキャップをつけるか
熱くなる、煙が出る、こげ臭いなどの異常時は、速
太陽光のあたらない所に保管すること
En
やかにカメラの電池を取り出すこと
電池を取る
太陽光が焦点を結び、火災の原因になることがあ
そのまま使用すると火災、やけどの原因となりま
保管注意
De
ります。
す。電池を取り出す際、やけどに十分注意してくだ
Fr
さい。電池を抜いて、販売店またはニコンサービス
三脚にカメラやレンズを取り付けたまま移動しな
すぐに修理
機関に修理を依頼してください。
Es
いこと
依頼を
転倒したりぶつけたりしてケガの原因になること
移動注意
Se
水につけたり水をかけたり、雨にぬらしたりしな
があります。
いこと
Ru
水かけ禁止
窓を閉め切った自動車の中や直射日光が当たる場
発火したり感電の原因となります。
Nl
所など、異常に温度が高くなる場所に放置しない
引火・爆発のおそれのある場所では使用しないこと
こと
It
プロパンガス・ガソリンなど引火性ガスや粉塵の
放置禁止
内部の部品に悪い影響を与え、火災の原因となる
Ck
発生する場所で使用すると、爆発や火災の原因と
使用禁止
ことがあります。
なります。
Ch
レンズまたはカメラで直接太陽や強い光を見ない
Kr
こと
見ないこと
失明や視力障害の原因となります。
3
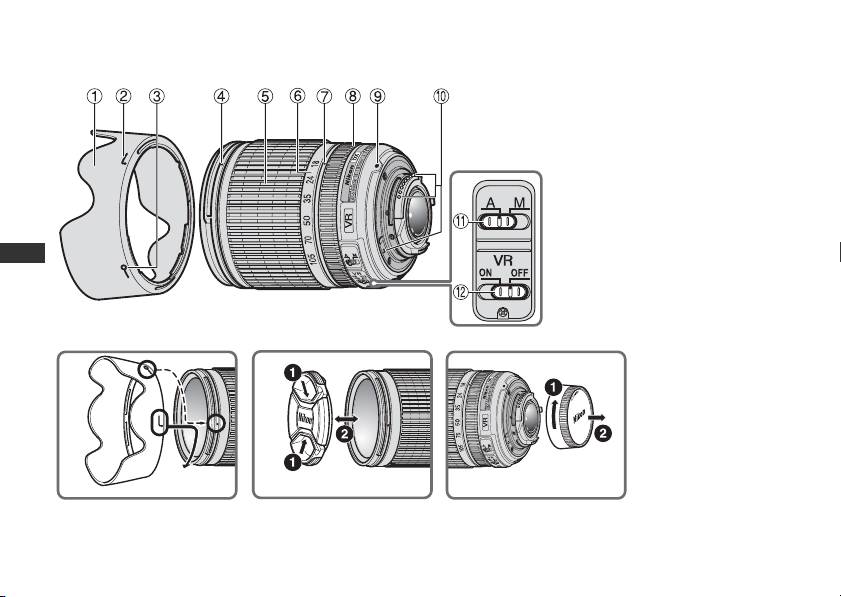
各部の名称
( ):参照頁
1 フード(P. 6)
2 フード取り付け指標(
P. 6)
3 フードセット指標(
P. 6)
4 フード着脱指標(
P. 6)
5 ズームリング(
P. 6)
6 焦点距離目盛
7 焦点距離目盛指標
8 フォーカスリング(
P. 7)
Jp
9 レンズ着脱指標(
P. 5)
En
0
CPU信号接点(P. 9)
De
a
A-M切り換えスイッチ(P. 7)
A
Fr
b 手ブレ補正スイッチ(
P. 8)
Es
Se
Ru
Nl
It
Ck
Ch
C DB
Kr
4

このたびはDXニッコールレンズをお買い上げいただきありがとうございます。このレンズは、ニコンDXフォーマッ
トのニコンデジタル一眼レフカメラ(
D300、D90など)専用です。
ニコン
DX
フォーマットでの撮影画角は、
35mm
判換算で焦点距離の約
1.5
倍の焦点距離に相当する画角になります。
ご使用の前に、この「使用説明書」をよくお読みの上、正しくお使いください。また、カメラの使用説明書もご覧ください。
主な特長
カメラへの取り付け方
・ 手ブレ補正機能(VR)を使用すると、使わないとき
1
カメラの電源スイッチをOFFにします。
※
と比べ約
3段分
シャッタースピードを遅くして撮影
2
レンズの裏ぶたを取り外します(図D)
できるため、シャッタースピードの選択範囲が広が
3
レンズとカメラのレンズ着脱指標9を合わせ、反時
り、幅広い領域で手持ち撮影が可能です。(※当社測
計回りにカチッと音がするまでレンズを回します。
定条件によります。また、手ブレ補正効果は、撮影者
このとき、レンズの着脱指標9が真上にきます。
や撮影条件によって異なります。)
4
レンズキャップを取り外します。(図C)
Jp
・ レンズ内超音波モーター(サイレント・ウェーブ・
En
カメラからレンズの取り外し方
モーター)を採用し静かな
AF(オートフォーカス)撮
De
影が可能です。また、
A-M切り換えスイッチa によ
レンズを取り外すには、カメラの電源スイッチをOFFに
り
AF(オートフォーカス)撮影およびMF(マニュア
し、レンズ取り外しボタンを押しながら時計回りにレン
Fr
ルフォーカス)撮影ができます。
ズを回します。
Es
・ 被写体までの距離情報をカメラ側に伝達する機能を
Se
備え、
3Dマルチパターン測光機能を持ったカメラと
Ru
の組み合わせ時には、より的確な露出制御を実現しま
す。
Nl
・ ニコン独自の
ED(特殊低分散)ガラスによる色収差
It
の補正とともに、非球面レンズや良好なボケ味を再現
Ck
する円形絞りの採用によりすぐれた光学性能、描写性
Ch
能を発揮します。
Kr
5
フード
HB-32
1
の取り付け、取り外し
ズーミングと被写界深度
取り付け方
撮影を行う場合は、ズーム
リング5 を回転させ(焦点
レンズ先端のフード着脱指標4 とフード取り付け指標
距離が変化します)構図を
(、
2ヶ所のいずれか)2を合わせ、カメラ側から見
決めてから、ピント合わせ
て反時計回りにカチッと音がするまでフード1 を回転
を行ってください。プレ
させ、確実に取り付けます。(図
B)
ビュー(絞り込み)機構を
・ フード着脱指標とフードセット指標( )3が合っ
持つカメラでは、撮影前に
ていることを確認してください。
被写界深度を確認できま
・ フードが正しく取り付けられないと撮影画面にケラ
す。詳しくは、カメラの使用説明書をご覧ください。
レを生じますのでご注意ください。
・ このレンズは内焦方式を採用しています。ニコン内焦
Jp
・ フード先端を強くつかむと着脱が困難になります。着
方式は、通常のレンズと異なるため、至近距離になる
脱の際は、フードの根元(フード取り付け指標部分)
En
と焦点距離が若干短くなります。
付近を持って回転させてください。
De
取り外し方
Fr
フードの根元(フード取り付け指標部分)付近を持ち、
Es
カメラ側から見て時計回りにフードを回転させて取り
Se
外します。
Ru
Nl
It
Ck
Ch
Kr
6

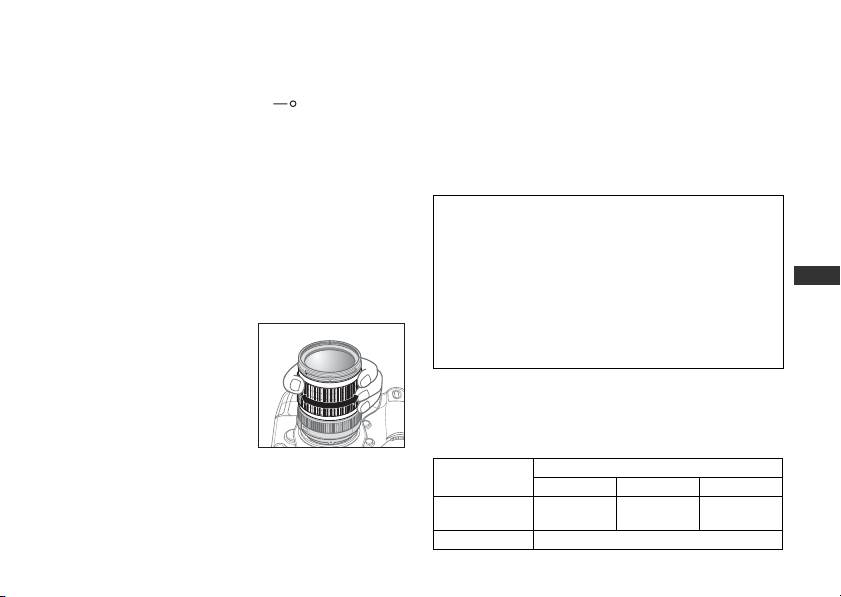
ピント合わせの方法(図
A)
マニュアルフォーカス撮影
レンズのA-M切り換えスイッチaを[ M]にセットしま
オートフォーカス撮影
す。フォーカスリング8を回転させてピントを合わせ撮
カメラのフォーカスモードをAF-A、AF-SまたはAF-Cに
影します。このときカメラ側のフォーカスモードは
AFで
セットし、レンズの
A-M切り換えスイッチaを[A]に
も
Mでもマニュアルフォーカス撮影ができます。
セットしてください。シャッターボタンを半押してピン
トを合わせ撮影します。
レンズのA-M
カメラのフォーカスモード
切り換え
AF-A/AF-C AF-S M
A-M切り換えスイッチが[A]の位置でもマニュアルフォー
スイッチa
カス撮影ができます
オートフォーカス
カメラのフォーカスモードを
AF-Sにセットして、オート
オートフォーカス
撮影
フォーカスによりピントが合ったら、シャッターボタンを
A
撮影
(マニュアル
半押しのまま、フォーカスリング8を回転させ、ピントを
Jp
フォーカス撮影)
調整できます。
En
マニュアルフォーカス撮影
M
(フォーカスエイド可)
De
ご注意: オートフォーカスの作動中には、フォーカスリン
グを回転させないでください。オートフォーカス
カメラのフォーカスモードについては、カメラの使用説
Fr
が停止したときには、再度、半押ししてください。
明書をご覧ください。
Es
オートフォーカスが苦手な被写体について
Se
「広角・超広角レンズのオートフォーカス撮影について」
Ru
(
P. 11)をご覧ください。
Nl
It
Ck
Ch
Kr
7

手ブレ補正機能(
VR)
・ 手ブレ補正中にカメラの電源スイッチを
OFF にした
※
り、レンズを取り外したりしないでください。(その
シャッタースピードで約3段分
の手ブレを補正します。
状態でレンズを振るとカタカタ音がすることがあり
パンニング(流し撮り)にも対応し、流し撮りも行えま
ますが、故障ではありません。カメラの電源スイッチ
す。(※当社測定条件によります。また、手ブレ補正効
を再度
ONにすれば、音は消えます。)
果は、撮影者や撮影条件によって異なります。)
・ 内蔵フラッシュ搭載のカメラ(
D300、D40 シリーズ
手ブレ補正機能の使い方
など)で、内蔵フラッシュ充電中には、手ブレ補正は
1
手ブレ補正スイッチbを[ON]にセットします。
行いません。
・ スイッチ b は、指標が合うようにセットしてく
・ 三脚を使用するときは、手ブレ補正スイッチbを[
OFF]
ださい。
にしてください。ただし、三脚を使っても雲台を固定
2
シャッターボタンを半押しすると手ブレを補正し
しないときや、一脚を使用するときには、スイッチを
Jp
[
ON]にすることをおすすめします。
ます。このときファインダー内の画像のブレも補正
・
AF 作動ボタンのあるカメラ(D2 シリーズ、D300 な
En
するため、ピント合わせが容易で、フレーミングし
ど)で、
AF作動ボタンを押しても、手ブレ補正は作
やすくなります。
De
動しません。
3
手ブレ補正スイッチbを[OFF]にセットすると、
Fr
手ブレを補正しません。
絞り値の設定
Es
手ブレ補正使用時のご注意
絞り値を設定する場合は、カメラで設定してください。
Se
・ シャッターボタンを半押し後、ファインダー像が安定
Ru
開放F値の変化
してから撮影することをおすすめします。
1
Nl
このレンズはズーミングにより、開放 F値が最大1
/3段
・ パンニング(流し撮り)でカメラの向きを大きく変え
It
変化します。ただし、露出を決める際に、
F値の変化量
た場合、流した方向の手ブレ補正は機能しません。例
はカメラが自動的に補正しますので考慮する必要はあ
Ck
えば、流し撮りで横方向にパンニングすると、縦方向
りません。
の手ブレだけが補正され、流し撮りが行えます。
Ch
・ 手ブレ補正の原理上、シャッターレリーズ後にファイ
Kr
ンダー像がわずかに動くことがありますが、異常では
ありません。
8

カメラの内蔵フラッシュ使用時のケラレに
レンズのお手入れと取り扱い上のご注意
ついて
・ レンズの CPU 信号接点 0 は汚さないようにご注意く
ださい。
カメラの内蔵フラッシュのケラレとは、フラッシュの光
・ レンズ面の清掃は、ホコリを拭う程度にしてくださ
がレンズのフード1や、焦点距離、撮影距離によっては
い。指紋がついたときは、柔らかい清潔な木綿の布に
レンズの先端でさえぎられて影になり、写真に映り込む
無水アルコール(エタノール)または市販のレンズク
現象です。
リーナーを少量湿らせ、レンズの中心から外周へ渦巻
・ ケラレを防止するために、レンズのフード 1 は取り
状に、拭きムラ、拭き残りのないように注意して拭い
外してください。
てください。
・ 撮影距離0.6m未満では使用できません。
・ シンナーやベンジンなどの有機溶剤は絶対に使用し
ないでください。
デジタル
ケラレなく撮影できる
・
レンズ表面の汚れや傷を防ぐためには、
NC
フィルター
一眼レフカメラ
焦点距離と撮影距離
Jp
をお使いいただけます。また、レンズのフード
1
も役
D700/D300/
En
立ちます。
D200/D100/
すべての焦点距離で、ケラレは発生しません。
・ レンズをソフトケースに入れるときは、必ずレンズ
De
D80
キャップと裏ぶたを取り付けてください。なお、フー
Fr
D90/
• 焦点距離18mmでは撮影距離1.5m以上。
ド1 を逆さ向きにしてレンズに取り付けた状態でも
D70
シリーズ
• 焦点距離24mm以上は制約なし。
Es
収納可能です。
•
焦点距離18mmでは撮影距離1.0m以上。
Se
D50
・ フード 1 を持ってカメラを持ち上げたりしないでく
• 焦点距離24mm以上は制約なし。
ださい。
Ru
• 焦点距離18mmでは撮影距離2.5m以上。
・ レンズを長期間使用しないときは、カビやサビを防ぐ
D60/
Nl
• 焦点距離24mmでは撮影距離1.0m以上。
ために、高温多湿のところを避けて風通しのよい場所
D40
シリーズ
• 焦点距離35mm以上は制約なし。
に保管してください。また、直射日光のあたるところ、
It
D100/D70の内蔵フラッシュは、20mmレンズの画角を
ナフタリンや樟脳のあるところも避けてください。
Ck
・ レンズを水に濡らすと、部品がサビつくなどして故障
カバーする照射角なので、焦点距離
18mmでは周辺が暗
Ch
の原因となりますのでご注意ください。
くなります。
・
ストーブの前など、高温になるところに置かないでく
Kr
ださい。極端に温度が高くなると、外観の一部に使用し
ている強化プラスチックが変形することがあります。
9

付属アクセサリー
仕 様
型式 ニコン
FマウントCPU内蔵Gタイプ、
・ 67mmスプリング式レンズキャップ LC-67
AF-S DXニッコールズームレンズ(ニ
・ 裏ぶた LF-1
コンデジタル一眼レフカメラ[ニコン
・ バヨネットフード HB-32
DXフォーマット]専用)
・ ソフトケース CL-1018
焦点距離
18mm―105mm
最大口径比 1:3.5―5.6
別売アクセサリー
レンズ構成 11群15枚(非球面レンズ1枚、EDレンズ
・ 67mmネジ込み式フィルター
1枚)
画角
76°―15°20′
使用できないアクセサリー
焦点距離目盛
18、24、35、50、70、105mm
撮影距離情報 カメラへの撮影距離情報出力可能
・ テレコンバーター:全種類
Jp
ズーミング ズームリングによる回転式
・ オート接写リング:
PKリング全種類
ピント合わせ
IF(ニコン内焦)方式、超音波モー
En
・
Kリング:全種類
ターによるオートフォーカス、マニュ
De
・ オートリング
BR-4
アルフォーカス可能
・ ベローズアタッチメント:全種類
Fr
手ブレ補正 ボイスコイルモーター(VCM)による
・ アタッチメントリング
SX-1
レンズシフト方式
Es
※その他のアクセサリーでも、使用できない場合があり
最短撮影距離
0.45 m(ズーム全域)
Se
ます。アクセサリーの使用説明書をご確認ください。
絞り羽根枚数
7枚(円形絞り)
Ru
絞り方式 自動絞り
絞りの範囲 焦点距離
18mm時 f 3.5―22、
Nl
105mm時 f 5.6―38
It
測光方式 開放測光
アタッチメントサイズ
67 mm(P=0.75 mm)
Ck
大きさ
約
76 mm
(最大径)×
89 mm
(バヨネット
Ch
マウント基準面からレンズ先端まで)
Kr
質量 約420 g
・ 仕様、外観の一部を、改善のため予告なく変更するこ
とがあります。
10
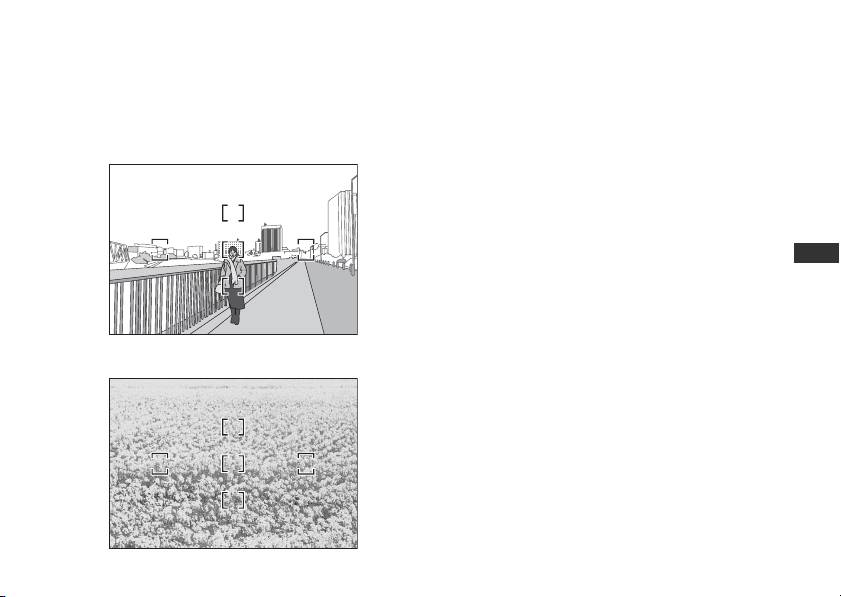
広角・超広角レンズのオートフォーカス撮影について
広角・超広角レンズでは、標準クラスのレンズと比べ、下記のような撮影条件になりやすく、オートフォーカス撮影
時には注意が必要です。
以下をお読みになって、オートフォーカス撮影にお役立てください。
1. フォーカスフレームに対して主要な被写体が
E〈人物〉
小さい場合
図Eのように、フォーカスフレーム内に遠くの建物と
近くの人物が混在するような被写体になると、背景
にピントが合い、人物のピント精度が低下する場合
があります。
Jp
2. 絵柄がこまかな場合
En
図Fのように、被写体が小さいか、明暗差が少ない被
De
写体になると、オートフォーカスにとっては苦手な
被写体になります。
Fr
◆このような時には・・・
Es
F〈花畑〉
1、2のような被写体条件でオートフォーカスが上手く働
Se
かない場合、主要被写体とほぼ同じ距離にある被写体で
Ru
フォーカスロックし、構図を元に戻して撮影する方法が
Nl
有効です。
It
また、マニュアルフォーカスに切り換えて、マニュアル
でピントを合わせて撮影する方法もあります。
Ck
その他
Ch
お手持ちのカメラの使用説明書で「オートフォーカスが
Kr
苦手な被写体について」の説明も参照してください。
11

Notes on Safety Operations
CAUTION
Do not disassemble
Keep out of reach of children
Touching the internal parts of the camera or lens could
Particular care should be taken to prevent infants from
result in injury. Repairs should be performed only by
putting the batteries or other small parts into their mouths.
qualified technicians. Should the camera or lens break
Observe the following precautions when handling
open as the result of a fall or other accident, take the
the camera and lens
product to a Nikon-authorized service representative for
• Keep the camera and lens unit dry. Failure to do so could
inspection after unplugging the product and/or removing
result in fire or electric shock.
the battery.
• Do not handle or touch the camera or lens unit with wet
Turn off immediately in the event of malfunction
hands. Failure to do so could result in electric shock.
Jp
Should you notice smoke or an unusual smell coming from
• When shooting with back-lighting, do not point the
En
the camera or lens, remove the battery immediately, taking
lens at the sun or allow sunlight to pass directly down
De
care to avoid burns. Continued operation could result in
the lens as this may cause the camera to overheat and
Fr
injury.
possibly cause a fire.
After removing or disconnecting the power source, take
Es
• When the lens will not be used for an extended period of
the product to a Nikon-authorized service representative
Se
time, attach both front and rear lens caps and store the
for inspection.
lens away from direct sunlight. Failure to do so could
Ru
Do not use the camera or lens in the presence of
result in a fire, as the lens may focus sunlight onto a
Nl
flammable gas
flammable object.
It
Operating electronic equipment in the presence of
flammable gas could result in an explosion or fire.
Ck
Do not look at the sun through the lens or viewfinder
Ch
Viewing the sun or other strong light sources through the
Kr
lens or viewfinder could cause permanent visual
impairment.
12
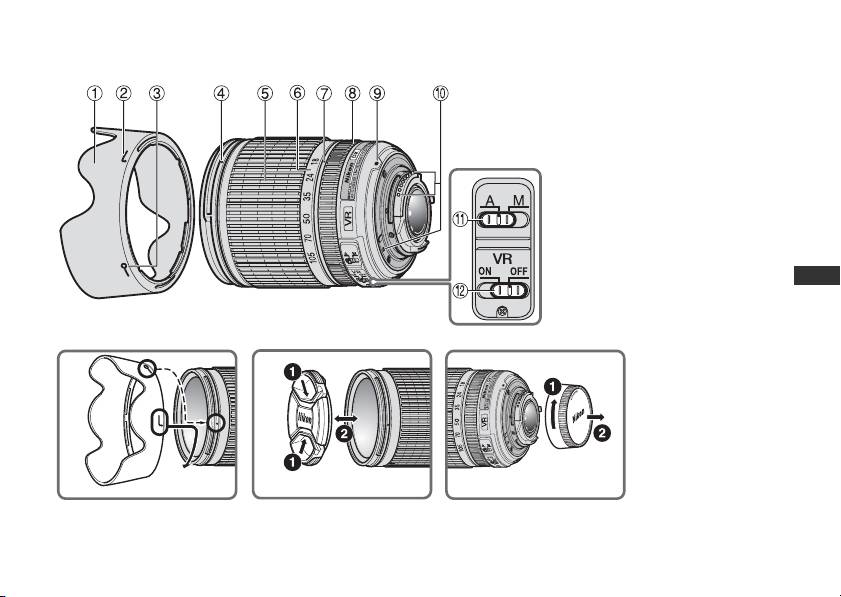
Nomenclature
( ) : reference page
Jp
En
De
A
Fr
Es
Se
Ru
Nl
It
Ck
Ch
C DB
Kr
13
1
Lens hood (P. 14)
2
Lens hood attachment index
(P. 14)
3 Lens hood setting index (P. 14)
4
Lens hood mounting index
(P. 14)
5 Zoom ring (P. 15)
6 Focal length scale
7 Focal length index
8 Focus ring (P. 15)
9 Mounting index (P. 14)
0 CPU contacts (P. 17)
a A-M mode switch (P. 15)
b Vibration reduction ON/OFF
switch (P. 16)

Thank you for purchasing the AF-S DX NIKKOR 18-105mm f/3.5-5.6G ED VR lens. DX Nikkor lenses are specially
designed for use with Nikon digital-SLR (Nikon DX-format) cameras, such as the D300 and D90. When mounted on
Nikon DX-format cameras, the lens picture angle is equivalent to approximately 1.5× the focal length in 35mm
format. Before using this lens, please read these instructions and refer to your camera’s User’s Manual.
Major features
aperture produces soft and pleasing blur
• By enabling vibration reduction (VR), slower shutter
characteristics in portions of pictures that are out-of-
speeds (approximately three stops*) can be used,
focus.
thus increasing the range of usable shutter speeds
Mounting the lens
and zoom positions, particularly when hand-holding
1
Turn the camera off.
the camera.
2
Remove the rear lens cap (Fig. D).
(*Based on results achieved under Nikon
3
Align the mounting index 9 on the lens with the
Jp
measurement conditions. The effects of vibration
mounting mark on the camera, and rotate the lens
reduction may vary according to shooting conditions
En
counterclockwise until it clicks into place. Be sure
and use.)
that the lens is in the correct position when the
De
• This lens employs a Silent Wave Motor to drive the
mounting index 9 is on the top of the lens.
Fr
focusing mechanism, making autofocusing smooth,
4
Remove the front lens cap (Fig. C).
silent and almost instantaneous. The A-M mode
Es
switch a is provided for simple selection of
Removing the lens
Se
autofocus (A) or manual focus (M) operation.
Turn the camera off before removing the lens. Press and
Ru
• More accurate exposure control is possible when this
hold the lens-release button on the camera while
is mounted on a Nikon camera with 3D color matrix
turning the lens clockwise.
Nl
metering capability, because subject distance
It
Using the Lens Hood HB-32 1
information is transferred from the lens to the camera.
Ck
• Superior optical performance and rendering
Attaching the hood
characteristics are maximized with the use of one
Ch
Align the lens hood attachment index ( , either of
aspherical lens element and one extra-low dispersion
two indexes) 2 on the hood with the lens hood
Kr
(ED) glass element, which ensure correction of
mounting index 4 on the lens, and turn the hood 1
chromatic aberration. In addition, the rounded
counterclockwise (as viewed when holding the camera
14
with the lens facing away from you) until it clicks into
lenses, focal length at closer distances decreases
place (Fig. B).
slightly.
Be sure that the lens hood mounting index is aligned
Focusing (Fig. A)
with the lens hood setting index ( ) 3.
Autofocus mode
If the lens hood is not correctly attached, vignetting
Set the camera focus mode to AF-A, AF-S or AF-C and
may occur.
set the A-M mode switch a on the lens to A. Press the
To facilitate attachment or removal of the hood, hold it
shutter-release button halfway to focus and completely
by the base (near the lens hood attachment index)
to shoot.
rather than its outer edge.
Manual focusing is possible even when the lens A-M
Detaching the hood
mode switch is set to A.
Hold the lens hood by the base (near the lens hood
Set the camera’s focus mode to AF-S, and press the
attachment index) and turn clockwise, as viewed when
shutter-release button halfway to initiate autofocus. Next,
Jp
holding the camera with the lens facing away from you,
while pressing the shutter-release button halfway,
En
to detach.
manually rotate the lens focus ring 8 to fine-tune focus.
De
Focusing, zooming, and depth of field
Note: Do not attempt to rotate the focus ring while
Before focusing, rotate the
autofocus is operating. If autofocus stops
Fr
operating, release and press the shutter-release
zoom ring 5 to adjust the
Es
button halfway again.
focal length until the desired
Se
composition is framed.
Manual focus mode
Ru
If your camera has a depth-of-
Set the A-M mode switch
a
on the lens to
M
. Rotate
field preview (stop-down)
Nl
the focus ring
8
manually to focus. Shooting is possible
button or lever, depth of field
It
when camera focus mode is set to either AF or M.
can be previewed through
Ck
the camera viewfinder. For more information, refer to
Lens A-M
Camera focus mode
your camera's User's Manual.
mode switch
a
Ch
AF-A/AF-C AF-S M
• This lens is equipped with the Internal Focusing (IF)
Autofocus
Kr
system. As this focusing system differs from non-IF
AAutofocus
—
(manual focus)
M Manual focus (focus assist is available)
15

For more information on camera focus modes, refer to
• If the camera is panned in a wide arc, compensation
your camera’s User’s Manual.
for camera shake in the panning direction is not
performed. For example, when panning the camera
Getting good results with autofocus
in a horizontal direction, vertical camera shake is
Refer to “Notes on using wide- or super wide-angle AF
reduced. This stabilizes the image whilst allowing the
Nikkor lenses” (P. 19).
desired panning effect to be realized.
Vibration reduction mode (VR)
• Due to the characteristics of the vibration reduction
By enabling vibration reduction (VR), slower shutter
mechanism, the image in the viewfinder may be blurred
speeds (approximately three stops*) can be used.
after the shutter is released. This is not a malfunction.
Panning is also supported.
• Do not turn the camera off or remove the lens from
(*Based on results achieved under Nikon measurement
the camera while vibration reduction is operating.
conditions. The effects of vibration reduction may vary
Failure to observe this note could result in the lens
according to shooting conditions and use.)
Jp
sounding and feeling as if an internal component is
Using vibration reduction
En
loose or broken when it is shaken. This is not a
1
Set the vibration reduction ON/OFF switch b to
malfunction. Turn the camera on again to correct this.
De
ON.
• With cameras such as D300 and D40-series models,
Fr
Note: Be sure to set the switch b so that the
featuring a built-in flash, vibration reduction does not
indicator is precisely aligned with ON.
function while the built-in flash is charging.
Es
2
Camera shake is reduced when the shutter-release
• When the camera is mounted on a tripod, set the
Se
button is pressed halfway. Autofocus and manual
vibration reduction ON/OFF switch b to OFF.
focusing, as well as precise framing of the subject,
Ru
However, it is recommended that the switch be set to
are simplified because camera shake visible
ON when using the camera on an unsecured tripod
Nl
through the viewfinder is also reduced.
head or with monopod.
3
To disable vibration reduction, set the vibration
It
• With autofocus cameras such as D2-series and D300
reduction ON/OFF switch b to OFF.
Ck
models, featuring an AF-ON button, vibration
Notes on using vibration reduction
reduction does not function when the AF-ON button
Ch
• After pressing the shutter-release button halfway,
is pressed.
Kr
wait until the image in the viewfinder stabilizes
before pressing the shutter-release button the rest of
Setting the aperture
the way down.
Use the camera to adjust the aperture setting.
16

Variable maximum apertures
Lens care
Zooming the lens changes the maximum aperture by
• Be careful not to allow the CPU contacts 0 to
1
up to 1
/3 stop.
become dirty or damaged.
However, the camera will compensate for any change
• Clean lens surfaces with a blower brush. To remove
in aperture by adjusting the shutter speed so as to
dirt and smudges, use a soft, clean cotton cloth or
maintain the correct exposure value.
lens tissue moistened with ethanol (alcohol) or lens
cleaner. Wipe in a circular motion from the center to
The built-in flash and vignetting
the outer edge, taking care not to leave traces or
Vignetting is the darkening of the corners around the
touch other parts of the lens.
image that occurs when the light emitted by the flash
• Never use organic solvent such as thinner or benzene
is obstructed by the lens hood 1, or lens barrel,
to clean the lens.
depending on the focal length or shooting distance.
• NC filters are available to protect the front lens
• To prevent vignetting, do not use the lens hood 1.
Jp
element. The lens hood 1 also helps to protect the
• The built-in flash cannot be used over distances of
front of the lens.
En
less than 0.6 m (2.0 ft.).
• When storing the lens in its flexible lens pouch, attach
De
Supported focal length/
both the front and rear lens caps. The lens can also be
Digital-SLR cameras
shooting distance
Fr
stored with the lens hood 1 attached in the reverse
D700/D300/D200/
No vignetting occurs at any focal
position.
Es
D100/D80
length
• When the lens is mounted on a camera, do not pick
Se
• 18mm/1.5 m (4.9 ft.) or greater
up or hold the camera and lens by the lens hood 1.
D90/D70-series
• 24mm or longer/no restrictions
Ru
• When the lens will not be used for an extended period
• 18mm/1 m (3.3 ft.) or greater
of time, store it in a cool, dry place to prevent mold and
Nl
D50
• 24mm or longer/no restrictions
rust. Be sure to store the lens away from direct sunlight
It
• 18mm/2.5 m (8.2 ft.) or greater
or chemicals such as camphor or naphthalene.
Ck
D60/D40-series
• 24mm/1 m (3.3 ft.) or greater
• Do not get water on the lens or drop it in water as this
• 35mm or longer/no restrictions
will cause it to rust and malfunction.
Ch
• Reinforced plastic is used for certain parts of the lens.
The built-in flash on the D100 and D70 is compatible
Kr
To avoid damage, never leave the lens in an
with focal lengths of 20mm or greater.
excessively hot place.
Vignetting occurs at a focal length of 18mm.
17

Standard accessories
Picture angle 76º–15º20’
• 67mm Snap-on Front Lens Cap LC-67
Focal length scale
18, 24, 35, 50, 70, 105mm
• Rear Lens Cap LF-1
Distance
Output to camera
• Bayonet Hood HB-32
information
• Flexible Lens Pouch CL-1018
Zoom control Manually via separate zoom ring
Optional accessory
Focusing
Nikon Internal Focusing (IF) system,
67mm screw-on filters
Autofocus using a Silent Wave Motor;
Incompatible accessories
manually via separate focus ring
• Teleconverters (all models)
Vibration
Lens-shift method using voice coil
• Auto Ring BR-4 and all models of Auto Extension Ring
reduction
motors (VCMs)
PK, K Ring and Bellows focusing attachment.
Jp
Closest focus
0.45 m (1.5 ft.) at all zoom settings
• Attachment Ring SX-1
distance
En
Other accessories may not be suitable for use with this
No. of diaphragm
7 pcs. (rounded)
lens. For details, refer to the documentation provided
De
blades
with accessories.
Fr
Diaphragm Fully automatic
Specifications
Es
Aperture range f/3.5 to f/22 (at 18mm), f/5.6 to f/38
Type of lens G-type AF-S DX Zoom-NIKKOR lens
Se
(at 105mm)
with built-in CPU and Nikon bayonet
Exposure
Via full-aperture method
Ru
mount (specially designed for use
measurement
with Nikon digital-SLR—Nikon DX-
Nl
format—cameras)
Attachment size 67 mm (P = 0.75 mm)
It
Focal length 18mm–105mm
Dimensions Approximately 76 mm (dia.) × 89
Ck
mm (extension from the camera’s
Maximum
f/3.5–5.6
Ch
lens-mount flange)
aperture
Weight Approximately 420 g (14.8 oz)
Kr
Lens
15 elements in 11 groups (1 aspherical
construction
lens and 1 ED lens elements)
Specifications and designs are subject to change without
notice or obligation on the part of the manufacturer.
18
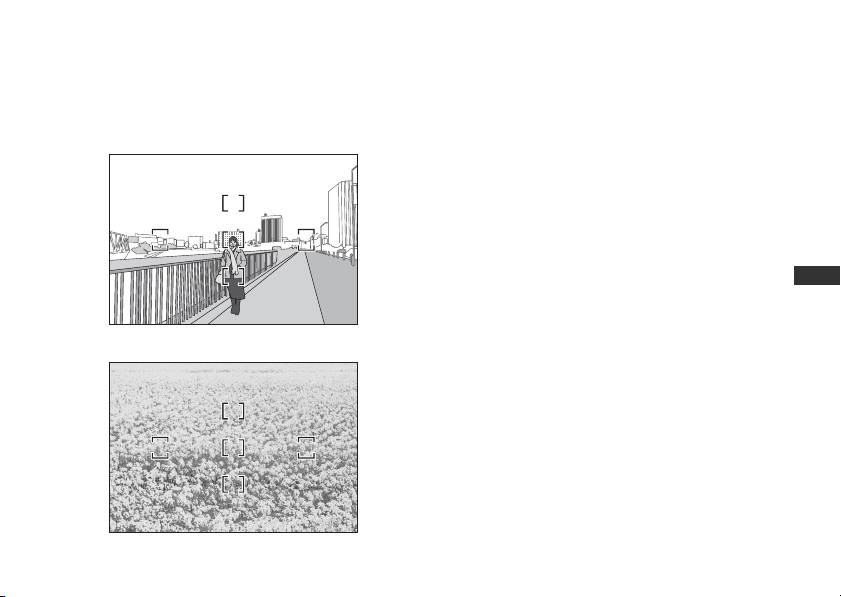
Notes on using wide- or super wide-angle AF Nikkor lenses
In the following situations, autofocus may not perform as expected when shooting with wide- or super wide-angle
AF Nikkor lenses.
1. When the main subject in the focus
E A person standing in front of a
brackets is relatively small
distant background
When a person standing in front of a distant
background is positioned within the focus brackets,
as shown in Fig. E, the background may be in focus,
while the subject is out of focus.
2. When the main subject is a finely
Jp
patterned subject or scene
When the subject is finely patterned or of low
En
contrast, such as a field filled with flowers, as shown
De
in Fig. F, focus may be difficult to acquire using
Fr
autofocus.
F A field filled with flowers
Es
Responses to these types of situations
Se
(1) Focus on a different subject located at the same
Ru
distance from the camera, apply focus lock,
Nl
recompose, and shoot.
It
(2) Set the camera’s focus mode to manual focus and
Ck
focus manually on the subject.
Ch
Refer to “Getting Good Results with Autofocus” in the
camera’s User’s Manual.
Kr
19

Hinweise für sicheren Betrieb
ACHTUNG
Keinesfalls zerlegen.
Dem Zugriff von Kindern entziehen.
Beim Berühren der Innenteile von Kamera oder Objektiv droht
Es ist unbedingt dafür zu sorgen, dass Kleinkinder keine
Verletzungsgefahr. Überlassen Sie Reparaturen unbedingt
Batterien oder andere Kleinteile in den Mund nehmen
ausschließlich qualifizierten Technikern. Kommt es durch einen
können.
heftigen Stoß (z.B. Fall auf den Boden) zu einem Bruch von
Beim Umgang mit Kamera und Objektiv unbedingt
Kamera oder Objektiv, so trennen Sie zunächst das Produkt vom
Stromnetz bzw. entnehmen die Batterie(n) und geben es dann
die folgenden Vorsichtmaßnahmen beachten:
an eine autorisierte Nikon-Servicestelle zur Überprüfung ab.
• Schützen Sie die Kamera und das Objektiv vor
Feuchtigkeit. Andernfalls droht Brand- oder
Bei einer Störung sofort die Stromversorgung
Stromschlaggefahr.
Jp
ausschalten.
• Handhaben oder berühren Sie die Kamera bzw. das
Bei Entwicklung von Rauch oder ungewöhnlichem Geruch
durch Kamera oder Objektiv entnehmen Sie sofort die
Objektiv keinesfalls mit nassen Händen. Andernfalls droht
De
Batterie(n); dabei vorsichtig vorgehen, denn es besteht
Stromschlaggefahr.
Verbrennungsgefahr. Bei einem Weiterbetrieb unter diesen
Fr
• Bei Gegenlichtaufnahmen nicht das Objektiv gegen die
Umständen droht Verletzungsgefahr.
Sonne richten oder das Sonnenlicht direkt durch das
Es
Nach dem Abtrennen von der Stromversorgung geben Sie
Objektiv eintreten lassen. Dies könnte eine Überhitzung
Se
das Gerät an eine autorisierte Nikon-Servicestelle zur
der Kamera verursachen und ein Brand könnte die Folge
Überprüfung ab.
Ru
sein.
Kamera oder Objektiv keinesfalls bei Vorhandensein
Nl
• Vor einem längeren Nichtgebrauch des Objektivs
von brennbarem Gas einsetzen.
bringen Sie den vorderen und hinteren Deckel an und
It
Wird elektronisches Gerät bei brennbarem Gas betrieben,
bewahren das Objektiv geschützt vor direkter
so droht u.U. Explosions- oder Brandgefahr.
Ck
Sonnenlichteinwirkung auf. Andernfalls droht
Keinesfalls durch Objektiv oder Sucher in die Sonne
Ch
Brandgefahr wegen möglicher Fokussierung von
blicken.
Kr
Beim Betrachten der Sonne oder anderer starker
Sonnenlicht durch das Objektiv auf brennbare
Lichtquellen durch Objektiv oder Sucher droht eine
Gegenstände.
permanente Schädigung des Sehvermögens.
20
