Nikon AF-S Nikkor 300mm f/2.8G ED VR II: инструкция
Раздел: Фотоаппараты
Тип:
Инструкция к Nikon AF-S Nikkor 300mm f/2.8G ED VR II
Оглавление
- Примечания по безопасности использования
- Соблюдайте следующие меры предосторожности во время эксплуатации фотокамеры и объектива
- Компоненты
- Ru
- Основные возможности Совместимые фотокамеры и доступные функции
- Фокусировка
- Переключатель выбора режима фокусировки и кнопка управления фокусировки (совместимые камеры указаны на стр. 90)
- Режим подавления вибраций (VRⅡ)
- Настройка кольца регулировки подавления вибрации ON/OFF Установка переключателя режима подавления вибраций Примечания по использованию подавления вибрации
- Глубина резкости Установка диафрагмы Использование встроенного поворотного кольца для крепления к штативу
- Встроенная вспышка и виньетирование Использование бленды Выдвижной держатель фильтра
- Рекомендуемые фокусировочные экраны
- Уход за объективом Стандартные принадлежности Дополнительная принадлежность
- Технические характеристики
安全上のご注意
ご使用の前に「安全上のご注意」をよくお読みのうえ、正しくお使いください。この「安
全上のご注意」は製品を安全に正しく使用していただき、あなたや他の人々への危害や
財産への損害を未然に防止するために、重要な内容を記載しています。お読みになった
後は、お使いになる方がいつでも見られる所に必ず保管してください。
表示について
表示と意味は次のようになっています。
この表示を無視して、誤った取り扱いをすると、人が死亡また
は重傷を負う可能性が想定される内容を示しています。
この表示を無視して、誤った取り扱いをすると、人が傷害を負
う可能性が想定される内容および物的損害の発生が想定される
内容を示しています。
お守りいただく内容の種類を、次の絵表示で区分し、説明しています。
絵表示の例
△
記号は、注意(警告を含む)を促す内容を告げるものです。図の中や近
くに具体的な注意内容(左図の場合は感電注意)が描かれています。
記号は、禁止の行為(してはいけないこと)を告げるものです。図の中
や近くに具体的な禁止内容(左図の場合は分解禁止)が描かれています。
●
記号は、行為を強制すること(必ずすること)を告げるものです。図の
中や近くに具体的な強制内容(左図の場合は電池を取り出す)が描かれて
います。
警告
Jp
分解したり、修理や改造をしないこと
分解禁止
感電したり、異常動作をしてケガの原因となります。
落下などによって破損し、内部が露出したときは、露出部に手を
接触禁止
触れないこと
感電したり、破損部でケガをする原因となります。カメラの電池を抜いて、
販売店またはニコンサービス機関に修理を依頼してください。
すぐに
修理依頼
を
2032
Jp
En
De
Fr
Es
Se
Ru
Nl
It
Ck
Ch
Kr
3
警告
熱くなる、煙が出る、こげ臭いなどの異常時は、速やかにカメラ
の電池を取り出すこと
電池を取る
そのまま使用すると火災、やけどの原因となります。電池を取り出す際、
やけどに充分注意してください。電池を抜いて、販売店またはニコンサー
すぐに
ビス機関に修理を依頼してください。
修理依頼を
水につけたり、水をかけたり、雨にぬらしたりしないこと
発火したり感電の原因となります。
水かけ禁止
引火、爆発のおそれのある場所では使用しないこと
プロパンガス・ガソリンなど引火性ガスや粉塵の発生する場所で使用する
使用禁止
と、爆発や火災の原因となります。
レンズまたはカメラで直接太陽や強い光を見ないこと
失明や視力障害の原因となります。
見ないこと
注意
ぬれた手でさわらないこと
感電の原因になることがあります。
感電注意
製品は幼児の手の届かないところに置くこと
ケガの原因になることがあります。
放置禁止
逆光撮影では、太陽を画角から充分にずらすこと
太陽光がカメラ内部で焦点を結び、火災の原因になることがあります。画
使用注意
角から太陽をわずかに外しても火災の原因になることがあります。
使用しないときは、レンズにキャップをつけるか太陽光のあたら
ない所に保管すること
保管注意
太陽光が焦点を結び、火災の原因になることがあります。
三脚にカメラやレンズを取り付けたまま移動しないこと
転倒したりぶつけたりしてケガの原因になることがあります。
移動注意
窓を閉め切った自動車の中や直射日光が当たる場所など、異常に
温度が高くなる場所に放置しないこと
放置禁止
内部の部品に悪い影響を与え、火災の原因となることがあります。
このたびはニッコールレンズをお買い上げくださいまして、誠にありがとうございます。
ご使用の前に、この使用説明書をよくお読みの上、正しくお使いください。
Jp
また、カメラの使用説明書もご覧ください。
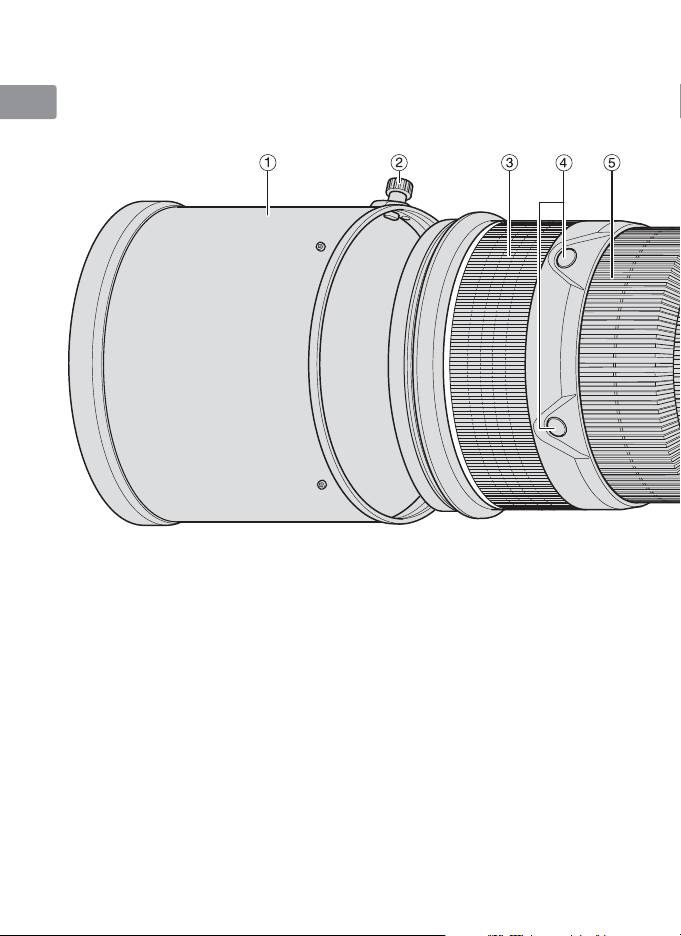
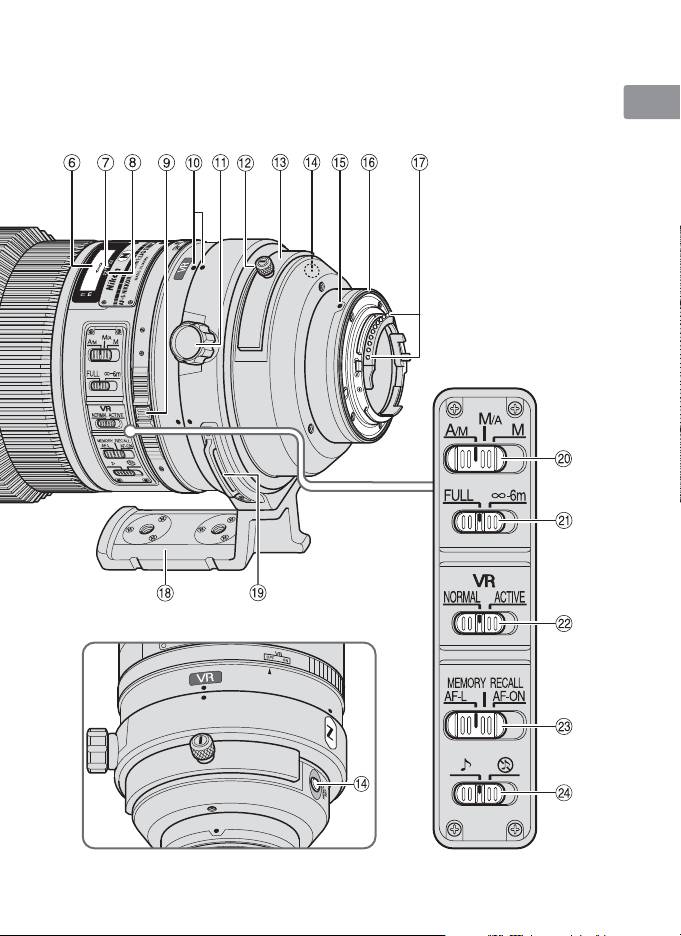
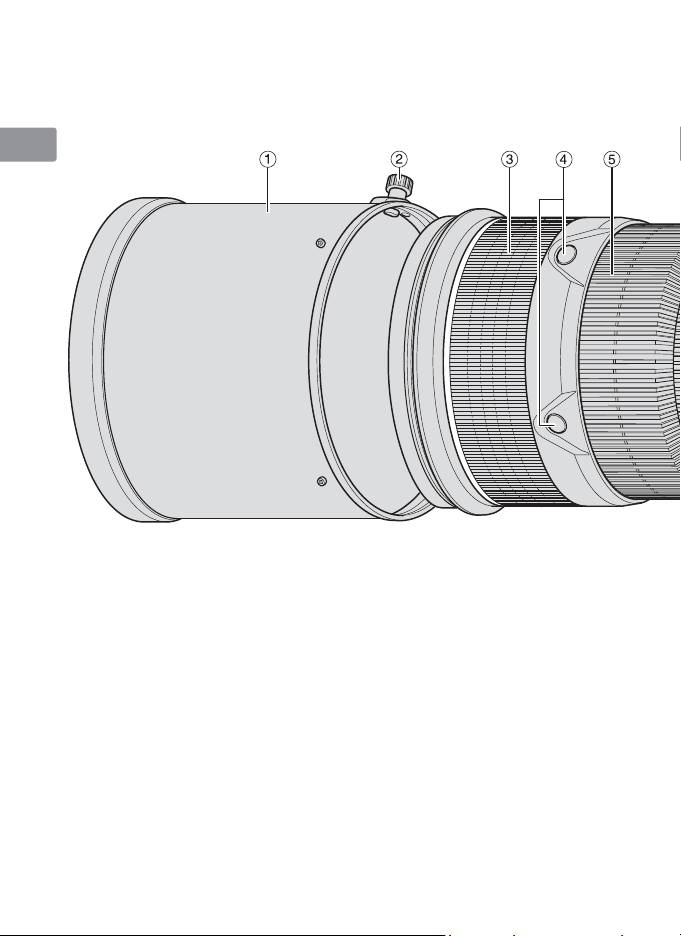
■各部の名称
En
De
Fr
Es
Se
Ru
Nl
It
Ck
Ch
Kr
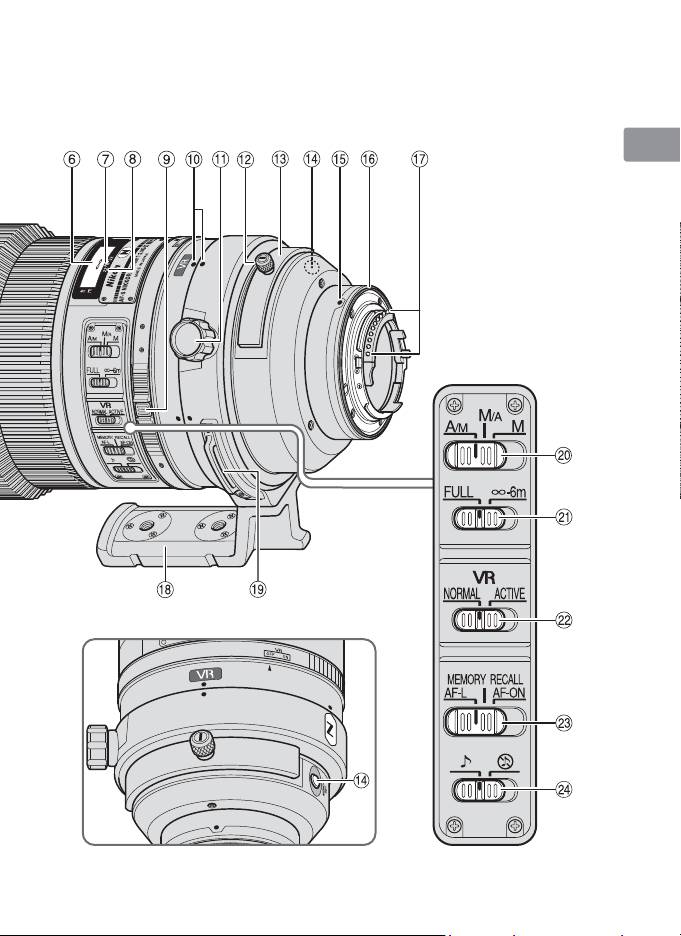
1 フード(P.12)
$ メモリーセットボタン(P.8)
2 クランプノブ(P.12)
% レンズ着脱指標
3 すべり止めゴム
^ レンズマウントゴムリング(P.14)
4 フォーカス作動ボタン
&CPU 信号接点(P.14)
(フォーカスロック / メモリーリコール /
* 組み込み式回転三脚座(P.11)
AF 作動)(P.8)
( 吊り金具
5 フォーカスリング(P.7)
) フォーカスモード切り換えスイッチ(P.7)
6 距離目盛(P.11)
q フォーカス制限切り換えスイッチ(P.7)
7 距離目盛基準線(P.11)
w 手ブレ補正モード切り換えスイッチ
8 被写界深度目盛(P.11)
(P.10)
9 手ブレ補正リングスイッチ(P.10)
e フォーカス作動設定スイッチ
0 レンズ回転位置指標(P.11)
(フォーカスロック / メモリーリコール /
! 三脚座止めネジ(P.11)
AF 作動)(P.8)
@ 組み込み式フィルターホルダーつまみ
r 電子音スイッチ(P.8)
(P.12)
( ):参照頁
# 組み込み式フィルターホルダー(P.12)
4
Jp
En
De
Fr
Es
Se
Ru
Nl
It
Ck
Ch
Kr
5

■主な特長
●
ナノクリスタルコート(Nano Crystal Coat)を一部のレンズに施したことにより、
Jp
強い太陽光が当たる屋外撮影から、スポットライトのある室内撮影まで、クリアーで
抜けの良い画像を提供します。
En
●
レンズ側でフォーカスロックができる機能(AF-L)、AF(オートフォーカス)を作動
できる機能(AF-ON)、およびあらかじめ記憶させたピント位置を瞬時に呼び出せる
De
機能(MEMORYRECALL)を装備しています。
※
●
手ブレ補正機能(VRⅡ)を使用すると、使わないときと比べ約 4 段分
シャッタース
Fr
ピードを遅くして撮影できるため、シャッタースピードの選択範囲が広がり、幅広い
領域で手持ち撮影が可能です。(※当社測定条件によります。また、手ブレ補正効果は、
Es
撮影者や撮影条件によって異なります。)
●
AF-I/AF-S テレコンバーターは、TC-14E/TC-14E Ⅱ/TC-17E Ⅱ/TC-20E/
Se
TC-20E Ⅱ/TC-20E Ⅲが使用可能です。
ご注意
Ru
●
DX フォーマットのニコンデジタル一眼レフカメラ(D300 シリーズ、D90 など)
に装着すると、対角線画角は 5 20 となり、35mm 判換算では焦点距離約 450mm
Nl
相当のレンズになります。
It
■使用できる機能
カメラによって、使用できる機能には制限・制約がありますので、カメラの使用説明書
Ck
でもご確認ください。
機 能 露出(撮影)モード
Ch
カメラ
フォーカス
メモリー
レンズ側
※1
VR
AF
P
SAM
ロック
リコール
での AF
Kr
FX フォーマット/DX フォーマット
のニコンデジタル一眼レフカメラ、
○○ ○ ○ ○ ○○○○
F6、F5、F100、F80 シリーズ、
ニコン U2、ニコン U
※2
プロネア 600i、プロネア S
×○ ○ ○ ○ ○○○○
F4 シリーズ、F90X シリーズ、
※3
※4
※3
×○
○○
△
○○××
F90 シリーズ、F70D
ニコン Us、F60D、F50D、
×× × × × ○○○○
F-401 シリーズ
F-801 シリーズ、F-601M × × × × × ○ ○ × ×
F3AF、F-601、F-501、
×× × × × ××××
MF カメラ(F-601M を除く)
○:使用可 △:制限あり ×:使用不可 VR:手ブレ補正 AF:オートフォーカス
※1:
P には AUTO(オート)モード、イメージプログラムモードを含みます。
※2:
M モードの設定はありません。
※3:
フォーカス作動設定スイッチが[AF-ON]の場合、AF(オートフォーカス)動作させる
にはシャッターボタン半押し状態で、フォーカス作動ボタンを押します。
※4:
シャッターボタン半押し状態で、メモリーセットボタンやフォーカス作動ボタンを押します。
6
■ピント合わせの方法
ご使用のカメラや撮影目的によって、下表のようなピント合わせが選択できます。
Jp
カメラの
レンズのフォーカスモード
カメラ
フォーカス
A/M M/A M
モード
En
FX フォーマット/DX フォーマットの
MF
AF
オート
マニュアル
ニコンデジタル一眼レフカメラ、
フォーカス
(C/S)
優先 AF
優先 AF
De
F6、F5、F4 シリーズ、F100、
(
エイド可
)
F90X シリーズ、F90 シリーズ、
MF
F80 シリーズ、F70D、ニコン U2、
MF
Fr
(フォーカスエイド可)
ニコン U、プロネア 600i、プロネア S
ニコン Us、F60D、F50D、
AF
MF
Es
F-801 シリーズ、F-401 シリーズ、
(C/S)
F-601M を除き
F-601M
MF
(
フォーカスエイド可
)
Se
AF:オートフォーカス MF:マニュアルフォーカス
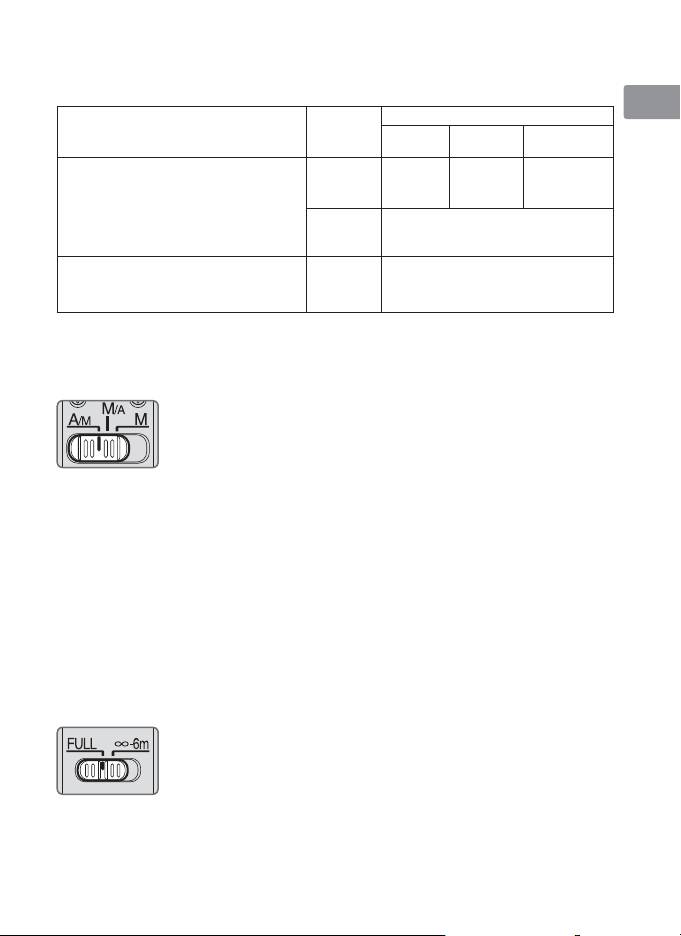
A/M(オート優先オートフォーカスモード)と
Ru
M/A(マニュアル優先オートフォーカスモード)の使い方
Nl
M/A:フォーカスリングを回転させると、瞬時に MF(マニュアル
フォーカス)撮影が行えます。
A/M:フォーカスリングを回転させても、瞬時には MF(マニュア
It
ルフォーカス)に切り換わりません。AF(オートフォーカス)
を優先させたい時にご使用ください。
Ck
a
フォーカスモード切り換えスイッチを[A/M]または[M/A]にセットします。
b
AF(オートフォーカス)撮影時、カメラのシャッターボタンを半押ししたまま、あ
Ch
るいはカメラの AF 作動(AF-ON)ボタンまたはレンズのフォーカス作動ボタン
(フォーカス作動設定スイッチ:AF-ON)を保持したまま、フォーカスリングを手で
Kr
回転させると、MF(マニュアルフォーカス)撮影が行えます。
c
カメラのシャッターボタンの半押しやカメラの AF 作動(AF-ON)ボタンまたはレン
ズのフォーカス作動ボタンを再度操作すると AF(オートフォーカス)で撮影が可能
となります。
フォーカス制限切り換えスイッチの使い方
AF(オートフォーカス)で撮影する場合に使える機能です。
FULL: 撮影距離が 6m 未満を含む場合にセットします。
∞− 6m:撮影距離が常に 6m 以上の場合にセットします。ピン
ト合わせの時間を短縮できます。
7
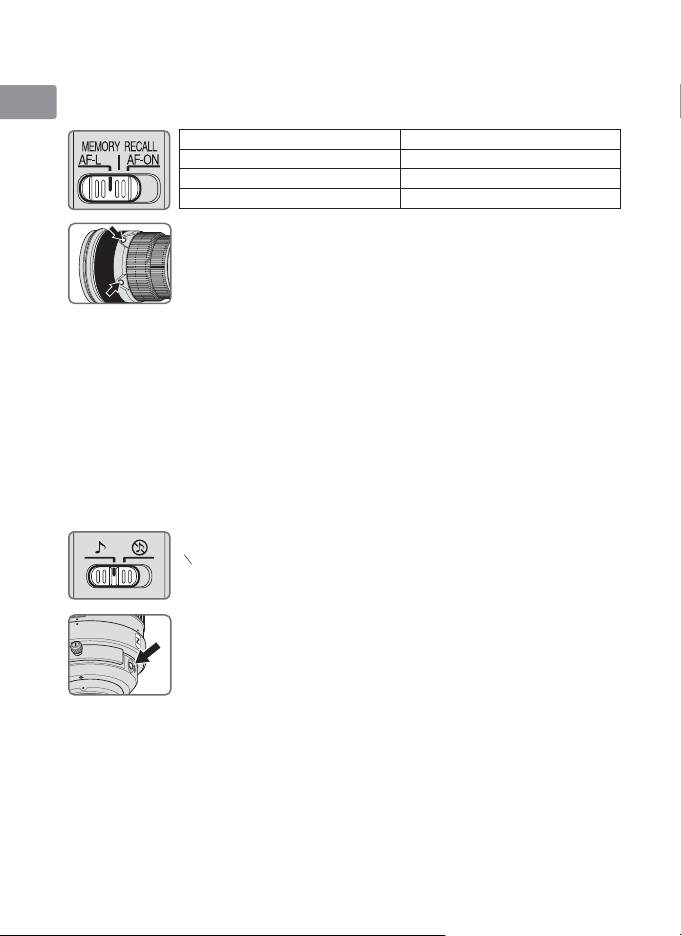
■フォーカス作動設定スイッチとフォーカス作動ボタンの使い方
(対応カメラは、P.6 参照)
Jp
フォーカス作動設定スイッチで、フォーカス作動ボタンの機能を次のように設定できます。
フォーカス作動設定スイッチ フォーカス作動ボタンの機能
En
AF-L フォーカスロック
MEMORYRECALL メモリーリコール
De
AF-ON AF(オートフォーカス)作動
●
フォーカス作動ボタンは、4 個の内いずれかを押すと機能します。
Fr
●
フォーカス作動ボタンは、ご希望の位置に改造(回転)できます。
詳しくは、ニコンサービス機関へお問い合わせください。
Es
Se
フォーカスロック(AF-L)
Ru
AF(オートフォーカス)で撮影する場合に使える機能です。
a
フォーカスモード切り換えスイッチを[A/M]または[M/A]にセットします。
Nl
b
フォーカス作動設定スイッチを[AF-L]にセットします。
c
AF(オートフォーカス)中にフォーカス作動ボタンを押し、フォーカスをロックし
It
て撮影します。
●
フォーカス作動ボタンを押している間、ピントが固定されます。
Ck
●
フォーカスロックはカメラ側でも行えます。
メモリーリコール(MEMORYRECALL)
Ch
♪:メモリーリコールの操作時に、電子音が鳴ります。
○
♪
:メモリーリコールの操作時に、電子音が鳴りません。
Kr
以下の手順は、電子音を[♪]にセットした場合の説明です。
a
被写体にピントを合わせメモリーセットボタンを押し、レンズにピ
ント位置を記憶させます。
●
正しく記憶された場合は、ピッと鳴ります。
●
正しく記憶されなかった場合は、ピッピーピーピーと鳴り、距離目
盛が左右に 10 回程度振れます。もう一度ピント位置を記憶させて
ください。
●
ピント位置の記憶は、フォーカスモードやフォーカス作動設定スイッチ等の設定にか
かわらず可能です。
●
カメラの電源を OFF にしたり、レンズをカメラから取り外してもピント位置を記憶
しています。
8
b
フォーカス作動設定スイッチを[MEMORYRECALL]にセットします。
c
フォーカス作動ボタンを押し、ピピッと鳴ったら撮影します。
●
シャッターボタンを半押ししていても、フォーカス作動ボタンを押すと記憶させた
Jp
ピント位置にセットされます。
●
フォーカス作動ボタンは、シャッターがきれるまで押し続けてください。
En
●
フォーカス作動ボタンから指を離すと、通常の AF(オートフォーカス)または MF(マ
ニュアルフォーカス)に戻ります。
De
AF(オートフォーカス)作動(AF-ON)
Fr
a
フォーカスモード切り換えスイッチを[A/M]または[M/A]にセットします。
b
フォーカス作動設定スイッチを[AF-ON]にセットします。
Es
c
フォーカス作動ボタンを押し、撮影します。
●
フォーカス作動ボタンを押している間は AF(オートフォーカス)が作動します。
Se
●
AF(オートフォーカス)作動はカメラ側でも行えます。
Ru
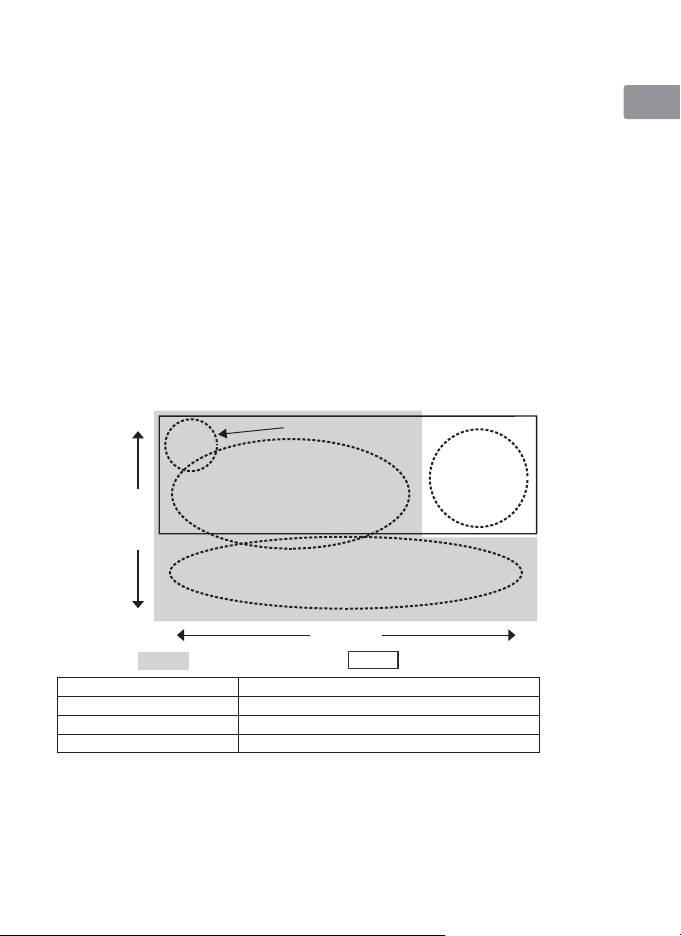
■手ブレ補正機能(VRⅡ)
手ブレ補正機能の概念図
Nl
高
三脚使用時のブレ
It
激しい揺れ
例)乗り物等
手ブレ
Ck
周
での揺れ
波
数
Ch
流し撮り(パンニング)
Kr
低
振 幅
大小
NORMALモードで対応
ACTIVEモードで対応
手ブレ補正 NORMAL モードまたは ACTIVE モードで対応
流し撮りでの手ブレ補正 NORMAL モードで対応
激しい揺れでの手ブレ補正 ACTIVE モードで対応
三脚使用時のブレ補正 NORMAL モードまたは ACTIVE モードで対応
9
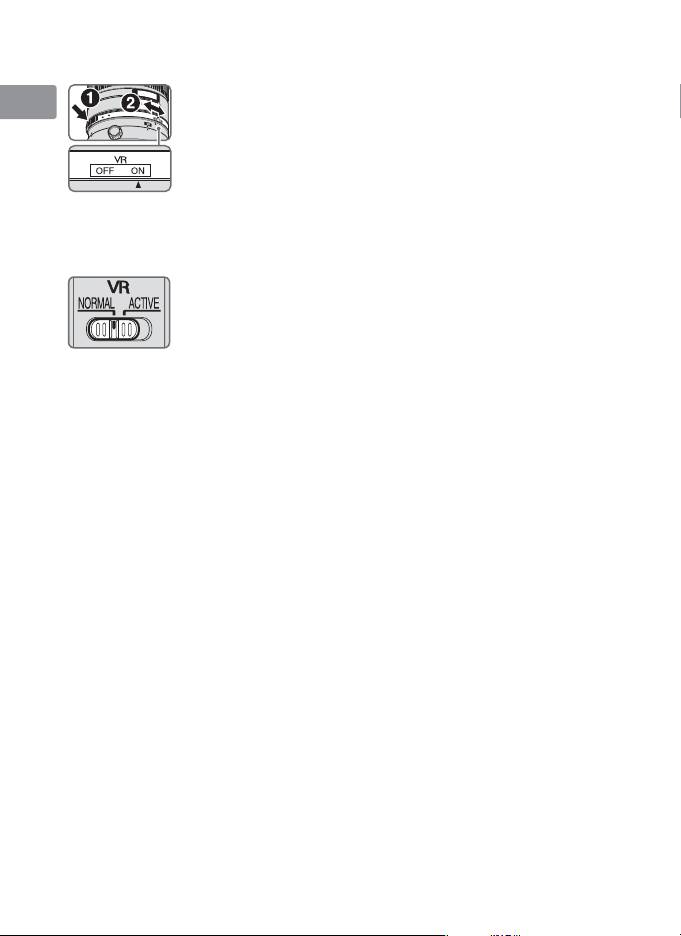
手ブレ補正リングスイッチの使い方
ON: シャッターボタンを半押しすると、手ブレを補正します。
Jp
ファインダー像のブレも補正するため、ピント合わせが容
易で、フレーミングしやすくなります。
En
OFF: 手ブレを補正しません。
De
手ブレ補正モード切り換えスイッチの使い方
Fr
手ブレ補正リングスイッチを[ON]にし、手ブレ補正モード切り換えスイッチを設定し
ます。
Es
NORMAL:主に、通常の手ブレを補正します。流し撮りでも手ブ
レを補正します。
Se
ACTIVE:乗り物に乗っている等、揺れの激しい条件でのブレか
ら通常の手ブレまで補正します。このモードでは流し
Ru
撮り自動検出は行いません。
手ブレ補正使用時のご注意
Nl
●
手ブレ補正が使用できないカメラ(P.6)では、必ず、手ブレ補正リングスイッチを
[OFF]にしてください。特にプロネア 600i では、このスイッチを[ON]にしたま
It
まにすると、電池の消耗が早くなることがありますのでご注意ください。
●
シャッターボタンを半押し後、ファインダー像が安定してから撮影することをおすす
Ck
めします。
●
手ブレ補正の原理上、シャッターレリーズ後にファインダー像がわずかに動くことが
Ch
ありますが、異常ではありません。
●
流し撮りする場合は、必ず NORMAL モードにしてください。NORMAL モードでは、
Kr
流し撮りなどでカメラの向きを大きく変えた場合、流した方向の手ブレ補正は機能し
ません。例えば、横方向に流し撮りすると、縦方向の手ブレだけが補正されます。
●
手ブレ補正中にカメラの電源を OFF にしたり、レンズを取り外したりしないでくだ
さい。(その状態でレンズを振るとカタカタ音がすることがありますが、故障ではあり
ません。カメラの電源を再度 ON にすれば、音は消えます。)
●
内蔵フラッシュ搭載のカメラで、内蔵フラッシュ充電中は、手ブレ補正は行いません。
●
三脚撮影時に手ブレ補正リングスイッチを[ON]にすると、三脚ブレを軽減します。
また、三脚を使っても雲台を固定しないときや一脚を使用する場合は、スイッチを[ON]
にすることをおすすめします。ただし、ブレ量が小さい撮影条件下で撮影を行った場
合は、VR の[ON]と[OFF]で効果が逆転する場合があります。その場合は、VR
を[OFF]にしてご使用ください。
●
AF 作動(AF-ON)ボタンのあるカメラで AF 作動ボタンを押したり、レンズ側の
フォーカス作動ボタンを[ON]にしても、手ブレ補正は作動しません。
10
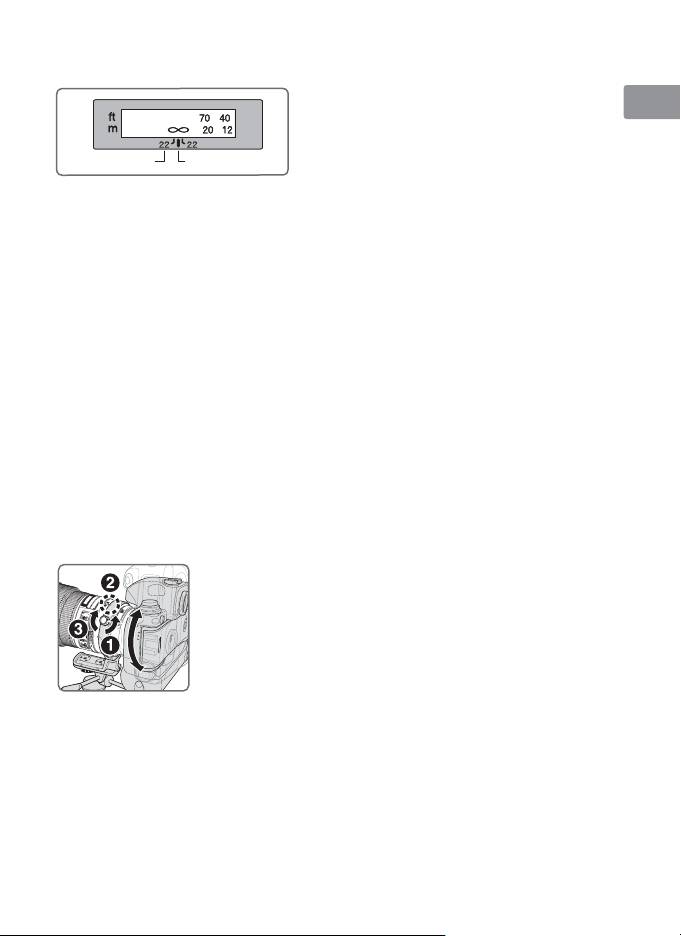
■被写界深度
被写体の前後のピントが合う範囲(被写界深度)
Jp
は、距離目盛基準線の両側の被写界深度目盛によ
って、おおよそ判ります。プレビュー(絞り込み)
En
機構を持つカメラでは、撮影前に被写界深度を確
被写界深度目盛 距離目盛基準線
認できます。
De
●
このレンズは IF(ニコン内焦)方式を採用しています。IF 方式は、撮影距離が短くな
るにしたがって焦点距離が短くなります。
Fr
●
距離目盛は目安であり、被写体までの距離を保証するものではありません。また、遠
景撮影でも被写界深度などの影響により∞マークに届かない位置でピントが合う場合
Es
があります。
●
詳しい被写界深度は、被写界深度表(P.198)をご覧ください。
Se
■絞り値の設定
Ru
絞り値は、カメラ側で設定してください。
Nl
■組み込み式回転三脚座の使い方
三脚は、カメラ側ではなくレンズ側の三脚座に取り付けてください。
It
●
三脚の形状によっては、カメラのグリップを握った状態でカメラを回転した際、三脚
に手がぶつかることがありますので、ご注意ください。
Ck
●
三脚座の座部の止めネジを外すことによって、座部を取り外すことができます。ご希
望の方は、ニコンサービス機関へお問い合わせください。
Ch
カメラ位置の変更
レンズの三脚座止めネジを少し緩め(❶)、カメラ位置(縦 /
Kr
横)に応じてレンズ回転位置指標を合わせ(❷)、三脚座止めネ
ジを締めて固定します(❸)。
11
■カメラの内蔵フラッシュ使用時のご注意
ケラレを防止するために、レンズのフードは取り外して使用してください。
Jp
カメラ
ニコン U、二コン Us、F60D、F50D、
すべての撮影距離でケラレが発生します。
En
F-601QD、F-401 シリーズ、プロネア 600i、
プロネア S
De
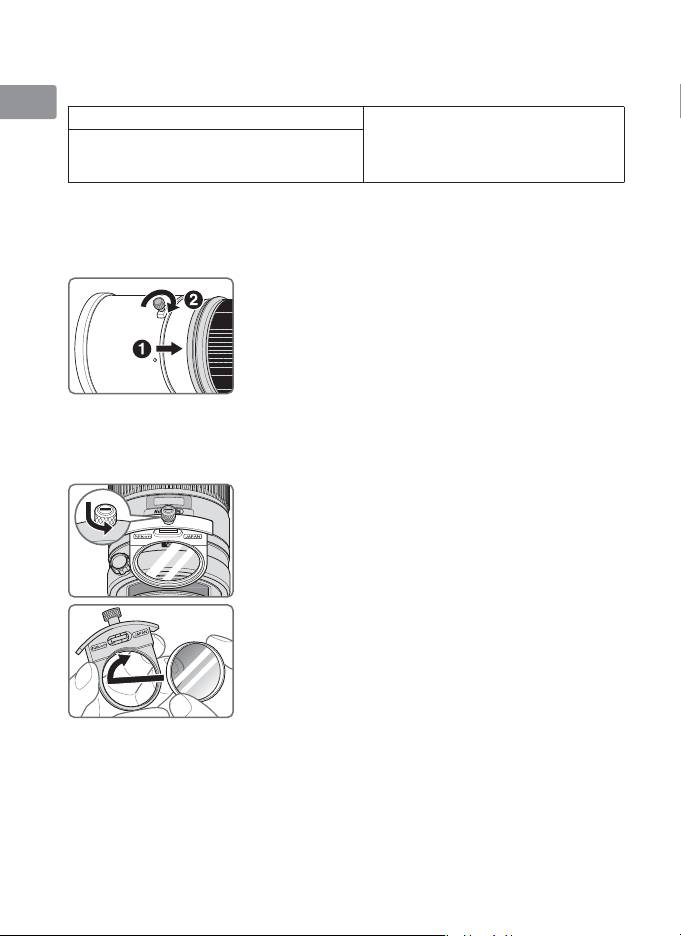
■フードの使い方
Fr
画像に悪影響を及ぼす光線をカットし、レンズ面の保護にも役立ちます。
取り付け方
Es
●
クランプノブをしっかり締めてください(❷)。
●
フードが正しく取り付けられないと撮影画面にケラレを
Se
生じますのでご注意ください。
●
収納時はフードを逆向きにしてレンズに取り付けられます。
Ru
Nl
■組み込み式フィルターホルダー
It
撮影の際は、必ずフィルターを装着してください(お買い上げ時は、NC フィルターが装
着されています)。
Ck
a
組み込み式フィルターホルダーつまみを押し込みなが
ら、つまみの白い指標が組み込み式フィルターホルダー
Ch
と平行になるよう反時計方向に回します。
b
組み込み式フィルターホルダーを抜き取ります。
Kr
c
装着されているフィルターを外します。
d
52mm ネジ込み式フィルターを、Nikon JAPAN の表
示がある面よりねじ込みます。
●
カメラ側または被写体側のどちらの側に向けて取り付けて
も、撮影に影響はありません。
組み込み式円偏光フィルター C-PL1L(別売)
●
ガラスなどの非金属面や水面の反射光をカットする場合におすすめします。
●
距離目盛は正常な位置からずれ、最至近がわずかに長くなります。
●
メモリーリコール(P.8)を使用する場合は、ピントを記憶させるときから装着してく
ださい。
12

■ファインダースクリーンとの組み合わせ
スクリーン
EC-B
G1
Jp
ABCE
F
G3 G4 J K L M P U
EC-E
G2
カメラ
En
F6 ◎ ◎―◎ ― ― ― ― ―◎― ◎ ―◎
○
F5+DP-30 ◎ ◎○◎ ◎ ―
◎― ◎ ―◎
De
(+0.5)
◎
○
◎
F5+DA-30
◎○◎ ◎ ―
◎―
―◎
Fr
(+0.5)
(+0.5)
(+0.5)
構図の決定やピント合わせの目的には
Es
◎ :好適です。
○ :視野の一部が多少見にくくなりますが、撮影結果には全く影響がありません。
Se
:
各カメラに存在しないファインダースクリーンです。
()
:中央部重点測光時の補正値です。F6 カメラの場合、測光値の補正は、カメラの
Ru
カスタムメニュー「b6:スクリーン補正」を「BorE 以外」にセットして行います。
B 型および E 型以外を使用する場合は、補正量が 0 でも、「BorE 以外」にセット
Nl
してください。F5 カメラの場合は、カスタムセッティング No.18 の設定で測光
値の補正を行います。詳しくはカメラの使用説明書をご覧ください。
It
空欄:使用不適当です。ただし、M スクリーンの場合、撮影倍率 1/1 倍以上の近接撮影
に用いるため、この限りではありません。
Ck
ご注意
Ch
●
F5 カメラの場合、マルチパターン測光は、EC-B、EC-E、B、E、J、A、L スクリーン
のみ可能です。
Kr
13

■
レンズのお手入れと取り扱い上のご注意
●
レンズをカメラに装着した状態で、カメラだけを持たないでください。カメラ(マウ
Jp
ント部分)破損の恐れがありますので、必ずレンズも持ってください。
●
CPU 信号接点は汚さないようにご注意ください。
En
●
レンズマウントゴムリングが破損した場合は、そのまま使用せず販売店またはニコン
サービス機関に修理を依頼してください。
De
●
レンズ面の清掃は、ホコリを拭う程度にしてください。指紋がついたときは、柔らかい
清潔な木綿の布に無水アルコール(エタノール)または市販のレンズクリーナーを少量
Fr
湿らせ、レンズの中心から外周へ渦巻状に、拭きムラ、拭き残りのないように注意して
拭いてください。
Es
●
シンナーやベンジンなどの有機溶剤は絶対に使用しないでください。
●
レンズをケースに入れるときは、必ずレンズキャップと裏ぶたを取り付けてください。
Se
●
フードを持ってカメラを持ち上げたりしないでください。
●
レンズを長期間使用しないときは、カビやサビを防ぐために、高温多湿のところを避
Ru
けて風通しのよい場所に保管してください。また、直射日光のあたるところ、ナフタ
リンや樟脳のあるところも避けてください。
Nl
●
レンズを水に濡らすと、部品がサビつくなどして故障の原因となりますのでご注意く
ださい。
It
●
ストーブの前など、高温になるところに置かないでください。極端に温度が高くなると、
外観の一部に使用している強化プラスチックが変形することがあります。
Ck
■付属アクセサリー
Ch
●
かぶせ式レンズキャップ
●
裏ぶた
●
かぶせフード HK-30
●
セミソフトケース CL-L1
Kr
●
組み込み式フィルターホルダー
●
52mm ネジ込み式 NC フィルター
●
ストラップ LN-1
ご注意
●
組み込み式フィルターホルダーは、付属の 52mm ネジ込み式フィルター等を取り付け、
必ず装着して撮影してください。
■別売アクセサリー
●
52mm ネジ込み式フィルター(円偏光フィルターⅡを除く)
●
組み込み式円偏光フィルター C-PL1L
●
AF-S テレコンバーターTC-14E Ⅱ/TC-17E Ⅱ/TC-20E Ⅲ
14

■仕 様
型式:
ニコン F マウント CPU 内蔵 G タイプ、AF-S レンズ
Jp
焦点距離: 300mm
最大口径比: 1:2.8
En
レンズ構成: 8 群 11 枚(ED レンズ 3 枚、ナノクリスタルコート)、
他保護ガラス 1 枚
De
画角: 8 10(35mm 判一眼レフカメラ、FX フォーマットのデジタル
一眼レフカメラ)
Fr
5 20(DX フォーマットのデジタル一眼レフカメラ)
6 40(IX240 カメラ)
撮影距離情報: カメラへの撮影距離情報出力可能
Es
ピント合わせ: IF(ニコン内焦)方式、超音波モーターによるオートフォーカス、
マニュアルフォーカス可能
Se
手ブレ補正: ボイスコイルモーター(VCM)によるレンズシフト方式
Ru
撮影距離目盛: ∞〜 2.2m(8ft 併記)
最短撮影距離: 2.3m(オートフォーカス時)、2.2m(マニュアルフォーカス時)
Nl
絞り羽根枚数: 9 枚(円形絞り)
絞り方式: 自動絞り
It
絞りの範囲: f/2.8 ― 22
測光方式: CPU 連動方式のカメラでは開放測光
Ck
フォーカス制限
切り換えスイッチ:
FULL(∞〜 2.3m)と∞− 6m の 2 段切り換え
Ch
三脚座: 位置指標(90)付きの 360回転三脚座リング、三脚座のみ着脱可能
寸法: 約 124 mm(最大径)× 267.5 mm(バヨネットマウント基準面
Kr
からレンズ先端まで)
質量: 約 2,900g
※仕様、外観の一部を、改善のため予告なく変更することがあります。
15

Notes on Safety Operations
CAUTION
Jp
Do not disassemble
En
Touching the internal parts of the camera or lens could result in injury. Repairs
should be performed only by qualified technicians. Should the camera or lens
De
break open as the result of a fall or other accident, take the product to a Nikon-
authorized service representative for inspection after unplugging the product
Fr
and/or removing the battery.
Es
Turn off immediately in the event of malfunction
Should you notice smoke or an unusual smell coming from the camera or
Se
lens, remove the battery immediately, taking care to avoid burns. Continued
operation could result in injury.
Ru
After removing or disconnecting the power source, take the product to a Nikon-
authorized service representative for inspection.
Nl
It
Do not use the camera or lens in the presence of flammable gas
Operating electronic equipment in the presence of flammable gas could result in
Ck
an explosion or fire.
Ch
Do not look at the sun through the lens or viewfinder
Viewing the sun or other strong light sources through the lens or viewfinder
Kr
could cause permanent visual impairment.
Keep out of reach of children
Particular care should be taken to prevent infants from putting the batteries or
other small parts into their mouths.
16

Jp
Observe the following precautions when handling the camera
and lens
En
• Keep the camera and lens unit dry. Failure to do so could result in fire or
electric shock.
De
• Do not handle or touch the camera or lens unit with wet hands. Failure to do
so could result in electric shock.
Fr
• When shooting with back-lighting, do not point the lens at the sun or allow
sunlight to pass directly down the lens as this may cause the camera to
Es
overheat and possibly cause a fire.
Se
• When the lens will not be used for an extended period of time, attach both
front and rear lens caps and store the lens away from direct sunlight. Failure
Ru
to do so could result in a fire, as the lens may focus sunlight onto a flammable
object.
Nl
It
Ck
Ch
Kr
17
Thank you for purchasing the AF-S NIKKOR 300mm f/2.8G ED VR
Ⅱ
lens. Before using this lens, please read these instructions and refer to
your camera's user's manual.
Jp
Nomenclature
En
De
Fr
Es
Se
Ru
Nl
It
Ck
Ch
1
Lens hood (P. 26)
$
Memory set button (P. 22)
2
%
Kr
Lens hood screw (P. 26)
Mounting index
3
Rubber grip
^
Lens mount rubber gasket (P. 28)
4
Focus operation button (Focus
&
CPU contacts (P. 28)
Lock/Memory recall/AF Start) (P. 22)
*
Built-in rotating tripod collar (P. 25)
5
Focus ring (P. 21)
(
Strap eyelet
6
Distance scale (P. 25)
)
Focus mode switch (P. 21)
7
Distance index line (P. 25)
q
Focusing limit switch (P. 21)
8
Depth-of-field indicators (P. 25)
w
Vibration reduction mode switch
9
Vibration reduction ON/OFF ring
(P. 24)
switch (P. 24)
e
Focus operation selection switch
0
Lens rotating position index (P. 25)
(AF-L/MEMORY RECALL/AF-ON)
!
Tripod collar lock screw (P. 25)
(P. 22)
@
r
Slip-in filter holder knob (P. 26)
Sound monitor switch (P. 22)
#
Slip-in filter holder (P. 26)
( ): reference page
18
Jp
En
De
Fr
Es
Se
Ru
Nl
It
Ck
Ch
Kr
19

Major features
•
The Nano Crystal Coat deposited on some of the lens elements ensures that fine, clear
Jp
images can be reproduced under various shooting conditions, from the sunny outdoors to
spotlighted interior scenes.
•
This lens features AF-L, which locks focus during autofocus, AF-ON, which activates
En
autofocus, and MEMORY RECALL, which saves and recalls selected focus distances.
•
By enabling vibration reduction (VR
Ⅱ
), slower shutter speeds (approximately four stops*)
De
can be used, thus increasing the range of usable shutter speeds, particularly when hand-
holding the camera. (*Based on results achieved under Nikon measurement conditions.
The effects of vibration reduction may vary according to shooting conditions and use.)
Fr
•
AF-I/AF-S Teleconverters TC-14E/TC-14E Ⅱ/TC-17E Ⅱ/TC-20E/TC-20E Ⅱ/TC-20E Ⅲ are
usable.
Es
Important
•
When mounted on Nikon DX format digital SLR cameras, such as the D300-Series
and D90, the lens’ picture angle becomes 5°20’ and its 35mm equivalent focal length is
Se
approx. 450mm.
Ru
Usable cameras and available functions
There may be some restrictions or limitation for available functions. Refer to camera's
user's manual for details.
Nl
Function Exposure mode
AF start
Cameras
Focus
Memory
*1
It
VR AF
on the
P
6$0
lock
recall
lens
Nikon digital SLR (Nikon FX/DX format)
Ck
cameras, F6, F5, F100, F80-Series/
N80-Series*, F75-Series/N75-Series*,
F65-Series/N65-Series*
Ch
2
Pronea 600i/6i*, Pronea S*
—
F4-Series, F90X/N90s*, F90-Series/
3
3
4
*
Kr
—
*
*
5
——
N90*, F70-Series/N70*
*
F60-Series/N60*, F55-Series/N55-Series*,
F50-Series/N50*, F-401x/N5005*, F-401s/
—— — — —
N4004s*, F-401/N4004*
F-801s/N8008s*, F-801/N8008*,
—— — — —
——
F-601
M /N6000*
F3AF, F-601/N6006*, F-501/N2020**,
— — — — — ————
Nikon MF cameras (except F-601
M /N6000*)
: Possible
—
: Not possible VR: Vibration reduction AF: Autofocus
* Sold exclusively in the USA
** Sold exclusively in the USA and Canada
*1: P includes AUTO and Vari-Program System.
*2: Manual (M) is not available.
*3:
When the focus operation selection switch is set to AF-ON, autofocus begins as soon as
the focus operation button is pressed while the shutter-release button pressed halfway.
*4: Press the memory set button or a focus operation button while pressing the shutter
release button halfway.
*5: Possible, with limited restrictions
20
