Konig Electronic Camera and recorder in housing: инструкция
Раздел: Безопасность
Тип:
Инструкция к Konig Electronic Camera and recorder in housing

SAS-DVRPIR10
MANUAL (p. 2)
BRUGERVEJLEDNING (s. 67)
ANLEITUNG (S. 7)
VEILEDNING (s. 72)
MODE D’EMPLOI (p. 12)
ИНСТРУКЦИЯ (77 стр.)
GEBRUIKSAANWIJZING (p. 17)
KILAVUZ (s. 82)
MANUALE (p. 22)
KASUTUSJUHEND (lk. 87)
MANUAL DE USO (p. 27)
NÁVOD (s. 92)
MANUAL (p. 32)
ROKASGRĀMATA (lpp. 97)
HASZNÁLATI ÚTMUTATÓ (o. 37)
NAUDOJIMO VADOVAS (102 p.)
KÄYTTÖOHJE (s. 42)
PRIRUČNIK (str. 107)
BRUKSANVISNING (s. 47)
РЪКОВОДСТВО (p. 112)
NÁVOD K POUŽITÍ (s. 52)
INSTRUKCJA OBSŁUGI (str. 117)
MANUAL DE UTILIZARE (p. 57)
PRIROČNIK (str. 122)
ΕΓΧΕΙΡΙΔΙΟ XPHΣHΣ (σελ. 62)
Motion Detector with Camera
ENGLISH
Introduction
The motion detector is ideal for hidden security and observation. In the PIR housing there
is an SD card reader (SD card not included) for recording, integrated with unique motion
detection technology. The recorder is used to constantly record but it will not store data if
there is no movement detected. If movement is detected the recorder will start storing the
data 3 seconds before movement is detected. This technology ensures that no movement is
lost and everything is captured. It is equipped with IR LED for night vision and microphone.
The SAS-DVRPIR10 comes with a remote control for easy operation.
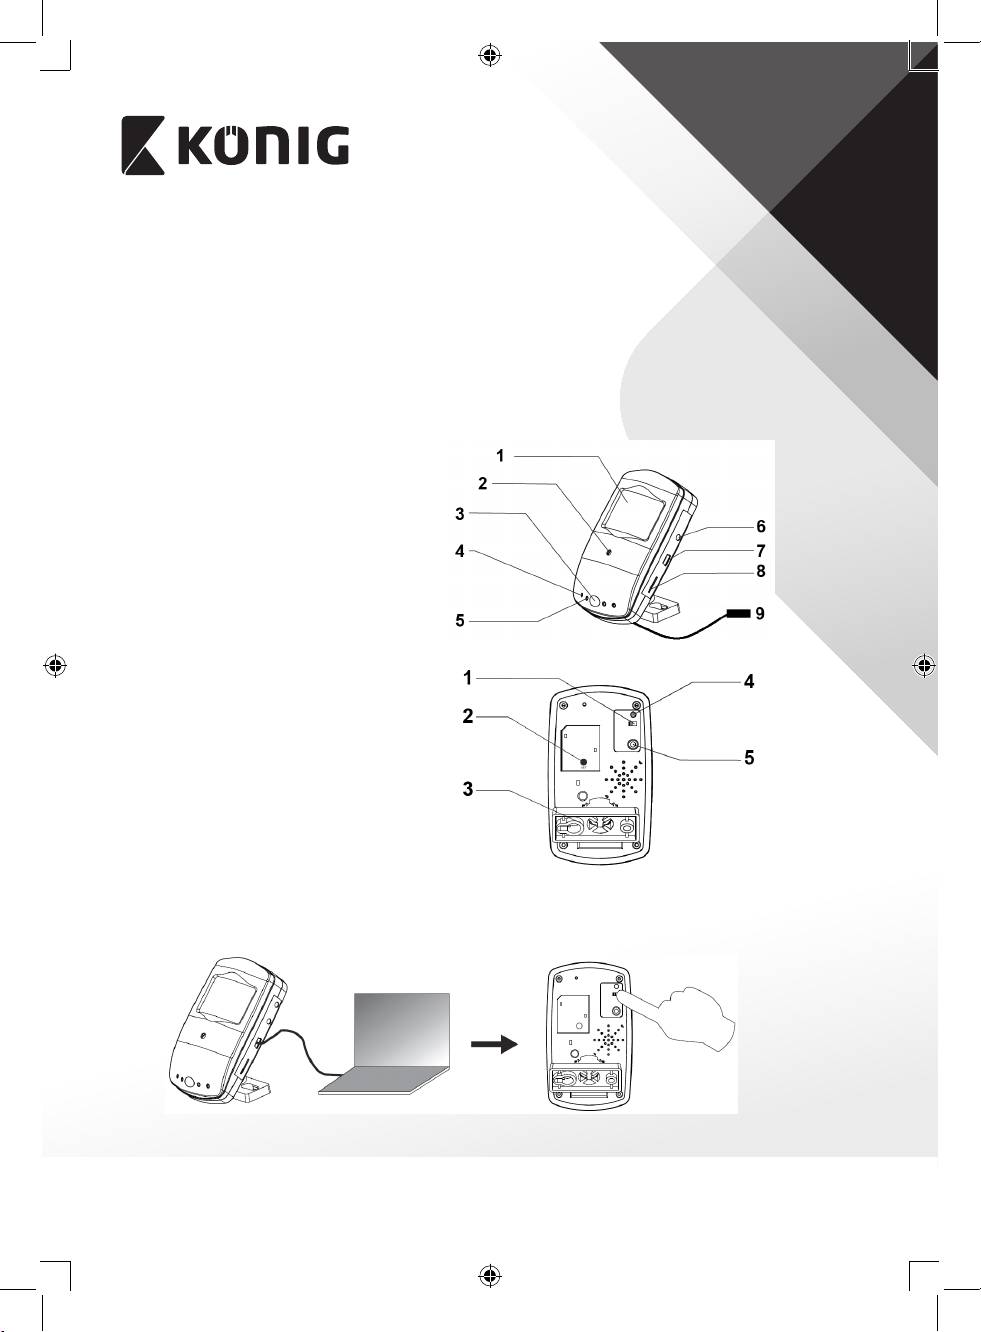
Description
1. LED light
2. Camera
3. IR receiver
4. Mic
5. Standby indicator
6. AV out
7. USB port
8. TF card slot
9. DC plug
1. Power On/O
2. Set
3. Bracket
4. Power indicator
5. Motion detection (trigger)
Settings
1. Connect the motion detector to your notebook, either directly or with a USB connection.
Turn on the power.
2
ENGLISH
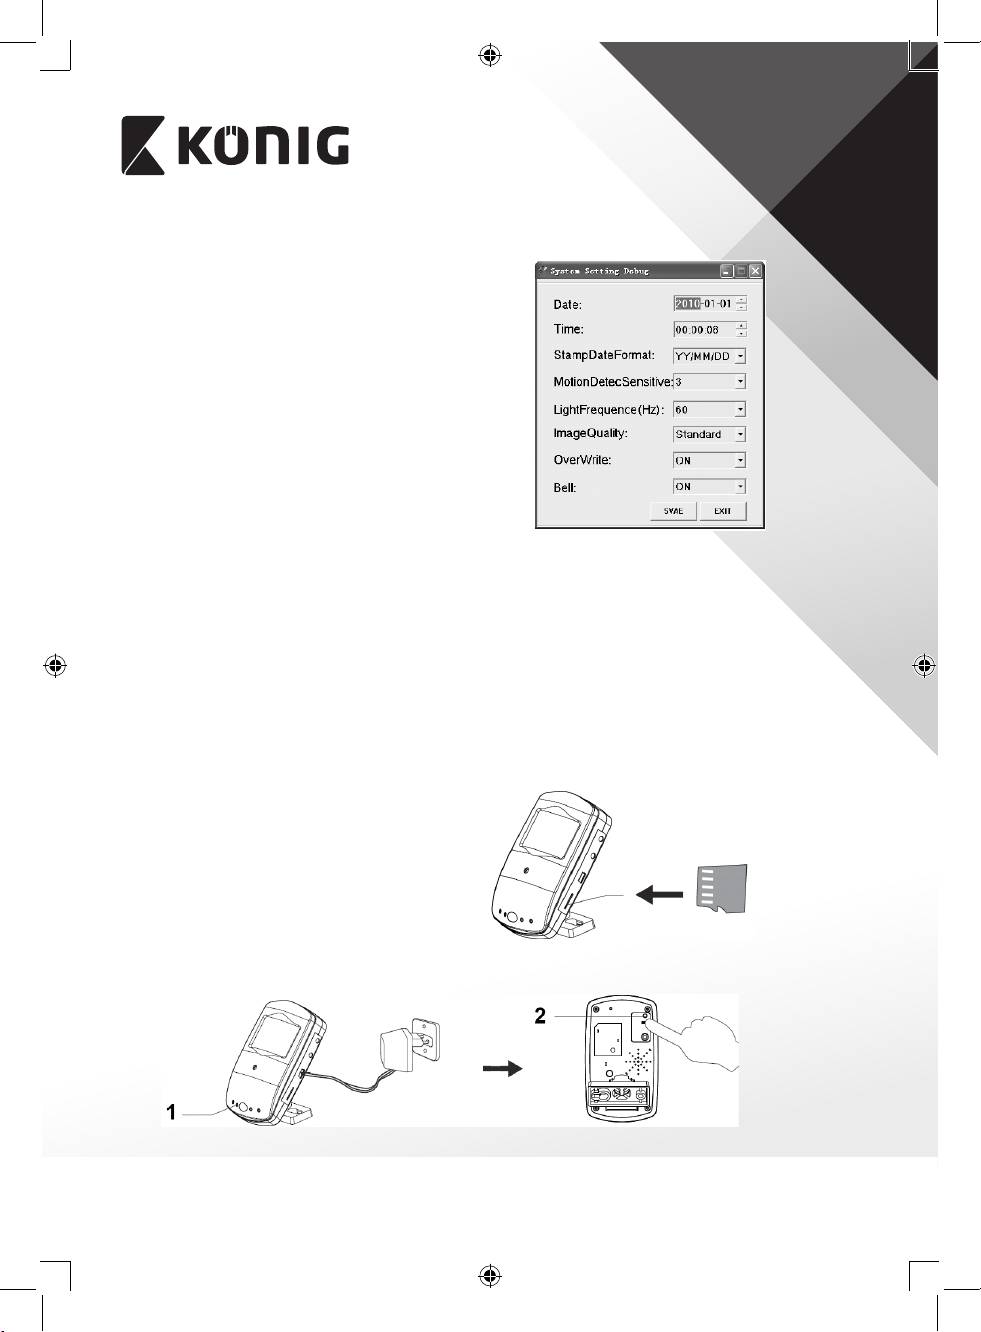
2. Open the folder and select DvXSet.exe to enter the settings.
• Date: Click on the year, month and date to set. Use
the up and down arrow button to adjust the settings.
• Time: Click on the hour, minute and second to set.
Use the up and down arrow button to adjust the
settings.
• Stamp Date Format: Select YY/MM/DD, DD/MM/YY
or MM/DD/YY. Use the arrow down button to adjust
the settings.
• Motion Detection Sensitivity: Select the sensitivity of
the motion detector from 1 to 5. Use the arrow down
button to adjust the setting. (5 is the most sensitive
setting, 3 is recommended).
• Light Frequency (Hz): Select the light frequency for
your country. For example, 50Hz for Europe; 60Hz for
United States. Use the arrow down button to select.
• Image Quality: Select the recording quality, High-HD, Standard or Low VGA. Use the arrow
down button to select.
• OverWrite: If the SD card must be overwritten when it is full, then select ON. If overwritten
is not preferred, then select OFF. Use the arrow down button to select.
• Bell: When you want to hear a peep sound, press the button on the remote control or
motion detector, then select ON. If not, then select OFF. Use the arrow down button to
select.
• After adjusting all settings, click on SAVE and then press the SET button on the back side of
the camera for 3 to 5 seconds to store the settings in the motion detector.
Operation
1. Insert a Micro SD Card (max. 32 GB).
2. Insert the power supply into DC plug of the DC cable. Switch the power on. The power
and standby indicator light up.
1. Power indicator 2. Standby indicator
3

ENGLISH
3. For operation on the motion detector itself
(otherwise use the remote control), press the
trigger button. When motion is detected,
the standby indicator ashes once and goes
out. To end the function, press the trigger
button again. The standby indicator will light
up again.
4. The motion detector can also be operated by
the remote control.
A: Start manual recording (motion detection is
disabled and the motion detector will record
constantly until the stop button is pressed)
B: Stop manual recording
C: Enable motion detection
D: Disable motion detection
Note: The remote control has infrared transmission, which prompts you to point the remote
control towards the motion detector for operating.
5. The motion detector can be connected
directly to a monitor or TV for live view or
playback function.
Use the AV cable to connect.
AV Line
When connected to a monitor or TV, the
following indicators can be shown on the screen.
A: The motion detector is recording
B: Present time and date
C: Recording time
D: Motion detection
4

ENGLISH
6. For playback or le transfer, connect the motion detector with the USB cable to a
computer or notebook. Switch on the motion detector. Open the folder to view les.
Open folder VIDEO to playback the recordings or copy/delete les (play back of les
using a player that supports AVI les).
7. The motion detector starts to record 3 seconds before motion is detected and 15 seconds
after the last detection with a minimum of 18 seconds of recording. When motion is
continually detected, the motion detector will record constantly. The recording time of
any single le should not exceed 15 minutes.
Specications
• Resolution: 1280 x 720
• Video format: AVI/D1/VGA 30 fps with audio
• Camera lens: 3 mm
• Supported SD card: Maximum 32 GB
• Video le size: 35 MB/min
• USB port: 2.0
• AV out: 3.5 mm
• Pre recording time: 3 Seconds
• Distance remote control: 10 Meters
• Night vision range: 8 Meters
• Power supply: 6 V, 800 mA
• Dimensions: 103 x 60 x 29.5 mm
5
ENGLISH
Safety precautions:
CAUTION
RISK OF ELECTRIC SHOCK
To reduce risk of electric shock, this product should ONLY be opened by an authorized technician
DO NOT OPEN
when service is required.
Disconnect the product from mains and other equipment if a problem should occur.
Do not expose the product to water or moisture.
Maintenance:
Clean only with a dry cloth.
Do not use cleaning solvents or abrasives.
Warranty:
No guarantee or liability can be accepted for any changes and modications of the product or damage caused due to incorrect use
of this product.
General
Designs and specications are subject to change without notice. All logos, brands and product names are trademarks or registered
trademarks of their respective holders and are hereby recognized as such.
Keep this manual and packaging for future reference.
Disposal:
This product is marked with this symbol. It means that used electrical and electronic products should not be mixed with
general household waste. There is a separate collections system for these products.
This product has been manufactured and supplied in compliance with all relevant regulations and directives, valid for all member
states of the European Union. It also complies to all applicable specications and regulations in the country of sales.
Formal documentation is available upon request. This includes, but is not limited to: Declaration of Conformity (and product
identity), Material Safety Data Sheet, product test report.
Please contact our customer service desk for support:
via website: http://www.nedis.com/en-us/contact/contact-form.htm
via e-mail: service@nedis.com
via telephone: +31 (0)73-5993965 (during oce hours)
NEDIS B.V., De Tweeling 28, 5215 MC ’s-Hertogenbosch, THE NETHERLANDS
6
