Konig Electronic Digital video recorder with built-in 1 TB hard disk: инструкция
Раздел: Безопасность
Тип:
Инструкция к Konig Electronic Digital video recorder with built-in 1 TB hard disk
SAS-DVRSET35/45
SAS-DVR1004/1008/1016
SAS-CAM11x0
/12x0
MANUAL (p. 2)
BRUGERVEJLEDNING (s. 183)
ANLEITUNG (S. 15)
VEILEDNING (s. 197)
MODE D’EMPLOI (p. 29)
ИНСТРУКЦИЯ (211 стр.)
GEBRUIKSAANWIJZING (p. 43)
KILAVUZ (s. 225)
MANUALE (p. 57)
KASUTUSJUHEND (lk. 239)
MANUAL DE USO (p. 71)
NÁVOD (s. 253)
MANUAL (p. 85)
ROKASGRĀMATA (lpp. 267)
HASZNÁLATI ÚTMUTATÓ (o. 99)
NAUDOJIMO VADOVAS (281 p.)
KÄYTTÖOHJE (s. 113)
PRIRUČNIK (str. 295)
BRUKSANVISNING (s. 127)
РЪКОВОДСТВО (p. 309)
NÁVOD K POUŽITÍ (s. 141)
INSTRUKCJA OBSŁUGI (str. 324)
MANUAL DE UTILIZARE (p. 155)
PRIROČNIK (str. 338)
ΕΓΧΕΙΡΙΔΙΟ XPHΣHΣ (σελ. 169)

ENGLISH
Table of contents
• About this short description manual 2
• Packaging content 2
• Technical specications 3
• Safety precautions 5
• Product description 5
- Front panel 5
- Rear panel 6
- Remote control 7
- Mouse 7
• Installation instructions 8
• User instructions 8
- Power on the system 9
- Sitemap main menu 10
DISPLAY 11
RECORD 11
SEARCH 11
NETWORK 12
ALARM 12
DEVICE 12
SYSTEM 13
ADVANCED 13
• Mobile device support 13
• Safety precautions 14
• Maintenance 14
• Warranty 14
• Disclaimer 14
• Disposal 14
About this short description manual
This manual describes the operation and installation of the digital video recorder and
cameras. Please refer to the extensive English manual for further details about the digital
video recorder (DVR).
• We recommend that you read this manual before installing/using the security camera
system.
• Keep this manual in a safe place for future reference.
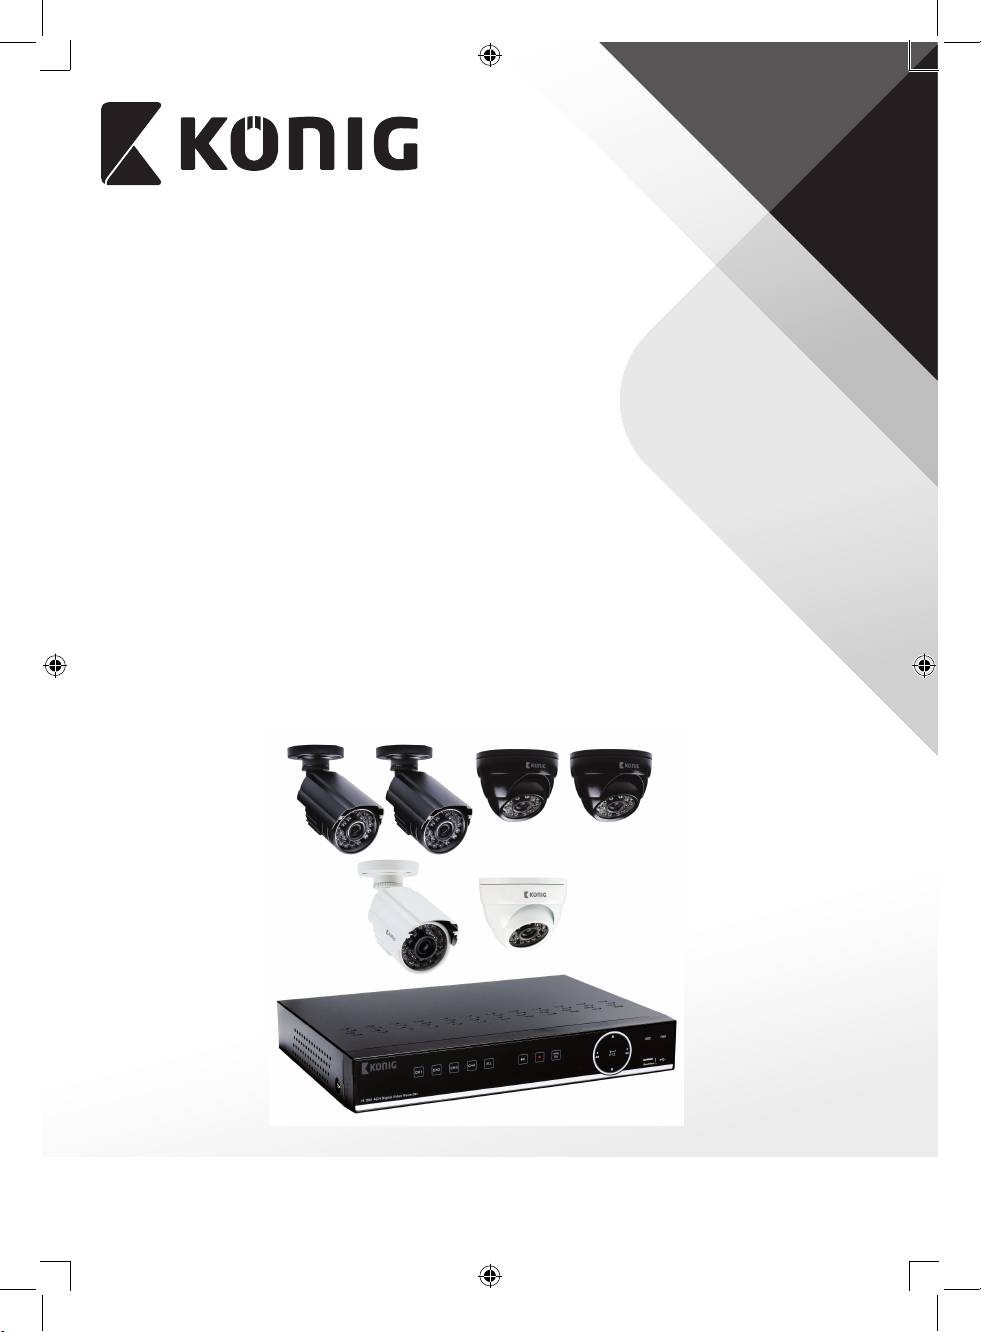
Packaging content
SAS-SETDVR35
• 1x DVR: SAS-DVR1004
• 2x camera: SAS-CAM1100
•
2x
18-metre connection cable
• 1x remote control (incl. 2x AAA battery)
• 1x USB mouse
• 1x AC/DC power supply
2

ENGLISH
•
1x
HDMI cable
•
1x UK/EU power cable
• 1x CD-ROM
• Installation guide
SAS-SETDVR45
• 1x DVR: SAS-DVR1004
• 4x camera: SAS-CAM1100
•
4x
18-metre connection cables
• 1x remote control (incl. 2x AAA battery)
• 1x USB mouse
• 1x HDMI™ cable
• 1x AC/DC power supply
• 1x EU power cable
• 1x UK power cable
• 1x CD-ROM
• Installation guide
SAS-DVR1004/1008/1016
•
1x DVR
• 1x remote control (incl. 2x AAA battery)
• 1x USB mouse
• 1x HDMI™ cable
• 1x AC/DC power supply
• 1x EU power cable
• 1x UK power cable
• 1x CD-ROM
• Installation guide
SAS-CAM1100/1110
• 1x camera
•
1x
18-metre connection cable
• Manual
SAS-CAM1200/1210
• 1x camera
•
1x
18-metre connection cable
• Manual
Technical specications
Digital video recorder SAS-DVR1004/1008/1016
• Video compression:
h.264
• Video system:
PAl/NTSC
• Operation system:
linux
• Video input:
4/8/16 channels BNC
• Video output:
1 channel BNC/1 channel VGA/1 channel HDMI™ 1080p
• Audio input:
2/4 channel RCA
• Audio output:
1 channel RCA
3

ENGLISH
• VGA resolutions:
800 x 600, 1024 x 768, 1280 x 1024, 1440 x 900, 1920 x 1080
• Display resolutions:
PAl: 960 x 576 @ 25 fps (each channel)
NTSC: 960 x 480 @ 30 fps (each channel)
• Record resolutions:
PAl D1 mode: 360 x 288 (CIF), 720 x 288 (hD1), 720 x 576 (D1)
960h Mode: 480 x 288 (WCIF), 960 x 288 (WhD1),
960 x 576 (WD1)
NTSC D1 Mode: 360 x 240 (CIF), 720 x 240 (hD1), 720 x 480 (D1)
960h Mode: 480 x 240 (WCIF), 960 x 240 (WhD1),
960 x 480 (WD1)
• Record frame rate:
PAl (each channel) D1 mode/960h mode: 25 fps
NTSC (each channel) D1 mode/960h mode: 30 fps
• Display:
full screen/quad/PIP/S.E.Q.
• HDD interface:
1x SATA 3.5 or 2.5 inch
• HDD capability:
up to 2 TB
• Playback:
4/8/16 channels simultaneously
• Playback via network: 4 channels
• Network interface:
RJ45, 10 m/100 m
• Network protocol:
supports TCP/IP, DhCP, DDNS, PPPoE
• Network function:
supports live view with IE and mobile phone
• USB interface:
USB 2.0 for mouse and le backup/upgrade
• Back-up:
AVI l
e via USB ash/removable hDD USB disk/USB CD/network
• Authority:
max. 7 users
• Operation:
live view, record, playback, backup and remote access at the
same time
• Recording quality:
best/good/normal
• Record modes:
normal/schedule/motion detection/remote recording
• Pre-recording:
3 sec.
• Playback mode:
play/fast forward/fast rewind/frame by frame
• Playback search:
date/time/le list
• Recording pack time:
15/30/45/60 min.
• Privacy zone:
yes
• Power supply:
DC 12 V/3 A
• Dimensions:
300 x 222 x 50 mm
• Weight:
1.5 kg (without hDD)
Camera SAS-CAM1100/1110
• Image chip: 1/4" CMOS
• Lens: 3.6 mm
• Horizontal resolution: 700 TVL
• View angle:
45°
• Infrared LED:
24 pcs, 5 ~ 10 m
• Light sensitivity:
1.5 lux
• Electronic shutter:
1/50 (1/60) ~ 1/100.000 sec.
• S/N ratio:
> 48 dB
• Gain:
auto
• Gamma correction:
> 0.45
• Protection:
IP66
• Working temperature: -20 °C ~ 55 °C
4
ENGLISH
• Video output: 1.0 V p-p/75 Ω
• Voltage: DC 12 V
• Dimensions: 145 x 60 x 55 mm
• Weight (with bracket): 350 g
Camera SAS-CAM1200/1210
• Image chip: 1/4" CMOS
• Lens:
3.
6 mm
• Horizontal resolution: 700 TVL
• View angle:
45°
• Infrared LED:
24
pcs, 5 ~ 10 m
• Light sensitivity:
1.5 lux
• Electronic shutter:
1/50 (1/60) ~ 1/100.000 sec.
• S/N ratio:
> 48 dB
• Gain:
autO
• Gamma correction:
> 0.45
• Protection:
IP66
• Working temperature: -20 °C ~ 55 °C
• Video out: 1.0 V p-p/75 Ω
• Voltage: DC 12 V
• Dimensions: 100 x 75 mm
• Weight (with bracket): 250 g
Safety precautions
Do not open the camera or DVR in the event of a malfunction. These products should only be
opened by a qualied engineer.
Do not submerge the camera and DVR in liquid.
Do not expose the DVR to water or humidity.
Do not expose the camera or DVR to high temperatures (see technical specications).
Do not install the system close to strong magnetic elds, such as speakers. This may aect the
performance of the system.
Product description
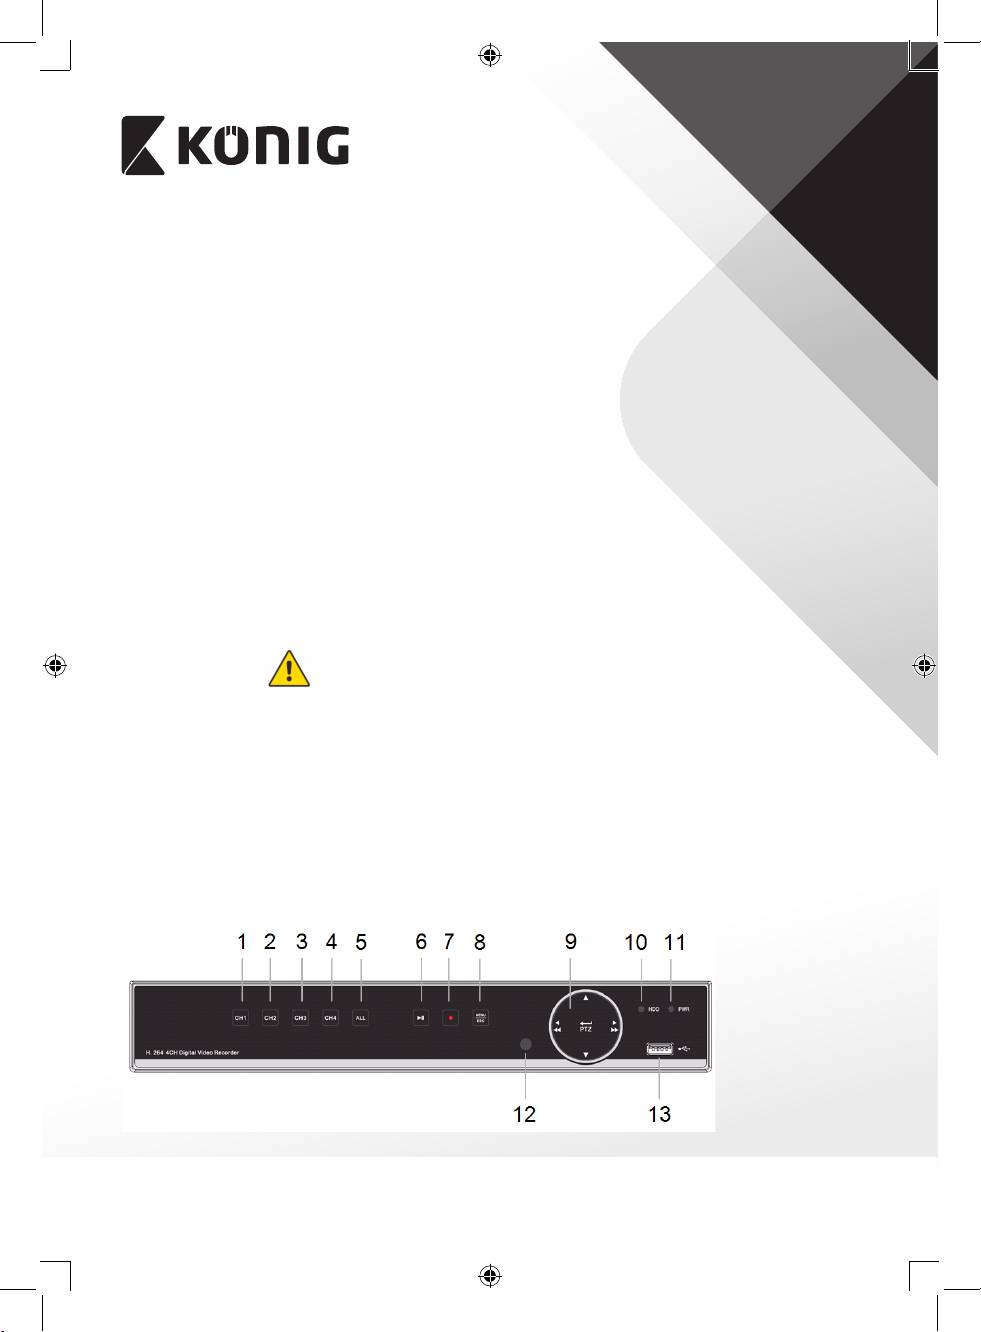
Front panel (SAS-DVR1004 shown)
5
ENGLISH
1. CH1, touch to select channel 1
2. CH2, touch to select channel 2
3. CH3, touch to select channel 3
4. CH4, touch to select channel 4
5. ALL, touch to select (see) all channels in 1 screen (quad view)
6. PLAY/PAUSE, touch to start playback or pause playback
7. REC, touch to start recording
8. MENU/ESC, touch to select menu or escape from menu
9. Select button:
</¯ Move left/rewind
>/˘ Move right/forward
A Move up
V Move down
10. HDD, hard disk drive indicator
11. PWR, power indicator
12. IR EYE, for receiving IR signals of remote control
13. USB connector for mouse
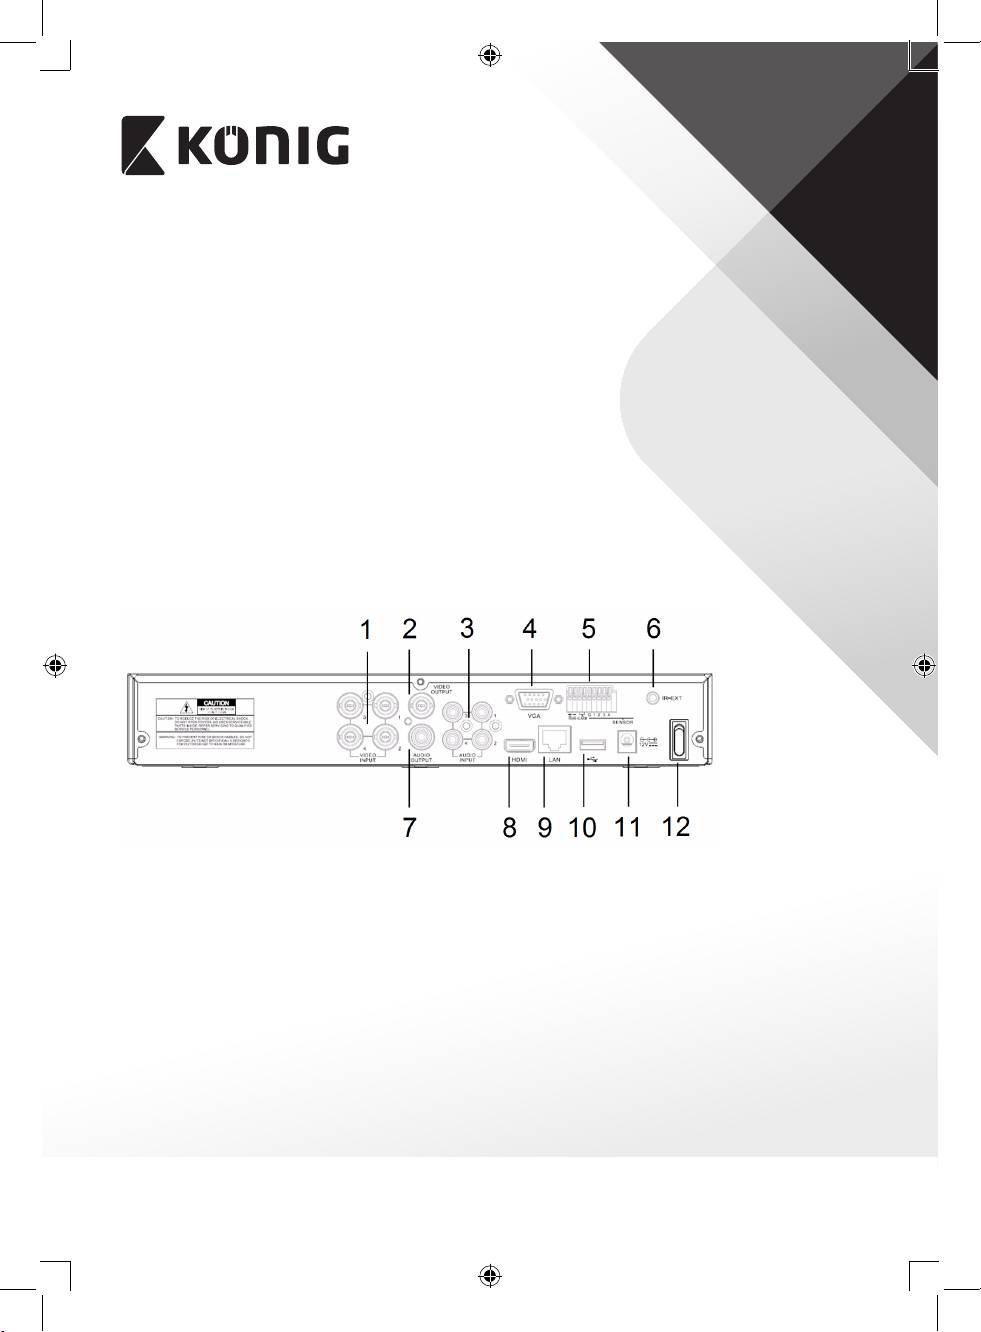
Rear panel
1.
Video (camera) input (max. 16 for SAS-DVR1016)
2. Video output (composite)
3. Audio input
4. Video output (VGA)
5. RS485/sensor/alarm interface (see below diagram)
6. Not used
7. Audio output
8. Video output (HDMI)
9. Ethernet port (LAN)
10. USB port (Flash drive, hard drive)
11. DC 12 V input
12. Power switch
6

ENGLISH
Remote control
1. Mute button: press to switch o the sound.
2. All button: press to select (see) all channels
in 1 screen (quad view).
3. Numeric buttons: press to select channel or
input of number.
4. Menu button: press to select the menu.
5. Submenu button: press to select the
submenu.
6. Select buttons: select options with the
cursor buttons and select button.
7. Playback/record buttons
Rewind button: press to reverse the video.
Play button: press to start playing the video.
Forward button: press to forward the video.
Recording button: press to record the video.
Pause button: press to pause the video.
Stop button: press to stop the video.
Mouse
Clicking the left mouse key: In menu lock mode, enter pop-up menu and click on any
sub menu to pop up log-in window. In menu unlock mode,
enter pop-up menu, and then click left key to enter any sub
menu directly.
After entering the main menu, click left key to enter any sub
menu: in (detailed le) menu mode, click on the left key to
playback a recorded le.
Change the status of check box and motion detection area.
Click on combo box to access pull down menu: click left key
to stop dwell time display if it is activated.
Click the left key to select values in edit boxes or pull-down
menu, and select Chinese characters, special symbols and
numeric characters. You can also click left instead of (enter
) or (backspace ).
Clicking the right mouse key: In live display mode, click on the right key to pop up the
main menu.
Double-click left mouse key: In live display or playback mode, double-click left key to
maximise the screen.
Moving the mouse: Select menu item.
7
ENGLISH
Sliding mouse: Slide the mouse to select a motion area if you are in motion
mode. Slide the mouse to adjust colour and volume if you
are in colour settings menu mode.
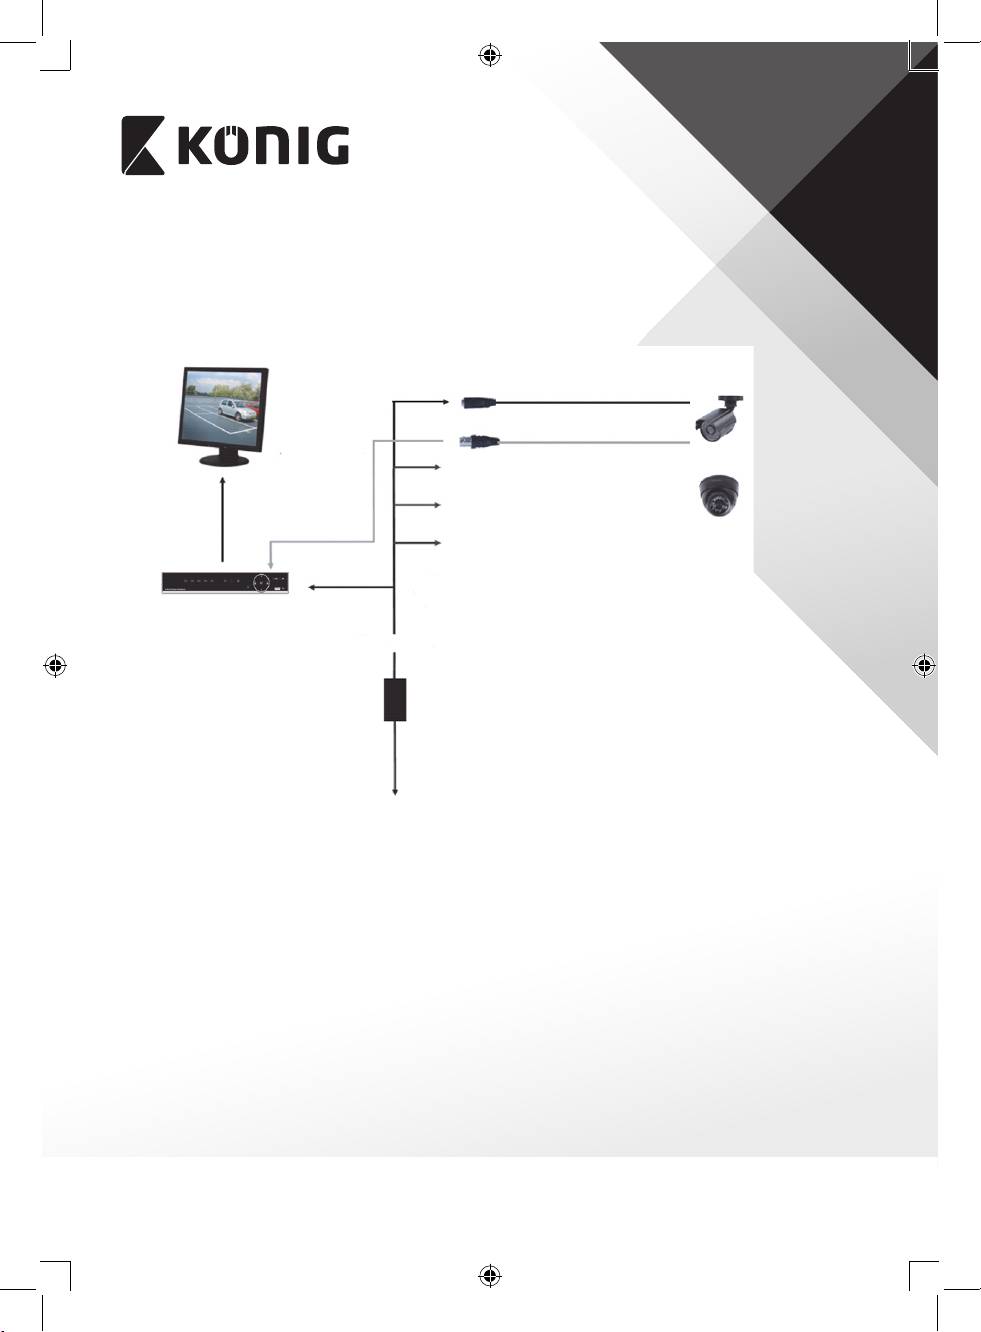
Installation instructions
Connection cable
To camera input
Max. 4/8/16 camera
inputs
To DC 12 V input
Divider cable
with 5x DC
output
Connect divider cable to power supply
AC/DC power
supply
To AC 220 V power outlet
User instructions
The following chapters describe some of the features and functions of the DVR. Refer to
the extensive English manual for further details about the DVR. For system settings, it is
recommended to use the mouse.
Note: the system language can be set to several languages. The screenshots in this manual,
however, are shown only in English.
8
ENGLISH
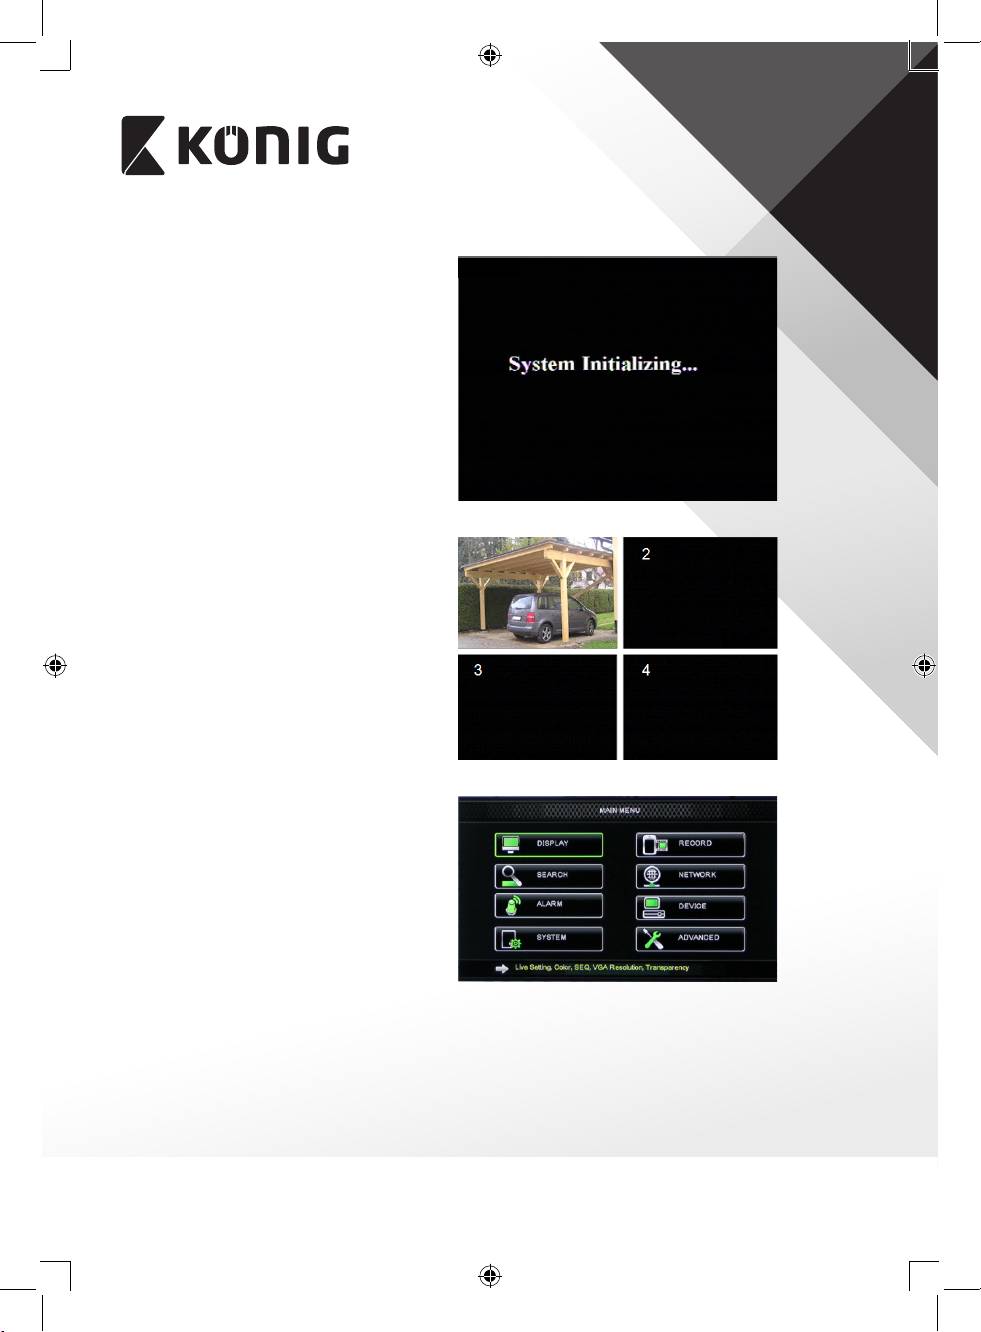
Power on the system
After connecting the connection cables of the
cameras and the monitor, connect the power
cable to the DVR and wall outlet. Press the
power button on the rear panel to power on
the system. You enter the system initialising
screen.
After system initialising is nished, the DVR
automatically shows the live screen of the
connected cameras (1, 2, 3 or 4). This is called
live mode.
MAIN MENU
In live mode, click on menu button on the
front panel or on the remote control to enter
the main menu interface. Alternatively, right-
click the mouse to show the toolbar with the
main menu icon.
In the main menu mode, you can control
device management settings, such as display,
record, network, search, device, system and
advanced settings etc. See next page for the
site map of the main menu.
9

ENGLISH
Sitemap main menu
Note: for the following instructions, we assume that you control the DVR main menu with a
mouse.
10
ENGLISH
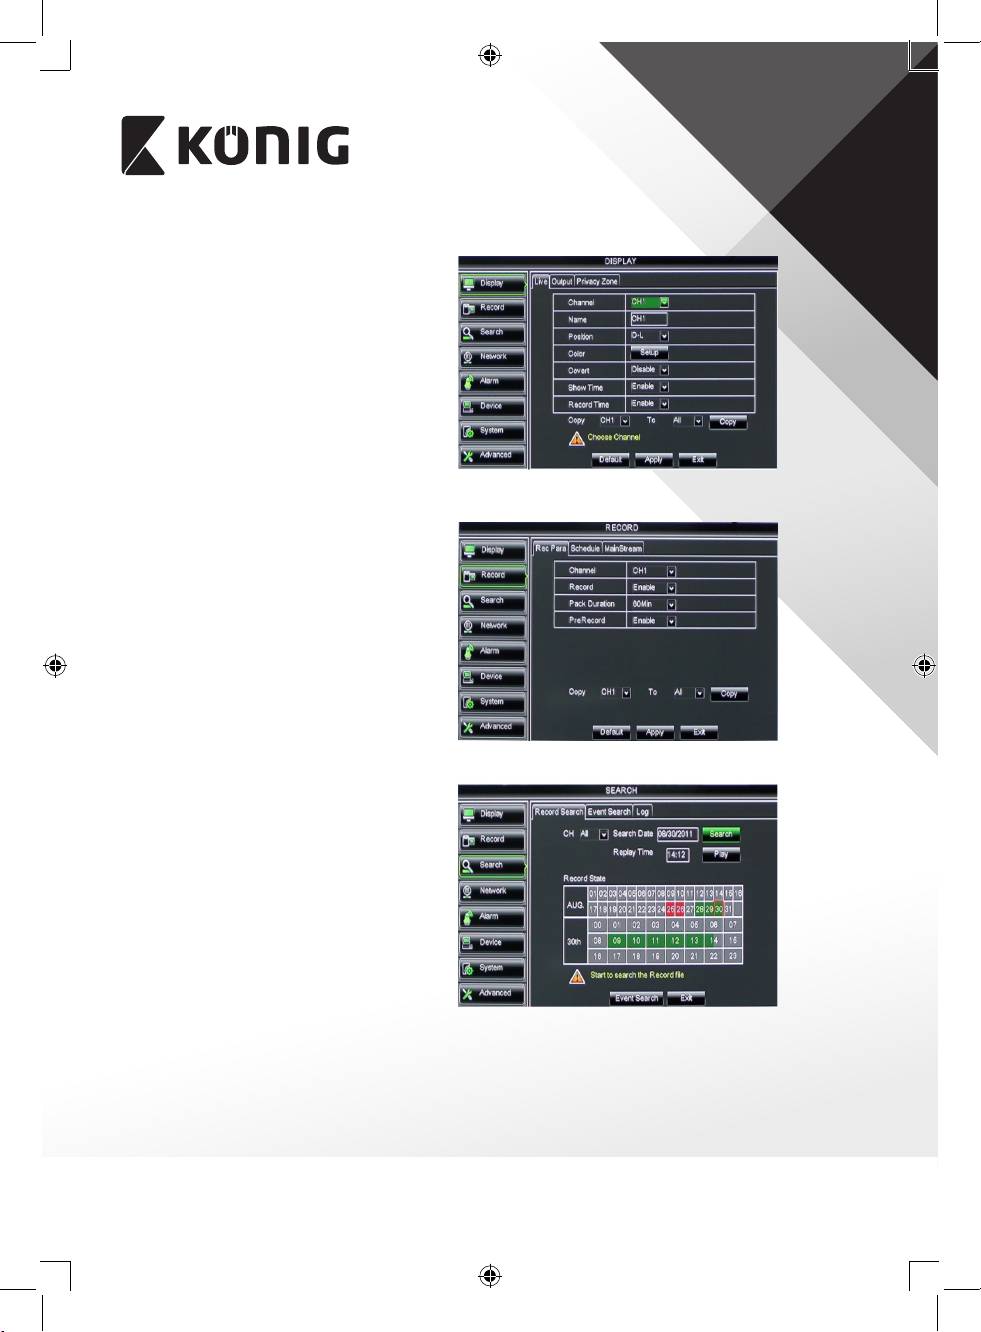
DISPLAY
By clicking on display in the main menu, you
enter the display section.
The live mode contains the on-screen
settings/information per channel and the
colour setting per channel if the DVR is in live
mode.
Output contains the settings for the video
output to the monitor.
With privacy zone you can set 4 zones per
channel which are not visible due to the
privacy restrictions.
RECORD
Section for setting the recording parameters.
The nal record settings dene the total
recording time with a hard disk of 500 GB.
With average settings, the DVR can record for
14 days, based on 8 hours per day.
SEARCH
The search section provides options to search
recordings by date, time or event.
The log option allows you to view the log
information you searched.
The backup option exports all the listed log
information.
11
ENGLISH
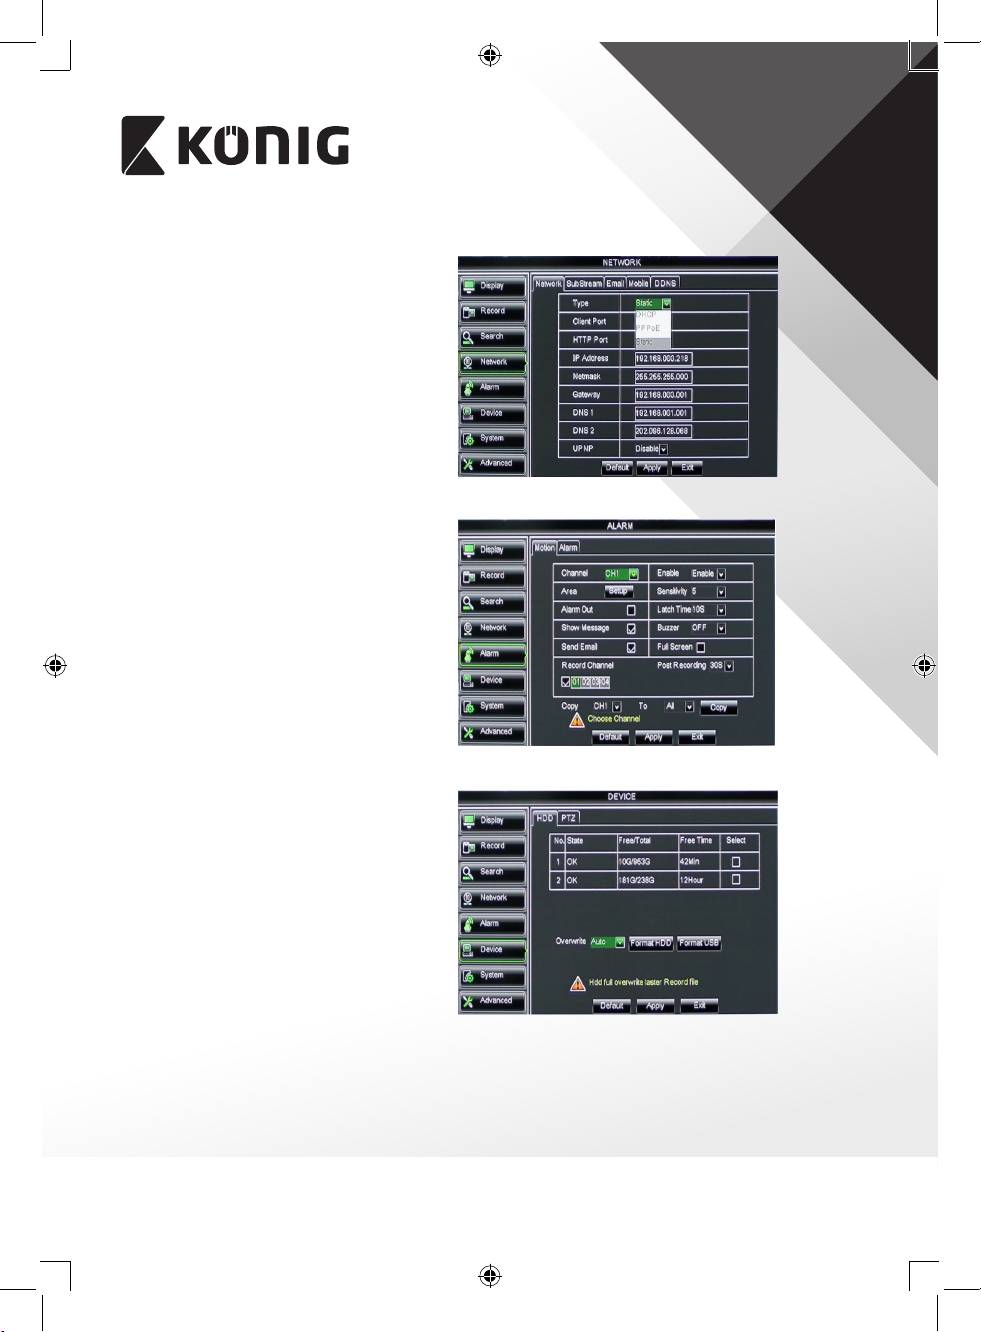
NETWORK
It includes all network settings to integrate
the DVR system in your network.
To set the network, some network skills are
recommended. Please contact your reseller or
any person with network skills for help.
To connect the DVR to the internet, certain
settings must be done in the network section.
Please refer to the extensive English manual
for further details about the network settings.
ALARM
It provides the option to set motion alarm per
channel. After the parameters are dened, the
DVR starts recording if it detects any motion.
The alarm section allows you to connect to an
external motion detector and set the related
parameters.
DEVICE
Section for information about hard disk
capacity, and pan, tilt and zoom settings of
the camera.
12
ENGLISH
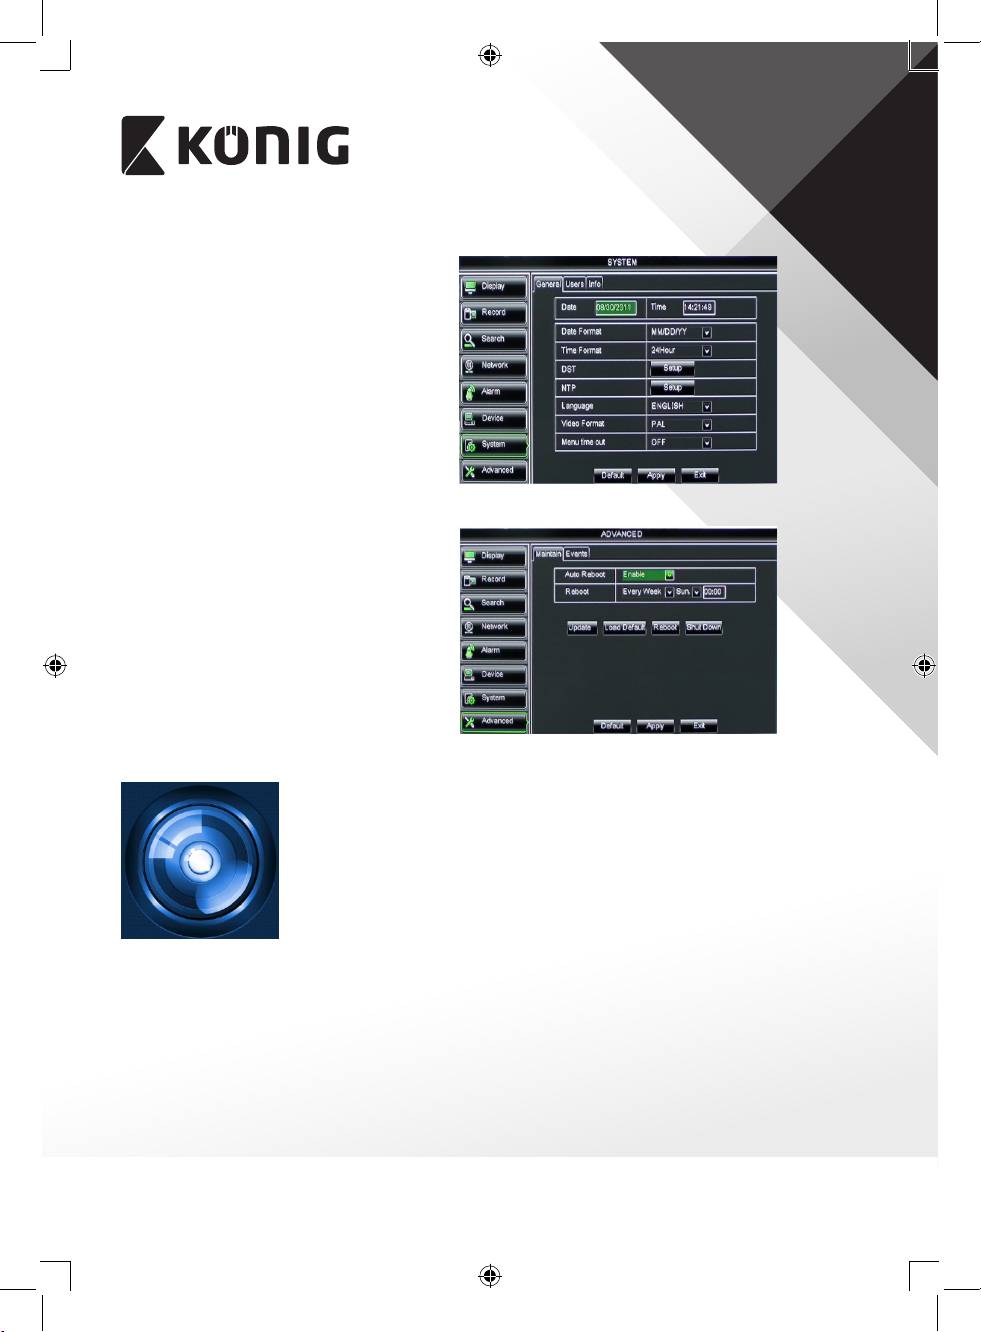
SYSTEM
It provides general settings for the DVR
system and its users.
ADVANCED
Section for advanced and additional system
settings.
Mobile device support
This DVR supports a live stream from the cameras to your mobile
device, such as smartphones and tablets. In this way, you can have
on-the-go access to your security system from virtually anywhere.
To be able to view feed, install the RXCamPro app on your mobile
device. You can nd the app in the Apple App Store (iOS 5.0 or
above) and Google Play (Android 2.3 or above).
Note: for using the mobile device support, the DVR must be connected to the internet with
the correct network settings.
13
ENGLISH
Safety precautions
CAUTION
RISK OF ELECTRIC SHOCK
To reduce risk of electric shock, this product should ONLY be opened by an authorized
DO NOT OPEN
technician when service is required.
Disconnect the product from mains and other equipment if a problem should occur.
Do not expose the product to water or moisture.
Maintenance
Clean the product only with a dry cloth.
Do not use cleaning solvents or abrasives.
Warranty
Any changes and/or modications to the product will void the warranty. We cannot accept any liability for damage caused by
incorrect use of this product.
Disclaimer
Designs and specications are subject to change without notice. All logos, brands and product names are trademarks or registered
trademarks of their respective holders and are hereby recognized as such.
Disposal
• This product is designated for separate collection at an appropriate collection point.
Do not dispose of this product with household waste.
• For more information, contact the retailer or the local authority responsible for waste management.
This product has been manufactured and supplied in compliance with all relevant regulations and directives, valid for all member
states of the European Union. It also complies to all applicable specications and regulations in the country of sales.
Formal documentation is available upon request. This includes, but is not limited to: Declaration of Conformity (and product
identity), Material Safety Data Sheet, product test report.
Please contact our customer service desk for support:
via website: http://www.nedis.com/en-us/
via e-mail: service@nedis.com
via telephone: +31 (0)73-5993965 (during oce hours)
NEDIS B.V., De Tweeling 28, 5215 MC ’s-Hertogenbosch, THE NETHERLANDS
14
