Karcher ICC 1 D Adv: Before Commissioning
Before Commissioning: Karcher ICC 1 D Adv
English
25
Note
The appliance is fitting with a foot brake that
can also function as a parking brake.
Î
Switch to operating mode "Parking
brake" (P).
Î
Press the brake pedal.
Î
Press brake pedal and keep it de-
pressed.
Î
Switch to operating mode "Foot brake".
Note
The appliance is fitted with tension belts,
ropes or chains for safe transport.
To unload the machine, proceed as follows:
Î
Lock parking brake.
Î
Remove the tension belts, ropes or
chains from the transport eyelets.
The machine can be moved in 2 ways:
(1) By pushing it (see Moving sweeper with-
out engaging self-propulsion).
(2) By driving it (see Moving sweeper by en-
gaging self-propulsion).
Î
Unscrew rear cover.
Î
Shift freewheel lever (pushing opera-
tion).
Note
Do not move the machine for long distances
without engaging self-propulsion, a speed
of 10 km/h should not be exceeded.
Î
Shift freewheel lever (driving operation).
Î
Park the sweeper on an even surface.
Î
Remove ignition key.
Î
Lock parking brake.
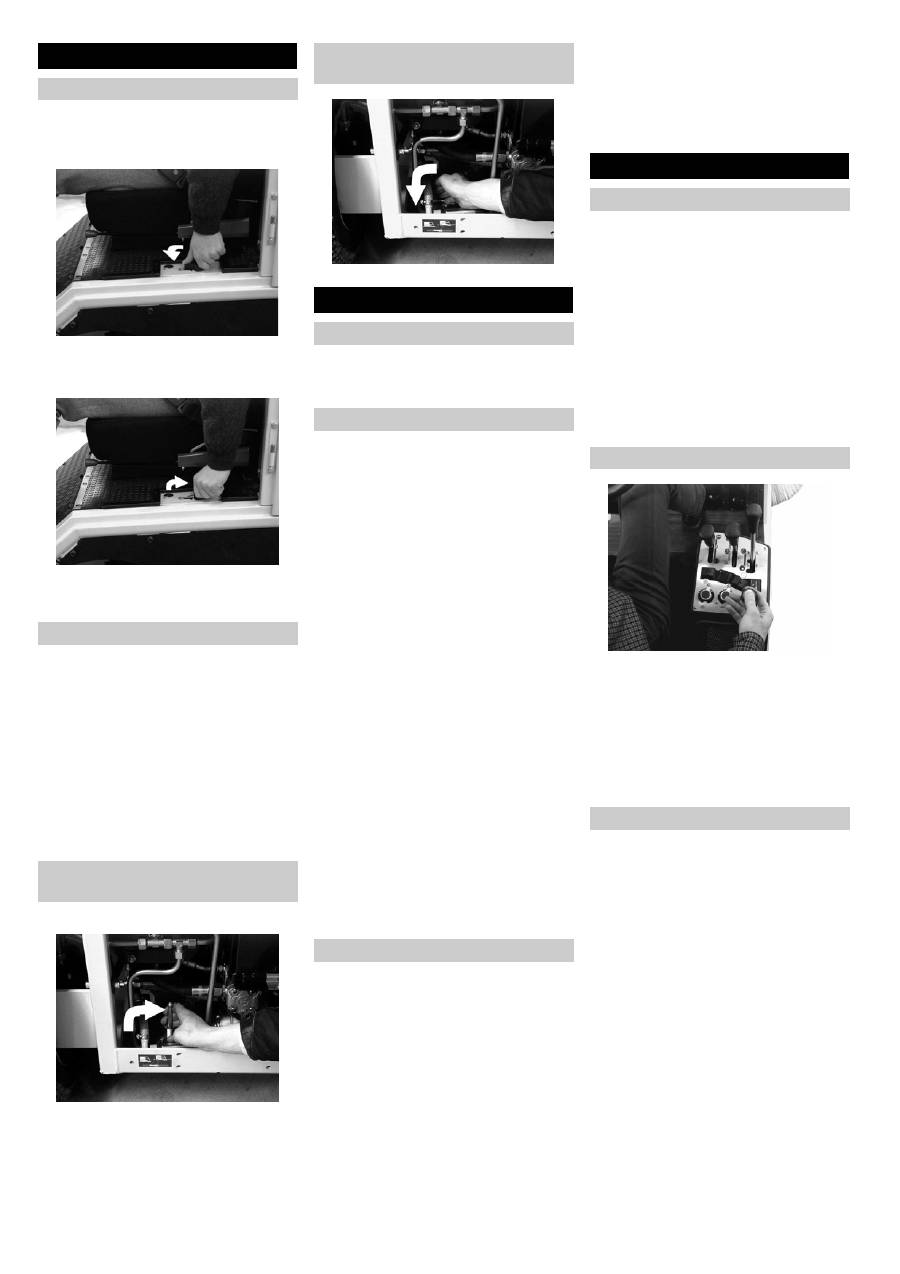
Danger
Risk of explosion!
–
Only use the fuels specified in the Oper-
ations Manual.
–
Do not refuel the machine in enclosed
spaces.
–
Smoking and naked flames are strictly
prohibited.
–
Ensure that no fuel reaches the hot
open surfaces.
Î
Switch off engine.
Î
Open fuel filler cap.
Î
Only diesel appliances: Fill in diesel.
Î
Only petrol device: Use regular unlead-
ed petrol.
Î
Fill in the tank up to a level 1 cm below
the lower edge of the filling nozzle be-
cause the fuel expands on heating.
Î
Wipe off any spilt fuel and close fuel fill-
er cap.
– Estimate the fuel requirement in order to
avoid overflows.
– Insert the fuelling gun as deep as possi-
ble into the fuel nozzle. Do not add any
more fuel once the fuelling gun stops
according to the settings.
Î
Check engine oil level.
Î
Check the hydraulic oil level.
Î
Check water cooler and maintain it.
Î
Check tyre pressure.
Î
Adjust driver's seat.
Î
Check suction blower channel.
Î
Check setting of suction opening.
Î
Check lights and ensure that they are
functioning properly.
Î
Check signaling and warning systems
for proper functioning.
Î
Fill the water reservoir.
Note
For description, see section on Care and
maintenance.
몇
Warning
Rectify any defect you may find immediate-
ly or bring the vehicle to a halt.
Î
Pull seat adjustment lever outwards.
Î
Slide seat, release lever and lock in
place.
Î
Check that the seat is properly locked in
position by attempting to move it back-
wards and forwards.
Set the inclination of the back-rest..
Î
Release back-rest.
Î
Pull upward the unlocking lever of the
back-rest.
Î
Change the inclination of the back-rest
via the position of the upper body.
Î
Release unlocking mechanism.
Î
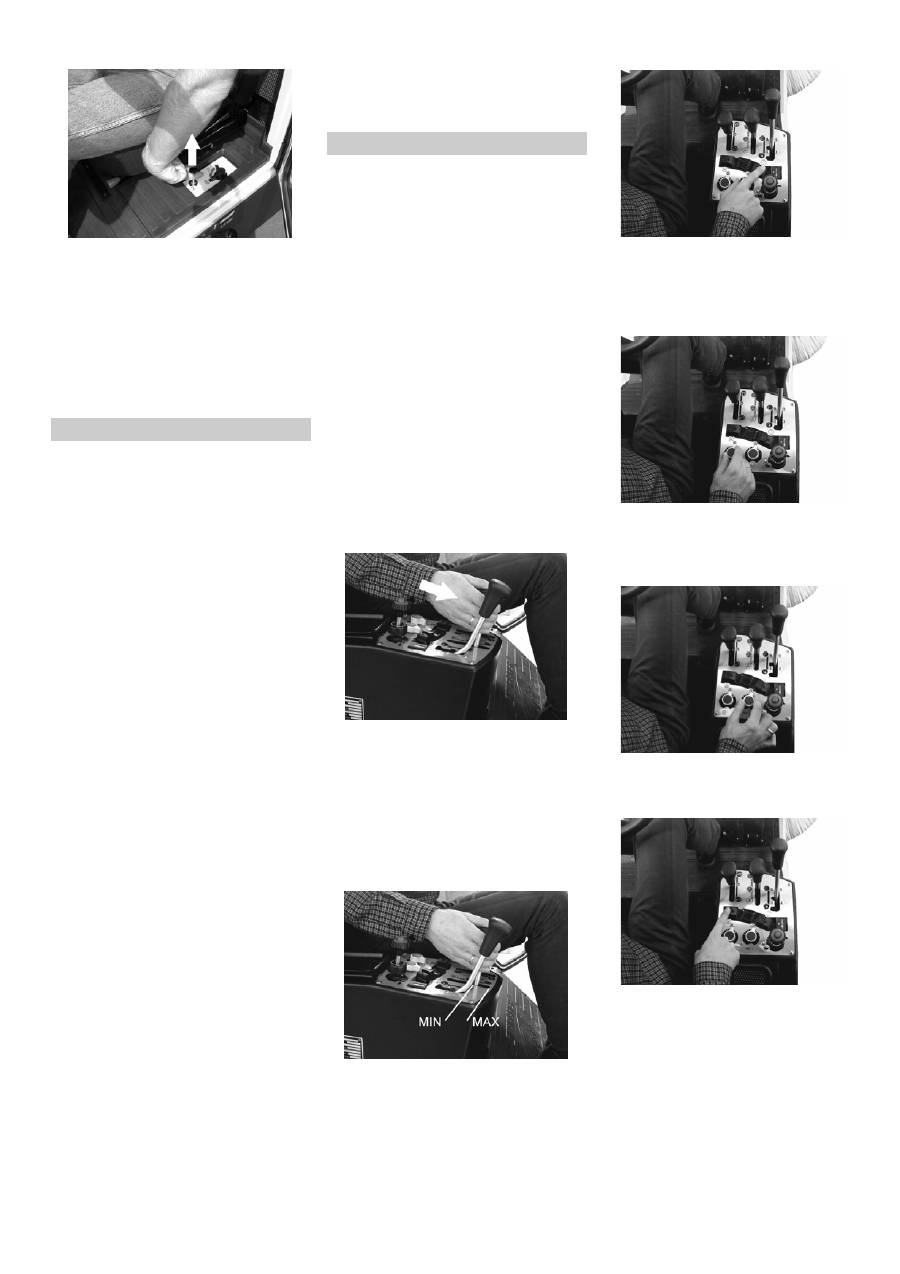
Press button.
– Drawn out: max. speed
– Pushed in: min. speed
Î
Turn the button.
– In clock-wise direction: min. speed
– Anti-clockwise direction: max. speed
Î
Sit on the driver's seat.
Î
Do not press the accelerator pedal.
Î
Lock parking brake.
Î
Engine speed adjustment - pull out 1/3
Î
Turn the ignition key to position "I".
Pre-heat lamp glows.
Î
When the pre-heating lamp goes off,
turn the ignition key to position "II".
Î
If the machine starts, release the igni-
tion key.
Before Commissioning
Parking brake/ foot brake
Unloading
Moving sweeper without engaging
self-propulsion
Moving sweeper by engaging self-
propulsion
Start up
General notes
Refuelling
Fuelling using a can
Fuelling using the fuelling gun
Inspection and maintenance work
Operation
Adjusting driver's seat
Adjust engine speed
Rough tuning
Fine tuning
Starting the machine
Pre-heating (only diesel appliances)
Start motor (only diesel appliances)
26
English
Î
Pull out the choke.
Î
Turn the ignition key to position "II".
Î
Release the ignition key when motor
starts up.
Î
Push the choke slowly back when motor
is running.
Note
Never operate the starter motor for longer
than 10 seconds. Wait at least 10 seconds
before operating the starter motor again.
Î
Engine speed adjustment - pull it out ful-
ly.
Î
Press brake pedal and keep it de-
pressed.
Î
Switch to operating mode "Foot brake".
Î
Press slowly the accelerator pedal "for-
ward".
Danger
Risk of injury! While reversing, ensure that
there is nobody in the way, ask them to
move if somebody is around.
Î
Press slowly the accelerator pedal "re-
verse".
Note
Driving method
– A warning tone is sounded while revers-
ing.
– The accelerator pedal can be used to
vary the driving speed infinitely.
– Avoid pressing the pedal suddenly as
this may damage the hydraulic system.
– In the event of power loss on inclined
surfaces, slightly reduce the pressure
on the accelerator pedal.
– Change the driving direction only after
the vehicle has come to a halt.
Î
Release the accelerator pedal, the ma-
chine brakes automatically and stops.
Note
The braking effect can be supported by
pressing the foot-brake.
몇
Warning
Raise the side-brushes and the suction
opening before overtaking hurdles.
Hurdles up to 150 mm in height:
Î
Bypass the hurdle slowly and carefully
at an angle of 45°.
Hurdles more than 150 mm in height:
Î
Only drive over these obstacles using a
suitable ramp.
몇
Warning
Risk of damage! Ensure that the vehicle
does not get stuck up.
Danger
Risk of injury! If the bulk waste flap is open,
stones or gravel may be flung forwards by
the roller brush. Make sure that this does
not endanger persons, animals or objects.
몇
Warning
Do not sweep up packing strips, wire or
similar objects as this may damage the suc-
tion blower unit.
몇
Warning
To avoid damaging the floor, do not contin-
ue to operate the sweeping machine in the
same position.
Note
To achieve an optimum cleaning result, the
driving speed should be adjusted to take
specific situations into account.
Note
During operation, the waste container
should be emptied at regular intervals.
Î
Press the lever to the front Side-brush-
es and suction opening will be lowered.
Note
The side-brushes are switched on automat-
ically.
Î
Pull the lever towards the rear. The side
brush and the suction opening are
raised.
Î
Adjust the side-brush speed using the
lever.
Î
Press spray water button.
Spray water for side-brushes and suction
opening gets activated to bind the dust.
Î
Adjust the water flow to the suction
channel using the regulation valve.
Î
Adjust the water flow to the side-brush-
es using the regulation valve.
Î
Press suction blower button.
Note
The water pump runs only when the suction
blower is switched on.
Note
The operator can view his working area
through the mirror of the suction opening.
Raising bulk waste flap:
Start motor (only petrol appliances)
Drive the machine
Drive forward
Reverse drive
Brakes
Driving over obstacles
Sweeping mode
Raise/lower side-brushes
Adjusting the side-brush speed
Turn on/off the spray water
Regulate water quantity in the suction
channel
Regulate the water flow to the side-
brushes.
Turn on/off the suction blower
Sweeping in larger objects
Оглавление
- Inhaltsverzeichnis Sicherheitshinweise
- Umweltschutz
- Bedien- und Funktionselemente
- Vor Inbetriebnahme
- Stilllegung
- Pflege und Wartung
- Zubehör
- Störungen
- Technische Daten
- CE-Erklärung
- Contents Safety instructions
- Environmental protection
- Operating and Functional Elements
- Before Commissioning
- Shutdown Maintenance and care
- Accessories
- Faults
- Specifications
- CE declaration
- Table des matières Consignes de sécurité
- Protection de l’environne- ment
- Eléments de commande
- Avant la mise en service
- Remisage Entretien et maintenance
- Accessoires
- Pannes
- Données techniques
- Déclaration CE
- Indice Norme di sicurezza
- Protezione dell’ambiente
- Elementi di comando e di funzione
- Prima della messa in funzione
- Messa a riposo
- Cura e manutenzione
- Accessori
- Guasti
- Dati tecnici
- Dichiarazione CE
- Inhoudsopgave Veiligheidsaanwijzingen
- Zorg voor het milieu
- Bediening- en werkingsonderdelen
- Voor ingebruikneming
- Stillegging
- Onderhoud
- Accessoires
- Storingen
- Technische gegevens
- CE-verklaring
- Índice de contenidos Instrucciones de seguridad
- Protección del medio ambien- te
- Elementos de operación y funcionamiento
- Antes de la puesta en marcha
- Puesta fuera de servicio
- Conservación y mantenimien- to
- Accesorios
- Averías
- Datos técnicos
- Declaración CE
- Índice Avisos de segurança
- Protecção do meio-ambiente
- Elementos de comando e de funcionamento
- Antes de colocar em funcio- namento
- Desactivação da máquina Conservação e manutenção
- Acessórios
- Avarias
- Dados técnicos
- Declaração CE
- Indholdsfortegnelse Sikkerhedsanvisninger
- Miljøbeskyttelse
- Betjenings- og funktionselementer
- Inden idrifttagning
- Afbrydning/nedlæggelsePleje og vedligeholdelse
- Tilbehør
- Fejl
- Tekniske data
- Overensstemmelseserklæ- ring
- Innholdsfortegnelse Sikkerhetsanvisninger
- Miljøvern
- Betjenings- og funksjonsorganer
- Før igangsetting
- Driftsopphold Pleie og vedlikehold
- Tilbehør
- Funksjonsfeil
- Tekniske data
- CE-erklæring
- Innehållsförteckning Säkerhetsanvisningar
- Miljöskydd
- Manövrerings- och funktionselement
- Före idrifttagandet
- Hibernation Skötsel och underhåll
- Tillbehör
- Störningar
- Tekniska data
- CE-försäkran
- Sisällysluettelo Turvaohjeet
- Ympäristönsuojelu
- Ohjaus- ja toimintaelementit
- Ennen käyttöönottoa
- Seisonta-aika Hoito ja huolto
- Varusteet
- Häiriöt
- Tekniset tiedot
- CE-todistus
- Πίνακας περιεχομένων Υποδείξεις ασφαλείας
- Αρμόζουσα χρήση
- Στοιχεία χειρισμού και λειτουργίας
- Πριν την ενεργοποίηση
- Διακοπή της λειτουργίας Φροντίδα και συντήρηση
- Εξαρτήματα
- Βλάβες
- Τεχνικά χαρακτηριστικά
- Δήλωση συμμόρφωσης CE
- İ çindekiler Güvenlik uyar ı lar ı
- Çevre koruma
- Kullan ı m ve çal ı ş ma elemanlar ı
- Cihaz ı çal ı ş t ı rmaya ba ş lamadan önce
- Durdurma Koruma ve Bak ı m
- Aksesuar
- Ar ı zalar
- Teknik bilgiler
- CE Beyan ı
- Оглавление Указания по технике безопасности
- Использование по назначению
- Описание элементов управления и рабочих узлов
- Перед началом работы
- Вывод из эксплуатации Уход и техническое обслуживание
- Принадлежности
- Неполадки
- Технические данные
- Заявление о соответствии требованиям СЕ
- Tartalomjegyzék Biztonsági tanácsok
- Környezetvédelem
- Kezelési- és funkciós elemek
- Üzembevétel el ő tt
- Leállítás Ápolás és karbantartás
- Tartozékok
- Üzemzavarok
- M ű szaki adatok
- CE-Nyilatkozat
- Obsah Bezpe č nostní pokyny
- Správné používání
- Ovládací a funk č ní prvky
- Pokyny p ř ed uvedením p ř ístroje do provozu
- Odstavení
- Ošet ř ování a údržba
- P ř íslušenství
- Poruchy
- Technické údaje
- Prohlášení o konformit ě
- Vsebinsko kazalo Varnostna navodila
- Varstvo okolja
- Upravljalni in funkcijski elementi
- Pred zagonom
- Mirovanje naprave Nega in vzdrževanje
- Pribor
- Motnje
- Tehni č ni podatki
- CE izjava
- Cuprins M ă suri de siguran ţă
- Utilizarea corect ă
- Elemente de utilizare ş i func ţ ionale
- Înainte de punerea în func ţ iune
- Scoaterea din func ţ iune
- Îngrijirea ş i între ţ inerea
- Accesorii
- Defec ţ iuni
- Date tehnice
- Declara ţ ie CE
- Съдържание Указания за безопасност
- Употреба , съобразена с предназначението
- Обслужващи и функционални елементи
- Преди пускане в експлоатация
- Спиране от експлоатация Грижи и поддръжка
- Принадлежности
- Повреди
- Технически данни
- СЕ – декларация
