Graco AquaMax 2335E: 3 Before starting the cleaner
3 Before starting the cleaner: Graco AquaMax 2335E
8
1)
Options / model variants
Original instructions
English
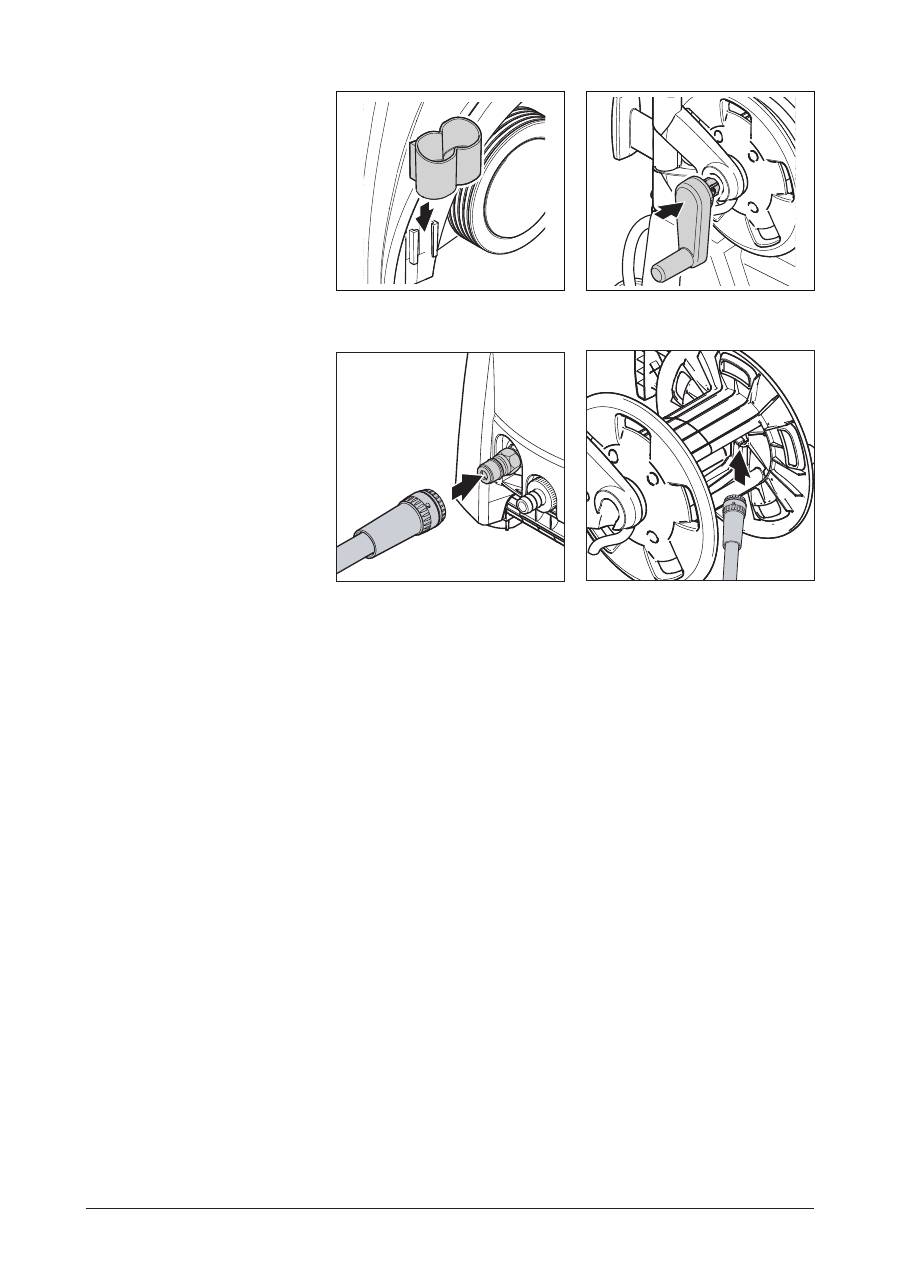
Connecting the high pressure
hose
Assembling the cleaner
Machines without high pressure
hose reel.
Machines with high pressure hose
reel.
3 Before starting the cleaner
9
1)
Options / model variants
Original instructions
English
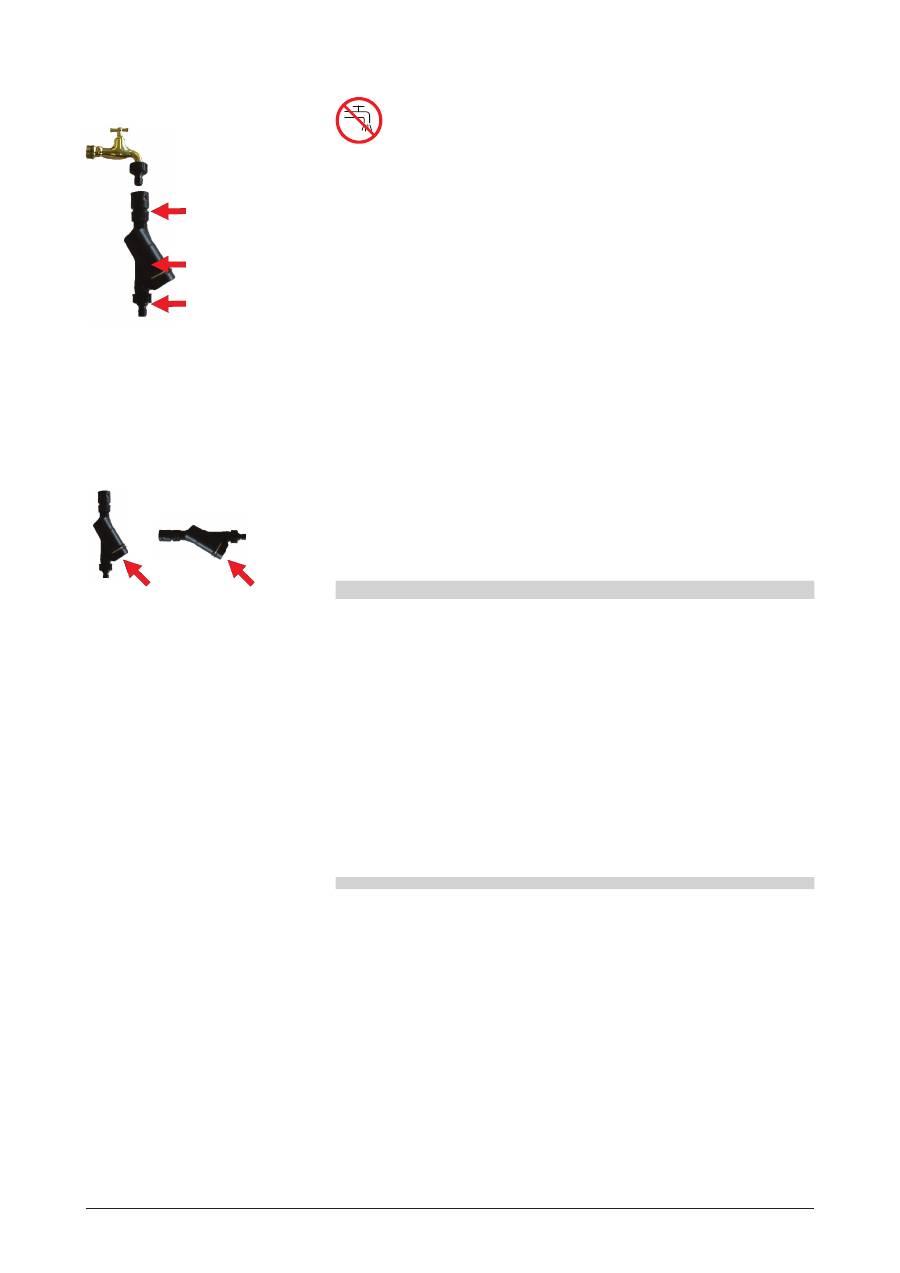
Installation guide
c c
BA valve
(a)
Female
coupling
BA
valve
(b)
Male
coupling
Maintenance
1. Mount a male coupling on the water tap.
2. Connect (a) on the BA valve to the water tap.
3. Mount a female coupling on the water inlet hose.
4. Connect (b) on the BA valve to the water inlet hose.
5. Connect the water inlet hose to the high pressure washer.
6. Turn on the water and start the machine.
At least once a year, check the function as follows:
1. After work, switch off the high pressure cleaner.
2. Close the water tap valve.
3. Release the pressure in water the supply hose by triggering the
spray pistol.
4. Dismount the backflow preventer. Water has to come out of the
drain opening (c) (max. 100ml) to ensure separation of the potable
water.
5. If this is not the case, try cleaning the BA valve or contact your
GRACO representative.
CAUTION
•
The backflow preventer can be mounted either vertically or hori-
zontally, and the drain opening (c) must be mounted pointing
downwards.
•
Water flowing from the drain opening (c) must be able to flow
freely.
•
If there is a risk of running sands in the inlet water (i.e. from your
own well), an additional filter should be mounted between the
water tap and backflow preventer.
•
The length of the hose between the backflow preventer and the
high pressure washer must be at least 12 metres (min diameter
3/4 inch) to absorb possible pressure peaks.
•
As soon as water has flown through the BA valve, this water is
not considered to be drinking water any more.
•
Protect the backflow preventer to any exposure to frost.
•
Keep the backflow preventer clean, and free of dirt.
This high pressure washer/cleaner is only allowed to be con-
nected with the drinking water mains, when an appropriate
backflow preventer has been installed, Type BA according to
EN 1717.
The BA valve can be ordered under number:
•
BA valve including GARDENA couplings: 106411177
•
BA valve including NITO couplings: 106411178
•
BA valve including GEKA couplings: 106411179
•
BA valve without couplings: 106411184
The couplings can be ordered under number:
•
3/4” GARDENA (a): 32541
•
3/4” GARDENA (b): 1608629
•
3/4” NITO (a): 1602945
•
3/4” NITO (b): 1600659
•
1/2” NITO (b): 1604669
•
3/4” GEKA (a): 1718
•
3/4” GEKA (b): 1311
10
1)
Options / model variants
Original instructions
English
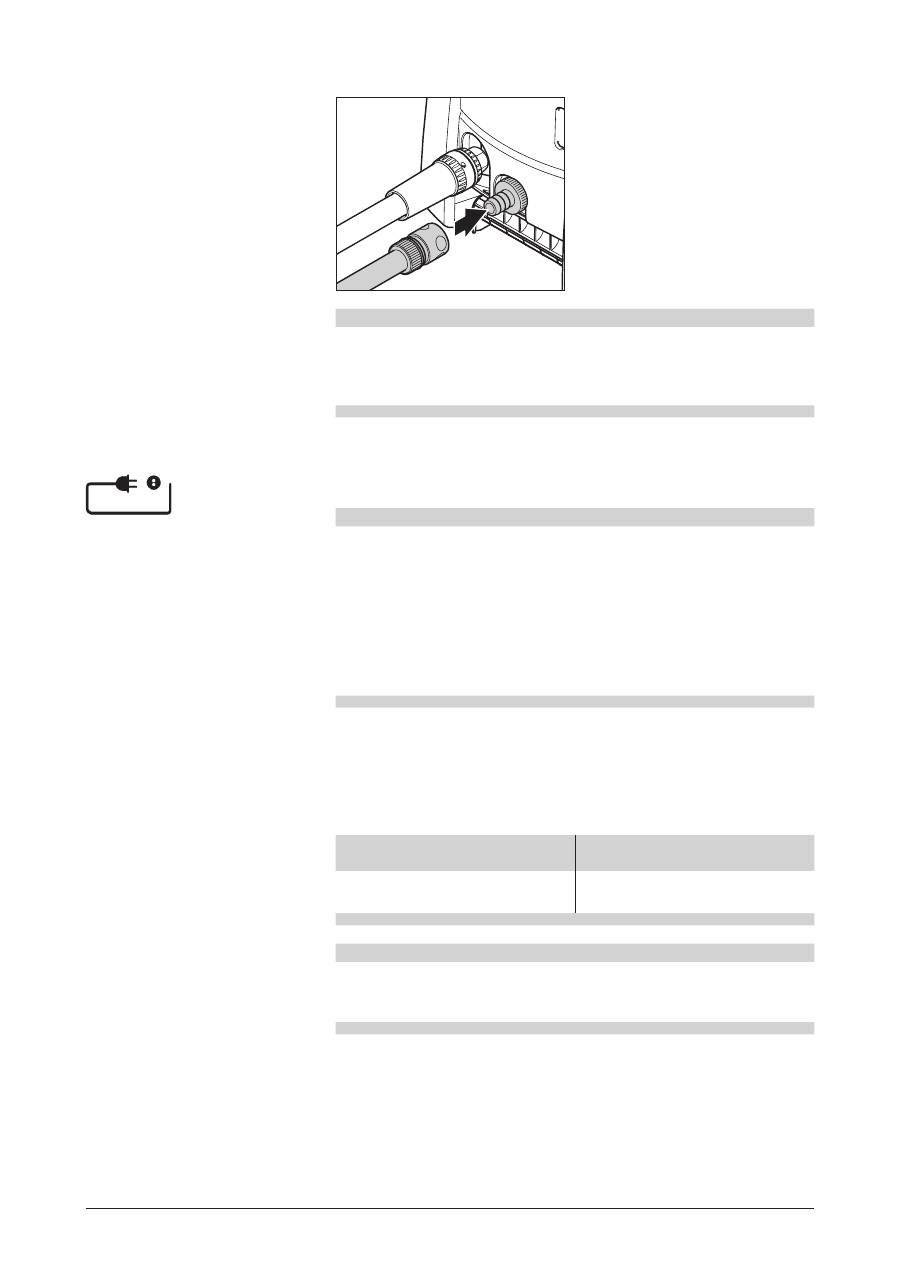
Connecting the water supply
1. Rinse the water supply hose
briefly in order to prevent
sand an other dirt particles
entering into the machine.
2. Connect water supply hose to
the machine.
3. Open water tap.
Electrical connection
Before connecting devices with voltage changeover
1)
: Check that the
pre-selected voltage on the machine corresponds with the voltage of
the electrical installation.
CAUTION
•
In the case of poor water quality (sand, etc.), we recommend that
a fine water filter is fitted in the water inlet.
•
We recommend the use of a textile-reinforced water hose with a
nominal diameter of min. 3/4” (19 mm).
CAUTION
•
Only connect the machine to an installation with earth connection.
•
The electric installation shall be made by a certified electrician.
•
According to IEC 60364-1 it is strongly recommended that the
electric supply to this machine should include a residual current
device (GFCI).
•
Do not damage the power cord (e.g. by driving over it, pulling or
crushing it).
•
Disconnect the power cord by grasping the plug only (do not pull
or tug the power cord).
CAUTION
•
When using cable reels: Due to the risk of overheating and fire,
always unwind the power supply cord fully.
•
Cable connections should be kept dry and off the ground.
Extension lead
As an extension lead, only use the version specified by the manufac-
turer or one of a higher quality.
When using an extension lead, check the minimum cross-sections of
the cable:
Cable length
Cross section
< 16 A
< 25 A
up to 20 m
1.5 mm
2
2.5 mm
2
20 to 50 m
2.5 mm
2
4.0 mm
2
Оглавление
- Contents
- 1 Important safety instructions
- 2 Introduction
- 3 Before starting the cleaner
- 4 Control / Operation
- 5 Applications and methods
- 6 After using the cleaner
- 7 Troubleshooting
- 8 Further information
- Inhalt
- 1 Wichtige Sicherheitshinweise
- 2 Beschreibung
- 3 Vor der Inbetriebnahme
- 4 Bedienung / Betrieb
- 5 Anwendungsgebiete und Arbeitsmeth- oden
- 6 Nach der Arbeit
- 7 Behebung von Störungen
- 8 Sonstiges
- Sommaire
- 1 Consignes de sécurité importantes
- 2 Description
- 3 Avant la mise en service
- 4 Commande / Service
- 5 Domaines d‘utilisation et méthodes de travail
- 6 Après le travail
- 7 Suppression de dérangements
- 8 Divers
- Inhoudsopgave
- 1 Belangrijke veiligheidsinstrukties
- 2 Beschrijving
- 3 Vóór de inbedrijfstelling
- 4 Bediening / Bedrijf
- 5 Toepassingsgebieden en arbeidsmeth- oden
- 6 Na de arbeid
- 7 Eliminatie van storingen
- 8 Varia
- Indice
- 1 Avvertenze importanti per la sicurezza
- 2 Descrizione
- 3 Prima della messa in funzione
- 4 Comandi/Funzionamento
- 5 Settori di impiego e metodi di lavoro
- 6 Dopo il lavoro
- 7 Eliminazione di disfunzioni
- 8 Altre indicazioni
- Innhold
- 1 Viktige sikkerhetsinstrukser
- 2 Beskrivelse
- 3 Før idriftsettelse
- 4 Betjening / drift
- 5 Bruksområder og arbeidsmetoder
- 6 Etter arbeidet
- 7 Utbedring av feil
- 8 Annet
- Innehåll
- 1 Viktiga säkerhetsanvisningar
- 2 Beskrivning
- 3 Before starting the cleaner
- 4 Manövrering/drift
- 5 Användningsområden och arbetsmetoder
- 6 Efter arbetet
- 7 Avhjälpande av störningar
- 8 Övrigt
- Indhold
- 1 Vigtige sikkerhedshenvisninger
- 2 Beskrivelse
- 3 Før idriftsættelse
- 4 Betjening / drift
- 5 Anvendelsesområder og arbejdsmetoder
- 6 Efter arbejdet
- 7 Afhjælpning af fejl
- 8 Andet
- Sisällys
- 1 Tärkeitä turvallisuusohjeitas
- 2 Laitteen kuvaus
- 3 Ennen käyttöönottoa
- 4 Käyttö / ohjaus
- 5 Käyttöalueet ja työskentelytavat
- 6 Työn jälkeen
- 7 Häiriöiden poisto
- 8 Muuta
- Contenido
- 1 Avisos de seguridad importantes
- 2 Descripción
- 3 Antes de la puesta en servicio
- 4 Manejo / Servicio
- 5 Usos programados y métodos de tra- bajo
- 6 Después del trabajo
- 7 Subsanación de fallos
- 8 Otros
- Conteúdo
- 1 Avisos de segurança importantes
- 2 Descrição
- 3 Antes da colocação em funcionamento
- 4 Comando / Funcionamento
- 5 Áreas de emprego e métodos de trabalho
- 6 Depois do trabalho pronto
- 7 Eliminar falhas
- 8 Outros
- Περιεχόμενα
- 1 Σημαντικές υποδείξεις ασφάλειας
- 2 Περιγραφή
- 3 Πριν από τη θέση σε λειτουργία
- 4 Χειρισμός / λειτουργία
- 5 Τομείς εφαρμογής και μέθοδοι εργασίας
- 6 Μετά την εργασία
- 7 Αρση βλαβών
- 8 ∆ιάφορα
- Ýçindekiler
- 1 Önemli güvenlik bilgileri
- 2 Tarifi
- 3 Devreye almadan önce
- 4 Kullanýmý / Çalýþtýrýlmasý
- 5 Kullaným alanlarý ve çalýþma metotlarý
- 6 İş bittikten sonra
- 7 Ar ı zalar ı n giderilmesi
- 8 Diðer hususlar
- Obsah
- 1 D ů ležitá bezpe č nostní upozorn ě ní
- 2 Popis
- 3 P ř ed uvedením do provozu
- 4 Obsluha / Provoz
- 5 Oblasti aplikace a metody práce
- 6 Po skon č ení práce
- 7 Odstra ň ování poruch
- 8 Ostatní
- Spis tre ś ci
- 1 Wa ż ne wskazówki bezpiecze ń stwa
- 2 Opis
- 3 Przed pierwszym uruchomieniem
- 4 Obs ł uga / u ż ytkowanie
- 5 Dziedziny zastosowania i metody pracy
- 6 Po zako ń czeniu pracy
- 7 Usuwanie usterek
- 8 Informacje dodatkowe
- Tartalom
- 1 Fontos biztonsági útmutatások
- 2 Leírás
- 3 Az üzembevétel el ő tt
- 4 Kezelés / Üzemeltetés
- 5 Felhasználási területek és munkamódszerek
- 6 A munka után
- 7 Zavarok kiküszöbölése
- 8 Egyebek
- Cuprins
- 1 Instruc ţ iuni de securitate importante
- 2 Descriere
- 3 Înainte de prima utilizare
- 4 Comand ă / func ţ ionare
- 5 Domenii ş i metode de utilizare
- 6 Dup ă utilizare
- 7 Depanare
- 8 Informa ţ ii suplimentare
- Содержание
- 1 Ïðàâèëà áåçîïàñíîñòè
- 2 Описание
- 3 Подготовка к работе
- 4 Èñïîëüçîâàíèå ìîéêè
- 5 Ìåòîäû ïðèìåíåíèÿ
- 6 Устранение неполадок
- 7 Äîïîëíèòåëüíàÿ èíôîðìàöèÿ
- Sisukord
- 1 Olulised ohutusjuhised
- 2 Kirjeldus
- 3 Enne pesuri käivitamist
- 4 Juhtimine/käitamine
- 5 Rakendusalad ja -meetodid
- 6 Pärast pesuri kasutamist
- 7 Tõrkeotsing
- 8 Lisateave
- Satura r ā d ī t ā js
- 1 Droš ī bas tehnika
- 2 Apraksts
- 3 Pirms t ī r ī t ā ja iesl ē gšanas
- 4 Darb ī bas vad ī šana/lietošana
- 5 Izmantošanas veidi un metodes
- 6 P ē c t ī r ī t ā ja lietošanas
- 7 Trauc ē jummekl ē šana
- 8 Papildinform ā cija
- Turinys
- 1 Svarb ū s saugumo nurodymai
- 2 Aprašymas
- 3 Prieš paleidžiant plovimo į rengin į
- 4 Valdymas / darbas
- 5 Paskirtis ir naudojimo b ū dai
- 6 Po valymo į renginio naudojimo
- 7 Gedim ų lokalizavimas ir šalinimas
- 8 Papildoma informacija
- 目次
- 1 安全にお使いいただくために
- 2 概要
- 3 本製品をお使いいただく前に
- 4 制御/操作
- 5 用途と方法
- 6 お使いいただいた後に
- 7 トラブルシューティング
- 8 その他の情報
