Acme IB-100: инструкция
Раздел: Бытовая, кухонная техника, электроника и оборудование
Тип: Утюг
Инструкция к Утюгу Acme IB-100
Оглавление
- введение инструкции по безопастности
- 13. Не используйте утюг, если он упал или имеет другие повреждения, утечки воды .
- специальные инструкции
- ознакомтесь с комплектацией вашего утюга
- рекомендации по первому использованию утюга подготовка к эксплуатации
- Выбор температуры
- инструкция по исползованию характеристики Функция увлажнения
- Система подачи направленного потока пара Система предотвращения слива жидкости Система чистки от накипи
- чистка хранение устранение неисправностей
- Утюг не нагревается Утюг не выделяет пар Не работает функция подачи направленного потока пара Не работает функция опрыскивания Не работает система предотвращения слива жидкости

Model: IB-100
steam
iron
www.acme.eu


4 GB User’s manual
14 LT Vartotojo gidas
24 LV Lietošanas instrukcija
34 EE Kasutusjuhend
44 PL Instrukcja obsługi
54 DE Bedienungsanleitung
64 FI Kayttoohje
74 SE Bruksanvisning
84 RO Manual de utilizare
94 BG Ръководство за употреба
104 RU Инструкция пользователя
114 UA Інструкція
3

GB
introduction
Congratulations on your choice to purchase Acme product!
For your convenience record the complete model number and the date you received the product
together with your purchase receipt and attach to the warranty and service information. Retain in
the event that warranty service is required.
NOTE: The rating of this product (as marked on the product and product package) is based on
specic loading tests. Normal use or the use of other recommended attachments may draw
signicantly less power.
important safeguards
When using your atiron, basic safety precautions should always be followed, including the
following:
READ ALL INSTRUCTIONS BEFORE USING
1. Use the iron only for its intended use.
2. To protect against the risk of electric shock, do not immerse the iron in water or other liquids.
3. The iron should always be turned to “Min” before plugging or unplugging from the mains
outlet. Never pull the cord to disconnect from the mains; instead, grasp the plug and pull to
disconnect.
4. Do not allow the cord to touch hot surfaces. Allow the iron to cool down completely before
putting away.
4

GB
5. The power cord plug must always be disconnected from the electrical outlet before lling the
tank with water or emptying it, and when the iron is not in use.
6. Do not operate the iron with a damaged cord or if the iron has been dropped or damaged.
If the power cord is damaged, it must be replaced by the manufacturer, a service agent or a
similarly qualied person to prevent any hazard. To avoid the risk of electric shock, do not
disassemble the iron; take it to the Carrefour After-Sales Service for examination and repair.
Incorrect reassembly can cause a risk of electric shock when the iron is used.
7. Close supervision is necessary for any appliance being used by or near children. Do not leave
the iron unattended when connected to the mains or on an ironing board.
8. Burns can occur from touching hot metal parts, hot water or steam. Use caution when you turn
a steam iron upside down, as there may be hot water in the tank.
9. If the iron is not operating normally, disconnect it from the power supply and contact the
Carrefour After-Sales Service.
10. Your iron is designed to rest on the heel. Do not leave the iron unattended when switched on.
Do not place the iron on an unprotected surface even if it is on its heel rest.
11. The iron must only be used and rested on a stable surface.
12. Before resting the iron on its support, check the stability of the surface on which the support
is installed.
13. Do not use the iron if it has been dropped or otherwise damaged, or if water is leaking from it.
14. Adults must pay special attention when using this appliance near children.
15. Never let young children play with the appliance.
16. Never let young children or invalids use this appliance without supervision.
5

GB
special instructions
Important precautions
To make good use of your appliance, please read these instructions carefully and look at the
illustrations before using it.
1. Check that the voltage on the product rating plate matches your mains voltage.
2. Never use the appliance if it is damaged in any way.
3. Completely unwind the power cord.
4. Always unplug the iron when not in use, even if only for a short period of time. When
unplugged from the mains, leave it standing on its heel rest.
5. Make sure that children cannot touch the hot iron and that they cannot pull on the power
cord.
6. Always unplug the iron before lling it with water or when removing the excess water from it.
7. NEVER submerge the iron in water.
Special instruction:
To avoid overloads, never connect any other high-power appliance to the same electric circuit.
6

GB
getting to know your iron
A. Spray button
B. Shot of steam button
C. Steam control knob
D. Spray nozzle
E. Water tank lling hole
F. MAX water level
G. Soleplate
H. Temperature control dial
I. Pilot light
7

GB
suggestions before using
the iron for the first time
1. Certain parts of the iron have been lightly greased; therefore the iron could give o a little
smoke when plugged in for the rst time. This will cease after a short while.
2. Before using the iron for the rst time, remove the plastic protector from the soleplate (if
present). Clean the soleplate with a soft cloth.
3. Keep the soleplate very smooth. Do not run it over metal objects (such as against the
uncovered ironing board, buttons, zips etc).
4. Pure wool garments (100% wool) can be ironed with the appliance in the steam position. You
should select preferently a high steam position and use a dry ironing cloth.
preparing for use
How to ll the water tank
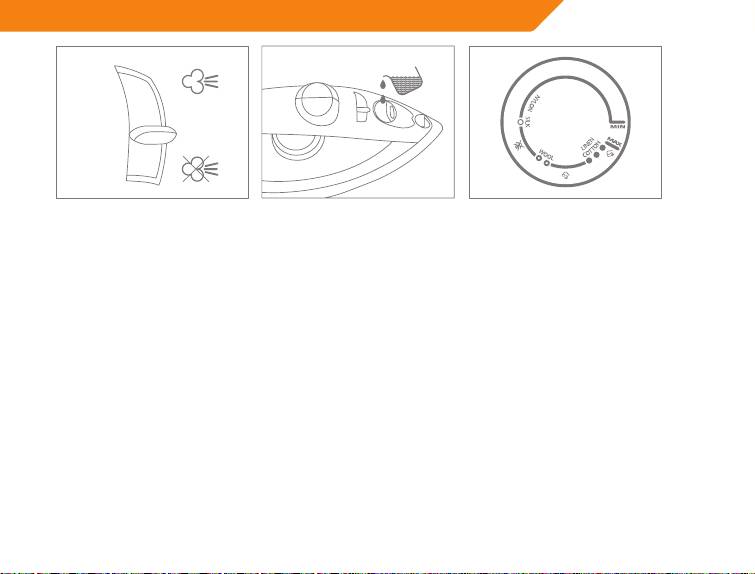
1. Unplug the iron.
2. Set the steam button to the dry ironing position. (Fig. 1)
3. Fill the tank through the lling hole. (Fig. 2)
- If water from the tap is too hard, it is advisable to use only distilled or demineralized water.
- Do not use chemically de-scaled or perfumed water.
Always empty the iron from the excess water remaining in the tank before storing it.
8

GB
1. 2. 3.
Selecting the temperature
1. Check the ironing instructions on the label of the garment to be ironed.
2. If the garment does not have any ironing instructions but you know the kind of fabric in which
it is made, select the temperature accordingly.
3. Fabrics with a special nish (polishing, wrinkles and contrasts) should be ironed at the lowest
temperatures.
4. If the fabric contains several types of bres, always select the lowest temperature applicable
to the most fragile bres so as not to damage them. For example, if a garment contains 60%
polyester and 40% cotton, you must always select the temperature applicable to polyester
and iron without steam.
5. First sort the garments to be ironed according to their ironing temperature: wool with wool,
cotton with cotton, etc. As the iron heats up faster than it cools down, start by ironing the
articles requiring the lowest temperature, such as those made of synthetic bres. Progress
towards those that require the highest temperatures.
9

GB
6. Turn the temperature control dial until the index is in front of the appropriate symbol as
follows:
• Positionfornylonandacetate
•• Positionforwool,silkormixures
••• Positionforcottonorlinen(steam)
using the appliance
Steam ironing
1. Fill the iron as described under “How to ll the water tank”.
2. Plug the iron into a mains outlet.
3. Steam ironing is possible only when the highest temperatures shown on the temperature
control dial are selected. Otherwise, water may escape through the soleplate openings.
4. Wait until the pilot light goes out, which indicates that the selected temperature has been
reached.
5. Turn the steam button to the required position.
6. When you have nished ironing and during breaks in ironing, rest the iron in the upright
position.
7. Unplug the iron from the mains outlet. Pour o any remaining water and leave the iron to cool
down.
10

GB
features
Water spray
1. The spray function can be used in any position, either in dry or steam ironing, as long there is
water in the water tank.
2. Press the spray button to use this function.
Note: When using this function for the rst time, the spray button may have to be pressed repeatedly
Shot of steam
The “Shot of steam” function produces extra steam for removing persistent wrinkles.
1. Set the temperature control dial to the “Max” position (Fig. 3) and wait until the pilot light goes
out.
2. Wait for a few seconds before pressing again, for the steam to penetrate deeply into the bre.
Note: For the best steam quality, do not use more than three successive bursts each time. Some
pumping action is needed to start this function.
Excessive use of this feature will cause the iron to cool, therefore ensure that the pilot light is out
before operating the “Shot of steam” control.
Anti-drip function
This function automatically stops producing steam when the temperature is too low to prevent
water from dripping out of the soleplate.
Automatic Anti-Calc function
The built-in Anti-Calc system reduces the build-up of scale and guarantees a long life for the iron.
11

GB
cleaning
1. Set the steam control to position 0, unplug the appliance from the mains outlet and allow it to
cool down completely before cleaning.
2. Do not use solvents or abrasive products to clean the iron. Clean with a damp cloth, avoid hard
contacts with metal objects
3. Regularly rinse the water tank with water. Empty the water tank after cleaning.
storage
1. Set the steam control to position 0, remove the plug from the wall socket and let the iron cool
down.
2. Empty the water tank.
3. Store the iron on its heel in a safe and dry place.
troubleshooting
The iron emits a foul smell or gives o smoke
The iron may give o a bad smell when turned on for the rst time. Oil used for coating certain
parts during manufacture need to be burnt o. Allow ten minutes for the foul smell to disappear.
12

GB
The iron does not heat
The iron should be plugged into electrical outlet. The temperature control dial must be set to the
desired temperature.
The iron does not produce steam
The water tank may be empty. Turn the steam control knob to required position and add water.
Allow the iron to heat and then set it to the “Steam” position.
The “Shot of steam” feature does not work
The water tank must be at least 1/4 full. The iron must be set to the “Steam” position. The iron
should be in the horizontal position. Prime the pump briey. Allow a short pause between shots.
Be sure to fully depress the “Shot of steam” button.
The “Water spray” feature does not work
The water tank must be at least 1/4 full. Fill the iron as described under “How to ll the water tank”.
Anti-drip function
1. Water supply is cut o automatically to prevent water from dripping from the soleplate when
the temperature of the iron is insucient to produce steam.
2. After plugging the iron into a mains outlet, wait for 3 minutes for steam to be produced.
13

LT
įžanga
Sveikiname nusprendus įsigyti „Acme“ gaminį!
Dėl savo patogumo užsirašykite visą modelio numerį ir gaminio įsigijimo datą ir laikykite kartu su
pirkimo kvitu, pridėję prie garantijos ir aptarnavimo informacijos. Išsaugokite tam atvejui, jeigu
reikės garantinio aptarnavimo.
PASTABA! Nominalus šio gaminio pajėgumas (kaip nurodyta ant gaminio ir gaminio pakuotės)
nustatytas remiantis speciniais apkrovimo testais. Normaliai naudojant arba naudojant kitus
rekomenduojamus įtaisus, galima suvartoti ženkliai mažiau energijos.
svarbios saugos instrukcijos
Naudojant laidynę, reikia visada laikytis pagrindinių atsargumo priemonių, įskaitant nurodytas
toliau.
PRIEŠ NAUDODAMI PERSKAITYKITE VISAS INSTRUKCIJAS.
1. Naudokite laidynę tik tam skirtais tikslais.
2. Norėdami apsisaugoti nuo elektros šoko rizikos, neįmerkite laidynės į vandenį ar kitus skysčius.
3. Prieš prijungiant ir atjungiant laidynę nuo maitinimo tinklo, visada turi būti nustatoma „Min“
padėtis. Norėdami atjungti laidynę nuo maitinimo tinklo, niekada netraukite už laido, suimkite
už kištuko ir patraukite.
4. Saugokite, kad laidas nesiliestų prie karštų paviršių. Prieš padėdami, leiskite laidynei visiškai
atvėsti.
14

LT
5. Prieš pildant bakelį vandeniu arba tuštinant jį, arba kai laidynė nenaudojama, maitinimo laidas
visada turi būti atjungtas nuo elektros lizdo.
6. Nesinaudokite laidyne, jeigu laidas pažeistas arba jeigu ji buvo numesta arba pažeista. Jeigu
pažeistas maitinimo laidas, norint išvengti pavojaus, jį turi pakeisti gamintojas, techninio
aptarnavimo agentas arba panašią kvalikaciją turintis asmuo. Norėdami išvengti elektros
šoko rizikos, neardykite laidynės; nugabenkite ją į garantinio aptarnavimo centrą apžiūrėti ir
pataisyti. Netinkamai sudėjus, galima sukelti elektros šoko riziką, kai laidynė naudojama.
7. Jeigu prietaisą naudoja vaikai arba jis naudojamas arti vaikų, reikia atidžios priežiūros.
Nepalikite laidynės be priežiūros, kai ji prijungta prie maitinimo lizdo arba yra ant lyginimo
lentos.
8. Palietus karštas metalines dalis, karštą vandenį arba garus, galima nusideginti. Apversdami
garinę laidynę aukštyn kojomis būkite atidūs, nes bakelyje gali būti karšto vandens.
9. Jeigu laidynė tinkamai neveikia, atjunkite ją nuo maitinimo tinklo ir susisiekite su garantinio
aptarnavimo centru.
10. Jūsų laidynė suprojektuota taip, kad nenaudojama būtų pastatyta vertikaliai. Nepalikite
įjungtos laidynės be priežiūros. Nedėkite laidynės ant neapsaugoto paviršiaus, net jeigu ji
pastatyta vertikaliai.
11. Laidynė turi būti naudojama ir pastatoma tik ant stabilaus paviršiaus.
12. Prieš padėdami laidynę ant jos stovo, patikrinkite, ar paviršius, ant kurio pastatytas stovas,
stabilus.
13. Nenaudokite laidynės, jeigu ji buvo numesta ar kitaip pažeista ir jeigu iš jos teka vanduo.
14. Suaugusieji privalo būti itin atidūs naudodamiesi prietaisu netoli vaikų.
15. Niekada neleiskite mažiems vaikams žaisti su prietaisu.
16. Niekada neleiskite mažiems vaikams arba neįgaliems asmenims naudotis šiuo prietaisu be
priežiūros.
15

LT
specialūs nurodymai
Svarbios atsargos priemonės
Kad visiškai išnaudotumėte prietaiso galimybes, prieš naudodamiesi atidžiai perskaitykite toliau
pateiktus nurodymus ir pažiūrėkite į paveikslus.
1. Patikrinkite, ar įtampa, nurodyta ant gaminio duomenų plokštelės, sutampa su jūsų tinklo
įtampa.
2. Niekada nenaudokite prietaiso, jeigu jis kokiu nors būdu pažeistas.
3. Visiškai atvyniokite maitinimo laidą.
4. Kai nenaudojate net ir trumpą laiko tarpą, visada atjunkite laidynę nuo maitinimo tinklo. Kai
atjungiate nuo maitinimo tinklo, palikite ją pastatytą stačiai.
5. Įsitikinkite, kad vaikai negali pasiekti karštos laidynės ir patraukti už maitinimo laido.
6. Prieš pildami į laidynę vandenį arba išpildami iš jos vandens perteklių, visada atjunkite ją nuo
maitinimo tinklo.
7. NIEKADA nemerkite laidynės į vandenį.
Specialus nurodymas
Kad išvengtumėte perkrovos, niekada nejunkite kito didelės galios prietaiso į tą pačią elektros
grandinę.
16

LT
laidynės apžvalga
A. Purškimo mygtukas
B. Garų paleidimo mygtukas
C. Garų reguliatorius
D. Purškimo antgalis
E. Vandens bakelio pildymo anga
F. Maksimalaus vandens lygio
indikatorius
G. Pado plokštė
H. Temperatūros reguliavimo
ratukas
I. Kontrolinė lemputė
17

LT
patarimai prieš naudojant
laidynę pirmą kartą
1. Kai kurios laidynės dalys gali būti šiek tiek pateptos, todėl įjungus pirmą kartą, gali kilti šiek tiek
dūmų. Po kurio laiko tai liausis.
2. Prieš naudodami laidynę pirmą kartą, nuo pado plokštės nuimkite plastikinę apsaugą (jeigu
uždėta). Nuvalykite pado plokštę minkšta šluoste.
3. Prižiūrėkite, kad pado plokštė būtų lygi. Nebraukite ja per metalinius objektus (pavyzdžiui, per
neuždengtą lyginimo lentą, sagas, užtrauktukus ir t. t.).
4. Grynos vilnos (100 % vilnos) drabužiai gali būti lyginami, kai nustatyta garų padėtis. Pasirinkite
pageidaujamą garų padėtį ir naudokite sausą lyginimo audinį.
prietaiso paruošimas naudoti
Kaip pripildyti vandens bakelį
1. Atjunkite laidynę nuo maitinimo lizdo.
2. Nustatykite garų mygtuką į sauso lyginimo padėtį (1 pav.).
3. Pripildykite bakelį per pildymo angą (2 pav.).
- Jeigu vanduo iš čiaupo per kietas, patariama naudoti tik distiliuotą arba demineralizuotą
vandenį.
- Nenaudokite chemiškai valyto arba kvapaus vandens.
Prieš padėdami laidynę į vietą, visada išpilkite vandens perteklių, likusį laidynės bakelyje.
18
LT
1. 2. 3.
Temperatūros pasirinkimas
1. Perskaitykite drabužio, kurį ketinate lyginti, lyginimo nurodymus etiketėje.
2. Jeigu jokių lyginimo instrukcijų nėra, tačiau žinote medžiagos, iš kurios drabužis pagamintas,
rūšį, temperatūrą pasirinkite pagal ją.
3. Medžiagos su specialia apdaila (blizgesiu, raukšlėmis ir kontrastais) turi būti lyginamos
pasirinkus žemiausią temperatūrą.
4. Jeigu medžiaga pagaminta iš skirtingų pluoštų, visada pasirinkite žemiausią temperatūrą,
tinkamą jautriausiems pluoštams, kad jų nepažeistumėte. Pavyzdžiui, jeigu drabužis
pagamintas iš 60 % poliesterio ir 40 % medvilnės, visada pasirinkite temperatūrą, tinkamą
poliesteriui ir lyginkite be garų.
5. Pirma surūšiuokite drabužius pagal jų lyginimo temperatūrą: vilnonius su vilnoniais,
medvilninius su medvilniniais ir t. t. Kadangi laidynė įkaista greičiau nei atvėsta, todėl pradėkite
lyginti nuo medžiagų, kurioms reikia žemiausios temperatūros, pavyzdžiui, sintetinio pluošto.
Tęskite lygindami medžiagas, kurioms reikia nustatyti aukštesnę temperatūrą.
6. Sukite temperatūros reguliavimo ratuką, kol rodyklė bus prieš reikiamą simbolį:
19

LT
•padėtisnailonuiiracetatuilyginti;
••padėtisvilnai,šilkuiarbamišiniamslyginti;
•••padėtismedvilneiarbalinuilyginti(garais).
prietaiso naudojimas
Lyginimas garais
1. Pripildykite laidynę, kaip nurodyta skyrelyje „Kaip pripildyti vandens bakelį“.
2. Prijunkite laidynę prie maitinimo lizdo.
3. Lyginti garais galima tik tada, kai pasirenkama aukščiausia temperatūra, parodyta ant
temperatūros reguliavimo ratuko. Kitu atveju, vanduo gali tekėti pro pado plokštės angas.
4. Palaukite, kol užges kontrolinė lemputė, rodanti, kad pasirinkta temperatūra pasiekta.
5. Pastumkite garų reguliatorių į reikiamą padėtį.
6. Kai baigiate lyginti arba per pertraukas padėkite laidynę vertikalioje padėtyje.
7. Atjunkite laidynę nuo maitinimo lizdo. Išpilkite likusį vandenį ir palikite laidynę atvėsti.
20
